
Getting Started with Crosswork AI
What is Crosswork AI?
Cisco Crosswork AI is a network intelligence platform designed to enhance network reliability and operational efficiency through AI-driven insights. Its multi-agentic AI framework distributes tasks across specialized AI agents to solve complex network problems efficiently and proactively. Crosswork AI supports both on-demand and scheduled analysis, enabling continuous monitoring, early detection, and agent-driven troubleshooting of network issues.
Crosswork AI is vendor and device agnostic, applying consistent detection and troubleshooting processes across diverse network devices and operating systems. It automates routine network audits, anomaly detection, risk-pattern identification, and root-cause investigation, helping reduce manual effort and human error. Crosswork AI integrates with Cisco Crosswork Network Controller (CNC) and Network Services Orchestrator (NSO), providing intelligent automation and analytics.
Crosswork AI also provides a Knowledge Graph for exploring network entities, relationships, topology, and dependencies, and observability views for reviewing agent activity, LLM usage, tool calls, and token consumption.
Supported capabilities
-
Configuration Drift Detection: Uses machine learning to learn typical configuration patterns and identify unintended changes or anomalies in network device configurations. This capability helps maintain network consistency and compliance by detecting deviations early and enabling intelligent review of configuration changes. You can run analysis on demand or schedule it to run later for continuous review. Provide feedback for anomalies that do not require further action to help improve future results.
-
Toxic Factor Identification: Uncovers hard-to-spot patterns associated with network events by analyzing event and inventory data. The agent uses data-driven insights to proactively identify risk factors that may contribute to network failures, downtime, and instability. You can run analysis on demand or schedule it to run at defined intervals for continuous monitoring.
-
Deep Network Troubleshooting: Diagnoses complex network issues with agent-driven troubleshooting. The agent analyzes a natural language issue description, generates and validates possible causes, and uses available network data to evaluate them. You can review, remove, or add new hypotheses and continue the investigation through additional iterations when more analysis is needed.
-
Knowledge Graph: Provides a structured view of network entities and relationships to help you understand topology and dependencies with temporal awareness. You can explore the Knowledge Graph schema, browse node types and attributes, and run GraphQL queries to investigate network context.
-
Observability: Provides visibility into agent and service activity through logs, metrics, traces, and default dashboards. Use observability views to monitor agent execution, LLM requests and token usage, tool calls, users, and model-related metrics.
Crosswork AI deployment
Crosswork AI is deployed as a single-node virtual machine. Installation is supported on the following deployment platforms:
-
VMware ESXi using OVA
-
KVM
The deployment requires two network interfaces:
-
Management network: Uses a single management IP address to access the Crosswork AI VM and UI.
-
Data network: Provides the data network connection for the Crosswork AI VM.

Single-NIC deployment is not supported in this release.
Deployment profiles
Crosswork AI supports the following deployment profiles. Select the profile based on the expected scale of the deployment, including the number of devices, links, and interfaces managed by the controller.
| Profile | CPU | RAM | Recommended data disk size | Recommended use |
|---|---|---|---|---|
|
Large |
12 vCPUs |
96 GB |
600 GB |
Regular deployments, or deployments with a Crosswork Network Controller single-VM deployment managing up to 1,000 devices. |
|
XLarge |
24 vCPUs |
128 GB |
1000 GB |
Scale deployments, or deployments with a Crosswork Network Controller cluster managing up to 25,000 devices. |
The data disk size is set to 1000 GB by default during installation. You can change the data disk size during deployment. The minimum supported data disk size is 500 GB, but use the recommended data disk size for the selected deployment profile.
Agent concurrency on the Large profile
Crosswork AI agents share CPU and memory resources. As a result, the number of concurrent runs available to one agent can depend on which other agents are running.
For the Large deployment profile, the baseline concurrent capacity is:
-
Toxic Factor Detection: 1 concurrent run
-
Configuration Drift Detection: Up to 3 concurrent runs
-
Deep Network Troubleshooting: Up to 5 concurrent sessions per DNT runtime instance
One DNT runtime instance supports up to five concurrent DNT sessions. If the first DNT runtime reaches this limit, Crosswork AI can create another DNT runtime instance only when sufficient CPU and memory are available in the shared resource pool.
These capacity values are not independent guarantees that can always be used simultaneously. On the Large profile, additional DNT capacity is available only when Toxic Factor Detection and Configuration Drift Detection are not consuming the shared resources required for another DNT runtime.
Deployment prerequisites
Before you deploy Crosswork AI, ensure that:
-
The deployment host has enough CPU, memory, CPU reservation, and storage resources for the deployment profile you plan to use.
-
The disk storage used by the Crosswork AI VM has an I/O latency of 20 ms or less.
Pre-installation checklist
Before you deploy Crosswork AI, gather the values required during deployment, system bringup, and setup for easy reference during the process.
| Parameter | Example | Your entry |
|---|---|---|
|
System name |
CWAI-Prod-01 |
|
|
DNS provider IP address |
8.8.8.8 |
|
|
DNS search domain |
cisco.com |
|
|
NTP provider |
1.1.1.1 |
|
|
Optional NTP authentication key |
123456789 |
|
|
Optional NTP authentication ID |
100 |
|
|
Optional NTP authentication type |
MD5 |
|
|
Optional proxy server |
proxy.example.com:8080 |
|
|
Optional proxy username |
proxy-user |
|
|
Optional proxy password |
** |
|
|
Optional ignored hosts |
10.0.0.1, example.local |
|
|
Crosswork AI FQDN or management IP address |
crosswork-ai.example.com |
|
|
Crosswork Network Controller FQDN or IP address |
cnc.example.com |
|
|
Role name used for SSO and DRA RBAC |
cwai |
|
|
LLM provider API key |
** |
|
|
Default LLM model reference |
openai/* |
|
|
NSO connection type |
direct, cnc_embedded, or cnc_external |
|
|
NSO or Crosswork Network Controller URL for NSO DRA |
||
|
NSO or Crosswork Network Controller username |
admin |
|
|
NSO or Crosswork Network Controller password |
** |
| Parameter | Example | Your entry |
|---|---|---|
|
Password for |
Welcome2Cisco! |
|
|
Management IPv4 address and subnet |
192.168.11.172/24 |
|
|
Management gateway IPv4 address |
192.168.11.1 |
|
|
Management IPv6 address and subnet |
||
|
Management gateway IPv6 address |
||
|
Data network IPv4 address and subnet |
192.168.8.172/24 |
|
|
Data network gateway IPv4 address |
192.168.8.1 |
|
|
Data network IPv6 address and subnet |
||
|
Data network gateway IPv6 address |
| Parameter | Example | Your entry |
|---|---|---|
|
QCOW2 image path |
/var/lib/libvirt/images/cwai.qcow2 |
|
|
VM disk path |
/var/lib/libvirt/images/cwai-disk.qcow2 |
|
|
Management bridge |
br-mgmt |
|
|
Data bridge |
br-data |
|
|
KVM host IP address |
192.168.100.10 |
|
|
KVM host username |
admin |
|
|
KVM host password |
** |
Deploying Crosswork AI in VMware ESXi
This section explains how to deploy Crosswork AI on VMware ESXi using the Crosswork AI OVA image and the VMware vCenter Deploy OVF Template wizard.
Guidelines for deploying Crosswork AI in VMware ESXi
Before you deploy Crosswork AI in VMware ESXi, ensure that:
-
Your VMware ESXi version is supported. Crosswork AI supports VMware ESXi 7.0, 7.0.1, 7.0.2, 7.0.3, 8.0, 8.0.2, 8.0.3, and 9.0.2.
-
You have the management IP address, subnet mask, and gateway IP address for the VM.
-
You have a password for the
rescue-useraccount. This password is also used as the initial GUI login password. -
VMware Tools periodic time synchronization is disabled after the VM is deployed, as described in the deployment procedure.
-
DRS, if enabled at the ESXi cluster level, is disabled during deployment.
Deploy Crosswork AI using VMware vCenter
To deploy Crosswork AI cluster using VMware vCenter, complete these steps:
-
Log in to your VMware vCenter.
Depending on the version of your vSphere client, the location and order of configuration screens may differ slightly.
-
Start the new VM deployment.
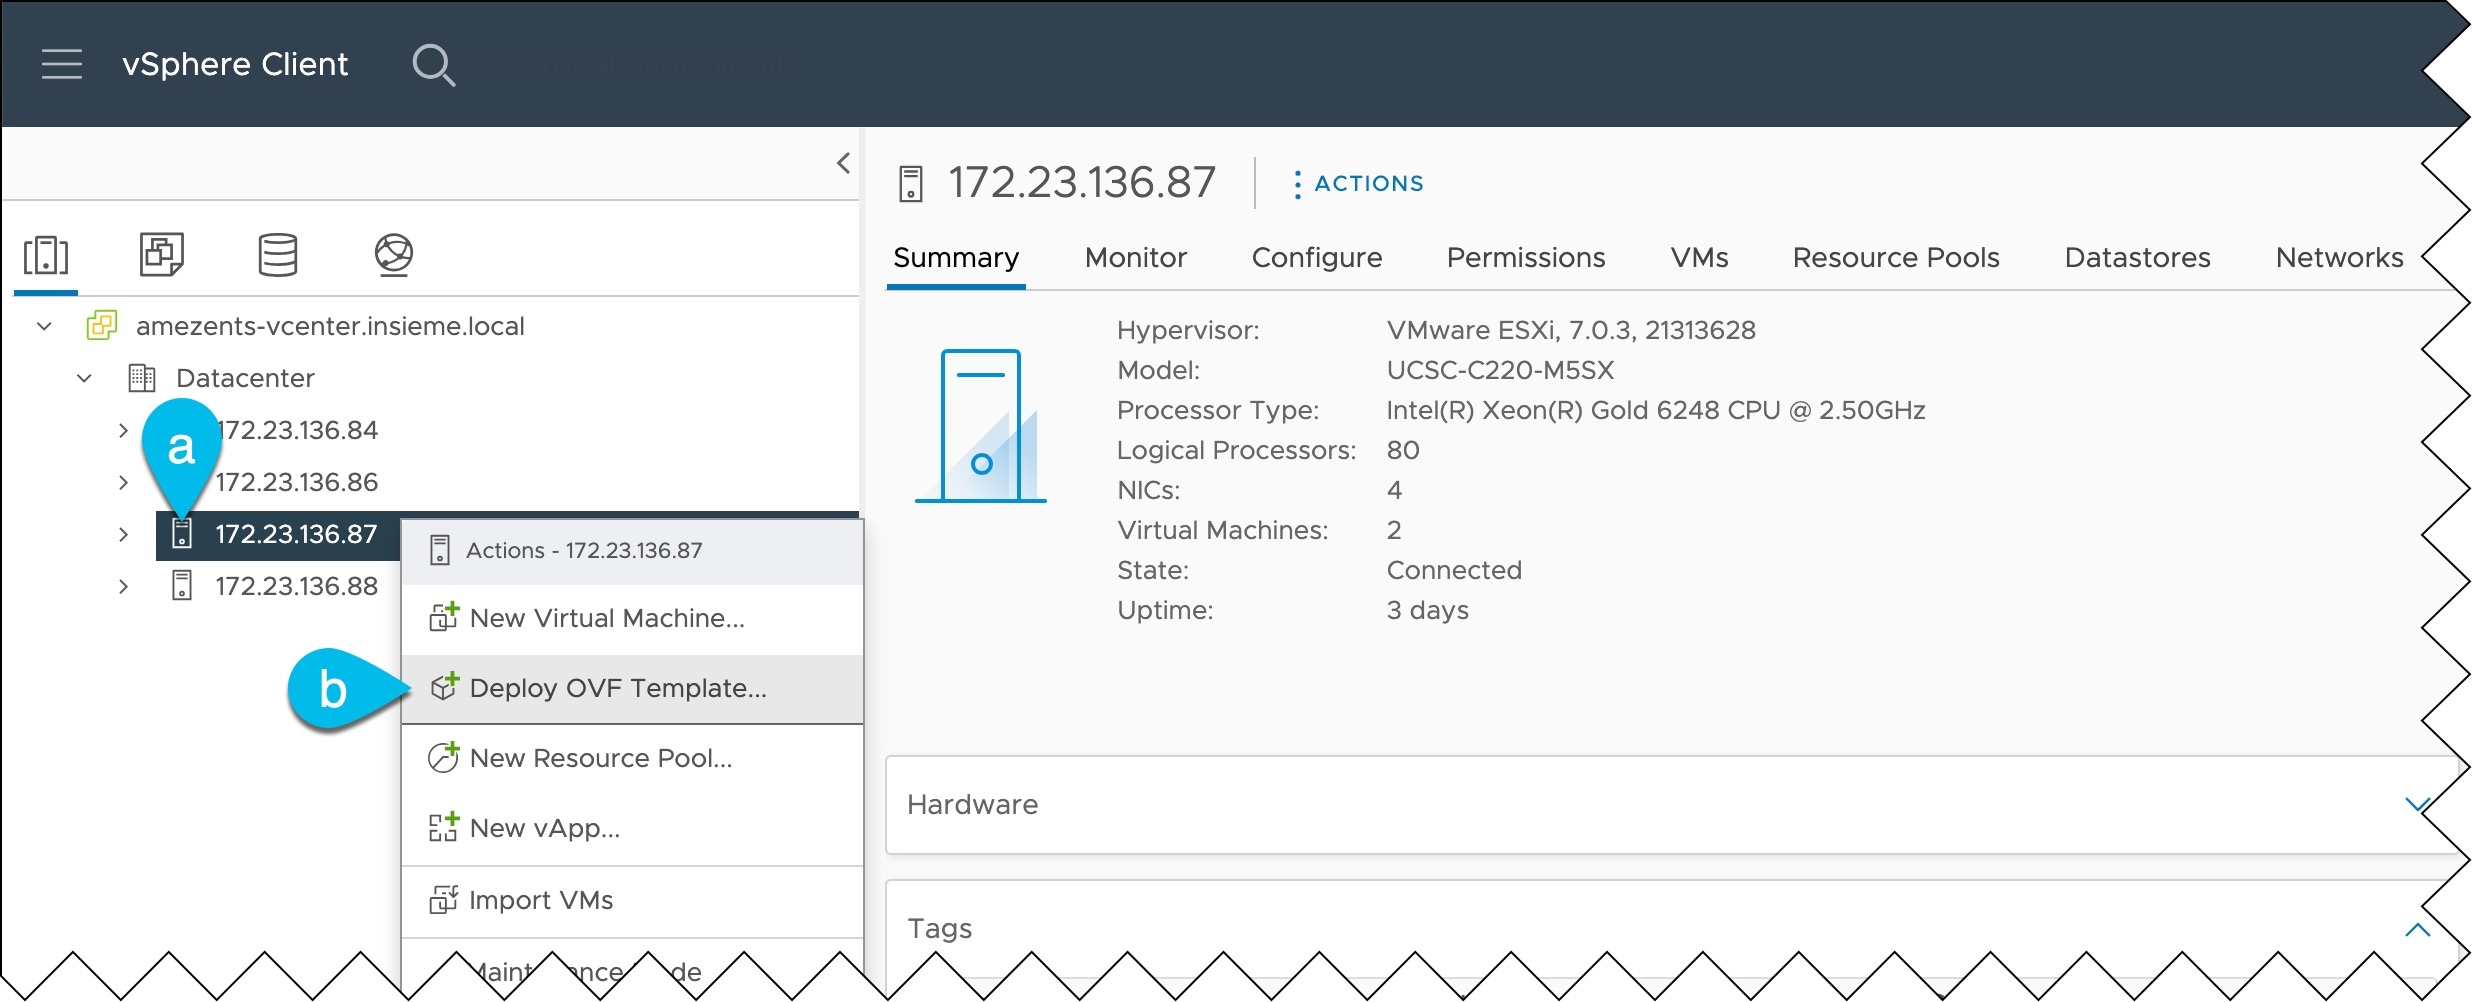 Figure 1. vSphere Client
-
In the vCenter inventory, navigate to the ESXi host where you want to deploy the Crosswork AI VM.
-
Right-click the ESXi host and choose Deploy OVF Template….
The Deploy OVF Template wizard appears.
-
-
In the Select an OVF template screen, provide the location of the Crosswork AI OVA image.
You can provide the image in one of these ways:
-
If the image is on a web server, select URL and enter the URL where the image is hosted.
-
If your image is local, select Local file and click Choose Files to upload the OVA file from your computer.
-
-
Click Next to continue.
-
In the Select a name and folder screen, enter a unique name for the virtual machine and select the folder where the VM should be created. Click Next to continue.
-
In the Select a compute resource screen, select the ESXi host where the VM will run.
Verify that the selected host has the required resources for the Crosswork AI deployment profile.
-
In the Review details screen, review the deployment details. If a certificate warning appears, acknowledge the warning and click Next to continue.
-
In the Configuration screen, select the deployment profile that matches your scale requirements:
-
Large: 12 CPUs and 96 GB memory - Recommended for regular deployments, or deployments with a Crosswork Network Controller single-VM deployment managing up to 1,000 devices.
-
XLarge: 24 CPUs and 128 GB memory - Recommended for scale deployments, or deployments with a Crosswork Network Controller cluster managing up to 25,000 devices.
-
-
In the Select storage screen, provide the storage information.
-
Select the datastore for the virtual machine.
-
From the Select virtual disk format drop-down, choose Thick Provisioning Lazy Zeroed.
-
Click Next to continue.
-
-
In the Select networks screen, map the Crosswork AI networks to the appropriate VMware port groups.
-
Management network: The bonded ports mgmt0/mgmt1 are used for the Crosswork AI cluster’s management network.
-
Data network: The bonded ports fabric0/fabric1 are used for the Crosswork AI cluster’s data network.
-
-
Click Next to continue.
-
In the Customize template screen, enter the deployment properties:
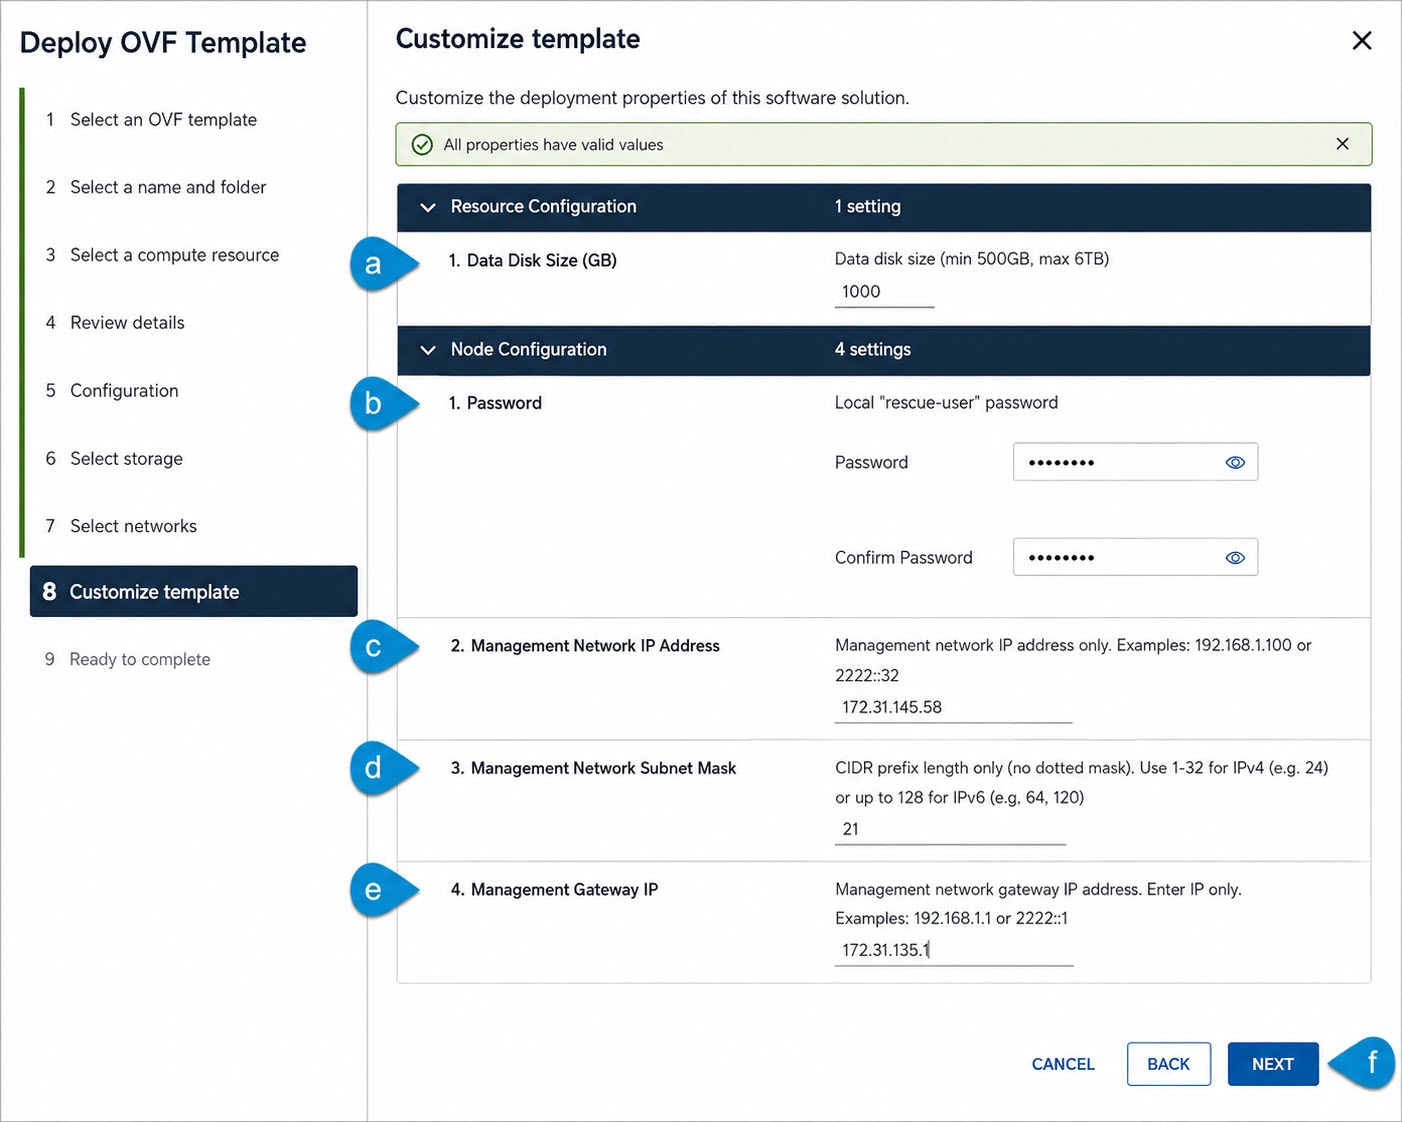 Figure 2. Deploy OVF template - Customize template
-
Enter the data disk size. The default is 1000 GB, and the minimum supported size is 600 GB. Use the recommended disk size for the selected deployment profile.
-
Provide and confirm the Password used for the
rescue-useraccount. -
Provide the Management Network IP address for the IP stack that you use for initial access to the VM.
-
Provide the corresponding Management Network subnet mask or prefix length.
-
Provide the corresponding Management Gateway IP address.
-
Click Next to continue.
-
-
In the Ready to complete screen, verify that all information is accurate and click Finish to start deploying the VM.
-
Monitor the vCenter deployment task until the VM deployment is complete.
Power on the Crosswork AI VM
-
After the VM is deployed, disable VMware Tools periodic time synchronization before you start the VM.
-
In vCenter, right-click the node’s VM and select Edit Settings.
-
Select the VM Options tab.
-
Expand the VMware Tools category and deselect the Synchronize time periodically option.
-
Save the settings.
-
-
In the vCenter inventory, locate the Crosswork AI VM.
-
From the Actions menu, choose Power > Power On. This step activates your virtual machine, allowing it to boot up from the designated configuration settings.
-
Open the VM console and verify that the VM starts successfully.
-
Check the console for any errors or notifications that require attention.
Complete system bringup
After you deploy and power on the VM, complete the system bringup workflow from the Crosswork AI GUI. This bootstrap process configures the node, validates the system settings, and brings the cluster online.
-
Open your browser and enter the Crosswork AI management IP address using HTTPS.
-
Log in using the
rescue-userpassword that you provided during OVA deployment. -
The Getting Started page displays the system bringup wizard. The wizard provides a step-by-step workflow to bring the system online.
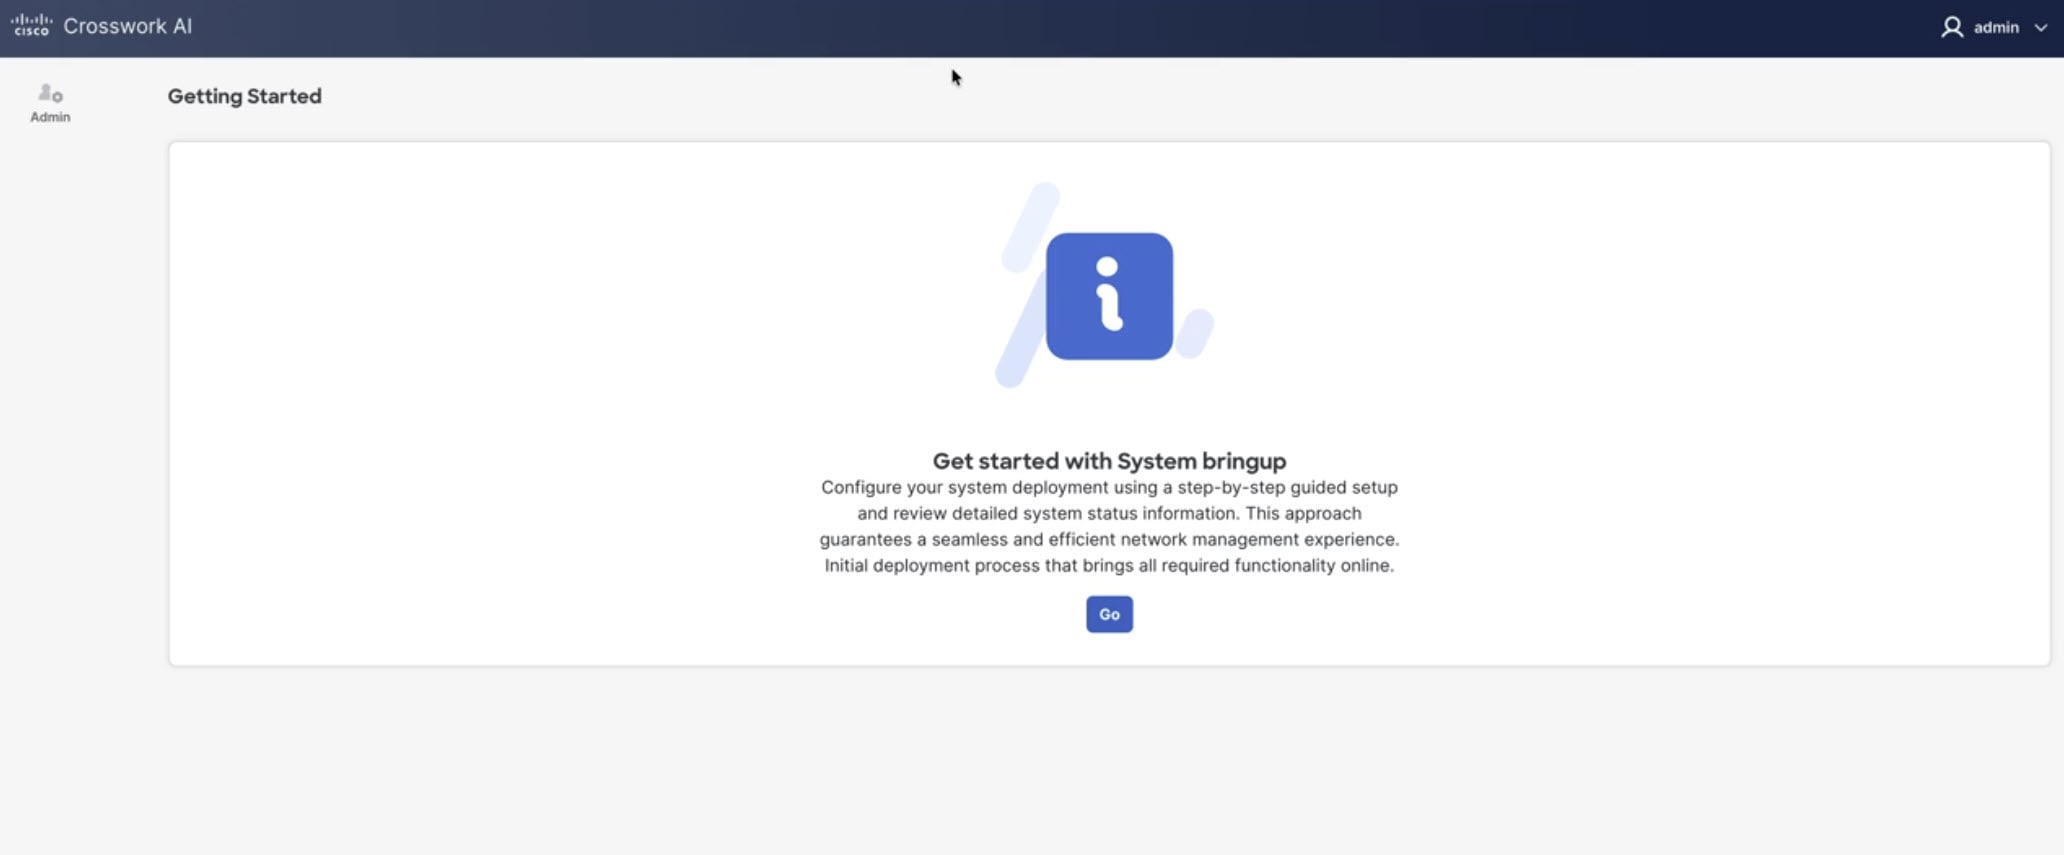 Figure 3. System bringup
 -
Select Go to start the setup.
-
For Basic information, enter the System name. This system name cannot be changed later unless you completely rebuild the system.
-
Choose the Network configuration for the IP stack, and then select Next.
The configuration fields depend on the selected IP stack. If you select dual stack, provide both IPv4 and IPv6 management addresses and data network addresses as applicable.
-
For Configuration, enter the required configuration fields.
-
Enter the DNS provider IP address for the selected IP stack. To configure additional DNS servers, select Add DNS provider and enter each additional DNS provider IP address.
-
Specify the DNS search domain.
-
Enter the NTP provider details and configure NTP authentication, if required.
To configure multiple NTP servers, add each NTP server separately.
-
Optionally, configure a proxy server if needed.
-
Select Next.
-
-
For Node details, edit the node information.
-
Enter a name for the Crosswork AI node.
-
Enter the management and data network IP addresses and gateways required for the selected IP stack. For a dual-stack deployment, enter both the IPv4 and IPv6 management and data network addresses and the applicable gateways.
-
Select Save, and then select Validate to validate the information that you entered.
-
-
In the Summary page, review and verify the Crosswork AI configuration information. Click Bootup to proceed with building the cluster.
-
During the Kubernetes cluster installation, the UI displays the progress as the system validates the node configuration and bootstraps the Kubernetes cluster. Click View details at any time to see specific installation activities.
While the bootup process is in progress, you may get logged out. Wait a few minutes before attempting to log in again to allow time for all services to come up.
-
After the Kubernetes cluster installation is complete, you are redirected to the Crosswork AI interface to complete the second stage of installation. During this stage, the UI displays the progress as Crosswork AI completes the post-Kubernetes setup and deploys the required infrastructure services.
-
After the bootstrap process is complete, Crosswork AI is configured and ready to use.
Deploying Crosswork AI in Linux KVM
You can deploy Crosswork AI in Linux KVM by using a QCOW2 image. The VM connects to the management and data networks through Linux bridges configured on the KVM host.
Guidelines for deploying Crosswork AI in Linux KVM
Before you deploy Crosswork AI in Linux KVM, ensure that:
-
The Crosswork AI QCOW2 image and KVM deployer are available on the KVM host.
-
Linux bridge networking is configured for the management and data networks.
-
You have the IP address, prefix, and gateway for the VM management network.
-
You have the IP address, prefix, and gateway for the VM data network.
-
You have the values required for the KVM deployment configuration file, including the image path, VM disk path, management and data network settings, bridge names, and KVM host credentials.
-
You have the password required for initial login and system bringup.
Configure Linux bridge networking
For Linux KVM deployments, configure Linux bridge networking on the KVM host. With bridge networking, the Crosswork AI VM connects to the same Layer 2 network as the physical network connected to the KVM host.
A Linux bridge acts as a virtual switch. The physical NIC is attached to the bridge, and the VM interface connects to the bridge instead of directly to the physical NIC.
Replace the variables in the following commands with values for your environment.
To create the bridge connection:
nmcli connection add type bridge ifname <bridge-name> con-name <bridge-name>To configure a static IP address on the bridge:
nmcli connection modify <bridge-name> ipv4.method manual \
  ipv4.addresses "<bridge-ip>/<prefix>" \
  ipv4.gateway "<gateway-ip>" \
  ipv4.dns "<dns-ip>" \
  ipv6.method ignore
To add the physical NIC as a bridge slave:
nmcli connection add type bridge-slave ifname <physical-nic> con-name <bridge-port-name> master <bridge-name>To bring up the bridge and bridge slave connections:
nmcli connection up <bridge-name>
nmcli connection up <bridge-port-name>
Before you add the physical NIC as a bridge slave, remove or disable any existing IP configuration on the physical NIC. After the bridge is configured, the host uses the bridge as its Layer 3 interface.
If the management and data networks use separate physical networks, configure separate Linux bridges for each network.
Prepare the QCOW2 image and installer
-
Download the Crosswork AI QCOW2 image and copy it to the KVM host.
-
Extract the tar file to obtain the QCOW2 image and the installer (for example, kvm_deployer).
`tar -xvf crosswork-ai.2.0.0.59.qcow2.tar.gz` -
Confirm that the QCOW2 image is available and readable.
-
Confirm that the KVM deployer is executable.
-
Create a deployment configuration file and update it with the values for your environment.
Example configuration file for single-node deployment:
image_path: "<path-to-qcow2-image>"
cluster_size: "1"
flavor: "<deployment-profile>"
admin_password: "<password>"
vms:
- name: "<node-name>"
  disk_path: "<path-to-vm-disk>"
  management_network: "<management-ip>/<prefix>"
  management_gateway: "<management-gateway-ip>"
  data_network: "<data-network-ip>/<prefix>"
  data_gateway: "<data-gateway-ip>"
  management_bridge: "<management-bridge-name>"
  data_bridge: "<data-bridge-name>"
  host_ip: "<kvm-host-ip>"
  host_user: "<kvm-host-user>"
  host_password: "<kvm-host-password>"
Parameters:
-
image_path: Full path to the Crosswork AI QCOW2 image. -
cluster_size: Number of nodes in the deployment. For a single-node deployment, enter1. -
flavor: Deployment profile to use for the VM. For example,app. -
admin_password: Password used for initial access and system bringup. -
vms.name: Name of the VM. -
vms.disk_path: Location where the VM disk is created on the KVM host. -
vms.management_network: Management IP address and prefix for the VM. -
vms.management_gateway: Gateway IP address for the management network. -
vms.data_network: Data network IP address and prefix for the VM. -
vms.data_gateway: Gateway IP address for the data network. -
vms.management_bridge: Linux bridge that carries management traffic. -
vms.data_bridge: Linux bridge that carries data network traffic. -
vms.host_ip: IP address of the KVM host. -
vms.host_user: User name used to connect to the KVM host. -
vms.host_password: Password used to connect to the KVM host.
-
Run the KVM deployment
From the directory that contains the deployment configuration file, run the KVM deployer.
-
Run this command.
./kvm_deployer --config ./configThe deployer creates and configures the VM based on the deployment configuration file. It attaches the VM interfaces to the specified management and data bridges and applies the initial deployment settings.
-
After the KVM deployer completes, verify that the VM is running and that the VM interfaces are attached to the correct management and data network bridges.
Set up Crosswork AI
This section provides instructions for integrating Crosswork AI with Crosswork Network Controller and Network Services Orchestrator (NSO). It covers setting up the LLM proxy, SSO, mTLS, and DRA instances so Crosswork AI can connect to the required systems.
Once the bootstrap process is complete, follow the instructions in this order:
-
Configure an external proxy for deployments without direct internet access from the Crosswork AI VM.
-
Download cwaictl if you plan to use cwaictl to run LLM proxy setup commands.
-
Set up LLM proxy to configure access to the LLM provider.
-
Set up SSO between Crosswork Network Controller and Crosswork AI.
-
Set up mTLS for BGP data transfer to the CNC DRA.
-
Start Data Retrieval Adapters instances for CNC and NSO.
-
Verify Crosswork Network Controller integration and assign device tags.
For information about the Crosswork AI REST APIs, including request parameters, response schemas, and API examples, refer to Crosswork AI API documentation.
Prerequisites
-
Crosswork Network Controller must be licensed for CNC Premier to support Crosswork AI integration and cross-launch.
-
Ensure that the system or API client you use for setup can reach the Crosswork AI instance.
-
Decide whether to use an FQDN, such as
crosswork-ai.example.com, or a stable IP address, such as10.100.100.123, for the Crosswork AI instance. Use the same value across the setup steps to avoid connectivity or certificate issues. -
For best performance, network latency between Crosswork AI and connected controllers, such as Crosswork Network Controller, should be less than 100 ms RTT.
Configure an external proxy
Crosswork AI agents do not connect directly to LLM providers. They use the Crosswork AI LLM proxy service as the central interface to the configured LLM provider. The LLM proxy service then connects to the external LLM provider.
External proxy and LLM proxy
-
External proxy: Allows the Crosswork AI VM to reach external internet services when direct internet access is not available.
-
LLM proxy: Crosswork AI service that provides a centralized interface for agents to access configured LLM models. If the Crosswork AI VM does not have direct internet access from the management IP, configure an external proxy before setting up LLM proxy. This allows LLM proxy to reach the configured LLM provider using the external proxy.
If the VM has direct internet access to the configured LLM provider, skip this section.
To configure external proxy settings:
-
Log in to Crosswork AI.
-
From the left navigation, choose Administration > System settings.
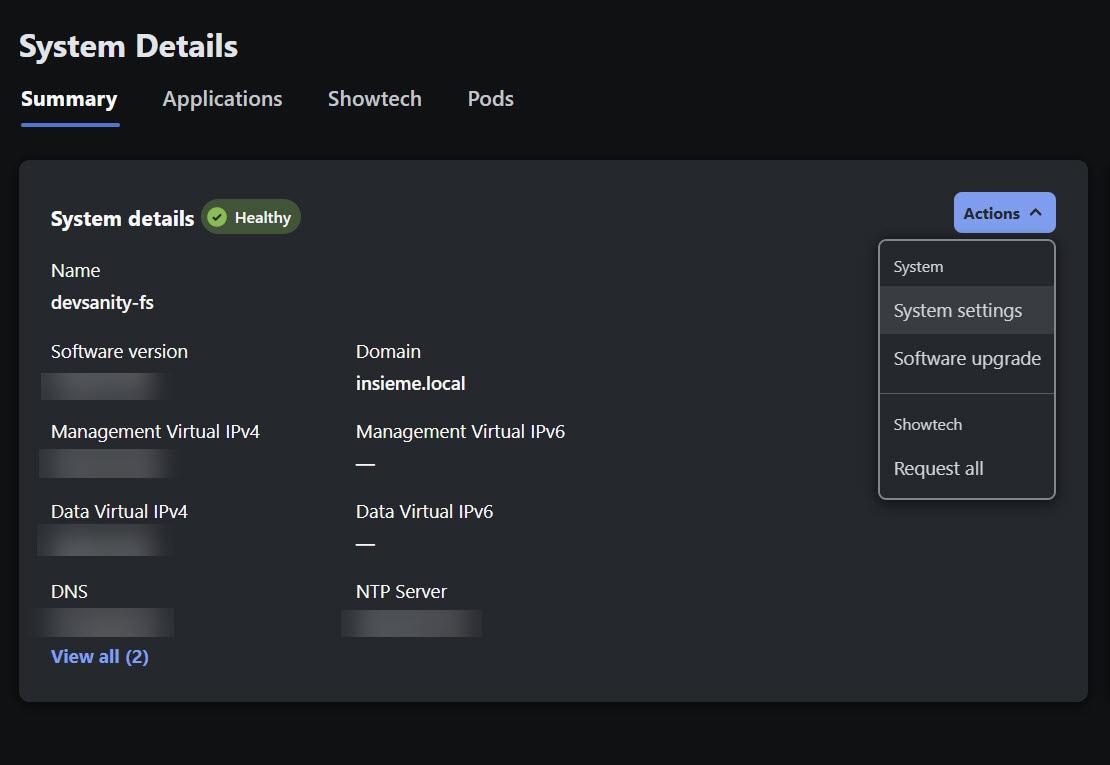 Figure 4. System settings
 -
In the Proxy configuration section, select Edit to configure a proxy server.
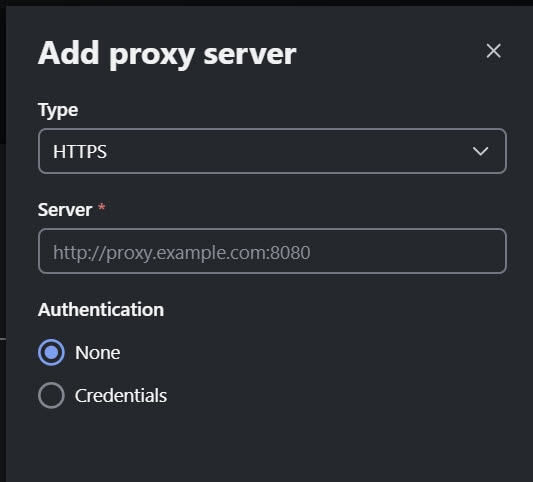 Figure 5. Add proxy server
 -
Choose the type of proxy server: HTTP, HTTPS, or HTTP and HTTPS. It is recommended to use HTTPS or HTTP and HTTPS.
-
Enter the server URL or IP address, and port.
-
If the proxy requires authentication, enter the proxy username and password.
-
In the ignored hosts field, enter any domains or IP addresses that should bypass the proxy.
Ignored hosts are destinations that Crosswork AI should reach directly instead of routing through the proxy. This field is typically left empty unless your deployment requires specific domains or IP addresses to bypass the proxy.
-
Save the proxy settings.
After you save the settings, Crosswork AI restarts the LLM proxy microservice. Wait for the restart to complete before you configure LLM provider models.
Download cwaictl
You can configure LLM provider models by using either the cwaictl CLI tool or the LLM REST APIs. To use cwaictl, download the tool from the Crosswork AI server and run it directly on your system.
You can also use cwaictl to run Crosswork AI setup and agent management commands, such as managing Configuration Drift Detection logical groups, training and inference tasks, and retrieving task results.
-
Open your browser and navigate to:
https://<cwai-host>/dist/ -
Download the package that matches your operating system:
-
cwaictl-linux-amd64.tar.gz – Linux (x86_64)
-
cwaictl-linux-arm64.tar.gz – Linux (ARM64)
-
cwaictl-darwin-amd64.tar.gz – macOS (Intel)
-
cwaictl-darwin-arm64.tar.gz – macOS (Apple Silicon)
-
cwaictl-windows-amd64.zip – Windows (x86_64)
-
-
Extract the archive. For example, on Linux (x86_64).
tar -xzf cwaictl-linux-amd64.tar.gzThe extracted archive contains:
-
cwaictl-linux-amd64: The binary executable for the application.
-
README.md: A file containing quick reference documentation.
-
docs/: A directory containing the detailed cwaictl user guide.
-
-
Copy the binary to a directory in your PATH or run directly.
sudo cp cwaictl-linux-amd64 /usr/local/bin/cwaictlAlternatively, you can add the current directory to your PATH and create an alias:
export PATH="$PATH:$(pwd)" alias cwaictl=cwaictl-linux-amd64 -
Verify the installation.
cwaictl buildinfoThis displays build information confirming the installation.
Set up LLM proxy
The LLM proxy service allows Crosswork AI agents to access configured LLM provider models. You can set up LLM proxy by using either cwaictl or the LLM REST APIs. Use the method that matches your deployment workflow.
Log in to Crosswork AI
Before you configure LLM provider models, log in to Crosswork AI.
Using cwaictl
-
Set the Crosswork AI base URL.
export CWAI_BASE_URL="https://<crosswork-ai-host>" -
Log in to Crosswork AI.
cwaictl -k auth login --username <username> -
When prompted, enter the password. The
-koption disables TLS verification.
Using REST API
export CWAI_HOST="https://<crosswork-ai-host>"
AUTH_COOKIE=$(curl -vk -H 'Content-Type: application/json' \
  -X POST "$CWAI_HOST/login" \
  -d '{"userName": "<username>", "userPasswd": "<password>", "domain": "DefaultAuth"}' \
  | jq .jwttoken)
Pass the resulting cookie on every subsequent REST API call:
-H "Cookie: AuthCookie=${AUTH_COOKIE}"Register an LLM provider model
The LLM proxy does not include any provider models by default. Before Crosswork AI can use an LLM, an administrator must configure at least one LLM provider and model, provide the required provider credentials, and configure the default models.
Agent developers can assign specific models when registering an agent, and administrators can override those assignments. If an assigned model is not configured in the LLM proxy, the default model is used.
The Routing Agent does not have models assigned by default. An administrator can assign specific models to the Routing Agent; otherwise, it uses the configured default models.
You can register an LLM provider model by using cwaictl or the LLM REST API. The REST API uses the following endpoint to create or update a model:
PUT /api/v1/llm/modelFor request parameters and payload details, refer to LLM API reference.
The provider-specific examples in this section use cwaictl.
OpenAI
To register OpenAI models by using the wildcard model reference:
cwaictl llm model set \
  --model "openai/*" \
  --model-ref "openai/*" \
  --api-key "<openai-api-key>" -k
Gemini
To register Gemini models by using the wildcard model reference:
cwaictl llm model set \
  --model "gemini/*" \
  --model-ref "gemini/*" \
  --api-key "<gemini-api-key>" -k
Anthropic
To register an Anthropic model with LLM proxy:
cwaictl llm model set \
  --model anthropic/claude-sonnet-4-20250514 \
  --model-ref claude-sonnet-4 \
  --api-key "<anthropic-api-key>" -k

cwaictl llm model set \
  --model anthropic/claude-3-5-haiku-20241022 \
  --model-ref claude-haiku-3-5 \
  --api-key "<anthropic-api-key>" \
  -k
Ollama
To register a self-hosted Ollama model with LLM proxy:
cwaictl llm model set \
  --model ollama/llama3 \
  --custom \
  --model-ref Ollama/llama3 \
  --api-base "" -k
NVIDIA NIM
To register an NVIDIA NIM model with LLM proxy:
cwaictl llm model set \
  --model "nvidia_nim/nvidia/nemotron-3-super-120b-a12b" \
  --model-ref "nemotron-3-super-120b" \
  --api-base "https://integrate.api.nvidia.com/v1/" \
  --api-key "<nvidia-nim-api-key>" -k
List configured LLM models
After you register a model, verify that it appears in the configured model list.
Using cwaictl
cwaictl llm model list -kUsing REST API
curl -k -H "Cookie: AuthCookie=${AUTH_COOKIE}" \
  "$CWAI_HOST/api/v1/llm/models"
To filter the list by provider:
curl -k -H "Cookie: AuthCookie=${AUTH_COOKIE}" \
  "$CWAI_HOST/api/v1/llm/models?provider=<provider-name>"
View LLM model details
To view details for a configured model, specify the model reference.
Using cwaictl
cwaictl llm model get --name "<model-ref>" -kUsing REST API
curl -k -H "Cookie: AuthCookie=${AUTH_COOKIE}" \
  "$CWAI_HOST/api/v1/llm/model?name=<model-ref>"
To retrieve model details by using the model ID:
curl -k -H "Cookie: AuthCookie=${AUTH_COOKIE}" \
  "$CWAI_HOST/api/v1/llm/model?id=<model-id>"
Set the default LLM model
Set one or more models as the default models for Crosswork AI. The default model is used when an agent or application does not have an explicit model association.
Using cwaictl
cwaictl llm default set \
  --models '["<model-ref>"]' -k
To view the configured default models:
cwaictl llm default get -kUsing REST API
curl -k -X PUT "$CWAI_HOST/api/v1/llm/default" \
  -H "Content-Type: application/json" \
  -H "Cookie: AuthCookie=${AUTH_COOKIE}" \
  -d '{
    "models": ["<model-ref>"]
  }'
To view the configured default models:
curl -k -H "Cookie: AuthCookie=${AUTH_COOKIE}" \
  "$CWAI_HOST/api/v1/llm/default"
Associate an LLM model with an agent or application
You can associate a model with a specific agent or application. The association type must be either agent or application.
Using cwaictl
To associate a model with the Routing application:
cwaictl llm association set --type application --with Routing \
  --models '["<model-ref>"]' -k
To associate a model with the Deep Network Troubleshooting agent:
cwaictl llm association set --type agent --with dnt \
  --models '["<model-ref>"]' -k
Using REST API
To associate a model with an application:
curl -k -X PUT "$CWAI_HOST/api/v1/llm/association" \
  -H "Content-Type: application/json" \
  -H "Cookie: AuthCookie=${AUTH_COOKIE}" \
  -d '{
    "association_type": "application",
    "association_with": "Routing",
    "models": ["<model-ref>"]
  }'
To associate a model with an agent:
curl -k -X PUT "$CWAI_HOST/api/v1/llm/association" \
  -H "Content-Type: application/json" \
  -H "Cookie: AuthCookie=${AUTH_COOKIE}" \
  -d '{
    "association_type": "agent",
    "association_with": "dnt",
    "models": ["<model-ref>"]
  }'
List associations
Using cwaictl
To list all LLM model associations:
cwaictl llm association list -kUsing REST API
To list all LLM model associations:
curl -k -H "Cookie: AuthCookie=${AUTH_COOKIE}" \
  "$CWAI_HOST/api/v1/llm/associations"
To search for agent associations:
curl -k -H "Cookie: AuthCookie=${AUTH_COOKIE}" \
  "$CWAI_HOST/api/v1/llm/associations?search=agent"
To search for associations for the Routing application:
curl -k -H "Cookie: AuthCookie=${AUTH_COOKIE}" \
  "$CWAI_HOST/api/v1/llm/associations?search=Routing"
The search parameter performs a case-insensitive substring match against the association type, entity name, and full name. It is not an exact field filter.
Verify LLM proxy connectivity
Use the connectivity check to confirm that LLM proxy can reach the configured model.
Using cwaictl
To verify connectivity for an application or agent:
cwaictl llm connectivity-check \
  --app <application-or-agent-name> \
  --model <model-ref> -k
To use the default association, omit the --app option.
cwaictl llm connectivity-check --model <model-ref> -kUsing REST API
To verify connectivity for an application or agent:
curl -k -X POST "$CWAI_HOST/api/v1/llm/connectivity-check" \
  -H "Content-Type: application/json" \
  -H "Cookie: AuthCookie=${AUTH_COOKIE}" \
  -d '{"app": "<application-or-agent-name>", "model": "<model-ref>"}'
A successful response looks similar to the following:
{
  "result": "connected!"
}
Set up SSO for cross-launch from Crosswork Network Controller
Single Sign-On (SSO) allows only authorized users, authenticated through your organization’s identity provider, to access Crosswork AI. In this setup Crosswork Network Controller acts as the SAML Identity Provider (IDP) and Crosswork AI acts as the SAML Service Provider (SP), trusting Crosswork Network Controller to authenticate users.
Export the IdP metadata from Crosswork Network Controller
The IdP metadata XML file is used to register Crosswork Network Controller as the IdP in Crosswork AI.
curl -k https://<cnc-host>:<port>/crosswork/sso/idp/metadata -o idp-metadata.xmlUpload IdP metadata in Crosswork AI
To upload IdP metadata:
-
In Crosswork AI, choose Administration > AAA and select Add identity provider.
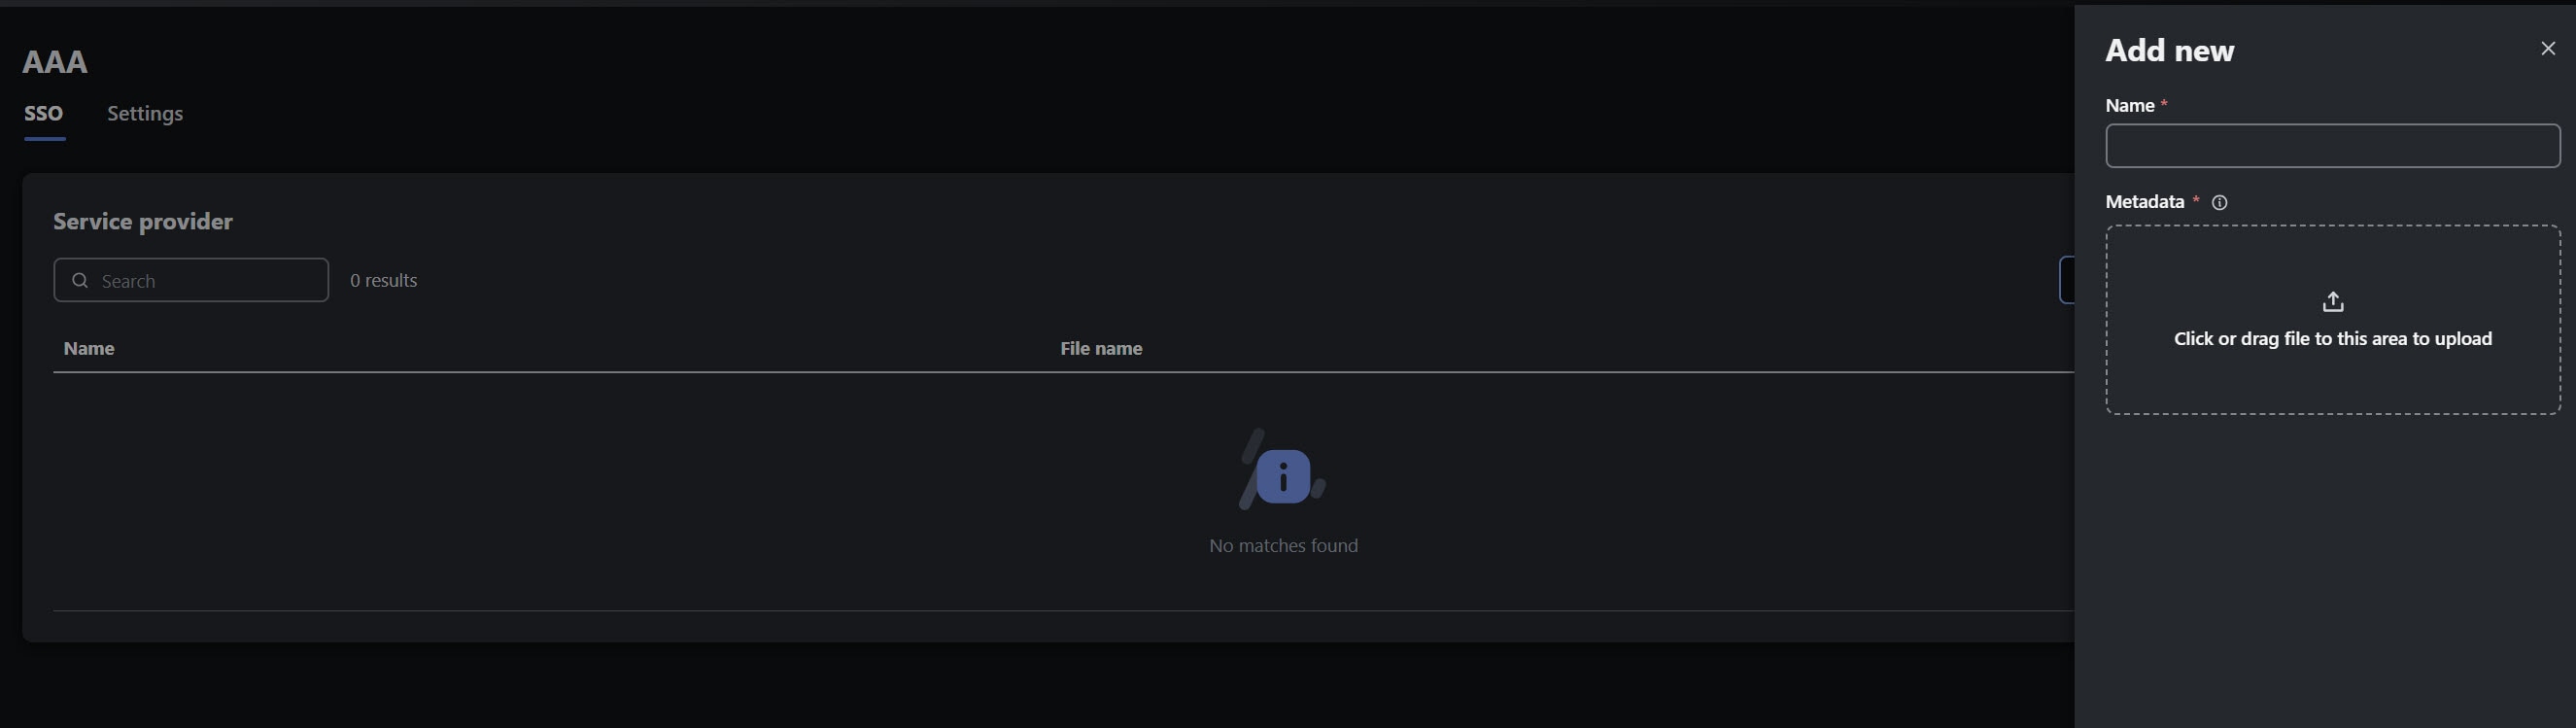 Figure 6. Add identity provider in Crosswork AI
 -
Enter the name of the identity provider.
-
For the Metadata, click the field to browse and add the exported metadata file (idp-metadata.xml) or drag the file to upload.
-
Click Add to finish adding the identity provider.
Export SP metadata from Crosswork AI
To export SP metadata:
-
In Crosswork AI, choose Administration > AAA.
-
Select Download SP metadata.
The sp-metadata.xml file will be downloaded.
Upload SP metadata in Crosswork Network Controller
To upload SP metadata:
-
In Crosswork Network Controller, choose Administration > AAA > SSO. The Identity Provider window is displayed.
-
Click + to add a service provider.
-
Enter the name of the service provider.
-
In the Evaluation order field, enter a unique number to set the order in which the service definition is considered.
-
For the Metadata, select Browse to navigate to the exported SP metadata file (sp-metadata.xml).
-
Click Add to finish adding the service provider.
-
Click Save All Changes. You will be prompted with a warning message about restarting the server to apply the changes. Click Save Changes to confirm.
Synchronize roles
For SSO to work correctly, Crosswork Network Controller and Crosswork AI must use matching role names.
Create the same role names in both systems.
Use lowercase role names without spaces or special characters. Avoid role names that include uppercase letters, spaces, or special characters.
Examples of acceptable role names:
-
cwai -
aioperator
Set up mTLS for BGP data
Set up mutual TLS between Crosswork AI and Crosswork Network Controller so BGP data can be sent to the Crosswork Network Controller Data Retrieval Adapter (DRA).
Export certificates from Crosswork AI
To export certificates:
-
In Crosswork AI, choose Administration > Certificate Management > Certificates > System certificates.
-
Select Export to export the certificate bundle.
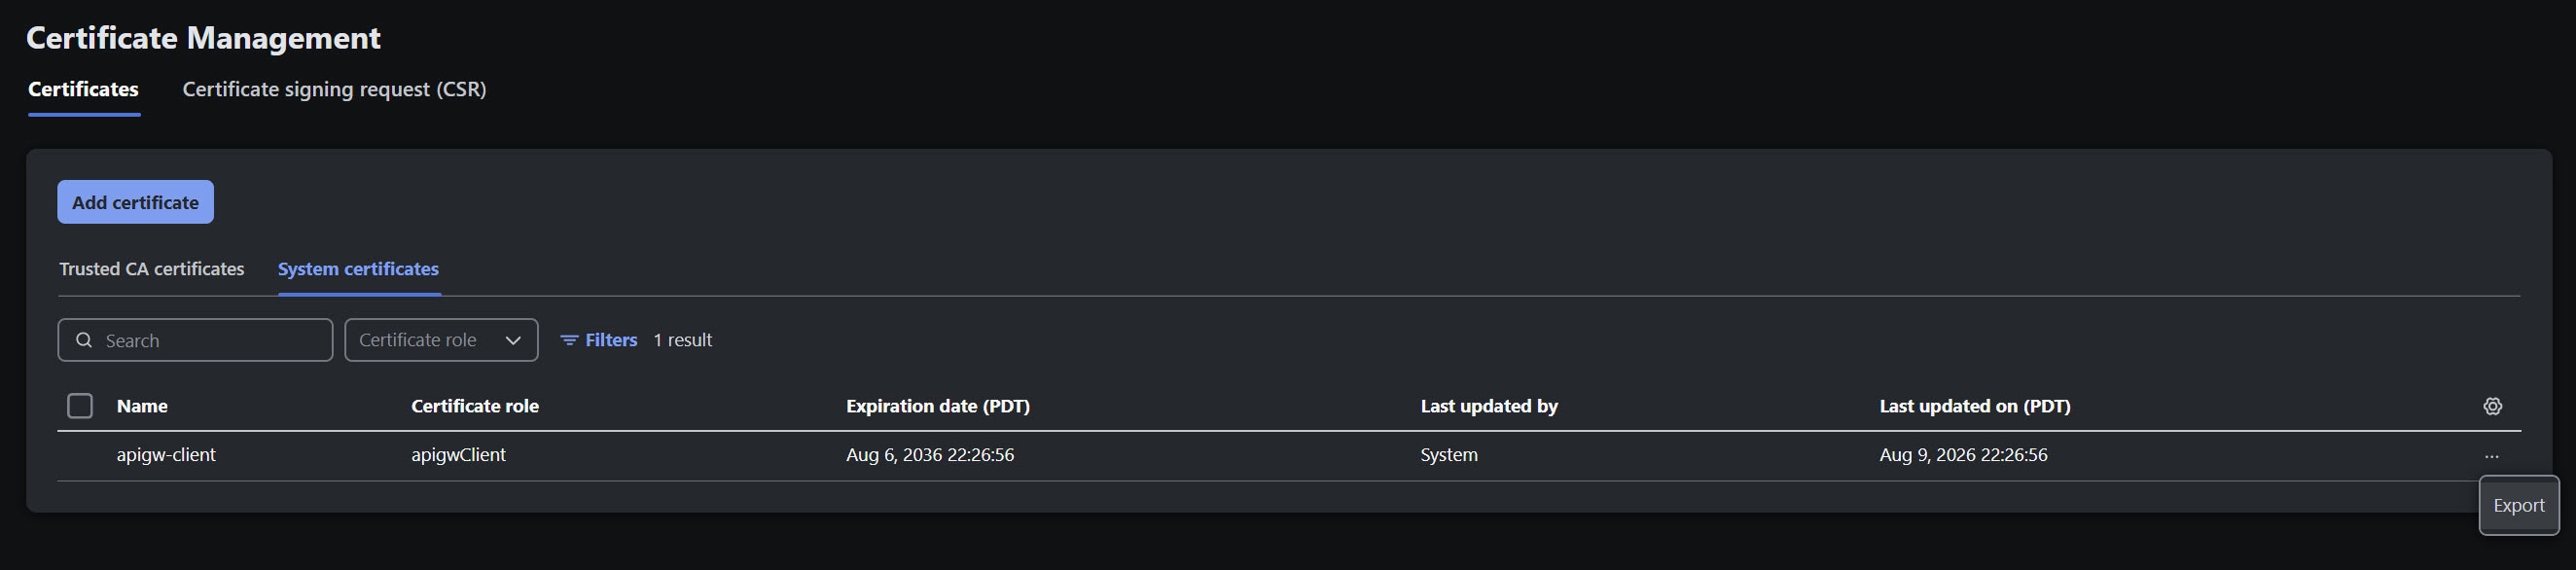 Figure 7. Export certificates from Crosswork AI
 -
Create a passphrase to protect your private key. You’ll need this passphrase when you import the certificates into Crosswork Network Controller.
Upload certificates in Crosswork Network Controller
To upload certificates:
-
In Crosswork Network Controller, choose Administration > Certificate Management and click the + icon.
-
Enter a unique name for the certificate.
-
For the Certificate role, select Crosswork AI provider mutual auth.
-
Upload the certificate files that you exported from Crosswork AI.
-
Enter the passphrase that you used when exporting the certificate bundle.
-
Click Save.
Start Data Retrieval Adapters instances
Data Retrieval Adapters (DRAs) allow Crosswork AI to retrieve and normalize data from external systems, such as Crosswork Network Controller and Network Services Orchestrator (NSO).
Create the DRAs required for the agents that you plan to use. If you plan to use all three agents, you must define DRAs for both CNC and NSO.
-
Configuration Drift Detection: Define NSO DRA
-
Toxic Factor Detection: Define CNC DRA
-
Deep Network Troubleshooting: Define DRAs for both CNC and NSO
Authenticate to use the DRA Gateway API
Before you call the DRA Gateway API, authenticate to Crosswork AI and get a JSON Web Token (JWT).
In your API client, create a request with the following details:
-
Method:
POST -
URL:
https://<crosswork-ai-host>/login -
Headers:
Content-Type: application/json Accept: application/json -
Body:
{
  "userName": "<username>",
  "userPasswd": "<password>",
  "domain": "local"
}
The response includes a jwttoken. Use this token in subsequent API requests by adding the following header:
Content-Type: application/json
Accept: application/json
Cookie: AuthCookie=<jwttoken>
Start the Crosswork Network Controller DRA instance
In your API client, create a request with the following details:
-
Method:
POST -
URL:
https://<crosswork-ai-host>/api/v1/dra-gateway/instance -
Headers:
Content-Type: application/json Accept: application/json -
Body:
{
  "typeId": "cnc-type",
  "name": "<dra-instance-name>",
  "configuration": {

    "cwai_host": "<crosswork-ai-management-ip-address>",
    "cwai_username": "<crosswork-ai-username>",
    "cwai_password": "<crosswork-ai-password>",

    "cnc_http_host": "<cnc-url>",

    "cnc_role_1_name": "<crosswork-ai-role-name>",
    "cnc_role_1_username": "<cnc-username>",
    "cnc_role_1_password": "<cnc-password>",

    "cnc_role_2_name": "<crosswork-ai-role-name>",
    "cnc_role_2_username": "<cnc-username>",
    "cnc_role_2_password": "<cnc-password>"
  }
}
Parameters:
-
typeId: DRA type. For the Crosswork Network Controller DRA, usecnc-type. -
name: Unique name for the DRA instance. -
cwai_host: Crosswork AI management IP address -
cwai_usernameandcwai_password: Credentials for Crosswork AI. -
cnc_http_host: CNC URL. For example, https://1.2.3.4:30603/ -
cnc_role_<n>_name,cnc_role_<n>_username, andcnc_role_<n>_password: One or more credential sets used to access Crosswork Network Controller.-
The
namevalue in each credential set should match a synchronized role name that exists in both Crosswork Network Controller and Crosswork AI. When a user request is sent to the DRA, the DRA extracts the user’s role IDs from the request and uses thenamevalue to select the best matching credential set. If no credential set matches the user’s roles, the request is blocked. -
For DRA to operate, configure at least one set of credentials. For background DRA connections to CNC where no user context is available, DRA uses the role identified by the first
cnc_role_1_nameentry in the list.
-
Start the NSO DRA instance
Start the NSO DRA if you plan to use Crosswork AI agents that require NSO data.
Before you start the NSO DRA instance, determine how NSO is deployed. To allow Crosswork AI to connect to NSO, you must provide the appropriate parameters and credentials, depending on your deployment type.
-
External NSO: For a standalone NSO deployment that runs on a separate VM or hardware, independent of Crosswork Network Controller, use these values:
-
nso_connection_type: Set todirect -
nso_http_host: Use NSO URL -
nso_role_<n>_name,nso_role_<n>_username, andnso_role_<n>_password: Use NSO credentials.
-
-
Embedded NSO (eNSO): For NSO that is embedded in Crosswork Network Controller, use these values:
-
nso_connection_type: Set tocnc_embedded -
nso_http_host: Use Crosswork Network Controller URL -
nso_role_<n>_name,nso_role_<n>_username, andnso_role_<n>_password: Use Crosswork Network Controller credentials.
-
-
External NSO accessed through Crosswork Network Controller: For an external NSO deployment where Crosswork Network Controller is used as a proxy, use these values:
-
nso_connection_type: Set tocnc_external -
nso_http_host: Use Crosswork Network Controller URL -
nso_role_<n>_name,nso_role_<n>_username, andnso_role_<n>_password: Use Crosswork Network Controller credentials.
-
To start the NSO DRA instance:
In your API client, create a request with the following details:
-
Method:
POST -
URL:
https://<crosswork-ai-host>/api/v1/dra-gateway/instance -
Headers:
Content-Type: application/json Accept: application/json -
Body:
{
  "typeId": "nso-type",
  "name": "<nso-dra-instance-name>",
  "configuration": {
    "nso_http_host": "<nso-or-cnc-url>",
    "nso_role_1_name": "<crosswork-ai-role-name>",
    "nso_role_1_username": "<nso-or-cnc-username>",
    "nso_role_1_password": "<nso-or-cnc-password>",
    "nso_connection_type": "<nso-connection-type>",
    "nso_restconf_root_resource": "restconf"
  }
}
Parameters:
-
typeId: DRA type. For the NSO DRA, usenso-type. -
name: Unique name for the DRA instance. -
nso_http_host: NSO or Crosswork Network Controller URL. The URL depends on the NSO connection type. -
nso_role_<n>_name,nso_role_<n>_username, andnso_role_<n>_password: One or more credential sets used to access NSO data. The credentials depend on the NSO connection type.-
The
namevalue in each credential set is used for RBAC. When a request is sent to the DRA, the DRA extracts the user’s role IDs from the request and uses thenamevalue to select the best matching credential set. If no credential set matches, the request is blocked. -
For the DRA to work, you must provide at least one set of credentials.
-
-
nso_connection_type: NSO connection type. Supported values aredirect,cnc_embedded, andcnc_external. -
nso_restconf_root_resource: RESTCONF root resource. Use this field to specify the correct prefix only if the RESTCONF root resource in NSO is notrestconf.
Verify Crosswork Network Controller integration
After you start the required DRA instances, verify that the required objects are created in Crosswork Network Controller.
-
Metric Manager BGP job
-
Choose Administration > Collection Jobs. The Collection Jobs page displays a list of all active jobs, including jobs dynamically initiated by the system, such as parameterized jobs.
-
Select Bulk jobs to verify that the Metric Manager BGP job (crosswork_ai_bgp_sensors) has been created.

The devices included in the
crosswork_ai_bgp_sensorsjob must support gNMI because the job collects BGP data using gNMI.
-
-
DLM tag:
crosswork-ai-tfdThe Crosswork Network Controller DRA creates the
crosswork-ai-tfdtag, but it does not assign the tag to devices. To send BGP data to Crosswork AI for Toxic Factor Detection, assign thecrosswork-ai-tfdtag manually to the devices for which BGP data must be collected.-
Choose Administration > Tag Management to verify that the
crosswork-ai-tfdtag has been created. -
Choose Device Management > Network Devices and select the devices you would like to tag.
-
Click the Modify tags icon. In the Edit tags pane, in the Associate tag field, type
crosswork-ai-tfd. -
Click the tag in the search result list to associate it with the device.
-
Click Save.
-
-
Credentials profile:
crosswork-ai-profile-
Choose Device Management > Credential Profiles. The page displays all created profiles.
-
Verify that
crosswork-ai-profilehas been created.
-
-
Provider:
crosswork-ai-provider-
Choose Administration > Manage Provider Access. The page displays all configured providers with details such as name, UUID, credential profile, and connectivity status.
-
Verify that
crosswork-ai-providerhas been created.
The provider includes a dynamic CNC DRA parameter that changes whenever the CNC DRA instance is recreated. If you reinstall Crosswork AI or recreate the CNC DRA instance, delete the existing
crosswork-ai-providerprovider from the Crosswork Network Controller UI before creating the new DRA instance.
-
Launch Crosswork AI from Crosswork Network Controller
After you complete the Crosswork Network Controller integration, you can launch Crosswork AI from the Crosswork Network Controller user interface.
To launch Crosswork AI from Crosswork Network Controller, click  . Crosswork AI opens in a new browser tab.

Get started with Crosswork AI
Crosswork AI dashboard
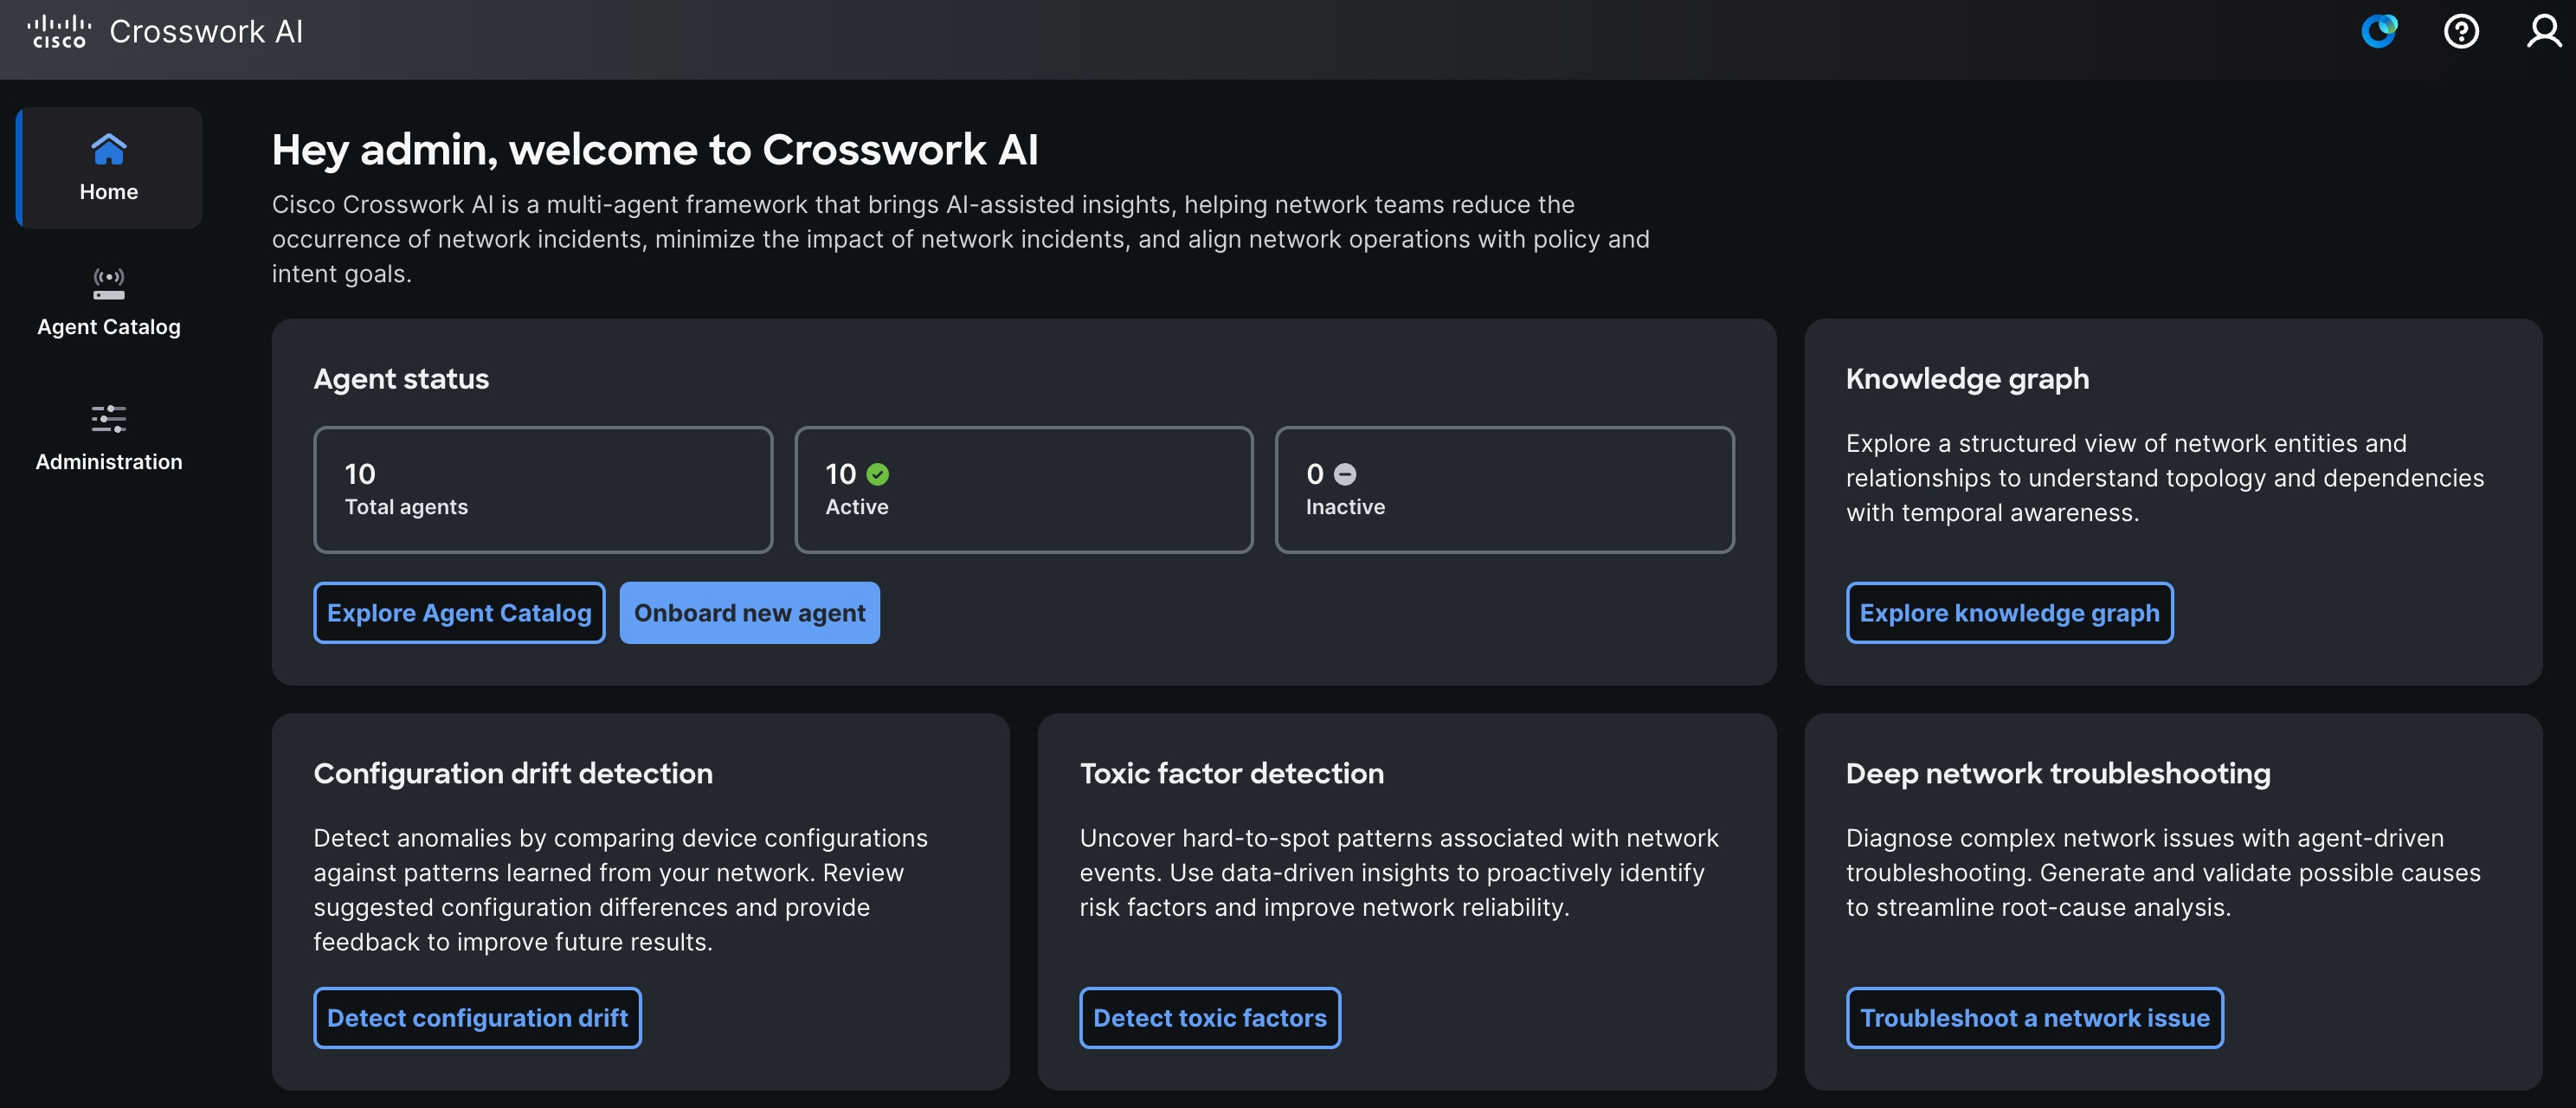
The Crosswork AI dashboard provides a summary of the available agents, their status, and quick access to the key workflows. You can:
-
View the total number of agents and see how many are active or inactive.
-
Open the Agent Catalog to review available agents.
-
Start built-in agent workflows:
-
Configuration Drift Detection
-
Toxic Factor Detection
-
Deep Network Troubleshooting.
-
-
Open Knowledge Graph to explore network entities, relationships, topology, and dependencies.
When you start an agent from a tile, such as Detect configuration drift, AI Assistant opens in a side panel and guides you through the agent workflow.
-
Access the Administration menu to manage system settings, software updates, certificates, users and roles, AAA, audit logs, and backup and restore operations.
Agent Catalog
Use Agent Catalog to manage and organize AI agents in Crosswork AI. Each agent card shows the agent name, status, source, tags, and description.
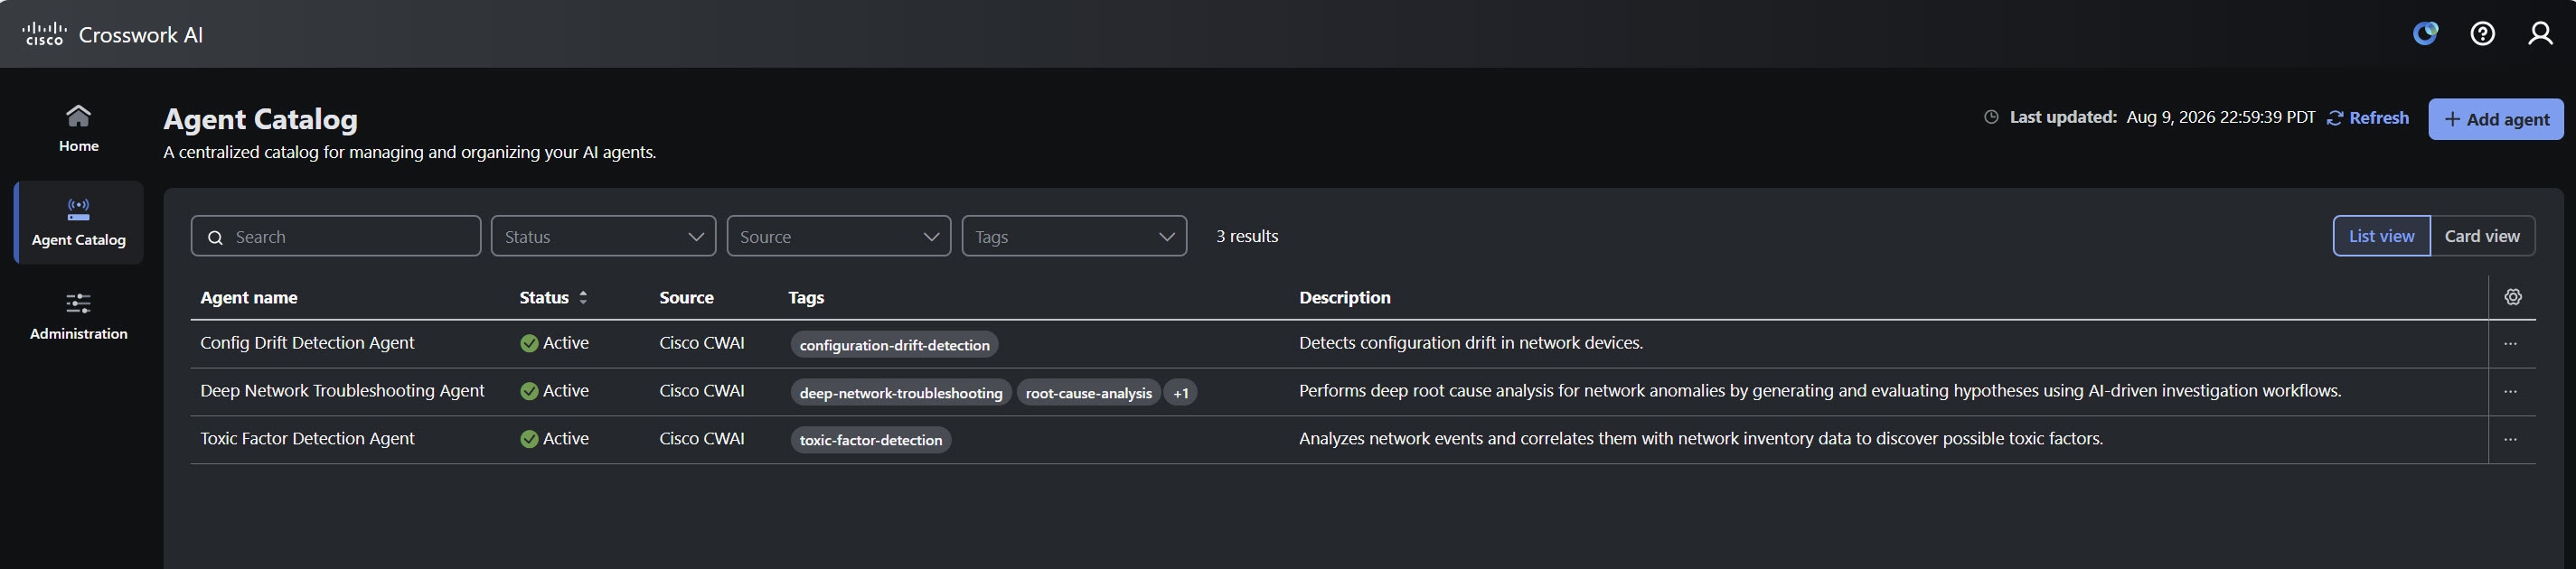
Agent Catalog includes built-in agents and custom agents.
-
Built-in agents: Agents that are included with Crosswork AI, such as Configuration Drift Detection, Toxic Factor Detection, and Deep Network Troubleshooting.
-
Custom agents: Agents that users with the required permissions can add to Crosswork AI.
Onboard a new agent
Use Add agent to onboard a custom agent to Crosswork AI.
-
Open Agent Catalog.
-
Click Add agent.
-
To review the expected bundle structure, click Download bundle template.
The template includes the required metadata file and an empty image file. Use the metadata file to define agent information such as the agent name, source, tags, and other required fields. The empty image file shows that the bundle must include an image artifact, but the image must be replaced with the actual agent image before you upload the bundle.
-
Upload the agent bundle.
The supported bundle format is
.tar.
-
Select the user roles authorized to use this agent.
-
Optionally select existing tags or add custom tags to organize the agent.
-
Click Add agent.
View and manage agents
To manage an agent:
-
In Crosswork AI, choose Agent Catalog.
-
Switch between list view and card view as needed.
-
Search for an agent by name or use filters to narrow the list by status, source, or tags.
-
Click the more options menu (…) on the agent card or row.
-
Select the action you want to perform.
Available actions depend on the agent type, status, and permissions assigned to the user.
-
Agent details: View additional information about the agent, such as status, source, version, date added, tags, user roles, and description.
-
Update: Replace the uploaded agent bundle or update agent metadata. This option applies to custom agents.
-
Activate or Deactivate: Change whether the agent is available for new runs.
-
Delete agent: Remove an inactive custom agent.
-
A deactivated agent cannot be used to start new runs. Agent runs that are already in progress continue until they complete.
Administration
Use Administration to manage system-level settings and operational controls for Crosswork AI. Administration includes areas for system details, software updates, backup and restore operations, certificates, users and roles, AAA, audit logs, and system settings.
Refer to Crosswork AI Administration for details.
Knowledge Graph Explorer
Use Knowledge Graph to explore network entities and the relationships between them, understand topology and dependencies across the network, and inspect the context available to Crosswork AI agents. You can browse entity types, review attributes and relationships, inspect available instances, and query graph data using GraphQL.
Refer to Crosswork AI Knowledge Graph Explorer for details.
Observability Service
Use the observability service to gain visibility into agentic flows across agents, services, and LLM-related activity through logs, metrics, and traces. OpenTelemetry-based observability helps you follow request flows, understand agent execution behavior, review LLM and tool usage, and forward observability data to external OTEL endpoints.
Refer to Crosswork AI Observability for details.
AI Assistant
AI Assistant provides a conversational interface for working with Crosswork AI agents. You can ask questions, start agent workflows, and review previous agent tasks.
When you start a workflow from an agent tile, AI Assistant opens in a side panel. It provides suggested prompts or presents options for running agents and listing scheduled tasks for on-demand or scheduled execution.
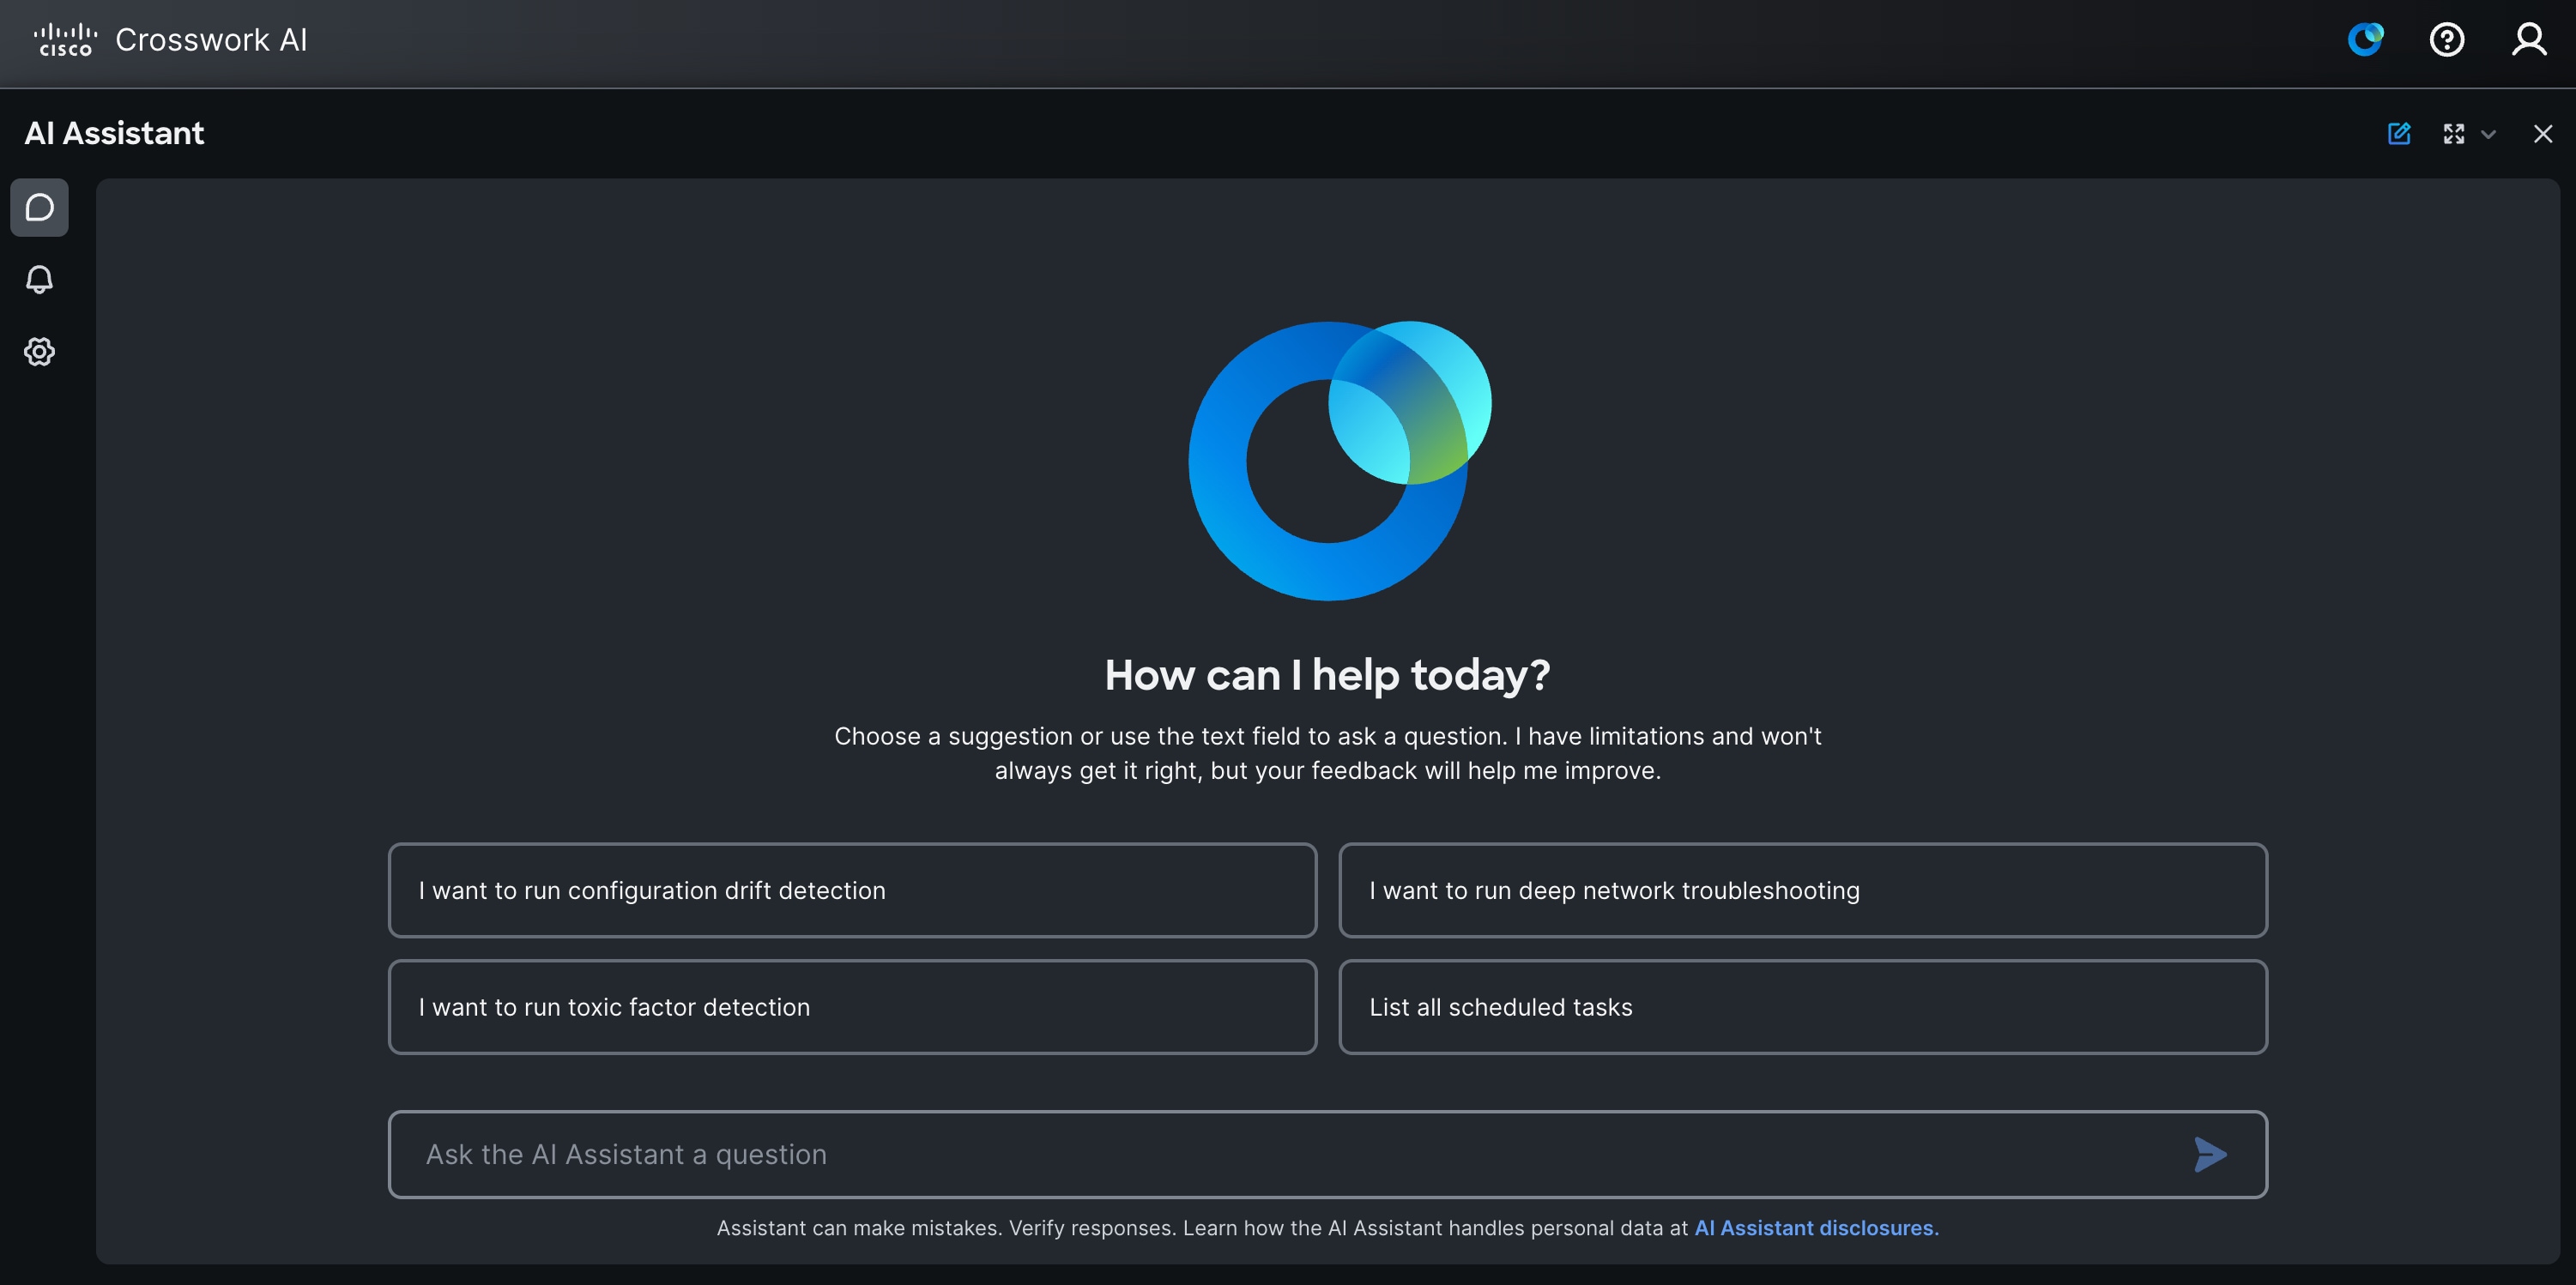
Ask a question or start an agent workflow
-
Click
in the top menu bar. Alternatively, click an agent tile on the home page. -
Select a suggested prompt or enter your question in the text field.
-
Review the response and follow any prompts from the assistant.
Work with threads
-
AI Assistant saves conversations as threads, so you can return to previous prompts and responses or start a new thread.
-
Click
 to start a new conversation with the AI Assistant.
 -
Click
 to open the history of previous threads.
Change the AI Assistant view
-
Click
 to change how AI Assistant appears.
 -
Switch between Docked, Floating window, Full screen, and New browser tab as needed.
Review AI Assistant notifications
-
Click
 to view AI Assistant notifications.
AI Assistant notifications inform you about results and errors from agent tasks. When new notifications are available, a number indicator appears on the icon and shows the total count of unread items.
-
To enable or disable alerts from AI Assistant, click
 to manage your preferences.
Account preferences
To manage account preferences, click  in the header. From the user menu, you can:
-
Change the color theme
-
Change your password
-
Log out
Troubleshooting
Collect tech support logs
Showtech is the primary tool for collecting logs and system information for troubleshooting. If you encounter a problem that you cannot resolve, or if Cisco Support requests diagnostic information, generate and download a showtech archive from the UI.
To collect tech support logs:
-
From the main menu, choose Administration > System Details. Click Actions and then select Request all.
The system creates a showtech job and automatically opens the Showtech tab. The job can take several minutes to complete while the system collects logs and diagnostic information.
-
In the Showtech tab, monitor the job status.
-
After the job is complete, download the showtech archive.
-
Share the archive file with Cisco Support for further troubleshooting.
Bootstrap process fails
Bootstrap can fail because of insufficient VM resources, incorrect network settings, DNS or NTP reachability issues, proxy configuration problems, or TFTP server reachability issues. The bootstrap UI might not show the exact failure reason. Use acs health from the VM console to view detailed health checks and identify the failing component.
To troubleshoot bootstrap failure:
-
Open the VM console for the Crosswork AI node.
-
Check system health
acs health
-
Review the output and correct the issue reported by
acs health. -
If the bootstrap parameters are incorrect, reset the system.
acs reboot factory-reset -
Repeat the bootstrap process and sign in again to the Crosswork AI management IP.
Cross-launch from Crosswork Network Controller does not open Crosswork AI
If the Crosswork AI launch icon is not available or the cross-launch fails, verify that:
-
The Crosswork AI provider exists in Crosswork Network Controller.
-
SSO is configured between Crosswork Network Controller and Crosswork AI.
-
The FQDN or IP address used during setup is consistent across SSO, mTLS, and provider configuration.
Sign-in fails
Sign-in can fail if your assigned role is not configured in Crosswork AI. Contact your administrator to add the role, then try again.
The role name in Crosswork AI must match the role provided by the identity provider.
BGP session down events are not included in Toxic Factor Identification
If BGP session down events are not included in Toxic Factor Identification analysis, verify that:
-
The
crosswork-ai-tfdtag exists in Crosswork Network Controller and is assigned to each device for which you want to collect BGP data. Devices without this tag are not included in BGP session down event analysis. -
mTLS is configured for BGP data transfer.