
Crosswork AI Administration
The Administration menu allows you to monitor and maintain Crosswork AI, manage software and backups, configure security and access, review audit activity, and update system settings.
To access administration, sign in to Crosswork AI and choose Administration from the main menu.
For deployment, system bringup, and initial integration setup, refer to Crosswork AI Getting Started doc.
Check system health and collect diagnostics
System Details help you monitor the health of the Crosswork AI system, applications, and pods. You can review the system configuration, monitor CPU, memory, and file system usage, and collect diagnostic information when a problem requires further investigation.
Review system status and resource usage
Review the system status and resource usage to confirm that Crosswork AI is operating normally and has sufficient CPU, memory, and file system capacity.
To review the system status and resource usage:
-
Choose Administration > System Details.
-
In Summary, review the overall status of the system.
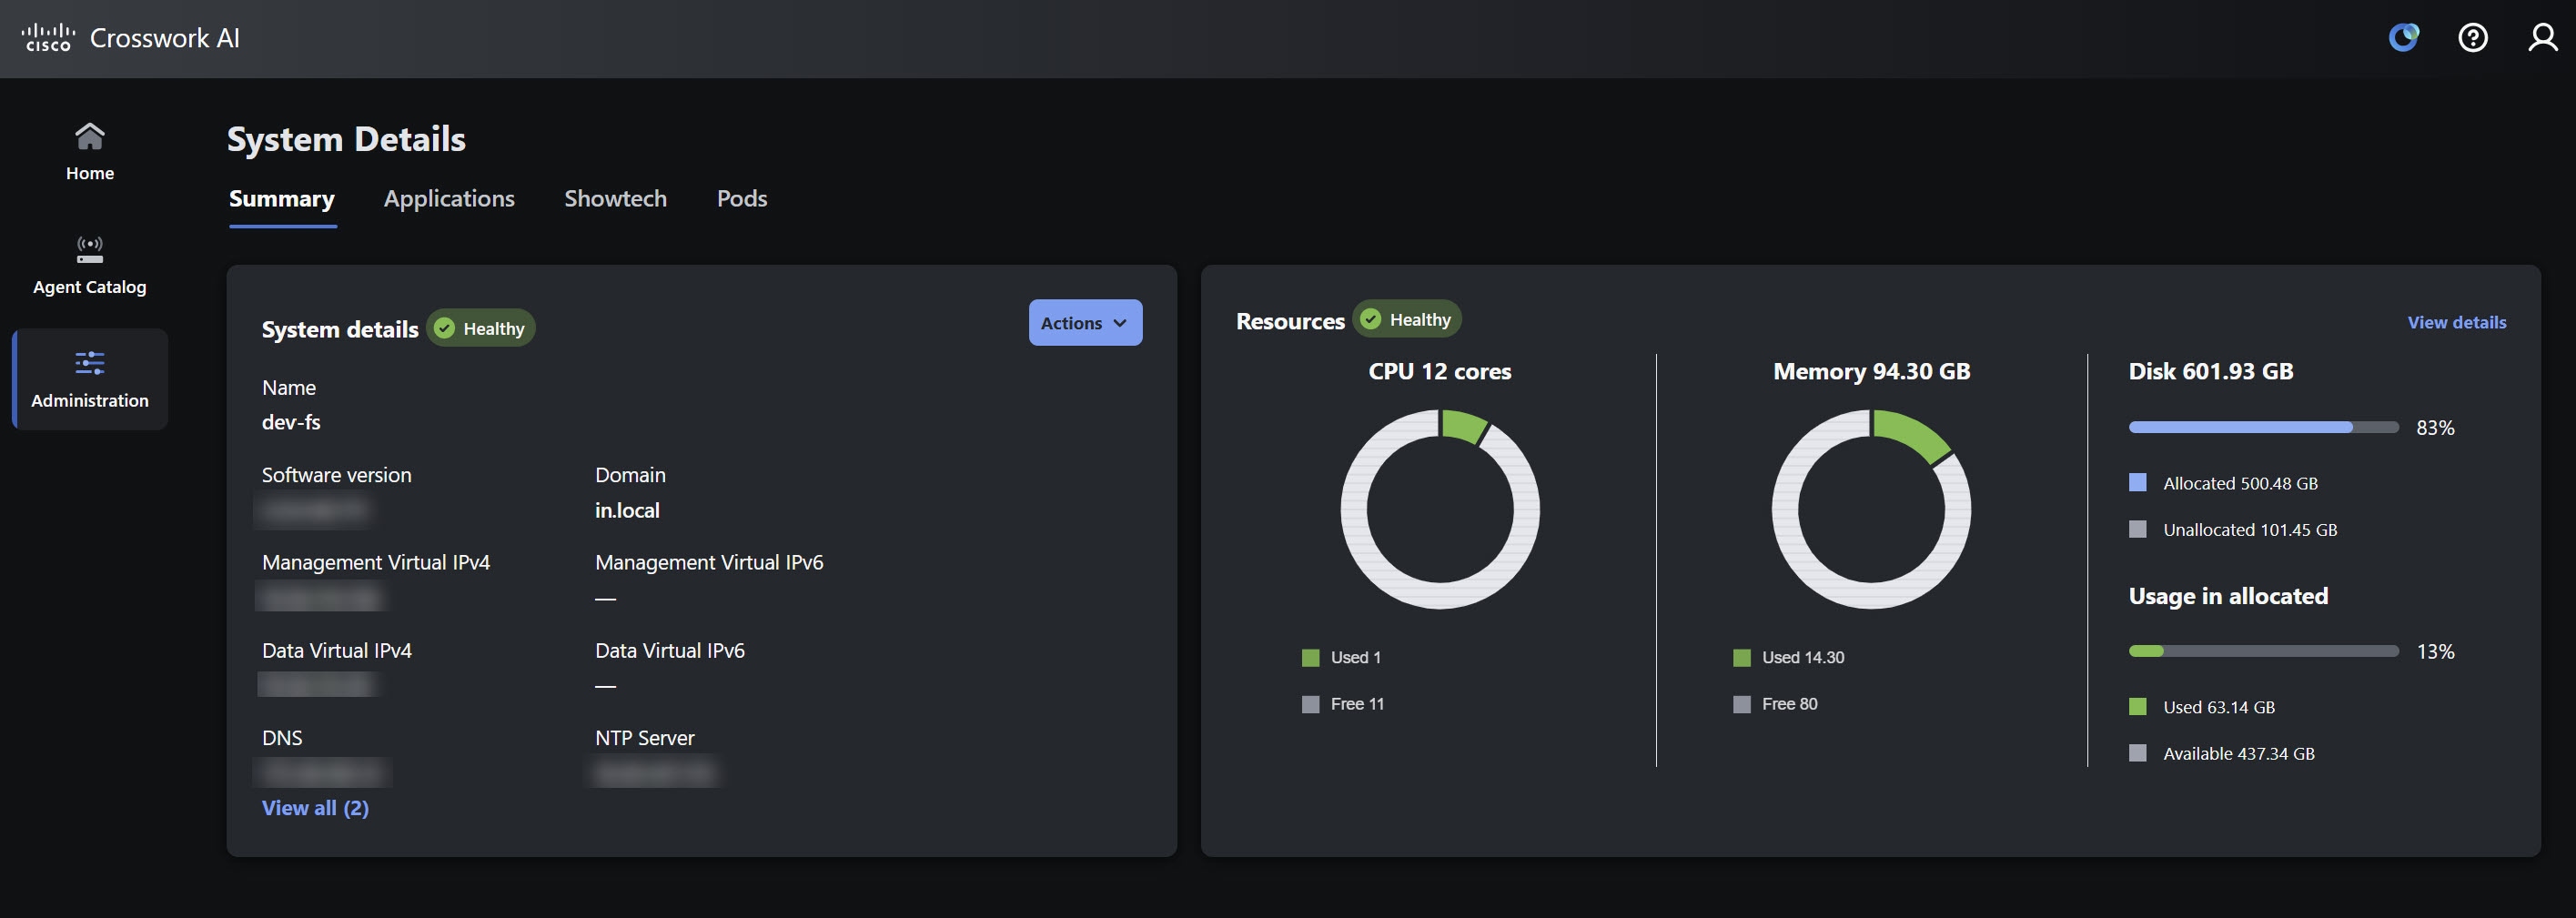 Figure 1. System details - summary
 -
Review the system information:
-
Name: Name assigned to the Crosswork AI system during system bringup.
-
Software version: Currently installed Crosswork AI software version.
-
Domain: Domain configured for the system.
-
Management Virtual IPv4 and Management Virtual IPv6: Virtual IP addresses used for management access.
-
Data Virtual IPv4 and Data Virtual IPv6: Virtual IP addresses used for the data network.
-
DNS: DNS server configured for the system. If multiple DNS servers are configured, select View all to display the complete list.
-
NTP Server: NTP server used to synchronize the system time.
-
-
In Resources, review the overall resource status and current usage:
-
CPU shows the percentage of CPU in use and the number of cores in use.
-
Memory shows the percentage and amount of memory in use.
-
Disk and Usage in allocated shows the percentage and amount of storage capacity in use.
-
-
Select View details to review additional resource information.

Resource metrics are retained for up to two days. Data outside this period is not available.
-
Choose Actions to access related administration tasks:
-
System settings opens the system configuration settings.
-
Software upgrade opens software management.
-
Request all generates a Showtech archive that contains logs and diagnostic information. Refer to Collect tech support logs for instructions.
-
Review application status
Review the application status to monitor the platform infrastructure or the Crosswork AI application microservices. Each application includes multiple microservices that work together to provide platform or product functionality.
To review application status:
-
Choose Administration > System Details and select Applications.
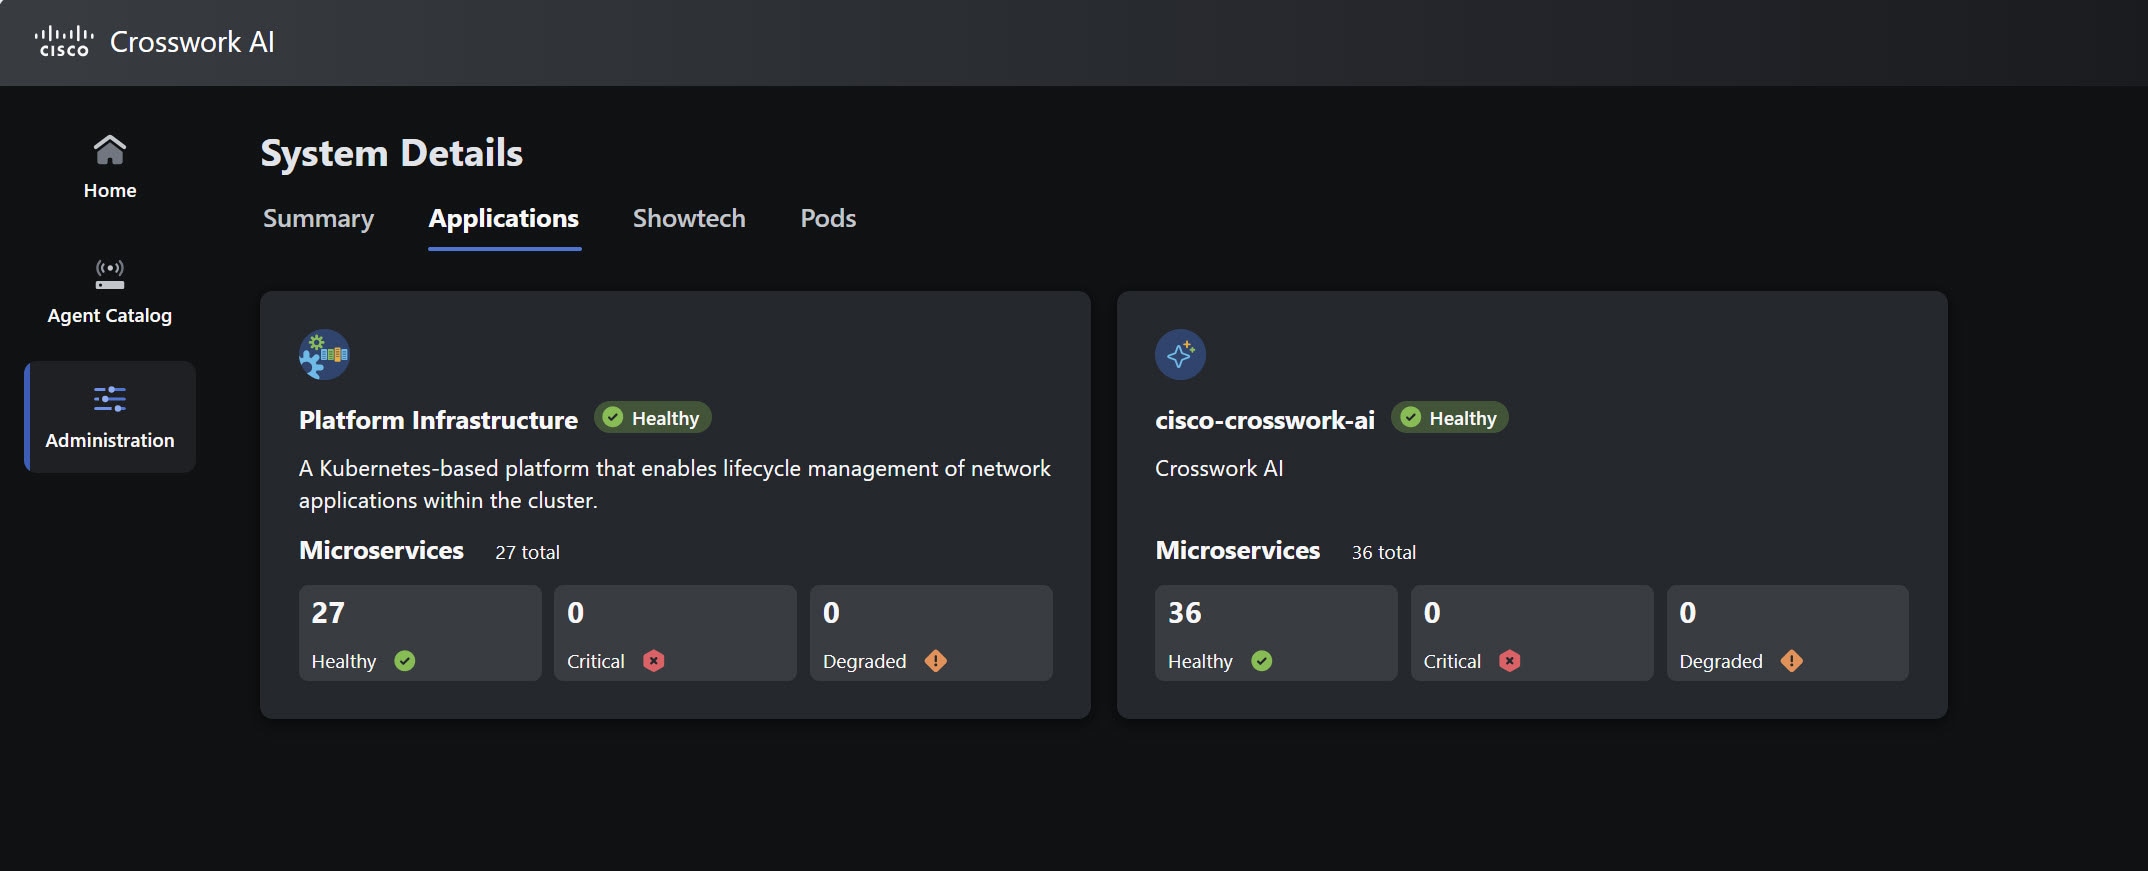 Figure 2. System details - applications
 -
Review the overall status of Platform Infrastructure and cisco-crosswork-ai.
-
For each application, the system displays the total number of microservices and the number reported as Healthy, Critical, or Degraded.
-
Select an application to review more information.
-
In Overview, review the overall application details. You can also choose Actions to access System settings and Software upgrade.
-
In Microservices, review the services that make up the application. For each microservice, the system displays its name, type, status, creation time, and uptime. Use search or filter by status to locate a specific microservice or identify services that are not operating normally.
-
In Jobs, review jobs associated with the application. Use search or filter by health status to locate a specific job or investigate an unsuccessful operation.
-
Collect tech support logs
Showtech is the primary tool for collecting logs and system information for troubleshooting. If you encounter a problem that you cannot resolve, or if Cisco Support requests diagnostic information, generate and download a Showtech archive.
To collect tech support logs:
-
Choose Administration > System Details.
-
Choose Actions > Request all.
The system creates a Showtech job and opens Showtech. The job can take several minutes to complete while the system collects logs and diagnostic information.
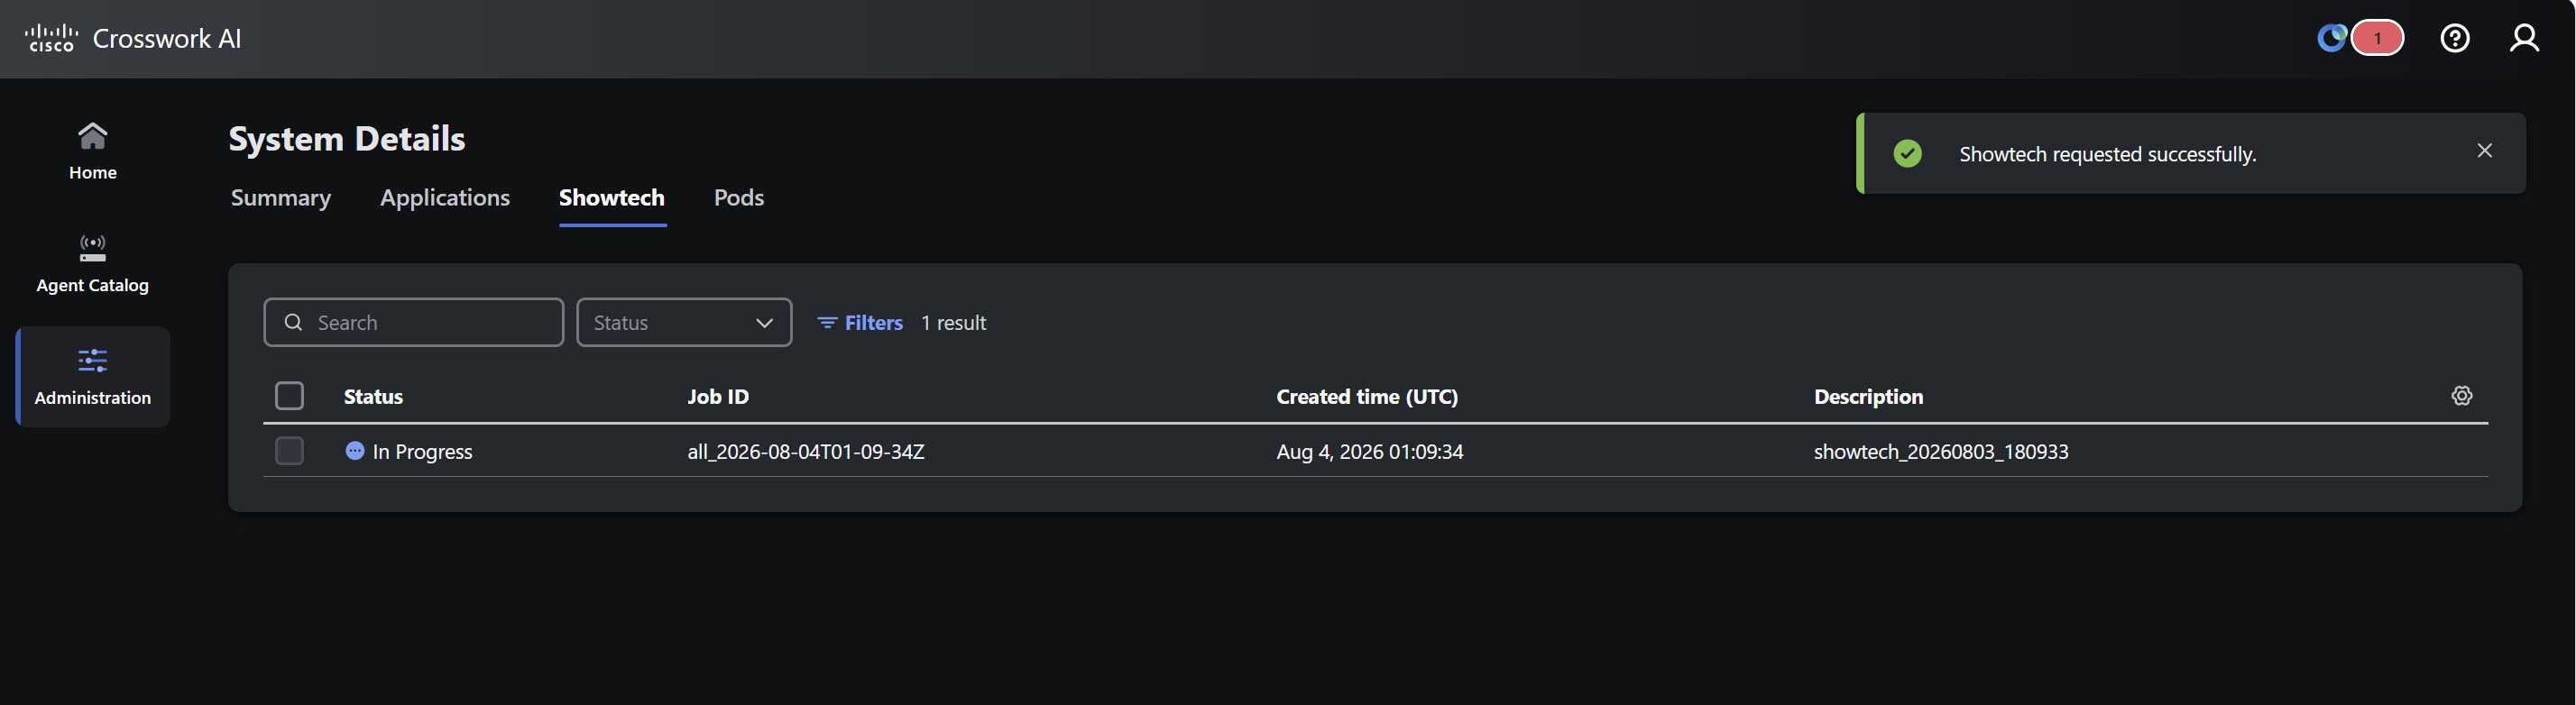 Figure 3. System details - showtech
 -
Monitor the job status.
-
After the job is complete, download the Showtech archive.
-
Share the archive file with Cisco Support for further troubleshooting.
Review pod status
Crosswork AI runs platform services, application services, agents, and agent tasks in Kubernetes pods. Review the pod status when an application includes critical or degraded microservices or when you need more detailed information about a system problem.
To review pod status:
-
Choose Administration > System Details and select Pods.
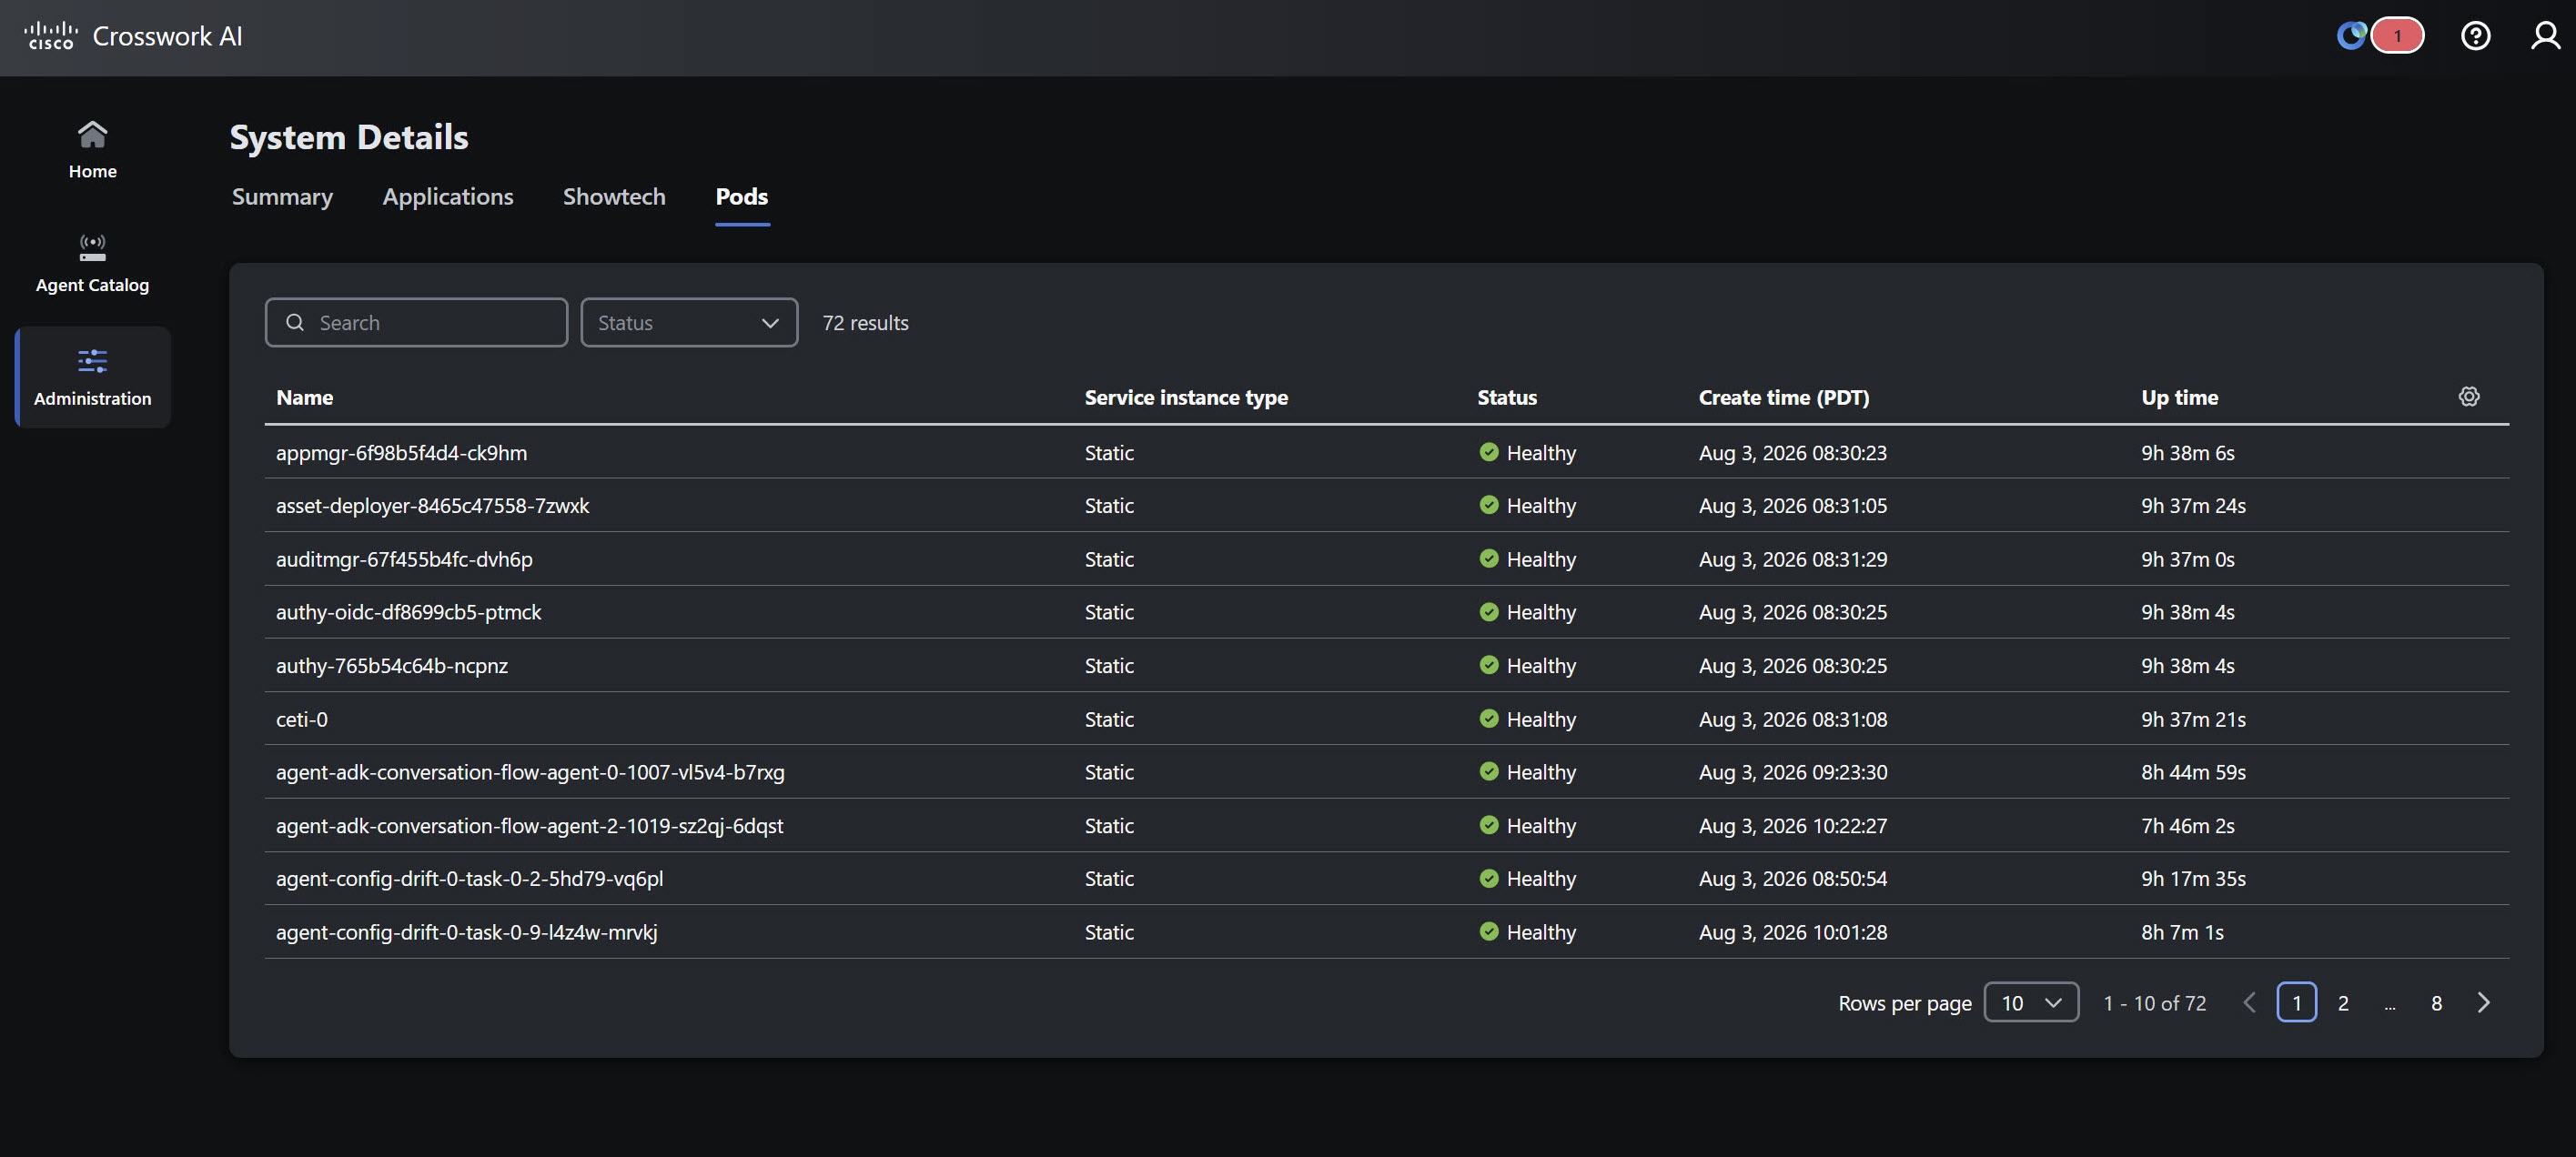 Figure 4. System details - pods
 -
Review the name, type, and current status, creation time, and uptime of each pod.
The creation time and uptime indicate when the pod was created and how long it has been running.
-
Use Search to locate a specific pod, or use Status to display pods with a particular status.
Manage software images
Software Management allows you to view installed Crosswork AI versions, add a new software image, and monitor installation status.
View installed software
Review the currently installed system and application versions before adding or installing a new software image.
To review the installed software:
-
Choose Administration > Software Management.
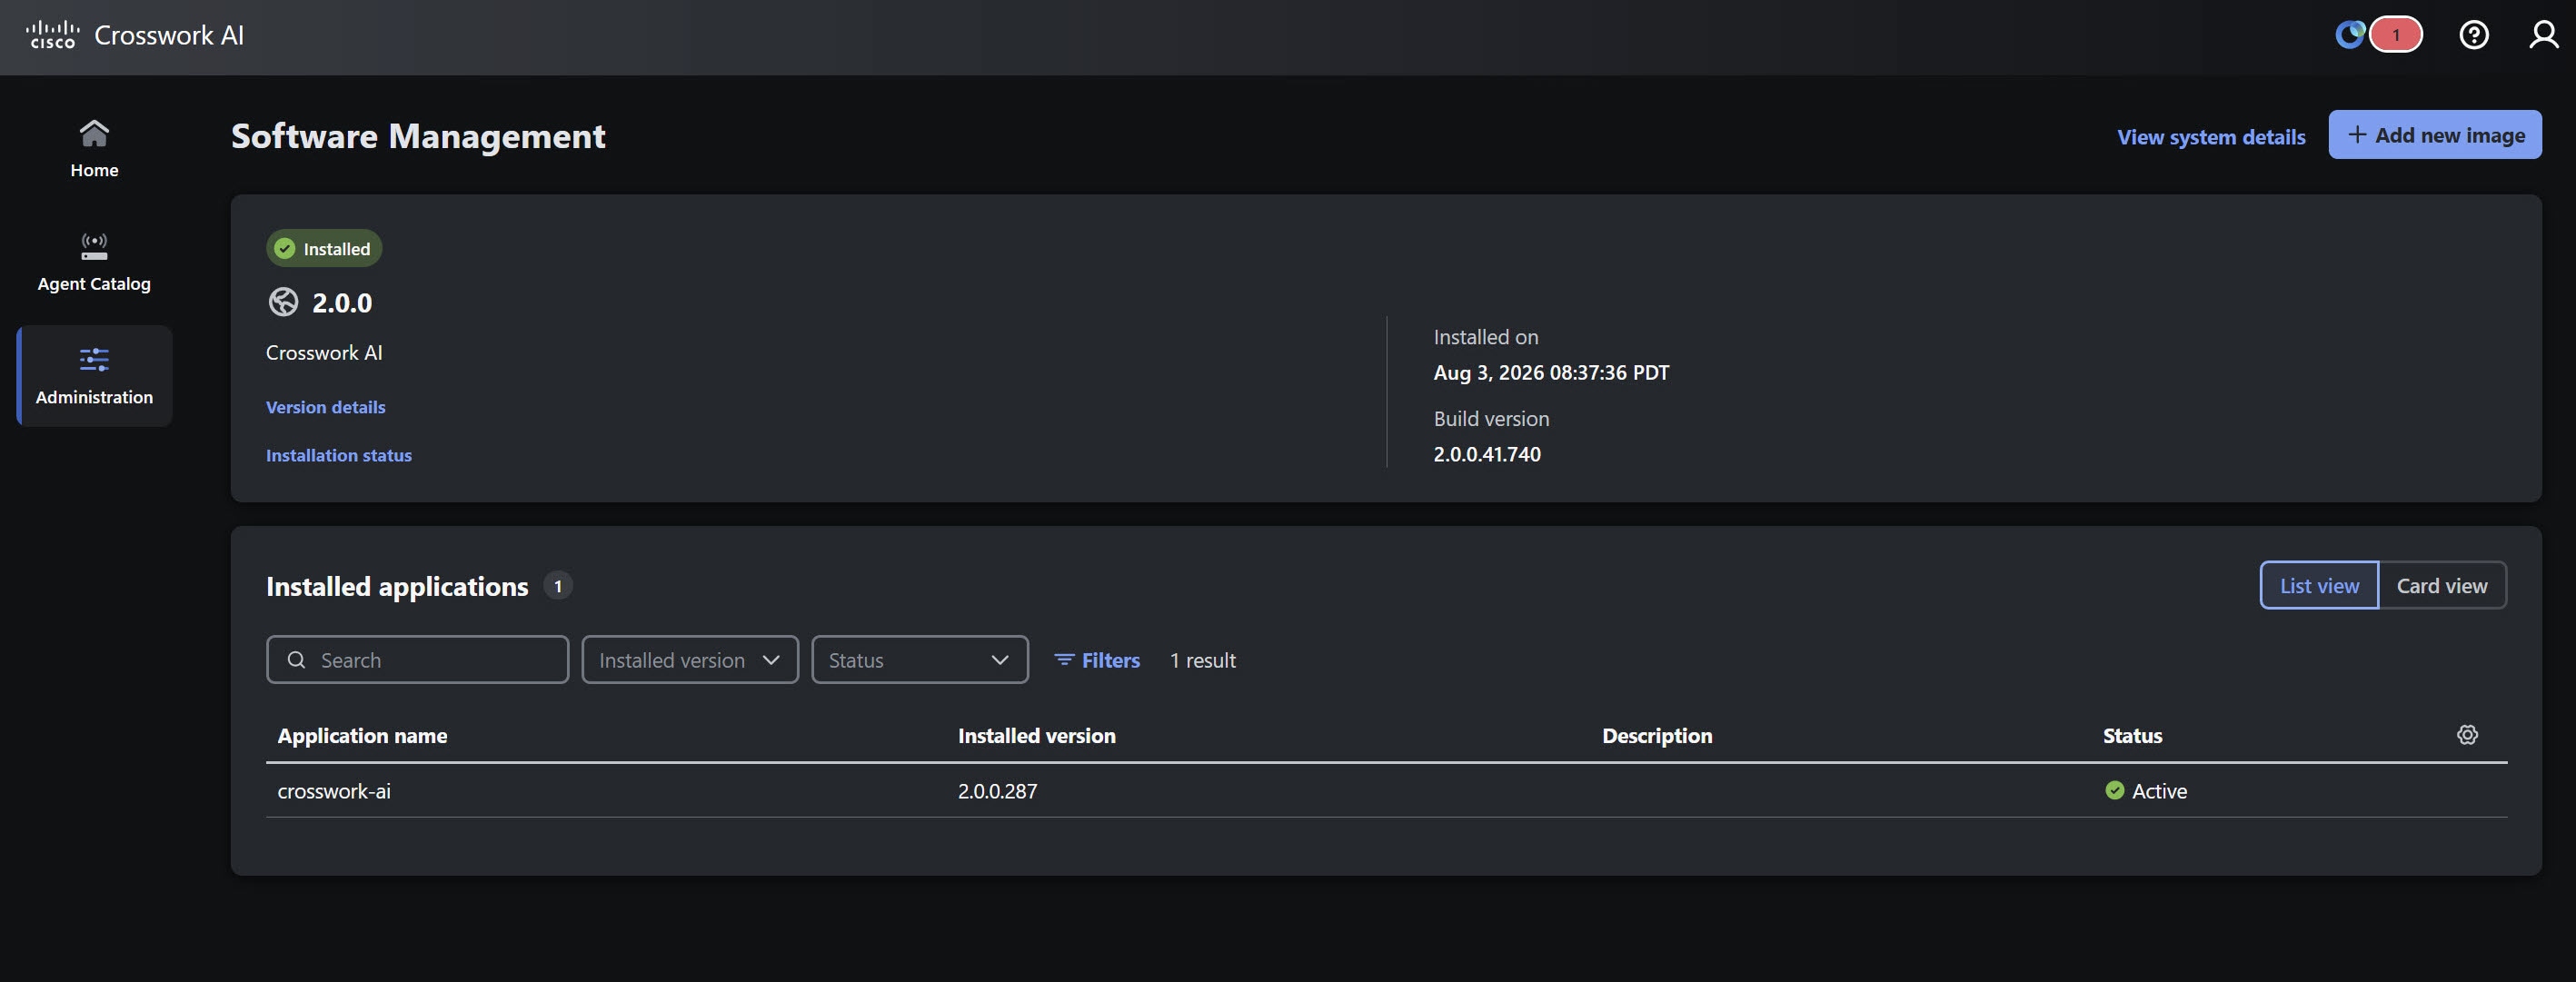 Figure 5. Software management
 -
Review the installed Crosswork AI release, installation date, and build version.
The Installed applications list also displays the installed version and status of each application.
-
Select Installation status to review the status of the installed image.
The installation status includes the system name, version, overall status, and the checks completed during installation.
-
Use Search or filter by installed version and status to narrow the results.
-
To review additional system information, select View system details.
Add a software image
To install a new Crosswork AI image, first add the corresponding software image to the system. You can upload the image from your local system or transfer it from an HTTP, SFTP, or SCP server. The image must be in .iso format.
Before you begin
Before adding a software image:
-
Obtain the
.isoimage for the Crosswork AI release that you plan to install. -
If the image is stored on a remote server, ensure that Crosswork AI can reach the server over the management network.
-
For an authenticated HTTP, SFTP, or SCP connection, obtain the server address, image location, and credentials required to access the image.
-
For SFTP or SCP, ensure that the account has permission to read the image from the specified server path.
To add a software image:
-
Choose Administration > Software Management, and then select Add new image.
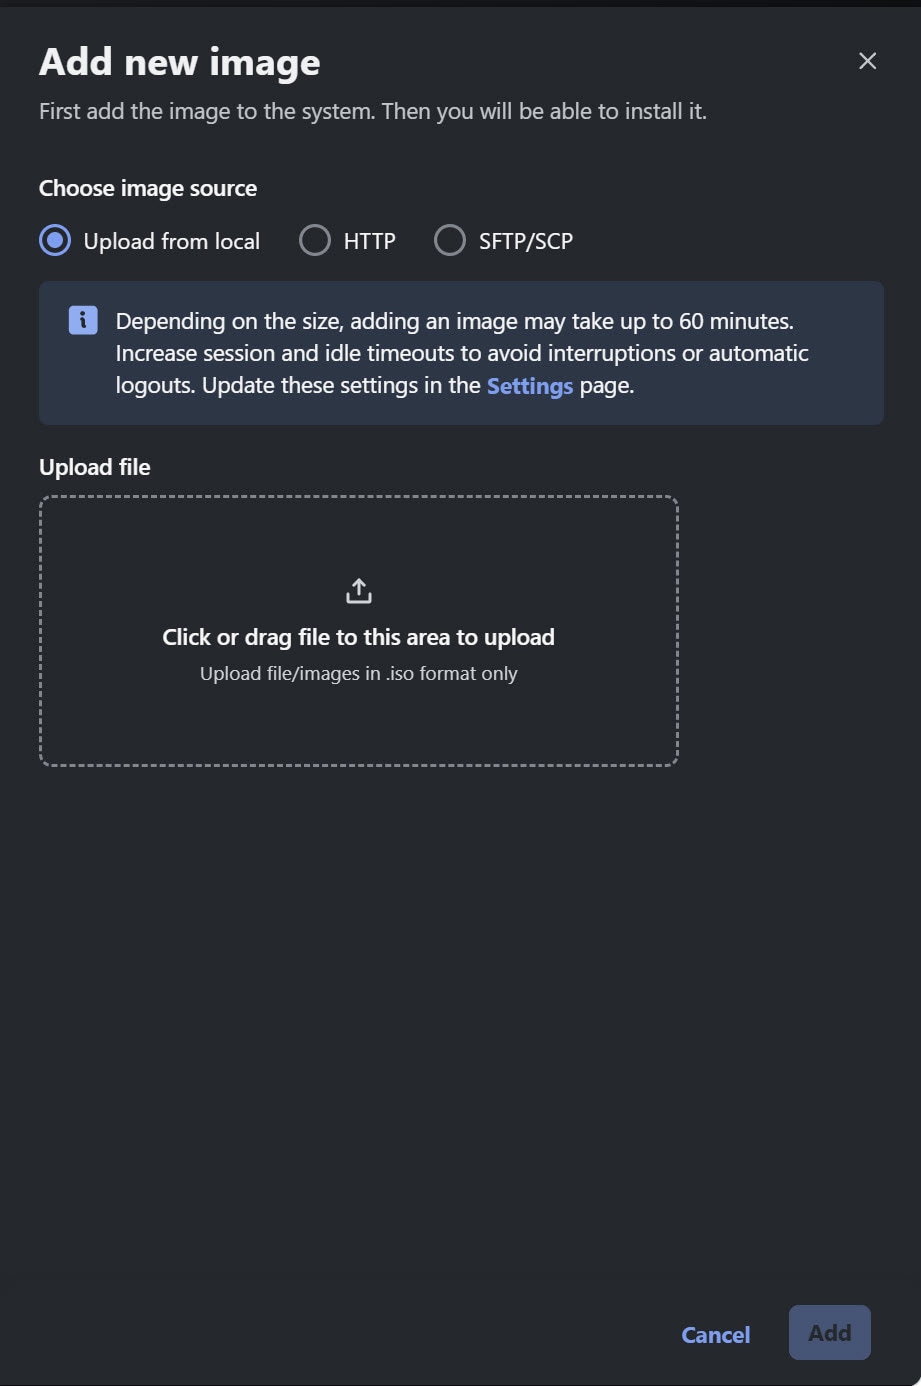 Figure 6. Add new image
 -
Select the image source:
-
Upload from local: To upload from the local system, select the upload area to locate the
.isoimage on your system, or drag the image into the upload area. -
HTTP: To upload using HTTP:
-
Enter the URL of the iso image.
-
Select Skip TLS verification if TLS certificate verification is not required for the connection.
-
If the server requires authentication, enable authentication and enter the username and password.
-
-
SFTP/SCP: To upload the image from an SFTP/SCP server:
-
For Choose storage server, choose a configured server or select Create new server.
-
To create a server, enter a name and, optionally, a description.
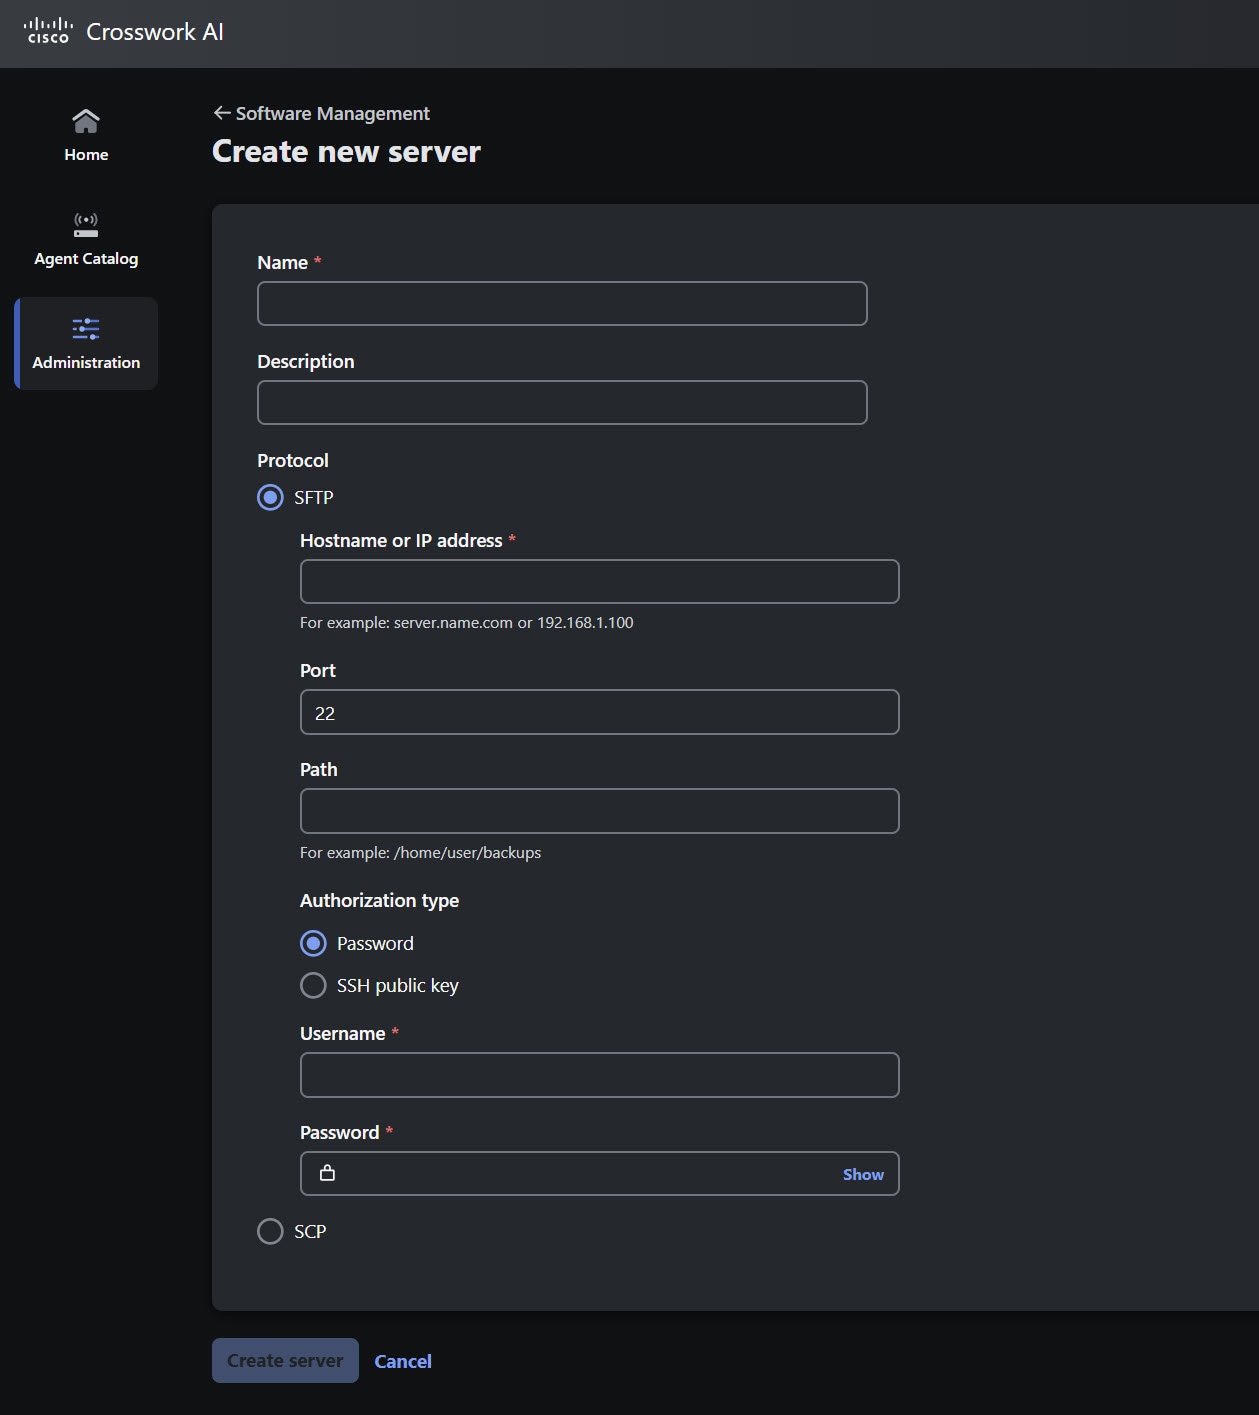 Figure 7. Create a new server
 -
Select SFTP or SCP.
-
Enter the hostname or IP address of the server.
-
Enter the server port. The default port is
22. -
Enter the path on the server, if required.
-
For Authorization type, select Password or SSH public key.
-
If you selected Password, enter the username and password used to access the server.
-
Select Create server.
-
In the Add new image panel, select the new server and enter the File path to the
.isoimage.
-
-
-
Select Add.
The system transfers the image from the selected source. After the image is added successfully, it becomes available for installation.
Depending on the image size, adding an image may take up to 60 minutes. Increase the session and idle timeout values as needed to avoid interruptions or automatic logouts. Update these settings in Administration > AAA > Settings.
Back up and restore Crosswork AI
Backup and Restore allows you to protect the Crosswork AI configuration and data. You can create a backup when needed, schedule recurring backups, and restore the system from a previously created backup.
Crosswork AI supports the following backup types:
-
Config-Only: Includes device configurations, network settings, and user preferences. The estimated backup size is 500 MB.
-
Full: Includes device data, configurations, logs, and user files. The estimated backup size is 10 GB.
Before you begin
-
SCP is the supported remote backup destination. Ensure that you have a secure SCP server with adequate space for backups.
-
Obtain the hostname or IP address of the SCP server, a file path on the server for storing backup files, and user credentials with SSH access and read and write permissions to that path.
-
Only one local backup can exist at a time.
-
Only one schedule can be configured for each backup type.
-
Only one backup or restore operation can run at a time.
-
Avoid using the system during a backup or restore operation. A backup takes the system offline for about 10 minutes. A restore can take longer and pauses other operations.
Create an on-demand backup
Create an on-demand backup to save either the current configuration data or configuration and operational data.
To create an on-demand backup:
-
Choose Administration > Backup and Restore and then select Create backup.
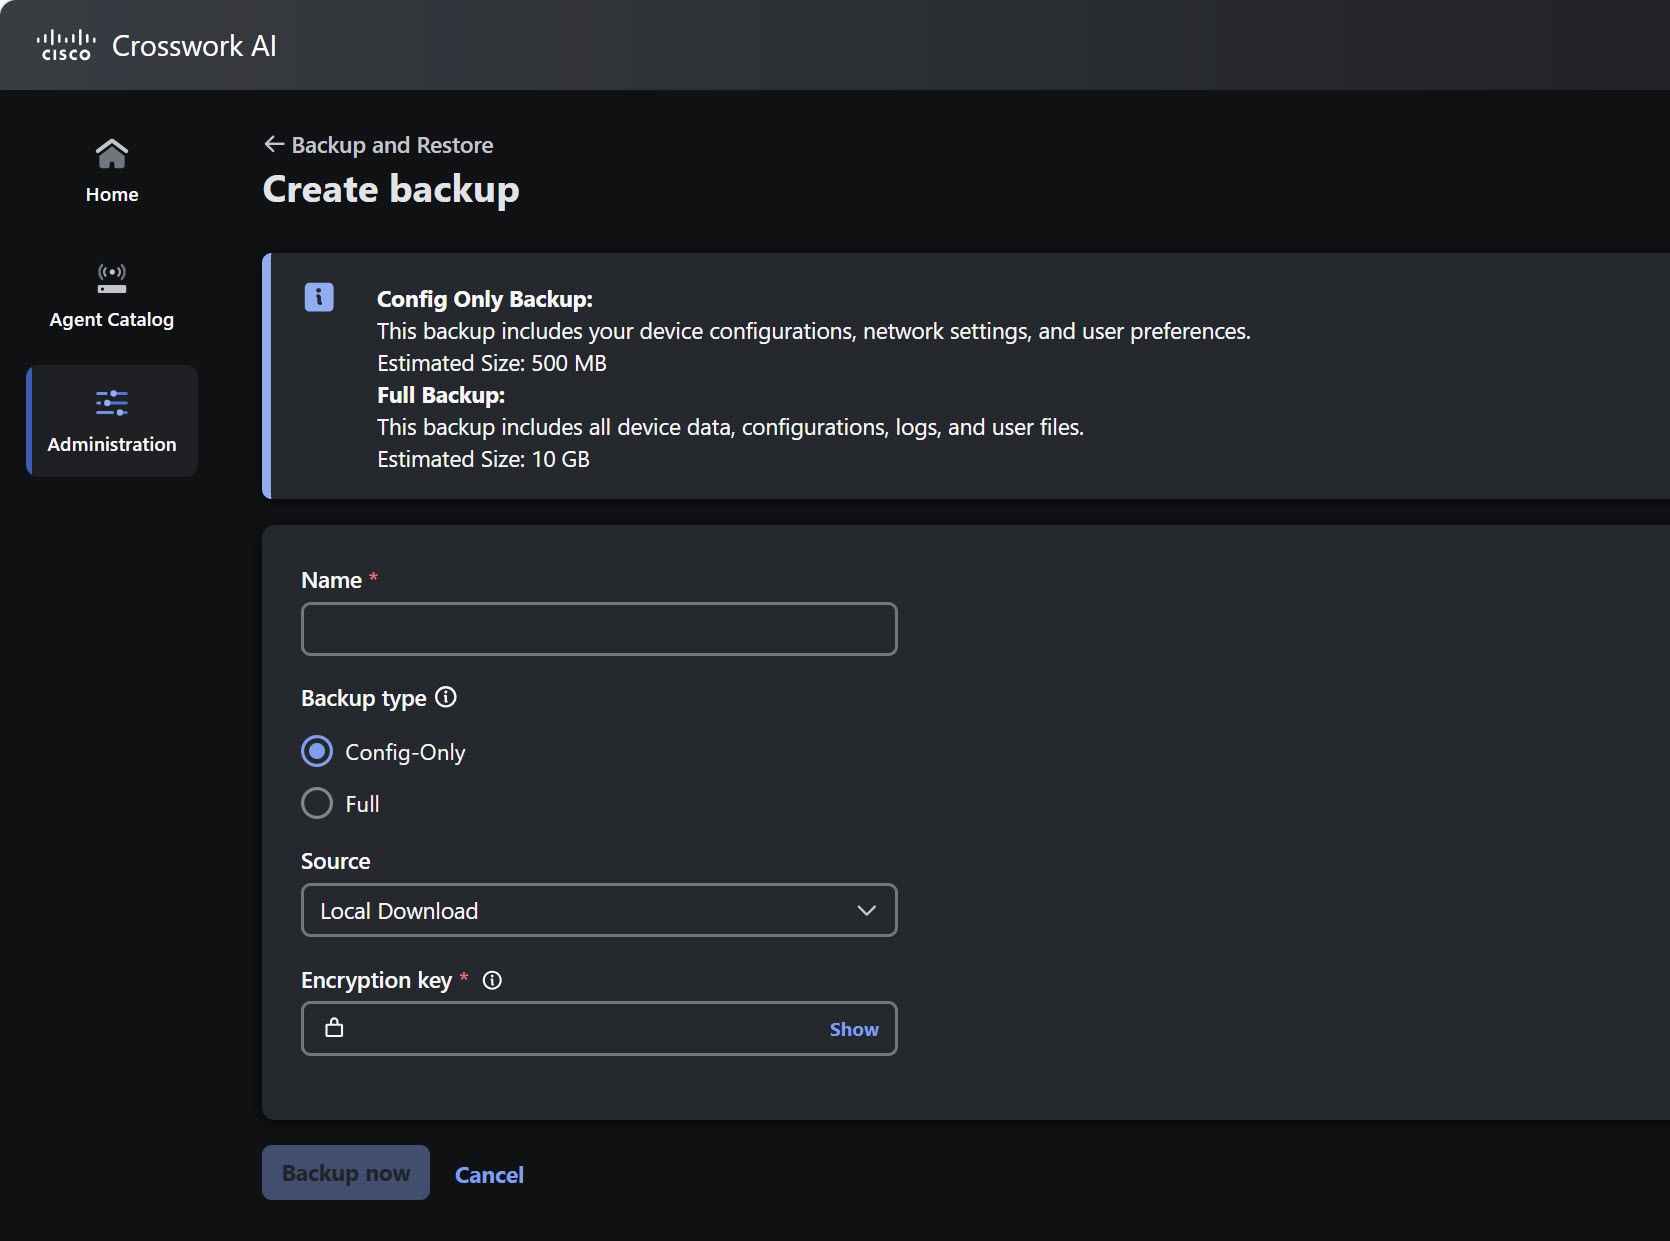 Figure 8. Create backup
 -
Enter a name for the backup.
-
For Backup type, select one of the following:
-
Config-Only to back up device configurations, network settings, and user preferences.
-
Full to back up device data, configurations, logs, and user files.
-
-
For Source, select Local download or Remote location as the backup destination.
-
For a remote backup, select a configured SCP server or select Create remote storage location.
To create a remote storage location, refer to Configure remote storage.
-
-
Enter an encryption key.
Store the encryption key securely. You must provide it as the decryption key when restoring the backup.
-
Select Backup now.
The system creates a backup job and adds it to the job list with the current status.
-
Monitor the backup progress under Job details.
While the backup is running, some operations may be temporarily unavailable or may respond more slowly than usual.
Schedule recurring backups
Schedule recurring backups to create recovery points automatically at regular intervals. Scheduled backups require a configured remote SCP location.
To schedule recurring backups:
-
Choose Administration > Backup and Restore, and then select Schedule backup.
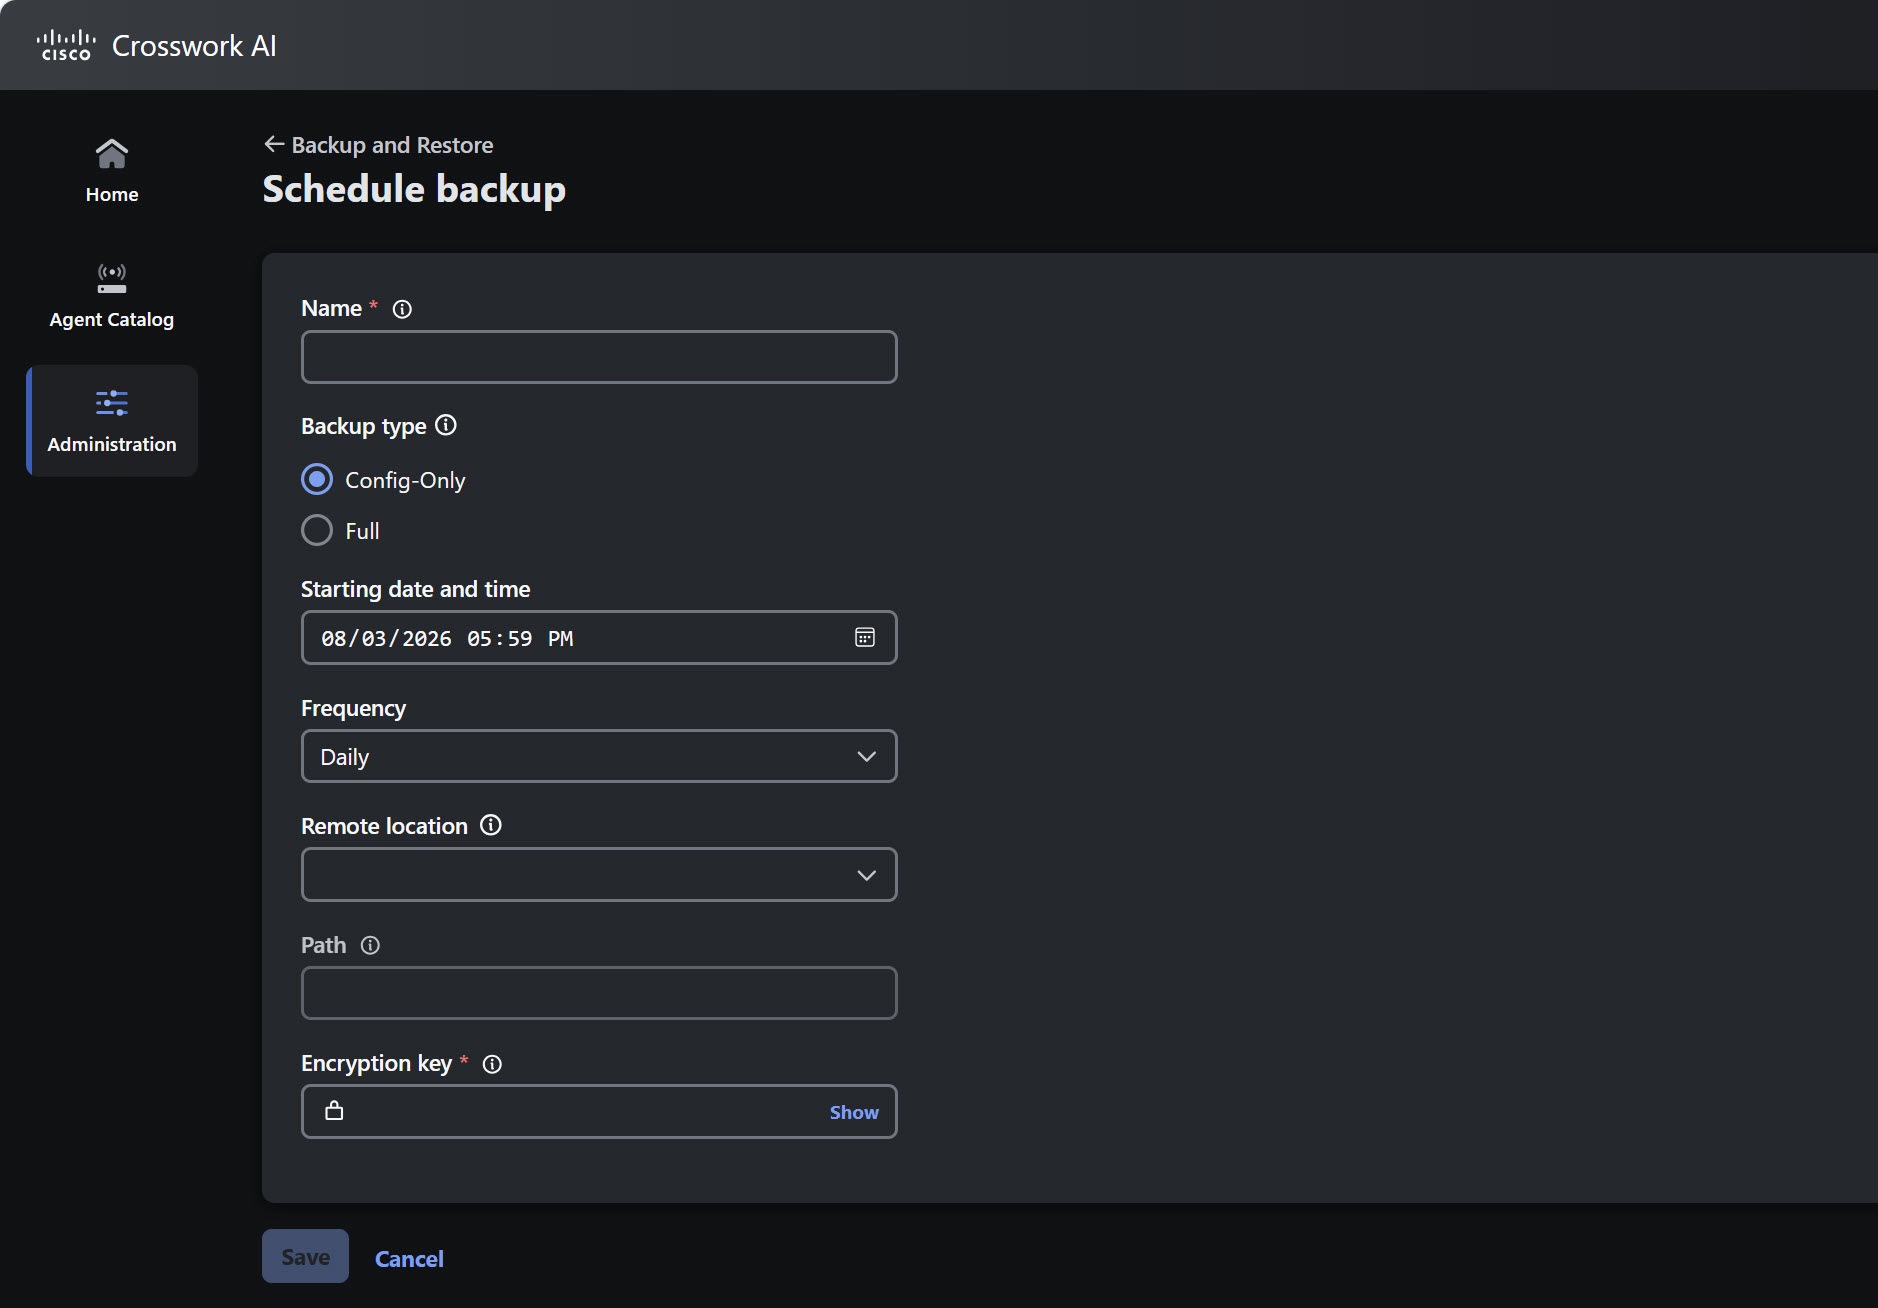 Figure 9. Schedule backup
 -
Enter a unique name for the schedule.
-
For Backup type, select one of the following:
-
Config-Only to back up device configurations, network settings, and user preferences.
-
Full to back up device data, configurations, logs, and user files.
-
-
Specify the date and time when the schedule should begin.
-
For Frequency, select how often the backup should run.
-
For Remote location, select a configured SCP server or select Create remote storage location.
To create a remote storage location, refer to Configure remote storage.
-
Enter an encryption key to secure the backup files.
Store the encryption key securely. You must provide it as the decryption key when restoring a backup created by this schedule.
-
Select Save.
After saving the schedule, select Schedules to verify that the schedule was created.
Restore from a backup
Use Restore to recover the Crosswork AI configuration and data after data loss or a service-impacting issue.
Before you begin, ensure you have:
-
The backup file that you want to restore.
-
The decryption key that corresponds to the encryption key used when the backup was created.
To restore from a backup:
-
Choose Administration > Backup and Restore, and then select Restore.
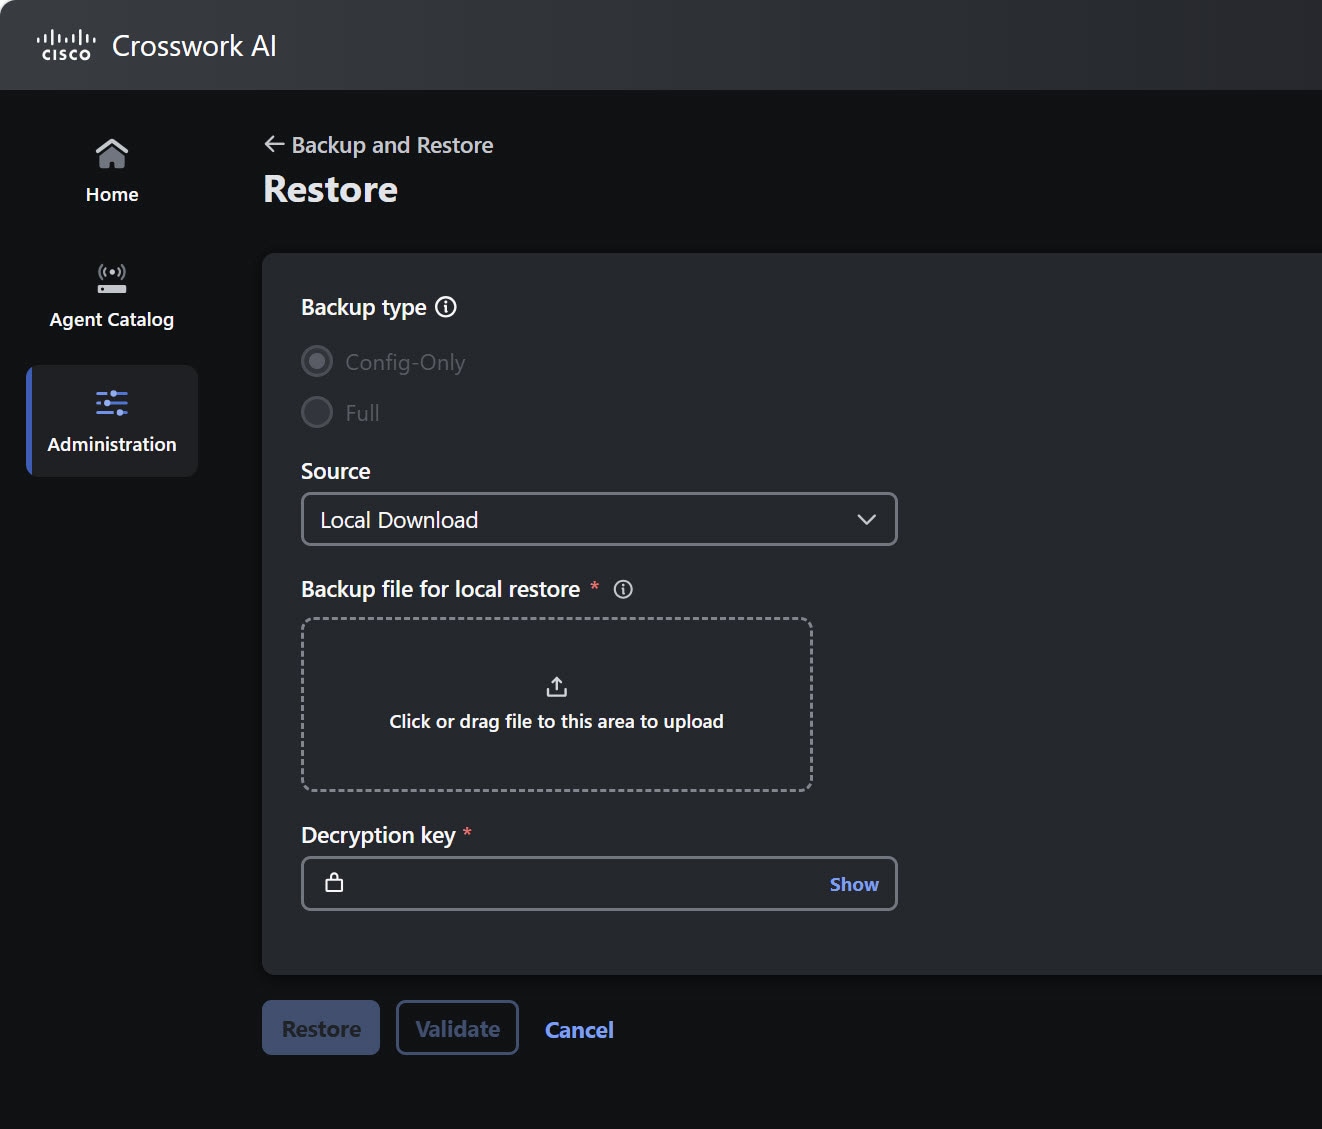 Figure 10. Restore backup
 -
From Source, select the location of the backup:
-
For a Local download, select the upload area to locate the backup archive on your system (for example a .tar.gz file) or drag the file into the upload area.
-
For a Remote location, select the remote SCP server and the backup file that you want to restore.
-
-
Enter the decryption key associated with the backup.
-
Select Validate to validate the backup file.
-
After validation completes successfully, select Restore.
Check backup and restore status
Check the status of a backup or restore operation to confirm whether it completed successfully or requires further investigation.
To check the operation status:
-
Choose Administration > Backup and Restore.
-
In Backup jobs, review active and completed backup jobs.
Review the start and end times, status, backup type, destination, and the user who started the backup. Use Search, Status, and Type to narrow the results.
-
Select History to review details of previously started backup and restore operations.
Review the operation, start and end times, status, type, details, and the user who started the operation. Use search or filter by status to narrow the results.
Manage certificates
Certificates help Crosswork AI authenticate systems and protect communications using TLS. A certificate associates an identity with a public key. The corresponding private key is stored separately and must be protected.
Use Certificate Management in Crosswork AI to view, upload, and manage certificates.
How are certificates used in Crosswork AI?
Crosswork AI supports the following certificate types:
-
Trusted CA certificates: Establish trust with certificates issued by a certificate authority. A trusted CA certificate can establish general trust or be assigned to a specific certificate role.
-
System certificates: Provide a certificate and corresponding private key for a specific certificate role.
Features that use certificates
You can associate a certificate with one or more of the following features:
-
Web Server: Replaces the default self-signed web server certificate with a user-provided certificate to secure browser connections to Crosswork AI.
-
Cyber Ark: Secures TLS communication between Crosswork AI and a configured Cyber Ark server.
-
Observability External TLS: Secures TLS connections used to send observability data to external destinations using HTTPS or gRPC over TLS.
Add a trusted CA certificate
Add a trusted CA certificate to establish general trust or associate the certificate with specific features.
To add a trusted CA certificate:
-
Choose Administration > Certificate Management, and then select Add certificate.
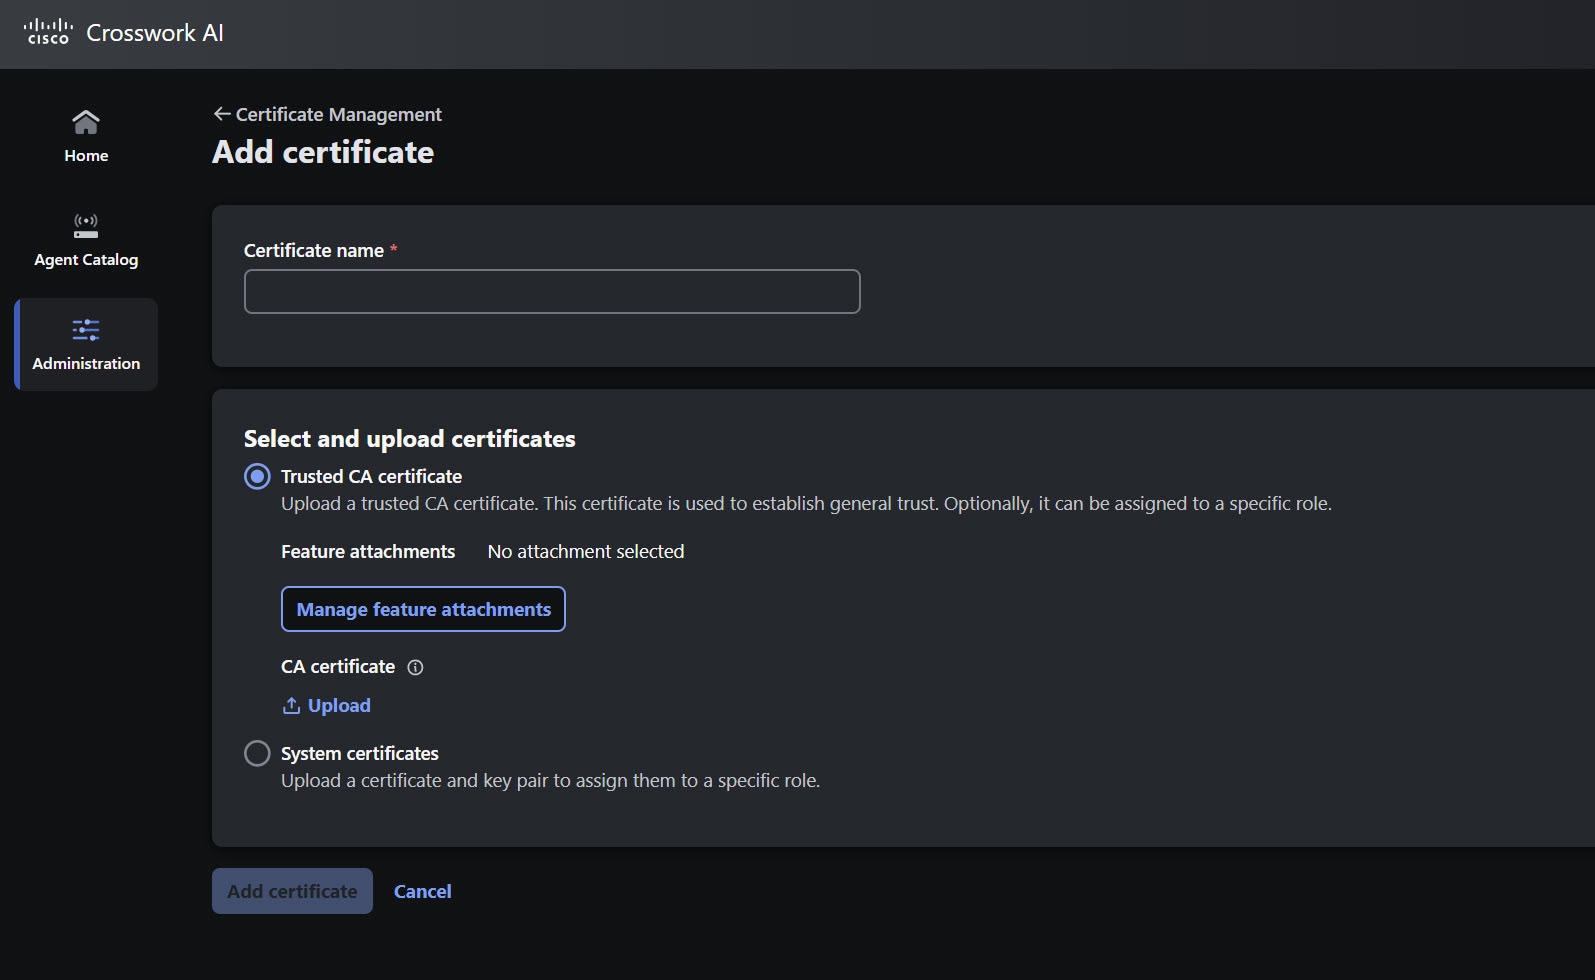 Figure 11. Add certificate
 -
Enter a certificate name.
-
Select Trusted CA certificate.
-
To associate the certificate with specific features, select Manage feature attachments.
-
Select one or more of the following feature attachments, and then select Save:
-
Web Server
-
Cyber Ark
-
Observability External TLS
Leave all feature attachments unselected to use the certificate for general trust.
-
-
Under CA certificate, select Upload and choose the trusted CA certificate.
-
Select Add certificate.
Add a system certificate
Provide a certificate and corresponding private key for use by specific features.
To add a system certificate:
-
Choose Administration > Certificate Management, and then select Add certificate.
-
Enter a certificate name.
-
Select System certificates.
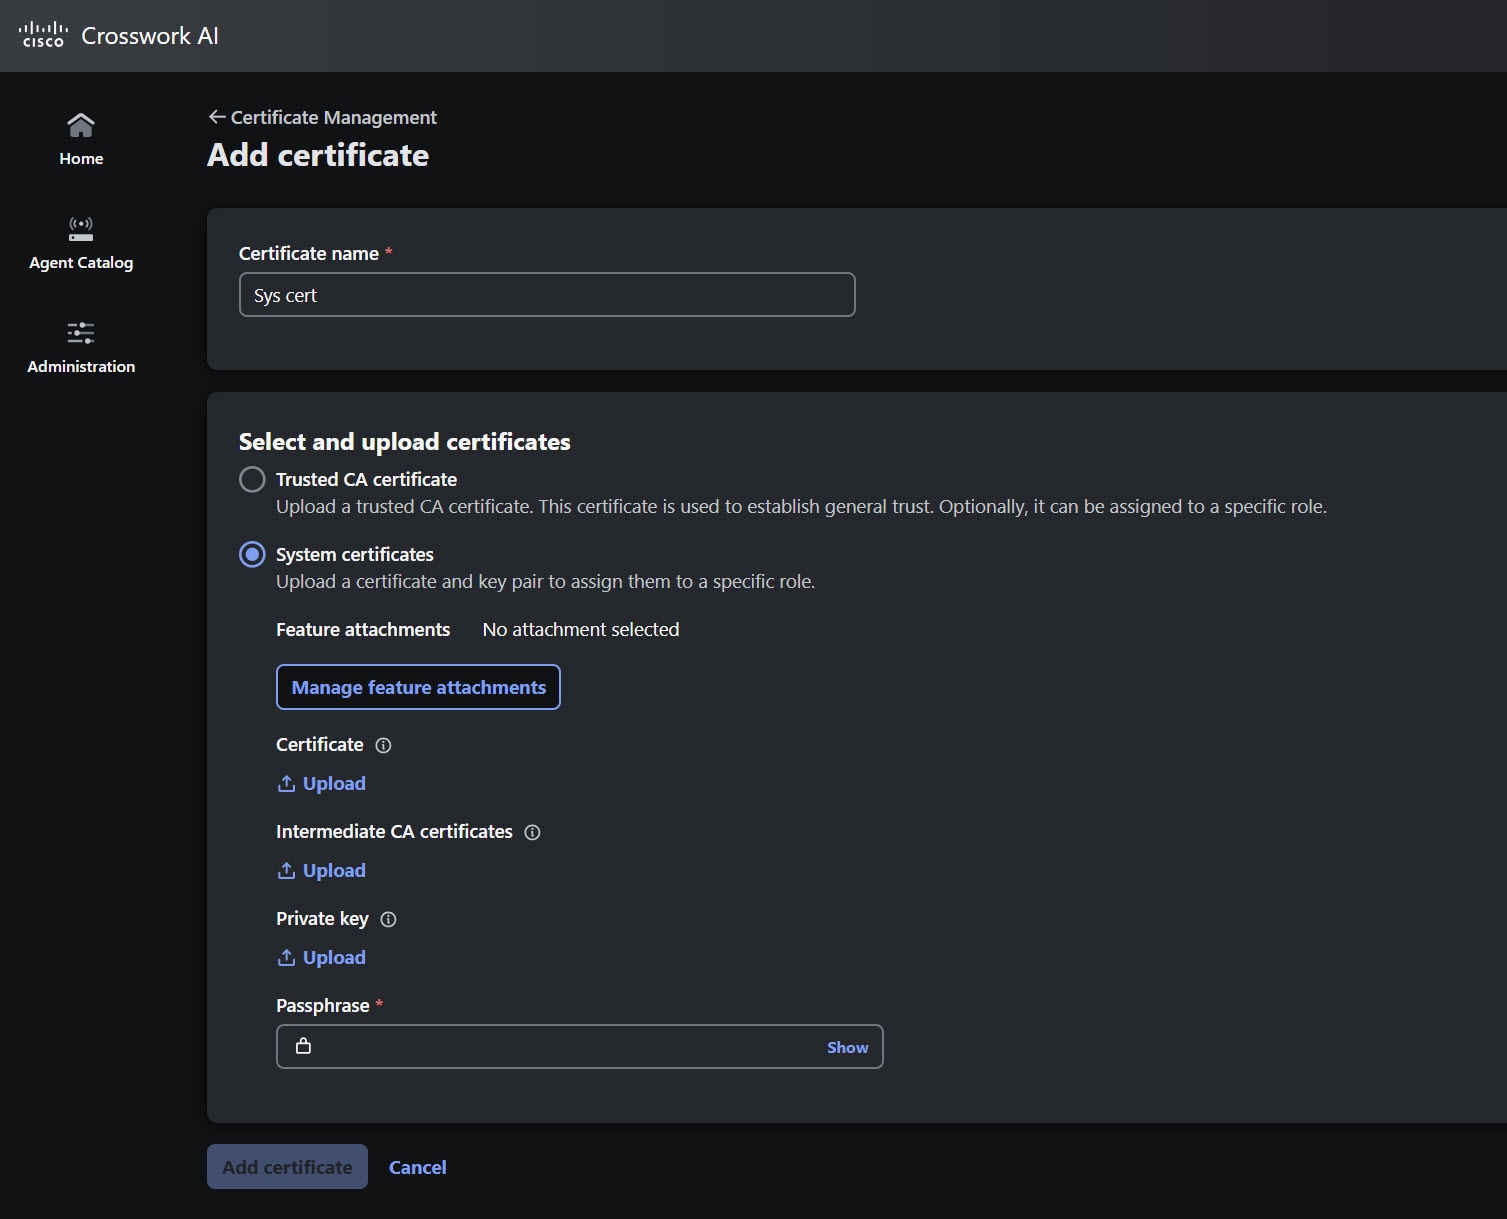 Figure 12. Add system certificate
 -
Select Manage feature attachments.
-
Select one or more of the following feature attachments, and then select Save:
-
Web Server
-
Cyber Ark
-
Observability External TLS
-
-
Under Certificate, select Upload and choose the system certificate.
-
If the certificate requires intermediate CA certificates, select Upload under Intermediate CA certificates and choose the applicable certificate files.
-
Under Private key, select Upload and choose the private key that corresponds to the system certificate.
-
Enter the private-key passphrase.
-
Select Add certificate.
Generate a certificate signing request
Generate a certificate signing request (CSR) when you need a certificate authority to issue a system certificate for Crosswork AI.
Before generating the CSR, obtain the subject information and key requirements specified by your certificate authority. Identify all IP addresses and fully qualified domain names that clients use to access Crosswork AI.
To generate a certificate signing request:
-
Choose Administration > Certificate Management, and then select Certificate signing request (CSR).
-
Select Generate CSR.
-
Enter a certificate name.
-
For Certificate role, choose System.
-
For Subject details, enter the FQDN of the server or a unique name, along with other details such as the country, state, locality, organization, and organizational unit.
-
Under Subject alternate names (SAN), enter the IP address and FQDN used to access the Crosswork AI deployment.
Add any additional IP addresses or FQDNs if they are required for certificate validation.
-
For Key, choose the key type, key size, and digest required by your organization’s certificate policy.
-
Select Generate CSR.
Manage users and roles
Users and Roles in Crosswork AI allows you to create users, assign roles, create custom roles, and view active user sessions.
Users are assigned roles that determine what they can do in Crosswork AI. Each role contains access profiles that define permissions for specific product capabilities. For example, the AI Agent Catalog access profile controls permissions to view or manage agents and their settings in the catalog.
Access profile permissions apply whether the capability is used through the Crosswork AI user interface or through an API.
System-defined roles and permissions
Crosswork AI provides system-defined roles for AI operations and system administration. You can assign these roles to users or create new roles with access profiles tailored to your requirements.
-
cw-ai-viewer: View Crosswork AI agents, LLMs, operations, Knowledge Graph, and related AI services in read-only mode.
-
cw-ai-operator: Run AI operations and perform day-to-day updates to agents, LLMs, and supporting AI services.
-
cw-ai-admin: Manage Crosswork AI capabilities, including agent catalog and instance management, knowledge graph, LLMs, observability destinations and UI access, AI operations, platform settings, AI service configuration, context service, DRA gateway, and MCP gateway.
-
observer: View system resources for monitoring and troubleshooting in read-only mode.
-
support-engineer: Manage system resources for maintenance and troubleshooting.
-
super-admin: Manage all system capabilities and settings.
The table lists the roles and permissions required for Crosswork AI capabilities.
| Capability | Action | Access profile | Minimum access | System-defined roles |
|---|---|---|---|---|
|
Configuration Drift Detection |
Create and manage logical groups |
AI Operations |
Manage |
Crosswork AI Operator |
|
Train a model |
AI Operations |
Manage |
Crosswork AI Operator |
|
|
Run inference on demand |
AI Operations |
Manage |
Crosswork AI Operator |
|
|
Schedule inference |
AI Operations |
Manage |
Crosswork AI Operator |
|
|
Manage anomaly feedback, including importing and exporting feedback |
AI Operations |
Manage |
Crosswork AI Operator |
|
|
Toxic Factor Identification |
Run toxic factor analysis |
AI Operations |
Manage |
Crosswork AI Operator |
|
Schedule toxic factor analysis |
AI Operations |
Manage |
Crosswork AI Operator |
|
|
Deep Network Troubleshooting |
Start or continue a troubleshooting investigation |
AI Operations |
Manage |
Crosswork AI Operator |
|
Review, add, or remove hypotheses and start validation |
AI Operations |
Manage |
Crosswork AI Operator |
|
|
AI operations |
View existing threads, messages, and task results |
AI Operations |
View |
Crosswork AI Viewer |
|
Knowledge Graph |
Explore graph schema and entity data, and run GraphQL queries |
AI Knowledge Graph |
View |
Crosswork AI Viewer |
|
Ingest data and run GraphQL mutations |
AI Knowledge Graph |
Edit |
Crosswork AI Operator |
|
|
Manage schema extensions and other Knowledge Graph administration |
AI Knowledge Graph |
Manage |
Crosswork AI Admin |
|
|
Observability |
View configured external observability destinations |
AI Observability |
View |
Crosswork AI Viewer |
|
Update an existing external observability destination |
AI Observability |
Edit |
Crosswork AI Operator |
|
|
Create or delete external observability destinations |
AI Observability |
Manage |
Crosswork AI Admin |
|
|
Access the Observability UI and view logs, metrics, traces, and dashboards |
AI Observability |
Manage |
Crosswork AI Admin |
|
|
Agent management |
View agents and their settings |
AI Agent Catalog |
View |
Crosswork AI Viewer |
|
Register or update agents and their settings |
AI Agent Catalog |
Edit |
Crosswork AI Operator |
|
|
Delete agents |
AI Agent Catalog |
Manage |
Crosswork AI Admin |
|
|
LLM management |
View LLM providers, models, associations, and default settings |
AI LLM Management |
View |
Crosswork AI Viewer |
|
Create or update LLM providers, models, associations, and default settings |
AI LLM Management |
Edit |
Crosswork AI Operator |
|
|
Delete LLM configuration |
AI LLM Management |
Manage |
Crosswork AI Admin |
|
|
Context Service |
View and search collections and documents |
Context Service Management |
View |
Crosswork AI Viewer |
|
Manage collections and documents |
Context Service Management |
Manage |
Crosswork AI Operator |
|
|
DRA Gateway |
View DRA Gateway instances, types, operations, and discovery information |
DRA Gateway |
View |
Crosswork AI Viewer |
|
Manage DRA Gateway instances, types, and operations |
DRA Gateway |
Manage |
Crosswork AI Operator |
|
|
MCP Gateway |
View MCP Gateway resources, tools, probes, and tasks |
MCP Gateway |
View |
Crosswork AI Viewer |
|
Manage MCP Gateway resources and related configuration |
MCP Gateway |
Manage |
Crosswork AI Operator |
|
|
System administration |
View system resources for monitoring and troubleshooting |
Observer System Access |
View |
Observer |
|
View backup status, history, and schedules |
Observer System Access |
View |
Observer |
|
|
Create and schedule system backups |
Support Engineer System Access |
Manage |
Support Engineer |
|
|
Collect tech support information |
Support Engineer System Access |
Manage |
Support Engineer |
Add a role
Create a new role with the required access profiles and permission levels.
To add a role:
-
Choose Administration > Users and Roles, select Roles, and then select Add role.
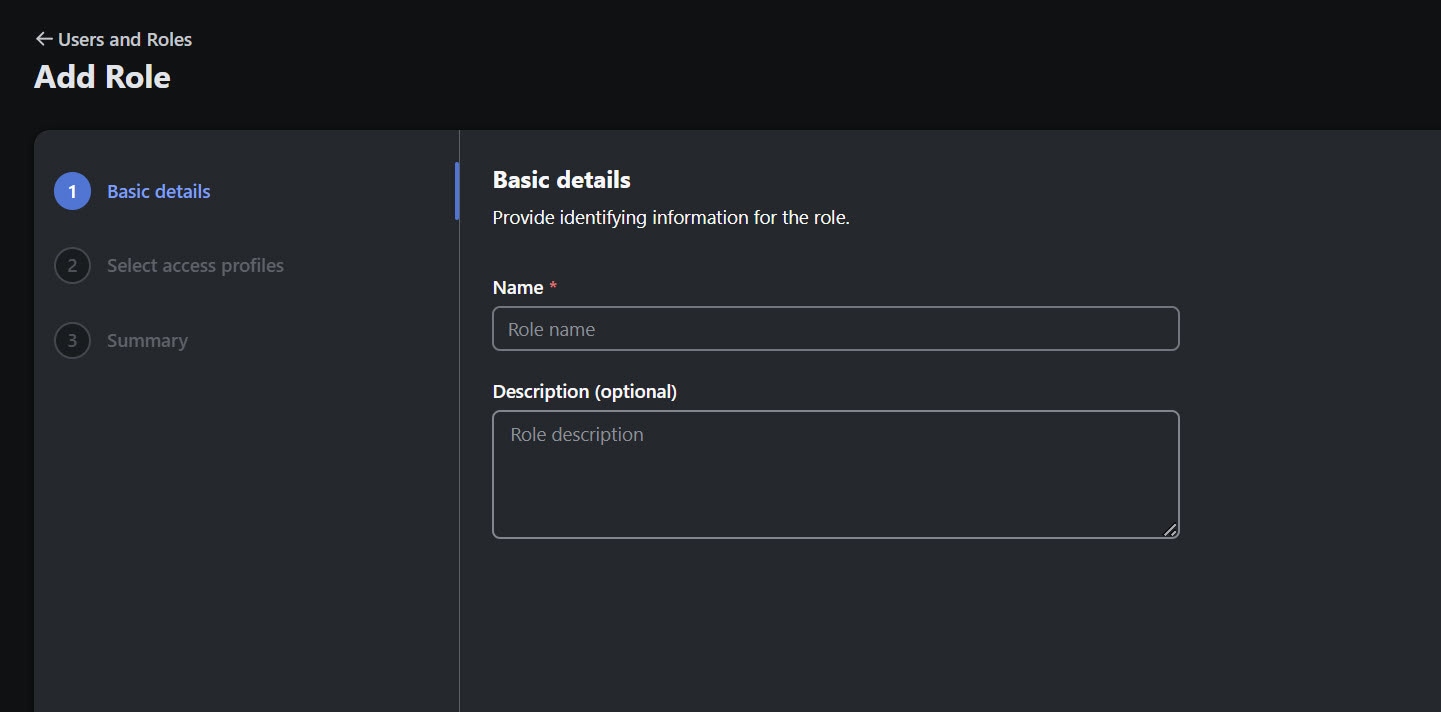 Figure 13. Add a new role
 -
Enter a name and, optionally, a description for the role.
-
Select Next.
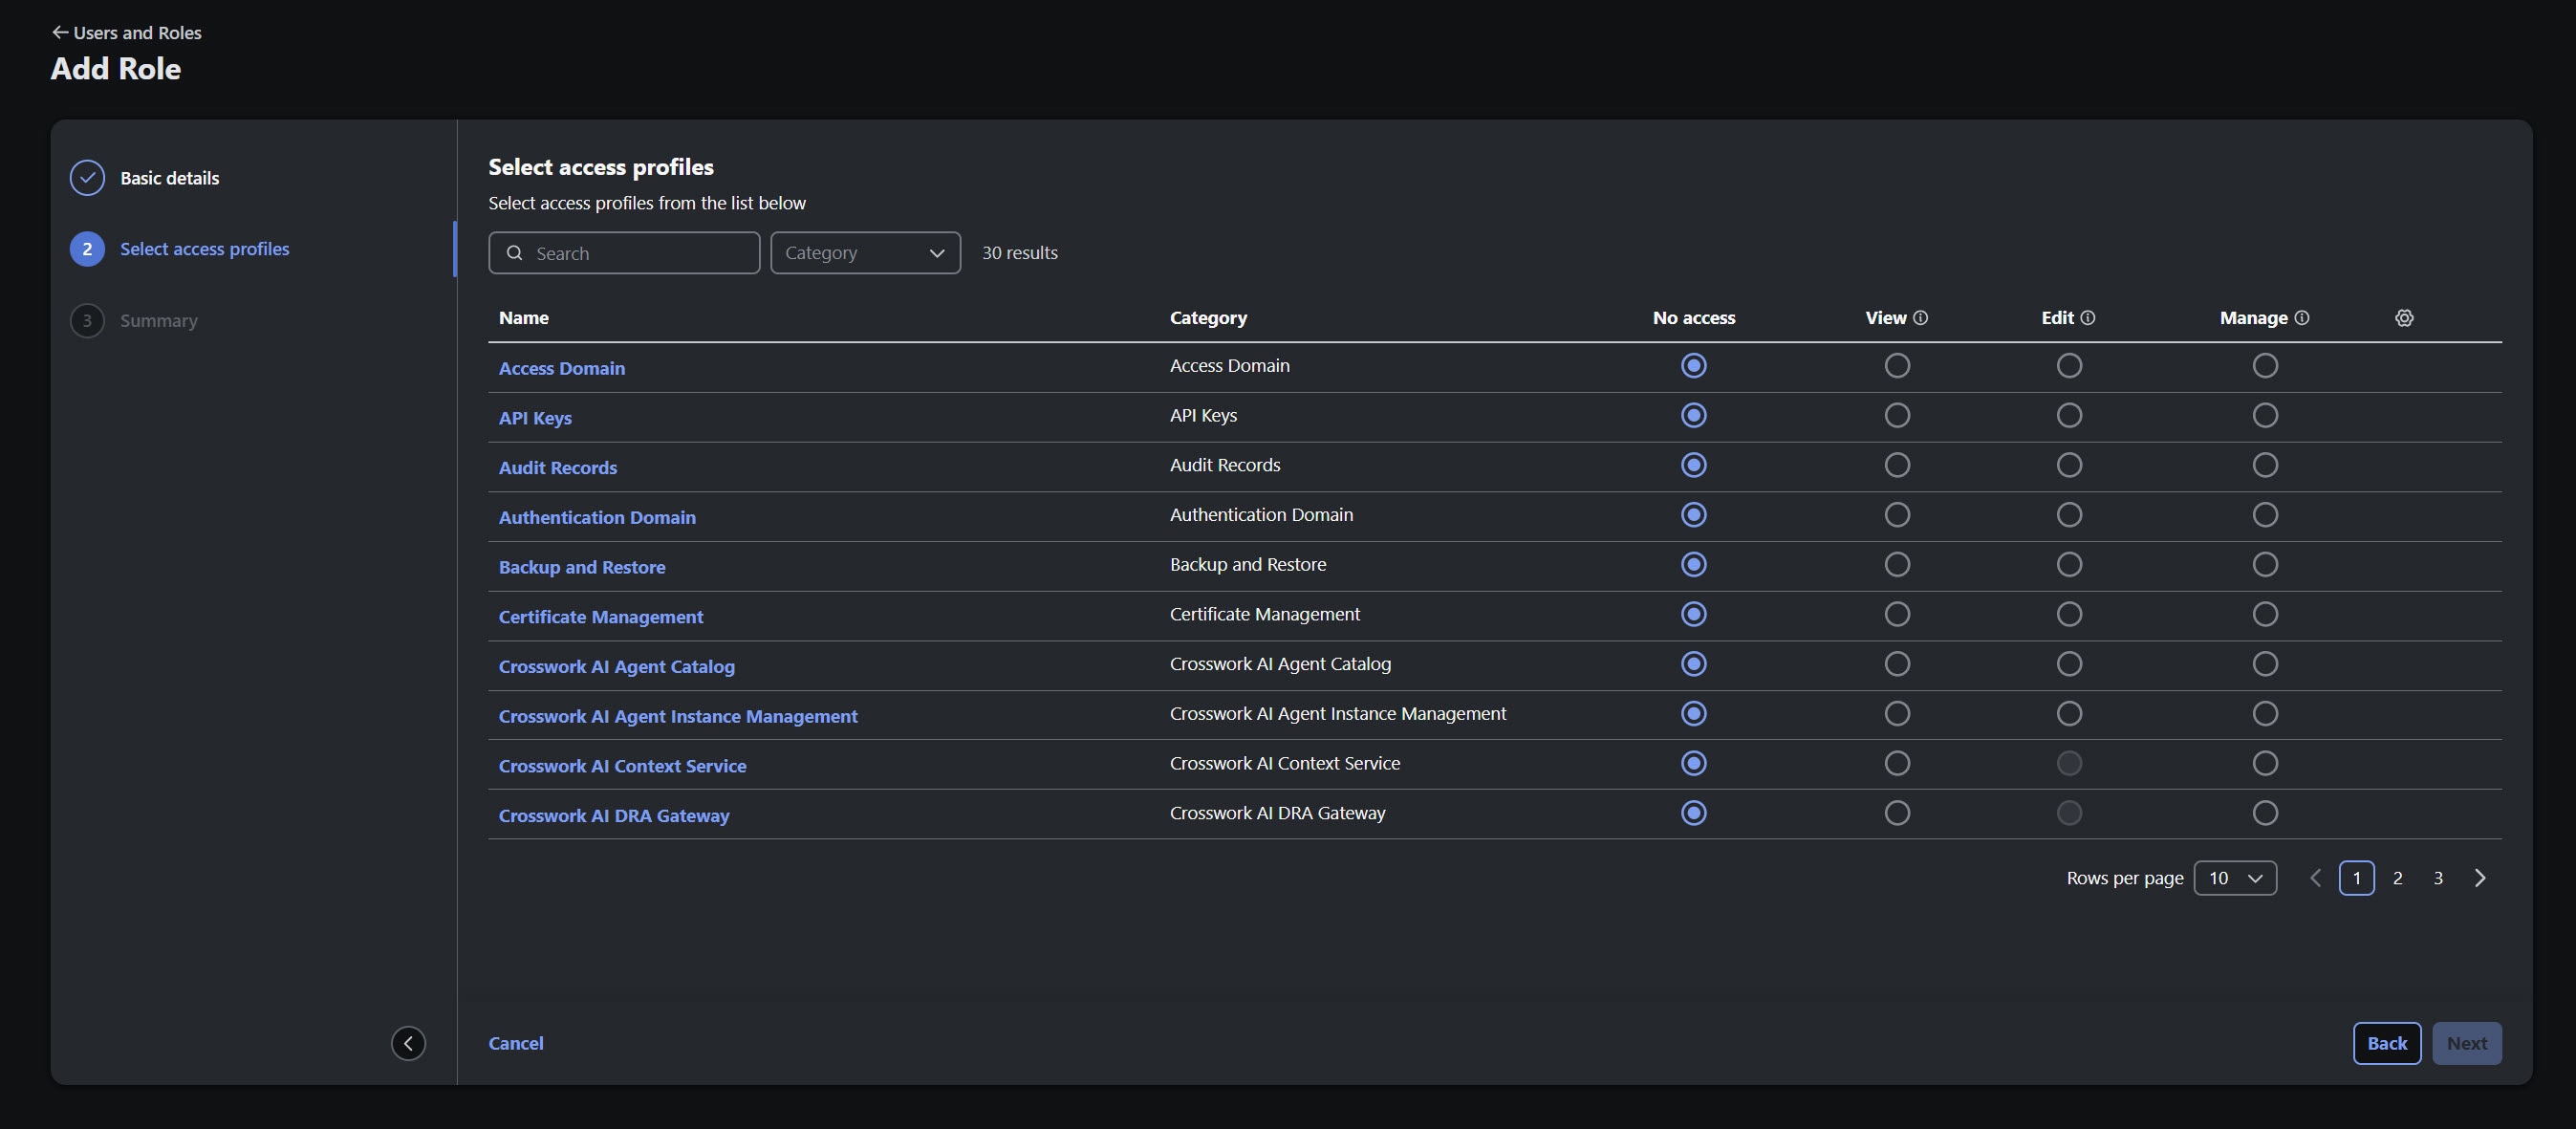 Figure 14. Select access profiles
 -
For each access profile required for the role, assign the appropriate access level:
-
No access
-
View
-
Edit
-
Manage
The available access levels can vary by access profile. Use Search or filter by category to locate specific access profiles.
-
-
Select Next.
-
Review the role details and selected access levels.
-
Select Confirm.
Add a user
Create a new user and assign the appropriate roles based on the user’s responsibilities.
To add a user:
-
Choose Administration > Users and Roles, and then select Add user.
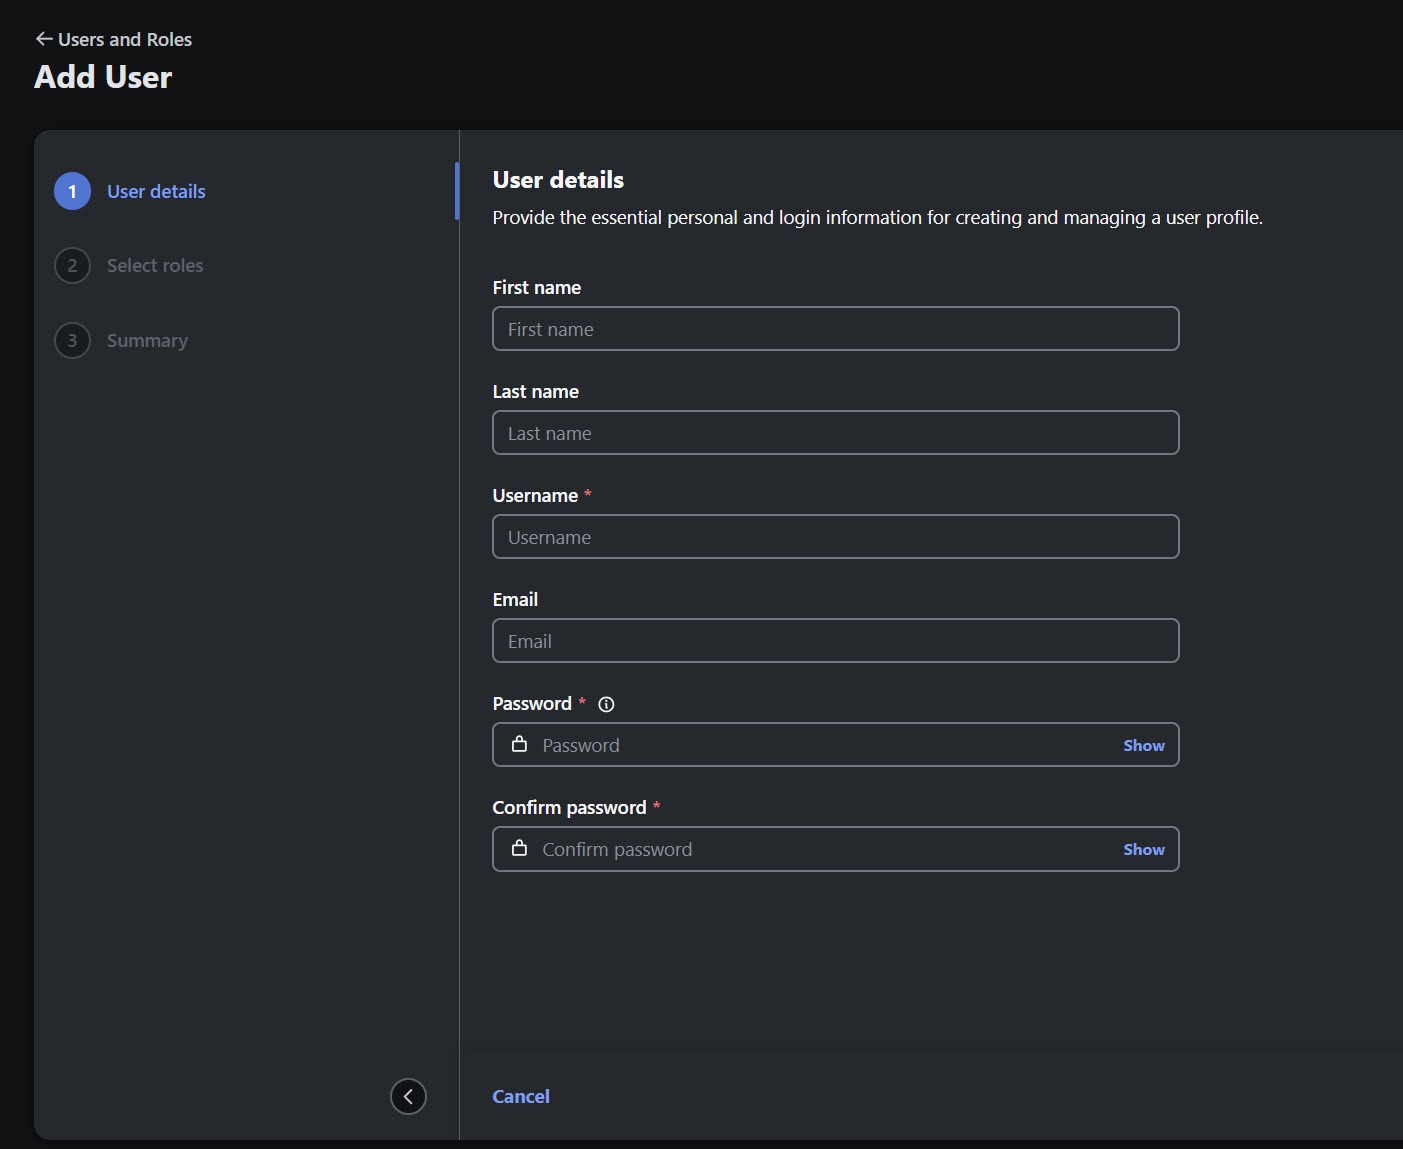 Figure 15. Add a new user
 -
Enter the user details.
-
Enter a Username.
-
Enter and confirm the password.
-
Optionally, enter the user’s first name, last name, and email address.
-
-
Select Next.
-
The access domain determines the resources governed by your role permissions. For Access domain, choose All-access. All-access is the only domain currently available for selection.
-
For Role, choose one or more roles for the user.
Assign only the roles required for the user’s responsibilities.
-
Select Next.
-
Review the user details and assigned roles.
-
Select Confirm.
View active sessions
View active sessions to identify users who are currently connected to Crosswork AI and check their recent session activity.
To view active sessions:
-
Choose Administration > Users and Roles, and then select Active sessions.
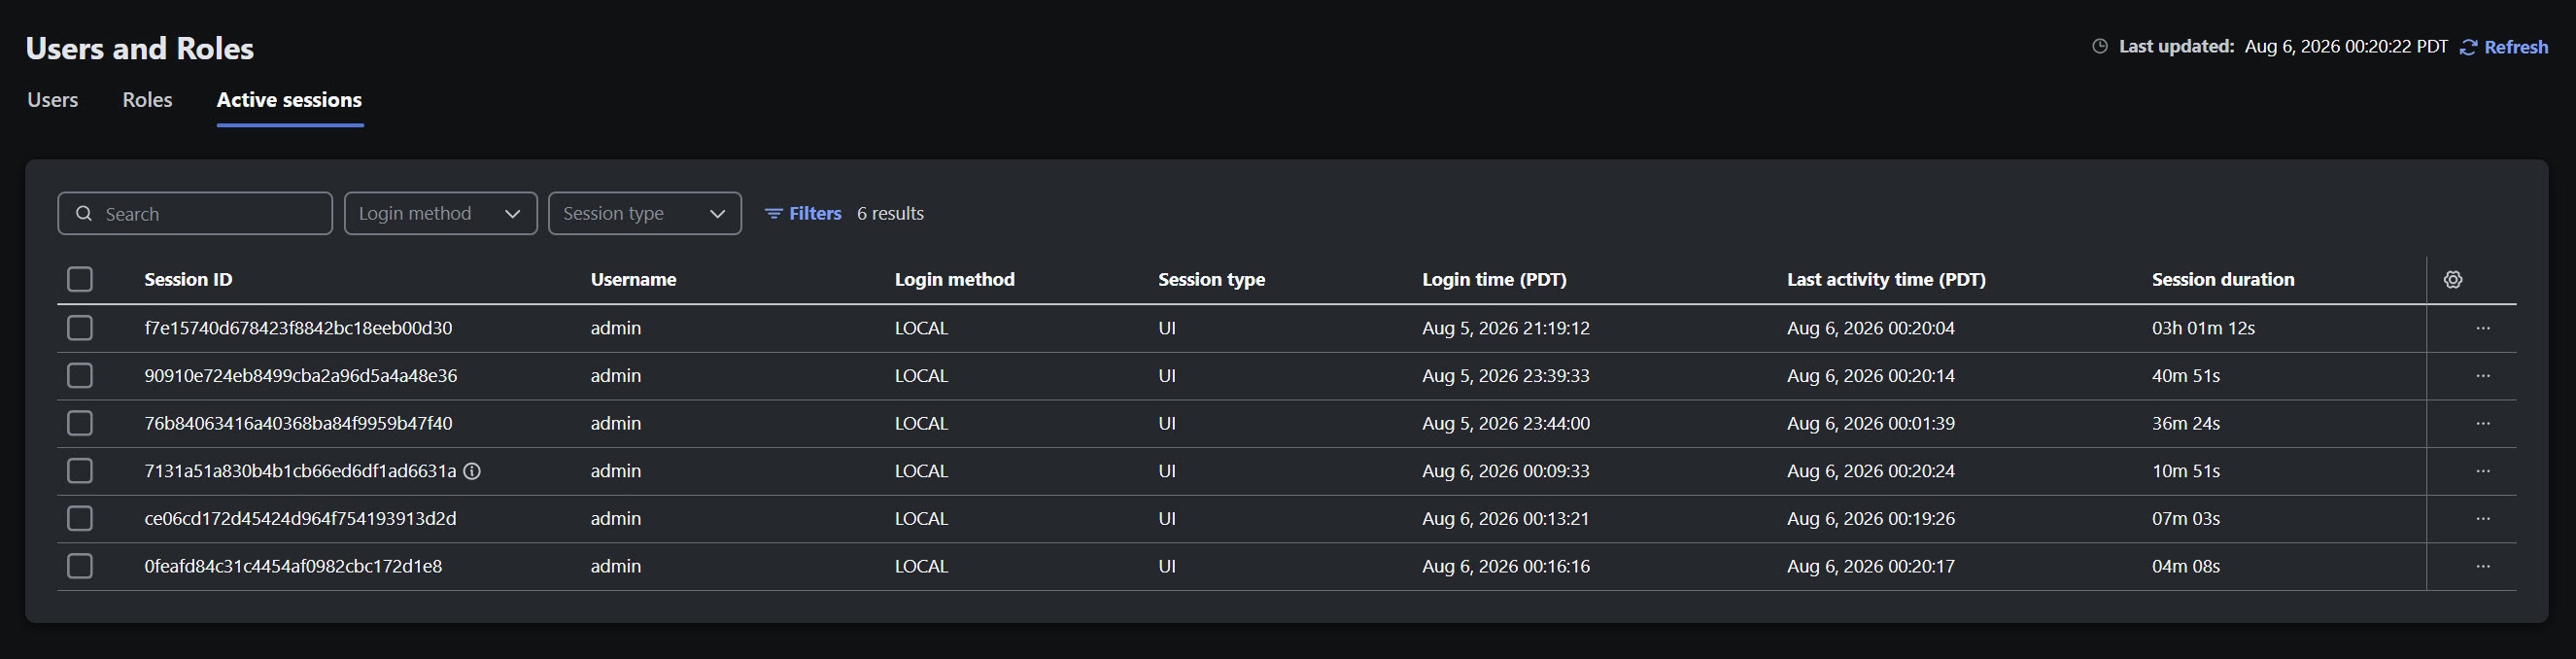 Figure 16. User active sessions
 -
Use Search or filter by login method and session type to narrow the results.
-
Review the session ID, username, login method, session type, login time, last activity time, and session duration.
-
To investigate activity associated with a session, choose … > Audit log for that session.
The Audit Log displays the related audit records. You can download the displayed audit records in CSV or JSON format.
-
Select Refresh to retrieve the latest session information.
Configure AAA settings
AAA in Crosswork AI provides settings for single sign-on (SSO), user session timeouts, and local password policies.
Configure and manage SSO
SSO for cross-launch from Crosswork Network Controller is typically configured during the initial Crosswork AI setup. In this configuration, Crosswork Network Controller acts as the SAML identity provider (IdP) and Crosswork AI acts as the service provider (SP).
Use AAA > SSO to manage the Crosswork AI side of the SSO configuration. You can add identity provider metadata and download the Crosswork AI service provider metadata.
For the complete SSO configuration between Crosswork Network Controller and Crosswork AI, including the configuration required in Crosswork Network Controller, refer to Set up SSO for cross-launch from Crosswork Network Controller in the Crosswork AI Getting Started guide.
To manage SSO metadata:
-
Choose Administration > AAA.
-
Select Add identity provider.
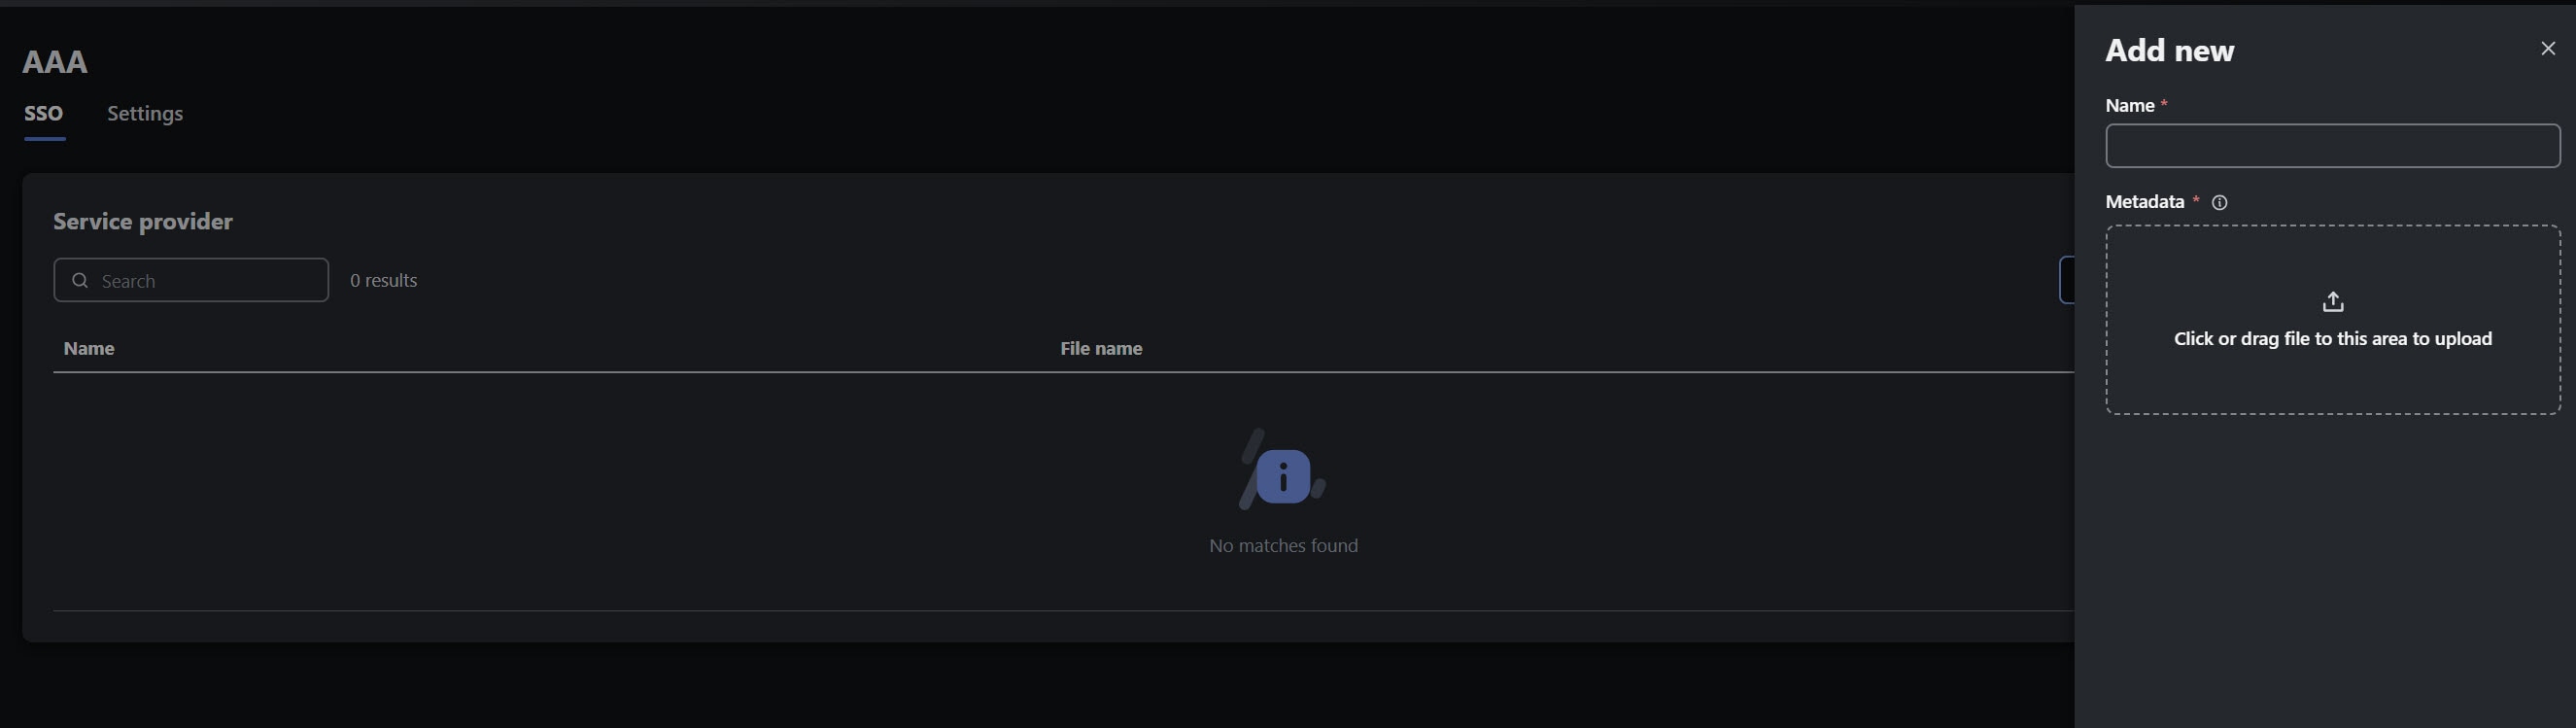 Figure 17. Add a new IdP
 -
Enter a name for the identity provider.
-
Upload the IdP metadata XML file.
-
Select Add.
-
To download the Crosswork AI service provider metadata, select Download SP metadata.

The role provided by the identity provider must have a matching role in Crosswork AI. Refer to Manage users and roles for information about Crosswork AI roles.
Configure session and password settings
Use Settings to control idle user sessions and configure password and account lockout requirements for locally authenticated users.
To configure session and password settings:
-
Choose Administration > AAA, and then select Settings.
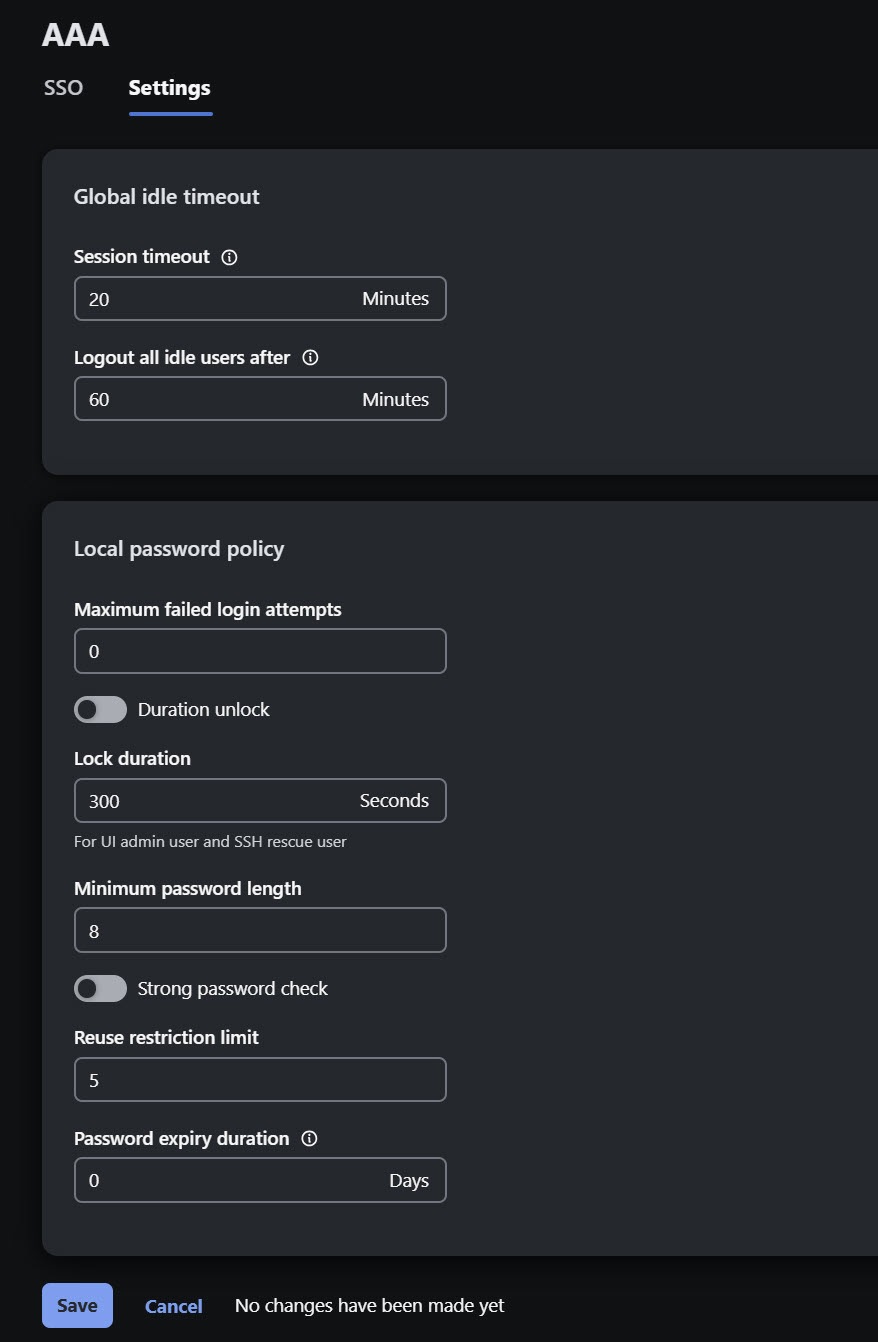 Figure 18. Configure AAA settings
 -
Under Global idle timeout, configure the session timeout settings as required:
Changing the session timeout settings restarts Crosswork AI services. The application and APIs are temporarily unavailable during the restart, and users may see a connection error or need to sign in again.
-
Session timeout: Specifies how long a user session can remain idle before the session expires.
-
Logout all idle users after: Specifies when all idle users are signed out.
-
-
Under Local password policy, configure the settings required for your security policy:
-
Maximum failed login attempts: Specifies how many unsuccessful sign-in attempts are allowed before the account is locked.
-
Duration unlock: Enables automatic unlocking after the configured Lock duration.
-
Lock duration: Specifies how long the account remains locked after the maximum failed login attempts is reached. The lock duration applies to the UI admin user and the SSH rescue user.
-
Minimum password length: Specifies the minimum number of characters required for a local user’s password.
-
Strong password check: Enables additional password-strength requirements.
-
Reuse restriction limit: Specifies how many previously used passwords a user cannot reuse.
-
Password expiry duration: Specifies the number of days before a local user’s password expires. A value of
0disables password expiration. When a password expires, the user must change it before signing in.
-
-
Select Save.
Review audit logs
Audit Log provides a record of user activity in Crosswork AI. Audit records help you investigate sign-in attempts, identify who performed an action, such as adding or removing an agent, and determine when and from which device the action occurred.
To review audit logs:
-
Choose Administration > Audit Log.
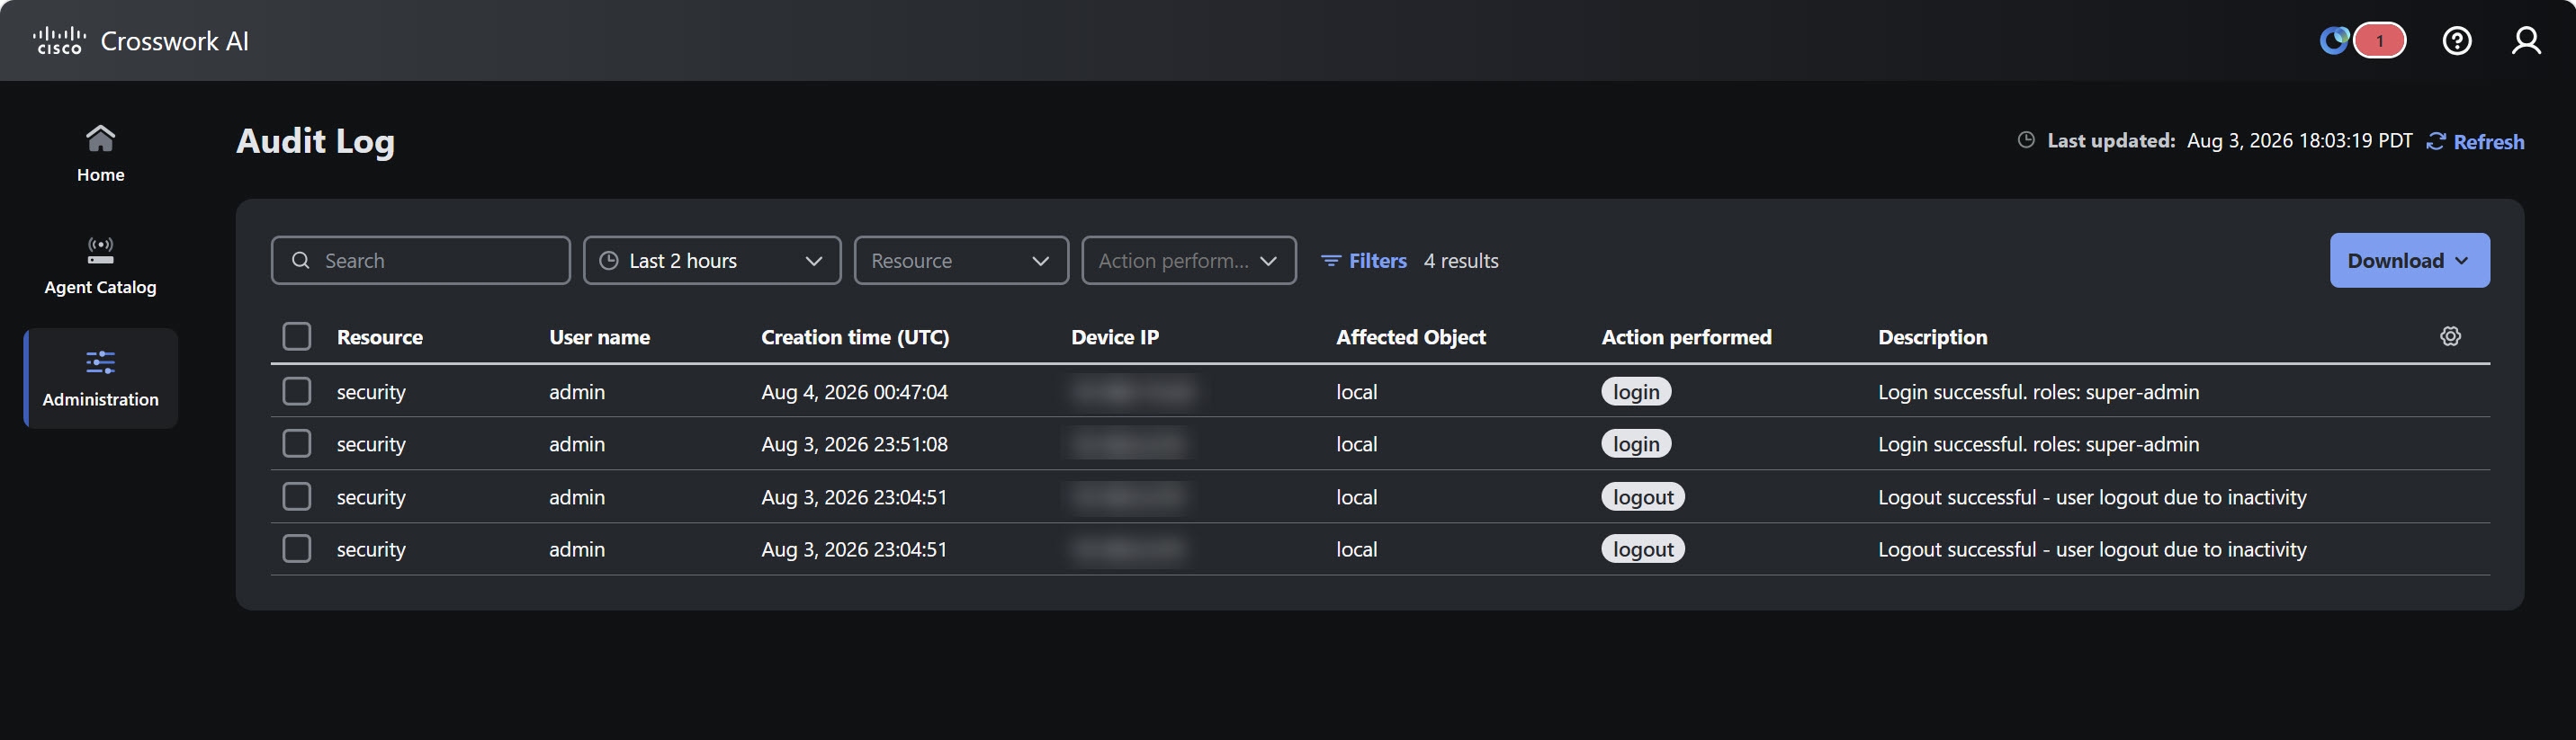 Figure 19. Audit logs
 -
To narrow the results, use Search or filter by period, resource, and action performed. Select
 to change the table density or choose which columns are displayed.
 -
Review the audit record details:
-
Resource: System resource associated with the activity.
-
User name: User that performed the action.
-
ID: Unique identifier for the audit record.
-
Creation time (UTC): Date and time when the activity was recorded.
-
Device IP: IP address from which the action originated.
-
Affected Object: Object affected by the action.
-
Action performed: Action recorded by the system, such as a login or logout.
-
Description: Additional information about the action and its result.
-
-
Select Refresh to retrieve the latest audit records.
-
To download the displayed audit records, choose one of the following:
-
Download > Download CSV
-
Download > Download JSON
The selected file is downloaded to your system.
-
Configure system settings
System Settings in Crosswork AI allows you to update network settings, remote storage, and other system-level settings.
DNS, NTP, and proxy settings are initially configured during system bringup. You can update these settings later as your environment changes.
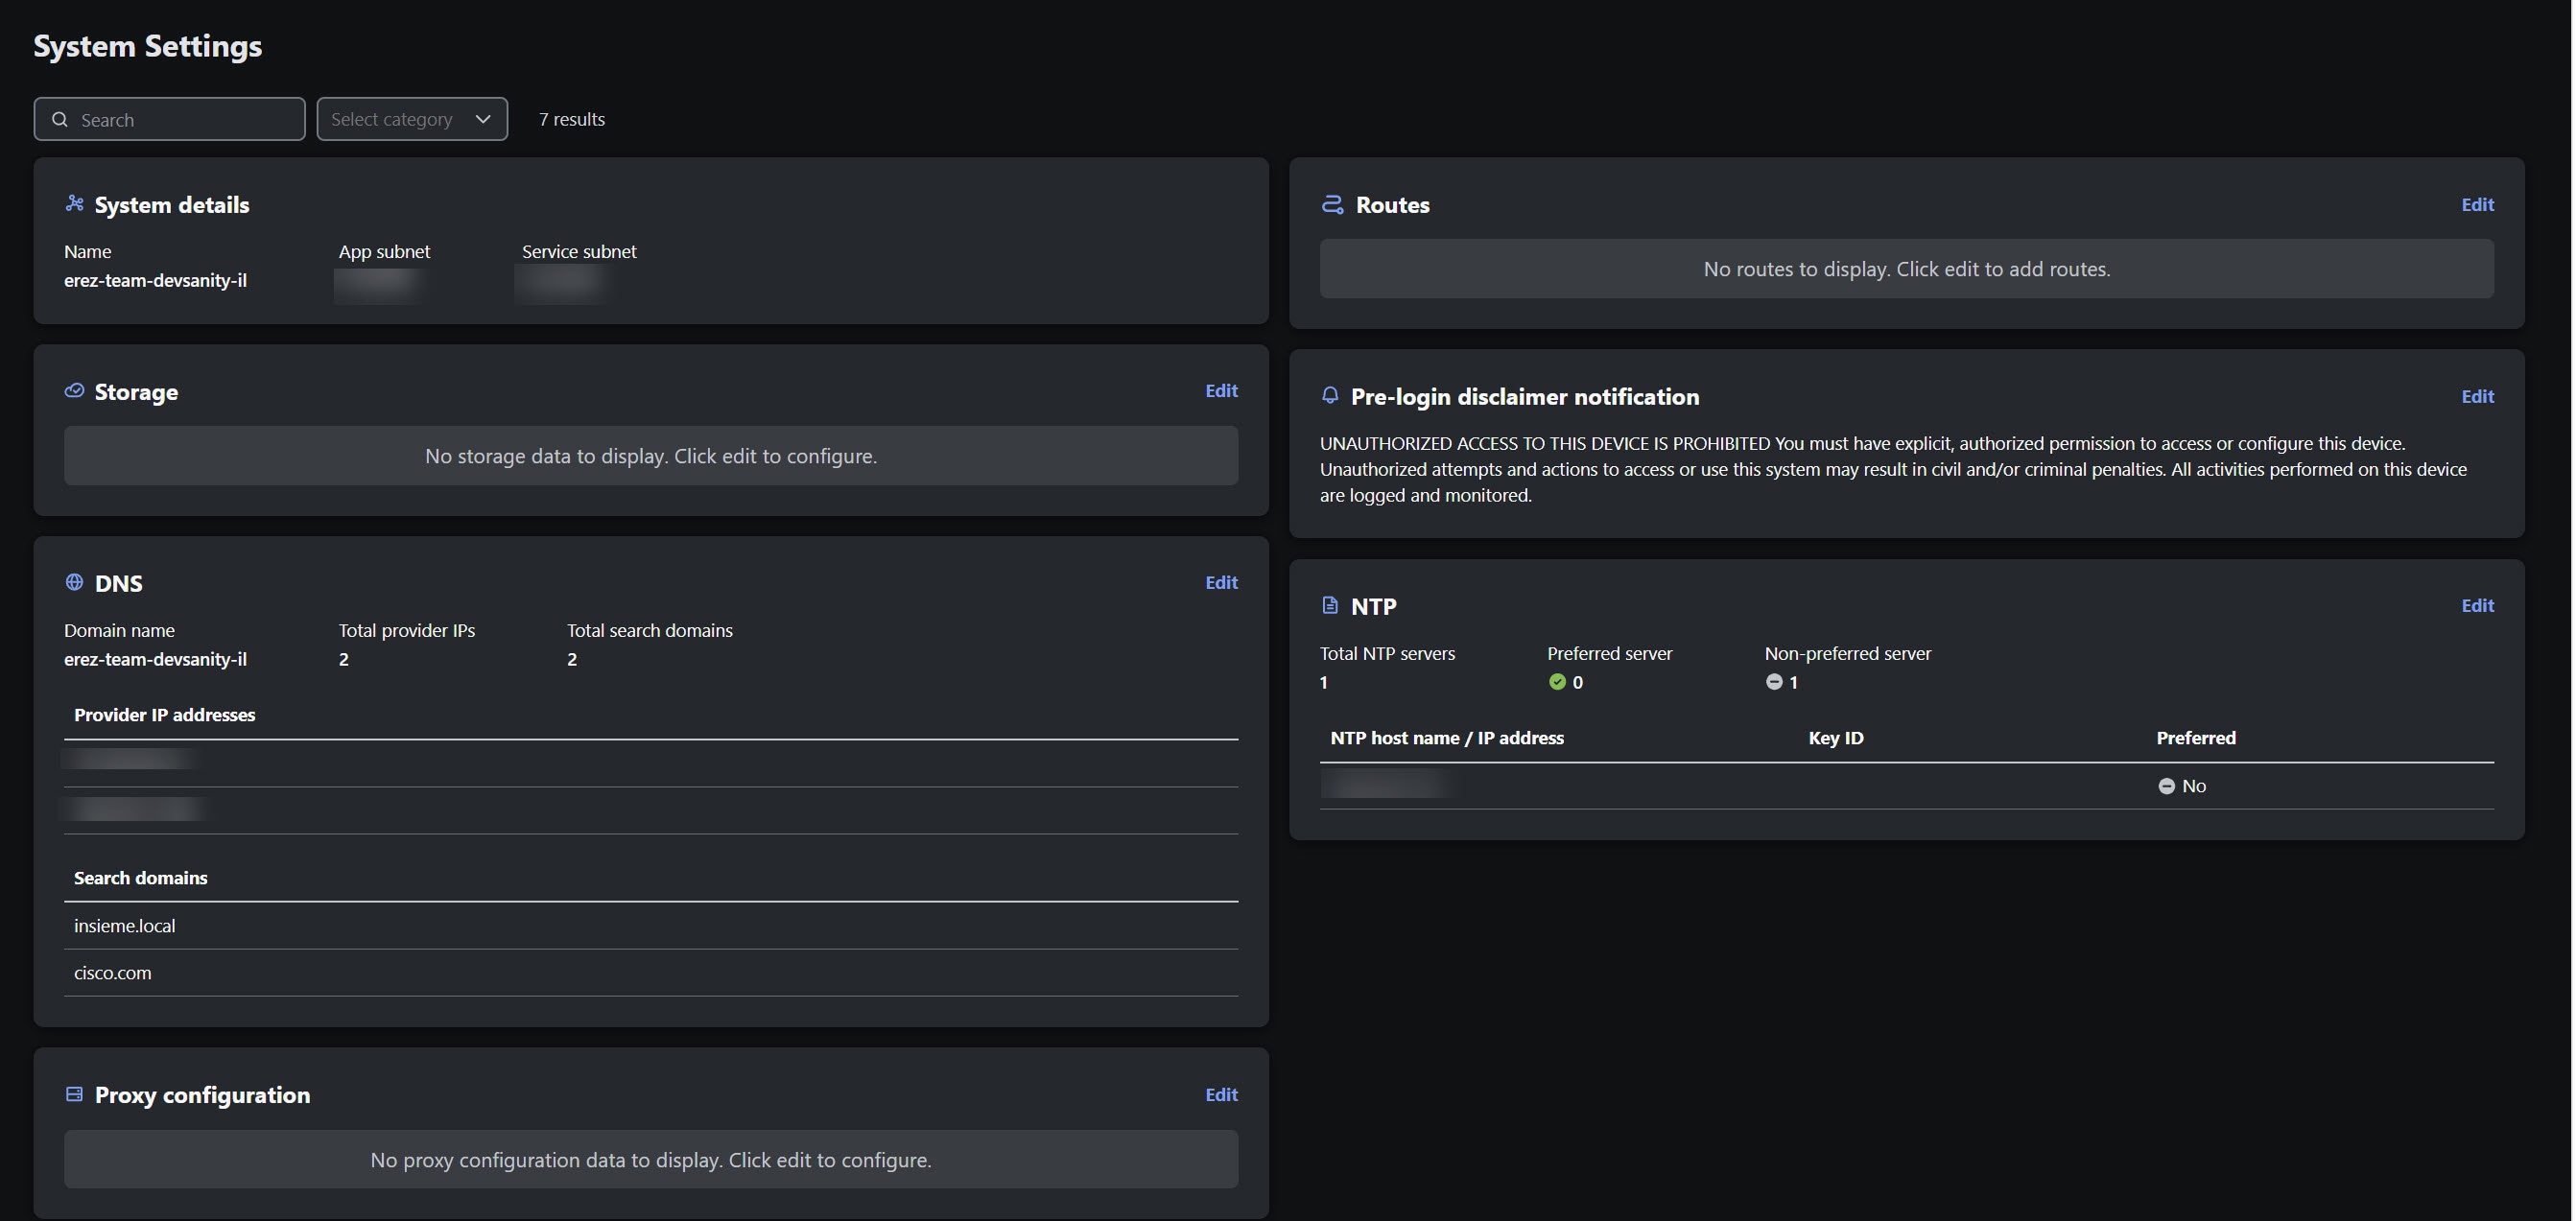
Configure remote storage
Configure an SCP location that Crosswork AI can use for remote storage.
Before you begin, ensure that the SCP server is reachable from Crosswork AI and that the user account has the required access to the remote path.
To configure or update a remote storage location:
-
Choose Administration > System Settings.
-
Under Storage, select Edit.
-
Select Add location to configure a new remote storage location, or select the edit icon for an existing location.
-
Enter a name and, optionally, a description for the remote location.
-
Enter the SCP server hostname or IP address.
-
Enter the path on the server, if required.
-
Enter the username and password used to access the server.
-
Select Save.
Configure network routes
Configure routes when Crosswork AI needs to reach additional networks through the management or data network.
The management network is used to access the Crosswork AI VM and UI. The data network is used internally by Kubernetes.
To configure or update network routes:
-
Choose Administration > System Settings.
-
Under Routes, select Edit.
-
Add the route to the appropriate network:
-
To enter a management route, select Add management route. To edit a management route, select the edit icon.
-
To enter a data route, select Add data network route. To edit a data route, select the edit icon.
-
-
Enter the destination IPv4 subnet in CIDR notation, for example,
192.168.1.0/24. -
Add additional routes as required.
-
Select Save.
Configure DNS
DNS provider IP addresses and search domains are configured during system bringup. Update the DNS configuration if the DNS servers or search domains used by Crosswork AI change.
To configure or update DNS:
-
Choose Administration > System Settings.
-
Under DNS, select Edit.
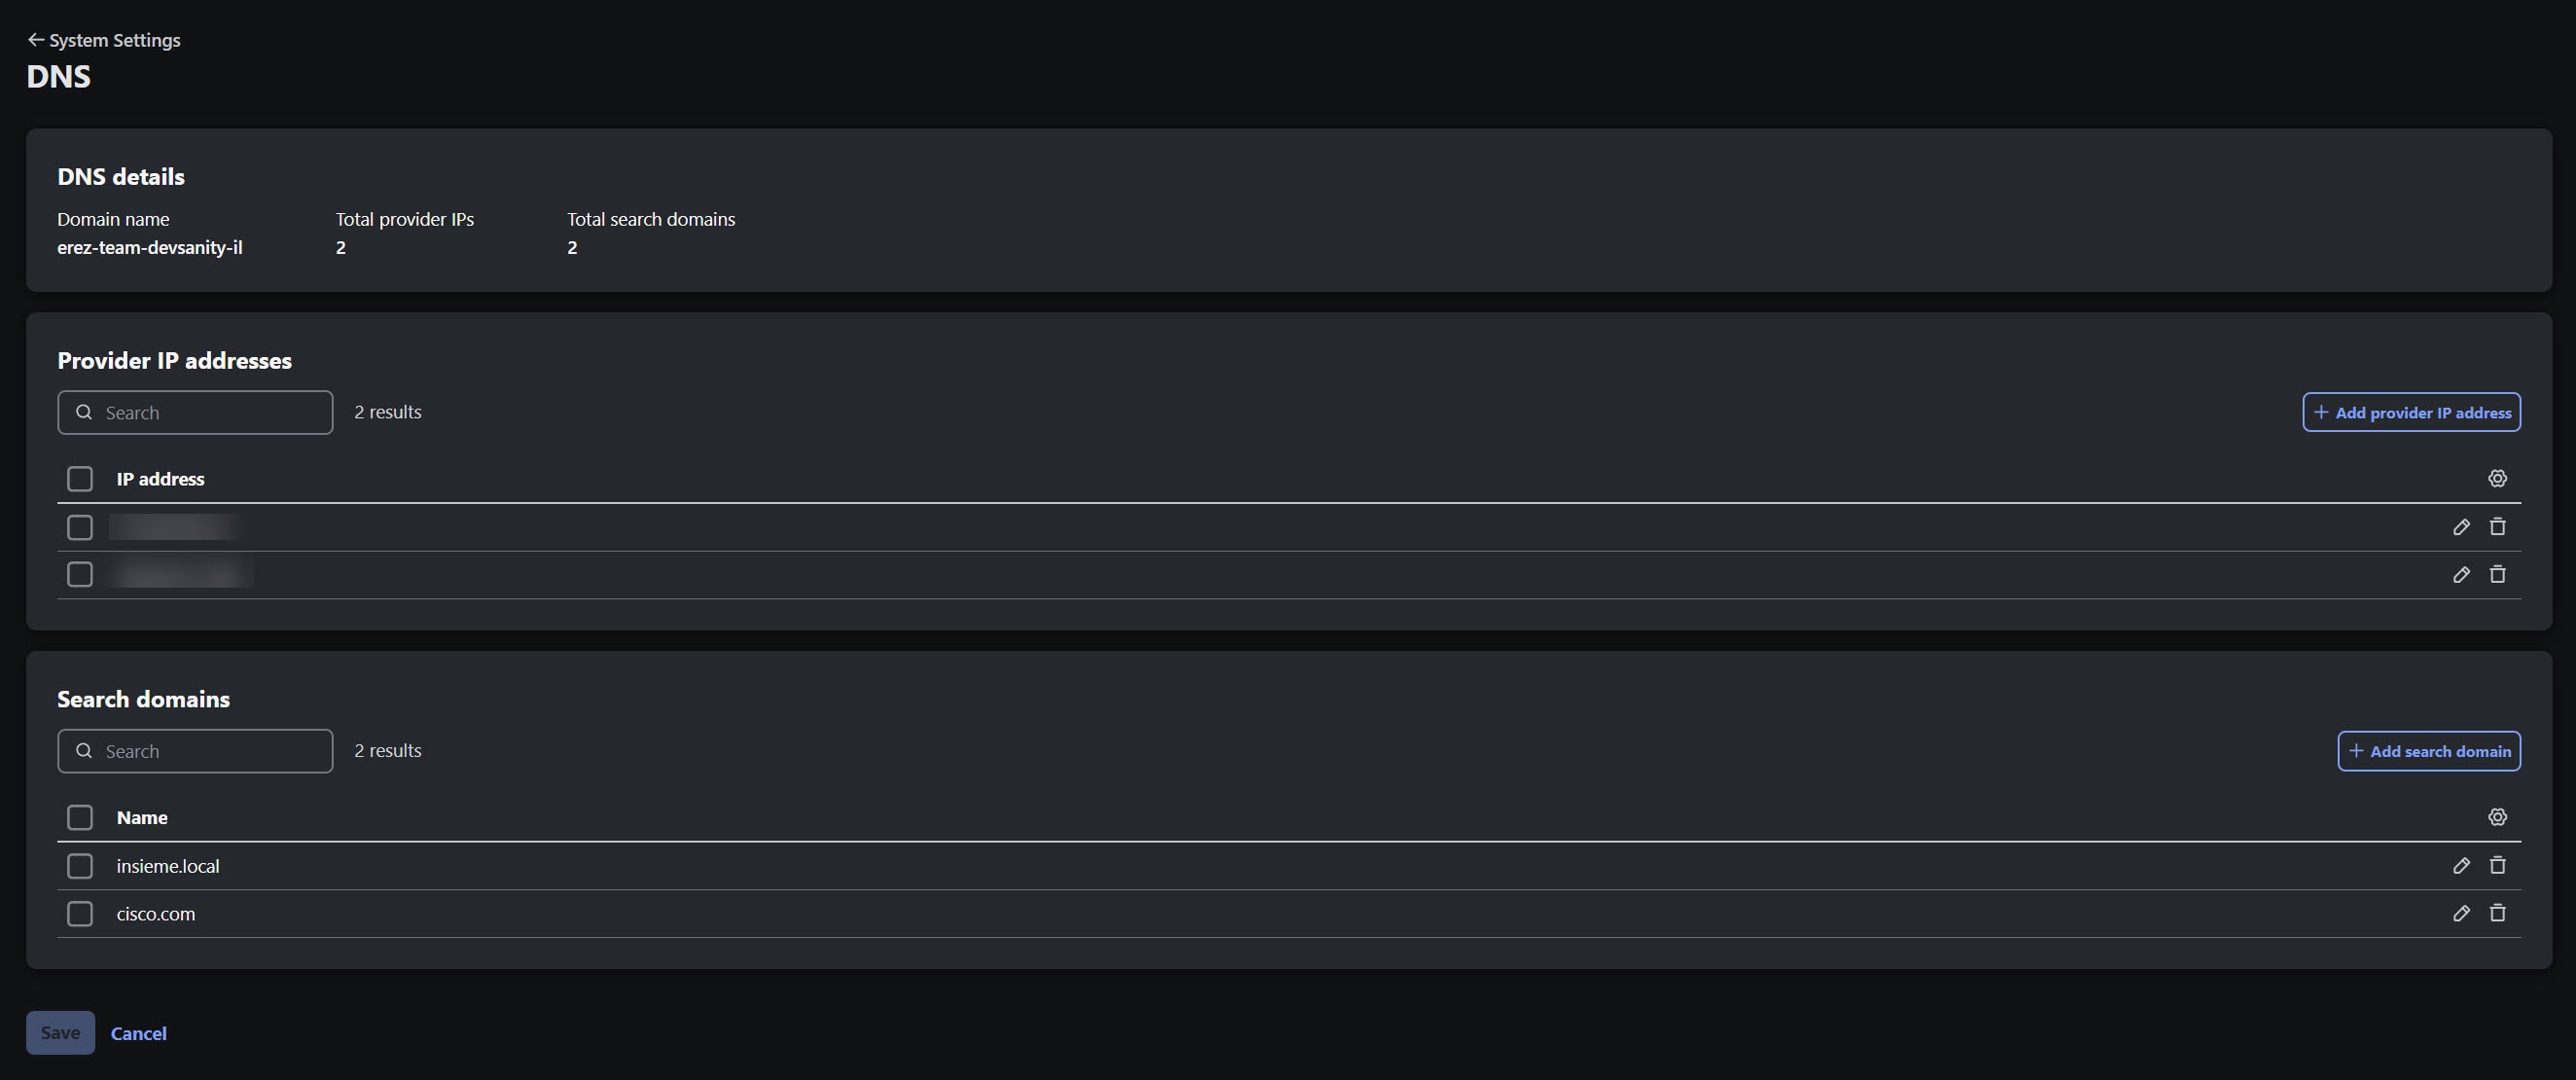 Figure 21. DNS settings
 -
Under Provider IP addresses, add, edit, or remove DNS server IP addresses as required.
To add a DNS server, select Add provider IP address and enter the IP address. Select Add.
-
Under Search domains, add, edit, or remove DNS search domains as required.
To add a search domain, select Add search domain and enter the domain name. Select Add.
-
Select Save to save the DNS settings.
Configure NTP
NTP settings are initially configured during system bringup. Update the NTP configuration if the time servers or authentication settings used by Crosswork AI change.
You can configure one or more NTP servers and optionally use authentication.
To configure or update NTP:
-
Choose Administration > System Settings.
-
Under NTP, select Edit.
-
If the NTP server requires authentication, add the authentication key:
-
Under ID authentication, select Add key.
-
Enter the key ID and key.
-
For Authentication type, choose MD5, SHA1, or AES128CMAC.
-
Enable Trusted if the key should be configured as trusted.
-
Select Add.
-
-
To add a new NTP server, select Add NTP host name. To edit an existing NTP server, choose Edit from the corresponding … menu.
-
Enter the NTP server hostname or IP address.
-
If you configured authentication, choose the corresponding Key ID.
-
Enable Preferred if this server should be the preferred NTP server.
-
Select Add.
-
Select Save to save the settings.
Configure an external proxy
Configure an external proxy when the Crosswork AI VM cannot directly reach required external services from the management network. For example, the external proxy can provide the connectivity required for the Crosswork AI LLM proxy to reach an external LLM provider.
If the VM has direct connectivity to the required external services, an external proxy is not required.
External proxy settings are typically configured during initial system bringup. For information about the initial configuration, refer to Configure an external proxy in the Crosswork AI Getting Started guide.
To configure or update an external proxy:
-
Choose Administration > System Settings.
-
Under Proxy configuration, select Edit.
-
Select Add to configure a new proxy, or select the edit icon for an existing proxy.
-
For Type, choose HTTP, HTTPS, or HTTP and HTTPS.
-
Enter the proxy server URL or IP address and port.
-
For Authentication, select one of the following:
-
None if the proxy does not require authentication.
-
Credentials if the proxy requires authentication, and enter the username and password.
-
-
Under Ignored hosts, add or edit any domains or IP addresses that should bypass the proxy.
-
Select Save.
After you save the proxy settings, Crosswork AI restarts the LLM proxy service. Wait for the restart to complete before configuring or verifying LLM provider connectivity.
Configure the pre-login disclaimer
Configure a pre-login disclaimer to display an authorized-use, security, or other required notice before users sign in to Crosswork AI.
To configure or update the pre-login disclaimer:
-
Choose Administration > System Settings.
-
Under Pre-login disclaimer notification, select Edit.
-
Enter the message that you want to display to users before sign-in.
-
Select Save to save the message.