Enables one-to-one Layer 2 NAT to map unique public IP addresses to private IP addresses for end devices. This functionality allows devices with duplicate private IP addresses to communicate across public networks in industrial deployments.
One-to-one (1:1) Layer 2 NAT allows you to assign a unique public IP address to an existing private IP address (end device). This enables the end device to communicate with a public network.
Layer 2 NAT maintains two translation tables:
private-to-public subnet translations
public-to-private subnet translations
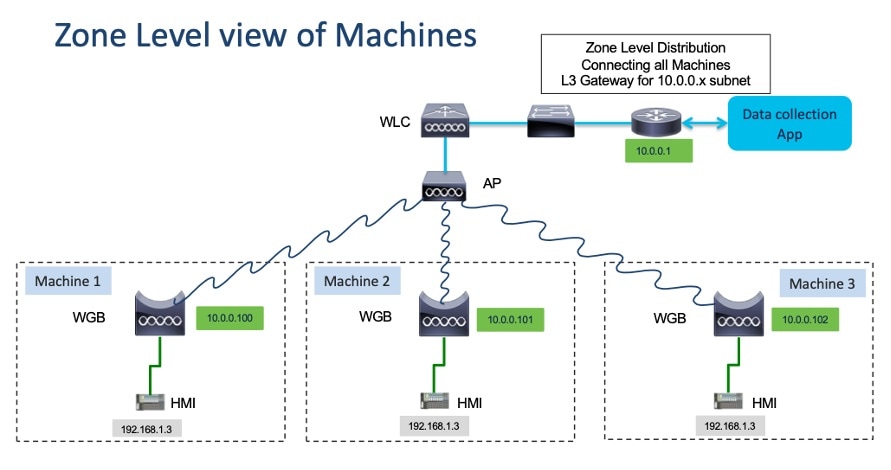
In industrial deployments, such as Human Machine Interfaces (HMIs) or robots, the same firmware is often programmed on every machine. This results in duplicate IP addresses across multiple devices. Layer 2 NAT resolves this issue by enabling devices with duplicate private IP addresses to communicate with public networks.
Configure Layer 2 NAT
The Layer 2 NAT (Network Address Translation) configuration commands are used to control IP address translation for wired clients within a VLAN at Layer 2.
These commands allow administrators to:
Enable or disable Layer 2 NAT globally on the device.
Define a default VLAN where NAT rules are applied.
Translate individual host addresses from private to public, or from public to private.
Translate entire subnets from private-to-public or public-to-private.
This configuration ensures seamless communication between private networks and external/public networks by dynamically or statically mapping IP addresses, while maintaining VLAN-based traffic segregation.
Procedure
Use the configure l2nat { enable | disable} command to enable or disable Layer 2 NAT.
Device# configure l2nat enable
Use the configure l2nat default-vlan vlan_id command to define the VLAN where all NAT rules are applied.
Device# configure l2nat default-vlan 10
Note
If you do not specify a VLAN ID, VLAN 0 is used.
Use the configure l2nat { add | delete} inside from host original_ip_addr to translated_ip_addr command to translate a private IP address of a wired client to a public IP address.
Device# configure l2nat add inside from host 192.168.1.10 to 203.0.113.10
Use the configure l2nat { add | delete} outside from host original_ip_addr to translated_ip_addr command to translate a public IP address to a private IP address.
Device# configure l2nat add outside from host 203.0.113.20 to 192.168.1.20
Use the configure l2nat { add | delete} inside from network original_nw_prefix to translated_nw_prefix subnet_mask command to translate a private subnet to a public subnet.
Device# configure l2nat add inside from network 192.168.1.0 to 203.0.113.0 255.255.255.0
Use the configure l2nat { add | delete} outside from network original_nw_prefix to translated_nw_prefix subnet_mask command to translate a public subnet to a private subnet.
Device# configure l2nat add outside from network 203.0.113.0 to 192.168.1.0 255.255.255.0
Verify Layer 2 NAT Configuration
Use the following commands to verify Layer 2 NAT configuration, check translation statistics, and clear rules or counters for troubleshooting.
show l2nat entry: Displays the Layer 2 NAT running entries.
show l2nat config: Displays the Layer 2 NAT configuration details.
show l2nat stats: Displays the Layer 2 NAT packet translation statistics.
show l2nat rules: Displays the Layer 2 NAT rules from the configuration.
debug l2nat: Enables debugging of packet translation process.
debug l2nat all: Prints out the NAT entry match result when a packet arrives.
Caution
This command may create overwhelming log print in console. Console may lose response because of this command, especially when Syslog service is enabled with a broadcast address.
undebug l2nat: Disables debugging of packet translation process.
Configuration Example of Host IP Address Translation
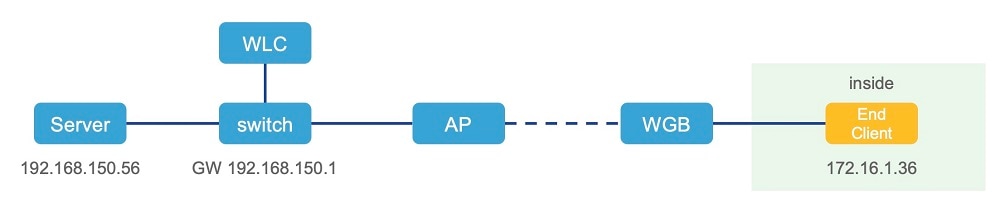
In this scenario, the end client (172.16.1.36) connected to WGB needs to communicate with the server (192.168.150.56) connected to the gateway. Layer 2 NAT provides an address for the end client on the outside network (192.168.150.36) and an address for the server on the inside network (172.16.1.56).
Layer 2 NAT configuration example
This example displays Layer 2 NAT configuration details. In the output, I2O means 'inside to outside' and O2I means 'outside to inside.
Device# show l2nat config

L2NAT Configuration are:
===================================
Status: enabled
Default Vlan: 0
The Number of L2nat Rules: 4
Dir      Inside                    Outside                    Vlan
O2I      172.16.1.56               192.168.150.56             0
I2O      172.16.1.36               192.168.150.36             0
I2O      172.16.1.255              192.168.150.255            0
I2O      172.16.1.1                192.168.150.1              0
This example displays the WGB wired clients over the bridge.
Before Layer 2 NAT is enabled:
Device# show wgb bridge
    ***Client ip table entries***
              mac vap     port vlan_id          seen_ip  confirm_ago  fast_brg
B8:AE:ED:7E:46:EB   0   wired0       0      172.16.1.36     0.360000      true
24:16:1B:F8:05:0F   0 wbridge1       0          0.0.0.0  3420.560000      true
After Layer 2 NAT is enabled:
Device# show wgb bridge
    ***Client ip table entries***
              mac vap     port vlan_id          seen_ip  confirm_ago  fast_brg
B8:AE:ED:7E:46:EB   0   wired0       0   192.168.150.36     0.440000      true
24:16:1B:F8:05:0F   0 wbridge1       0          0.0.0.0  3502.220000      true
Note
If the wired client in NAT experiences E2E traffic issues, you can restart the client registration process by using the clear wgb client single command:
Layer 2 NAT packet translation statistics example
This example displays the Layer 2 NAT packet translation statistics.
To reset the statistics, you can use the clear l2nat stats command.
Configuration Example of Network Address Translation
In this scenario, Layer 2 NAT translates inside addresses in the 172.16.1.0/24 subnet to addresses in the 192.168.150.0/24 subnet, replacing only the network prefix during translation. The host bits remain the same.
The command used for this scenario is here:
Device# configure l2nat add inside from network 172.16.1.0 to 192.168.150.0 255.255.255.0