Cisco Catalyst IW9165E Rugged Access Point and Wireless Client Configuration Guide, Cisco IOS XE 26.2.x

PDF

Cisco Catalyst IW9165E Rugged Access Point and Wireless Client Configuration Guide, Cisco IOS XE 26.2.x

Low latency profile

Want to summarize with AI?

Log in

Optimizes IEEE 802.11 networks to meet the low latency and Quality of Service requirements essential for IoT applications. These configurations ensure consistent performance for latency-sensitive traffic in wireless environments.


Low latency profiles are configurations that optimize IEEE 802.11 networks to meet the low latency and Quality of Service requirements essential for IoT applications.

  • Enhanced Distributed Channel Access (EDCA): Prioritizes wireless channel access for latency-sensitive traffic to ensure consistent performance.

  • Aggregated MAC Protocol Data Unit (AMPDU): Combines multiple data frames into a single transmission to reduce overhead and improve efficiency.

  • Packet Retry: Ensures successful data delivery by retransmitting aggregated or individual packets based on network conditions.

IoT Application Support

These features collectively support the deployment of IoT devices and applications that demand low latency and high Quality of Service in wireless environments.

Enable or disable an optimized-video EDCA profile

Configure an optimized low-latency profile for video use cases to improve video performance by reducing delays and enhancing the quality of service.

This task focuses on enabling or disabling the optimized-video EDCA profile on a specific radio interface of WGB. The optimized-video profile ensures better handling of video traffic by prioritizing it in the network.

Procedure

  1. Enable or disable the optimized-video EDCA profile on a specific radio interface of WGB using one of the options.

    Option Description
    Enable optimized video EDCA profile Use the configure dot11Radio radio_slot_id profile optimized-video enable command.
    Device# configure dot11Radio 1 profile optimized-video enable
    Disable optimized video EDCA profile Use the configure dot11Radio radio_slot_id profile optimized-video disable command.
    Device# configure dot11Radio 1 profile optimized-video disable
  2. (Optional) Use the show controllers dot11Radio radio_slot_id command to verify the configuration:

    Device# show controllers dot11Radio 1
    EDCA profile: optimized-video
    EDCA in use
    =============
    AC Type CwMin CwMax Aifs Txop ACM
    AC_BE L 4 10 11 0 0
    AC_BK L 6 10 11 0 0
    AC_VI L 3 4 2 94 0
    AC_VO L 2 3 1 47 0
    
    Packet parameters in use
    =============
    wbridge1 A-MPDU Priority 0: Enabled
    wbridge1 A-MPDU Priority 1: Enabled
    wbridge1 A-MPDU Priority 2: Enabled
    wbridge1 A-MPDU Priority 3: Enabled
    wbridge1 A-MPDU Priority 4: Disabled
    wbridge1 A-MPDU Priority 5: Disabled
    wbridge1 A-MPDU Priority 6: Disabled
    wbridge1 A-MPDU Priority 7: Disabled
    wbridge1 A-MPDU subframe number: 3
    wbridge1 Packet retries drop threshold: 16

Enable or disable optimized-automation EDCA profile

Enable the optimized low-latency profile for automation use cases to improve performance and efficiency in wireless network environments.

Procedure

  1. Enable or disable the optimized-video EDCA profile on a specific radio interface of WGB using one of the options.

    Option Description
    Enable optimized-automation EDCA profile Use the configure dot11Radio radio_slot_id profile optimized-automation enable command.
    Device# configure dot11Radio 1 profile optimized-automation enable
    Disable optimized-automation EDCA profile Use the configure dot11Radio radio_slot_id profile optimized-automation disable command.
    Device# configure dot11Radio 1 profile optimized-automation disable
  2. (Optional) Use the show controllers dot11Radio radio_slot_id command to verify the configuration:

    Device# show controllers dot11Radio 1
    
    EDCA profile: optimized-automation
    EDCA in use
    =============
    AC Type CwMin CwMax Aifs Txop ACM
    AC_BE L 7 10 12 0 0
    AC_BK L 8 10 12 0 0
    AC_VI L 7 7 3 0 0
    AC_VO L 3 3 1 0 0
    
    Packet parameters in use
    =============
    wbridge1 A-MPDU Priority 0: Enabled
    wbridge1 A-MPDU Priority 1: Enabled
    wbridge1 A-MPDU Priority 2: Enabled
    wbridge1 A-MPDU Priority 3: Enabled
    wbridge1 A-MPDU Priority 4: Disabled
    wbridge1 A-MPDU Priority 5: Disabled
    wbridge1 A-MPDU Priority 6: Disabled
    wbridge1 A-MPDU Priority 7: Disabled
    wbridge1 A-MPDU subframe number: 3
    wbridge1 Packet retries drop threshold: 16

Configure customized-wmm EDCA profile

Customize the Wi-Fi Multimedia (WMM) profile to optimize traffic queues and improve QoS for specific types of network traffic.

WMM enhances the performance of Wi-Fi networks by prioritizing traffic based on the type of data being transmitted. Configuring a customized WMM EDCA (Enhanced Distributed Channel Access) profile allows you to fine-tune the performance parameters for voice, video, background, and best-effort traffic.

Procedure

  1. Use the configure dot11Radio radio_slot_id profile customized-wmm enable command to enable the customized WMM profile.

    Device# configure dot11Radio 1 profile customized-wmm enable
  2. Use the configure dot11Radio {0| 1|2}wmm {be| vi| vo| bk}{cwmin cwmin_num |cwmax cwmax_num | aifs aifs_num |txoplimit txoplimit_num} command to configure customized WMM profile parameters.

    configure dot11Radio 1 wmm vo cwmin 3

    Parameter descriptions:

    • be—best-effort traffic queue (CS0 and CS3)

    • bk—background traffic queue (CS1 and CS2)

    • vi—video traffic queue (CS4 and CS5)

    • vo—voice traffic queue (CS6 and CS7)

    • aifs—Arbitration Inter-Frame Spacing, <1-15> in units of slot time

    • cwmin—Contention Window min, <0-15> 2^n-1, in units of slot time

    • cwmax—Contention Window max, <0-15> 2^n-1, in units of slot time

    • txoplimit—Transmission opportunity time, <0-255> integer number, in units of 32us

  3. (Optional) Disable the customized WMM profile.

    Use the configure dot11Radio radio_slot_id profile customized-wmm disable command to disable the customized WMM profile.

    Device#configure dot11Radio 1 profile customized-wmm disable

Configure EDCA parameters using Controller GUI

Configure Enhanced Distributed Channel Access (EDCA) parameters to optimize wireless channel access for voice, video, and other QoS traffic.

Procedure

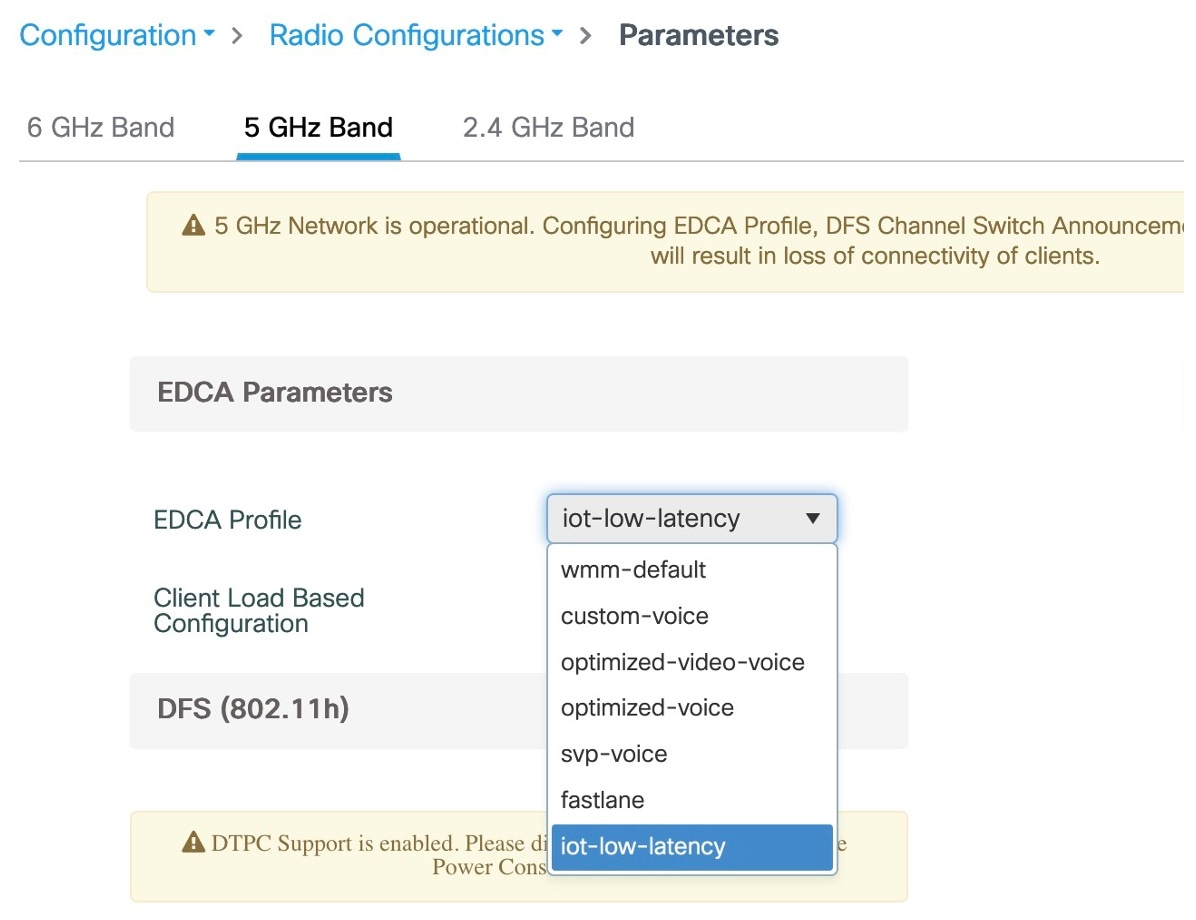
  1. Navigate to Configuration > Radio Configurations > Parameters.

    This page allows you to configure global parameters for 6 GHz, 5 GHz, and 2.4 GHz radios.

    Note

    You cannot configure or modify parameters, if the radio network is enabled. Disable the network status on the Configuration > Radio Configurations > Network page to continue.

  2. In the EDCA Parameters section, choose an EDCA profile from the EDCA Profile drop-down list.

    EDCA parameters provide preferential wireless channel access for voice, video, and other QoS traffic.

  3. Click Apply.


Configure EDCA parameters using Controller CLI

To optimize wireless network performance for IoT low-latency applications by adjusting Enhanced Distributed Channel Access (EDCA) parameters.

Perform these steps on the command-line interface (CLI) of a Cisco Wireless Controller.

Procedure

  1. Use the configure terminal command to enter the global configuration mode.

    Device# configure terminal
  2. Use the ap dot11 {5ghz | 24ghz | 6ghz } shutdown command to disable the radio network.

    Device(config)# ap dot11 5ghz shutdown
  3. Use the ap dot11 {5ghz | 24ghz | 6ghz } edca-parameters iot-low-latency command to enable the iot-low-latency EDCA profile for the 5 GHz, 2.4 GHz, or 6 GHz network.

    Device(config)# ap dot11 5ghz edca-parameters iot-low-latency
  4. Use the no ap dot11 {5ghz | 24ghz | 6ghz } shutdown command to enable the radio network.

    Device(config)# no ap dot11 5ghz shutdown
  5. Use the end command to return to privileged EXEC mode.

    Device(config)# end
  6. (Optional) Use the show ap dot11 {5ghz | 24ghz | 6ghz } network command to view the current configuration.

    Device# show ap dot11 5ghz network
    
    EDCA profile type check                   : iot-low-latency
    

A-MPDU

Aggregation is the process of grouping multiple packet data frames into a single larger frame for transmission, rather than sending them individually. This method enhances efficiency and reduces overhead in wireless communications. Two common aggregation methods are Aggregated MAC Protocol Data Unit (A-MPDU) and Aggregated MAC Service Data Unit (A-MSDU). A-MPDU parameters specifically define the size of the aggregated packet and the necessary spacing between aggregated packets, allowing the receiving WLAN station to properly decode the data.


Configure A-MPDU

Before you begin

Configure A-MPDU parameters to optimize the aggregation and transmission of packet data frames, ensuring efficient decoding by WLAN stations.

Procedure

  1. Use the ap dot11 {5ghz | 24ghz | 6ghz } rf-profile profile-name command to configure profile-based A-MPDU parameters.

    Device# ap dot11 5ghz rf-profile Video-Optimized
  2. Use the dot11n a-mpdu tx block-ack window-size window-size command to configure transmission block-acknowledgment (block-ack) window size.

    Device(config-rf-profile)# dot11n a-mpdu tx block-ack window-size 64 
    Note

    RF profile level configured value takes preference over globally configured value.

  3. Use the exit command to return to global configuration mode.

    Device(config-rf-profile)# exit
  4. Use the ap dot11 {5ghz | 24ghz | 6ghz } dot11n a-mpdu tx block-ack window-size window-size command to configure transmission block-acknowledgment window size globally.

    Device(config)# ap dot11 24ghz dot11n a-mpdu tx block-ack window-size 32  
  5. Use the wireless tag rf rf-tag-name command to create an RF tag.

    Device(config)# wireless tag rf Branch-RF-Tag 
    
  6. Use the 5ghz-rf-policy rf-profile-name command to bind RF tags to RF profiles and to apply them to specific radios.

    Device(config-wireless-rf-tag)# 5ghz-rf-policy Video-Optimized 
  7. Use the end command to return to privileged EXEC mode.

    Device(config-wireless-rf-tag)# end
  8. (Optional) Use the show controllers dot11Radio radio_slot_id command to show the configured A-MPDU length value.

    Device# show controllers dot11Radio 1
    
    Radio Aggregation Config:
    =========================
    
    TX A-MPDU Priority: 0x3f
    TX A-MSDU Priority: 0x3f
    TX A-MPDU Window:   0x7f