Prepare Platform Integration

Prepare Platform Integration

Controller-based deployments and Meraki deployments use different activation paths. For Catalyst 9800 and AireOS networks, enable the Hotspot service on the Cisco Spaces Connector. For standard Meraki API deployments, OpenRoaming activation is handled through Meraki API integration; a Hotspot Connector is not required unless Cisco Support directs a connector-based Meraki activation.


Note


  • The Cisco Spaces Connector requires direct outbound access to Cisco Spaces and OpenRoaming services.

  • If the connector path crosses a firewall, DNS security service, proxy, or SSL inspection device, allowlist the required domains and ports in the OpenRoaming Firewall Rules section.

  • Bypass TLS inspection or proxy authentication before enabling the hotspot service.


Controller-Based Deployments: Enable Hotspot on Cisco Spaces Connector

Before you begin

Controller, connector, and access point prerequisites:

  • Catalyst 9800 WLC requires IOS XE 16.12.1 or later and a Cisco Spaces Connector.

  • AireOS WLC requires AireOS 8.10.x and a Cisco Spaces Connector. AireOS 8.9, 8.8, 8.7, and earlier releases are EoL/EoS and are not supported for OpenRoaming.

  • Deploy and activate Cisco Spaces Connector. Version 3.x is highly recommended for new deployments. Minimum supported version is 2.3.2 or above.

  • Supported APs include all 9100 Series Access Points and Catalyst Wave 1 and Wave 2 Access Points.

  • Review the WLC release notes to confirm AP support for the target controller release.

Unsupported deployment and connectivity prerequisites:

  • Embedded Wireless Controller (EWC) on Catalyst 9100 and Embedded Wireless on Catalyst 9000 switches are not supported.

  • CMX Tethering is not supported.

  • Confirm that Hotspot Service is added to the connector.

  • Configure and test connectivity between the connector and the wireless controller.

  • Validate connector internet access or firewall/proxy allowlisting.

  • HTTP/HTTPS proxy configuration on the Cisco Spaces Connector is not supported for the OpenRoaming hotspot path. Use the firewall allowlist and direct outbound access model described in OpenRoaming Firewall Rules.

Procedure


Step 1

In Cisco Spaces, go to Setup > Wireless Networks.

Step 2

In the Connect your wireless network flow, open the connector list and select the required Connector 3.x.

Step 3

Add Hotspot Service to the connector if it is not already enabled. Cisco Spaces adds the service-manager service by default.

Step 4

In the Connector GUI, configure the hotspot service token.

Step 5

Configure and test controller connectivity for the applicable controller type.

Step 6

After the hotspot service and controller connectivity are configured, return to OpenRoaming > Setup.


Verify hotspot-enabled connector

Continue this task after the hotspot service and controller connectivity are configured, and after returning to OpenRoaming > Setup.

Procedure


Step 1

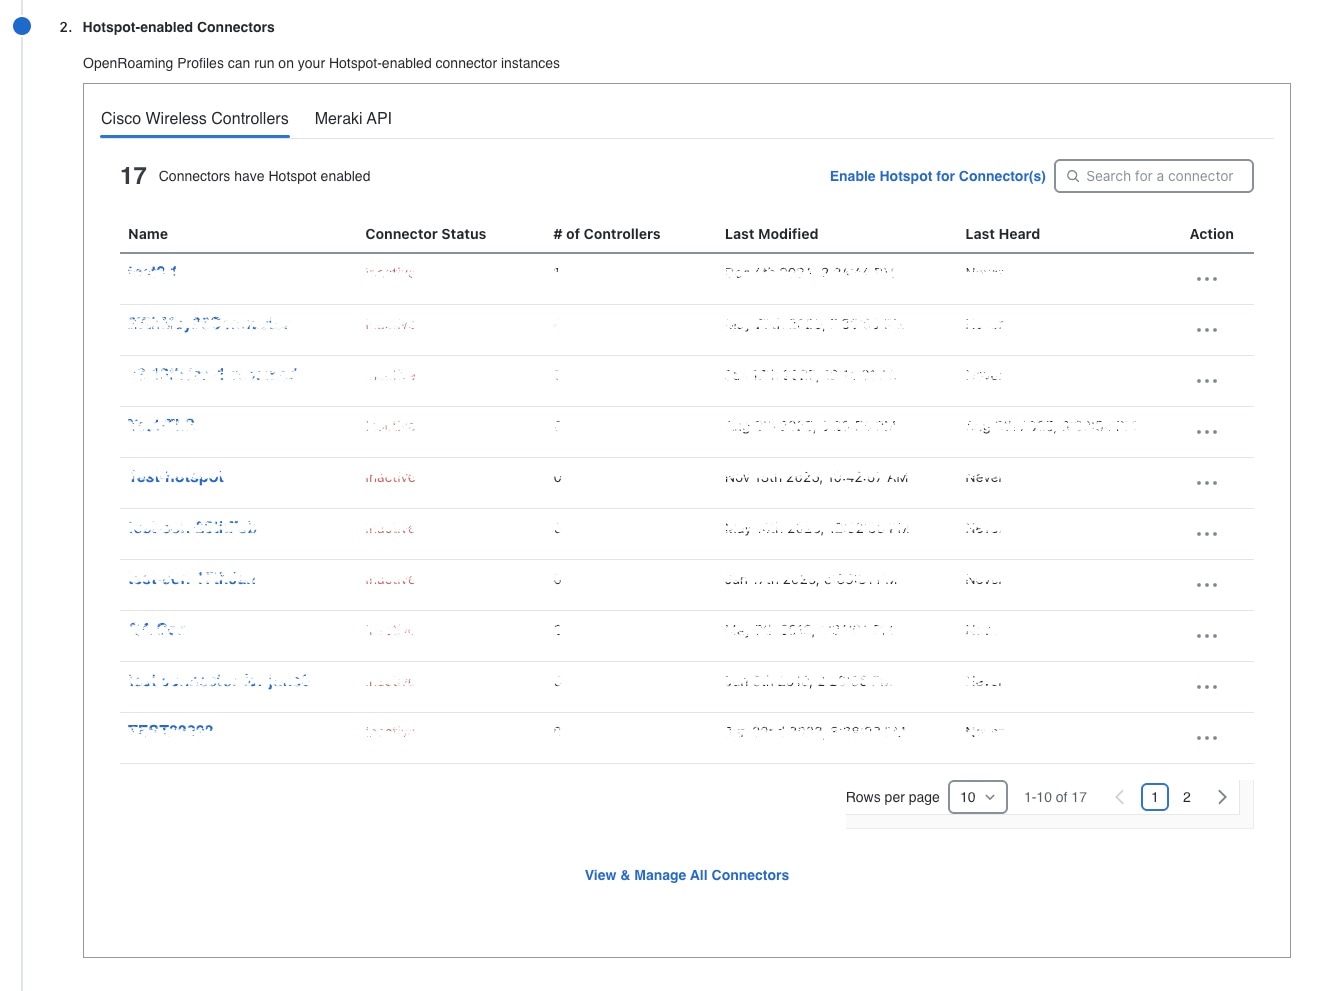
In Section 2, Hotspot-enabled Connectors, verify that the connector is listed.

Figure 1. Hotspot-enabled Connectors

Step 2

In Section 3, verify that the associated controllers are displayed.

Step 3

In the Connector Status column, confirm that the status is Running. If status is not Running, check DNS, firewall or proxy logs, connector token, connector services, and controller reachability.


Note


  • Starting December 2023, Connector 2.x entered software maintenance mode. Security updates continue through June 2024 and support for critical bug fixes continues through October 2024.

  • Adding Hotspot Service installs the OpenRoaming hotspot container on the Cisco Spaces Connector.

  • If the selected connector is already hotspot enabled, continue to the wireless network configuration section.

  • Each hotspot token is intended for one Cisco Spaces Connector.

  • For active-active or HA connector deployments, generate and configure a separate hotspot token for each connector.

  • Reusing the same hotspot token on multiple connectors can prevent the hotspot-enabled connector from working.

  • After the token is saved, the connector downloads and installs the Hotspot Connector image. Refresh the OpenRoaming Setup window before validating connector status.


Controller-Based Deployments: View Connector Details

Procedure


Step 1

On the OpenRoaming window, choose Setup.

Step 2

In Hotspot-enabled Connectors section, click View & Manage All Connectors.

Step 3

Under the Cisco Wireless Controllers tab, click a Connector name.

Step 4

Review Connector Details, then close the window and return to OpenRoaming Setup.


Controller-Based Deployments: View Hotspot Token

Procedure


Step 1

On the OpenRoaming window, choose Setup.

Step 2

In Hotspot-enabled Connectors section.

Step 3

Under the Cisco Wireless Controllers tab, click the three-dot icon in the Action column for the connector.

Step 4

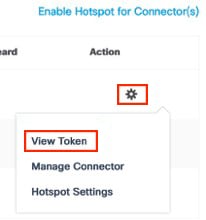
Click View Token.

Figure 2. View Token

Step 5

Click Copy to use the token for Connector setup.

Step 6

In the Cisco Spaces Connector GUI, paste this token in the Configure Token window.


Note


  • After the token is saved, hotspot information is downloaded to the Connector.

  • Refresh the window and verify that the Hotspot tab is present and status is Running.


Controller-Based Deployments: Manage Connector

Procedure


Step 1

On the OpenRoaming window, choose Setup.

Step 2

In Hotspot-enabled Connectors section, Click View & Manage All Connectors.

Step 3

Under the Cisco Wireless Controllers tab, click the three-dot icon in the Action column for the connector.

Step 4

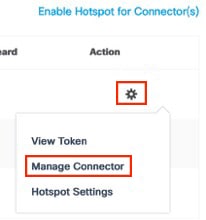
Click Manage Connector.

Figure 3. Manage Connector

Step 5

Choose the required action: Restart connector, Upload logs to cloud, Enable connector debug mode, Enable Hotspot debug mode, or Automatically keep this connector up to date.


Note


  • If the Connector Hotspot service must use specific DNS resolvers, click the three-dot icon for the connector and open Hotspot Settings. Add the required DNS server IP address.

  • Dedicated DNS resolver configuration is optional and applies only when required for the connector/hotspot path.

  • When a new hotspot container version is available, the connector displays the update in the Connector UI.

  • Hotspot container updates do not require token reconfiguration. The connector downloads the new image, stops the old container, and starts the new container.

  • Use debug mode during troubleshooting and disable it when no longer required.

  • Collect logs before restarting a connector during an active issue.


Meraki Deployments: Validate Meraki API Integration

For Meraki deployments, Cisco Spaces uses Meraki API integration to discover organizations and networks before applying an OpenRoaming profile. Use this section to establish or verify the Meraki API connection. Assign the OpenRoaming profile in Configure Cisco Meraki Network.

Before you begin

  • Use a Meraki administrator account with API permissions for the target organization.

  • Confirm that Cisco Spaces can reach the Meraki API path through the customer firewall, proxy, or DNS security controls.

  • For Meraki deployments, ensure the Meraki APs can reach the OpenRoaming RadSec endpoints over TCP 2083 as described in OpenRoaming Firewall Rules.

  • Do not apply an OpenRoaming profile in this section. Profile assignment is covered in Configure Cisco Meraki Network.

Procedure


Step 1

On the OpenRoaming window, choose Setup.

Step 2

In Hotspot-enabled Connectors section, click Meraki API tab.

Step 3

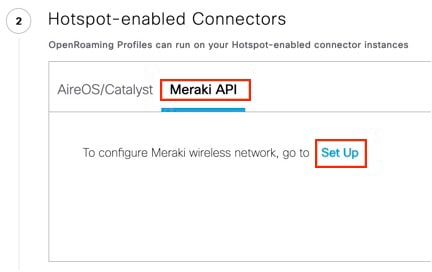
Under the Meraki API tab, click Set Up link.

Figure 4. Meraki API

Step 4

Complete the Meraki account authorization prompts and select the required organization when prompted.

Step 5

Click Next to complete the Meraki API connection.

Step 6

Refresh the OpenRoaming Setup page and confirm that the Meraki API tab shows the Cisco Meraki account as connected.

Figure 5.


Note


  • A green status indicator in the Meraki API tab confirms that the Meraki API connection is active.

  • If the tab displays Set Up, complete the Meraki integration before configuring the Meraki network for OpenRoaming.

  • Continue to Configure Cisco Meraki Network only after the account connection is active.