Cisco Spaces: OpenRoaming App

Configure OpenRoaming

Cisco Spaces: OpenRoaming Configuration Guide

Before you begin

Complete the prerequisites in this section before configuring OpenRoaming. To open the OpenRoaming app in Cisco Spaces, click the OpenRoaming tile on the Cisco Spaces dashboard.

Access and account readiness:

  • Open OpenRoaming from Cisco Spaces Home > Visitor Onboarding & Experience OpenRoaming, or from Feature Apps > OpenRoaming > Open App.

  • During first-time setup, the Terms and Conditions dialog appears when Setup is opened. Click I Agree to open the OpenRoaming Setup window.

  • If OpenRoaming was configured earlier, the OpenRoaming app opens the home or reports page. If Terms and Conditions were accepted but setup is incomplete, the app opens the Get Started page.

  • Confirm that the Cisco Spaces account is active and that the target wireless network is added to Cisco Spaces before starting OpenRoaming configuration.

Deployment and connectivity readiness:

  • For controller-based deployments, confirm Cisco Spaces Connector is deployed and associated with the Catalyst 9800 or AireOS controller.

  • For Meraki deployments, confirm the Cisco Meraki account is added to Cisco Spaces and the admin has read/write access in Meraki Dashboard.

  • Confirm the administrator has read/write permissions in Cisco Spaces for OpenRoaming and Cisco Spaces, read/write access to the target Meraki Dashboard or WLC, and read access to the connector for verification.

  • The Cisco Spaces Connector, controller, Meraki APs, and Meraki API path must reach Cisco Spaces and OpenRoaming services.

  • If the deployment uses a firewall, DNS security service, proxy, or SSL inspection device, allowlist the required domains, ports, and Meraki RadSec HAProxy IP destinations before configuration.

  • Bypass TLS inspection and proxy authentication for OpenRoaming service traffic.
Deployment flow by platform

Summary

Use the workflow that matches the wireless platform. Profile creation is common to all deployments. Activation and network configuration differ between controller-based and Meraki deployments.

Workflow

These stages describe the deployment flow by platform.

  1. Catalyst 9800 and AireOS Flow
    • Create the OpenRoaming profile in Cisco Spaces.
    • Enable Hotspot service on the Cisco Spaces Connector and configure the hotspot token.
    • Confirm the connector hotspot status is Running and that the controller is visible in Cisco Spaces.
    • Generate the Catalyst 9800 or AireOS CLI configuration from Cisco Spaces.
    • Review and apply the generated CLI on the controller. For Catalyst 9800, select the Catalyst version option that matches the controller IOS XE release before copying the configuration.
    • Check OpenRoaming activation, then test with a supported client.
  2. Cisco Meraki Flow
    • Create the OpenRoaming profile in Cisco Spaces with a new unique SSID name.
    • Validate that the Meraki API integration is connected and active in Cisco Spaces.
    • Select the Meraki organization and Meraki networks, then apply the OpenRoaming profile.
    • In the Meraki Dashboard, confirm that the SSID exists and is enabled with RADIUS, WPA2 or WPA3 encryption, no splash page, and Hotspot 2.0 enabled.
    • Check OpenRoaming activation, Meraki clients, and Meraki Organization > Monitor > Change Log, then test with a supported client.

Create an OpenRoaming profile

An OpenRoaming profile contains information about the network SSID and specifies which user identities are allowed to access the guest network. You can also configure carrier offload in the OpenRoaming profile.

Before you begin

Before creating the profile, confirm SSID naming, access policy, identity requirements, carrier-offload scope, and firewall/domain readiness.

Procedure


Step 1

Choose an access policy.

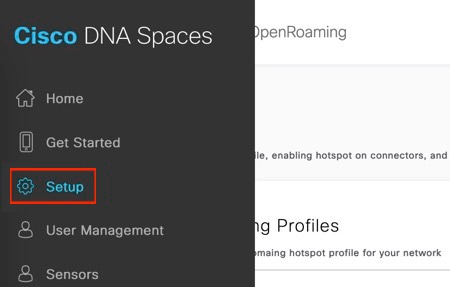
  1. On the OpenRoaming window, choose Setup. The OpenRoaming Setup window is displayed.

    Figure 1. OpenRoaming Setup
  2. In the OpenRoaming Profiles section, click Create OpenRoaming Profile. The Create an OpenRoaming Profile configuration wizard is displayed.

  3. Click Proceed.

  4. Under Access Policy, specify who can access your OpenRoaming network.

    • Accept all authenticated users: This is the default option.

    • Accept only users who provide their identity: Use when real identity such as an email ID is required.

    • Accept users with specified identity types: Choose the desired identity types and enable Require real identity if needed.

    • Accept only your users: Use only when the customer identity provider integration is ready.

  5. Under Preferred Credentials, specify who can access your OpenRoaming.

    • I do not have preferred credentials: This is the default option.

    • I have preferred credentials, which I want to use: Select a domain from the drop-down list, click Add.

  6. Click Continue. The SSID Details window is displayed.

Step 2

Configure an SSID.

  1. In the SSID Details section, enter the SSID name. This is the secure SSID that will be broadcast for OpenRoaming and should be separate from captive-portal guest SSIDs.

  2. In the Advanced section, choose Default Status as Enable or Disable. The default option is Enable.

  3. For Fast Transition (802.11r), choose Adaptive, Enable, or Disable. The default option is Adaptive.

  4. Click Continue. The Carrier Offload window is displayed.

Step 3

(Optional) Configure carrier offload.

  1. Use the Allow Carrier Offload knob to enable Carrier Offload settings.

  2. Select from the available carriers.

Carrier offload enables mobile carrier subscribers to use the OpenRoaming SSID for carrier-integrated voice and data services. This configuration is optional.

Before configuring carrier offload, confirm the following prerequisites:

  • You must have an existing relationship with a mobile carrier or service provider.

  • The settlement provider must already be configured with the mobile carrier or service provider.

  • Required carrier offload domains must be allowlisted if the customer enables carrier offload.

For more information, refer to the Carrier Offload Activation.

Step 4

Click Continue. The Review your Configuration window is displayed.

Step 5

Review and confirm the OpenRoaming profile configuration.

  1. In the Review Your Configuration window, verify the access policy and SSID details.

  2. If the configuration is correct, click Done. A success message appears briefly, and a confirmation window is displayed.

  3. Confirm that the profile appears in the OpenRoaming Profiles section and that the access policy, SSID, and carrier-offload settings match the intended deployment.

Step 6

Click Continue OR setup to return to OpenRoaming Setup window.


Note


Profile and SSID notes:

  • If Accept only your users is selected, I do not have preferred credentials is disabled. Confirm IdP readiness before selecting this policy.

  • For Catalyst and AireOS deployments, if the name entered is an existing SSID, ensure that the SSID name is an exact match of what is in the network.

  • SSID broadcast must remain enabled.

  • For Meraki deployments, use a new unique SSID name and ensure that an unused disabled SSID is available before applying the OpenRoaming profile.

  • Use Adaptive for 802.11r unless another setting has been validated for the target client mix. Enable allows all clients to use Fast Transition, including clients that do not support it. Adaptive enables Fast Transition only for capable clients; other clients fall back to regular reauthentication.

Carrier offload notes:

  • Partner App activation support in OpenRoaming is available for AT&T and T-Mobile. Partner App activation is required before associating a carrier-enabled OpenRoaming profile to a newly onboarded controller or Meraki network.

  • If the required Partner App is not activated, Cisco Spaces does not allow the carrier-enabled profile to be configured on the newly onboarded network.


Edit an OpenRoaming profile

Procedure


Step 1

On the OpenRoaming window, choose Setup. The OpenRoaming Setup window is displayed.

Step 2

(Optional) To view the existing configuration, click the profile name.

Step 3

In the OpenRoaming Profiles section, click the three-dot icon for the profile that you want to update.

Step 4

Click Edit profile.

Step 5

Make changes and click Continue until the Review your Configuration window is displayed.

Step 6

Review the updates. If the changes are correct, click Done.

Step 7

Before editing a production profile, confirm the impact on assigned controllers, Meraki networks, carrier offload, and identity policy. Use a change window for production updates.


Delete an OpenRoaming profile

Procedure


Step 1

On the OpenRoaming window, choose Setup. The OpenRoaming Setup window is displayed.

Step 2

In the OpenRoaming Profiles section, click the three-dot icon for the profile you want to delete.

Step 3

Click Delete profile.

A warning window is displayed.

Step 4

Click Delete.


Note


Do not delete a profile that is still assigned to a controller or Meraki network unless rollback and customer impact are understood.