- Preface
- Overview
- Installing the Server Operating System or Hypervisor
- Managing the Server
- Viewing Server Properties
- Viewing Server Sensors
- Managing Remote Presence
- Managing User Accounts
- Configuring Network-Related Settings
- Configuring Communication Services
- Managing Certificates
- Configuring Platform Event Filters
- CIMC Firmware Management
- Viewing Logs
- Server Utilities
- Diagnostic Tests
- Index
Installing the Server Operating System or Hypervisor
This chapter includes the following sections:
- Operating System or Hypervisor Installation Methods
- KVM Console
- PXE Installation Servers
- Host Image Mapping
Operating System or Hypervisor Installation Methods
E-Series Servers support several operating systems and hypervisors. Regardless of the platform being installed, you can install it on your server using one of the following tools:
KVM Console
The KVM console is an interface accessible from CIMC that emulates a direct keyboard, video, and mouse connection to the server. The KVM console allows you to connect to the server from a remote location. Instead of using CD/DVD or floppy drives physically connected to the server, the KVM console uses virtual media, which are actual disk drives or disk image files that are mapped to virtual CD/DVD or floppy drives. You can map any of the following to a virtual drive:
- CD/DVD or floppy drive on your computer
- Disk image files (ISO or IMG files) on your computer
- USB flash drive on your computer
Installing an Operating System or Hypervisor Using the KVM Console
 Note |
VMware vSphere Hypervisor™ requires a customized image. To download the customized image, see Downloading the Customized VMware vSphere Hypervisor Image. |
| Step 1 | Load the operating system or hypervisor installation disk into your CD/DVD drive, or copy the disk image files to your computer. | ||
| Step 2 | If CIMC is not open, log into the CIMC GUI. | ||
| Step 3 | In the Navigation pane, click the Server tab. | ||
| Step 4 | On the Server tab, click Summary. | ||
| Step 5 |
From the Actions area, click Launch KVM Console. The KVM Console opens in a separate window. |
||
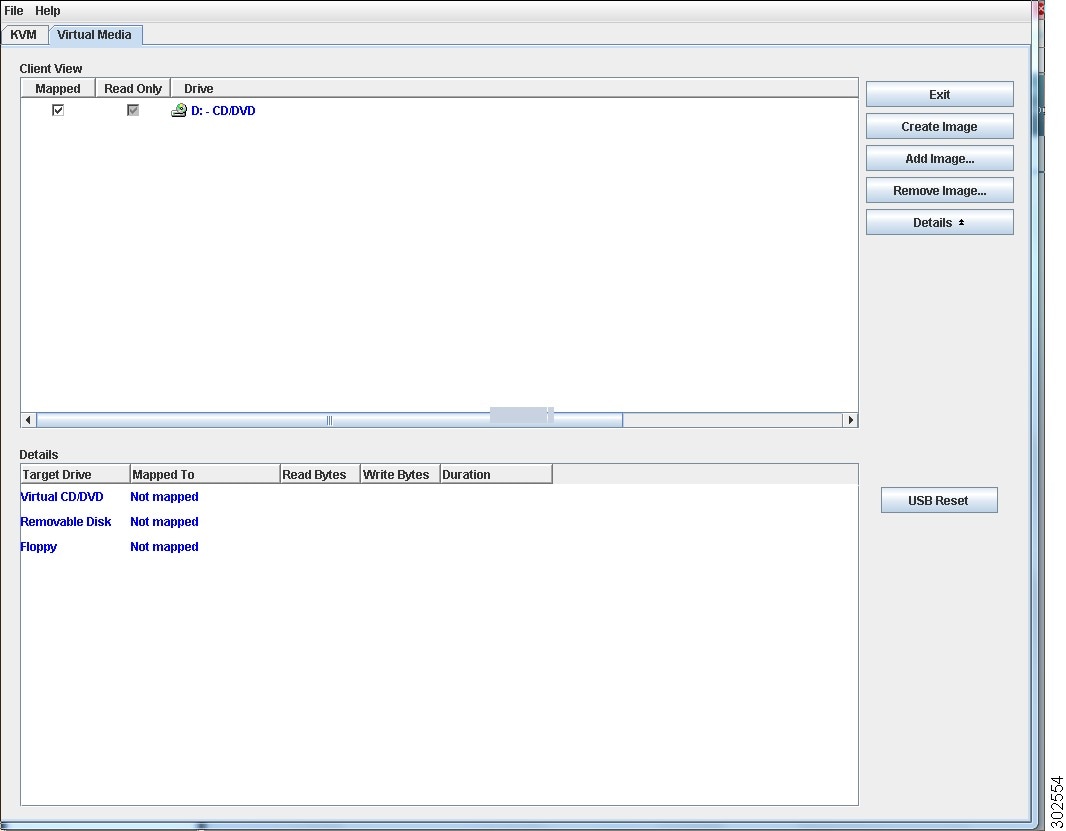
| Step 6 |
From the KVM console, click the Virtual Media tab.
|
||
| Step 7 |
In the Virtual Media tab, map the virtual media using either of the following methods:
|
||
| Step 8 |
Set the boot order to make the virtual CD/DVD drive as the boot device. To set the boot order, see Configuring the Server Boot Order. |
||
| Step 9 |
Reboot the server. When the server reboots, it begins the installation process from the virtual CD/DVD drive. Refer to the installation guide for the platform being installed to guide you through the rest of the installation process. |
||
| Step 10 | If disk drives are not displayed after you install the operating system or hypervisor, you must install drivers. See the appropriate operating system or hypervisor documentation for instructions on how to install drivers. For instructions on how to install drivers on a Microsoft Windows operating system, see Installing Drivers for the Microsoft Windows Operating System. |
What to Do Next
After the installation is complete, reset the virtual media boot order to its original setting.
PXE Installation Servers
A Preboot Execution Environment (PXE) installation server allows a client to boot and install an operating system or hypervisor from a remote location. To use this method, a PXE environment must be configured and available on your LAN, typically a dedicated provisioning LAN. In addition, the server must be set to boot from the network. When the server boots, it sends a PXE request across the network. The PXE installation server acknowledges the request, and starts a sequence of events that installs the operating system or hypervisor on the server.
PXE servers can use installation disks, disk images, or scripts to install the operating system or hypervisor. Proprietary disk images can also be used to install the platform, additional components, or applications.
Note |
PXE installation is an efficient method for installing a platform on a large number of servers. However, considering that this method requires setting up a PXE environment, it might be easier to use another installation method. |
Installing an Operating System or Hypervisor Using a PXE Installation Server
Note |
VMware vSphere Hypervisor™ requires a customized image. To download the customized image, see Downloading the Customized VMware vSphere Hypervisor Image. |
What to Do Next
After the installation is complete, reset the LAN boot order to its original setting.
Host Image Mapping
The Host Image Mapping feature allows you to download, map, unmap, or delete a host image. Download a host image, such as a Microsoft Windows, Linux, or VMware from a remote FTP, FTPS, HTTP, or HTTPS server onto the CIMC internal repository, then map the image onto the virtual drive of a USB controller in the E-Series Server. After you map the image, set the boot order to make the virtual drive, in which the image is mounted, as the first boot device, and then reboot the server. The host image must have .iso as the file extension.
The Host Image Mapping feature also allows you to download and mount a diagnostics image. The diagnostics image must have .diag as the file extension.
- Mapping the Host Image
- Unmapping the Host Image
- Deleting the Host Image
- Downloading the Customized VMware vSphere Hypervisor Image
Mapping the Host Image
- Log into CIMC as a user with admin privileges.
- Obtain the host image file from the appropriate third-party.
Note |
VMware vSphere Hypervisor™ requires a customized image. To download the customized image, see Downloading the Customized VMware vSphere Hypervisor Image. |
Note |
If you start an image update while an update is already in process, both updates will fail. |
| Step 1 | In the Navigation pane, click the Server tab. | ||||||
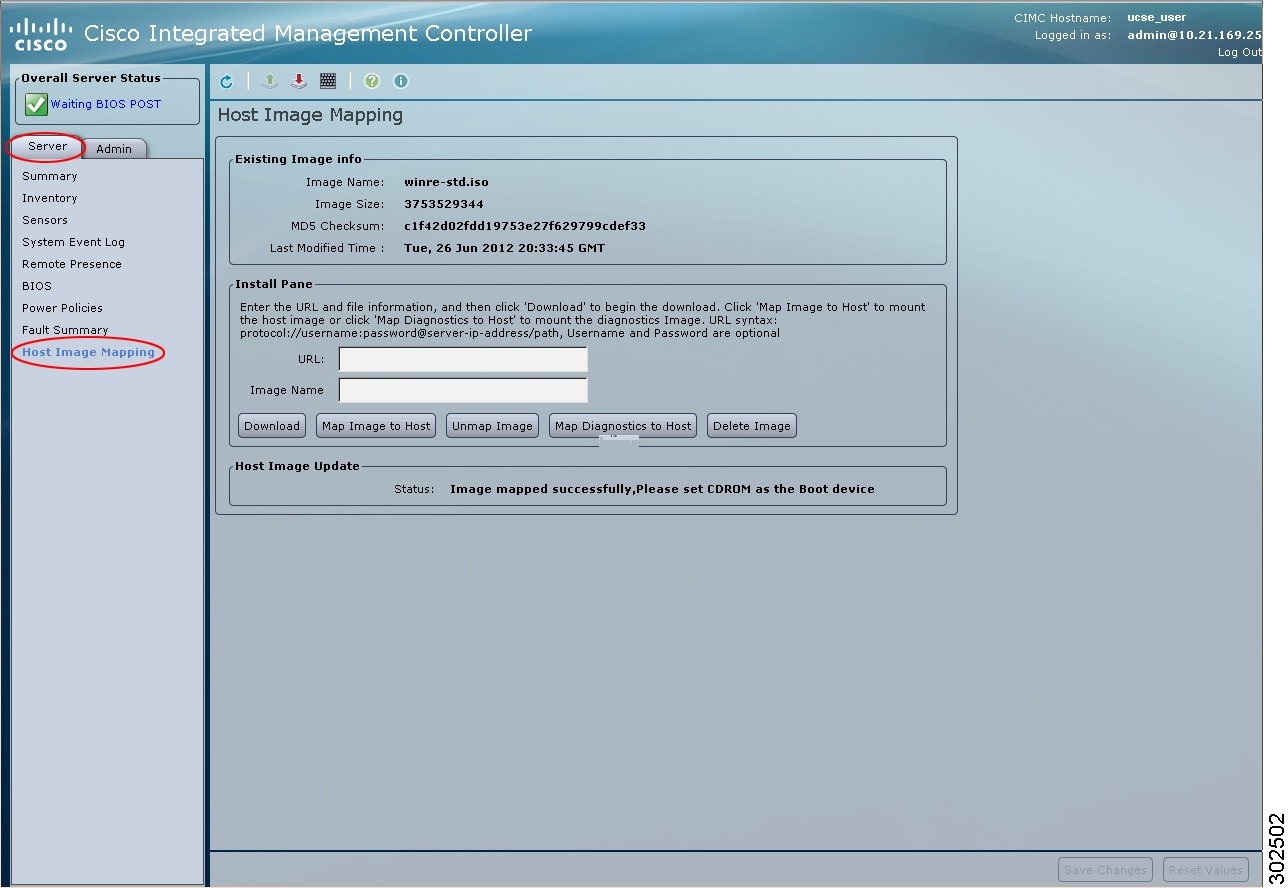
| Step 2 |
On the Server tab, click Host Image Mapping.
|
||||||
| Step 3 |
In the Install Pane, complete the following fields:
|
||||||
| Step 4 |
Click Download. The image file is downloaded from the specified FTP, FTPS, HTTP, or HTTPS server onto the CIMC internal repository. |
||||||
| Step 5 |
Click Map Image to Host. The image is mounted on the virtual drive of a USB controller. The virtual drive can be one of the following: |
||||||
| Step 6 |
Set the boot order to make the virtual drive in which the image is mounted as the first boot device. To set the boot order, see Configuring the Server Boot Order.
|
||||||
| Step 7 | Reboot the server. | ||||||
| Step 8 | If the image contains an answer file, the operating system or hypervisor installation is automated and the image is installed. Otherwise, the installation wizard is displayed. Follow the wizard steps to install the image. | ||||||
| Step 9 | If disk drives are not displayed after you install the operating system or hypervisor, you must install drivers. See the appropriate operating system or hypervisor documentation for instructions on how to install drivers. For instructions on how to install drivers on a Microsoft Windows operating system, see Installing Drivers for the Microsoft Windows Operating System. |
What to Do Next
- After the installation is complete, reset the virtual media boot order to its original setting.
- Unmap the host image. See Unmapping the Host Image.
Installing Drivers for the Microsoft Windows Server
Note |
If you purchased E-Series Server Option 1 (E-Series Server without preinstalled operating system or hypervisor), and you installed your own version of the Microsoft Windows Server, you must install drivers. |
Microsoft Windows operating system requires that you install three drivers:
- On-Board Network Drivers for Windows 2008 R2
- LSI Drivers (On-Board Hardware RAID Controller) for Windows 2008 R2
- Intel Drivers for Windows 2008 R2
If you have purchased a 10 Gigabit add-on card, you must also install the 10G PCIe Network Drivers for Windows 2008 R2.
| Step 1 | Download the drivers from Cisco.com. See Obtaining Software from Cisco Systems. |
| Step 2 | Copy the driver files into an USB flash drive. |
| Step 3 |
Install your own version of Microsoft Windows Server. During the installation process, you will be prompted for the LSI Drivers. |
| Step 4 | Plug the USB flash drive into the USB slot in the E-Series Server, and then install the LSI Drivers. |
| Step 5 | After the Microsoft Windows Server installation is complete, install the On-Board Network Drivers (Broadcom) and the Intel Drivers. |
Unmapping the Host Image
Deleting the Host Image
Downloading the Customized VMware vSphere Hypervisor Image
Use this procedure to download the customized VMware vSpere Hypervisor™ image.
| Step 1 |
Navigate to https://my.vmware.com/web/vmware/login. The VMware login page appears. |
| Step 2 |
Enter your VMware credentials, and then click Log In. If you do not have an account with VMware, click Register to create a free account. |
| Step 3 | Under the Support Requests pane, click Knowledge Base. |
| Step 4 | In the Search field located on the top right corner, enter ESXi-5.0.0-623860-custom-Cisco-2.0.1.6.iso, and then click Search. |
| Step 5 | From the Search Results, click Download VMware View 5.1 to download the customized VMware vSpere Hypervisor™ image. |
What to Do Next
Install the VMware vSpere Hypervisor™ image. For installation instructions, see Mapping the Host Image.
 Feedback