Prerequisites
Ensure that you have completed the tasks in the chapter IOx Applications in this guide.
The documentation set for this product strives to use bias-free language. For the purposes of this documentation set, bias-free is defined as language that does not imply discrimination based on age, disability, gender, racial identity, ethnic identity, sexual orientation, socioeconomic status, and intersectionality. Exceptions may be present in the documentation due to language that is hardcoded in the user interfaces of the product software, language used based on RFP documentation, or language that is used by a referenced third-party product. Learn more about how Cisco is using Inclusive Language.
Ensure that you have completed the tasks in the chapter IOx Applications in this guide.
The application is Cisco Cyber Vision. For more details, refer to Cisco Cyber Vision .
Cisco Catalyst IE3400 Rugged, IE3400 Heavy Duty, and IE3300 Rugged Series Switches support both LXC and Docker based applications with ARM64 architecture.
Both IPv4 and IPv6 configurations are supported.
Place the application package or tar file in the flash or SD card in the IOS partition for configuring with the CLI.
Use the application Gigabit Ethernet interface (AppGig1/1) on the switch for forwarding the layer 2 application traffic. Ensure that the interface is up on the switch and configured for a trunk port.
Configure layer 2 interfaces with Ap1/1 and VLAN with an IP address in same VLAN network.
Configure gateway interfaces for IOx applications to an SVI or IP address in the same network.
You can configure multiple guest or layer 2 interfaces [0-63] for an application, and each interface can be placed in a different VLAN.
You can configure up to three gateway interfaces.
IOx infra supports configuring multiple gateways. You can configure one default gateway to support all the interfaces.
The application configuration allows options to configure Docker runtime options.
Limitations
Cisco IOx applications support Cisco Catalyst IE3400 Rugged, IE3400 Heavy Duty, and IE3300-8U2X, and IE3300-8T2X Rugged Series Switches.
The CCV sensor support on IE3300-8T2S and IE3300-8P2S is limited to hardware version 6 or later. Check the output of the show version command to see the hardware version.
There are two methods of deploying IOx applications to a Cisco Catalyst IE3400 Rugged, IE3400 Heavy Duty, and IE3300 Rugged Series Switches:
Deploy an application using Cisco IOx Local Manager (GUI): Accessed through the web-based user interface, provides resource profiles such as tiny, exclusive, default, and custom. Custom profiles allow modification of CPU, memory, and disk values. A platform-specific application installed as part of the Cisco IOx framework.
Deploying IOx applications using the IOS-XE CLI : Used to manage the device and deploy applications without enabling the web server. The CLI that is part of the switch software for connecting to the switch on the device.
Cisco IOx Local Manager provides a web-based user interface that you can use to manage, administer, monitor, and troubleshoot applications on a host system, and to perform various related activities. You can access Cisco IOx Local Manager from the Cisco Catalyst IE3400 Rugged, IE3400 Heavy Duty, and IE3300 Rugged Series Switches web-based user interface and use Cisco IOx Local Manager to deploy applications.
To access Cisco IOx Local Manager, choose (IOx appears under Services). In the Cisco IOx Local Manager log in window that appears, enter the user name and password that you use to log in to Cisco IOS, then click Log In.
For detailed information about Cisco IOx Local Manager, including how to add, deploy, activate, start, and stop applications, see Cisco IOx Local Manager Reference Guide.
To deploy IOx applications using the IOS-XE CLI, you need to configure the application and then install, activate, and start it.
The deployment process involves these actors and components:
IOx application: The software to be deployed and managed.
Cisco Catalyst IE3400 Rugged Series Switch: The hardware platform hosting the IOx application.
AppGigabitEthernet1/1 interface: Dedicated for IOx support, configured as a trunk and internally connected to a Linux bridge.
SVI LAN 10: Provides the default gateway for the application.
The process consists of configuring the network interfaces, assigning IP addresses, and deploying the IOx application using the IOS-XE CLI.
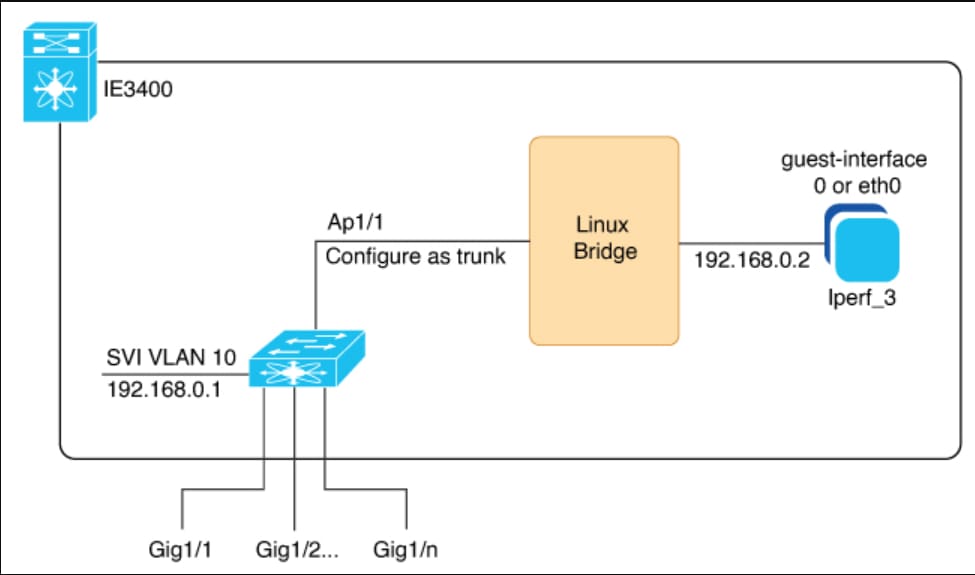
These stages describe the deployment of IOx applications using the IOS-XE CLI on Cisco Catalyst IE3400 Rugged Series Switches.
Enter the commands in the following procedure to configure an application using the IOS-XE CLI.
You must have configured the network for IOx. See the section IOx applications.
|
Step 1 |
Use the enable command to enable privileged EXEC mode. Example:Enter your password if prompted. |
||
|
Step 2 |
Use the configure terminal command to enter global configuration mode. Example: |
||
|
Step 3 |
Use the app-hosting appid iperf_3 command to configure an application name. Example: |
||
|
Step 4 |
Use the app-vnic AppGigabitEthernet trunk command to configure AppGigabitEthernet trunk. Example: |
||
|
Step 5 |
Use the vlan 10 guest-interface 0 command to configure a VLAN guest interface and enter application-hosting VLAN-access IP configuration mode. Example:The configuration places Eth0 into vlan 10. |
||
|
Step 6 |
Use the guest-ipaddress guest_ip_address netmask|prefix number command to configure a static IP address. Example:
The subnet for this IP address on the VLAN (in this example vlan 10 ) must match the subnet configured for the IP address assigned to vlan 10 interface. See the preceding examples. |
||
|
Step 7 |
Use the exit command to exit submode. Example: |
||
|
Step 8 |
Use the exit command to exit submode. Example: |
||
|
Step 9 |
Use the app-default-gateway default_gateway_address guest-interface guest_interface number command to configure the default gateway for the application. Example:The VLAN ID interface of the switch is used as the gateway.
|
You can add a maximum of 30 lines of run time options. The system generates a concatenated string from line 1 through line 30. A string can have more than one Docker run time option.
When a run time option changes, do the following: Stop, deactivate, activate, and then start the application for the new run time options to take effect.
|
Step 1 |
Use the enable command to enable privileged EXEC mode. Example:Enter your password if prompted. |
|
Step 2 |
Use the configure terminal command to enter global configuration mode. Example: |
|
Step 3 |
Use the app-hosting appid iperf_3 command to configure an application name. Example: |
|
Step 4 |
Use the app-resource docker command to enter application-hosting docker-configuration mode. Example: |
|
Step 5 |
Use the run-opts 1 "--entrypoint '/bin/sleep 10000'" command to specify the Docker run time options. Example: |
|
Step 6 |
Use the exit command to exit the application-hosting docker-configuration mode. Example: |
Complete the following steps to activate application hosting, which is required before resource changes take effect.
Check memory and storage using the command show app-hosting resource .
|
Step 1 |
Use the enable command to enable privileged EXEC mode. Example:Enter your password if prompted. |
||
|
Step 2 |
Use the configure terminal command to enter global configuration mode. Example: |
||
|
Step 3 |
Use the app-hosting appid iperf_3 command to configure an application name. Example: |
||
|
Step 4 |
Use the app-resource profile custom command to configure the custom application resource profile. Example:
|
||
|
Step 5 |
Use the cpu value command to configure CPU units. Example: |
||
|
Step 6 |
Use the memory value command to configure memory in megabytes. Example: |
||
|
Step 7 |
Use the persist-disk value command to configure disk space in megabytes. Example: |
After you configure an application in the IOS-XE CLI, you activate the application by taking it through three states: installation, activation, and startup.
You first install the application using the
app-hosting install
command, which after installation, the application moves to the deployed state. During installation, the sign verification
of the application is checked, if the check is enabled. For more information, see the section
Verify IOx application signature
.
After installation, you activate the application using the
app-hosting activate
command. During activation, the application is assigned resources on the switch; activation fails if there are not enough
resources available.
After activation, you move the application to the running state using the
app-hosting start
command. During start, the application interfaces are created and assigned IP addresses.
 Note |
You can check the state of the application at any point of installation, activation, or start by using the
|
Install, activate, and start the IOx application on the switch, and configure the interfaces to enable communication with the application.
Complete the following commands to install, activate, and start the IOx application on the switch and to configure the interfaces.
You must have configured the network and the IOx application. See the section IOx Applications .
|
Step 1 |
Use the app-hosting install appid application_name package application_filename command to install the application and move it to the deployed state. Example:Installs the application and moves it into the deployed state. |
|
Step 2 |
(Optional) Use the show app-hosting list command to confirm the application's installation and state. Example: |
|
Step 3 |
Use the app-hosting activate appid application_name command to activate the application and assigns it switch resources. Example: |
|
Step 4 |
Use the app-hosting start appid application_name command to start an application on the switch. Example: |
Application package signature ensures that an application package is valid and the one installed on the device comes from a trusted source.
You can check signature verification of a Cisco IOx application during its installation. The configuration keyword start is available under application-hosting application configurations. If you use this keyword, IOx infra automatically activates and starts the application after installation. Otherwise, you must explicitly use the activate and start CLI commands to start the application.
You can enable or disable signature verification at any time regardless of any installed application states.
Ensure you have access to the device and application-hosting configuration mode.
|
Use the app-hosting verification enable command to enable sign verification and the
Example: |
This section provides examples of IOS-XE CLI commands for IOx applications.
Use the show app-hosting resource command to view the maximum resources and available resources on the switch for all iox applications.
Switch# show app-hosting resource
CPU:
Quota: 33(Percentage)
Available: 0(Percentage)
VCPU:
Count: 2
Memory:
Quota: 1248(MB)
Available: 0(MB)
Storage space:
Total: 2548(MB)
Available: 268(MB)Use the show app-hosting infra command to view the CPU quota in units and whether app signature verification is enabled on the switch for IOx.
Switch# show app-hosting infra
IOX version: 2.11.0.0
App signature verification: enabled
CAF Health: Stable
Internal working directory: /flash11/iox
Application Interface Mapping
AppGigabitEthernet Port # Interface Name Port Type Bandwidth
1 VirtEth KR Port - Internal 1G
CPU:
Quota: 33(Percentage)
Available: 0(Percentage)
Quota: 1400(Units)
Available: 0(Units)
Use the show app-hosting list command to view the application-related information on the switch.
Switch# show app-hosting list
        App id                                   State
        ---------------------------------------------------------
        iperf_3                                  RUNNING
Use the show app-hosting detail appid app_id command to view the detailed application-related information on the switch.
Switch# show app-hosting detail appid iperf_3
        App id                 : iperf_3
        Owner                  : iox
        State                  : RUNNING
        Application
        Type                 : docker
        Name                 : networkstatic/iperf_3
        Version              : latest
        Description          :
        Author               : Brent Salisbury <brent.salisbury@gmail.com>
        Path                 : bootflash:iperf_3x86.tar
        URL Path             :
        Activated profile name : custom
        Resource reservation
        Memory               : 500 MB
        Disk                 : 500 MB
        CPU                  : 173 units
        CPU-percent          : 5 %
        VCPU                 : 1
        Platform resource profiles
        Profile Name                  CPU(unit)  Memory(MB)  Disk(MB)
        --------------------------------------------------------------
        Attached devices
        Type              Name               Alias
        ---------------------------------------------
        serial/shell     iox_console_shell   serial0
        serial/aux       iox_console_aux     serial1
        serial/syslog    iox_syslog          serial2
        serial/trace     iox_trace           serial3
        Network interfaces
        ---------------------------------------
        eth0:
        MAC address         : 52:54:dd:67:81:6f
        IPv6 address        : ::
        Network name        : mgmt-bridge300
        eth3:
        MAC address         : 52:54:dd:b2:4d:86
        IPv4 address        : 20.1.2.2
        IPv6 address        : ::
        Network name        : VPG0
        eth1:
        MAC address         : 52:54:dd:f2:29:67
        IPv4 address        : 10.1.1.2
        IPv6 address        : 2001:1::5054:ddff:fef2:2967
        Network name        : mgmt-bridge-v2340
        Docker
        ------
        Run-time information
        Command              :
        Entry-point          : /bin/sleep 10000
        Run options in use   : --entrypoint '/bin/sleep 10000'
        Package run options  :
        Application health information
        Status               : 0
        Last probe error     :
        Last probe output    :
        switch#
Use the app-hosting stop appid app_id command to stop the IOx application on the switch.
Switch# app-hosting stop appid iperf_3
        iperf_3 stopped successfully
        Current state is: STOPPED
        switch#
Use the app-hosting deactivate appid app_id command to deactivate the IOx application on the switch.
Switch# app-hosting deactivate appid iperf_3
        iperf_3 deactivated successfully
        Current state is: DEPLOYED
        switch#
Use the app-hosting uninstall appid app_id command to uninstall the IOx application on the switch.
Switch# app-hosting uninstall appid iperf_3
        Uninstalling 'iperf_3'. Use 'show app-hosting list' for progress.
        switch#
This list shows the app-hosting commands:
Switch# app-hosting ?
        activate      Application activate					<== to activate app
        clear         Clear console/aux connection				<== to clear console or aux session if connected
        connect       Application connect					<== to connect the app console or aux or session once in run state
        data          Application data					<== to upload files to the apps
        deactivate    Application deactivate					<== to deactivate an app
        debug         debug							<== for caf related debug commands
        install       Application install					<== to install app
        move          Move File						<== to move trace or core file
        settings      Application settings					<== to configure app specific setting using file
        start         Application start					<== to start an app
        stop          Application stop					<== to stop an app
        uninstall     Application uninstall					<== to uninstall an app`
        upgrade       Application upgrade					<== to upgrade app to new version
        verification  Application signature verification setting (global) 	<== to enable/disable the sign verification
 Feedback