IOx Applications

IOx applications

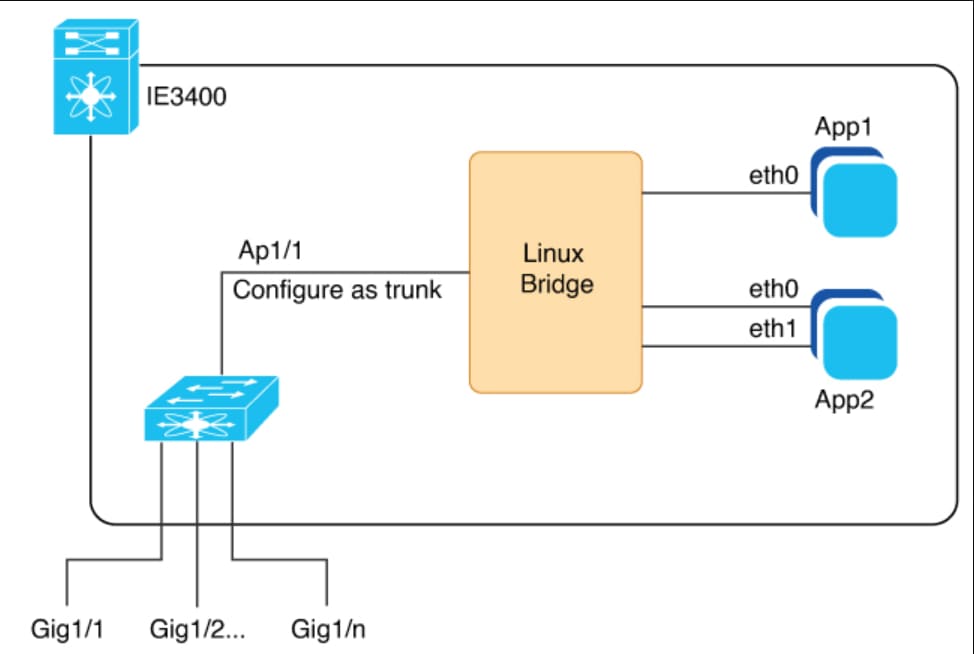
IOx applications is an end-to-end application hosting framework that combines Cisco IOS and Linux to provide secure, consistent application deployment and lifecycle management on Cisco network platforms. It has a dedicated connectivity interface Ap1/1 on Cisco Catalyst IE3400 Rugged, IE3400 Heavy Duty, and IE3300 Rugged Series Switches. It

  • provides an additional interface specifically for IOx application connectivity, and

  • can be configured as a regular, physical interface in trunk mode, and

Guidelines for IOx application

  • Configure a VLAN ID for the Ap1/1 interface, regardless of trunk mode.

    Ensure that the configured VLAN is not the default VLAN. By default, VLAN 1 serves as the native VLAN and carries untagged packets.

  • Assign an IP address to a VLAN interface that is also a member of the Ap1/1 trunk interface.

How to provide connections to IOx applications

The allowed VLANs on the Ap1/1 trunk interface should match the VLANs that need to carry data traffic to or from applications on IOx. These VLANs include ones carrying management traffic. The example used in this guide is 10. VLAN 10 is the VLAN carrying traffic for the application to communicate with the network. This traffic can include the IP traffic to the management VLAN. You should configure the same VLAN ID when managing the applications so the VLANs match. If you intend to use vlan 1 to communicate with the network, then choose a different native VLAN on Ap1/1.

After you configure the network, you must enable IOx on the switch.

Summary

You can configure the allowed VLANs on the Ap1/1 trunk interface to match the VLANs carrying data and management traffic for IOx applications, ensuring proper communication.

Workflow

Figure 1. Connections with IE3400 IOx network with applications

TheConnections with IE3400 IOx network with applications illustration shows Ethernet and layer 2 connections possible in an IOx network on a Cisco Catalyst IE3400 Rugged Series Switch.

The dedicated interface AppGigabitEthernet1/1 for IOx support is internally connected to a linux bridge. The interface needs to be configured as a trunk. You can have multiple applications in an IOx network, each of which can have multiple Ethernet connections and can be placed in any VLAN.

For a similar illustration showing a sample network configuration, see the section Deploying IOx applications using the IOS-XE CLI in this guide.

These stages describe how to configure VLANs and interfaces for IOx application connectivity.

  1. Configure the allowed VLANs on the Ap1/1 trunk interface to match the VLANs required for IOx application data and management traffic. Ensure the same VLAN ID is used for managing applications and avoid using VLAN 1 as the native VLAN if it is used for network communication.
    • Identify the VLANs needed for application and management traffic (for example, VLAN 10).
    • Configure the Ap1/1 interface as a trunk and allow the identified VLANs.
    • Enable IOx on the switch after network configuration is complete.
    The dedicated AppGigabitEthernet1/1 interface for IOx is internally connected to a Linux bridge and must be configured as a trunk. Multiple applications can be supported, each with multiple Ethernet connections in any VLAN.

Configure VLAN ID for IOx interface

You must configure the VLAN ID for the IOx interface and then configure the SVI address for the VLAN. You do so to connect to and manage the VLAN. You must make sure that the VLAN is routable throughout the network.

Procedure


Step 1

Configure a VLAN ID for an IOx interface.

  1. Use the configure terminal command to enter global configuration mode.

    Example:

    Switch# configure terminal
  2. Use the interface interface_id command to specify an interface.

    Example:

    Switch(config)# interface Ap1/1
  3. Use the switchport trunk allowed vlan vlan_id command to specify VLAN 10 as allowed on the trunk link for the IOx interface.

    Example:

    Switch(config-if)# switchport trunk allowed vlan 10
  4. Use the switchport mode trunk command to set the IOx interface to operate as a trunk port, carrying multiple VLANs.

    Example:

    Switch(config-if)# switchport mode trunk
  5. Use the end command to exit configuration mode and return to privileged EXEC mode.

Example:

Switch(config-if)# end

Step 2

Configure a SVI address for the VLAN.

  1. Use the configure terminal command to enter global configuration mode.

    Example:

    Switch# configure terminal
  2. Use the interface vlan vlan_id command to specify an interface.

    Example:

    Switch(config)# interface vlan 10
  3. Use the ip address ip_address subnet mask command to assign the IP address and subnet mask to VLAN 10, enabling layer 3 connectivity for that VLAN.

    Example:

    Switch(config-if)# ip address 192.168.0.1 255.255.255.0
  4. Use the end command to exit configuration mode and return to privileged EXEC mode.

Example:

Switch(config-if)# end

Enable IOx

Enable IOx on the switch to support IOx applications and services. This procedure ensures the SD card is properly partitioned and the necessary services are configured.

After you configure the VLAN for the IOx interface, you must enable IOx on the switch.


Note


Cisco IOS requires at least 1 GB on the SD card. If you have a 4 GB SD card partition for IOx, the default partition size for IOx is 70 percent.


Before you begin

Before enabling IOx on the switch, ensure that you have an SD card for IOx with at least 4GB. An SD card is required by IOx for storage.

Procedure


Step 1

Use the partition sdflash: iox command to format the SD card IOx partition with the EXT4 filesystem.

The SD card is required to store the IOx applications and data.

Example:

Switch# partition sdflash: iox 
Partitioning IOS:IOX(30%:70%) Default
Please make sure to back-up "sdflash:" contents
Partition operation will destroy all data in "sdflash:". Continue?[confirm]

Note


The default behavior of the partition command is to allocate 70 percent of the 4 GB on the SD Card to IOx.

Step 2

Use the configure terminal command to enter global configuration mode.

Example:

Switch# configure terminal
Enter configuration commands, one per line. End with CNTL/Z.

Step 3

Use the iox command to enable iox.

Example:

Switch(config)# iox
Warning: Do not remove SD flash card when IOx is enabled or errors on SD device could occur.
*Feb 21 12:49:18.310: %UICFGEXP-6-SERVER_NOTIFIED_START: R0/0: psd: Server iox has been notified
to start
*Feb 21 12:49:48.165: %IM-6-IOX_ENABLEMENT: R0/0: ioxman: IOX is ready.

Step 4

Use the ip http secure-server command to enable web server.

Example:

Switch(config)# ip http secure-server

This step ensures access to the IOx functionality through the Local Manager UI.

Step 5

Use the username admin privilege 15 password 0 secret command to enable user access:

Example:

Switch(config)# username admin privilege 15 password 0 secret

Step 6

Use the end command to exit configuration mode.

Example:

Switch# end

Step 7

Use the show iox-service command to monitor Iox infrastructure usage.

Example:

Switch# show iox-service
IOx Infrastructure Summary:
---------------------------
IOx service (CAF) : Running
IOx service (HA) : Running
IOx service (IOxman) : Running
IOx service (Sec storage) : Running
Libvirtd 5.5.0 : Running
Dockerd v19.03.13-ce : Running