Cisco TrustSec

Feature History for Cisco TrustSec

This table provides release and platform support information for the features explained in this module.

These features are available in all the releases subsequent to the one they were introduced in, unless noted otherwise.

Release

Feature Name and Description

Supported Platform

Cisco IOS XE 17.18.1

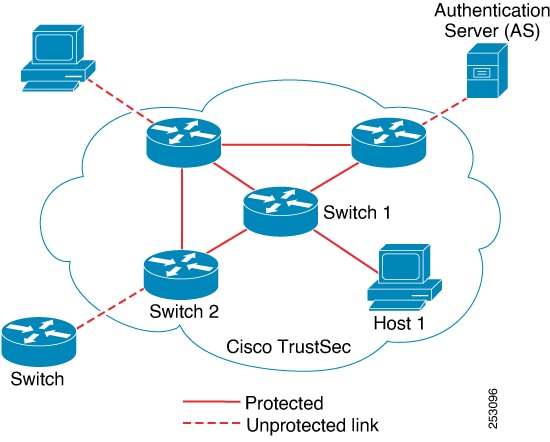
Cisco TrustSec:

Cisco TrustSec builds secure networks by establishing domains of trusted network devices. Each device in the domain is authenticated by its peers, and communication between devices is secured with encryption, message integrity checks, and data-path replay protection.

Cisco C9350 Series Smart Switches

Cisco C9610 Series Smart Switches

Cisco TrustSec

Cisco TrustSec builds secure networks by establishing domains of trusted network devices. Each device in the domain is authenticated by its peers, and communication between devices is secured with encryption, message integrity checks, and data-path replay protection.

Key components of Cisco TrustSec

Cisco TrustSec architecture incorporates these three key components:

  • Authenticated networking infrastructure

    After the first device (called the seed device) authenticates with the authentication server to begin the Cisco TrustSec domain, each new device added to the domain is authenticated by its peer devices already within the domain. The peers act as intermediaries for the domain’s authentication server. Each newly-authenticated device is categorized by the authentication server and assigned a security group number based on its identity, role, and security posture.

  • Security group-based access control:

    Access policies within the Cisco TrustSec domain are topology-independent, based on the roles (as indicated by security roup number) of source and destination devices rather than on network addresses. Individual packets are tagged with the security group number of the source.

  • Secure communication:

    With encryption-capable hardware, communication on each link between devicesin the domain can be secured with a combination of encryption, message integrity checks, and data-path replay protection mechanisms.

Figure shows a Cisco TrustSec domain with

  • An endpoint device and several networking devices within the Cisco TrustSec domain.

  • An endpoint device and one networking device outside the Cisco TrustSec domain. This is because they are either not Cisco TrustSec-capable devices or they have been refused access.

  • The authentication server outside of the Cisco TrustSec domain. The authentication server can either be a Cisco Identities Service Engine (Cisco ISE), or a Cisco Secure Access Control System (Cisco ACS)

Figure 1. Cisco TrustSec Domain

Roles in the Cisco TrustSec authentication process

In the Cisco TrustSec authentication process, there are these roles:

  • Supplicant

    An unauthenticated device that is connected to a peer within the Cisco TrustSec domain and is attempting to gain access to the domain.

  • Authentication Server

    The system responsible for verifying the supplicant’s identity and assigning policies that control the supplicant’s access to services within the Cisco TrustSec domain.

  • Authenticator

    An authenticated device that is already a member of the Cisco TrustSec domain and is authorized to authenticate new supplicant peers on behalf of the authentication server.

Authentication Process Sequence

When a connection is established between a supplicant and an authenticator, the process typically follows these steps:

  1. Authentication (802.1X):

    The supplicant’s credentials are verified by the authentication server, with the authenticator serving as an intermediary. Mutual authentication takes place between the supplicant and the authenticator.

  2. Authorization:

    Based on the supplicant’s identity, the authentication server issues authorization policies, such as security group assignments and access control lists (ACLs), to both connected peers. The server also shares each peer’s identity with the other, enabling the appropriate policies to be applied to the link.

  3. Security Association Protocol (SAP) Negotiation:

    If both ends of the link support encryption, the supplicant and authenticator negotiate parameters to establish a security association.

Once all three steps are successfully completed, the authenticator transitions the link from an unauthorized (blocking) state to an authorized state, allowing the supplicant to join the Cisco TrustSec domain.

Identities and Credentials

The following sections describe these foundational elements—Device Identities, Device Credentials, User Credentials, and Protected Access Credentials (PACs)—and how they interact in a TrustSec deployment.

Device Identities

Cisco TrustSec uses assigned device names (device IDs) instead of IP or MAC addresses to uniquely identify switches. These device IDs are used for authorization policy lookups and password lookups during authentication.

Device Credentials

Cisco TrustSec supports password-based credentials and uses MSCHAPv2 for mutual authentication.

Device credentials are used during EAP-FAST phase 0 (PAC provisioning) exchanges. Subsequent link bring-ups use EAP-FAST phase 1 and 2, leveraging the provisioned PAC.

User Credentials

Cisco TrustSec does not require a specific type of user credential for endpoint devices. Any authentication method supported by the authentication server (for example, MSCHAPv2, GTC, RSA OTP for Cisco ACS 5.1) can be used.

Protected Access Credential

A PAC is a unique shared credential for mutual client and server authentication, eliminating the need for Public Key Infrastructure (PKI) and digital certificates.

PAC Creation Steps

  1. The server's Authority Identity (A-ID) maintains a local master key.

  2. When a client, initiator identity (I-ID), requests a PAC, the server generates a unique PAC key and PAC-Opaque field.

  3. The PAC-Opaque field contains the PAC key, I-ID, and key lifetime, encrypted with the master key.

  4. A PAC-Info field containing the A-ID is created.

  5. The PAC is automatically distributed or imported to the client.


    Note


    The server does not maintain the PAC or PAC key, enabling a stateless EAP-FAST server.


The figure below describes the PAC's construction. A PAC consists of the PAC-Opaque, PAC Key, and PAC-Info fields. The PAC-Info field contains the A-ID.

Figure 2. PAC's Process Flow

PAC Provisioning

  • In Secure RADIUS, the PAC key is provisioned into each device during authentication to derive the shared secret.

  • Clients send an additional RADIUS attribute containing the PAC-Opaque field, which the server interprets to recover information and validate identity.

  • EAP-FAST Phase 0 is used for automatic PAC provisioning.

PAC-less Authentication

PAC-less mode simplifies the deployment of Cisco TrustSec policies by eliminating the need for a Protected Access Credential (PAC), which is typically required for secure communication between devices and the Identity Services Engine (ISE). This approach is particularly advantageous in environments with multiple ISE nodes, as devices can seamlessly connect to a secondary ISE node if the primary becomes unavailable, without the need to re-establish the PAC, thus reducing service interruptions.

Benefits

By removing the dependency on PACs, AAA PAC-less authentication streamlines the authentication process. This enhances scalability, improves the user experience, and enables support for modern authentication approaches consistent with Zero Trust security principles.

PAC-less Authentication Workflow

  1. In PAC-less mode, devices begin authentication by sending a RADIUS request that includes the Cisco TrustSec username, password, and an EAP attribute message.

  2. The ISE replies with a RADIUS access-challenge to initiate an EAP-FAST session.

  3. Once the EAP-FAST session is established, the ISE provides the PAC opaque and PAC information. The PAC opaque contains the PAC key and user identity, encrypted using the EAP-FAST server master key. The PAC information includes the server identity and Time-to-Live timers.

  4. The PAC opaque is then embedded in the Message-Authenticator field of subsequent Cisco TrustSec RADIUS requests to the ISE. This enables the secure download of environment data and Security Group Access Control List (SGACL) policies.

Guidelines for Cisco TrustSec

General Guidelines

  • Cisco TrustSec is not supported in FIPS mode.

  • Cisco TrustSec cannot be configured on a pure bridging domain with the IPSG enabled.

Guidelines for Identities and Credentials

  • Protected access credential (PAC) provisioning fails and remains in hung state, when an invalid device ID is specified. Even after clearing the PAC, and configuring the correct device ID and password, PAC still fails.

    As a workaround, in the Cisco Identity Services Engine (ISE), uncheck the Suppress Anomalous Clients option in the Administration > System > Settings > Protocols > Radius menu for PAC to work.

Configure Cisco TrustSec Credentials

This task allows you to configure your device with device ID, password and authentication method.

Procedure


Step 1

enable

Example:

Device> enable

Enables privileged EXEC mode.

Enter your password, if prompted

Step 2

cts credentials id cts-id password password

Example:

Device# cts credentials id ctsid password abcd

Configures the Cisco TrustSec device ID for this device to use when authenticating with other Cisco TrustSec devices with EAP-FAST because Cisco TrustSec requires each device in the network to identity itself uniquely.

  • The cts-id argument has a maximum length of 32 characters and is case sensitive.

  • The password argument is the password or this device to use when authenticating with other Cisco TrustSec devices with EAP-FAST.

Step 3

configure terminal

Example:

Device(config)# configure terminal

Enters global configuration mode.

Step 4

aaa new-model

Example:

Device(config)# aaa new-model

Enables new RADIUS and AAA access control commands and functions and disables old commands.

Step 5

aaa authentication dot1x default group radius

Example:

Device(config)# aaa authentication dot1x default group radius

Specifies that RADIUS servers are used for authentication on interfaces running IEEE 802.1X.

Step 6

cts authorization list network list-name

Example:

Device(config)# cts authorization list network cts-mlist

Specifies a list of AAA servers for the Cisco TrustSec seed device to use.

Step 7

aaa authorization network list-name group radius

Example:

Device(config)# aaa authorization network cts-mlist group radius

Specifies the Cisco TrustSec authorization list name for allnetwork-related service requests from RADIUS servers.

Step 8

exit

Example:

Device(config)# exit

Exits global configuration mode.

Step 9

show cts server-list

Example:

Device# show cts server-list

Displays the RADIUS the server configurations for Cisco TrustSec seed devices

Step 10

show cts credentials

Example:

Device# show cts credentials

Display sthe Cisco TrustSec device ID. The stored password is never displayed.


Security Groups and Security Group Tags

These sections provide information about security groups and security group tags.

Security Groups

A security group is a collection of users, endpoint devices, and resources that share common access control policies. Administrators define these groups in Cisco ISE or Cisco Secure ACS. When new users or devices join the Cisco TrustSec domain, the authentication server automatically assigns them to the appropriate security groups. Each group receives a unique 16-bit security group number, which is globally recognized within the Cisco TrustSec domain. The total number of security groups is determined by the number of authenticated network entities, and administrators do not need to manually configure these group numbers.

Security Group Tags and Packet Tagging

After a device is authenticated, Cisco TrustSec tags every packet originating from that device with a Security Group Tag (SGT). This tag includes the device’s assigned security group number and travels with the packet across the network within the Cisco TrustSec header. The SGT acts as a single label that defines the source's access privileges throughout the enterprise network.

Source and Destination Group Tags

The SGT represents the security group of the packet’s source, so it is often called the source SGT. The device receiving the packet is also assigned to a security group, known as the destination security group (SG). For simplicity, this may be referred to as the destination group tag (DGT), although the Cisco TrustSec packet itself does not include the destination device’s security group number.

Determining the Source Security Group Tag

When a packet enters a Cisco TrustSec domain, the network device at the ingress point must identify the source SGT so it can tag the packet appropriately before forwarding it into the TrustSec environment. Similarly, the egress device needs to determine the packet’s SGT to enforce Security Group Access Control Lists (SGACLs).

There are several ways a network device can determine the SGT for a packet:

  1. Policy Acquisition from the Authentication Server

    After the Cisco TrustSec authentication process, the network device obtains policy information from the authentication server. This information includes whether the peer device is trusted. If the device is not trusted, the authentication server provides an SGT, which the network device applies to all packets received from that peer.

  2. SGT Included in the Packet

    If the packet is received from a trusted peer device, it will already carry the SGT. This situation applies to devices that are not the initial entry point in the Cisco TrustSec domain for the given packet.

  3. Identity Port Mapping (IPM)

    With Identity Port Mapping, the network administrator can manually assign an identity to the link connected to the peer device. The network device then requests policy details, including the SGT and trust status, from the authentication server.

  4. Source IP Address Lookup

    In certain scenarios, policies can be configured to assign an SGT to a packet based on its source IP address. The SGT Exchange Protocol (SXP) can also be used to automatically populate the mapping table between IP addresses and SGTs.

Determining the Destination Security Group Tag

The egress network device in a Cisco TrustSec domain is responsible for identifying the destination security group (DGT) in order to enforce SGACLs. To determine the destination security group for a packet, the network device uses the same methods as those used for determining the source security group, except that it cannot extract the group number from a packet tag—since the destination group number is not included in the packet’s tag.

In certain scenarios, ingress devices or other intermediate network devices may have access to destination group information. When this occurs, SGACLs can be enforced at these devices rather than solely at the egress point.