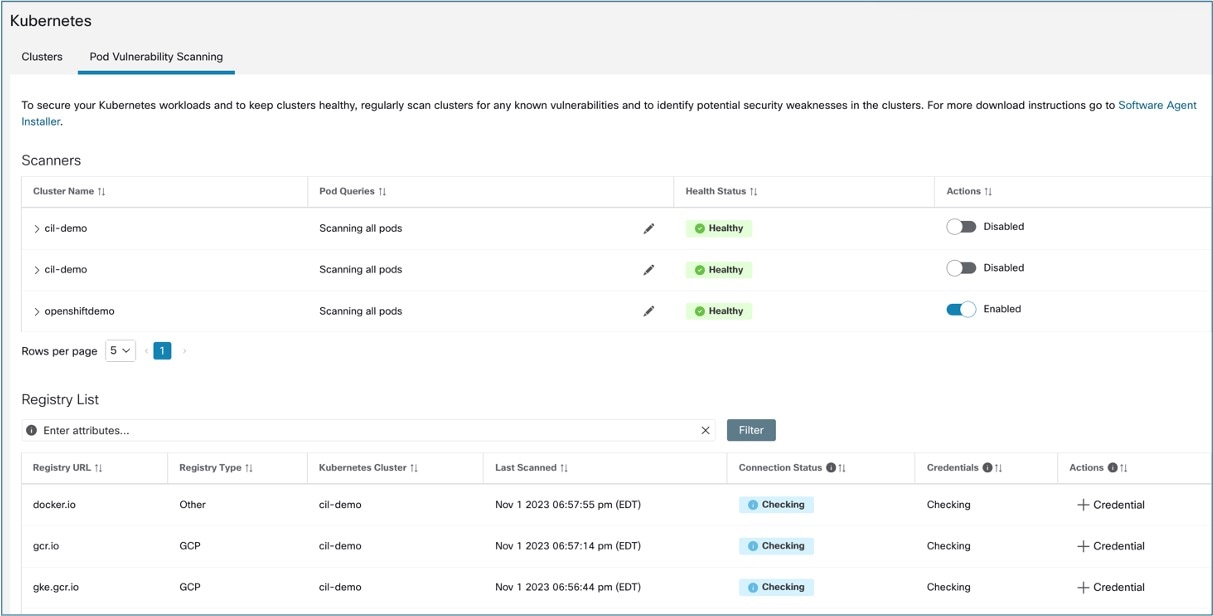
Identify Vulnerabilities using the Pod Vulnerability Scanner

The secure workload scanner pod provides visibility into all the software packages and vulnerabilities associated with container images running on the Kubernetes cluster.

When onboarding a cluster through a connector or external orchestrator, enable the Pod Vulnerability Scanner option. This action initiates a scanner pod within the Kubernetes cluster.

Core benefits of the scanner include image analysis, vulnerability assessment and cluster-wide visibility.

Scenario

A security analyst and a DevOps engineer collaborate to manage vulnerabilities in a Kubernetes cluster using the Secure Workload scanner pod.

Is this use case for you?

The target audience for this scenario includes DevOps engineers, Security analysts, and Cloud and Network security engineers responsible for ensuring the security of containerized applications throughout the development lifecycle. This involves continuously monitoring and securing containerized environments to detect potential threats and vulnerabilities.

Vulnerability Scanning for Container Images

The scanner checks the container images currently running on the cluster. It compiles a list of registries that host those images. After you add the registry credentials, the scanner scans the image. It creates a comprehensive report of the results and sends this information back to the cluster.

For any onboarded cluster using a connector or external orchestrator, you can optionally enable vulnerability scanning. Once the vulnerability scanning is enabled, a scanner pod becomes active on the Kubernetes cluster. To enable scanning for vulnerabilities on Kubernetes clusters, perform these steps:

Procedure


Step 1

From the navigation pane, choose Manage > Workloads > Kubernetes.

  • Clusters tab: The Clusters tab displays a list of all onboarded clusters and their associated inventory, such as services and pods.
  • Pod vulnerability scanning tab: The pod scanner systematically scans the container images currently in operation on the cluster and compiles a list of the registries hosting those images.

Step 2

Click Pod vulnerability scanning.

Figure 1. Enable Container Scanning

Note


Daemonset or agent installation is required for this functionality to be available.

Step 3

To start the scan, enable the toggle under Actions. By default, the toggle is disabled.

Step 4

Click the edit icon to modify the query and select a subset of pods running on the cluster. By default, a pod query appears that scans all pod inventories in the cluster. You can edit pod queries to select the pods you want to scan.

Step 5

Click on a cluster to view the Health Status Summary.

  • Click on Kubernetes Node Name to view the workload profile.

  • Enable the toggle to automatically download additional information to the host, which allows the scanner to execute.

Step 6

Verify the connection status and enter the credentials. The Registry List shows all detected registries.

Note


Note that credentials may vary based on the registry type.

Registry type

Credentials

Azure

Tenant ID, Client ID, Secret Key

AWS

Access Key, Secret Key

GCP

Service account key in JSON format

Others

Username, Password

Figure 2. Enable Container Scanning

Step 7

To scan the CVE results, from the navigation pane, choose Investigate > Vulnerabilities. After you add the registry credentials, the scanner pulls the container image from the registry. It then scans for CVEs and the CVE report is then published on the Secure Workload user interface.

Figure 3. Vulnerability Dashboard

The pod CVE attributes can also be used to create policy objects and therefore define the CVE risk-based segmentation policies.