
How-to Guides
Explore our in-depth guides on how to achieve your goals in Cisco Identity.
- Using Response Actions
- Manage Tenant Settings
- Control and Monitor Access
- Linking User Accounts
- Investigating Users
- Creating Advanced Queries
Accessing and Securing your Cisco Identity Tenant
Overview
This article describes several critical aspects of the Cisco Identity security solution:
- Understanding tenant types
- Accessing your tenant
- Securing access to your tenant
Tenant Types
The Cisco Identity cloud platform leverages several different tenant tiers and editions, as well as geolocations, which is not unusual for SaaS solutions. From an client perspective, the different environments do not have different development cycles or characteristics.
Cisco Identity Production Environment
The Production environment is refreshed with the latest build on a weekly cycle.
Social authentication platforms are not allowed for Production tenants. Only SSO from a client's IdP or IAM solution, such as Azure, Okta, Duo Security SSO, etc., is allowed. For this reason, users are not required to enroll and use MFA via the Cisco Identity customer auth platform.
Accessing your Tenant from Duo Security
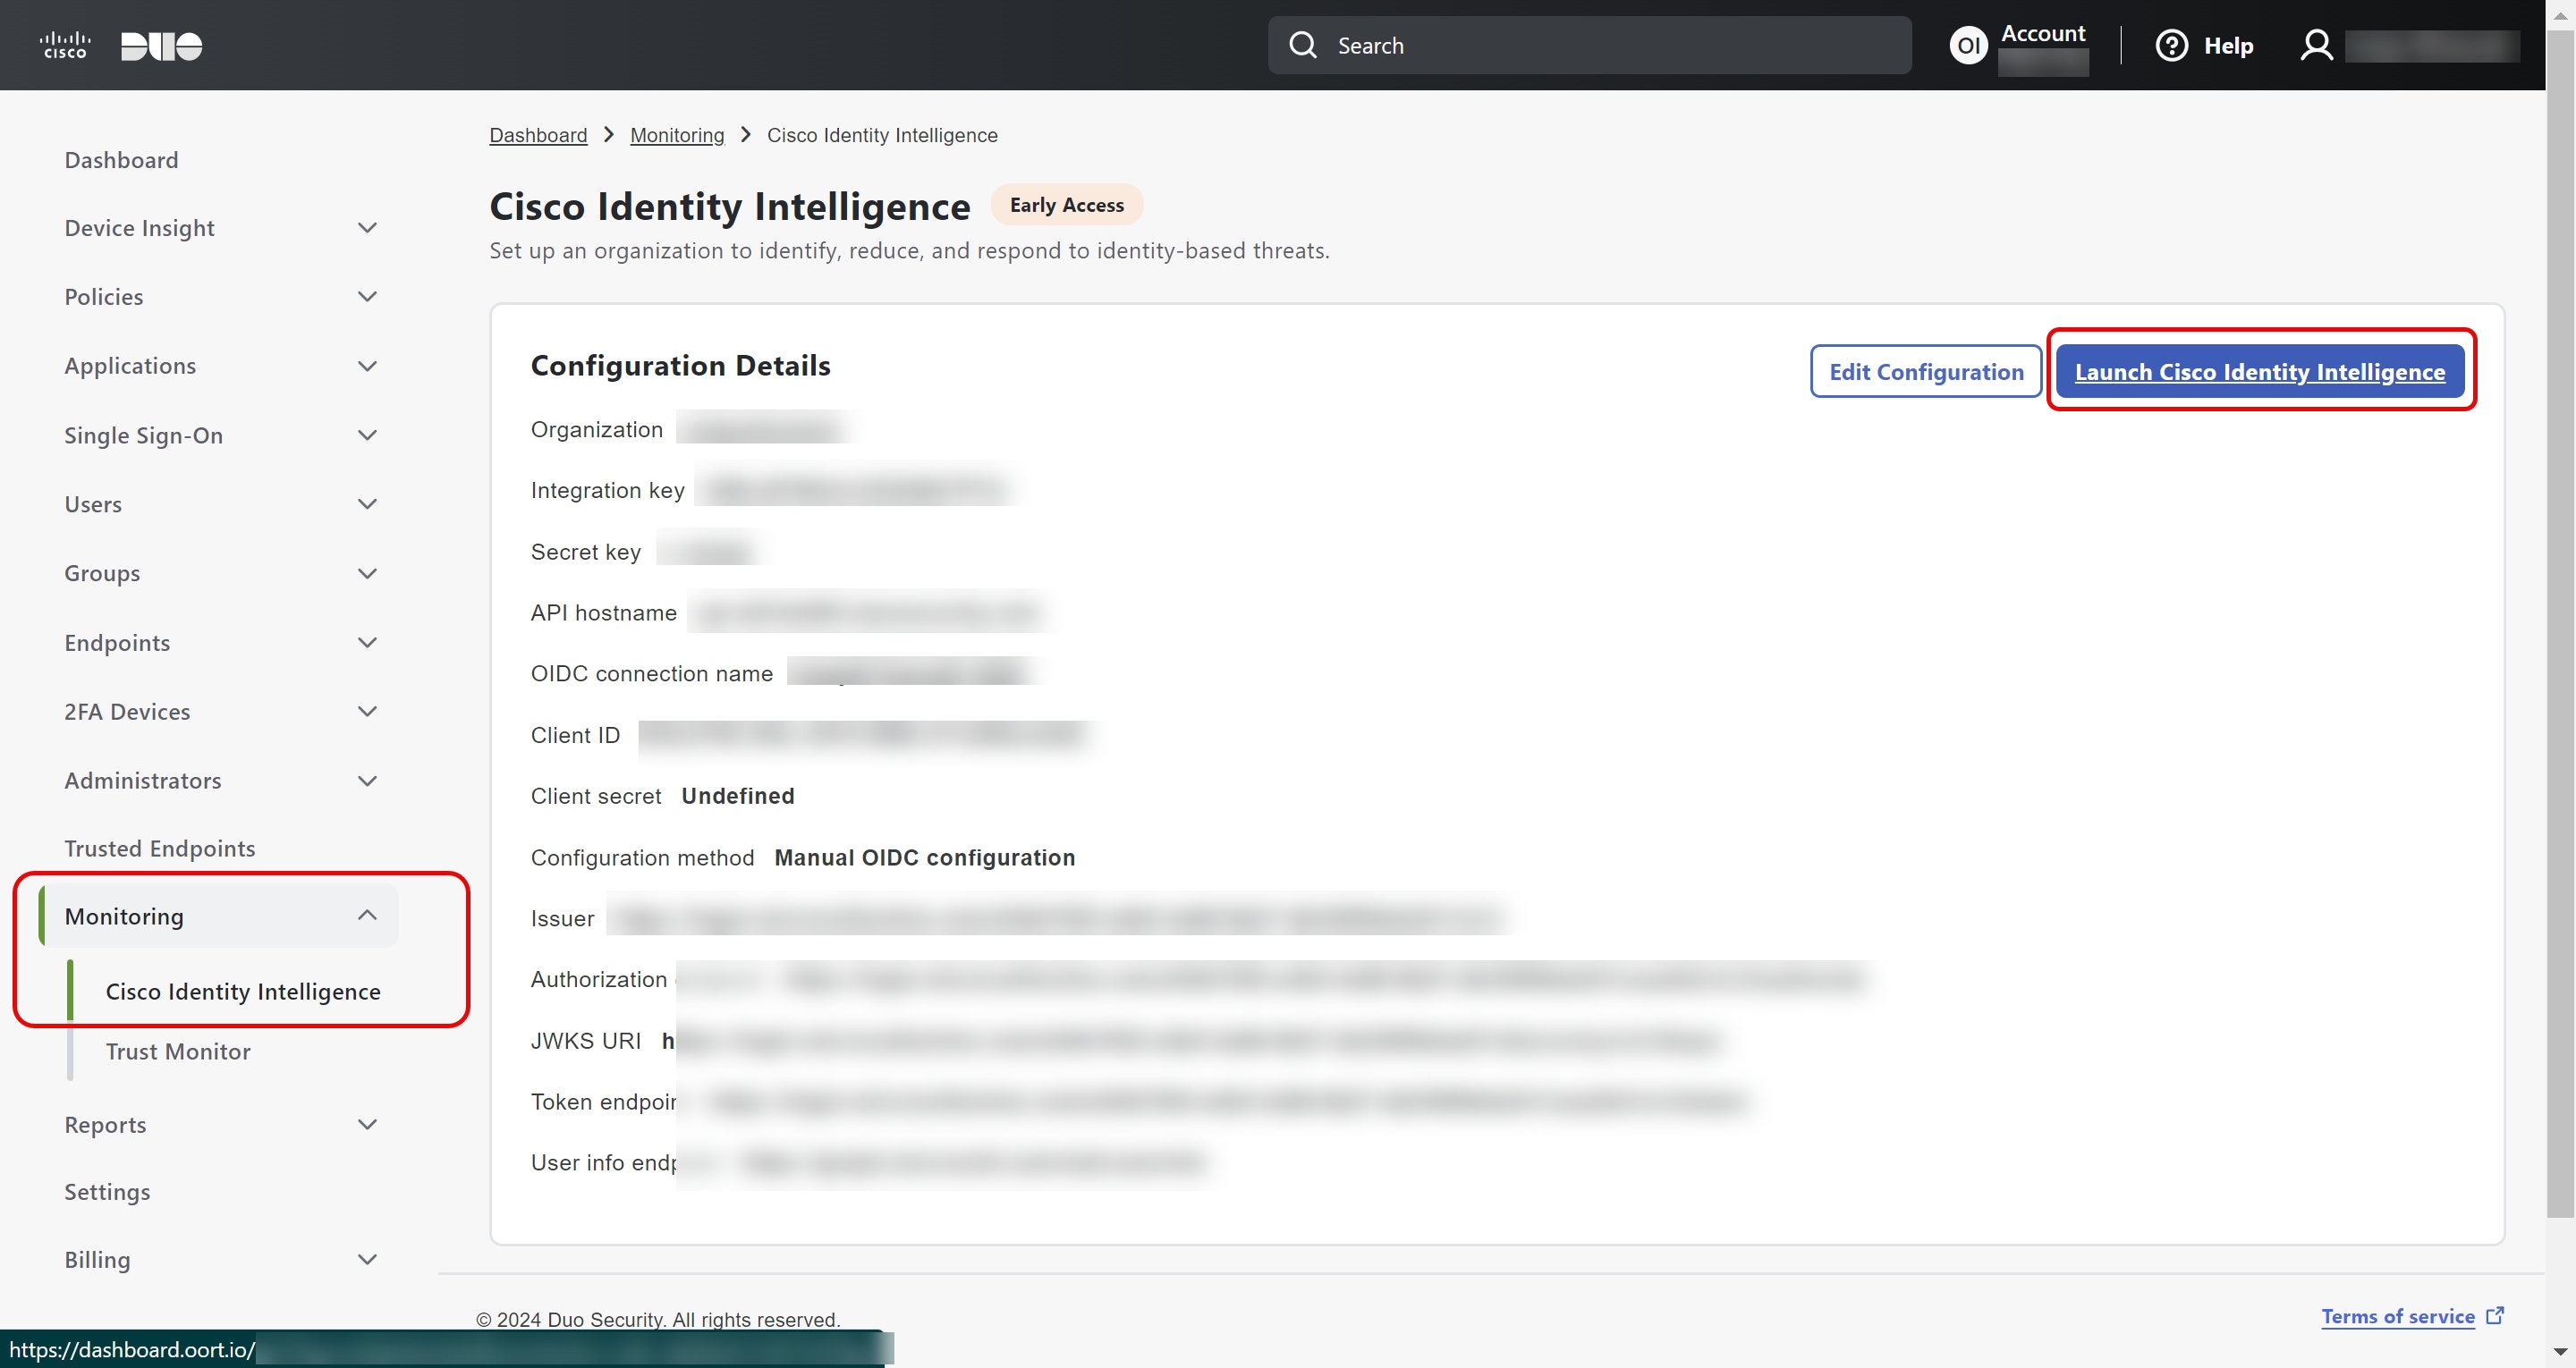
If your Cisco Identity tenant has been provisioned from your Duo tenant, then you can access Cisco Identity from the Launch Cisco Identity button under the Monitoring tab.
Creating a Bookmark or Shortcut for Direct Tenant Access
For Duo Security customers, to create a direct URL bookmark in Duo Central or another IDP or SSO platform for users to launch the Cisco Identity console, simply right click the Launch button shown above and copy the URL to the clipboard.
This URL will have both the tenant name ("slug") and the SSO connection name for your tenant appended to it. It will take users directly to your SSO and into the Cisco Identity tenant after authentication.
If you are not a Duo Security customer with an integrated Cisco Identity tenant, you can copy a bookmark URL via Tenant Settings, or simply copy a share link from one of many locations in the console, such as the Dashboard page, to use when creating a browser bookmark. This will be of the form (note the base URL is geo deployment zone specific, see below for the list):
https://dashboard.oort.io/go?slug=tenantname
Use this as your bookmark. Users will need to select your SSO login button and then authenticate.
Accessing your Tenant Directly
There are several ways to access your tenant.
-
Navigate to the following URLs, depending on your tenant location:
US Production: https://dashboard.oort.io/
EU Production: https://dashboard.eu.oort.io/ Australia Production: https://dashboard.au.oort.io/ Japan Production: https://dashboard.jp.oort.io/ United Kingdom: https://dashboard.uk.oort.io/ Canada: https://dashboard.ca.oort.io/ Singapore: https://dashboard.sg.oort.io/ India: https://dashboard.in.oort.io/
-
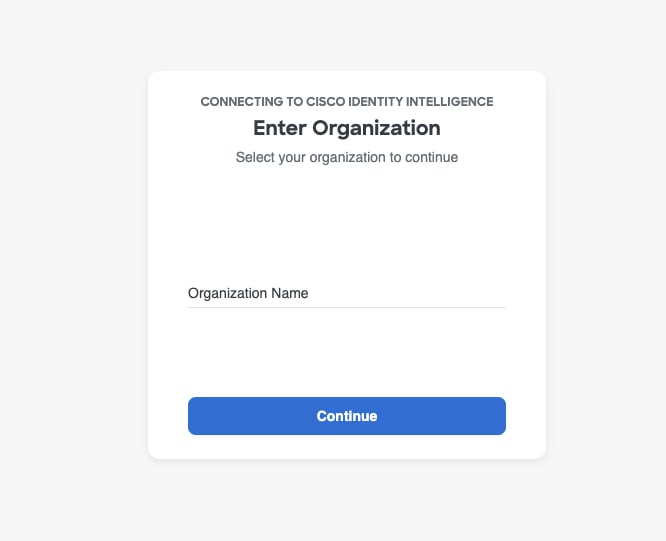
Click the Login button in the top right and then enter your tenant name. Then click Continue.
-
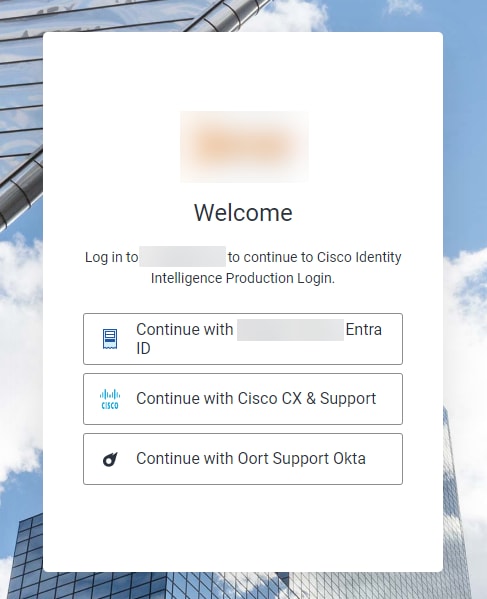
At this point, you will be presented with the available logon options, which will include your enterprise SSO method.
One or more login options for Cisco Support will also be present, but are unused unless permissions is granted by the client.
-
Select your enterprise SSO login option and continue with the login process for it. You will be redirected to the Dashboard page when complete. Note - Cisco Identity does not provide a local username and password login option.
Securing your Cisco Identity Tenant
There are several important concepts related to securing your Cisco Identity tenant.
- Multi-factor authentication (MFA): Cisco requires this in all tenants.
- Session idle timeouts: Cisco has a default 15-minute session idle timeout.
- Role-based Access Controls (RBAC): Cisco recommends RBAC be implemented in all Production tenants.
MFA in Production Tenants
Cisco relies solely on customer IAM platforms for customer authentication and SSO into production tenants. Cisco insists on some form of MFA for these connections, but it is the customer's responsibility to implement and enforce it via their IAM platform.
MFA enrollment with the Cisco customer authentication platform is not required for this reason.
Can Cisco Identity analyze behavior and fail checks more frequently?
While the short answer to this question is "yes", there are several important things to consider and requirements that must be met for Cisco Identity to change the frequency of its data collection and analysis.
First, it is important to understand how Cisco Identity works out of the box.
Note: There is no setting that can be manually enabled or disabled by customers within their own Cisco Identity tenants. The Cisco Identity team will make the change for you
How Cisco Identity works
Step 1: Data Collection
Generally speaking, by default, your Cisco Identity tenant pulls data regularly throughout the day from all of the identity sources connected to your tenant via their respective APIs. We refer to this as Data Collection. In many cases, Cisco Identity only pulls the delta of data - anything new or anything that has changed - compared to the previous data collection.
This data collection process happens in the background, approximately every hour or so.
Although data is being collected frequently throughout the day, Cisco Identity does not do anything immediately with that data - new check failures are not recorded, user activity logs are not updated, check failure notifications are not sent, User Trust Levels and Identity Posture Score are not recalculated, just to name a few examples.
Step 2: Data Analysis
That is because the data collection alone is not sufficient to trigger those different events to happen. To support all these events (and more) Cisco Identity must run a full analysis of the data that was collected throughout the day to examine the individual data points, analyze data points across identity sources, compare the new data points to historical data points (ie: data from previous days), evaluate the data and events against each check's logic, etc. It is important to note that after the Data Analysis is complete for a given identity source, user check failures will still not be updated.
As you can imagine, this is quite a complex, time consuming and resource intensive process, which is why the Data Analysis runs once every 24 hours for each identity source. There is no set timing for when each identity source's data analysis runs, they are distributed throughout the day at random.
Step 3: Data Updates and Notifications
User data and check failures are updated once a day on a scheduled 24-hour cycle for ALL connected identity sources. It is during this step that the platform is updated with new records and you will start seeing updates and the new information populated in the platform. If notification targets are enabled on checks, then alerts for new check failures will be sent at this time as well. The timing of the notification task can be modified to fit your organization's preferences.
You can customize the time that check notification occurs to fit your organization's preferences. To do so, navigate to the Tenant Settings menu item and select the Checks Timing option. For example, some customers prefer that notifications be sent before the start of their work day so that they can start their day by reviewing all the new check failures.
Be sure to build in some buffer time to ensure that all checks can be updated before the team is online as this process can take some time, especially for larger tenants. If the process is still running when your team starts accessing the platform, the platform may still be updating, so the results can change from one minute to the next, which can create confusion.
The exception - Near Time Checks
All that being said, there are certain instances where the check analysis and notifications update outside of the 24 hour cycle. This happens with "near time" compatible checks
What are "Near Time" compatible checks
Cisco Identity has a small number of checks today that are considered "near time" compatible, which means that the platform will detect and alert on failures for these checks much closer to the time that the actual event happened. Rather than wait for the 24-hour analysis cycle, "near time" checks will typically notify about a failure within approximately an hour of the user event occurring.
For the compatible checks to process events in near time, event streaming must be enabled for the compatible source(s). Event Streaming is managed per identity provider. Below are links to documentation about how to configure event streaming documentation for each source:
- Okta
- Entra Event Hub
- Duo
It is important to note that certain checks may be near time compatible with one identity source, but not another. Compatibility is determined based on the format of the data received from the identity source and any associated limitations that allow or prohibit us from making the check near time compatible.
Important things to consider before increasing detection frequency
Cisco Identity can change a tenant's setting so that user activity logs and check failures are updated more often throughout the day instead of the default 24 hour cycle. We refer to this updated setting as Threat Discovery Mode (TDM): High
While this may sound great at first, there are a few very important things to consider before switching your tenant to TDM: High .
As we described above, for Cisco Identity to support all the events and data displayed in the UI, it must run a full analysis of the data it has collected throughout the day. With TDM: High, Cisco Identity must run the full analysis on an hourly basis in order to update all the data displayed in the platform.
Risks of Threat Discovery Mode: High
We often find that after enabling this setting, many customers come back to us and ask us to turn it off. This is because even with the best intentions, for most teams TDM: High is too frequent. Before the team has had a chance to finish reviewing, investigating, triaging and remediating the detections from 10 AM, the analysis runs again at 11 AM and now, there are a whole batch of new failures to investigate. This can be very overwhelming and stressful for teams to manage, and even counterproductive to their success with Cisco Identity.
That is why we highly recommend that you consider how your team is set up (size, level of experience/expertise, etc), how they would manage and work with this frequency of check failures, how they would balance this alongside their other responsibilities, as well as ensure that the team has a very well tested and established process in place for investigating and triaging detections, before making the change, so that your team can make the most of TDM: High .
Below are some example questions you should ask yourself/the team to determine if TDM: High makes sense for the team at their current stage of adoption and operationalization:
- Who will be responsible for reviewing, investigating and triaging check failures?
- Who will be responsible for reviewing all the detections that come in during the team's "offline" or "non-business" hours?
- What is the current volume of check failures seen on a daily basis across all checks? Across the checks of most importance?
- Would the team be able to get the number of failing users down to 0 in one day on only the checks that are most important to your organization?
- What notification system is in place to ensure that the team can proactively review any detections as soon as they are reported?
- How does your team currently manage the detections that Cisco Identity reports daily?
- What processes do the team follow today to operationalize the information provided by Cisco Identity?
- Does your team have sufficient resourcing to review new user failures every hour?
- What other tools or responsibilities does the team have that they will need to balance alongside the work created by Cisco Identity? How does this fit in with the increased workload associated with
TDM: High? - If the team cannot successfully operationalize the data received at this level of frequency, what is the intended value or benefit your team gains by receiving the data at this rate?
If your organization cannot properly operationalize and manage the frequency, and volume, of detections that would occur by being in TDM: High , then the value your team will get from updating this setting is incredibly limited. Even worse, if the team is not ready, changing to TDM: High is more likely to hurt your team's adoption and usage of Cisco Identity than it is to help.
If this is the case, it is best to hold off on making the change and continue working with the 24 hour schedule, until the team is able to really benefit from having data updated more frequently throughout their day.
Prerequisites to enable Threat Discovery Mode: High
As we discussed, because of the increased frequency of data collection and the general risk associated with enabling TDM: High , there are a few requirements that must be met before TDM: High can be enabled on a tenant.
Prerequisites
1. You have at least 1 additional identity source connected to your Cisco Identity tenant
The more identity sources that are connected to your Cisco Identity tenant, the better the platform works. It is critical to connect your primary Identity Provider (IdP) to your tenant get a holistic view of your users and to identify users who may not exist in Duo. If you connect additional sources, your view on a user gets even wider. When you connect your Human Resource Information System (HRIS) data, you get additional context about a user that is also valuable.
Cisco Identity leverages the additional user context, data and activity from these sources to reduce the number of false positives reported. This is important when utilizing TDM: High because the detection analysis is happening very frequently, so low-fidelity results can create a lot of additional, time consuming and low value work for your team compared to high-fidelity results that are worth the investigation. If Duo is the only integration connected to your Cisco Identity tenant, the detection results are much more likely to be noisy, so you will get less value not just from Cisco Identity overall, but also less value from TDM: High.
2. Notification Target must be enabled
Setting up and configuring Notification Targets is an important step to general operationalization of Cisco Identity, and is an even more critical component to get meaningful value from TDM: High. With TDM: High, checks will start failing on an hourly basis. If your tenant does not have a notification target connected and configured on checks, then the team will not be able to receive proactive alerts about new users failing throughout the day and they will need to sign in to the platform repeatedly to see what has changed from the previous hour. Additionally, without an alerting mechanism, there will be a delay between when a detection was reported, when the team logs into the UI to see that a detection was reported and the team starting an investigation.
These delays diminish the value of TDM: High because even though the data analysis is running frequently throughout the day, the team isn't able to easily investigate the issues at the same pace since they won't know about the detection as soon as Cisco Identity reports it.
We highly recommend using a messaging system (ex: Slack, Teams, Webex) or using Webhooks to send the alerts to a SIEM, rather than using an email notification target. Notifications sent to messaging systems include more details about the user failure and triage options, making it easier to manage and interact with the alerts than email, while SIEMs are great options for teams managing a large volume of notifications, consolidating logs and alerts across multiple tools, or working with a Security Operations (SOC) team.
3. Streaming must be enabled for all compatible connected identity sources
If you would like to enable TDM: High you must first enable Streaming on all connected identity sources that support streaming (currently Duo, Entra ID, Okta). This is for a few reasons:
- There are certain data points that Cisco Identity only receives via Streaming that are needed to determine check failures
- Streaming ensures that data can be sent to Cisco Identity without overloading the identity source's APIs or causing rate limiting/throttling issues that could impact other tools in your environment
- Note: Microsoft Event Hub does incur an additional cost for Microsoft. You will need to speak with your Microsoft rep to learn about pricing. Streaming for Entra is required to support
TDM: Highbecause it is very common for Cisco Identity to experience rate limiting on Microsoft's GraphQL API as it is shared across multiple Microsoft services. Because their API is shared across multiple services, if Microsoft starts to rate limit the API, it can also cause unpredictable and unexpected results in other Microsoft services (ex: Sharepoint) - If Streaming is not currently enabled, there is no near-time alerting for checks that are already near-time compatible without
TDM: High. We recommend that you enable streaming and use the small number of near time compatible checks to simulate the experience and gauge the volume and frequency associated withTDM: High . This will help you better understand if the team is prepared to properly operationalize the check results of a few checks, before enablingTDM: Highacross ALL checks.
Enabling Threat Discovery Mode: High
If you have read all the documentation above, your tenant meets the requirements listed, and you would like to have TDM: High enabled on your tenant, contact your Duo representative team or Support. They will reach out to the Cisco Identity team directly who will verify the requirements are met and enable the TDM: High setting.
There is currently not a way to manually enable or disable this setting within your own tenant. If you would like to disable the setting, you will need to follow the same process to request that it be turned off.
Cisco Identity in Cloud Control
Cisco Identity in Cisco Cloud Control
Welcome to the Cisco Identity documentation for Cisco Cloud Control.
This guide provides comprehensive information for understanding, configuring, and using Identity to bring identity context to your network.
Table of Contents
- Overview
- Getting Started
- Identity for AI Canvas
- Identity in Cisco Cloud Control Inventory
Overview
Note: Cisco Cloud Control is only available in the US at this time.
What is Cisco Identity?
Cisco Identity brings identity context to the network through Cisco Cloud Control. It's an analytics hub that aggregates identity, device, network, application, and agentic activity into one operational view.
Cisco Identity helps you:
- See the actors behind access: Identify humans, devices, apps, workloads, service accounts, and AI agents
- Evaluate posture and change: Use Trust Levels, anomaly signals, and timelines to understand risk
- Investigate with context: Use AI Canvas to bring identity, device, network, and application context into guided investigations
- Turn context into action: Use actor context to inform network policy, segmentation, and access decisions
Getting Started
Prerequisites
Before using Cisco Identity, ensure you have:
-
Access to Cisco Cloud Control: You must have Administrator or read-only role in Cisco Cloud Control * Tenant Full Admin is required to add, edit, test, or remove Cisco Identity integrations
- Note: The Cisco Cloud Control Integration Admin role does not currently grant integration-management permissions within Cisco Identity
- Tenant Read-Only users can view Cisco Identity data but cannot configure integrations or take any other actions
-
At least one connected product: Cisco Identity requires your org to have at least one product (e.g.: Secure Access, Meraki, Splunk, or more) already connected in Cisco Cloud Control - an empty Cisco Cloud Control tenant alone is not sufficient
License Requirements
- All Customers: Can integrate Cisco Identity with Cisco product integrations (Duo, ISE, Secure Access, Webex, Splunk)
- Duo Advantage+ or ISE Advantage+: Required to integrate external (non-Cisco) sources
To verify your edition for paid access, open a support case with Cisco Support.
Access & Roles
Cisco Identity uses Cisco Cloud Control roles to control access:
- Tenant Full Admin: Can access Cisco Identity and configure integrations
- Tenant Read-Only: Can view Cisco Identity data but cannot make configuration changes or take any other write actions
- Integration Admin: This Cisco Cloud Control role is not currently supported for managing integrations within Cisco Identity
If you need to add or manage an integration, ask a Cisco Cloud Control Tenant Full Admin to assign you the Tenant Full Admin role through Admin Console > Users.
Accessing Identity
- Log in to Cisco Cloud Control via any supported product
- Navigate to Platform Services and select Identity
- Your tenant will automatically be provisioned for you to start using Cisco Identity
Initial Configuration
Warning: The following configuration steps require the Tenant Full Admin role. Tenant Read-Only users can view integrations but cannot add or modify them. The Integration Admin role is not currently supported for these actions.
Step 1: Review Integrations
- In Identity, navigate to Settings > Integrations
- Verify supported sources and targets: * Cisco: Duo, ISE, Secure Access, Webex, Splunk * External: Okta, Entra, Active Directory, Google, Slack, GitHub and more
Step 2: Configure Data Collection
For each integration:
- Select Add Integration for the desired source from the Integrations list.
- Integrations that are not available for your organization based on Licensing will be greyed out. Contact Support if you believe your organization should be entitled to these integrations per your licensing
- Follow the integration configuration steps found in documentation article for the respective integration that you have selected
- After you have completed the necessary steps, select Save to store your changes and to trigger the automated connectivity test. The connectivity test can take several minutes but you do not have to stay on this screen for it to continue processing
- If the test completes successfully, the integration is configured and data collection will start automatically within the next ___. If the connectivity test fails (
Connectivity Status: Failed), review the errors in the system logs and the current configuration to resolve the issue
Step 3: Explore the Dashboard
Warning: The data ingestion process can take over 24 hours or up to a week to complete and stabilize as it collects historical data. In very large environments, this can even take up to 2 weeks. For this reason, we highly recommend not reviewing data before 7 days as it can still contain data inconsistencies.
- Navigate to the Identity dashboard
-
Review key metrics such as: * Total actors and entities (humans, devices, apps, non-humans, agents) * Trust Level distribution * Posture Score * Top risk factors and insights
-
Drill into specific actors, entities, detections or trends
What's Next
Now that you've done your initial setup, learn more about how you can improve your identity security posture score and clean up identities.
Identity for AI Canvas
Note: Identity for AI Canvas is currently in beta and is only available to customers on Cisco Cloud Control.
The functionality is still evolving and subject to change. Before using the results, verify them for accuracy and completeness.
What is AI Canvas?
AI Canvas brings identity, device, network, and application context into guided investigations using natural language.
AI Canvas is an AI-powered investigation assistant that answers natural language questions about your Cisco Cloud Control products.
For Cisco Identity, you can ask about identity and access, correlate data across identity sources, network telemetry, and application logs, receive guided investigation paths, and generate investigation summaries.
Using AI Canvas
AI Canvas provides guidance for common investigations including compromised credentials, suspicious access, and posture degradation. Start with broad questions, use actor identifiers, specify timeframes, and build on previous responses to deepen investigations.
Access AI Canvas by navigating to AI Canvas from the header in Cisco Cloud Control. Ask questions about:
- Actors: High-risk users, service account status, access patterns, anomalies
- Devices: Compliance status, unmanaged devices, device usage
- Access: Resource access history, failed authentications, privilege assignments
- AI Agents: Agent activity, service account usage, resource access patterns
For comprehensive AI Canvas documentation including detailed examples, investigation workflows, and best practices, see the Cisco Cloud Control Canvas guide.
Identity in Cisco Cloud Control Inventory
Cisco Cloud Control Inventory provides centralized visibility into networking devices, including ISE infrastructure nodes (Primary Admin Nodes, Secondary Admin Nodes, Policy Service Nodes, and Monitoring/Troubleshooting Nodes).
Once ISE is integrated with Cisco Identity, navigate to Inventory under Platform Services to view node information including hostname, type, software version, health status, and sync time. You can search, filter, and export inventory data.
For comprehensive Inventory documentation, see the Cisco Cloud Control Inventory documentation.
Additional Resources
MFA FAQ
Overview
Cisco Identity collects MFA factor information from any available sources.
This article addresses some frequently asked questions around MFA factor usage and classification.
MFA Factor Strength
Cisco Identity categorizes different types of MFA factors by strength according to the guidelines set forth in the latest NIST 800-63B standard, specifically the Authenticator Assurance Levels (AAL).
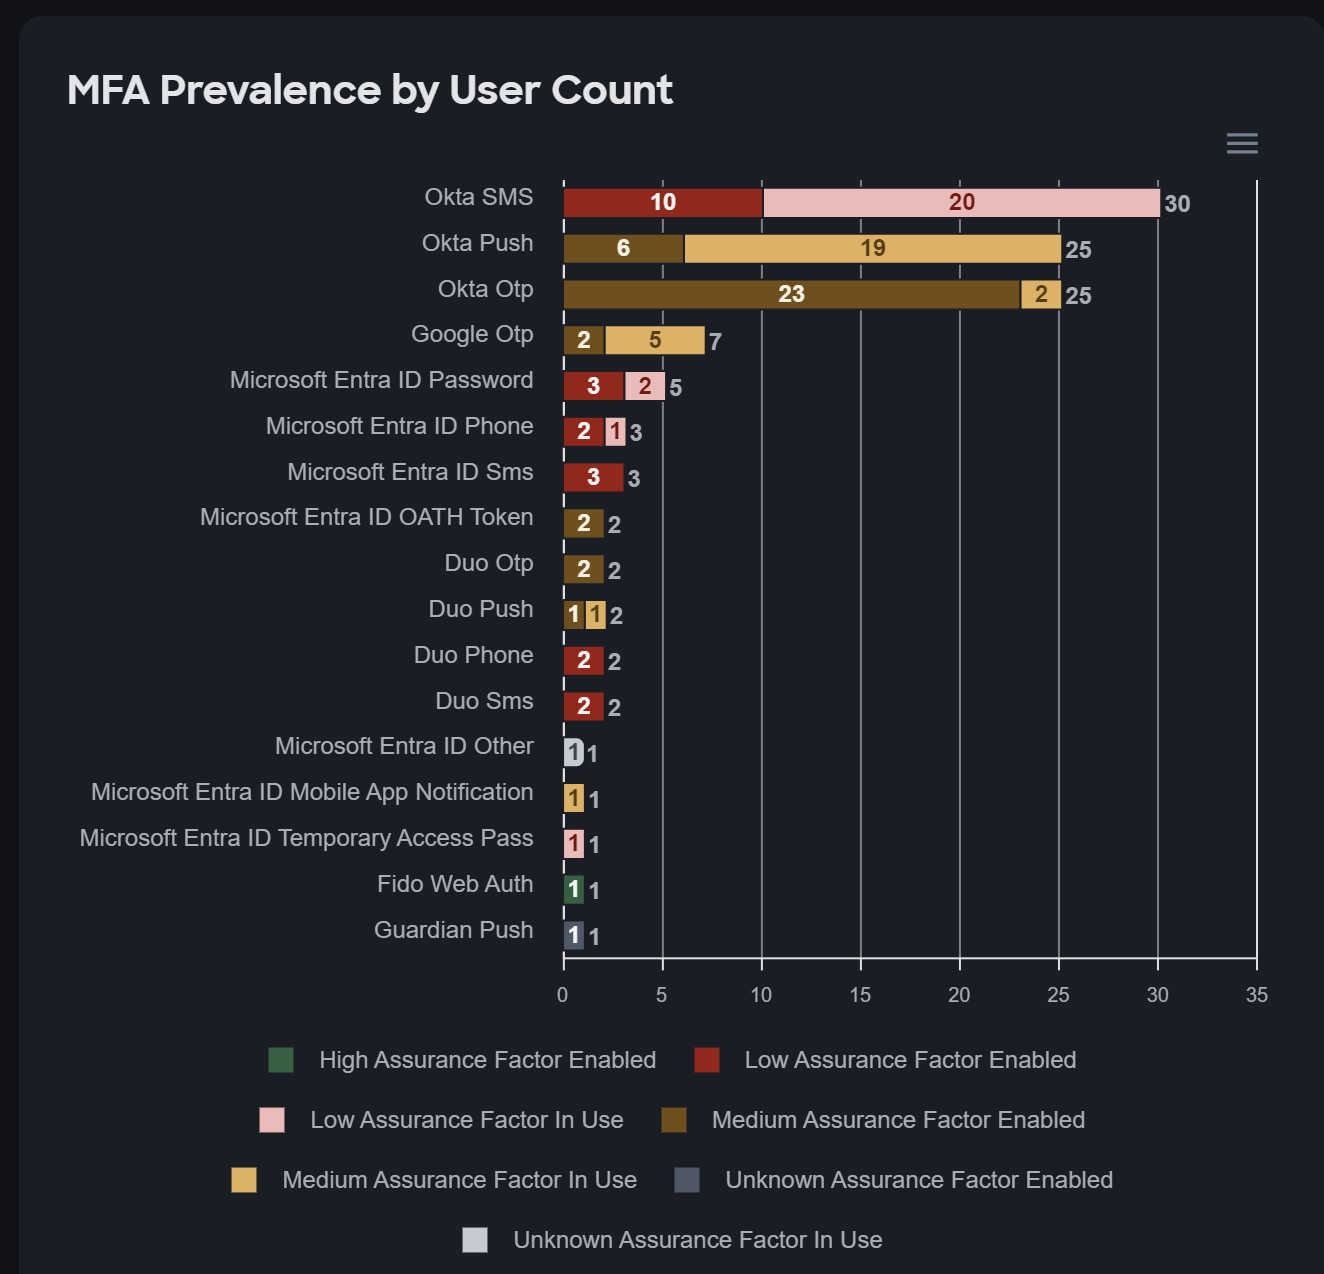
In the chart below, shown the Dashboard, authenticators may have an assurance level of Low, Medium, or High, which corresponds to AAL 1, 2, and 3, respectively.
A level of Unknown means that the identity source likely is using a 3rd party MFA provider or platform and the authenticator strength is not reported in the event details.
See the #mfa-factor-strength-mapping list below for specific identity providers and factor types.
MFA Factor Status
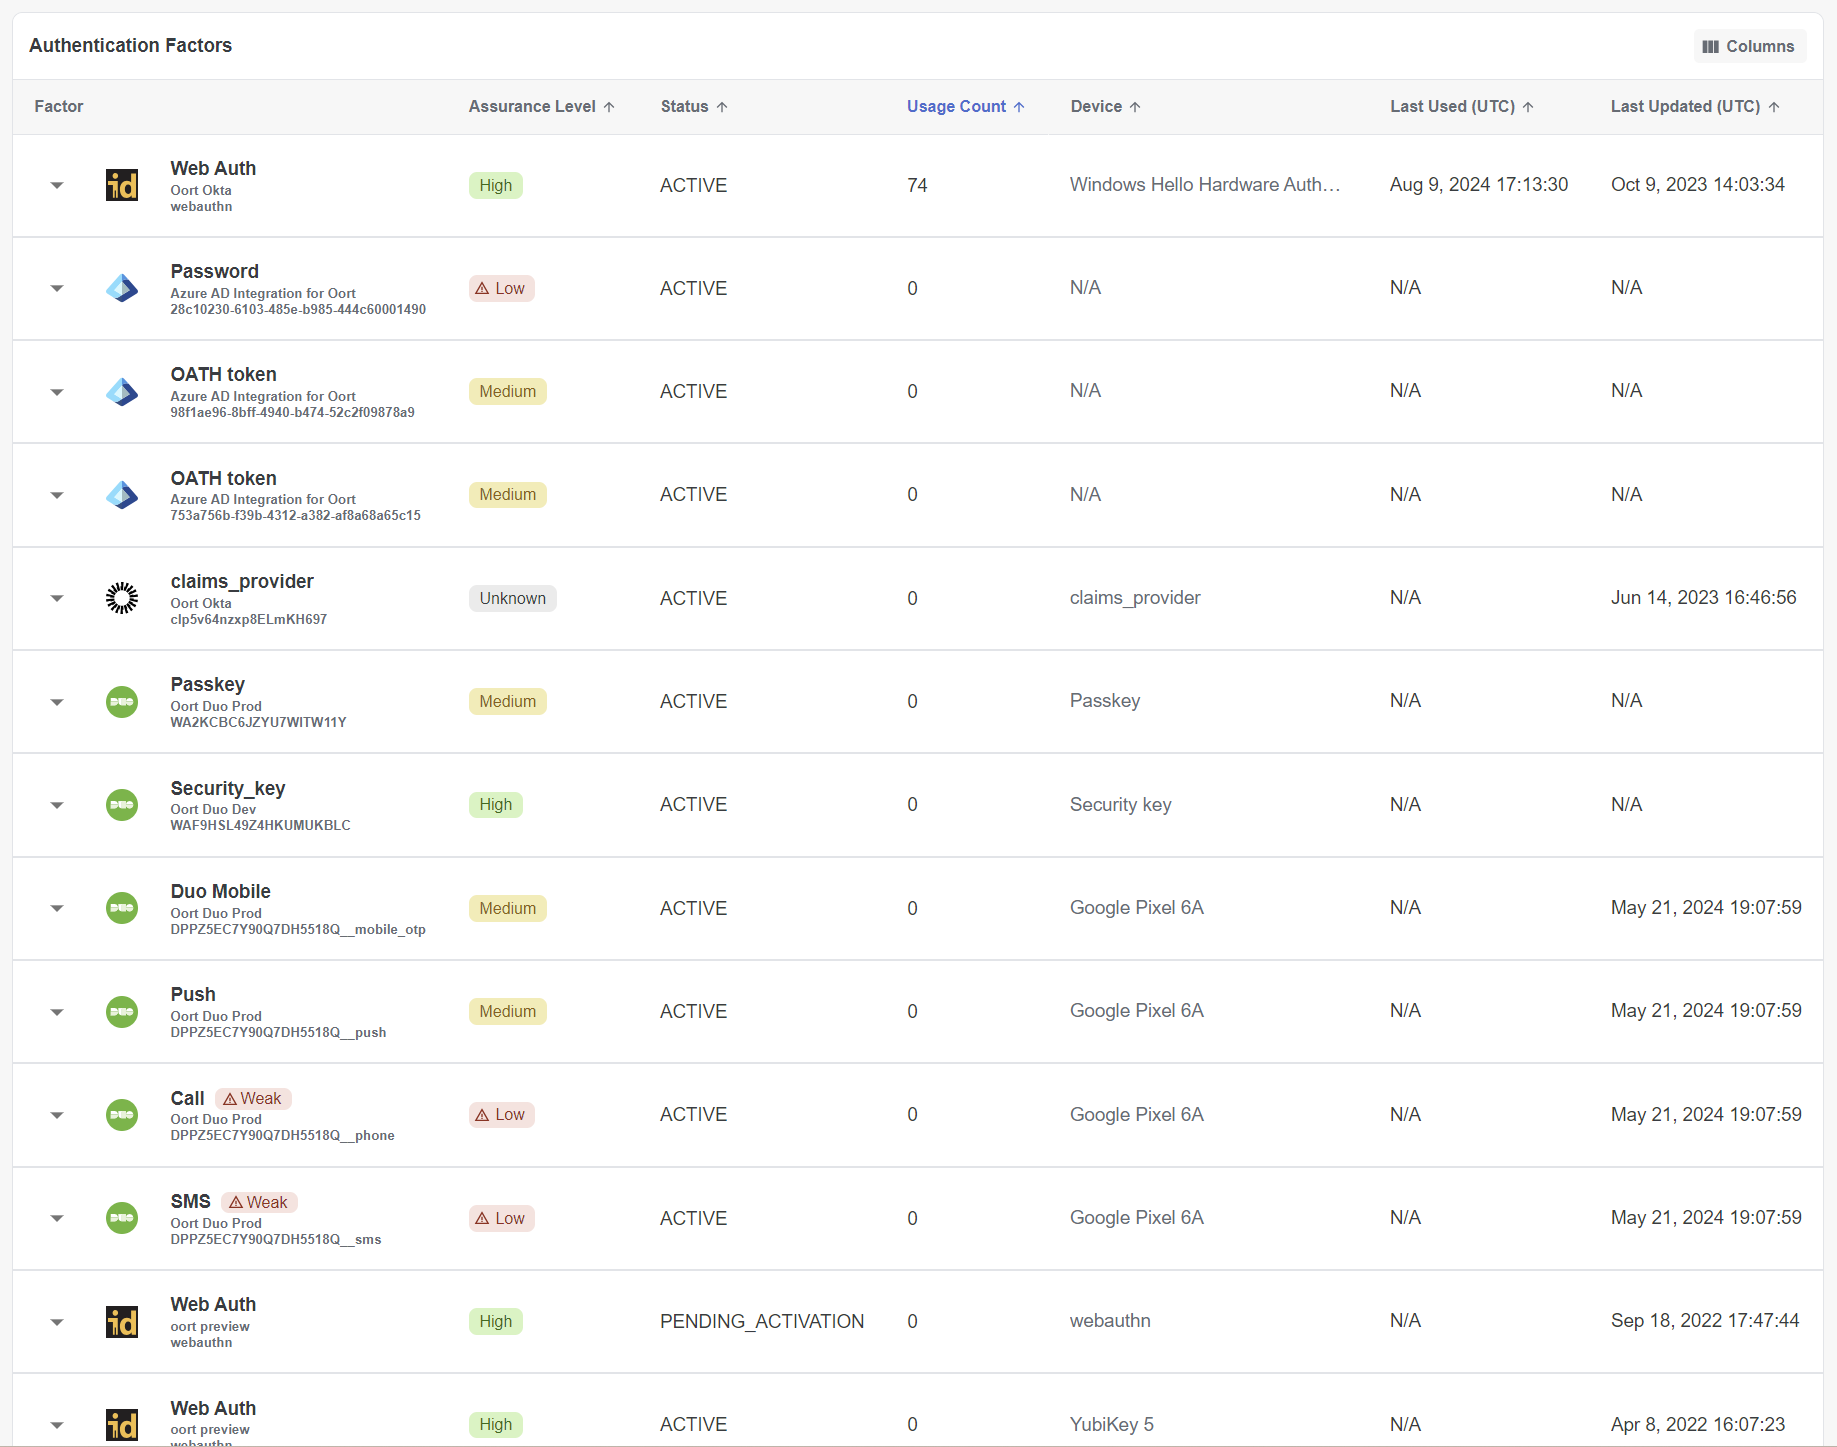
User MFA factors may have a variety of statuses reported by the identity system. Most factors will typically show as ACTIVE or DISABLED.
Note that factors with a status of PENDING or PENDING_ACTIVIATION are NOT considered to be fully enrolled and activated factors, so a user with only these factor statuses (besides Password as a first factor) will fail the No MFA Configured check.
MFA Factor Strength Mapping
The list below provides the current factor mapping for each factor type encountered in the primary IDP and IAM systems.
Passkeys
Based on the recent NIST publication around Syncable Authenticators, more commonly known as Passkeys, which are capable of AAL2, Cisco Identity classifies Passkeys as Medium strength.
Factor Strength Table
NOTE: Factor types, names, and other details reported by the IDP and IAM systems are constantly evolving and changing, so the actual user interface may differ slightly.
['AZURE_AD', 'alternateMobilePhone', undefined, AssuranceLevel.Low],
['AZURE_AD', 'appCode', undefined, AssuranceLevel.Medium],
['AZURE_AD', 'appNotification', undefined, AssuranceLevel.Medium],
['AZURE_AD', 'email', undefined, AssuranceLevel.Low],
['AZURE_AD', 'mobilePhone', undefined, AssuranceLevel.Low],
['AZURE_AD', 'officePhone', undefined, AssuranceLevel.Low],
['AZURE_AD', 'securityQuestion', undefined, AssuranceLevel.Low],
['AZURE_AD', 'microsoftAuthenticator', undefined, AssuranceLevel.Medium],
['AZURE_AD', 'password', undefined, AssuranceLevel.Low],
['AZURE_AD', 'phone', undefined, AssuranceLevel.Low],
['AZURE_AD', 'softwareOath', undefined, AssuranceLevel.Medium],
['AZURE_AD', 'windowsHelloForBusiness', undefined, AssuranceLevel.High],
['AZURE_AD', '509 Certificate', undefined, AssuranceLevel.High],
['AZURE_AD', 'Other', undefined, AssuranceLevel.Unknown],
['AZURE_AD', 'microsoftAuthenticatorPasswordless', undefined, AssuranceLevel.High],
['AZURE_AD', 'mobileAppNotification', undefined, AssuranceLevel.Medium],
['AZURE_AD', 'temporaryAccessPass', undefined, AssuranceLevel.Low],
['AZURE_AD', 'QR code', undefined, AssuranceLevel.Medium],
['AZURE_AD', 'fido2', undefined, AssuranceLevel.High],
['AZURE_AD', 'platformCredentialAuthenticationMethod', undefined, AssuranceLevel.Unknown],
['CUSTOM', 'claims_provider', 'BeyondID_MFA', AssuranceLevel.Unknown],
['CUSTOM', 'claims_provider', 'Duo OIDC MFA', AssuranceLevel.Unknown],
['CUSTOM', 'token:hotp', 'Feitian Hardware TOTP', AssuranceLevel.Unknown],
['DEL_OATH', 'token', 'On-Prem MFA', AssuranceLevel.Unknown],
['DUO', 'd1', undefined, AssuranceLevel.Medium],
['DUO', 'bypass_code', undefined, AssuranceLevel.Low],
['DUO', 'duo_mobile_passcode', undefined, AssuranceLevel.Medium],
['DUO', 'duo_push', undefined, AssuranceLevel.Medium],
['DUO', 'phone_call', undefined, AssuranceLevel.Low],
['DUO', 'Passkey', undefined, AssuranceLevel.Medium],
['DUO', 'Platform_authenticator_(2fa)', undefined, AssuranceLevel.Medium],
['DUO', 'Platform_authenticator_(passwordless)', undefined, AssuranceLevel.High],
['DUO', 'Security_Key', undefined, AssuranceLevel.High],
['DUO', 'sms_passcode', undefined, AssuranceLevel.Low],
['DUO', 'Touch_ID', undefined, AssuranceLevel.High],
['DUO', 'u2ftoken', undefined, AssuranceLevel.High],
['DUO', 'web', 'DUO', AssuranceLevel.Unknown],
['DUO', 'WebAuthn_Chrome_Touch_ID', 'DUO', AssuranceLevel.High],
['DUO', 'yk', 'DUO', AssuranceLevel.High],
['DUO', 'verified_duo_push', undefined, AssuranceLevel.Medium],
['FIDO', 'webauthn', 'YubiKey 5', AssuranceLevel.High],
['FIDO', 'webauthn', 'Windows Hello Software Authenticator', AssuranceLevel.High],
['FIDO', 'webauthn', 'FIDO', AssuranceLevel.High],
['FIDO', 'webauthn', 'MacBook Touch ID', AssuranceLevel.High],
['FIDO', 'webauthn', undefined, AssuranceLevel.High],
['GOOGLE', 'google_otp', 'Google Authenticator', AssuranceLevel.Medium],
['GOOGLE', 'token:software:totp', 'GOOGLE', AssuranceLevel.Medium],
['GOOGLE', 'token:software:totp', undefined, AssuranceLevel.Medium],
['GUARDIAN', 'push', undefined, AssuranceLevel.Unknown],
['GUARDIAN', 'totp', undefined, AssuranceLevel.Unknown],
['GUARDIAN', 'webauthn-platform', undefined, AssuranceLevel.Unknown],
['OKTA', 'call', 'OKTA', AssuranceLevel.Low],
['OKTA', 'duo', 'Duo Security', AssuranceLevel.Unknown],
['OKTA', 'email', 'Email', AssuranceLevel.Low],
['OKTA', 'email', undefined, AssuranceLevel.Low],
['OKTA', 'google_otp', 'Google Authenticator', AssuranceLevel.Medium],
['OKTA', 'okta_email', 'Email', AssuranceLevel.Low],
['OKTA', 'okta_password', 'Password', AssuranceLevel.Low],
['OKTA', 'okta_verify', 'Okta Verify', AssuranceLevel.Medium],
['OKTA', 'password', 'Password', AssuranceLevel.Low],
['OKTA', 'push', 'OKTA', AssuranceLevel.Medium],
['OKTA', 'push', 'Okta Verify', AssuranceLevel.Medium],
['OKTA', 'push', undefined, AssuranceLevel.Medium],
['OKTA', 'question', 'OKTA', AssuranceLevel.Low],
['OKTA', 'security_question', 'Security Question', AssuranceLevel.Low],
['OKTA', 'signed_nonce', 'Okta Verify', AssuranceLevel.High],
['OKTA', 'sms', 'OKTA', AssuranceLevel.Low],
['OKTA', 'sms', undefined, AssuranceLevel.Low],
['OKTA', 'token:software:totp', 'OKTA', AssuranceLevel.Medium],
['OKTA', 'token:software:totp', undefined, AssuranceLevel.Medium],
['OKTA', 'webauthn', 'Security Key By Yubico with NFC', AssuranceLevel.High],
['OKTA', 'webauthn', 'YubiKey 5Ci', AssuranceLevel.High],
['OKTA', 'yubikey_token', 'Yubikey', AssuranceLevel.High],
['YUBICO', 'token:hardware', 'YUBICO', AssuranceLevel.High],
['YUBICO', 'token:hardware', undefined, AssuranceLevel.High],['AZURE_AD', 'Other', undefined, AssuranceLevel.Unknown],
['AZURE_AD', 'platformCredentialAuthenticationMethod', undefined, AssuranceLevel.Unknown],
['AZURE_AD', 'SMS Sign-in', undefined, AssuranceLevel.Low],
['AZURE_AD', 'Temporary Access Pass', undefined, AssuranceLevel.Low],
['CLAIMS', 'external_idp', 'DUO OIDC MFA', AssuranceLevel.Unknown],
['CLAIMS', 'claims_provider', undefined, AssuranceLevel.Unknown],
['DUO', 'duo', 'Duo Security', AssuranceLevel.Unknown],
['DUO', 'h6', undefined, AssuranceLevel.Unknown],
['DUO', 'web', undefined, AssuranceLevel.Unknown],
['FIDO', 'webauthn', 'Security Key By Yubico', AssuranceLevel.High],
['HOTP', 'otp', 'FEITIAN c200 Token', AssuranceLevel.Medium],
['HOTP', 'otp', 'Legacy TOTP Token', AssuranceLevel.Medium],
['OKTA', 'call', undefined, AssuranceLevel.Low],
['OKTA', 'custom_otp', 'FEITIAN c200 Token', AssuranceLevel.Medium],
['OKTA', 'custom_otp', 'Token2 C105', AssuranceLevel.Medium],
['OKTA', 'duo', 'Duo Security', AssuranceLevel.Unknown],
['OKTA', 'external_idp', 'DUO OIDC MFA', AssuranceLevel.Unknown],
['OKTA', 'phone_number', 'Phone', AssuranceLevel.Low],
['OKTA', 'question', undefined, AssuranceLevel.Low],
['OKTA', 'security_question', 'Security Question For MFA', AssuranceLevel.Low],
['OKTA', 'signed_nonce', undefined, AssuranceLevel.High],
['OKTA', 'signed_nonce', 'OKTA', AssuranceLevel.High],
['OKTA', 'sms', 'Phone', AssuranceLevel.Low],
['OKTA', 'webauthn', 'YubiKey 5 FIPS', AssuranceLevel.High],
['OKTA', 'webauthn', 'YubiKey 5 FIPS with NFC', AssuranceLevel.High],
['OKTA', 'yubikey_token', 'YubiKey Authenticator', AssuranceLevel.High],
['YUBIKEY', 'otp', 'YubiKey Authenticator', AssuranceLevel.Medium]Okta Workflows Webhook Example
Overview
Okta Workflows provide a flexible and extensible platform for orchestrating common operations within an Okta environment. Now with the Cisco Identity webhook feature, you can combine the power of Cisco Identity analytics and Okta Workflow automation to accomplish numerous things.
This article provides a basic example of how to use Cisco Identity webhook destinations with Okta Workflows.
Assumptions
This article assumes the following:
- General familiarity with the Okta Workflows platform
- An Okta tenant capable of supporting the Workflows module (not a Developer tenant)
- Additional downstream or adjacent platform integrations in Okta Workflows, such as Slack, Microsoft 365, ServiceNOW, etc.
- Okta Super Admin role
High-Level Design
This example traces the following design:
- Creation of an API Endpoint in Okta Workflow for ingesting Cisco Identity notification events
- Parsing of the JSON event message, including event type, criticality, and list of users failing
- Invoking a
For Eachfunction for each user listed in the notification, which invokes a Helper flow to evaluate specific logic and perform certain actions - Sending a Slack message with the output of the failed check notification
Import Pre-Configured Workflows
Cisco Identity has exported the Okta Workflows for this example, which can then be imported into your Workflow console for review and testing.
Configuration Steps
- Create a new flow and provide a suitable name for it
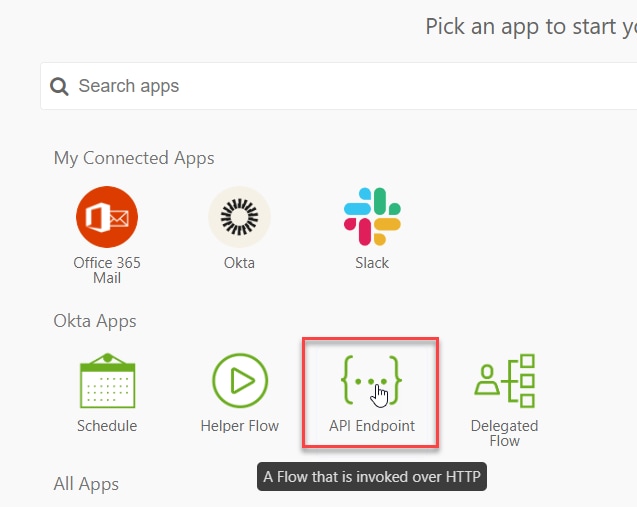
- Add a new event type of API Endpoint
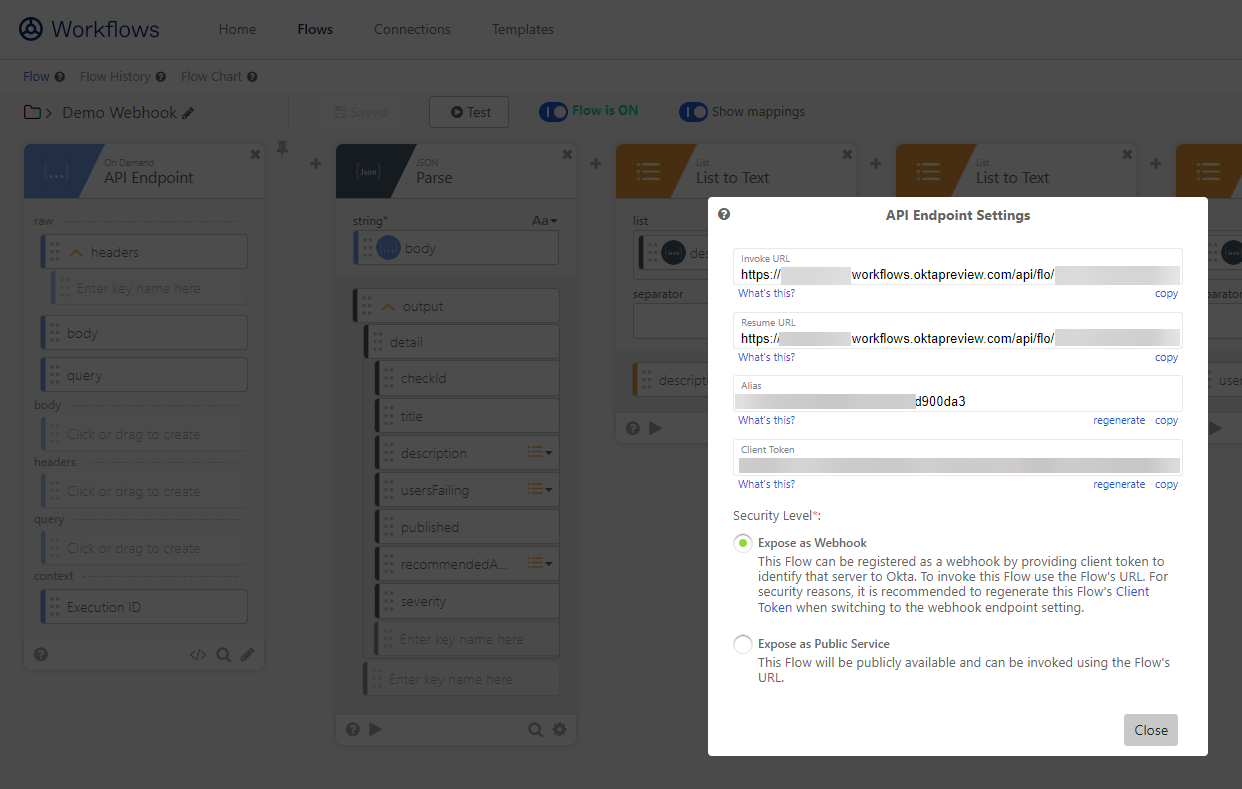
- Select Expose as Webhook and copy the Invoke URL and Client Token. These will be used in the Cisco Identity configuration.
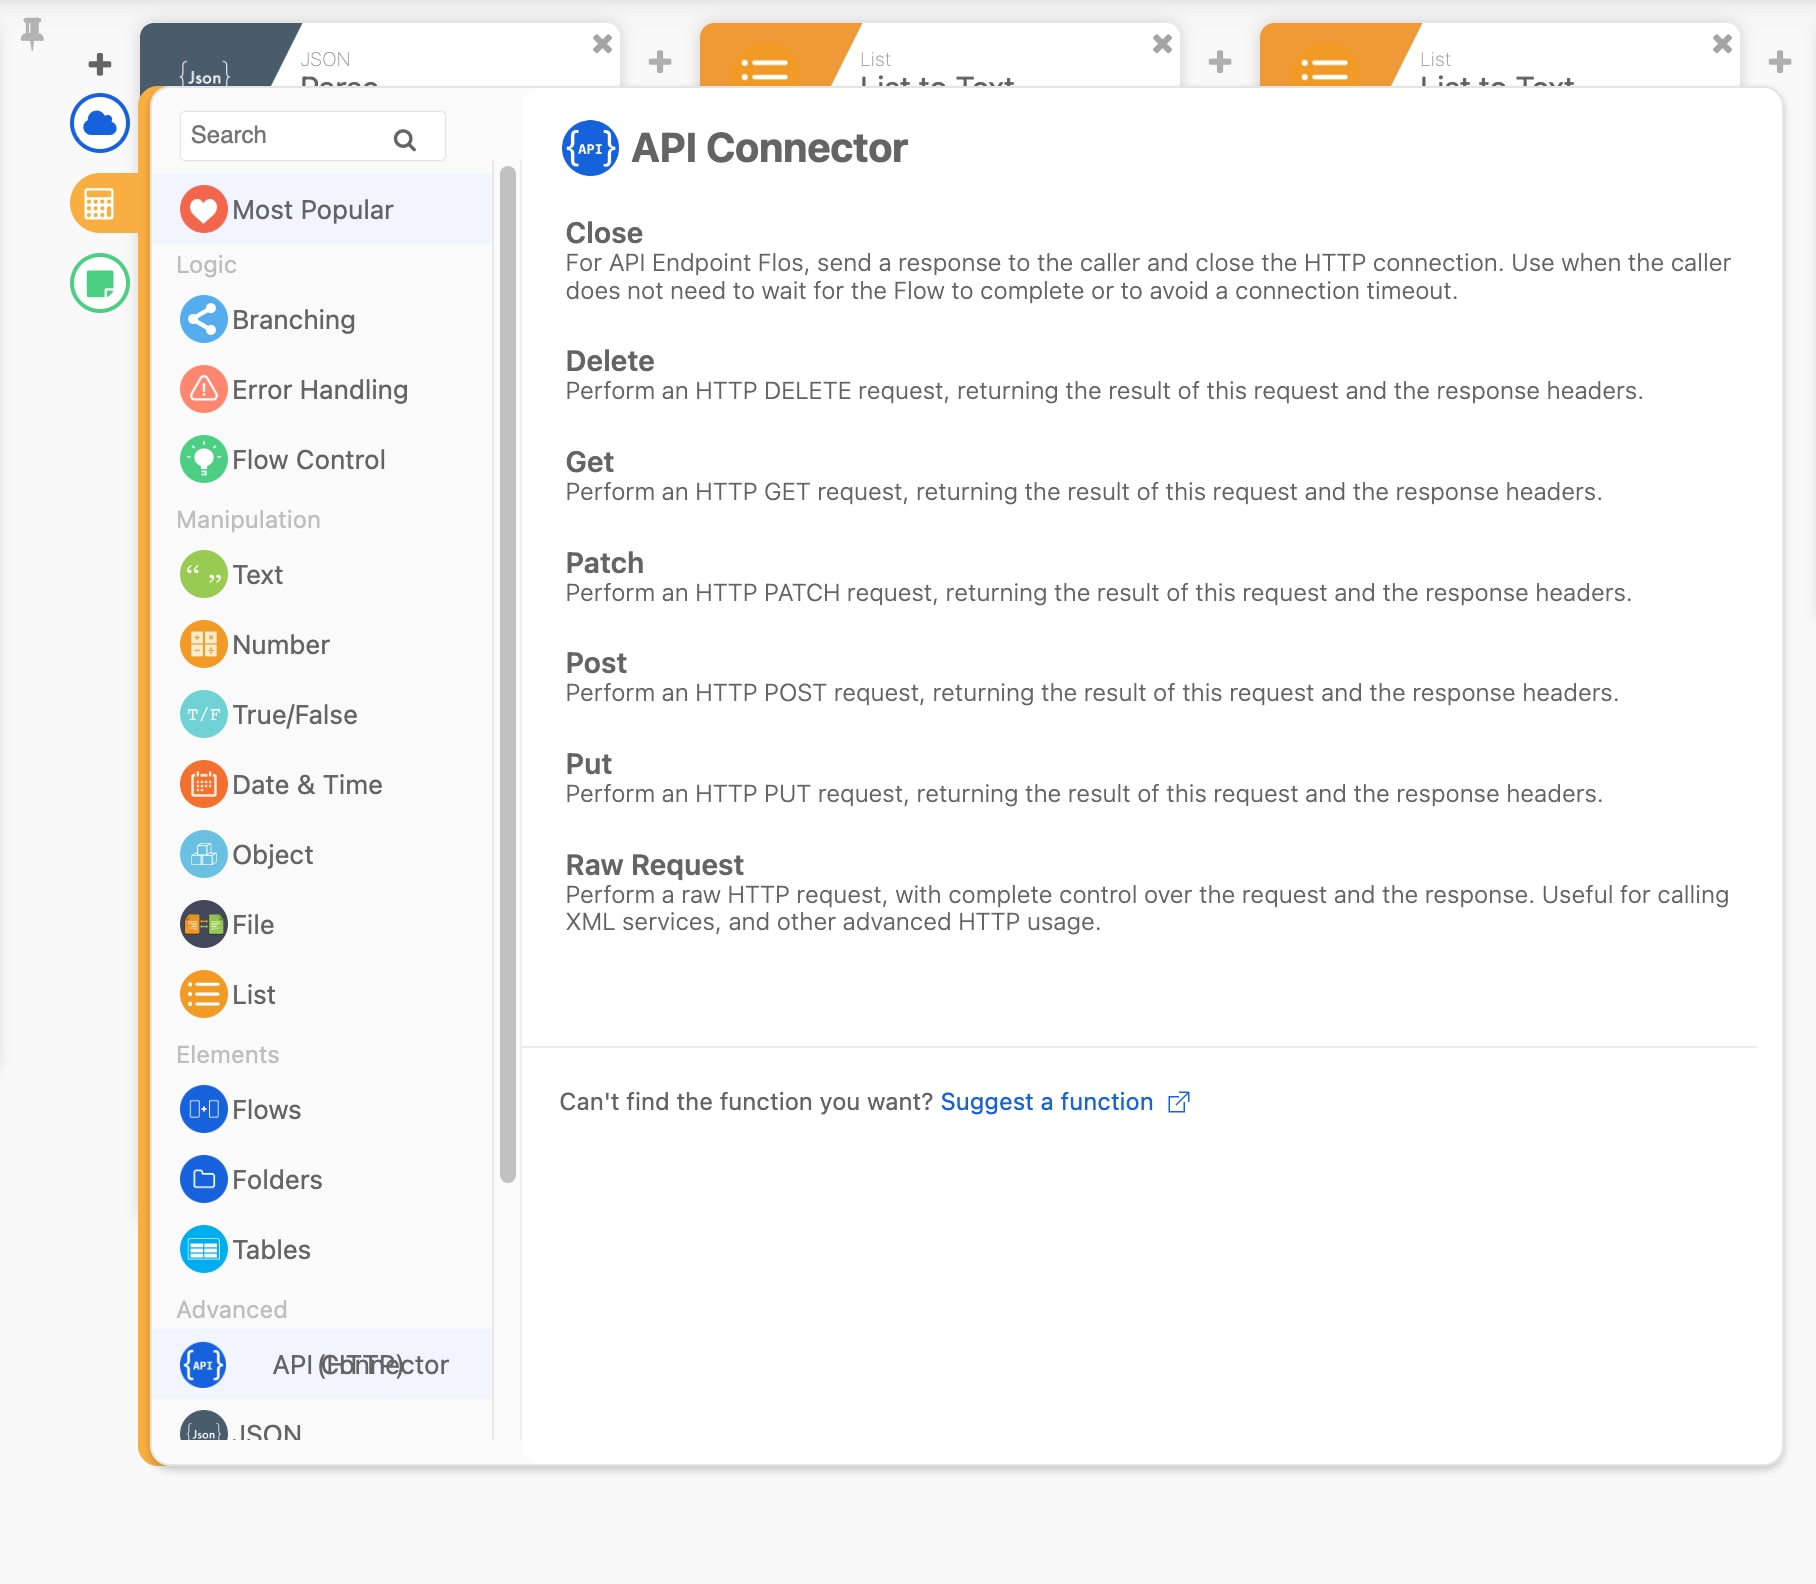
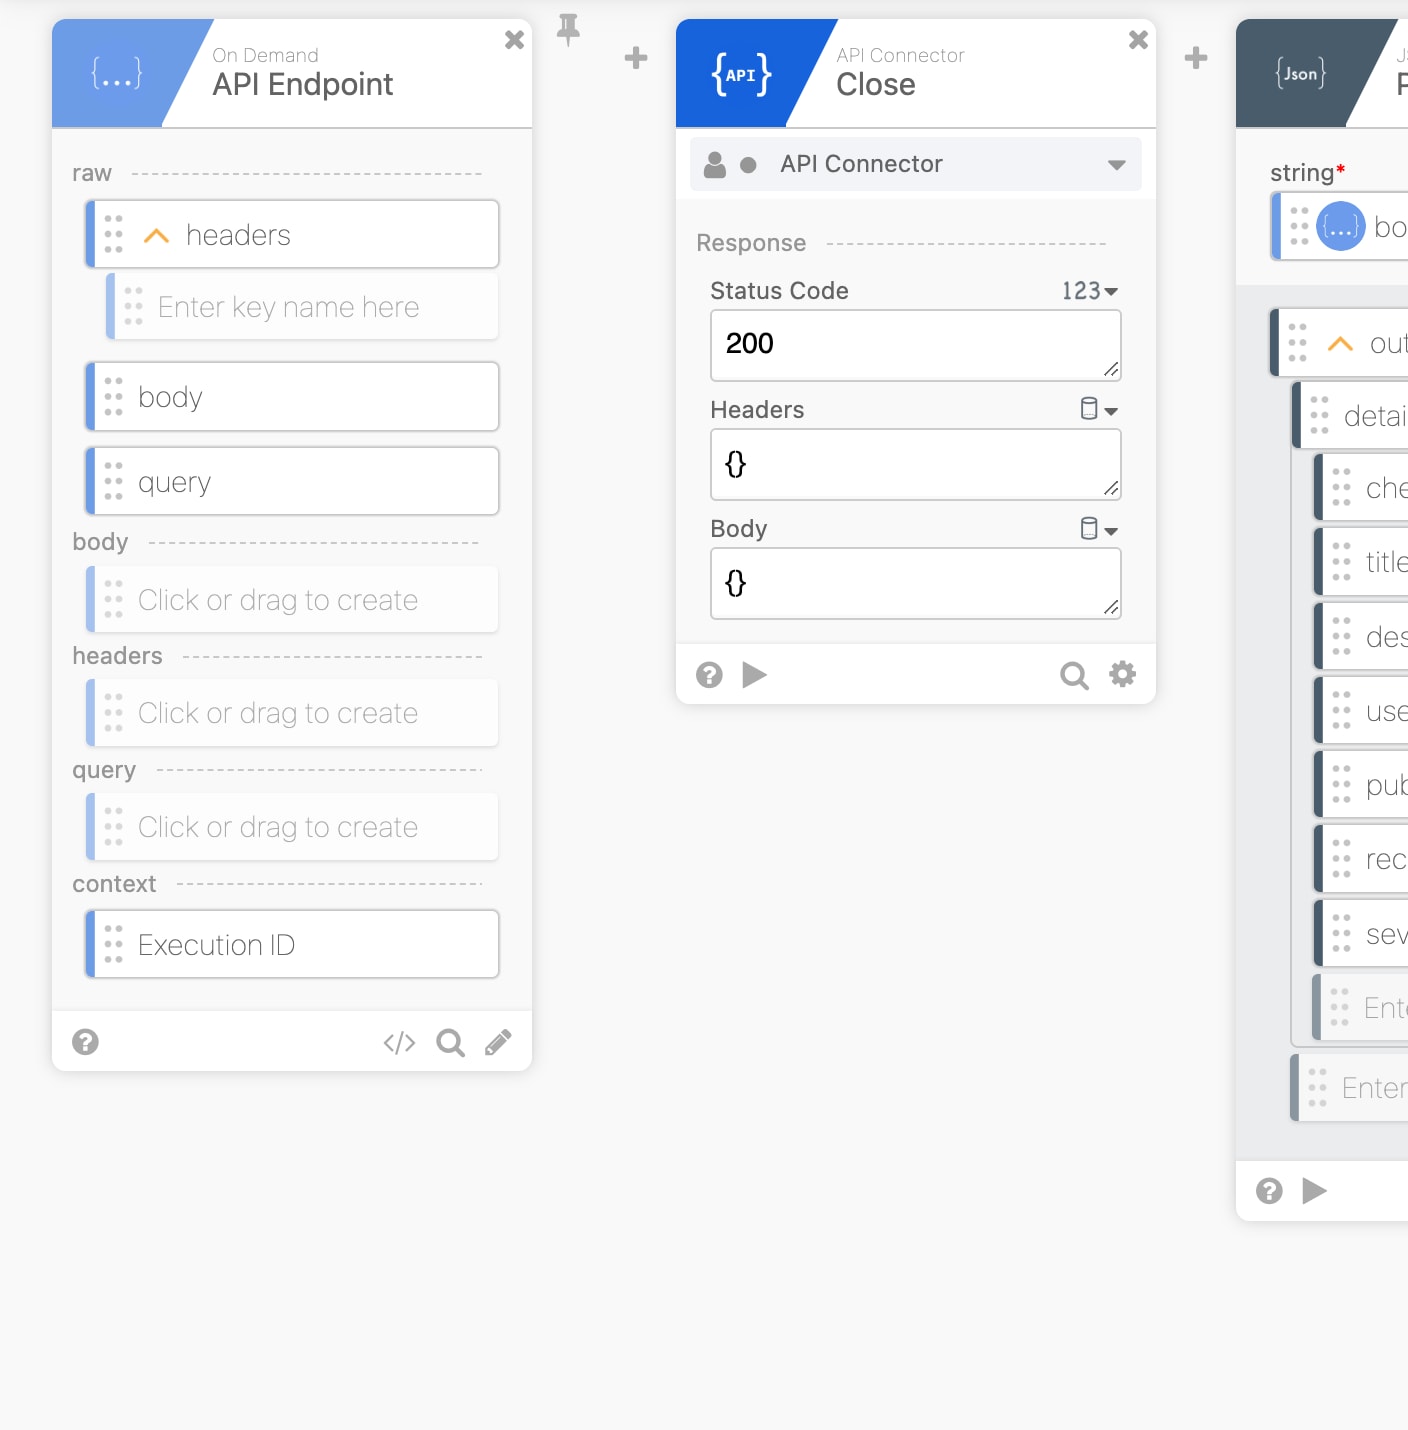
- Next add an API Connector - Close action.
- Set the status code value to 200. Because the workflow is async and may take time, this will return a value to Cisco Identity and allow the action to close.
- Next add a JSON Parse action, using the Body from the API endpoint as input. Structure the output fields as shown below.
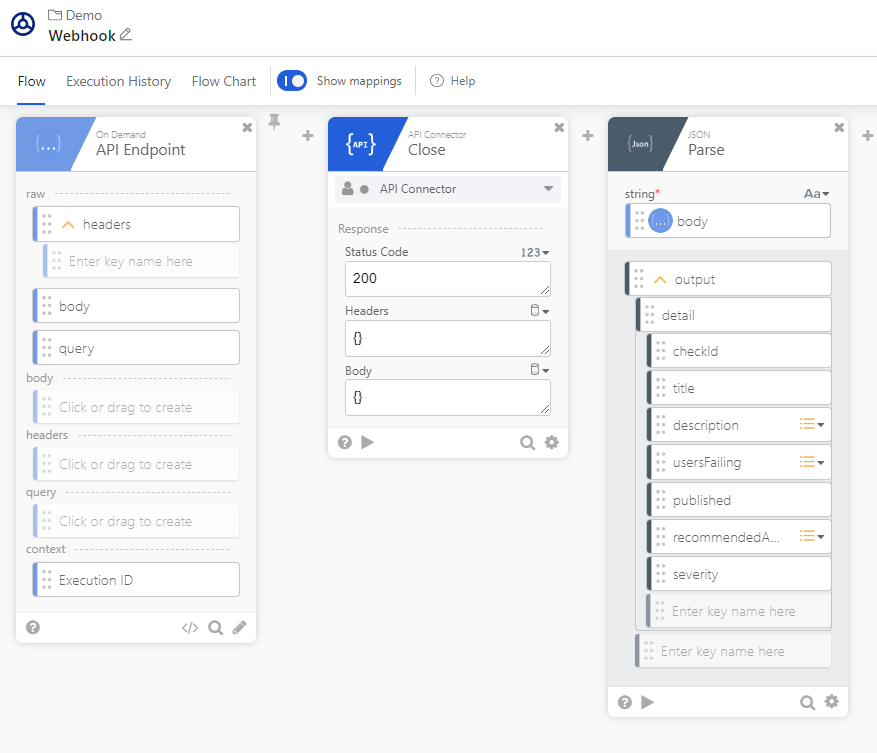
If using the Test Connectivity action in Cisco Identity to test the API endpoint and workflow, the specific event message sent will be:
{
  "version": "0",
  "id": "abf0607d-3856-b397-5138-0131ec1b63d7",
  "detail-type": "WebhookTest",
  "source": "11111111-2222-3333-4444-555555555555__66666666",
  "account": "000000000000",
  "time": "2023-08-08T13:27:22Z",
  "region": "us-east-2",
  "resources": [],
  "detail": {
    "id": "11111111-2222-3333-4444-555555555555",
    "checkId": "oort-test-check-id",
    "title": "OORT Failing Check Event Test",
    "description": [
      "description1",
      "description2"
    ],
    "recommendedActions": [
      "action1",
      "action2"
    ],
    "severity": "critical",
    "usersFailing": [
      "user1@example.com",
      "user2@example.com"
    ],
    "published": "2023-08-08T13:27:22.416Z"
}- Add several List actions to convert the JSON strings to text, for later use in the workflow.
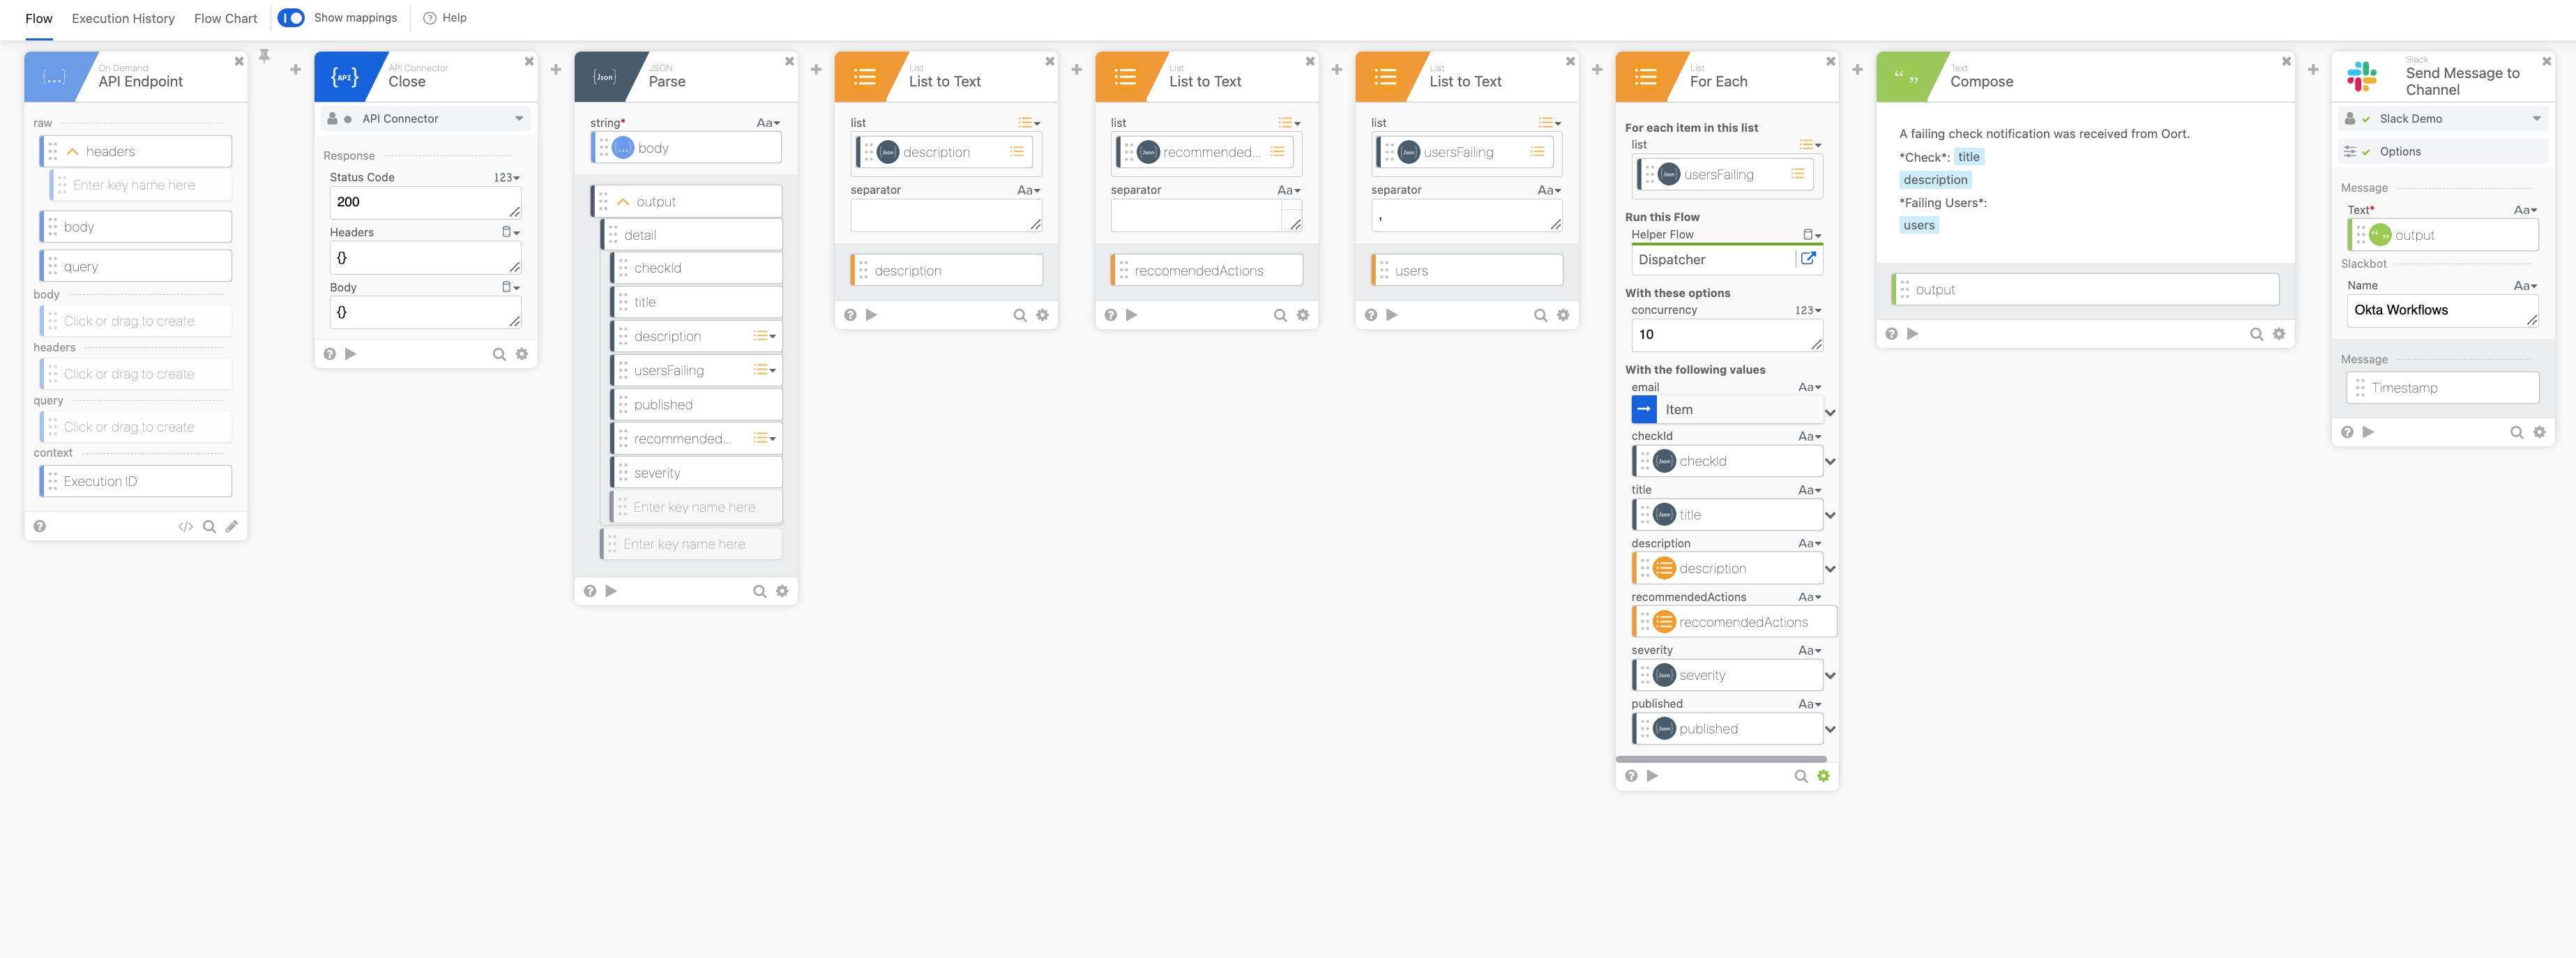
- At this point, it's useful to Save this flow and create a 2nd flow of type Helper to execute specific actions for each failing user, referenced in the next step. See the #helper-flow section. This will act as a placeholder.
- In this example, we want to invoke a Helper workflow named
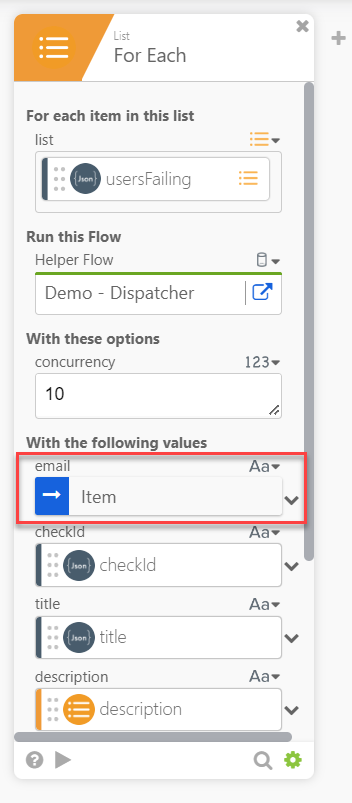
Demo - Dispatcherfor each user listed in the check failure event message, so a For Each is added to do this. Note that the email address listed is specified as typeITEM.
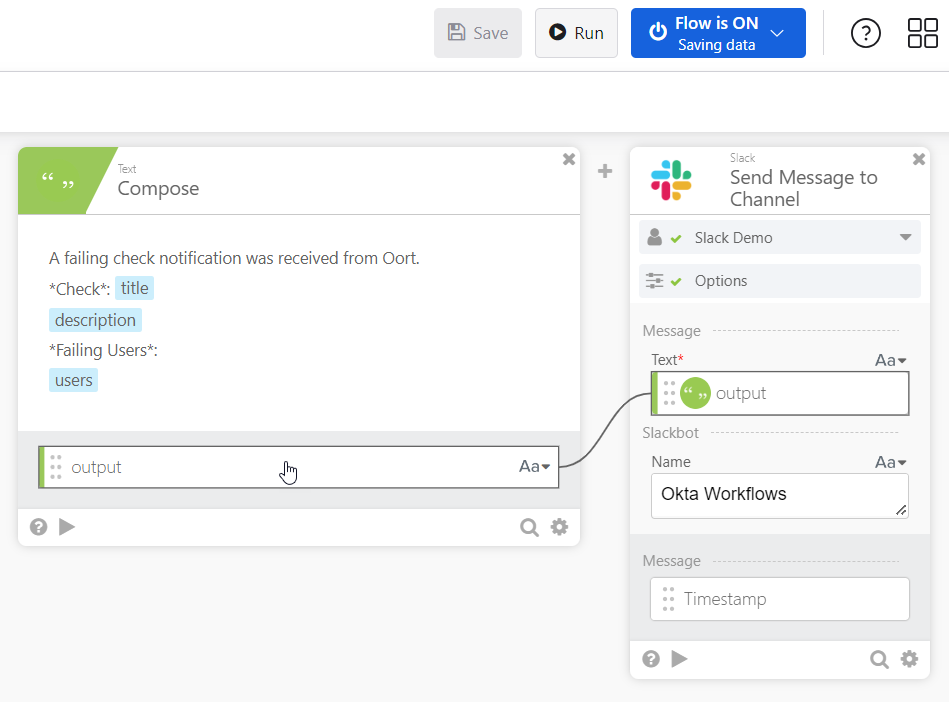
- Additional actions for the primary API flow are added at this point. This includes
- Using Compose Test to create a message block with the Lists created in previous actions
- Using the output of the Compose action to send a Slack message to a channel (requires a Slack app connector)
Helper Flow
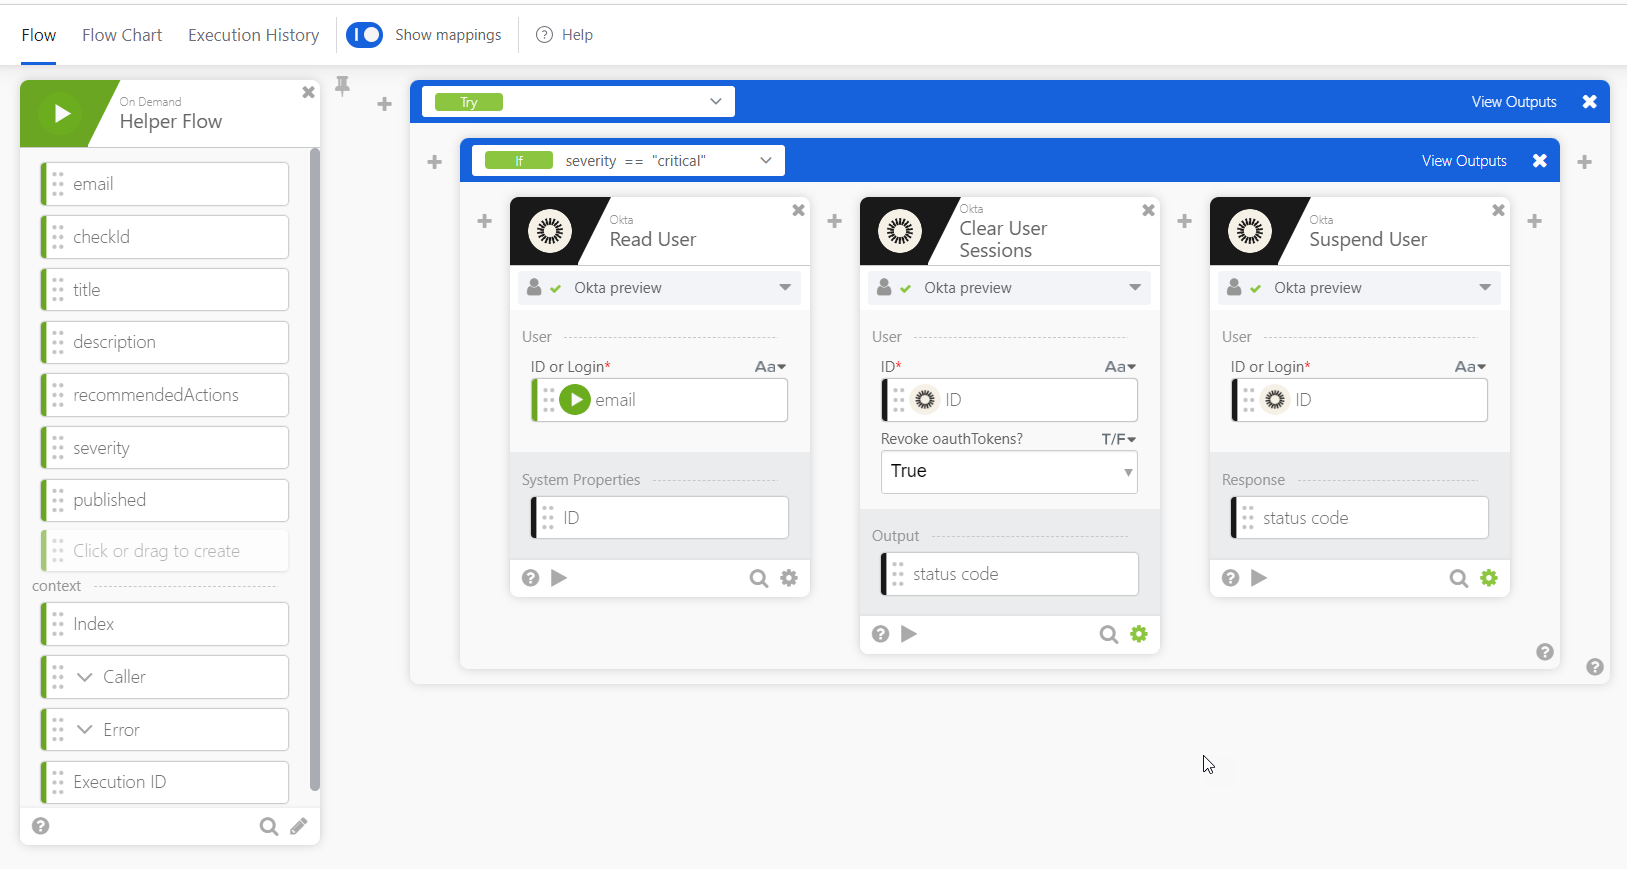
The Demo - Dispatcher Helper flow reference above is constructed of the following:
- The on-demand Helper flow that receives the input of the List - For Each action in the primary API flow
- Okta Actions to
- Read the Okta user ID based on the email provided
- Revoke any existing sessions
- Suspend the user
Cisco Identity Configuration
Using the API Endpoint Invoke URL and Client Token from above, create a webhook notification target in your Cisco Identity tenant.
Note:
- The auth method should be API Key
- The API Key name will be
x-api-client-tokenas described in Okta documentation - You can use the Test Connectivity function to trigger event messages to your webhook
- When ready, make sure to enable the Webhook notification target in the specific Check or Checks you want to use it with. You can review this list in the oort-insights section.
Tips
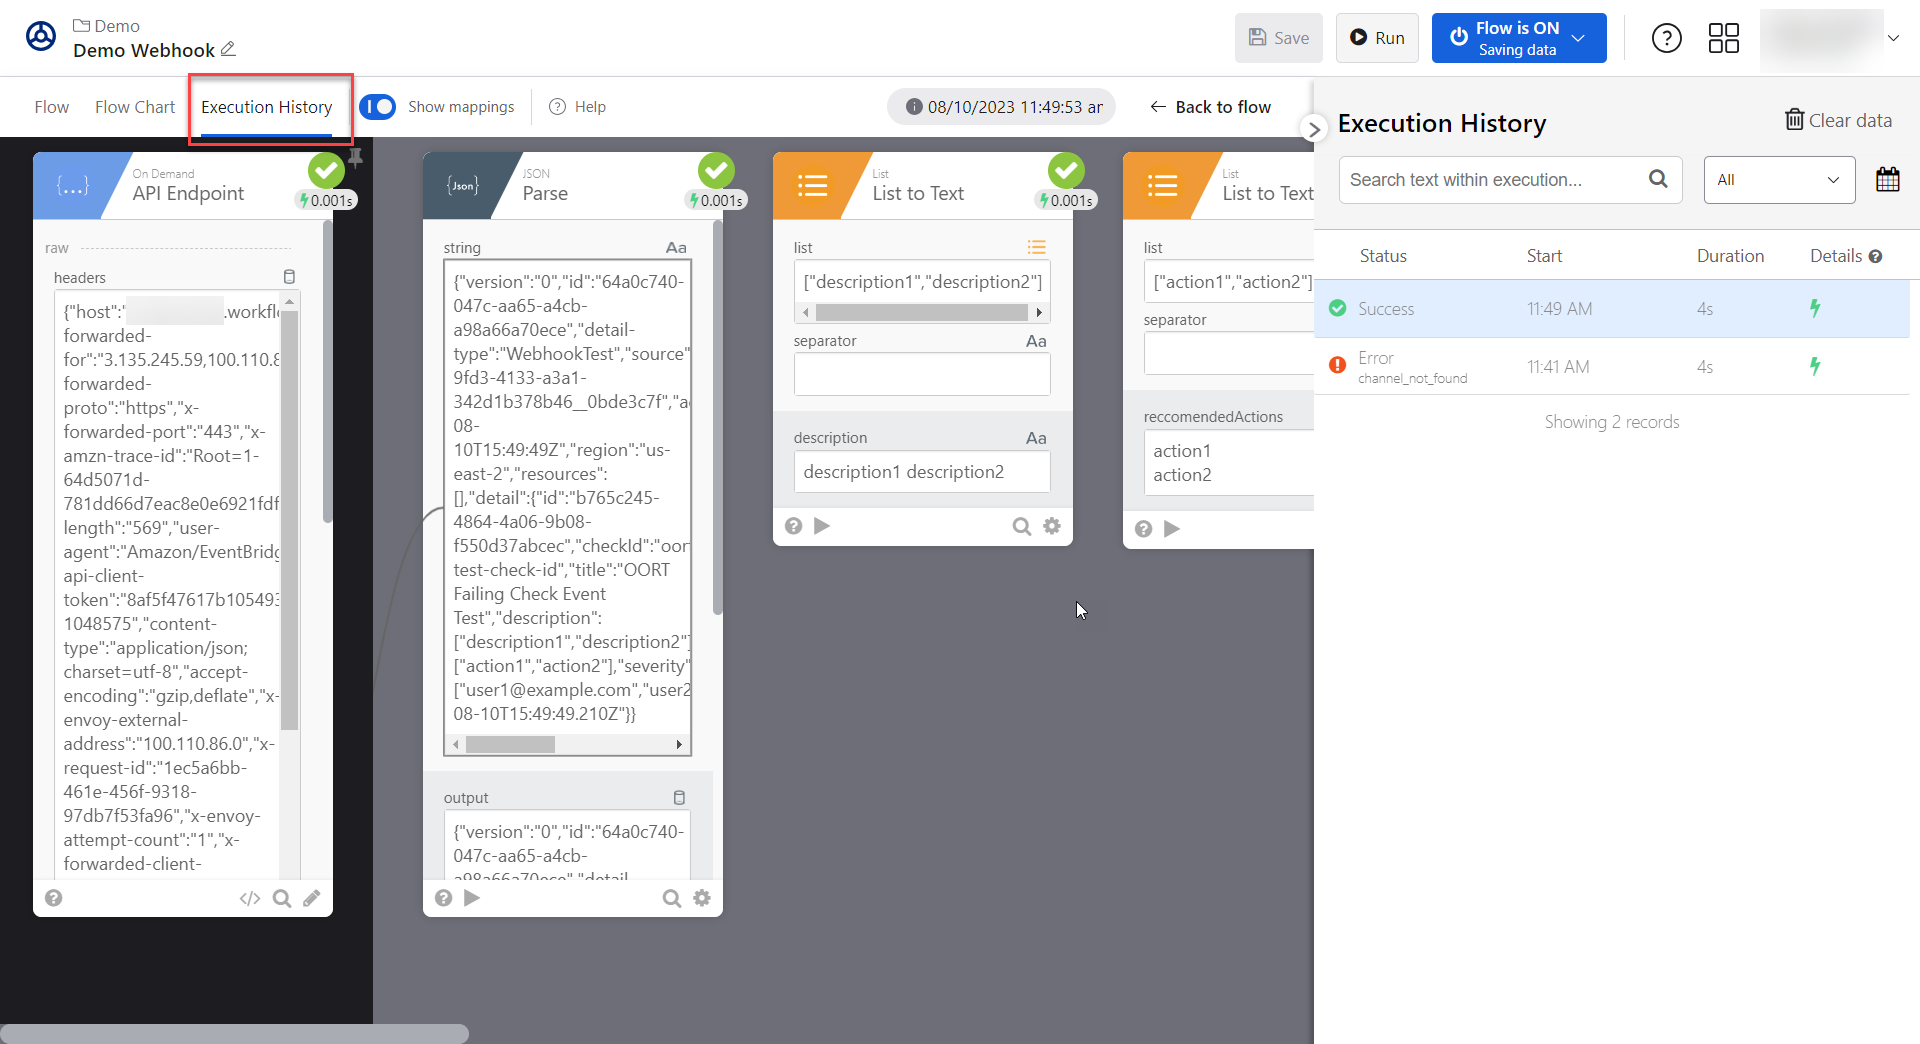
Workflow Execution History
Execution history is very helpful for troubleshooting your workflow.
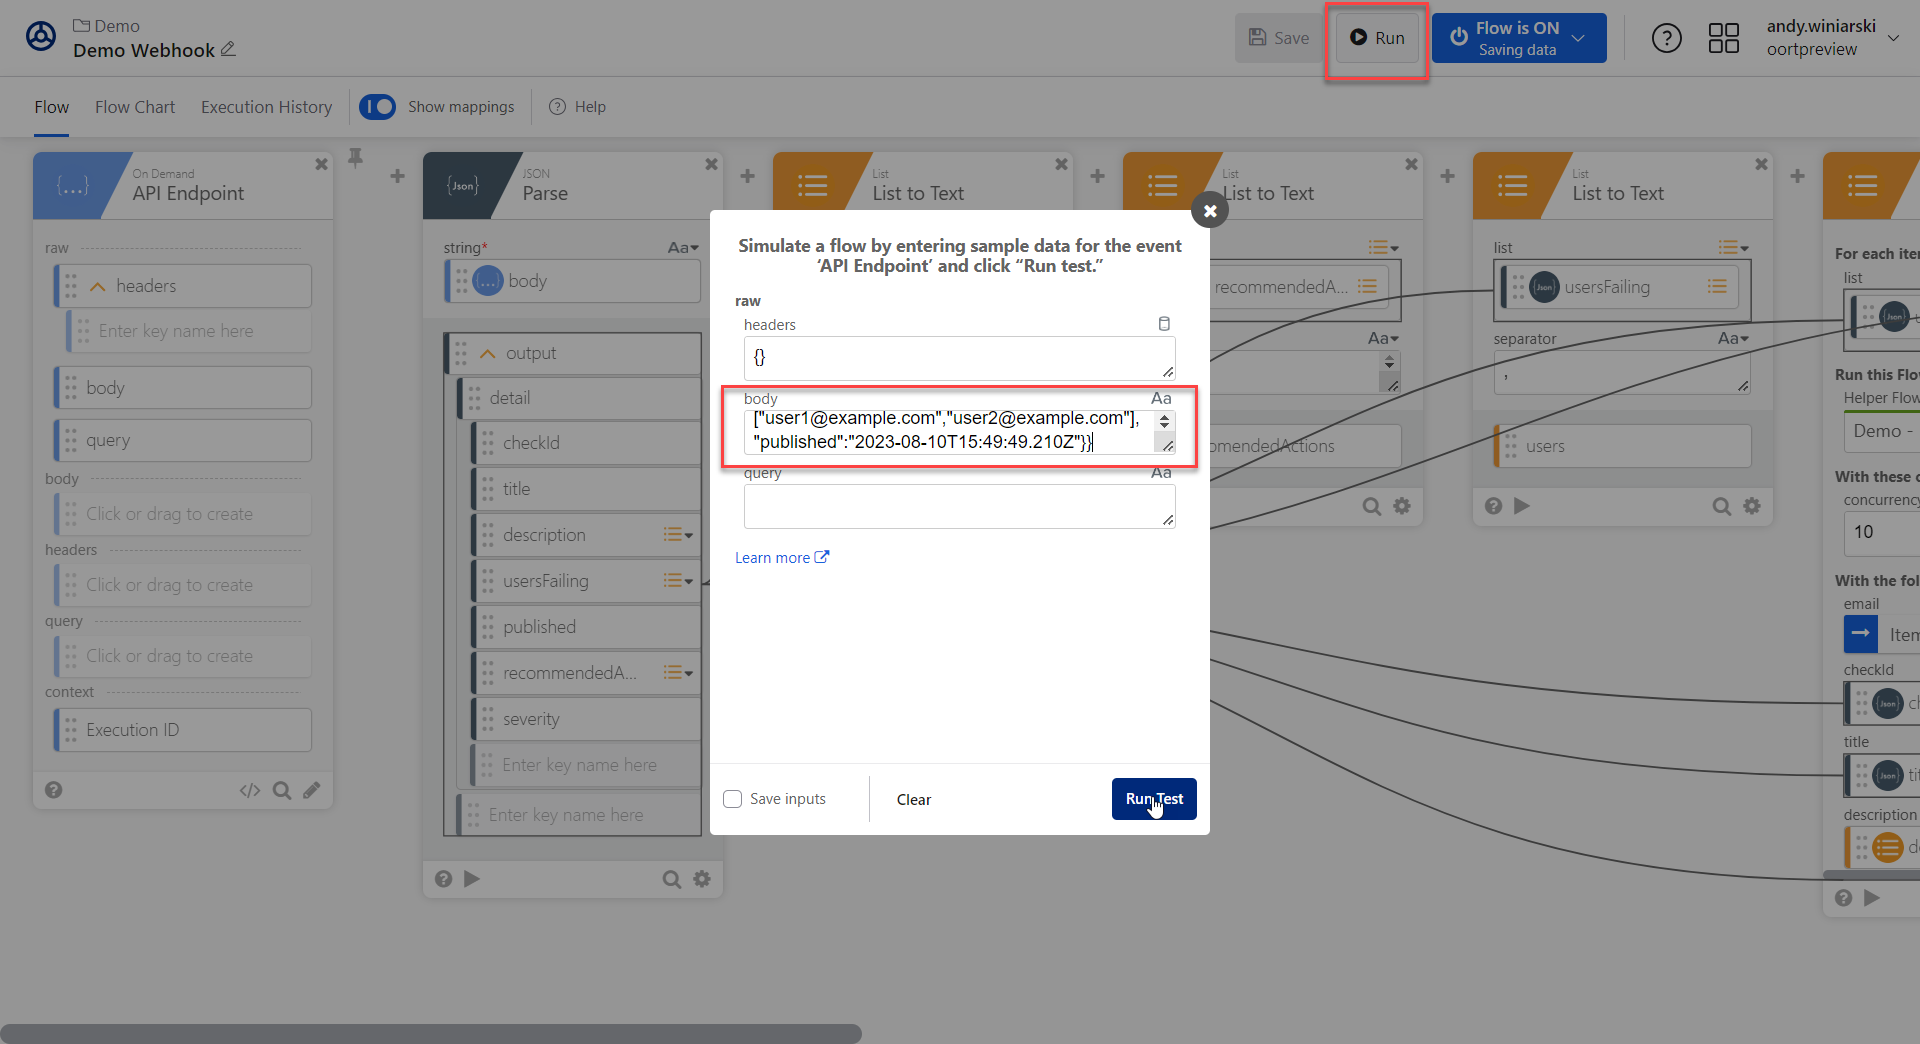
Run Flow with Test Data
You can use the Run button to run the flow with manually input data.
Copy the body of the JSON Parse string from a previously sent test message and use it as the Body input to the Run Test function.
Webhooks in Action
Understanding HRIS Data and SCIM
Overview
Cisco Identity can ingest data from HRIS or HCM (human capital management) systems and compare it to other identity sources in order to highlight inconsistencies or security risks, such as improperly deprovisioned or terminated users.
The common format for exchange of user identity data or objects between systems is SCIM or System for Cross-domain Identity Management.
Aligning your HRIS or HCM data output format to SCIM allows for faster and more consistent mapping of user identities between systems.
Goal
The goal of this document is to outline the elements of the core SCIM model for the "user" resource, which is used in the Cisco Identity platform.
Benefits
Mismatches between identity sources such as an HRIS system and a primary identity platform (IDP) or IAM system are a common and significant source of security vulnerabilities.
In many cases, discrepancies may arise, e.g. a user moves departments or managers in HR and the IDP system is not updated (or vice versa)
This problem often propagates itself to a more serious problem of a user account not being deprovisioned in the IDP when the user leaves the organization
User Account Examples
In the case where user account information doesn't match between two identity sources, Cisco Identity will provide an indication in the User 360 view
In the scenario where a user account record is missing from the HRIS file, we suggest opening a ticket or emailing the user's manager to determine why the user record might be missing in the HR system.
SCIM User Resource Properties
The Cisco Identity platform leverages the following User properties or elements from the SCIM RFC 7643.
- schema
- id
- externaIId
- meta
- username
- name
- displayname
- nickname
- profileurl
- title
- usertype
- preferredlanguage
- locale
- timezone
- active
- phonenumbers
- emails
- addresses
- user
Note that these properties are of different types - some are singular values and some can contain an array of values.
They will also have different formats, as defined in the RFC. For example, "timezone" is formatted according to IANA Time Zone database format [RFC6557].
The "user" property (last in the list above) is defined as part of the Enterprise User Schema Extension. Please see the format below for included sub-attributes, such as costCenter and department.
Cisco Identity SCIM JSON Format
The format below represents an ideal SCIM data model for import into Cisco Identity.
Note - copy this block into your JSON viewer or editor of choice for better viewing.
You can also download this template file here.
[
  {
    "name": "schemas",
    "type": "array<string>"
  },
  {
    "name": "id",
    "type": "string"
  },
  {
    "name": "externalid",
    "type": "string"
  },
  {
    "name": "meta",
    "type": "struct<resourceType:string,created:string,lastModified:string,location:string,version:string>"
  },
  {
    "name": "username",
    "type": "string"
  },
  {
    "name": "name",
    "type": "struct<formatted:string,familyName:string,givenName:string,middleName:string,honorificPrefix:string,honorificSuffix:string>"
  },
  {
    "name": "displayname",
    "type": "string"
  },
  {
    "name": "nickname",
    "type": "string"
  },
  {
    "name": "profileurl",
    "type": "string"
  },
  {
    "name": "title",
    "type": "string"
  }]
[
{
"name": "usertype",
"type": "string"
},
{
"name": "preferredlanguage",
"type": "string"
},
{
"name": "locale",
"type": "string"
},
{
"name": "timezone",
"type": "string"
},
{
"name": "active",
"type": "boolean"
},
{
"name": "phonenumbers",
"type": "array<struct<type:string,value:string>>"
},
{
"name": "emails",
"type": "array<struct<type:string,value:string,primary:boolean>>"
},
{
"name": "addresses",
"type": "array<struct<formatted:string,streetAddress:string,locality:string,region:string,postalCode:string,country:string>>"
},
{
"name": "user",
"type": "struct<employeeNumber:string,costCenter:string,organization:string,division:string,department:string,manager:struct<value:string,displayName:string>>"
}]Next Steps
You can upload HRIS data via the Manual Uploads option within the Add Integration page. Further information is available under "How to Import Workday HRIS Data".
Please reach out to your Cisco Identity representative for further information or with any questions on this feature.