
Cisco Cloud Control
Cisco Cloud Control is the unified operations platform for AgenticOps. It brings every Cisco domain into one consistent environment, enabling teams to proactively manage, govern, and operate across the full IT estate from a single experience. The platform simplifies management by offering a single operational interface that complements existing Cisco product controllers, reducing complexity and improving efficiency for IT operations. It enables seamless cross-domain workflows and a consistent user experience without replacing individual product dashboards.
By bringing together inventory, topology, actions, identity, and workflows, Cisco Cloud Control gives operators the context and tools to understand their environment, investigate issues across domains, and take action within one operating experience. AI Assistant provides a natural-language entry point for asking questions, understanding the environment, and starting an investigation. When an issue requires more context or a coordinated investigation, AI Canvas provides a shared operational workspace where teams and AI agents work together to investigate and take action to resolve it.

Cisco Cloud Control is Generally Available in the United States only. Support for additional regions will be added in future milestones.
What Cisco Cloud Control offers
-
One login: Move across connected Cisco products without signing in again or losing context.
-
One inventory and topology: View sites, assets, health, and connections across connected Cisco products in one place.
-
One view for alerts: Review alerts that Cisco Cloud Control correlates across IT domains, along with the recommended next steps. Review the available context, take an authorized action, or continue the investigation in AI Canvas.
-
One agentic workspace: Work with AI agents in a shared workspace to review evidence, understand cause and impact, and investigate and resolve issues across IT domains.
-
One assistant: Use AI Assistant (homepage or sidebar) for quick answers and tasks across domains.
-
Governed AI operations: AI agents operate within the permissions, policies, and boundaries your organization defines, with centralized governance, auditability, and appropriate human oversight built in.
Get started with Cisco Cloud Control
To get started with Cisco Cloud Control, complete the following tasks:
-
Complete the necessary readiness for the products to onboard Cisco Cloud Control.
-
Onboard to Cisco Cloud Control:
-
For each product you want to manage in Cisco Cloud Control, identify an admin who can sign in to the product and accept the terms and conditions.
-
The admin authenticates with each product by signing in.
-
The admin links the product tenants and creates a tenant group.
-
After completing the onboarding, refer to Cisco Cloud Control Overview for an overview of the Cisco Cloud Control Home page, platform services, and capabilities.
Prerequisites
Product-specific prerequisites are listed under each product. Complete the prerequisites for the products you plan to onboard into Cisco Cloud Control.
If a product is not listed in this section, no additional product-specific prerequisites are required.
ThousandEyes
ThousandEyes provides digital experience monitoring and visibility across applications, networks, and internet paths.
Ensure that the admin performing the onboarding has Organization Admin access to the required ThousandEyes orgs or another role that includes the Edit security & authentication settings permission.
Meraki
Meraki provides cloud-managed networking and centralized management for distributed network infrastructure.
Additional configuration for IdP-initiated SAML login
If your organization uses IdP-initiated SAML login, where users start from an IdP-hosted dashboard that includes a Meraki application tile, ensure your organization’s SAML login URL is configured in Meraki.
-
Have an administrator sign in to Meraki and go to Organization > Settings > Authentication > SSO Login URL.
-
Confirm that the SSO Login URL field is populated. If it is empty, contact your IdP admin to obtain the "SSO Login URL" for Meraki. Enter the URL in the SSO Login URL field, then select Save.
For more information, refer to Provide your IdP’s SSO Login URL.
Meraki users with SAML SSO must verify their email
If you sign in to the Meraki dashboard using Security Assertion Markup Language (SAML) single sign-on (SSO), complete the following email verification steps to enable access to Cisco Cloud Control using your existing SAML authentication.
This procedure applies only to users who sign in to the Meraki Dashboard using SAML SSO. It doesn’t apply to users who sign in with a local Meraki username and password.
-
Sign in to Meraki using your SAML login.

-
Select Verify email to confirm the email address you will use to access Cisco Cloud Control.
-
Enter the email address for the Cisco account you’ll use to sign in to Cisco Cloud Control.
Make sure you can receive email at this address, as a verification code will be sent to it.
The email address you verify should:-
Be your primary business email address.
-
Be associated with your Cisco account and will be used to sign in to Cisco Cloud Control.
-
Match the email address you use with other Cisco products you want to manage through Cisco Cloud Control.
Your SAML login username may not be an email address. For example, some organizations use an employee ID or username to authenticate with their Identity Provider (IdP). During the verification step, always enter your Cisco-associated email address. For many organizations, this is also the email address used to sign in to the IdP Portal page.
-
-
Complete email verification by entering the code sent to your email address.
Troubleshoot SAML email verification
If you encounter the userNameType must be accountName error during email verification, both of these conditions might apply:
-
Your SAML user record has been flagged by Cisco Cloud Control onboarding as not yet verified or invalid.
-
You are a local Meraki admin using an email address that Meraki has verified.
Meraki does not allow the same email address for both a local account and a SAML account. Additionally, while Meraki does not require SAML users to have a valid email address, Cisco Cloud Control does. The error occurs when the email address matches one already associated with a verified local user.
To resolve the error:
-
Delete your local user if it is no longer used. For more information, refer to Delete a Meraki-hosted User.
-
If you need to keep the local user—for example, because you use it to generate API keys—edit its email address using plus addressing, also called subaddressing. SAML users cannot create API keys. Plus addressing creates an alias based on your existing email address.
Email address changes can take up to five minutes to sync.
To use a plus-addressing alias:
-
Log in to the Meraki Dashboard using your local user credentials.
-
Select My Profile.
-
Under Your email address, change the email address to use the alias. For example, change
name@company.comtoname+alias@company.com, wherealiasis any text you choose.For more information, refer to:
-
-
After resolving the email conflict, repeat the email verification process. If you changed the local user’s email address, use the updated address in Step 3.
Catalyst Center
Catalyst Center provides centralized management and automation for campus and branch networks.
-
Supported versions:
-
2.3.7.11
-
3.1.6 with GSMU 200 (General Availability)
-
3.2.3 with GSMU 100 (General Availability)
-
3.3.1 (Controlled Availability)
-
-
User permissions:
NETWORK-ADMIN-ROLEorSUPER-ADMIN-ROLE -
User identity matching: The Catalyst Center username must match the user’s Cisco Cloud Control email identity. For example, if the user signs in to Cisco Cloud Control as user1@cisco.com, the Catalyst Center username must also be user1@cisco.com, rather than a short username such as
user1. This consistency allows the user to be correctly correlated between Catalyst Center and Cisco Cloud Control.-
External authentication (TACACS+/RADIUS): Configure the AAA or identity infrastructure so the user can authenticate to Catalyst Center with the same email address or UPN used in Cisco Cloud Control.
-
Local authentication: Create a Catalyst Center local user with the same Cisco Cloud Control email address as the username.
-
In Catalyst Center, go to Systems > Users & Roles > + Add User.
-
In the Add User dialog, enter the full email address (for example,
user1@cisco.com) in the Username field.
-
-
-
Firewall requirements: The firewall is configured to allow the following FQDNs and ports to connect to Cisco Catalyst Cloud:
-
Port
443 -
FQDNs:
-
ciscoconnectdna.com -
neoffers.cisco.com -
neoffers-de.cisco.com -
neoffers-sg.cisco.com -
Dnaservices.cisco.com -
dashboard.meraki.com -
Api.meraki.com
-
-
Intersight
Cisco Intersight provides centralized visibility, automation, and lifecycle management for Cisco compute infrastructure across data centers and edge locations.
If you use SAML SSO to log into Intersight, follow these steps so you can access Cisco Cloud Control through Intersight:
-
From the Intersight dashboard, select Settings > Authentication > Cisco ID.
-
Configure your IdP to enable SAML SSO user access.
For more information, refer to Configure Cisco Cloud Control User Access in Intersight.
Nexus Dashboard
Nexus Dashboard provides centralized management and operations for data center networks and fabrics.
-
Cisco Cloud Control supports Nexus Dashboard version 4.x.
-
If you do not have an Intersight tenant and need one only to connect your Nexus Dashboard assets, visit https://www.intersight.com and create a new account.
Nexus Hyperfabric
Nexus Hyperfabric provides cloud-managed data center networking for deploying and operating Nexus-based fabrics.
To make Nexus Hyperfabric data available in Cisco Cloud Control, enable data sharing for the Nexus Hyperfabric organization.
-
Log in to the Nexus Hyperfabric.
-
Choose Administration > Organization settings.
-
Enable data sharing.
Splunk Cloud
The Splunk integration with Cisco Cloud Control provides single sign-on, cross-launch between platforms, access to Splunk data and skills in AI Canvas, and Splunk AI Assistant capabilities through the Cisco Unified AI Assistant.
Before onboarding or connecting Splunk Cloud Platform to Cisco Cloud Control, confirm the following:
-
Splunk Cloud Platform stack runs version 10.5 or later.
-
Splunk Cloud stack is hosted on US Commercial AWS.
Future Support: GCP, Azure, FedRamp, Gov Cloud
-
A Splunk user with the “sc_admin” role must:
-
Install the latest versions of the following apps:
-
Splunk MCP Server
-
Splunk AI Assistant
-
-
Assign the
mcp_tool_executecapability to every role that requires Splunk access in AI Canvas.Navigate to Splunk Cloud Home > Settings > Roles > Capabilities to assign it.
-
-
Splunk users must verify their email addresses to complete their migration to Cisco Unified Identity.
-
Version 10.5: Contact your sales team to enable email verification.
-
Version 10.6 or later: Email verification is enabled by default when users log in.
-
-
Identify any PCI, HIPAA, or other compliance requirements that may require reviewing the applicable Cisco terms.
-
For Splunk customers in the AWS US East region, identify any regional data requirements before connecting your Splunk environment to Cisco Cloud Control in the US West region.
Catalyst SD-WAN Manager
Catalyst SD-WAN Manager provides centralized management and monitoring for Cisco SD-WAN networks.
-
Catalyst SD-WAN Manager integrates with Cisco Cloud Control through Security, formerly known as Security Cloud Control.
-
Deployment support:
-
Supported: Catalyst SD-WAN Manager Cloud deployments
-
Planned: Catalyst SD-WAN Manager Cloud-Pro deployments
-
-
For information about supported Catalyst SD-WAN Manager releases, compatibility requirements, and onboarding to Security, contact SD-WAN Manager–Cisco Cloud Control compatibility support. The supported releases may change as compatibility requirements are updated.
-
Organizations outside the United States are not available for selection in the tenant switcher. This is intentional. Security filters non-US organizations to prevent their data from being processed by US-based Cisco Cloud Control services.
Supported browsers
Cisco Cloud Control supports these browsers:
-
Google Chrome
-
Mozilla Firefox
-
Apple Safari
-
Microsoft Edge
If you encounter issues when cross-launching Intersight, Meraki, or ThousandEyes from Firefox, use a private window.
Onboard to Cisco Cloud Control
Onboarding associates the Cisco products you want to manage with Cisco Cloud Control. You sign in using one of those products, link the tenants you want to include, and create a tenant group. A tenant is an isolated set of data within an organization. Depending on the product, a tenant may be an organization, account, network, stack, or another product-specific entity. A tenant group brings together at least two product tenants so your team can manage them as a single logical environment in Cisco Cloud Control.
Before you complete these steps, ensure that at least one common admin user with the same email address is configured across all products. This user can log in to Cisco Cloud Control and complete initial tenant linking and onboarding.
-
Enter your email address and select Continue.
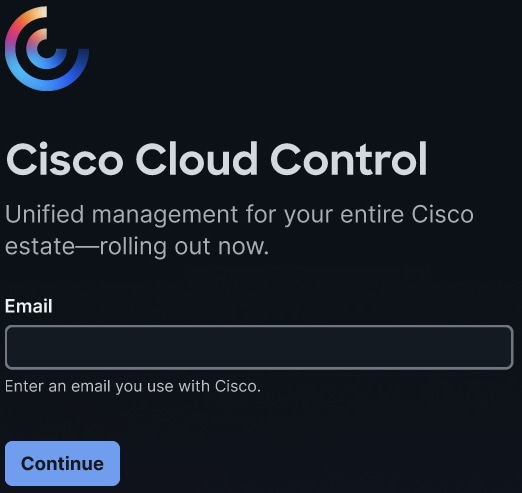
On subsequent logins, you can log into Cisco Cloud Control using a different product than the one you selected initially:
-
In the Welcome back dialog box, select More options.
-
Select a product, then select Sign in.
-
-
Associate your products with Cisco Cloud Control.
-
Select your product name.
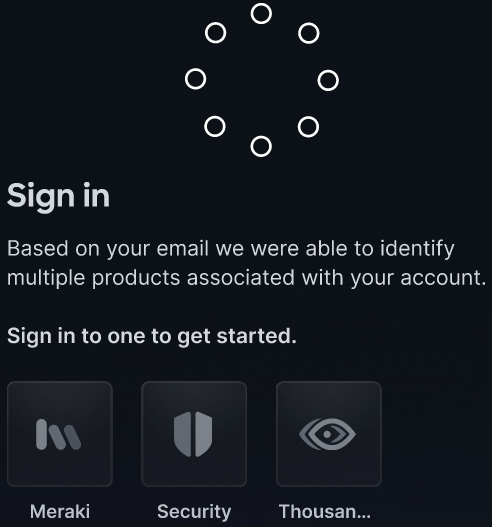
-
Enter your password and then select Next.
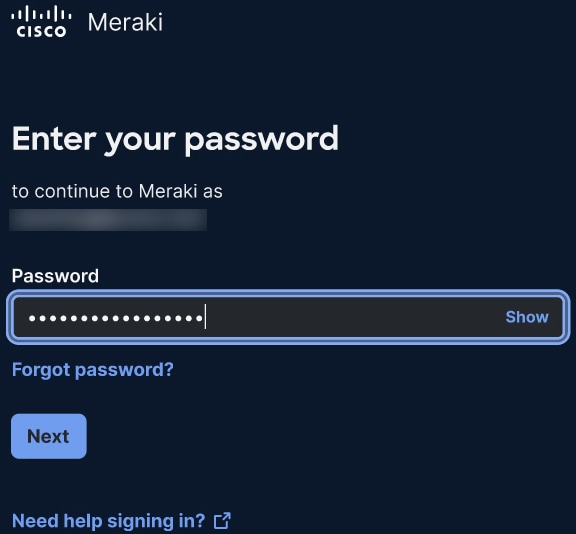
-
-
Review the terms and conditions for using Cisco Cloud Control, then select Accept.
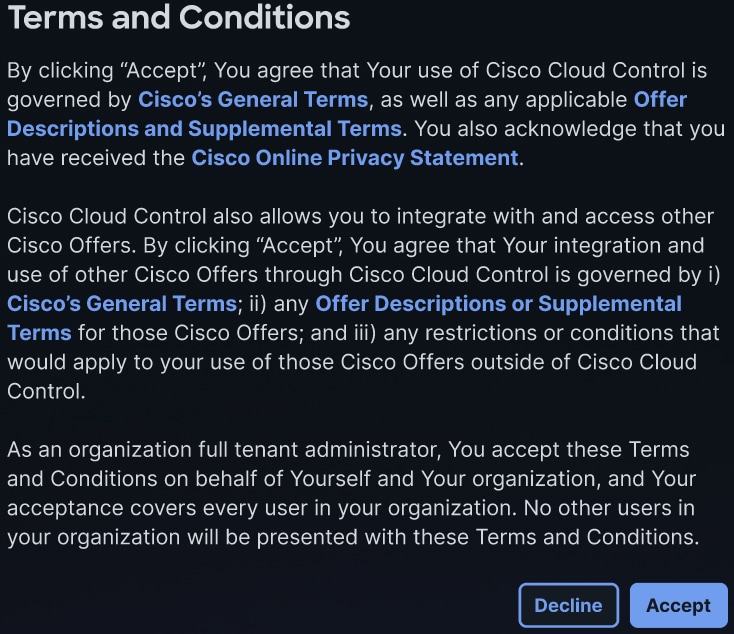
-
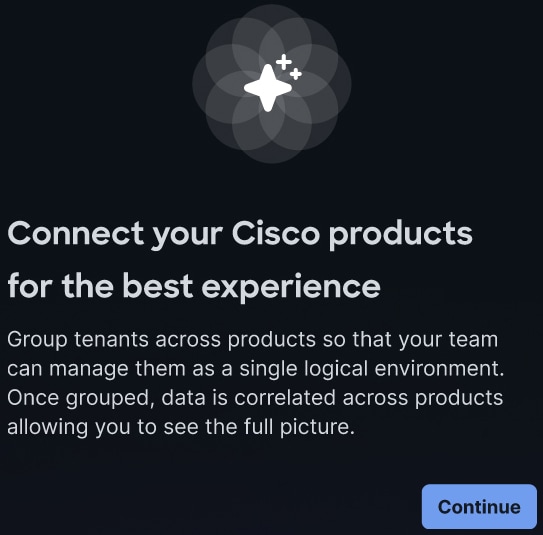
You are prompted to link tenants. Select Continue.
-
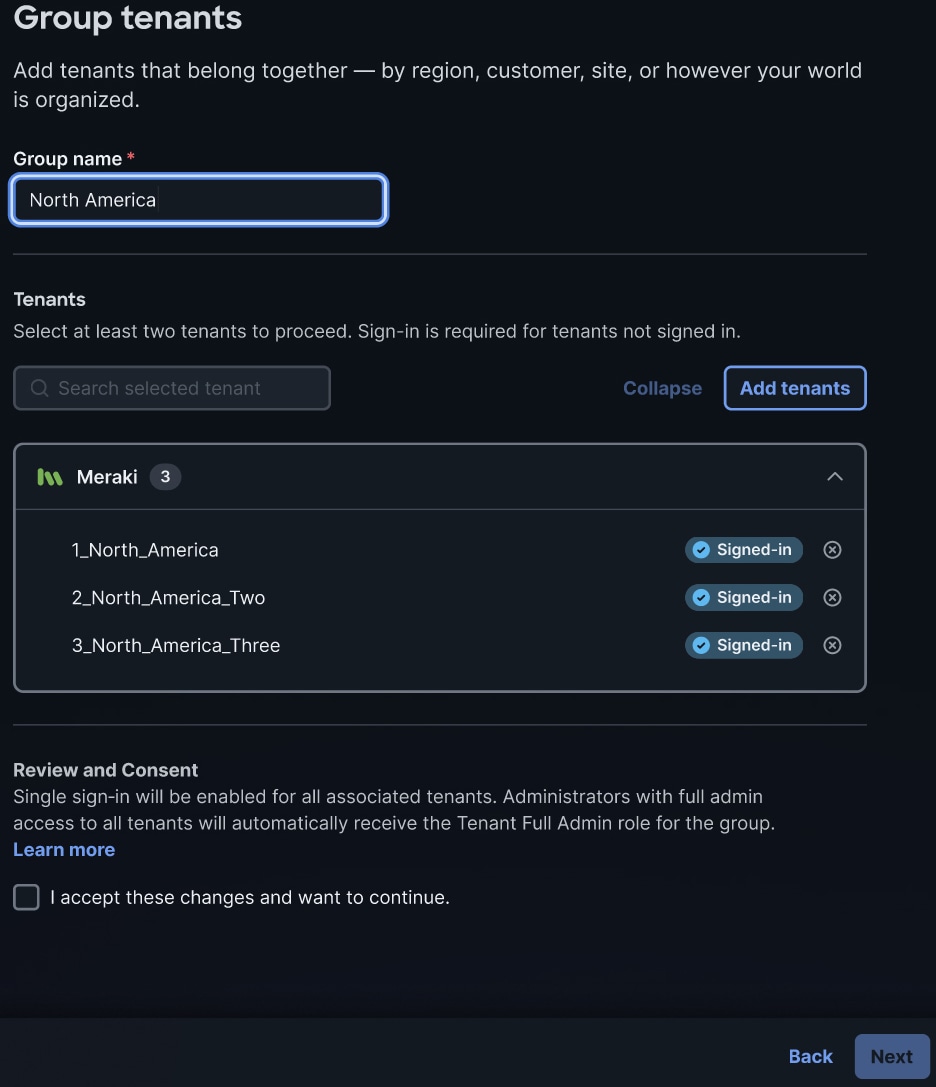
Create a tenant group to manage your data, users, and resources across multiple products in a single logical environment. Cisco Cloud Control displays the tenants associated with the product you used to sign in.
A tenant group is not a user-level access setting. Every user with access to a product tenant in the group can see that tenant.
-
Enter a name for the tenant group you are creating.
-
Select Add tenants to specify the tenants you want to group. Select at least two tenants.
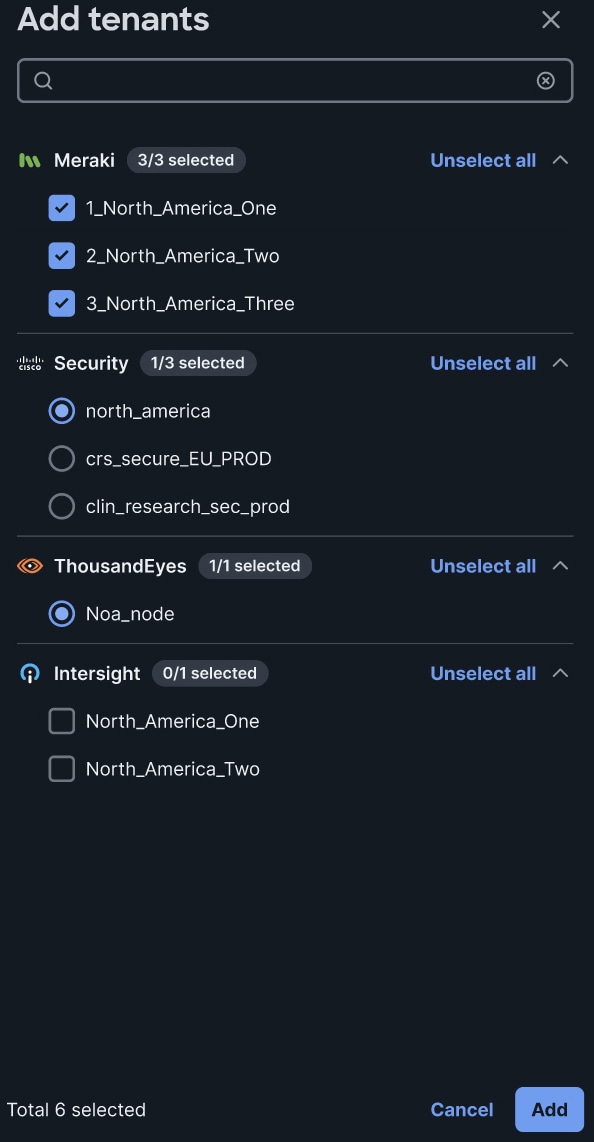
You can select multiple tenants for these products:
-
Meraki
-
Intersight
-
Nexus Hyperfabric
-
Collaboration Control Hub
-
Splunk Cloud
-
-
Click Add.
-
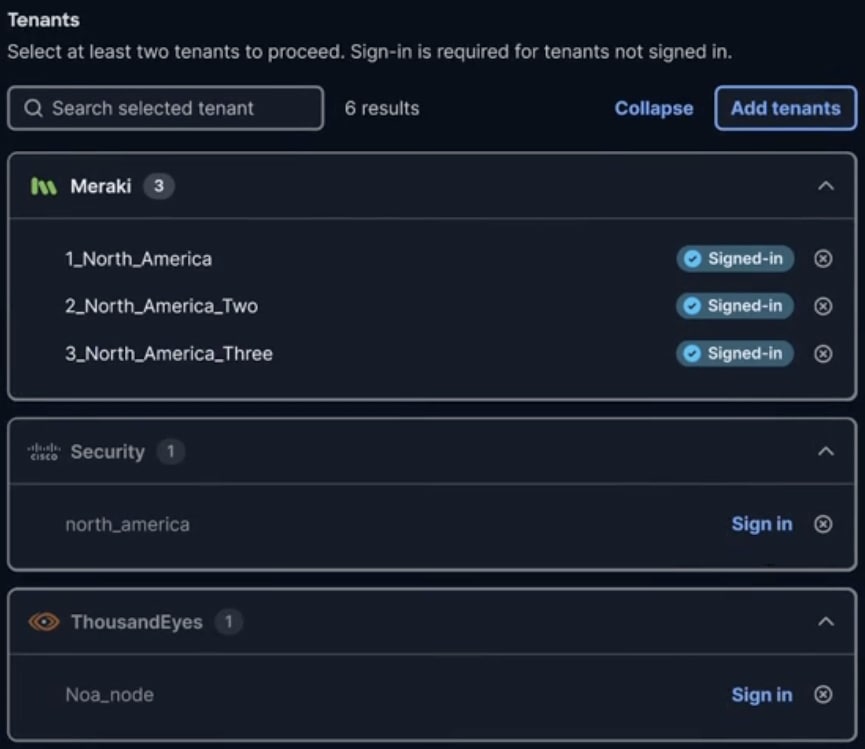
If you are adding a tenant from a product you are not currently logged into, select Sign in to authenticate to that product.
-
Select the check box to accept the tenant settings.
When you accept the tenant settings, single sign-in is enabled for all associated tenants. Administrators with full admin access to all associated tenants automatically receive the Tenant Full Admin role for the group.
-
Select Next.
-
-
If you want to create another tenant group, select New tenant group. Otherwise, select Continue to open Cisco Cloud Control’s Home page.
After onboarding, only users with admin privileges for a product (such as Meraki) can access the Tenants page in the Admin Console to configure a Cisco Cloud Control tenant linked to that product.
Post-onboarding setup
The procedures in this section are required only for the products listed here.
Connect Catalyst Center
-
In Cisco Cloud Control, select
 and click on Admin Console.
 -
Select Integrations, then select Create Integration.
-
From the drop-down list, select Catalyst Center. Then select Connect.
-
Confirm that you meet the listed prerequisites, then select Connect again.
-
If you do not have a Meraki account associated with the email address you use to sign in to Cisco Cloud Control, a wizard will guide you through creating a new Meraki account. Enter the required username and password, then verify your account using the verification email from Meraki. After verification, select Next to proceed with adding your Catalyst Center.
After a new Meraki account is created, Catalyst Center takes approximately 5-10 minutes to become accessible from Cisco Cloud Control.
-
In the Add Catalyst Center wizard, enter this information about your Catalyst Center deployment:
-
Display label
-
IP address or FQDN
-
Member ID. In Catalyst Center, select the help icon (?), go to About, and copy the Member ID.
Then select Add Catalyst Center.
-
-
Activate Catalyst Center’s integration with Cisco Cloud Control:
-
Navigate to Catalyst Center and select System > Settings > External Services > Cisco Catalyst Cloud.
-
Register to Catalyst Cloud if not registered yet.
-
In Applications, select Activate on the Cisco Cloud Control and Meraki tile.
-
Confirm that Catalyst Center has been integrated with Cisco Cloud Control.
-
-
Return to the Cisco Cloud Control tab and select Refresh Page.
-
The screen will update, indicating that Catalyst Center is now connected to Cisco Cloud Control.
-
Select Close.
-
In Integrations, confirm that the Catalyst Center integration you completed has a status of
Activated.
-
-
After approximately 5–10 minutes, in Cisco Cloud Control’s top navigation bar, select
to open the Main menu and select Admin Console.Select Tenants and confirm that the new Catalyst Center tenant appears under Meraki and has been added to the correct tenant group.
Connect Splunk Cloud Platform
-
As the Splunk Cloud Platform administrator, or as a user with the sc_admin role, sign in to Splunk Cloud Platform through the normal customer login path.

-
Confirm that all prerequisites, including email verification, have been completed.
-
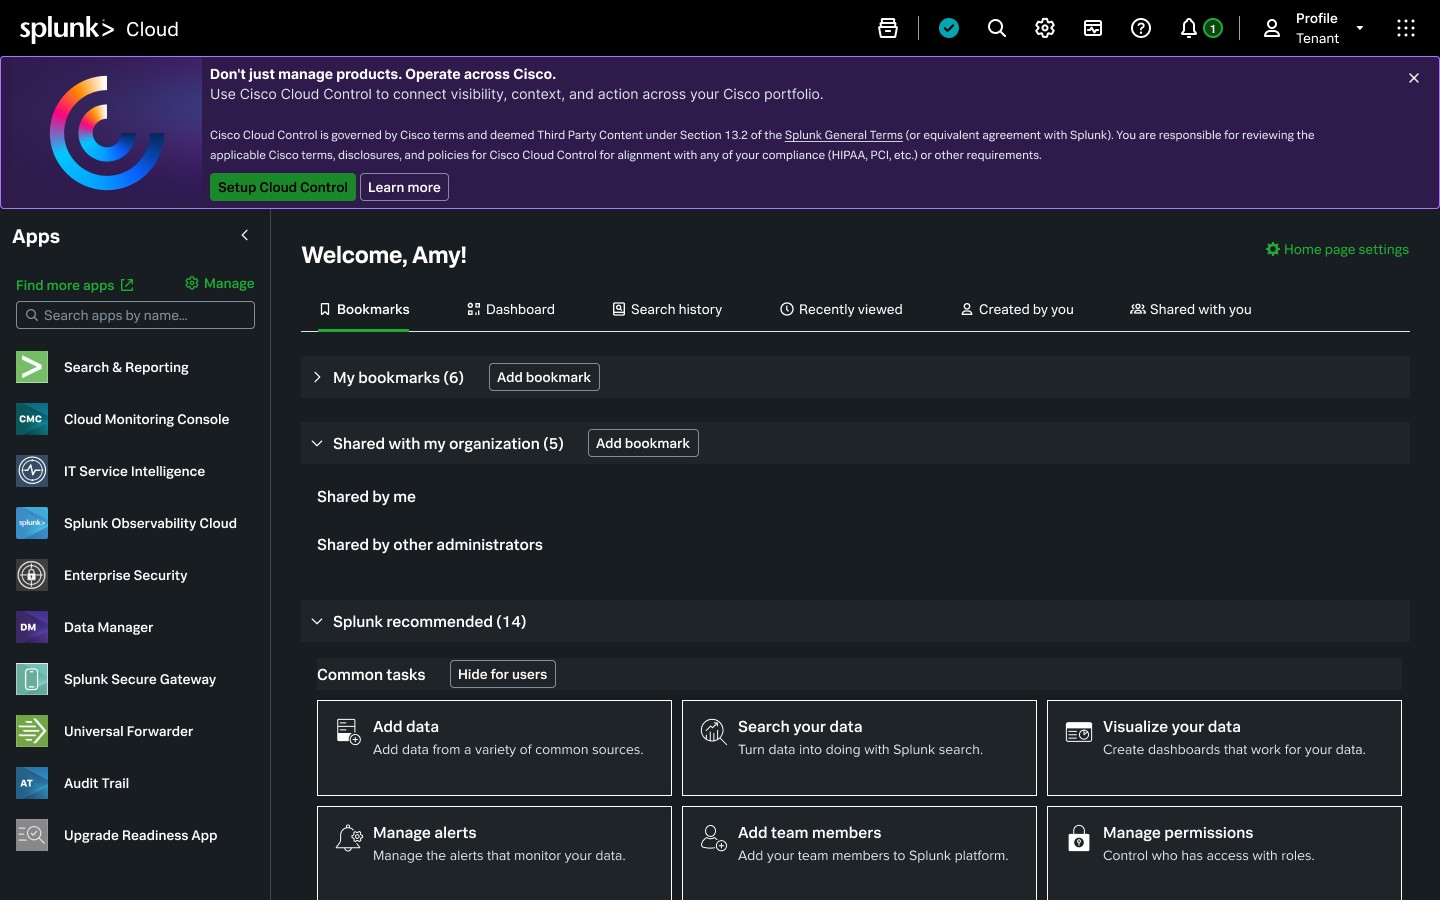
During the onboarding session, the onboarding team approves your access. After approval, a banner appears in Splunk Cloud Platform prompting you to set up Cisco Cloud Control. Select Set up Cloud Control.
Connect Nexus Dashboard with Intersight
Connect a Nexus Dashboard instance to Cisco Cloud Control through Intersight to enable data sharing.
If the Nexus Dashboard instance you want to add is already connected to Intersight, you do not need to complete this procedure. You only need to connect the associated Intersight tenant to Cisco Cloud Control.
Before you begin, ensure that:
-
At least one Intersight tenant is configured in Cisco Cloud Control.
-
You have the necessary permissions to claim a target device.
Follow the steps to connect the Nexus Dashboard instance to Cisco Cloud Control through Intersight. You can repeat these steps to add additional Nexus Dashboard instances to the same Intersight tenant.
-
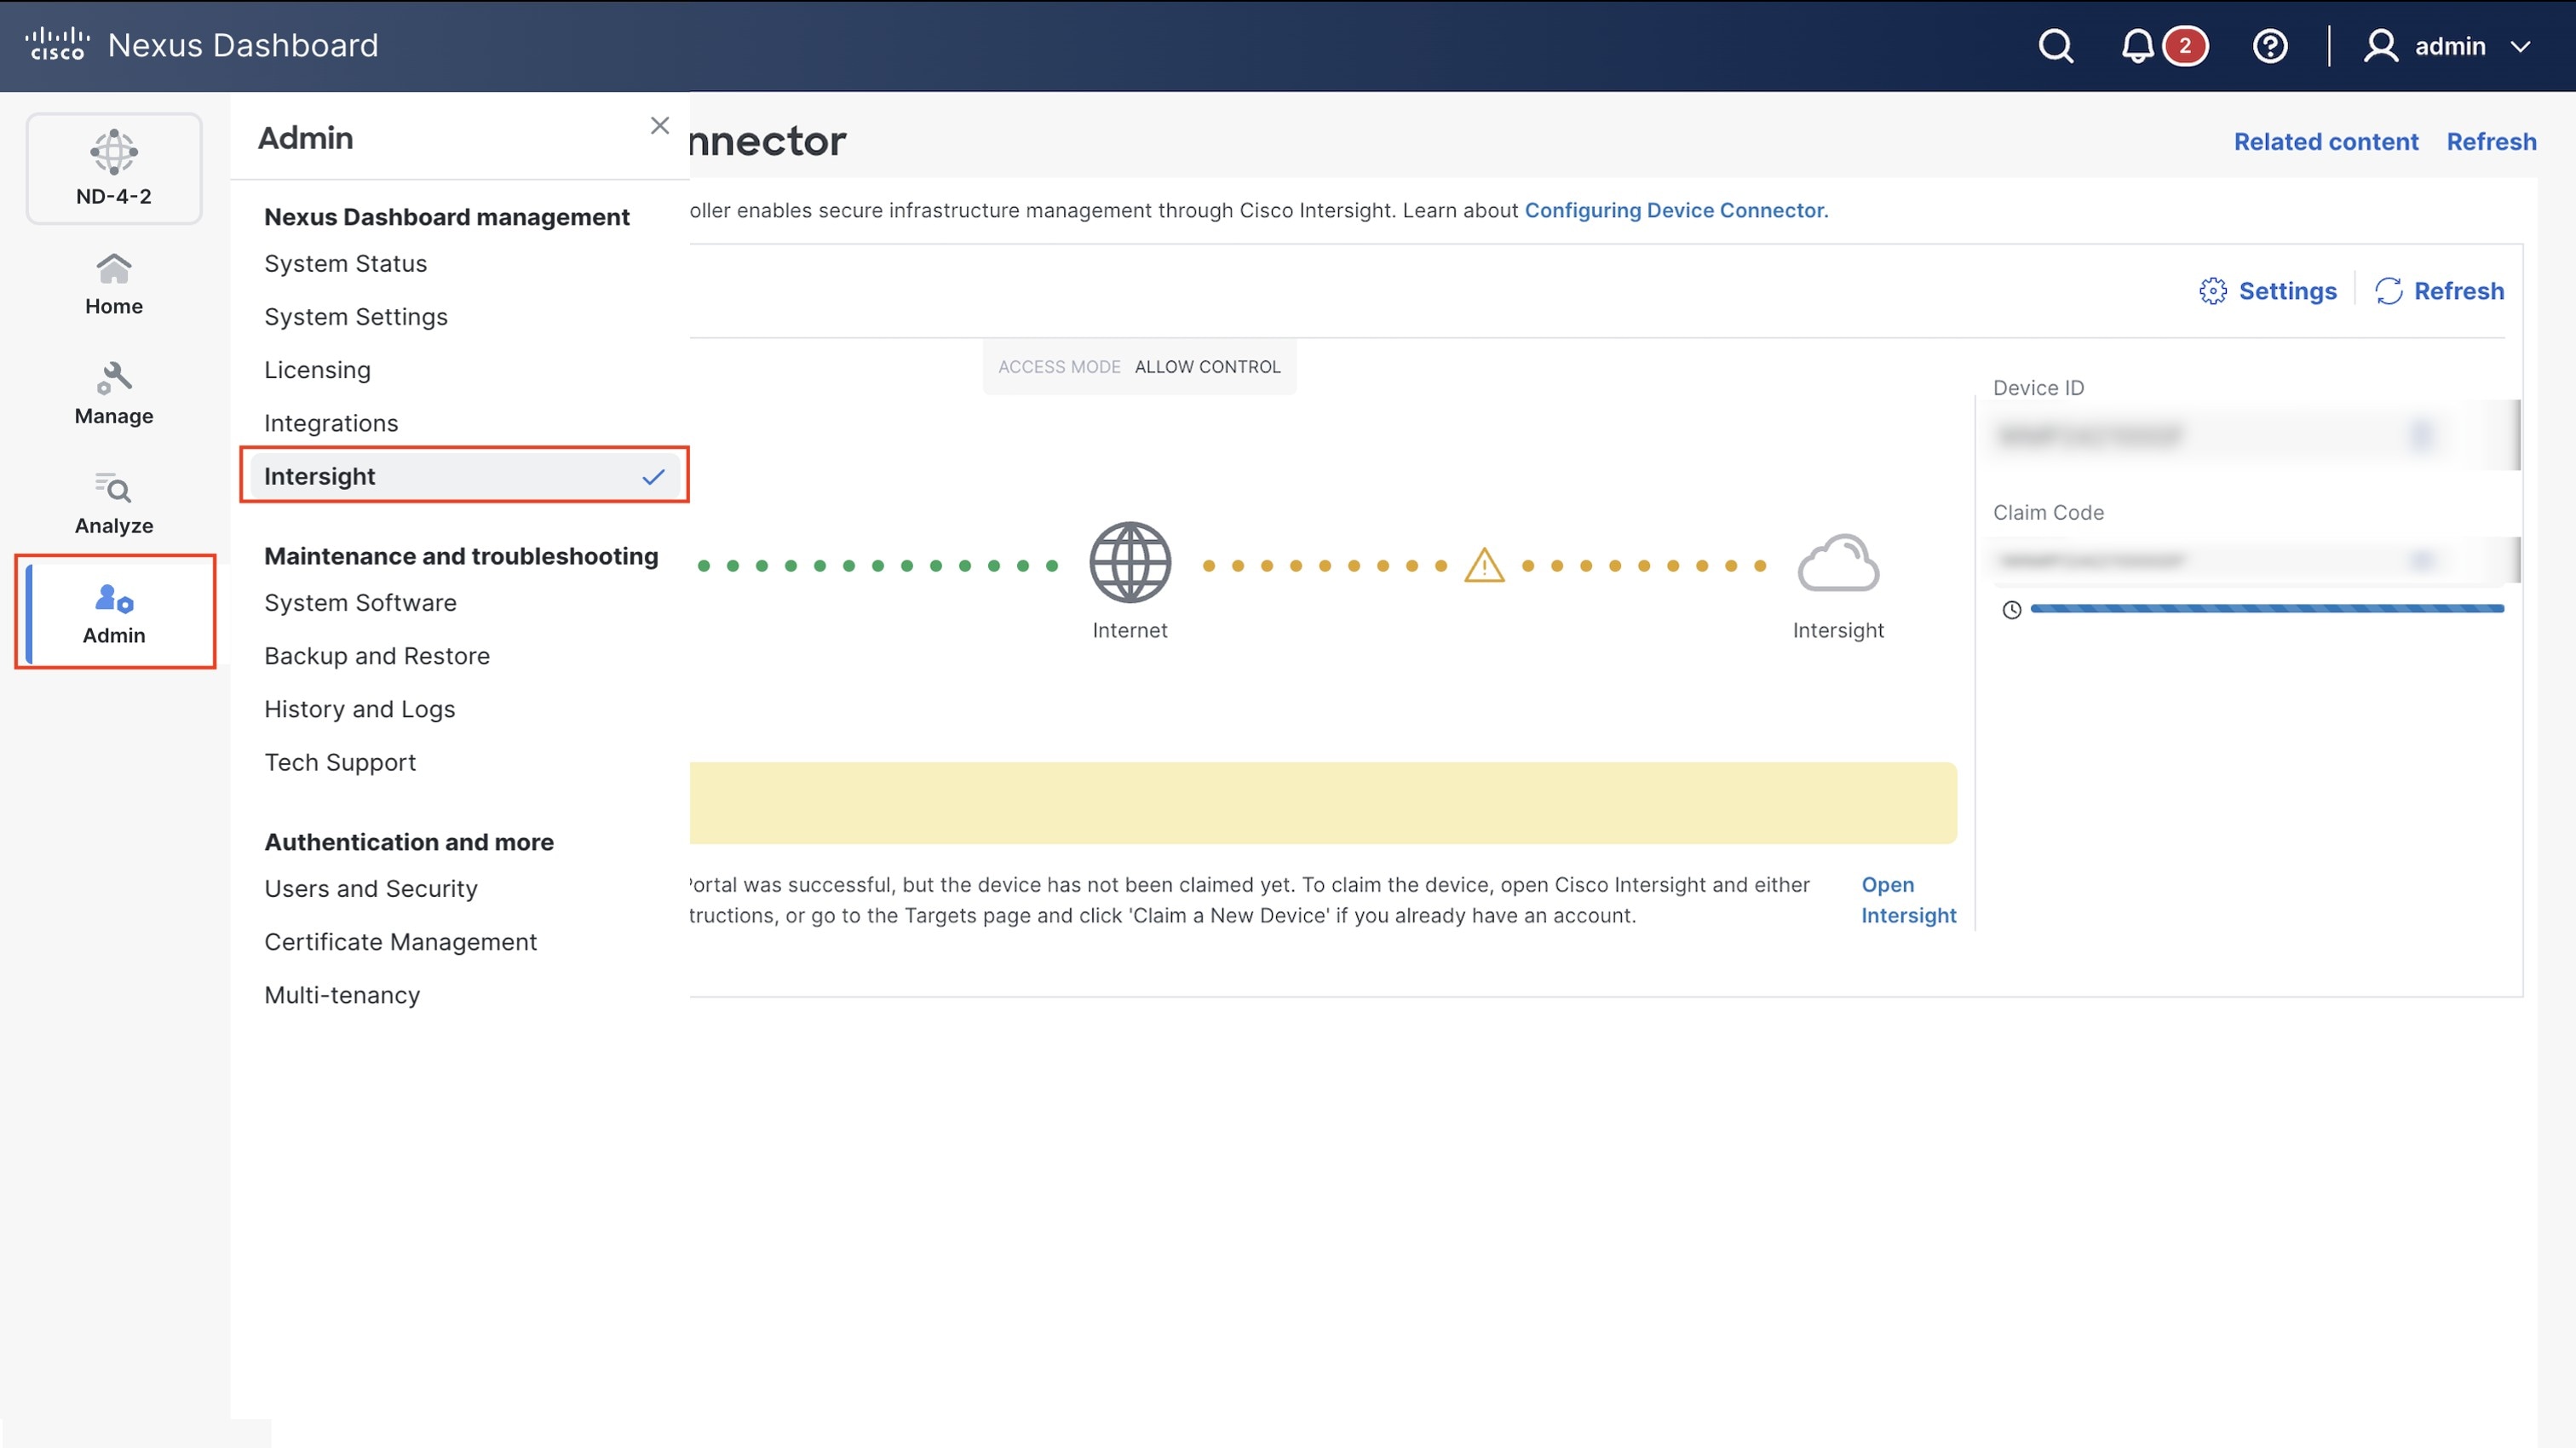
Log in to Nexus Dashboard directly, and select Admin > Nexus Dashboard management > Intersight.
-
Copy the device ID and claim code listed for your instance.
-
In Cisco Cloud Control, launch Nexus Dashboard.
-
From the left navigation, select Clusters.
-
Select Add Cluster.
The wizard opens to guide you through connecting your Nexus Dashboard instance to Cisco Cloud Control through Intersight.
-
Select Continue.
-
Enter the device ID and claim code for your instance, and then select Continue.
By default, the Nexus Dashboard instance is claimed by the Cisco Cloud Control tenant that you used to launch Nexus Dashboard.Your instance now appears on the Nexus Dashboard’s Clusters page.
Preparing for AI Canvas
Complete the required steps for each product whose data you want to make available in AI Canvas.
Configure Nexus Dashboard access for AI Canvas
Follow these steps to configure Nexus Dashboard access for a Cisco Cloud Control user.
-
Select
and choose Admin Console. -
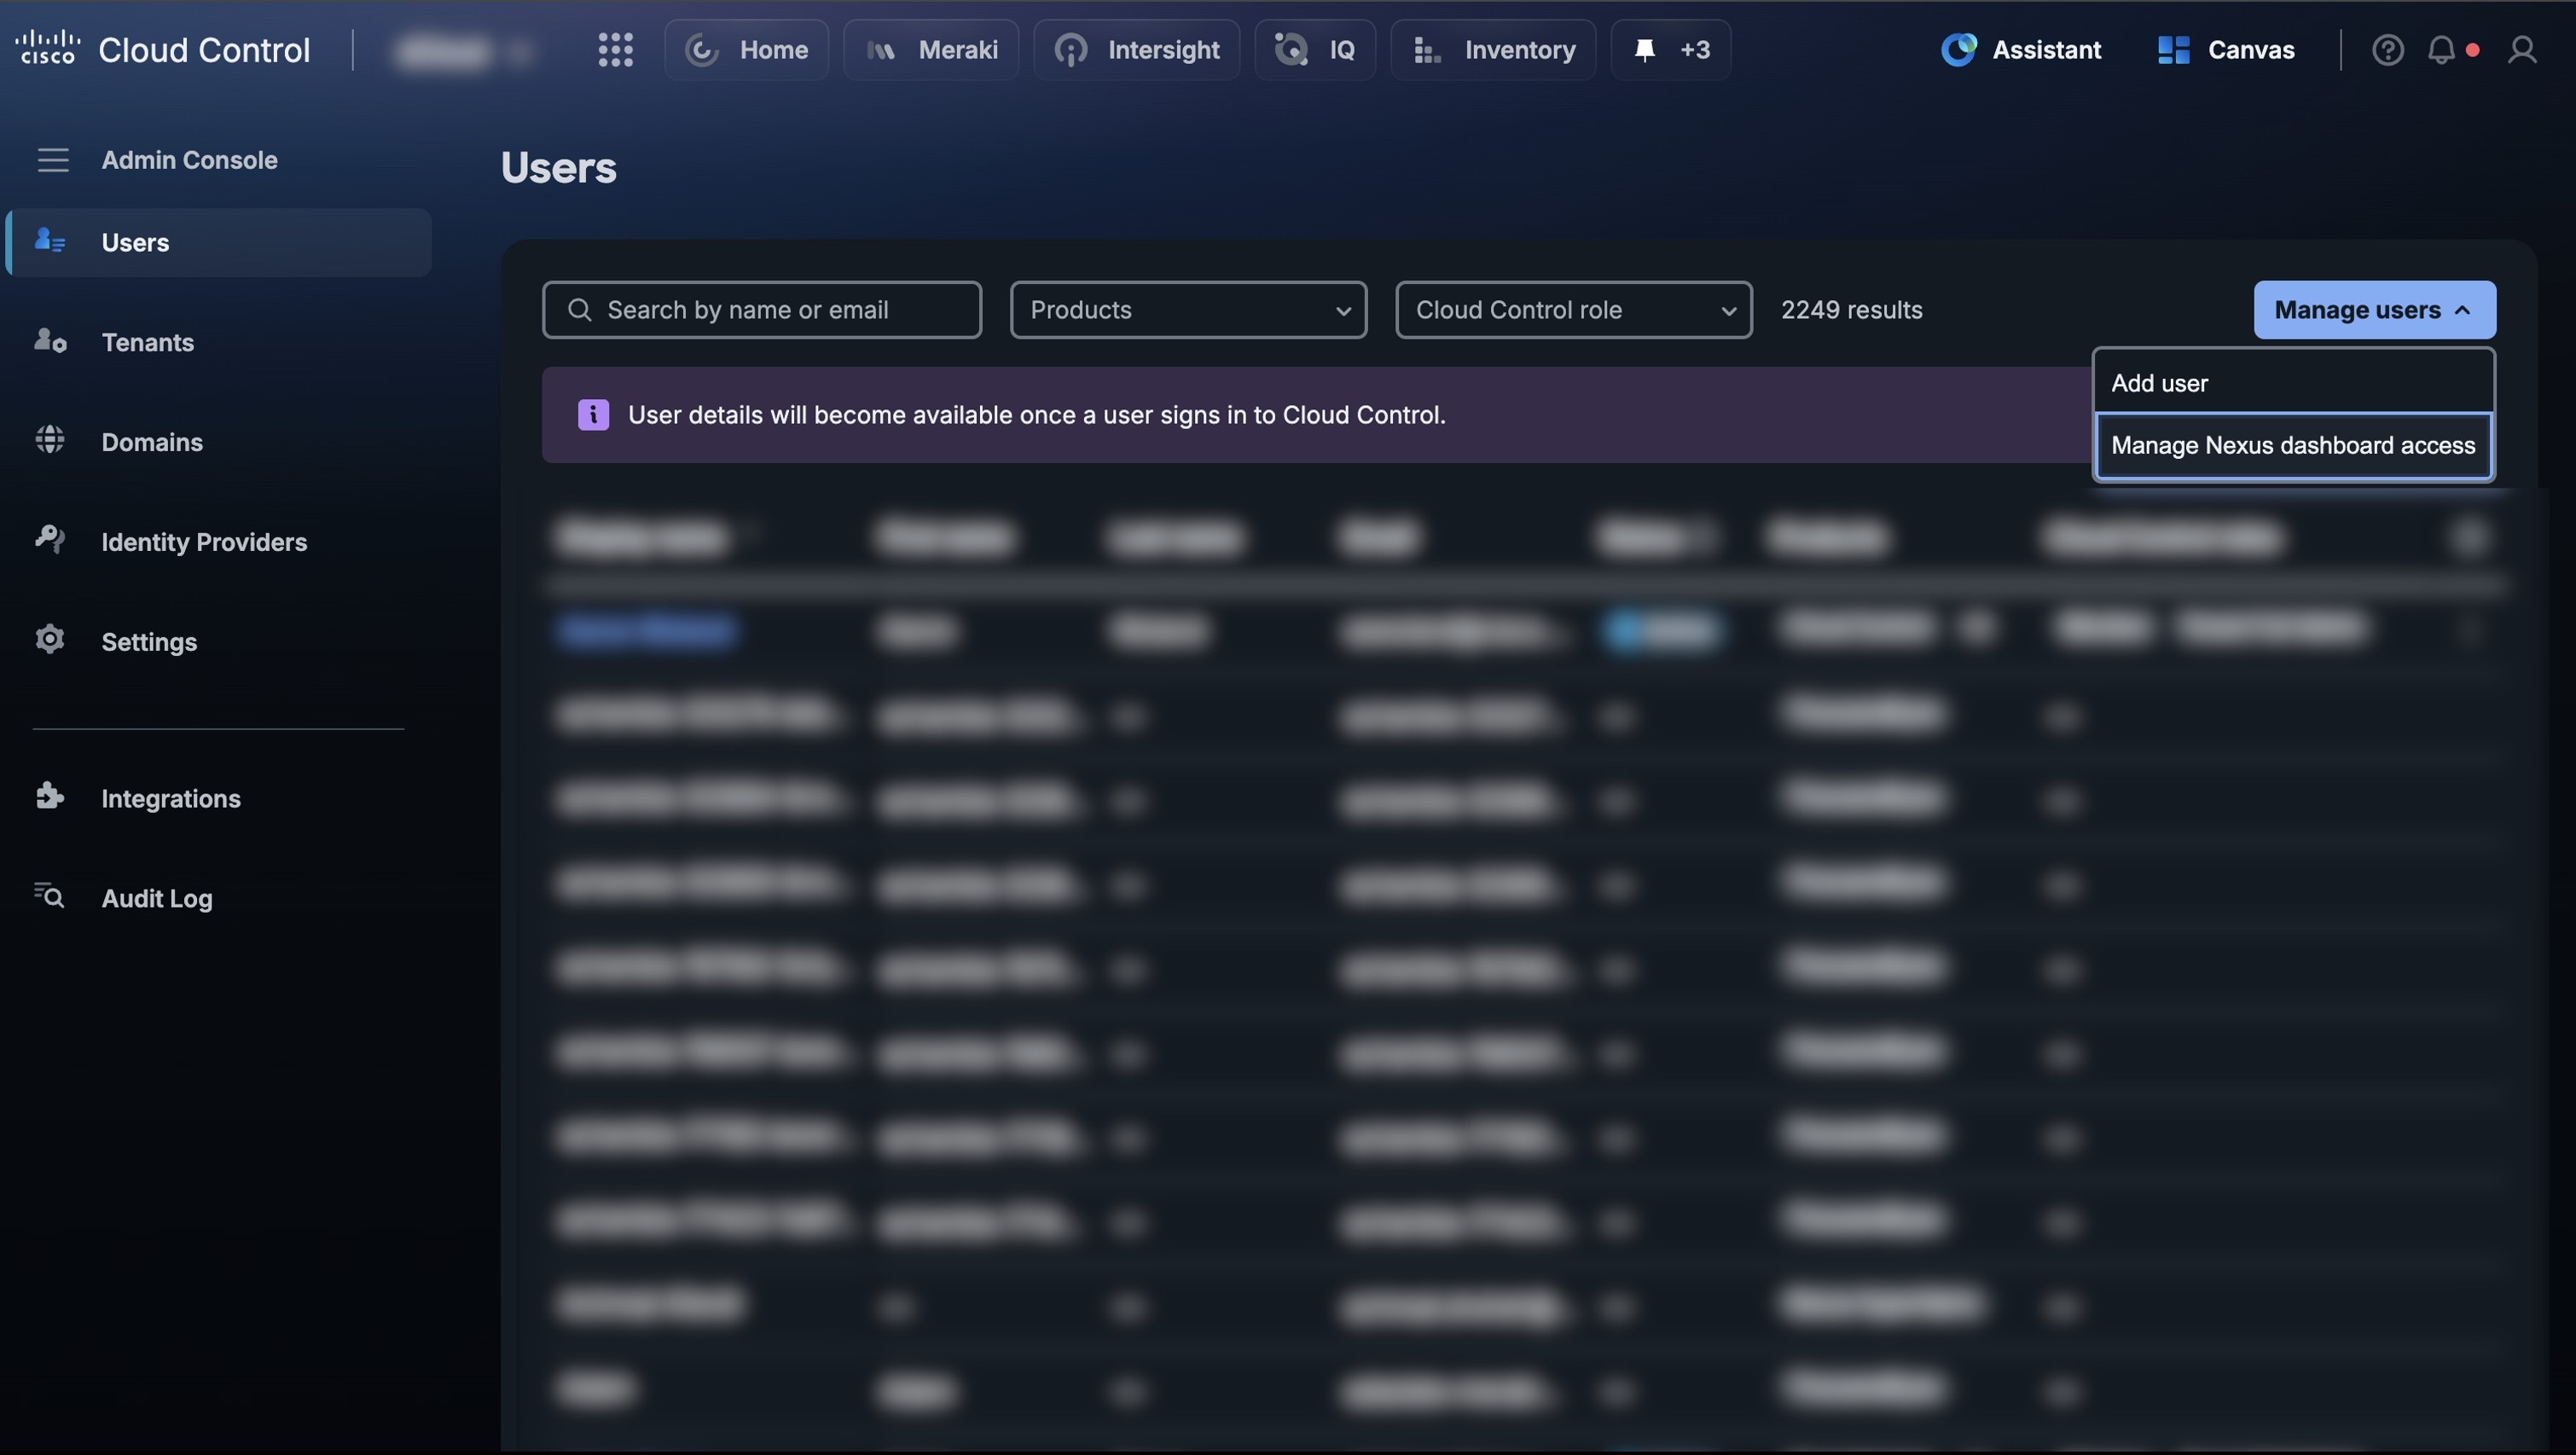
On the Users page, select Manage users, then select Manage Nexus dashboard access.
-
To change the settings for a user who already has access to Nexus Dashboard, select
 > Manage assignment. Then proceed to the role assignment step.
 -
Select Assign.
-
In Assign user, complete these steps:
-
Select a Cisco Cloud Control user, then select Next.
-
Check the role that you want to assign to the user:
-
Fabric Administrator: Has full fabric management privileges.
-
Designer: Can modify configurations, but cannot deploy these changes to network fabrics.
-
Approver: Can approve or deny submitted configuration changes when change control is enabled.
-
Observer: Has read-only access.
-
Support Engineer: Performs support tasks. Can also deploy or revert approved changes under change control, but cannot modify configurations.
-
-
Indicate why you are assigning an access role to the user. Then select Next.
-
Confirm that the settings you entered are correct. Then select Save.
-