Manage Firewall administration in Security Cloud Control Firewall Management

Use this chapter if you administer Security Cloud Control Firewall Management for your organization. It explains how to manage organization-wide firewall settings, user access, notifications, logging visibility, and role permissions.

This section provides the following information:

What firewall administration settings control

Firewall administration settings apply across the managed organization and can affect multiple devices and users. Some toggle buttons appear only when the related feature is enabled for your managed organization.

Configure general settings

Use Administration > General Settings to manage organization-wide settings that affect multiple managed devices and users in your managed organization.


Note


You do not see toggle buttons for features that are not enabled for your managed organization.


Enable AI Assistant for Firewall

AI Assistant is an AI-driven virtual companion that provides contextual guidance and insights to manage security policies, troubleshooting issues, and optimizing configurations. For more information, refer to Onboard with Cisco AI Assistant.

By default, the AI Assistant is enabled. When you enable or disable the AI Assistant, the change affects all users in your managed organization .

Procedure


Step 1

From the Security Cloud Control Home page, click Firewall.

Step 2

Choose Administration > General Settings.

Step 3

Turn off the Enable AI Assistant for Firewall toggle button to disable the AI Assistant.


Enable the option to auto-accept device changes

When this setting is enabled, Security Cloud Control Firewall Management automatically accepts changes that users make directly on the device. If you leave this setting disabled, or disable it later, you must review each device conflict before you accept it.

Follow these steps to enable automatic acceptance of device changes:

Procedure


Step 1

From the Security Cloud Control Home page, click Firewall.

Step 2

Choose Administration > General Settings.

Step 3

Turn on the Enable the option to auto-accept device changes toggle button.


Enable Multicloud Defense SCC features

When you enable this feature, you can configure site-to-site IPsec VPN tunnels between Multicloud Defense and your ASA and Firewall Threat Defense devices that are managed by Security Cloud Control Firewall Management. After you enable the feature, you can establish and deploy VPN configurations between these managed devices to improve secure connectivity across your multicloud infrastructure.

Follow these steps to enable Multicloud Defense Security Cloud Control Firewall Management features:

Procedure


Step 1

Choose Settings > General Settings.

Step 2

Turn on the Enable Multicloud Defense SCC features toggle button.


Enable object sharing with Multicloud Defense

Enable this setting to share Multicloud Defense network objects from Security Cloud Control Firewall Management.

Follow these steps to enable object sharing with Multicloud Defense:

SUMMARY STEPS

  1. Choose Administration > General Settings.
  2. Turn on the Enable object sharing with Multicloud Defense toggle button.

DETAILED STEPS


Step 1

Choose Administration > General Settings.

Step 2

Turn on the Enable object sharing with Multicloud Defense toggle button.


Enable ASA Health Monitoring

You must enable Device Health Metrics at the managed organization level. For ASA devices managed by Secure Device Connector, you must also enable the feature at the individual device level. These steps ensure health data is collected and made available for analysis within the dashboard.

You must have the Super Admin user role to enable this feature.

Follow these steps to enable ASA health monitoring for the managed organization:

Procedure


Step 1

From the Security Cloud Control Home page, click Firewall.

Step 2

Choose Administration > General Settings.

Step 3

Turn on the Enable ASA Health Monitoring toggle button to enable the Device Health Metrics feature for your managed organization.

Device Type Considerations

  • For ASA devices managed by Cloud Device Gateway (CDG), health metrics are enabled when the Enable Device Health Metrics toggle in General Settings is enabled.

  • For ASA devices managed by Secure Device Connector (SDC), manually enable health metrics for each device:

    1. Choose Security Devices.

    2. Select the SDC-managed ASA device.

    3. In the Device Actions pane, choose Opt-in to Health Metrics.

      If the device is already opted in, you will see the option to Opt-out of Health Metrics instead.

Note


Each SDC can support health metrics collection for up to 50 ASA devices.


Set the default conflict detection interval

This interval determines the frequency at which Security Cloud Control polls onboarded devices for changes. The selection applies to all devices managed in this tenant. You can change this option at any time.


Note


This selection can be overridden via the Conflict Detection option available from the Security Devices page after you have selected one or multiple devices.


Follow these steps to set the default conflict detection interval:

Procedure


Step 1

From the Security Cloud Control Home page, click Firewall.

Step 2

Choose Administration > General Settings.

Step 3

From the Default conflict detection interval drop-down list, select a time value.


Enable scheduled automatic deployments

Enabling the option to schedule automatic deployments allows you to schedule future deployments at a date and time when it is convenient. Once you enable this option, you can schedule a single automatic deployment or set up recurring automatic deployments. To schedule an automatic deployment, see Schedule an Automatic Deployment.

Changes you make on Security Cloud Control for a device are not automatically deployed to the device if it has pending changes Pending changes.. If a device is not in the Synced state, such as Conflict Detected or Not Synced, scheduled deployments are not executed. The jobs page lists any instance where a scheduled deployment fails.

If you turn off Enable the Option to Schedule Automatic Deployments, all scheduled deployments are deleted.


Important


If you use Security Cloud Control to create more than one scheduled deployment for a device, the new deployment overwrites the existing deployment. If you create more than one scheduled deployment for a device using the API, you must delete the existing deployment before scheduling the new deployment.


Follow these steps to enable scheduled automatic deployments:

Procedure


Step 1

From the Security Cloud Control Home page, click Firewall.

Step 2

Choose Administration > General Settings.

Step 3

Turn on the Enable the option to schedule automatic deployments toggle button to enable it.


Manage web analytics

Web analytics provides anonymous product usage information to Cisco based on page hits. The information includes pages viewed, the time spent on a page, browser versions, product version, and device hostname. This data helps Cisco determine feature usage patterns and improve the product. All usage data is anonymous and no sensitive data is transmitted.

Web analytics is enabled by default. To disable web analytics or re-enable it in the future, complete these steps:

Procedure


Step 1

From the Security Cloud Control Home page, click Firewall.

Step 2

Choose Administration > General Settings.

Step 3

Turn on the Web Analytics toggle button to enable it.


Set the FDM Default recurring backup schedule

Use this setting to configure a default recurring backup schedule for your devices. When you schedule a backup for a device, you can use the default values or customize them. If you change the default recurring backup schedule, existing scheduled backups keep their current recurring settings.

Follow these steps to set the FDM default recurring backup schedule:

Procedure


Step 1

From the Security Cloud Control Home page, click Firewall.

Step 2

Choose Administration > General Settings.

Step 3

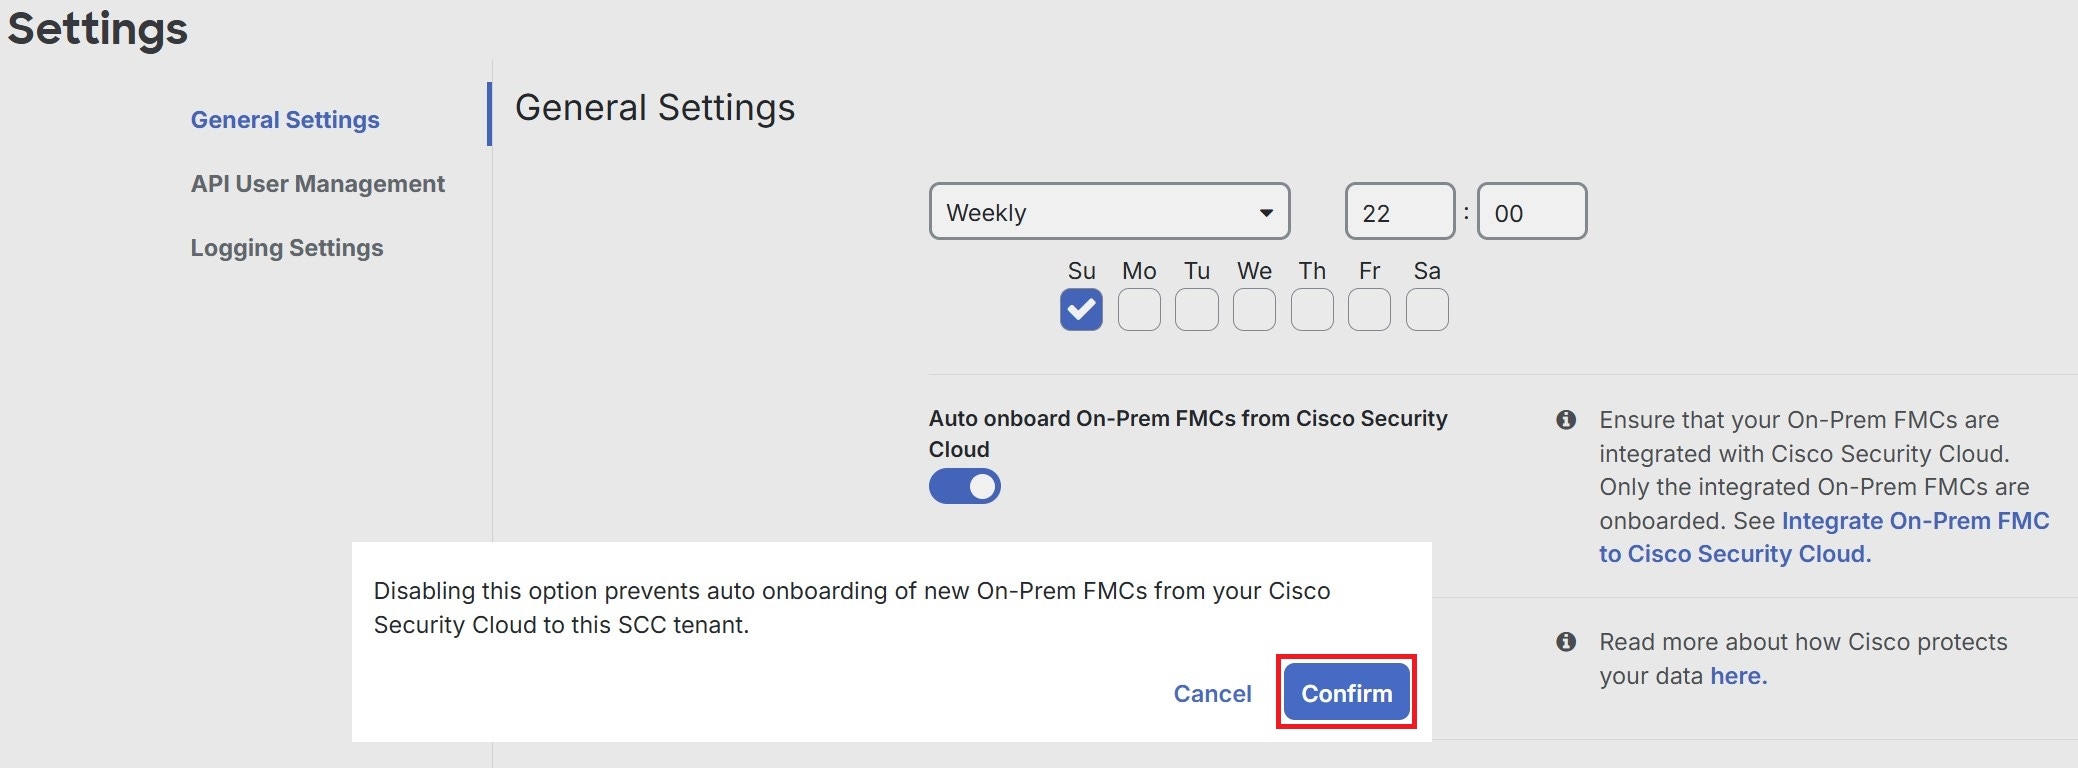
Under the FDM Default Recurring Backup Schedule section, from the Frequency drop-down, select daily, weekly, or monthly backup.

Step 4

Select the time of day for the backup. Enter the time using the 24-hour format in Coordinated Universal Time (UTC); for example, 22:00 (10:00 PM UTC).

Step 5

For weekly backups, select the days of the week for the backup. For monthly backups, select the Days of Month field and add the days when the backup should run. If you enter day 31 for a month with fewer than 31 days, the backup will not run for that month. Enter a name and description for the backup schedule.

Step 6

Click Save.


Auto onboard On-Prem FMCs from Cisco Security Cloud

Disabling the auto-onboarding functionality stops new on-premises Firewall Management Centers from being automatically added from your Cisco Security Cloud tenant.


Note


Only a Super Admin or Admin can enable or disable this functionality on Security Cloud Control.


Procedure


Step 1

From the Security Cloud Control Home page, click Firewall.

Step 2

Choose Administration > General Settings.

Step 3

Turn off the Auto onboard On-Prem FMCs from Cisco Security Cloud toggle button to disable the auto-onboarding of on-premises Firewall Management Center.

Step 4

Click Confirm.

Confirmation dialog allows disabling automatic onboarding of On-Prem FMCs. The dialog appears in General Settings and provides the user a clear disable option.


Enable event data sharing with Talos

Share malicious event data from your device with Talos, Cisco's threat intelligence organization. Sharing event data allows Talos to improve threat detection and response capabilities, provide more targeted security updates for your network, and deliver better protection against emerging threats.

For more information about Talos, see the Cisco Talos product page.

Enabling the Enable event data sharing with Talos toggle button does not automatically activate the Talos Threat Hunting Telemetry feature in Cloud-Delivered Firewall Management Center. For the best results with this feature, also enable the Talos Threat Hunting Telemetry in Cloud-Delivered Firewall Management Center. For more information, see Set Intrusion Policy Preferences.

Sharing event data with Talos is enabled by default. To opt out, follow this procedure:

Procedure


Step 1

From the Security Cloud Control Home page, click Firewall.

Step 2

Choose Administration > General Settings.

Step 3

Turn off the Enable event data sharing with Talos toggle button to disable this setting.

Note


Sharing event data enables Talos to provide relevant security insights for your network. Disabling this setting might limit your ability to fully leverage Talos's capabilities and could affect your network's defense against evolving threats.


View firewall management instance details

Firewall Management Instance Details are helpful if you need to contact the Cisco Technical Assistance Center (TAC). You can copy these tenant details by clicking the copy icon.

  • Firewall Management Instance Name: The display name of the firewall management instance.

  • Firewall Management Instance ID: The system-generated unique identifier for the firewall management instance in Cisco Security Cloud Control.

  • Secure Services Exchange ID: The unique identifier for the firewall management instance in the Secure Services Exchange environment. Cisco uses this value for service integration and backend correlation across cloud services.

  • Security Cloud Control Organization ID: The unique identifier of the Security Cloud Control organization associated with the firewall management instance.

Use the Security Cloud Control Firewall Management platform navigator

The platform navigator is a nine-block applications cross-launcher () that appears on the top-right corner of Security Cloud Control. You can readily cross-launch to these Cisco networking and security applications:

Networking applications

  • Catalyst: Cisco Catalyst products include a wide variety of network switches, wireless controllers, wireless access points, and edge platforms and routers, supporting enterprise-class business needs to heavy-duty and rugged networking environments.

  • Intersight: Cisco Intersight is a cloud operations platform that consists of optional, modular capabilities of advanced infrastructure, workload optimization, and Kubernetes services. Cisco Intersight infrastructure services include the deployment, monitoring, management, and support of your physical and virtual infrastructure. It supports Cisco Unified Computing System (Cisco UCS), Cisco HyperFlex hyperconverged infrastructure (HCI), and other third-party Intersight-connected targets.

  • IoT Operations Dashboard: Cisco IoT Operations Dashboard is a cloud-based IoT services platform that empowers operations teams to securely connect, maintain, and gain insights from industrial networking devices and connected industrial assets at massive scale. With one comprehensive view of all their connected industrial assets, operations teams can uncover valuable insights that help them streamline operations and drive business continuity.

  • Meraki: Cisco Meraki is an IT and IoT cloud-managed platform that provides a centralized management platform for Cisco Meraki devices.

  • Spaces: Cisco Spaces is a cloud-based location services platform through which organizations can gain insights into how people and things move throughout their physical spaces. With these insights, they can deliver contextual engagements that are valuable and relevant. Besides looking at where people go, organizations can also drive operational efficiencies by monitoring the location, movement, and utilization of assets.

  • ThousandEyes: Cisco ThousandEyes is a cloud service suite that helps monitor and measure the availability and performance of web applications, services, and networks. It provides end-to-end visibility from any user to any application over any network, enabling enterprises to swiftly get to the source of issues, resolve them faster, and manage performance effectively.

  • Workflows: Cisco Workflows is a cloud-hosted automation application that is part of the larger Cisco Networking Cloud vision. It provides an entitlement to cross-domain automation capabilities for Cisco customers. It streamlines repetitive and error-prone tasks across both Cisco and third-party applications using custom and premade automation templates, as well as various adapter options that can be provided by Cisco or built independently, reaching targets in the cloud or on-premises.

Security applications

  • Duo Security: Cisco Duo is a user-centric zero-trust security platform with two-factor authentication to protect access to sensitive data for all users, devices, and applications. It offers features such as adaptive policies, single sign-on (SSO), and advanced endpoint visibility, making it a comprehensive solution for securing remote access and maintaining business continuity.

  • Secure Access: Cisco Secure Access simplifies IT operations through a single, cloud-managed console, unified client, centralized policy creation, and aggregated reporting. Extensive security capabilities converged in one solution (ZTNA, SWG, CASB, FWaaS, DNS security, RBI, and more) mitigate security risk by applying zero trust principles and enforcing granular security policies. Market leading Talos threat intelligence fuels unmatched threat blocking to mitigate risk and speed investigations.

  • Secure Endpoint: Cisco Secure Endpoint, formerly known as Cisco AMP for Endpoints, is a cloud-managed endpoint security solution designed to prevent breaches and rapidly detect, contain, and remediate threats. It instantly checks your files against a cloud-based scanner with advanced tracking features. These features enable security analysts to identify and isolate initial outbreak sources. The solution also provides retrospective quarantine for files found to be malicious.

  • Cisco Security Provisioning and Administration: Cisco Security Provisioning and Administration is a web application that provides centralized management of Cisco Secure product instances, user identity, and user access management across Cisco Security Cloud. Security Cloud Control administrators can create new Security Cloud enterprises, manage users in an enterprise, claim domains, and integrate their organization’s SSO identity provider, among other tasks.

  • XDR: Cisco Extended Detection and Response (XDR) is a cloud-based solution designed to simplify security operations and empower security teams to detect, prioritize, and respond to sophisticated threats. By integrating both Cisco and third-party security solutions into a unified platform, Cisco XDR offers a comprehensive approach to threat management. Integrated with the threat intelligence provided by Talos, Cisco XDR enriches incident data with additional context and asset insights, reducing false positives and enhancing overall threat detection, response, and forensic capabilities.

Manage users and groups within Security Cloud Control organization

The purpose of this task is to provide centralized and automated management of user access across Cisco security products through role-based access control (RBAC).

Security Cloud Control supports role-based access control (RBAC) to automate access management across the organization. A role defines the level of user access to functions within a product. With Security Cloud Control, you can centralize the management of user roles within an organization, allowing organization users to switch seamlessly between products without the need to log in repeatedly.

Additionally, you can create API-only users for Security Cloud Control Firewall Management. API-only users allow systems to interact with Security Cloud Control using APIs, eliminating the need for a user interface.

Procedure


Step 1

From the Security Cloud Control Home page, click Platform Management.

Step 2

Choose Platform Management > Access Management > Administrator Access

For more information, see Managing users in the Security Cloud Control platform services documentation.


Manage API-Only users for Security Cloud Control Firewall Management

Developers use Security Cloud Control Firewall Management API tokens when making Security Cloud Control Firewall Management REST API calls. The API token must be included in the REST API authorization header for a successful call. API-only users can generate API tokens. Regular users cannot create API tokens for themselves or others.

The purpose of creating an API-only user in Security Cloud Control Firewall Management is to enable secure, programmatic access to the system using API tokens.

An API-only user role allows a user to interact with Security Cloud Control Firewall Management using APIs, eliminating the need for a user interface. API-only users cannot log in to the Security Cloud Control interface directly. The role benefits organizations -only user role is useful in organizations that need automated processes and integrations.

Only API-only users can generate API tokens; regular users cannot create API tokens for themselves or others.

Procedure


Step 1

From the Security Cloud Control Home page, click Firewall.

Step 2

In the left pane, choose Administration > API User Management.

Step 3

Click the Add a new user () icon to add a new user to your tenant.

Step 4

In the Username field, enter a name for the API-only user.

Step 5

From the Role drop-down list, choose a role for the API-only user and click Add.

Step 6

In the Token column for the new API Only user, click Generate API Token to obtain an API token. Save the token in a secure location in accordance with your enterprise's best practices for maintaining sensitive data.

Note


Click edit to change the role of the existing API-only user.


View Security Cloud Control notifications

Click the notifications icon to view the most recent alerts that have occurred or affected the devices that you onboarded to your tenant. The settings that you choose on the Notification Settings page determine the notification types that appear in Security Cloud Control Firewall Management.

This drop-down page is grouped into three tabs: Overview, All, and Dismissed.

Overview tab

The Overview tab displays a combination of the most recent high-priority alerts and events to which you are subscribed. High priority events are the following:

  • Deployment Failed

  • Backup Failed

  • Upgrade Failed

  • Migrate FTD to Cloud-Delivered Firewall Management Center Failed

  • Device went offline

  • Device HA state changed

  • Device certificates expiring

You can configure which alerts you want to receive by clicking the Notification Settings in the Notifications window or by selecting UserID > User Preferences page. The User ID button in the upper right corner of the dashboard.

All tab

Displays all notifications, regardless of priority, including email subscription notifications and all high-priority items.

Dismissed tab

Displays notifications that you dismissed. You can dismiss individual notifications by clicking the "x" of the notification.

Opting to Dismiss notifications from the drop-down menu dismisses notifications from both the "Overview" and "All" tabs. They will remain in the Dismiss tab for 30 days, after which they will be removed from Security Cloud Control.

Search notifications

When viewing the notifications drop-down window, for any of the tabs mentioned above, you can use the search bar at the top of the drop-down to query for key words or alerts.

View Notification Preferences

View your personal preferences in the Notification Preferences page. From this page you can configure the following "Notify Me in Security Cloud Control When" alerts and enable email notifications to receive any of the alerts . See Notification Preferences.

Manage user notification preferences

Security Cloud Control Firewall Management generates notifications whenever a device linked to your tenant encounters a specific event. This includes actions taken by the device, expiring or expired device certificates, or the start, completion, or failure of a report generation task. By default, these notifications are enabled and visible to all users associated with the tenant, regardless of their role. You have the option to customize your personal notification preferences to display only the alerts that interest you. These preferences are unique to you and do not impact other users connected to the tenant.


Note


Changes made to the notifications listed below are automatically updated in real time and do not require deployment.


Device workflow alerts

  • Deployments - This action does not include integration instances for SSH or IOS devices.

  • Backups - This action is only applicable for FDM-managed devices.

  • Upgrades - This action is only applicable for ASA and FDM-managed devices.

  • Migrate Firewall Threat Defense to cloud - This action is applicable when changing the Firewall Threat Defense

    device manager from Firewall Management Center to Security Cloud Control.

Device event alerts

  • Went offline - Applies to all devices associated with your tenant.

  • Back online - Applies to all the devices associated with your tenant.

  • Conflict detected - Applies to all the devices associated with your tenant.

  • HA state changed - Indicates the device within an HA or failover pair, the current state, and the state it changed from. This action applies to all HA and failover configurations associated with your tenant.

  • Site-to-Site session disconnected - Applies to all site-to-site VPN configurations configured in your tenant.

Event search report alerts

  • Report generation started: Notifies you when a report generation task starts. This applies to both immediate and scheduled search reports.

  • Report generation completed: Notifies you when a report generation task ends. This applies to both immediate and scheduled search reports.

  • Report generation failed: Notifies you when a report generation task fails. This applies to both immediate and scheduled search reports. Check the parameters or query and try again.

Application insights alerts

  • Application available: Notifies you when a monitored application becomes available.

  • Application unavailable: Notifies you when a monitored application becomes unavailable.

Opt out of notifications

By default, all notification types are enabled. To stop receiving a notification type, clear that notification and click Save.

Manage email notifications

Enable the `Email notifications` toggle button to receive email for the alerts that you select.

By default, Use Security Cloud Control notification settings above is selected. When this option is selected, email notifications match the same notifications and events that you selected in the Notify Me in Security Cloud Control When sections.

If you want email notifications for only some alerts, clear Use Security Cloud Control notification settings above, select the alert types that you want to receive by email, and then click Save.

View logging settings

Use Logging Settings to check current logging usage for your tenant.

The page shows:

  • Your monthly event logging limit.

  • The number of days until the limit resets.

  • Stored logging usage, which represents the compressed event data that the Cisco cloud received.

Click View Historical Usage to review the logs that your tenant received during the last 12 months.

The page also includes links that you can use to request additional storage.

Understand user roles in Security Cloud Control Firewall Management

Security Cloud Control Firewall Management assigns roles per user and per organization. If a user has access to more than one tenant, that user can have the same user ID but different roles on different organizations. For example, a user can have the `Read-Only` role on one organization and the `Super Admin` role on another.

When the interface or documentation refers to a `Read-Only` user, `Admin` user, or `Super Admin` user, it describes that user's permission level on a specific organization.

Read-only role

A user assigned the Read-Only role sees this blue banner on every page:

Users with the `Read-Only` role can:

  • View any page or any setting in Security Cloud Control.

  • Search and filter the contents of any page.

  • Compare device configurations, view the change log, and see VPN mappings.

  • View every warning regarding any setting or object on any page.

  • Generate, refresh, and revoke their own API tokens. Note that if a read-only user revokes their own token, they cannot recreate it.

  • Contact support through our interface and can export a change log.

Users with the `Read-Only` role cannot:

  • Create, update, configure, or delete anything on any page.

  • Onboard devices.

  • Step-through the tasks needed to create something like an object or a policy, but not be able to save it.

  • Create Security Cloud Control user records.

  • Change user role.

  • Attach or detach access rules to a policy.

Edit-Only role

Users with the Edit-Only role can:

  • Edit and save device configurations, including but not limited to objects, policies, rulesets, interfaces, VPN, etc.

  • Allow configuration changes that are made through the Read Configuration action.

  • Utilize the Change Request Management action.

Users with the Edit-Only role cannot:

  • Deploy changes to a device or to multiple devices.

  • Discard staged changes or changes that are detected through OOB.

  • Upload AnyConnect Packages, or configure these settings.

  • Schedule or manually start image upgrades for devices.

  • Schedule or manually start a security database upgrade.

  • Manually switch between Snort 2 and Snort 3 versions.

  • Create a template.

  • Change the existing OOB Change settings.

  • Edit System Management settings.

  • Onboard devices.

  • Delete devices.

  • Delete VPN sessions or user sessions.

  • Create Security Cloud Control user records.

  • Change user role.

Deploy-Only role

Users with the Deploy-Only role can:

  • Deploy staged changes to a device, or to multiple devices.

  • Revert or restore configuration changes for ASA devices.

  • Schedule or manually start image upgrades for devices.

  • Schedule or manually start a security database upgrade.

  • Utilize the Change Request Management action.

Users with the `Deploy-Only` role cannot:

  • Manually switch between Snort 2 and Snort 3 versions.

  • Create a template.

  • Change the existing OOB Change settings.

  • Edit System Management settings.

  • Onboard devices.

  • Delete devices.

  • Delete VPN sessions or user sessions.

  • Create, update, configure, or delete anything on any page.

  • Onboard devices.

  • Step-through the tasks needed to create something like an object or a policy, but not be able to save it.

  • Create Security Cloud Control user records.

  • Change user role.

  • Attach or detach access rules to a policy.

VPN Sessions Manager role

The `VPN Sessions Manager` role is intended for administrators who monitor remote access VPN connections, not site-to-site VPN connections.

Users with the VPN Sessions Manager role can:

  • View any page or any setting in Security Cloud Control.

  • Search and filter the contents of any page.

  • Compare device configurations, view the change log, and see RA VPN mappings.

  • View every warning regarding any setting or object on any page.

  • Generate, refresh, and revoke their own API tokens. Note that if a VPN Sessions Manager user revokes their own token, they cannot recreate it.

  • Contact support through our interface and export a change log.

  • Terminate existing RA VPN sessions.

Users with the VPN Sessions Manager role cannot:

  • Create, update, configure, or delete anything on any page.

  • Onboard devices.

  • Step-through the tasks needed to create something like an object or a policy, but not be able to save it.

  • Create Security Cloud Control user records.

  • Change user role.

  • Attach or detach access rules to a policy.

Admin role

Users with the `Admin` role have complete access to most areas of Security Cloud Control Firewall Management.

  • Create, read, update, and delete any object or policy in Security Cloud Control Firewall Management and configure any setting.

  • Onboard devices.

  • View any page or any setting in Security Cloud Control.

  • Search and filter the contents of any page.

  • Compare device configurations, view the change log, and see VPN mappings.

  • View every warning regarding any setting or object on any page.

  • Generate, refresh, and revoke their own API tokens. If their token is revoked, they can contact support through our interface and can export a change log.

Admin users cannot do the following:

  • Create Security Cloud Control user records.

  • Change user role.

Super Admin role

Users with the Super Admin role have complete access to all areas of Security Cloud Control Firewall Management.

Users with the Super Admin role can:

  • Change user roles.

  • Create user records.

  • Create, read, update, and delete any object or policy in Security Cloud Control and configure any setting.

  • Onboard devices.

  • View any page or any setting in Security Cloud Control.

  • Search and filter the contents of any page.

  • Compare device configurations, view the change log, and see VPN mappings.

  • View every warning regarding any setting or object on any page.

  • Generate, refresh, and revoke their own API tokens. If their token is revoked, they can

  • Contact support through our interface and can export a change log.

Filters on security devices, policies, and objects page

Use filters on the Security Devices, Policies, and Objects pages to find devices and objects. To filter, select the filter icon in the left pane.

On the Security Devices page, the filter panel lets you filter devices by criteria such as device type, hardware version, software version, Snort version, configuration status, connection state, conflict detection, Secure Device Connector, and labels. You can apply filters within the selected device type tab.

When the FTD tab is open, the filter panel also lets you filter FTD devices by the management application that Security Cloud Control uses to access them.

To filter, click in the left-hand pane of the Security Devices, Policies, and Objects tabs.


Note


When the FTD tab is opened, the filter pane provides filters to show FDM-managed devices based on the management application through which the devices are accessed from Security Cloud Control.

  • FDM: Devices managed using FTD API or Firewall Device Manager.

  • FMC-FTD: Devices managed using Firepower Management Center.

  • FTD: Devices managed using FTD Management.