Security considerations
Security considerations are security features and components in NFVIS that
-
provide a high-level overview of security related components for planning deployment-specific security strategies
-
include recommendations on security best practices for enforcing core network security elements, and
-
embed security from installation through all software layers including credential management, integrity and tamper protection, session management, and secure device access.
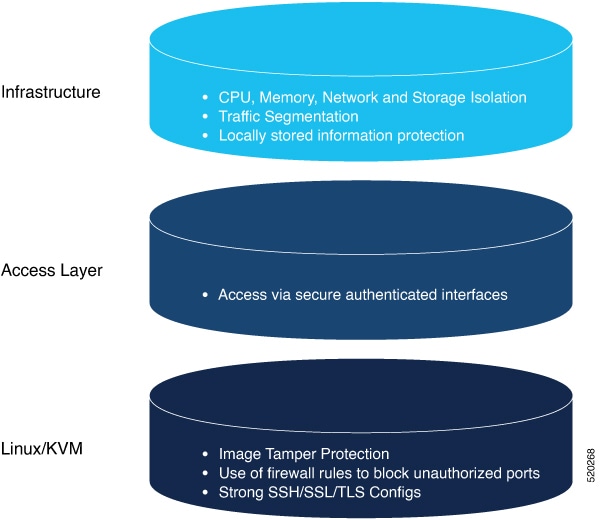
NFVIS software layers
The NFVIS software has security embedded right from installation through all software layers. The subsequent chapters focus on these out-of-the-box security aspects such as credential management, integrity and tamper protection, session management, secure device access and more.
Installation
To ensure that the NFVIS software has not been tampered with , the software image is verified before installation using the following mechanisms:
Image tamper protection
NFVIS supports RPM signing and signature verification for all RPM packages in the ISO and upgrade images.
RPM signing
RPM signing is a cryptographic security mechanism that
-
ensures cryptographic integrity and authenticity of all RPM packages in the Cisco NFVIS ISO and upgrade images
-
guarantees that the RPM packages have not been tampered with, and
-
verifies that the RPM packages are from NFVIS using private keys created and securely maintained by Cisco.
RPM signature verification
RPM signature verification is a security mechanism that
-
verifies the signature of all RPM packages before an installation or upgrade
-
aborts the upgrade if signature verification fails, and
-
ensures package integrity during NFVIS software operations.
NFVIS behavior during signature verification failure
NFVIS software verifies the signature of all the RPM packages before an installation or upgrade. If signature verification fails during an installation or upgrade, the upgrade is aborted.
Image integrity verification
Image integrity verification is a security mechanism that
-
ensures the integrity of all additional non-RPM files available in the Cisco NFVIS ISO image using published hash values
-
provides hash verification for both Cisco NFVIS ISO images and upgrade images, and
-
complements RPM signing and signature verification for complete image security.
Hash verification process
RPM signing and signature verification can be done only for the RPM packages available in the Cisco NFVIS ISO and upgrade images. To ensure the integrity of all the additional non-RPM files available in the Cisco NFVIS ISO image, a hash of the Cisco NFVIS ISO image is published along with the image. Similarly, a hash of the Cisco NFVIS upgrade image is published along with the image. To verify that the hash of Cisco NFVIS ISO image or upgrade image matches the hash published by Cisco, run the command and compare the hash with the published hash:
% /usr/bin/sha512sum <ImageFile>
c2122783efc18b039246ae1bcd4eec4e5e027526967b5b809da5632d462dfa6724a9b20ec318c74548c6bd7e9b8217ce96b5ece93dcdd74fda5e01bb382ad607  <ImageFile>
Secure unique device identification
A Secure Unique Device Identification (SUDI) is a security mechanism that
-
provides NFVIS with an immutable identity used to verify that the device is a genuine Cisco product
-
ensures that the device is well-known to the customer's inventory system, and
-
enables secure, remote on-boarding of devices through authenticated and automated configuration using Zero Touch Provisioning (ZTP).
SUDI certificate and key-pair characteristics
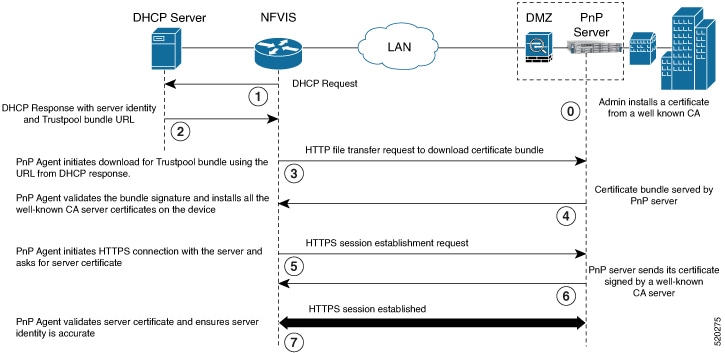
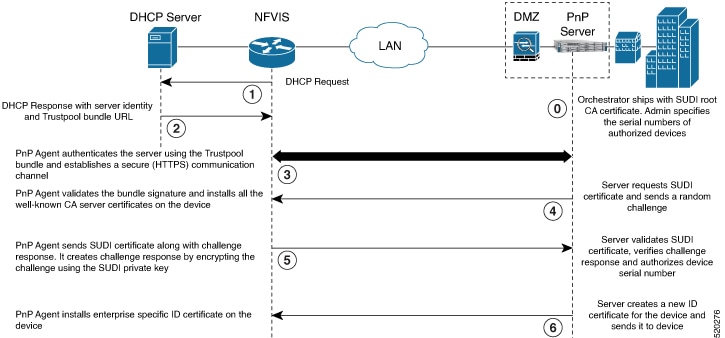
The SUDI consists of an X.509v3 certificate and an associated key-pair which are protected in hardware. The SUDI certificate contains the product identifier and serial number and is rooted in Cisco Public Key Infrastructure. The key pair and the SUDI certificate are inserted into the hardware module during manufacturing, and the private key can never be exported.
The SUDI-based identity enables authenticated and automated configuration using Zero Touch Provisioning (ZTP). This ensures that the orchestration server is talking to a genuine NFVIS device. A backend system can issue a challenge to the NFVIS device to validate its identity and the device will respond to the challenge using its SUDI based identity. This allows the backend system to not only verify against its inventory that the right device is in the right location but also provide encrypted configuration that can only be opened by the specific device, thereby ensuring confidentiality in transit.
SUDI workflow diagrams
These workflow diagrams illustrate how NFVIS uses SUDI:
Device access
Device access is a security framework that
-
provides different access mechanisms including console as well as remote access based on protocols such as HTTPS and SSH
-
ensures that access is only granted to authenticated users and they can perform just the authorized actions
-
restricts device accessibility, user capabilities, and permitted methods of access to prevent unauthorized access to NFVIS.
Device access security controls
Each access mechanism should be carefully reviewed and configured. Ensure that only the required access mechanisms are enabled and that they are properly secured. The key steps to securing both interactive and management access to NFVIS are to restrict the device accessibility, restrict the capabilities of the permitted users to what is required, and restrict the permitted methods of access. Device access is logged for auditing and NFVIS ensures the confidentiality of locally stored sensitive data.
It is critical to establish the appropriate controls in order to prevent unauthorized access to NFVIS.
Enforced password change at first login
Enforced password change at first login is a security feature that
-
prevents security incidents by requiring users to change default credentials after initial login
-
forces NFVIS users to update their password when first accessing the system with default credentials (username: admin and password Admin123#), and
-
protects systems from attacks that exploit unchanged default login credentials.
Additional information
For more information, see Access NFVIS.
Restricting login vulnerabilities
You can prevent the vulnerability to dictionary and Denial of Service (DoS) attacks by using the following features.
Enforcement of strong password
An authentication mechanism is only as strong as its credentials. For this reason, it is important to ensure users have strong passwords. NFVIS checks that a strong password is configured as per these rules.
Password must contain:
-
At least one uppercase character
-
At least one lowercase character
-
At least one number
-
At least one of these special characters: hash (#), underscore (_), hyphen (-), asterisk (*), or question mark (?)
-
Seven characters or more
-
The password length should be between 7 and 128 characters.
Configure minimum length for passwords
Configure the minimum password length requirement to strengthen security by making brute-force attacks more difficult. Password length significantly affects the search space for attackers attempting to guess user passwords.
The admin user can configure the minimum length required for passwords of all users. The minimum length must be between 7 and 128 characters. By default, the minimum length required for passwords is set to 7 characters.
Procedure
|
Configure the minimum password length using CLI or API.
|
The minimum password length is configured for all user accounts, enhancing system security by requiring stronger passwords.
Configure password lifetime
Configure password lifetime settings to determine how long a password can be used before the user is required to change it.
The password lifetime determines how long a password can be used before the user is required to change it. The admin user can configure minimum and maximum lifetime values for passwords for all users and enforce a rule to check these values. The default minimum lifetime value is set to 1 day and the default maximum lifetime value is set to 60 days.
When a minimum lifetime value is configured, the user cannot change the password until the specified number of days have passed. Similarly, when a maximum lifetime value is configured, a user must change the password before the specified number of days pass. If a user does not change the password and the specified number of days have passed, a notification is sent to the user.
 Note |
The minimum and maximum lifetime values and the rule to check for these values are not applied to the admin user. |
Procedure
|
Step 1 |
Configure password lifetime using CLI. Example: |
|
Step 2 |
Configure password lifetime using API. Example: |
Password lifetime settings are configured with the specified minimum and maximum values, and the enforcement rule is applied to all users except the admin user.
Previous password reuse limitation
Previous password reuse limitation is a security mechanism that
-
prevents users from reusing recently used passwords
-
makes password expiry meaningful by blocking immediate reversion to old passwords, and
-
maintains password history to enforce security policies.
NFVIS password reuse prevention
NFVIS checks that the new password is not the same as one of the 5 previously used passwords. One exception to this rule is that the admin user can change the password to the default password even if it was one of the 5 previously used passwords.
Recommendation: restrict frequency of login attempts
Restrict the frequency of login attempts to prevent brute force attacks and avoid denial of service conditions.
If a remote peer is allowed to login an unlimited number of times, it may eventually be able to guess the login credentials by brute force. Since passphrases are often easy to guess, this is a common attack. By limiting the rate at which the peer can attempt logins, we prevent this attack. We also avoid spending the system resources on unnecessarily authenticating these brute-force login attempts which could create a Denial of Service attack.
NFVIS enforces a 5 minute user lockdown after 10 failed login attempts.
Disable inactive user accounts
Monitoring user activity and disabling unused or stale user accounts helps to secure the system from insider attacks. The unused accounts should eventually be removed.
The admin user can enforce a rule to mark unused user accounts as inactive and configure the number of days after which an unused user account is marked as inactive. Once marked as inactive, that user cannot login to the system. To allow the user to login to the system, the admin user can activate the user account.
Note |
The inactivity period and the rule to check the inactivity period are not applied to the admin user. |
Procedure
|
Configure the enforcement of account inactivity using CLI or API.
The default value for inactivity-days is 35. |
User accounts that remain inactive for the specified number of days are automatically marked as inactive and cannot login to the system.
Activate an inactive user account
This task allows the admin user to reactivate a user account that has been deactivated or is in an inactive state.
User accounts may become inactive due to various reasons such as security policies or administrative actions. When a user account needs to be reactivated, the admin user can perform this task using either CLI commands or API calls.
Procedure
|
Choose one of the following methods to activate the inactive user account:
|
The previously inactive user account is now activated and the user can access the system with their credentials.
Integration with external AAA servers
Integration with external AAA servers is a security framework that
-
authenticates users through password credentials when they login to NFVIS via ssh or the Web UI
-
authorizes users to perform specific operations based on their access requirements, and
-
supports RADIUS and TACACS protocols to mediate network access through centralized AAA servers.
AAA server deployment recommendations
It is recommended that a centralized AAA server be deployed to enforce per-user, AAA-based login authentication for NFVIS access. On the AAA server, only minimum access privileges should be granted to authenticated users according to their specific access requirements. This reduces the exposure to both malicious and unintentional security incidents.
For more information on external authentication, see Configure RADIUS and Configure a TACACS+ server.
Authentication cache for external authentication server
An authentication cache for external authentication server is a local storage mechanism that
-
stores hash entries using the username and OTP after successful TACACS server authentication
-
maintains expiration timestamps that match the SSH session idle timeout value of 15 minutes, and
-
authenticates subsequent requests with the same username against the local hash value first before contacting the TACACS server.
Authentication cache behavior
The NFVIS portal uses the same One-Time Password (OTP) for all API calls after the initial authentication. The API calls fail as soon as the OTP expires. This feature supports TACACS OTP authentication with the NFVIS portal.
After you have successfully authenticated through the TACACS server using an OTP, NFVIS creates a hash entry using the username and the OTP and stores this hash value locally. This locally stored hash value has an expiration time stamp associated with it. The time stamp has the same value as the SSH session idle timeout value which is 15 minutes. All the subsequent authencation requests with the same username are authenticated against this local hash value first. If the authentication fails with the local hash, NFVIS authenticates this request with TACACS server and creates a new hash entry when the authentication is successful. If a hash entry already exists, its time stamp is reset to 15 minutes.
If you are removed from the TACACS server after successfully logging into the portal, you can continue to use the portal until the hash entry in NFVIS expires.
When you explicitly log out from the NFVIS portal or are logged out due to idle time, the portal calls a new API to notify NFVIS backend to flush the hash entry. The authentication cache and all of its entries are cleared out after NFVIS reboot, factory reset, or upgrade.
Role based access control
Role-based access control (RBAC) is a method of restricting network access that
-
limits access based on the roles of individual users within an enterprise
-
lets users access just the information they need
-
prevents them from accessing information that doesn't pertain to them, and
-
uses an employee's role in the enterprise to determine the permissions granted.
NFVIS user roles and privileges
Limiting network access is important to organizations that have many employees, employ contractors or permit access to third parties, such as customers and vendors. In such a scenario, IT is difficult to monitor network access effectively. Instead, IT is better to control what is accessible, in order to secure the sensitive data and critical applications.
An employee's role in the enterprise should be used to determine the permissions granted, in order to ensure that employees with lower privileges can't access sensitive information or perform critical tasks.
The user roles and privileges are defined in NFVIS:
|
User Role |
Privilege |
|---|---|
|
Administrators |
Can configure all available features and perform all tasks including changing of user roles. The administrator cannot delete basic infrastructure that is fundamental to NFVIS. The Admin user's role cannot be changed; IT is always "administrators". |
|
Operators |
Can Start and stop a VM, and view all information. |
|
Auditors |
They are the least privileged users. They have Read-only permission and therefore, can't modify any configuration. |
Benefits of using RBAC to restrict unnecessary network access based on people's roles within an organization:
-
Improving operational efficiency. Having predefined roles in RBAC makes IT is easy to include new users with the right privileges or switch roles of existing users. IT also cuts down on the potential for error when user permissions are being assigned.
-
Enhancing compliance. Every organization must comply with local, state and federal regulations. Companies generally prefer to implement RBAC systems to meet the regulatory and statutory requirements for confidentiality and privacy because executives and IT departments can more effectively manage how the data is accessed and used. This is particularly important for financial institutions and healthcare companies that manage sensitive data.
-
Reducing costs. By not allowing user access to certain processes and applications, companies may conserve or use resources such as network bandwidth, memory and storage in a cost-effective manner.
-
Decreasing risk of breaches and data leakage. Implementing RBAC means restricting access to sensitive information, thus reducing the potential for data breaches or data leakage.
Best practices for role-based access control implementations:
-
As an administrator, determine the list of users and assign the users to the predefined roles. For example, the user "networkadmin" can be created and added to the user group "administrators".
configure terminal
rbac authentication users create-user name networkadmin password Test1_pass role administrators
commit
Note
The user groups or roles are created by the system. You cannot create or modify a user group.
To change the password, use the RBAC authentication users user change-password command in global configuration mode. To change the user role, use the RBAC authentication users user change-role command in global configuration mode.
-
Terminate accounts for users who no longer require access.
configure terminal rbac authentication users delete-user name test1 -
Periodically conduct audits to evaluate the roles, the employees who are assigned to them and the access that's permitted for each role. If a user is found to have unnecessary access to a certain system, change the user's role.
Granular Role-Based Access Control
This feature adds a new resource group policy that manages the VM and VNF and allows you to assign users to a group to control VNF access, during VNF deployment. For more information, see Granular role-based access control.
Recommendation: restrict device accessibility
Disable unused services to prevent security vulnerabilities from default configurations and passwords that attackers can exploit to gain unauthorized access to system information.
Users have repeatedly been caught unawares by attacks against features they had not protected because they did not know that those features were enabled. Unused services tend to be left with default configurations which are not always secure. These services may also be using default passwords. Some services can give an attacker easy access to information on what the server is running or how the network is setup.
Attack vector reduction
Attack vector reduction is a security strategy that
-
limits software packages to only those essential for NFVIS functionality to reduce potential security vulnerabilities
-
registers all third-party software in a central Cisco database for organized security response, and
-
ensures periodic patching of software packages for known Common Vulnerabilities and Exposures (CVEs) in every release.
Security benefits
This approach provides multiple security advantages. Any piece of software can potentially contain security vulnerabilities. More software means more avenues for attack. Even if there are no publicly known vulnerabilities at the time of inclusion, vulnerabilities will probably be discovered or disclosed in the future. To avoid such scenarios, only those software packages which are essential for the NFVIS functionality are installed. This helps to limit software vulnerabilities, reduce resource consumption, and reduce extra work when problems are found with those packages.
Enable only essential ports by default
Only those services which are absolutely necessary to setup and manage NFVIS are available by default. This removes the user effort needed to configure firewalls and deny access to unnecessary services.
|
Open Port |
Service |
Description |
|---|---|---|
|
22/TCP |
SSH |
Secure Socket Shell for remote command-line access to NFVIS |
|
80/TCP |
HTTP |
Hypertext Transfer Protocol for the NFVIS portal access. All HTTP traffic received by NFVIS is redirected to port 443 for HTTPS |
|
443/TCP |
HTTPS |
Hypertext Transfer Protocol Secure for secure NFVIS portal access |
|
830/TCP |
NETCONF-SSH |
Port opened for the Network Configuration Protocol (NETCONF) over SSH. NETCONF is a protocol used for automated configuration of NFVIS and for receiving asynchronous event notifications from NFVIS. |
|
161/UDP |
SNMP |
Simple Network Management Protocol (SNMP). Used by NFVIS to communicate with remote network-monitoring applications. For more information see, Introduction about SNMP. |
Authorized network access restrictions
Authorized network access restriction is a security mechanism that
-
permits only authorized originators to attempt device management access
-
limits access to services they are authorized to use, and
-
reduces the risk of unauthorized access and exposure to attacks such as brute force, dictionary, or DoS attacks.
NFVIS access control lists
NFVIS can be configured such that access is restricted to known, trusted sources and expected management traffic profiles. To protect the NFVIS management interfaces from unnecessary and potentially harmful traffic, an admin user can create Access Control Lists (ACLs) for the network traffic that is received. These ACLs specify the source IP addresses/networks from which the traffic originates, and the type of traffic that is permitted or rejected from these sources. These IP traffic filters are applied to each management interface on NFVIS.
These parameters are configured in an IP receive Access Control List (IP-receive-ACL):
|
Parameter |
Value |
Description |
|---|---|---|
|
Source network/Netmask |
Network/netmask. For example: 0.0.0.0/0 172.39.162.0/24 |
This field specifies the IP address/network from which the traffic originates |
|
Service |
HTTPS ICMP NETCONF scpd SNMP SSH |
Type of traffic from the specified source. |
|
Action |
accept drop reject |
Action to be taken on the traffic from the source network. With accept , new connection attempts will be granted. With reject , connection attempts will not be accepted. If the rule is for a TCP based service such as HTTPS, NETCONF, SCP, SSH, the source will get a TCP reset (RST) packet. For non-TCP rules such as SNMP and ICMP, the packet will be dropped. With drop , all packets will be dropped immediately, there is no information sent to the source. |
|
Priority |
A numeric value |
The priority is used to enforce an order on the rules. Rules with a higher numeric value for priority will be added further down in the chain. If you want to make sure that a rule will be added after another one, use a low priority number for the first and a higher priority number for the next. |
The sample configurations illustrate some scenarios that can be adapted for specific use-cases.
Configuring the IP Receive ACL
The more restrictive an ACL, the more limited the exposure to unauthorized access attempts. However, a more restrictive ACL can create a management overhead, and can impact accessibility to perform troubleshooting. Consequently, there is a balance to be considered. One compromise is to restrict access to internal corporate IP addresses only. Each customer must evaluate the implementation of ACLs in relation to their own security policy, risks, exposure, and acceptance thereof.
Reject SSH traffic from a subnet:
nfvis(config)# system settings ip-receive-acl 171.70.63.0/24 service ssh action reject priority 1
Removing ACLs:
When an entry is deleted from IP-receive-ACL, all configurations to that source are deleted since the source IP address is the key. To delete just one service, configure other services again.
nfvis(config)# no system settings ip-receive-acl 171.70.63.0/24
For more details see, Configure the IP receive ACL
Access privileged debug shell
This task provides secure shell access to NFVIS for interactive debugging when standard troubleshooting methods are insufficient and Cisco Technical Assistance Center or development team requires system-level access.
The super-user account on NFVIS is disabled by default, to prevent all unrestricted, potentially adverse, system-wide changes and NFVIS does not expose the system shell to the user. However, for some hard to debug issues on the NFVIS system, the Cisco Technical Assistance Center team (TAC) or development team might require shell access to the customer's NFVIS. NFVIS has a secure unlock infrastructure to ensure that privileged debug access to a device in the field is restricted to authorized Cisco employees. To securely access the Linux shell for this kind of interactive debugging, a challenge-response authentication mechanism is used between NFVIS and the Interactive debugging server maintained by Cisco. The admin user's password is also required in addition to the challenge-response entry to ensure that the device is accessed with the customer's consent.
Before you begin
Follow these steps to access the shell for interactive debugging:
Procedure
|
Step 1 |
Initiate the shell access procedure using the hidden command. Example: |
|
Step 2 |
Copy the challenge string displayed on the screen. Example: |
|
Step 3 |
Provide the challenge string to the Cisco member for verification. The Cisco member enters the Challenge string on an Interactive Debug server maintained by Cisco. This server verifies that the Cisco user is authorized to debug NFVIS using the shell, and then returns a response string. |
|
Step 4 |
Enter the response string when prompted. Input your response when ready: |
|
Step 5 |
Enter the admin password when prompted. |
|
Step 6 |
Access the shell if the password is valid. Development or TAC team uses the shell to proceed with the debugging. |
|
Step 7 |
Type Exit to exit shell access when debugging is complete. |
You have successfully accessed the privileged debug shell and can perform interactive debugging with Cisco support team assistance.
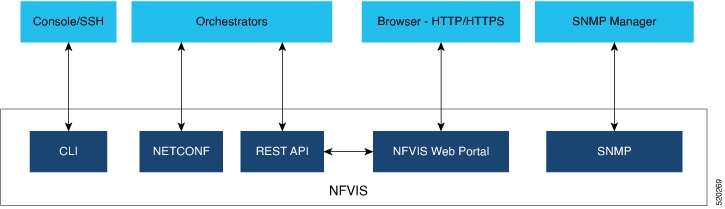
Secure interfaces
Describes the interfaces available for NFVIS management access and outlines security best practices to implement for each interface to ensure secure system administration.
NFVIS management access is allowed using the interfaces shown in the diagram. The following sections describe security best practices for these interfaces to NFVIS.
Console
A console port is an asynchronous serial port that
-
allows you to connect to the NFVIS CLI for initial configuration
-
can be accessed with either physical access to the NFVIS or remote access through the use of a terminal server, and
-
requires access lists on the terminal server to allow access only from the required source addresses when console port access is required via a terminal server.
SSH
SSH is a secure network protocol that
-
provides users with secure remote access to the NFVIS CLI
-
ensures the integrity and confidentiality of NFVIS management traffic, and
-
uses version 2 with strong encryption, hash, and key exchange algorithms recommended by the Security and Trust Organization within Cisco.
SSH implementation details
NFVIS uses SSH version 2, which is Cisco's and the Internet's de facto standard protocol for interactive logins. The integrity and confidentiality of NFVIS management traffic is essential to the security of the administered network since administration protocols frequently carry information which could be used to penetrate or disrupt the network.
CLI session timeout
A CLI session timeout is a security mechanism that
-
automatically logs out users from CLI sessions after 15 minutes of inactivity
-
limits the risk of internal attacks, such as one user trying to use another user's session, and
-
reduces network security risks when users leave logged-in sessions unattended.
Session security mechanism
By logging in via SSH, a user establishes a session with NFVIS. While the user is logged in, if the user leaves the logged-in session unattended, this can expose the network to a security risk. Session security limits the risk of internal attacks, such as one user trying to use another user's session.
To mitigate this risk, NFVIS times out CLI sessions after 15 minutes of inactivity. When the session timeout is reached, the user is automatically logged out.
NETCONF
The Network Configuration Protocol (NETCONF) is a network management protocol that
-
is developed and standardized by the IETF for the automated configuration of network devices
-
uses an Extensible Markup Language (XML) based data encoding for the configuration data as well as the protocol messages, and
-
exchanges protocol messages on top of a secure transport protocol.
NETCONF capabilities
NETCONF allows NFVIS to expose an XML-based API that the network operator can use to set and get configuration data and event notifications securely over SSH.
For more information see, NETCONF event notifications.
REST API
A REST API is a configuration interface that
-
allows requesting systems to access and manipulate NFVIS configuration using a uniform and predefined set of stateless operations
-
operates over HTTPS for secure communication, and
-
limits concurrent sessions to 100 to prevent denial of service attacks.
REST API session management
When the user issues a REST API, a session is established with NFVIS. In order to limit risks related to denial of service attacks, NFVIS limits the total number of concurrent REST sessions to 100.
Details on all the REST APIs can be found in the NFVIS API Reference guide.
NFVIS web portal
The NFVIS portal is a web-based graphical user interface that
-
displays information about NFVIS
-
presents users with an easy means to configure and monitor NFVIS over HTTPS, and
-
eliminates the need to know the NFVIS CLI and API.
Session management
The stateless nature of HTTP and HTTPS requires a method of uniquely tracking users through the use of unique session IDs and cookies.
NFVIS encrypts the user's session. The AES-256-CBC cipher is used to encrypt the session contents with an HMAC-SHA-256 authentication tag. A random 128-bit Initialization Vector is generated for each encryption operation.
An Audit record is started when a portal session is created. Session information is deleted when the user logs out or when the session times out.
The default idle timeout for portal sessions is 15 minutes. However, this can be configured for the current session to a value between 5 and 60 minutes on the Settings page. Auto-logout will be initiated after this period. Multiple sessions are not permitted in a single browser. The Maximum number of concurrent sessions are set to 30.
The NFVIS portal utilizes cookies to associate data with the user. It uses these cookie properties for enhanced security:
-
ephemeral to ensure the cookie expires when the browser is closed
-
httpOnly to make the cookie inaccessible from JavaScript
-
secureProxy to ensure the cookie can only be sent over SSL.
Even after authentication, attacks such as Cross-Site Request Forgery (CSRF) are possible. In this scenario, an end user might inadvertently execute unwanted actions on a web application in which they're currently authenticated. To prevent this, NFVIS uses CSRF tokens to validate every REST API that is invoked during each session.
URL Redirection
In typical web servers, when a page is not found on the web server, the user gets a 404 message; for pages that exist, they get a login page. The security impact of this is that an attacker can perform a brute force scan and easily detect which pages and folders exist.
To prevent this on NFVIS, all non-existent URLs prefixed with the device IP are redirected to the portal login page with a 301 status response code. This means that irrespective of the URL requested by an attacker, they will always get the login page to authenticate themselves.
All HTTP server requests are redirected to HTTPS and have these headers configured:
-
X-Content-Type-Options
-
X-XSS-Protection
-
Content-Security-Policy
-
X-Frame-Options
-
Strict-Transport-Security
-
Cache-Control
Portal Disablement
The NFVIS portal access is enabled by default. If you are not planning to use the portal, it is recommended to disable portal access using this command:
Configure terminal
System portal access disabled
commit
HTTPS
All HTTPS data to and from NFVIS uses Transport Layer Security (TLS) to communicate across the network. TLS is the successor to Secure Socket Layer (SSL). The TLS handshake involves authentication during which the client verifies the server's SSL certificate with the certificate authority that issued it. This confirms that the server is who it says it is, and that the client is interacting with the owner of the domain.
By default, NFVIS uses a self-signed certificate to prove its identity to its clients. This certificate has a 2048-bit public key to increase the security of the TLS encryption, since the encryption strength is directly related to the key size. NFVIS generates a self-signed SSL certificate when first installed. It is a security best practice to replace this certificate with a valid certificate signed by a compliant Certificate Authority (CA).
Manage certificates
Replace the default self-signed certificate with a CA-signed certificate to enhance security and follow best practices for certificate management in NFVIS.
Procedure
|
Step 1 |
Generate a Certificate Signing Request (CSR) on NFVIS. A Certificate Signing request (CSR) is a file with a block of encoded text that is given to a Certificate Authority when applying for an SSL Certificate. This file contains information that should be included in the certificate such as the organization name, common name (domain name), locality, and country. The file also contains the public key that should be included in the certificate. NFVIS uses a 2048-bit public key since encryption strength is higher with a higher key size. To generate a CSR on NFVIS, run the following command: The CSR file is saved as /data/intdatastore/download/NFVIS.CSR. |
|
Step 2 |
Get an SSL certificate from a CA using the CSR. From an external host, use the scp command to download the Certificate Signing Request. Contact a Certificate authority to issue a new SSL server certificate using this CSR. |
|
Step 3 |
Install the CA Signed Certificate. From an external server, use the scp command to upload the certificate file into NFVIS to the data/intdatastore/uploads/ directory. Install the certificate in NFVIS using the following command. |
|
Step 4 |
Switch to using the CA Signed Certificate. Use the following command to start using the CA signed certificate instead of the default self-signed certificate. |
NFVIS now uses the CA-signed certificate instead of the default self-signed certificate for secure HTTPS communications.
SNMP access
SNMP access is a network management mechanism that
-
collects and organizes information about managed devices on IP networks
-
modifies that information to change device behavior, and
-
provides different security levels through three significant versions.
SNMP version security features
Three significant versions of SNMP have been developed. NFVIS supports SNMP version 1, version 2c and version 3. SNMP versions 1 and 2 use community strings for authentication, and these are sent in plain-text. So, it is a security best practice to use SNMP v3 instead.
SNMPv3 provides secure access to devices by using three aspects: - users, authentication, and encryption. SNMPv3 uses the USM (User-based Security Module) for controlling access to information available via SNMP. The SNMP v3 user is configured with an authentication type, a privacy type as well as a passphrase. All users sharing a group utilize the same SNMP version, however, the specific security level settings (password, encryption type, etc.) are specified per-user.
This table summarizes the security options within SNMP:
|
Model |
Level |
Authentication |
Encyption |
Outcome |
|---|---|---|---|---|
|
v1 |
noAuthNoPriv |
Community String |
No |
Uses a community string match for authentication. |
|
v2c |
noAuthNoPriv |
Community String |
No |
Uses a community string match for authentication. |
|
v3 |
noAuthNoPriv |
Username |
No |
Uses a username match for authentication. |
|
v3 |
authNoPriv |
Message Digest 5 (MD5) or Secure Hash Algorithm (SHA) |
No |
Provides authentication based on the HMAC-MD5-96 or HMAC-SHA-96 algorithms. |
|
v3 |
authPriv |
MD5 or SHA |
Data Encryption Standard (DES) or Advanced Encryption Standard (AES) |
Provides authentication based on the HMAC-MD5-96 or HMAC-SHA-96 algorithms. Provides DES Cipher algorithm in Cipher Block Chaining Mode (CBC-DES) or AES encryption algorithm used in Cipher FeedBack Mode (CFB), with a 128-bit key size(CFB128-AES-128) |
Since its adoption by NIST, AES has become the dominant encryption algorithm throughout the industry. To follow the industry's migration away from MD5 and toward SHA, it is a security best practice to configure the SNMP v3 authentication protocol as SHA and privacy protocol as AES.
SNMP on NFVIS supports V1, V2, and V3 — but only SNMPv3 with authPriv (sha256/AES) operates in secure mode; all other combinations (V1, V2, and V3 with noAuthNoPriv or authNoPriv using md5/SHA/DES) are classified as insecure.
Insecure mode dependency
nfvis# show system mode
system mode status secure
nfvis(config)# snmp user test user-version 1 user-group test_group auth-protocol md5 priv-protocol des passphrase qwertyuiop encryption-passphrase qwertyuiop
nfvis(config-user-test)# commit
Aborted: 'snmp user test user-version': SNMP Version 1 is insecure. Enable insecure mode to configure this
Insecure Mode
nfvis# show system mode
system mode status insecure
nfvis(config)# snmp user test user-version 1 user-group test_group auth-protocol md5 priv-protocol des passphrase qwertyuiop encryption-passphrase qwertyuiop
nfvis(config-user-test)# commit
Commit complete.
For more details on SNMP, see SNMP.
Recommendation: legal notification banners
We recommend that a legal notification banner is present on all interactive sessions to ensure that users are notified of the security policy being enforced and to which they are subject.
In some jurisdictions, civil and/or criminal prosecution of an attacker who breaks into a system is easier, or even required, if a legal notification banner is presented, informing unauthorized users that their use is in fact unauthorized. In some jurisdictions, it may also be forbidden to monitor the activity of an unauthorized user unless they have been notified of the intent to do so.
Banner content requirements
Discuss this issue with your own legal counsel to ensure that the notification banner meets company, local, and international legal requirements.
-
Notification that the system access and use is permitted only by specifically authorized personnel, and perhaps information about who may authorize use.
-
Notification that unauthorized access and use of the system is unlawful, and may be subject to civil and/or criminal penalties.
-
Notification that access and use of the system may be logged or monitored without further notice, and the resulting logs may be used as evidence in court.
-
Additional specific notices required by specific local laws.
Legal notification requirements are complex and vary in each jurisdiction and situation. Even within jurisdictions, legal opinions vary. This is often critical to securing appropriate action in the event of a security breach.
Security considerations for banner content
A legal notification banner should not contain any specific information about the device, such as its name, model, software, location, operator or owner because this kind of information may be useful to an attacker.
Sample banner implementation
The following is a sample legal notification banner which can be displayed before login:
UNAUTHORIZED ACCESS TO THIS DEVICE IS PROHIBITED You must have explicit, authorized permission to access or configure this device. Unauthorized attempts and actions to access or use this system may result in civil and/or criminal penalties. All activities performed on this device are logged and monitored
Note |
Present a legal notification banner approved by company legal counsel. |
NFVIS banner configuration
We recommend that a login banner is implemented to ensure that a legal notification banner is presented on all the device management access sessions prior to a login prompt being presented.
NFVIS allows the configuration of a banner and Message of the Day (MOTD). The banner is displayed before the user logs in. Once the user logs in to NFVIS, a system-defined banner provides Copyright information about NFVIS, and the message-of-the-day (MOTD), if configured, will appear, followed by the command line prompt or portal view, depending on the login method. Use this command to configure the banner and MOTD:
nfvis(config)# banner-motd banner <banner-text> motd <message-of-the-day-text>
For more information about the banner command, see Configure your banner and message of the day.
Factory default reset
A factory default reset is a device reset feature that
-
removes all customer-specific data that has been added to the device since the time of its shipping
-
erases configurations, log files, VM images, connectivity information, and user login credentials, and
-
provides one command to reset the device to factory-original settings.
Factory reset scenarios
Factory default reset is useful in these scenarios:
-
Return Material Authorization (RMA) for a device—If you have to return a device to Cisco for RMA, use Factory Default reset to remove all the customer-specific data.
-
Recovering a compromised device— If the key material or credentials stored on a device is compromised, reset the device to factory configuration and then reconfigure the device.
-
If the same device needs to be re-used at a different site with a new configuration, perform a Factory Default reset to remove the existing configuration and bring it to a clean state.
NFVIS provides these options within Factory default reset:
|
Factory Reset Option |
Data Erased |
Data Retained |
|---|---|---|
|
all |
All configuration, uploaded image files, VMs and logs. Connectivity to the device will be lost. |
The admin account is retained and the password will be changed to the factory default password. |
|
all-except-images |
All configuration except image configuration, VMs, and uploaded image files. Connectivity to the device will be lost. |
Image configuration, registered images and logs The admin account is retained and the password will be changed to the factory default password. |
|
all-except-images-connectivity |
All configuration except image, network and connectivity configuration, VMs, and uploaded image files. Connectivity to the device is available. |
Images, network and connectivity related configuration, registered images, and logs. The admin account is retained and the previously configured admin password will be preserved. |
|
manufacturing |
All configuration except image configuration, VMs, uploaded image files, and logs. Connectivity to the device will be lost. |
Image related configuration and registered images The admin account is retained and the password will be changed to the factory default password. |
The user must choose the appropriate option carefully based on the purpose of the Factory Default reset.
For more information, see Reset to factory default.
Infrastructure management networks
An infrastructure management network is a network that
-
carries the control and management plane traffic (such as NTP, SSH, SNMP, syslog, etc.) for the infrastructure devices
-
provides visibility into and control over the network through device access via console and Ethernet interfaces, and
-
enables remote manageability even under high load and high traffic conditions.
Infrastructure management network design considerations
This control and management plane traffic is critical to network operations. Consequently, a well-designed and secure infrastructure management network is critical to the overall security and operations of a network. One of the key recommendations for a secure infrastructure management network is the separation of management and data traffic in order to ensure remote manageability even under high load and high traffic conditions. This can be achieved using a dedicated management interface.
Infrastructure management network implementation approaches are:
Out-of-band management
Out-of-band management (OOB) is a network management approach that
-
uses a network which is completely independent and physically disparate from the data network that it helps to manage
-
is sometimes referred to as a Data Communications Network (DCN), and
-
provides greater control over device management by restricting management packets to designated interfaces.
Connection methods and benefits
Network devices can connect to the OOB network in different ways:
-
NFVIS supports a built-in management interface that can be used to connect to the OOB network. NFVIS allows the configuration of a predefined physical interface, the MGMT port on the ENCS, as a dedicated management interface.
-
Network devices can also connect to the OOB network via dedicated data interfaces. In this case, ACLs should be deployed to ensure that management traffic is only handled by the dedicated interfaces.
Benefits include:
-
More security for devices by restricting management packets to designated interfaces
-
Improved performance for data packets on non-management interfaces
-
Support for network scalability
-
Need for fewer access control lists (ACLs) to restrict access to a device
-
Prevention of management packet floods from reaching the CPU
For further information, see Configure the IP receive ACL and Configure port 22222 and management interface ACL.
Pseudo out-of-band management
A pseudo out-of-band management network is a network configuration that
-
uses the same physical infrastructure as the data network but provides logical separation through the virtual separation of traffic, by using VLANs
-
enables NFVIS to create VLANs and virtual bridges to help identify different sources of traffic and separate traffic between VMs, and
-
isolates the virtual machine network's data traffic and the management network through separate bridges and VLANs, thus providing traffic segmentation between the VMs and the host.
Additional information
For further information see VLAN configuration for NFVIS management traffic.
In-band management
An in-band management network is a management approach that uses the same physical and logical paths as the data traffic.
Network design considerations
This network design requires a per-customer analysis of risk versus benefits and costs. Some general considerations include:
-
An isolated OOB management network maximizes visibility and control over the network even during disruptive events.
-
Transmitting network telemetry over an OOB network minimizes the chance for disruption of the very information which provides critical network visibility.
-
In-band management access to network infrastructure, hosts, etc. is vulnerable to complete loss in the event of a network incident, removing all the network visibility and control. Appropriate QoS controls should be put in place to mitigate this occurrence.
-
NFVIS features interfaces which are dedicated to device management, including serial console ports and Ethernet management interfaces.
-
An OOB management network can typically be deployed at a reasonable cost, since management network traffic does not typically demand high bandwidth nor high performance devices, and only requires sufficient port density to support the connectivity to each infrastructure device.
Locally stored information protection
Protecting sensitive information
Protecting sensitive information is a security mechanism that
-
stores passwords and secrets locally on NFVIS as hashes to prevent recovery of original credentials
-
maintains passwords through centralized AAA servers while providing local fallback capabilities, and
-
follows widely accepted industry norms for password protection.
Local password storage requirements
NFVIS requires locally-stored passwords for specific cases even when centralized AAA servers are deployed:
-
Local fallback when AAA servers are not available
-
Special-use usernames
File transfer
File transfer is a network operation that
-
enables the secure copying of VM image and NFVIS upgrade files to NFVIS devices
-
uses Secure Copy (SCP) protocol to ensure security and authentication during transfer, and
-
relies on SSH for secure authentication and transport mechanisms.
File transfer implementation
A secure copy from NFVIS is initiated through the SCP command. The secure copy (SCP) command allows only the admin user to securely copy files from NFVIS to an external system, or from an external system to NFVIS.
The syntax for the SCP command is:
scp <source> <destination>
NFVIS uses port 22222 for the SCP server. By default, this port is closed and users cannot secure copy files into NFVIS from an external client. If there is a need to SCP a file from an external client, the user can open the port using:
system settings ip-receive-acl (address)/(mask lenth)  service scpd priority (number) action accept
commit
To prevent users from accessing system directories, secure copy can be performed only to or from intdatastore:, extdatastore1:, extdatastore2:, usb: and nfs:, if available. Secure copy can also be performed from logs and techsupport.
Logging
Logging is a security mechanism that
-
records NFVIS access and configuration changes as audit logs
-
provides forensic analysis capabilities for unauthorized access attempts and configuration issues, and
-
enables real-time identification of anomalous activities that may indicate attacks.
Logged information
NFVIS access and configuration changes are logged as audit logs to record this information:
-
Who accessed the device
-
When did a user log in
-
What did a user do in terms of the host configuration and the VM lifecycle
-
When did a user log off
-
Failed access attempts
-
Failed authentication requests
-
Failed authorization requests
This information is invaluable for forensic analysis in case of unauthorized attempts or access, as well as for configuration change issues and to help plan group administration changes. It may also be used real time to identify anomalous activities which may indicate that an attack is taking place. This analysis can be correlated with information from additional external sources, such as IDS and firewall logs.
All the key events on the NFVIS are sent as event notifications to NETCONF subscribers and as syslogs to the configured central logging servers. For more information on syslog messages and event notifications, see Appendix.
Virtual machine security
This section describes security features related to the registration, deployment and operation of Virtual Machines on NFVIS.
VNC console access protection
VNC console access protection is a security mechanism that
-
allows users to create Virtual Network Computing (VNC) sessions to access a deployed VM's remote desktop
-
dynamically opens a port for 60 seconds to which users can connect using their web browser, and
-
assigns port numbers dynamically to allow only one-time access to the VNC console.
VNC console access process
NFVIS dynamically opens a port when a user creates a VNC session. This port is only left open for 60 seconds for an external server to start a session to the VM. If no activity is seen within this time, the port is closed.
VNC console command example
nfvis# vncconsole start deployment-name 1510614035 vm-name ROUTER
vncconsole-url :6005/vnc_auto.html
Pointing your browser to https://<NFVIS ip>:6005/vnc_auto.html will connect to the ROUTER VM's VNC console.
Encrypted VM config data variables
An encrypted VM config data variable is a security mechanism that
-
allows users to flag config data variables as sensitive during VM deployment
-
encrypts sensitive values using AES-CFB-128 encryption before storage or passing to internal subsystems, and
-
prevents passwords and keys from appearing as clear text in log files and internal database records.
Additional information
During VM deployment, the user provides a day-0 configuration file for the VM. This file can contain sensitive information such as passwords and keys. If this information is passed as clear text, it appears in log files and internal database records in clear text.
For more information see, VM deployment parameters
Checksum verification for remote image registration
Checksum verification for remote image registration is a security mechanism that
-
verifies the integrity of downloaded VNF images from external sources
-
ensures files are not corrupted during network transmission or modified by malicious third parties, and
-
uses SHA256 or SHA512 algorithms to validate image checksums before installation.
Checksum verification process
When registering a remotely located VNF image, the user specifies its location for download from external sources such as NFS servers or remote HTTPS servers.
NFVIS supports checksum and checksum_algorithm options that allow users to provide the expected checksum and specify the checksum algorithm (SHA256 or SHA512) for verifying the downloaded image. Image creation fails if the checksum does not match the expected value.
Certification validation for remote image registration
Certification validation for remote image registration is a security mechanism that
-
verifies SSL certificates when downloading VNF images from remote HTTPS servers
-
requires users to specify either the path to the certificate file or PEM format certificate contents, and
-
ensures secure downloads during the image registration process in NFVIS.
Certificate specification requirements
When registering a VNF image located on an HTTPS server, the image must be downloaded from the remote HTTPS server. To securely download this image, NFVIS verifies the SSL certificate of the server. The user needs to specify either the path to the certificate file or the PEM format certificate contents to enable this secure download.
More details can be found at Register a remote VM image
VM isolation and resource provisioning
VM isolation and resource provisioning is a network function virtualization capability that
-
partitions physical hardware resources into separate virtual environments for multiple VNFs
-
ensures individual VM domains are isolated as separate, distinct, and secure environments that do not contend with each other for shared resources, and
-
prevents VMs from using more resources than provisioned to avoid Denial of Service conditions.
NFV architecture components
The Network Function Virtualization (NFV) architecture consists of:
-
Virtualized network functions (VNFs), which are Virtual Machines running software applications that deliver network functionality such as a router, firewall, load balancer, and so on.
-
Network functions virtualization infrastructure, which consists of the infrastructure components—compute, memory, storage, and networking, on a platform that supports the required software and hypervisor.
With NFV, network functions are virtualized so that multiple functions can be run on a single server. As a result, less physical hardware is needed, allowing for resource consolidation. In this environment, it is essential to simulate dedicated resources for multiple VNFs from a single, physical hardware system. Using NFVIS, VMs can be deployed in a controlled manner such that each VM receives the resources it needs. Resources are partitioned as needed from the physical environment to the many virtual environments.
As a result, CPU, memory, network and storage are protected.
CPU isolation
CPU isolation is a resource management mechanism that
-
reserves cores for infrastructure software running on the host
-
makes the remaining cores available for VM deployment, and
-
guarantees that VM performance does not affect NFVIS host performance.
CPU allocation by VM type
NFVIS handles CPU allocation differently based on VM latency requirements.
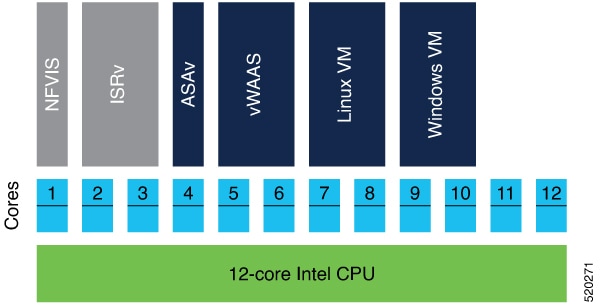
The system uses two distinct allocation methods:
-
Low-latency VMs: NFVIS explicitly assigns dedicated cores to low latency VMs. If the VM requires 2 vCPUs, it is assigned 2 dedicated cores. This prevents sharing and oversubscription of cores and guarantees the performance of the low-latency VMs. If the number of available cores is less than the number of vCPUs requested by another low-latency VM, the deployment is prevented since we do not have sufficient resources.
-
Non low-latency VMs: NFVIS assigns sharable CPUs to non low latency VMs. If the VM requires 2 vCPUs, it is assigned 2 CPUs. These 2 CPUs are shareable among other non low latency VMs. If the number of available CPUs is less than the number of vCPUs requested by another non low-latency VM, the deployment is still allowed because this VM will share the CPU with existing non low latency VMs.
Memory allocation
Memory allocation is a resource management mechanism that
-
reserves memory for NFVIS Infrastructure and previously deployed VMs before allowing new VM deployment
-
ensures sufficient memory availability through validation checks, and
-
prevents memory oversubscription for VMs.
Memory allocation process
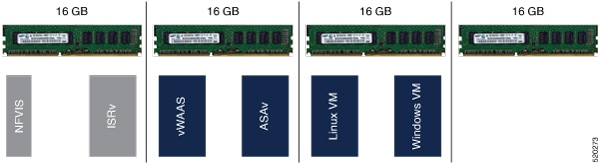
When a VM is deployed, there is a check to ensure that the memory available after reserving the memory required for the infrastructure and previously deployed VMs, is sufficient for the new VM.
VMs are not allowed to directly access the host file system and storage.
Interface isolation
Interface isolation is a virtualization capability that
-
allows the isolation of PCI Express (PCIe) resources such as an Ethernet port using Single Root I/O Virtualization (SR-IOV),
-
enables a single Ethernet port to appear as multiple, separate, physical devices known as Virtual Functions, and
-
provides data protection between guests on the same physical server as the data is managed and controlled by the hardware.
SR-IOV implementation details
All Virtual Function devices on an adapter share the same physical network port. A guest can use one or more of these Virtual Functions, with each Virtual Function appearing to the guest as a network card, in the same way as a normal network card would appear to an operating system.
Virtual Functions provide the following performance characteristics:
-
Near-native performance
-
Better performance than para-virtualized drivers and emulated access
NFVIS VNFs can use SR-IOV networks to connect to WAN and LAN Backplane ports. Each VM owns a virtual interface and its related resources achieving data protection among VMs.

Secure development lifecycle
A secure development lifecycle is a software development process that
-
reduces vulnerabilities and enhances the security and resilience of Cisco solutions
-
applies industry-leading practices and technology to build trustworthy solutions, and
-
results in fewer field-discovered product security incidents.
NFVIS SDL processes
Every NFVIS release goes through these processes:
-
Following Cisco-internal and market-based Product Security Requirements
-
Registering 3rd party software with a central repository at Cisco for vulnerability tracking
-
Periodically patching software with known fixes for CVEs
-
Designing software with Security in mind
-
Following secure coding practices such as using vetted common security modules like CiscoSSL, running Static Analysis and implementing input validation for Preventing command injection
-
Using Application Security tools such as IBM AppScan, Nessus, and other Cisco internal tools.
 Feedback