Install NFVIS on BEx7K/CE1400V appliances based out of UCS-C series servers
This task installs Cisco NFVIS on BEx7K/CE1400V appliances based out of UCS-C series servers by configuring boot order, mapping virtual media, and completing the installation process through CIMC.
UCS-C series devices has to configure RAID disk group before installing NFVIS. UCS-C supports only single RAID disk group for fresh installation.
Procedure
|
Step 1 |
Log in to CIMC. The recommended CIMC version for UCS-C Series Servers and Cisco CSP platforms is 3.0(3c) or later version. The recommended CIMC version for Cisco UCS-C Series Rack Servers is 4.3(2) or later versions. |
|||||||||||||||||||||
|
Step 2 |
To launch KVM Console, Select Launch KVM from the CIMC homepage. You can choose Java or HTML based KVM. It is recommnded to use HTML based KVM. Ensure that the pop-up blocker is disabled as KVM Console will open in a separate window. |
|||||||||||||||||||||
|
Step 3 |
To map virtual devices from the KVM Console:
|
|||||||||||||||||||||
|
Step 4 |
To configure boot order:
|
|||||||||||||||||||||
|
Step 5 |
Power cycle server to start the installation: From CIMC homepage, select Host Power. Reboot the server by selecting the Power Off option. After the server is down, select the Power On option. When the server reboots, the KVM console automatically installs Cisco NFVIS from the virtual CD/DVD drive. The entire installation might take 30 minutes to one hour to complete. |
|||||||||||||||||||||
|
Step 6 |
After the installation is complete, the system automatically reboots from the hard drive. Log into the system when the command prompt NFVIS login is displayed after the reboot. Use admin as the login name and Admin123# as the default password.
|
|||||||||||||||||||||
|
Step 7 |
Verify the installation using the System API, CLI, or by viewing the system information from the Cisco NFVIS portal.
|
Cisco NFVIS is successfully installed on the BEx7K/CE1400V appliances based out of UCS-C series servers and ready for configuration and virtual machine deployment.
Default system configuration
Default system configuration on the Cisco BEx7K/CE1400V appliances based out of UCS-C series servers is a network setup that
-
configures networks in Cisco NFVIS to allow inbound and outbound traffic
-
enables VMs to be service chained, and
-
creates default networks and bridges that cannot be deleted.
Network configuration details
This diagram illustrates the default network configuration:
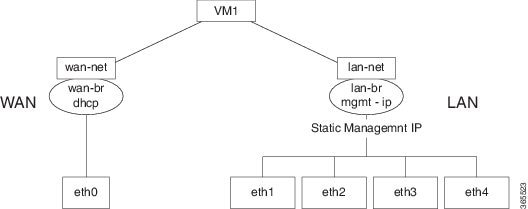
These networks and bridges are created by default and cannot be deleted. You can configure more as required:
-
A LAN network (LAN-net) and a LAN bridge (LAN-br)—The default static management IP address (192.168.1.1) for the NFVIS host is configured on the LAN bridge. One of the ports for inbound and outbound traffic are associated with the LAN bridge. Any LAN port can be used to access the default static IP address. By default, the hostname is set to "NFVIS".
-
A WAN network (WAN-net) and a WAN bridge (WAN-br)—This is created with the "eth0" port, and is configured to enable the DHCP connection.
By default, the first port on the device is associated with the WAN bridge. One of the other ports on the device are associated with the LAN bridge.
 Feedback