Application hosting
Application hosting is a software as a service solution that:
-
enables hosted applications to run remotely using commands
-
gives administrators a platform for leveraging their own tools and utilities, and
-
provides software as a service capabilities for remote application execution.
Application hosting
Application hosting is a network capability that enables third-party applications to run directly on network infrastructure devices.
Application hosting
Application hosting is a platform capability that:
-
enables administrators to leverage their own tools and utilities on network devices
-
provides reusable, portable, and scalable applications for virtual environments, and
-
supports third-party off-the-shelf applications built using Linux tool chains.
Application hosting capabilities
Applications hosted on network devices serve various purposes:
-
Automation
-
Configuration management monitoring
-
Integration with existing tool chains
Cisco devices support custom applications cross-compiled with the software development kit that Cisco provides.
IOx framework
IOx is a Cisco-developed end-to-end application framework that:
-
provides application hosting capabilities for different application types on Cisco network platforms
-
uses a different architecture for the IR8100 compared to other Cisco platforms that use the hypervisor approach, and
-
runs as a process on the IR8100 rather than as a virtual machine like on other platforms.
Cisco application hosting
Cisco application hosting is a virtualization service that:
-
launches designated applications in containers
-
checks available resources (memory, CPU, and storage), and allocates and manages them
-
provides an application hosting infrastructure referred to as Cisco Application Framework (CAF), and
-
helps in the setup of platform-specific networking (packet-path) via VirtualPortGroup and management interfaces.
Application hosting services
Application hosting provides the following services:
-
Provides support for console logging
-
Provides access to services via REST APIs
-
Provides a CLI endpoint
The IR8100 allows you to deploy applications using the application hosting CLI commands. You can also deploy applications using the Local Manager and Fog Director.
The container is referred to as the virtualization environment provided to run the guest application on the host operating system. The Cisco IOS-XE virtualization services provide manageability and networking models for running guest applications. The virtualization infrastructure allows the administrator to define a logical interface that specifies the connectivity between the host and the guest. IOx maps the logical interface into the Virtual Network Interface Card (vNIC) that the guest application uses.
Applications to be deployed in the containers are packaged as TAR files. The configuration that is specific to these applications is also packaged as part of the TAR file.
The management interface on the device connects the application hosting network to the IOS management interface. The Layer 3 interface of the application receives the Layer 2 bridged traffic from the IOS management interface. The management interface connects through the management bridge to the container/application interface. The IP address of the application must be on the same subnet as the management interface IP address.
IOXMAN
IOXMAN is a process that:
-
establishes a tracing infrastructure to provide logging or tracing services for guest applications, except Libvirt, that emulates serial devices
-
operates based on the lifecycle of the guest application to enable and disable the tracing service
-
sends logging data to IOS syslog, saves tracing data to IOx tracelog, and maintains IOx tracelog for each guest application.
Application hosting on the IR8100 industrial integrated services router
Application hosting on the IR8100 industrial integrated services router is a network service capability that:
-
requires applications to comply with ARM 64-bits architecture due to the non-x86 CPU design
-
supports deployment through CLI commands, Local Manager WebUI, and Fog Director management platforms, and
-
requires Virtual Port Group interface configuration before installing or activating IOx applications from Local Manager.
Deployment methods and requirements
 Note |
|
Application hosting can be achieved using the application hosting CLI commands as well as using Local Manager and Fog Director. Application hosting using Local Manager is done through WebUI. To deploy the applications using Local Manager, enable WebUI and then log in to Local Manager.
Application Management is available using FND.
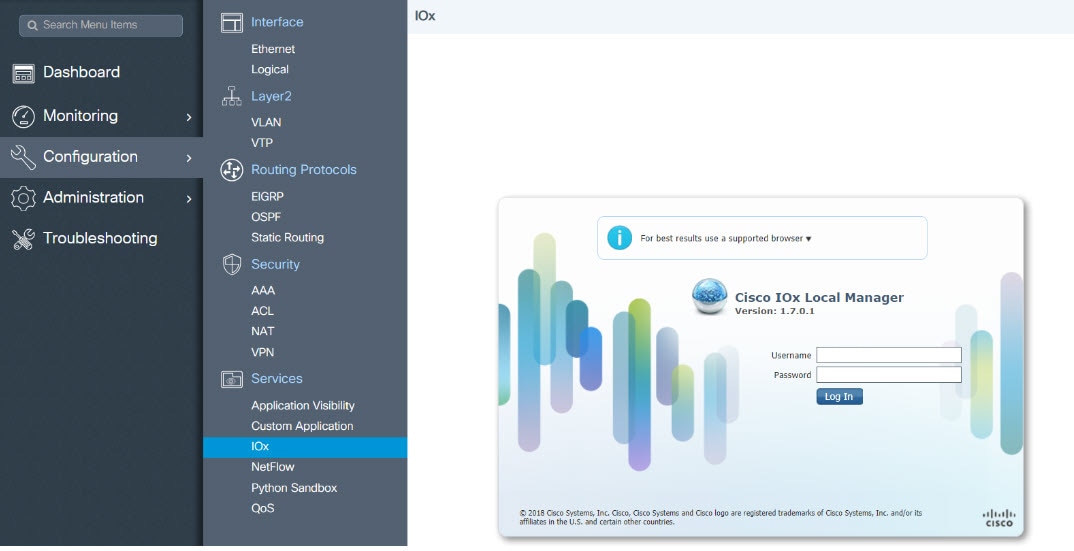
1. From WebUI, click on Configuration > Services > IOx
2. Log in using the username and password configured.
3. Follow the steps for the application lifecycle in the Cisco IOx Local Manager Reference Guide using this link: https://www.cisco.com/c/en/us/td/docs/routers/access/800/software/guides/iox/lm/reference-guide/1-7/b_iox_lm_ref_guide_1_7/b_iox_lm_ref_guide_1_7_chapter_011.html
The next section explains the deployment of an application using the application hosting CLI commands.
VirtualPortGroup
A VirtualPortGroup is a software construct on Cisco IOS that:
-
maps to a Linux bridge IP address
-
represents the switch virtual interface (SVI) of the Linux container, and
-
connects the application hosting network to the IOS routing domain.
VirtualPortGroup configuration and connectivity
Each bridge can contain multiple interfaces; each mapping to a different container. Each container can also have multiple interfaces.
VirtualPortGroup interfaces are configured by using the interface virtualportgroup command. Once these interfaces are created, IP address and other resources are allocated.
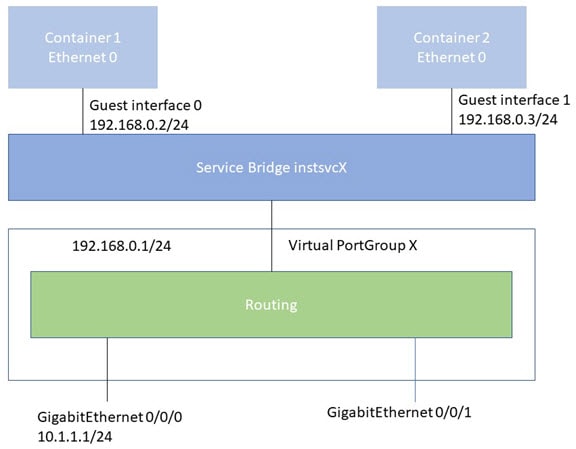
The VirtualPortGroup interface connects the application hosting network to the IOS routing domain. The Layer 3 interface of the application receives routed traffic from IOS. The VirtualPortGroup interface connects through the SVC Bridge to the container/application interface.
The graphic helps to understand the relationship between the VirtualPortGroup and other interfaces, as it is different than the IR8x9 routers.
vNICs
A vNIC is a virtual network interface card that
-
forms part of an application container in a virtual Ethernet pair configuration
-
connects to the platform dataplane for sending and receiving packets, and
-
operates as a standard Ethernet interface inside the container.
vNIC architecture and management
For container life cycle management, the Layer 3 routing model supports one container per internal logical interface. This configuration creates a virtual Ethernet pair for each application, where one interface (vNIC) belongs to the application container and the other interface (vpgX) belongs to the host system.
IOx manages the following components for each vNIC:
-
Gateway (VirtualPortGroup interface) assignment
-
IP address allocation
-
Unique MAC address assignment
Configure application hosting
Application hosting configuration allows you to deploy, manage, and monitor applications within your network infrastructure.
Enable IOx
The IOx Local Manager provides a web-based user interface that you can use to manage, administer, monitor, and troubleshoot apps on the host system, and to perform a variety of related activities.
Follow these steps to enable IOx.
Procedure
|
Step 1 |
Use the enable command to enable privileged EXEC mode. Enter your password if prompted. Example: |
||
|
Step 2 |
Use the configure terminal command to enter global configuration mode. Example: |
||
|
Step 3 |
Use the iox command to enable IOx. Example: |
||
|
Step 4 |
Use the ip http server command to enable the HTTP server on your IP or IPv6 system. Example:
|
||
|
Step 5 |
Use the ip http secure-server command to enable a secure HTTP (HTTPS) server. Example: |
||
|
Step 6 |
Use the username name privilege level password {0 | 7 | user-password} encrypted-password command to establish a username-based authentication system and privilege level for the user. Example:
|
||
|
Step 7 |
Use the end command to exit configuration mode and return to privileged EXEC mode. Example: |
Configure a VirtualPortGroup to a Layer 3 data port
Multiple Layer 3 data ports can be routed to one or more VirtualPortGroups or containers. VirtualPortGroups and Layer 3 data ports must be on different subnets.
Enable the ip routing command to allow external routing on the Layer 3 data port.
Follow these steps to configure a VirtualPortGroup to a Layer 3 data port.
Procedure
|
Step 1 |
Use the configure terminal command to enter global configuration mode. Example: |
|
Step 2 |
Use these steps for configuring the interface: |
|
Step 3 |
Use these commands to configure the VirtualPortGroup interface: |
|
Step 4 |
Use the configure terminal command to enter global configuration mode. Example: |
|
Step 5 |
Use the app-hosting appid name command to configure the application and enter application configuration mode. Example: |
|
Step 6 |
Use the app-vnic gateway0 virtualportgroup number guest-interface number command to configure the application interface and the gateway of the application. Example: |
|
Step 7 |
Use the guest-ipaddress ip-address netmask mask command to configure the application Ethernet interface IP address. Example: |
|
Step 8 |
Use the app-default-gateway ip-address guest-interface number command to configure the default gateway for the application. Example: |
|
Step 9 |
Use the end command to exit application configuration mode and return to privileged EXEC mode. Example: |
Install and uninstall apps
Use this task to manage the complete lifecycle of applications on network devices, from installation through removal.
You can install apps from any local storage location, such as flash, bootflash, and usbflash0. The activation process validates all application resource requests before proceeding.
Follow these steps to install and uninstall apps.
Procedure
|
Step 1 |
Use the enable command to enable privileged EXEC mode. Enter your password if prompted. Example: |
||
|
Step 2 |
Use the app-hosting install appid application-name package package-path command to install an app from the specified location. Example:
|
||
|
Step 3 |
Use the app-hosting activate appid application-name command to activate the application. Example:
|
||
|
Step 4 |
Use the app-hosting start appid application-name command to start the application. Example:
|
||
|
Step 5 |
Use the app-hosting stop appid application-name command to stop the application. Example: |
||
|
Step 6 |
Use the app-hosting deactivate appid application-name command to deactivate the application. Example:
|
||
|
Step 7 |
Use the app-hosting uninstall appid application-name command to uninstall the application. Example:
|
Override the app resource configuration
Note |
Resource changes take effect only after you configure the app-hosting activate command.
|
Follow these steps to override the app resource configuration.
Procedure
|
Step 1 |
Use the enable command to enable privileged EXEC mode. Enter your password if prompted. Example: |
||
|
Step 2 |
Use the configure terminal command to enter global configuration mode. Example: |
||
|
Step 3 |
Use the app-hosting appid name command to enable application hosting and enter application hosting configuration mode. Example: |
||
|
Step 4 |
Use the app-resource profile name command to configure the custom application resource profile and enter custom application resource profile configuration mode. Example:
|
||
|
Step 5 |
Use the cpu unit command to change the default CPU allocation for the application. Example:
|
||
|
Step 6 |
Use the memory memory command to change the default memory allocation. Example: |
||
|
Step 7 |
Use the vcpu number command to change the virtual CPU (vCPU) allocation for the application. Example: |
||
|
Step 8 |
Use the end command to exit custom application resource profile configuration mode and return to privileged EXEC mode. Example: |
Verify the application hosting configuration
Use this verification procedure to check the operational status of IOx services and application hosting on your device. This helps ensure that your application hosting environment is properly configured and running.
Follow these steps to verify the application hosting configuration.
Procedure
|
Step 1 |
Use the enable command to enable privileged EXEC mode. Enter your password if prompted. Example: |
|
Step 2 |
Use the show iox-service command to display the status of all IOx services. Example: |
|
Step 3 |
Use the show app-hosting detail command to display detailed information about the application. Example: |
|
Step 4 |
Use the show app-hosting list command to display the list of applications and their status. Example: |
You have successfully verified the application hosting configuration. The IOx services status, detailed application information, and application list confirm the operational state of your application hosting environment.
Configuration examples for application hosting
See the given examples:
Example: Enable IOx
This example demonstrates the command sequence for enabling IOx functionality on a Cisco device, including the necessary HTTP server configuration and user authentication setup.
Device> enable
Device# configure terminal
Device(config)# iox
Device(config)# ip http server
Device(config)# ip http secure-server
Device(config)# username cisco privilege 15 password 0 cisco
Device(config)# end
VirtualPortGroup configuration to a Layer 3 data port example
This example demonstrates the configuration steps for setting up a VirtualPortGroup interface with Layer 3 routing capabilities and connecting it to a data port.
Device> enable
Device# configure terminal
Device(config)# ip routing
Device(config)# interface gigabitethernet 0/0/0
Device(config-if)# no switchport
Device(config-if)# ip address 10.1.1.1 255.255.255.0
Device(config-if)# exit
Device(config)# interface virtualportgroup 0
Device(config-if)# ip address 192.168.0.1 255.255.255.0
Device(config-if)# end
App installation and uninstallation commands
This reference shows the sequence of CLI commands used to manage IOx applications throughout their lifecycle on network devices, from initial installation through final removal.
Device> enable
Device# app-hosting install appid app1 package flash:my_iox_app.tar
Device# app-hosting activate appid app1
Device# app-hosting start appid app1
Device# app-hosting stop appid app1
Device# app-hosting deactivate appid app1
Device# app-hosting uninstall appid app1
App resource configuration override example
This example demonstrates how to override the default app resource configuration by creating a custom profile with specific CPU, memory, and vCPU settings for an application.
Device# configure terminal
Device(config)# app-hosting appid app1
Device(config-app-hosting)# app-resource profile custom
Device(config-app-resource-profile-custom)# cpu 800
Device(config-app-resource-profile-custom)# memory 512
Device(config-app-resource-profile-custom)# vcpu 2
Device(config-app-resource-profile-custom)# end
Native docker support
Native Docker Support is a capability that
-
enables users to deploy docker applications on the IR1800
-
follows a similar application lifecycle process to the procedure in the Installing and Uninstalling Apps section, and
-
requires entry point configuration as part of the application configuration.
Entry point configuration example
The example shows the entry point configuration for docker applications:
Router#conf t
Enter configuration commands, one per line. End with CNTL/Z.
Router(config)#app-hosting appid app3
Router(config-app-hosting)#app-vnic gateway0 virtualportgroup 0 guest-interface 0
Router(config-app-hosting-gateway0)#guest-ipaddress 192.168.0.7 netmask 255.255.255.0
Router(config-app-hosting-gateway0)#app-default-gateway 192.168.0.1 guest-interface 0
Router(config-app-hosting)#app-resource docker
Router(config-app-hosting-docker)#run-opts 1 "--entrypoint '/bin/sleep 10000'"
Router(config-app-hosting-docker)#end
Router#
The output for docker applications is shown in the example:
Router#show app-hosting detail
App id : app1
Owner : iox
State : RUNNING
Application
Type : docker
Name : aarch64/busybox
Version : latest
Description :
Path : bootflash:busybox.tar
Activated profile name : custom
Resource reservation
Memory : 431 MB
Disk : 10 MB
CPU : 577 units
VCPU : 1
Attached devices
Type Name Alias
---------------------------------------------
serial/shell iox_console_shell serial0
serial/aux iox_console_aux serial1
serial/syslog iox_syslog serial2
serial/trace iox_trace serial3
Network interfaces
---------------------------------------
eth0:
MAC address : 52:54:dd:e9:ab:7a
IPv4 address : 192.168.0.7
Network name : VPG0
Docker
------
Run-time information
Command :
Entry-point : /bin/sleep 10000
Run options in use : --entrypoint '/bin/sleep 10000'
Application health information
Status : 0
Last probe error :
Last probe output :
Router#
Enable signed verification for Cisco signed applications
Cisco signed applications are supported on the IR1800. To install a signed application, you must enable signed verification on the device.
Follow these steps to enable signed verification for Cisco signed applications.
Procedure
|
Step 1 |
Use the configure terminal command to enter global configuration mode. Example: |
|
Step 2 |
Use the app-hosting signed-verification command to enable signed verification for applications. Example: |
|
Step 3 |
Use the exit command to exit configuration mode. Example: |
What to do next
After you enable signed verification, follow the instructions in the Installing and Uninstalling Apps section under IOx Application Hosting to install the application.Cisco Cyber Vision and Edge Intelligence
Cisco Cyber Vision and Edge Intelligence are integrated solutions that:
-
provide real-time monitoring and visibility into Industrial Control Systems (ICS) and Industrial IoT networks
-
enable simplified data extraction, transformation, governance and delivery from IoT sensors to applications, and
-
integrate with IoT IOS-XE platforms beginning with release 17.4 through IOX sensor deployment.
Cyber Vision Center integration details
Cisco Cyber Vision Center (CVC) gives more visibility into Industrial IoT networks across Industrial Control Systems (ICS) with real-time monitoring of control and data networks. On IoT IOS-XE platforms beginning with release 17.4, integration of CVC is supported by deploying IOX Cyber Vision sensor. With this sensor deployed on IoT Routers, the platform can forward the traffic from IOX applications to Cyber Vision Center for real-time monitoring and we can forward any captured PCAP files to Vision center from IOX application. The minimum Cybervision release is 3.1.1 to work with the IR8100. For more information about CVC, see Deployment of Cyber Vision Center (CVC) on IOS-XE platform and Release Notes for Cisco Cyber Vision Release 3.1.1.
Cisco Edge Intelligence allows for simplified data extraction from IoT sensors, transformation, governance and delivery to applications that need this data. The release for the IR8100 is version 1.0.6, and is called:
ei_1.0.6_ir1101.K9.tar
Complete information about Cisco Edge Intelligence is found at:
Cisco ThousandEyes Enterprise Agent
A Cisco ThousandEyes Enterprise Agent is a network monitoring solution that
-
runs a variety of tests using agents
-
provides real-time monitoring of network and application performance, and
-
offers multidimensional insights with routing and device data for end-to-end visibility.
Additional information
The Cisco ThousandEyes Enterprise Agent enables you to view end-to-end paths across networks and services affecting your business. It actively monitors network traffic paths across internal, external, and internet networks, helping analyze network performance and application availability.
You can use application-hosting features to deploy the Cisco ThousandEyes Enterprise Agent as a container application on Cisco Industrial IoT Routers. The agent runs as a Docker container using the Cisco IOx.
Starting with Cisco IOS XE Release 17.18.2, you can configure Cisco ThousandEyes Enterprise Agent in Controller mode.
For details about configuring Cisco ThousandEyes Enterprise Agent in controller mode, see Cisco SD-WAN Systems and Interfaces Configuration Guide.
For more information about Cisco ThousandEyes Enterprise Agent, see ThousandEyes Documentation.
 Feedback