Configuring Cisco Resilient Mesh and the WPAN Module

Cisco Resilient Mesh and WPAN modules

A Cisco Resilient Mesh and WPAN Module is a solution for wireless personal area networking and mesh connectivity that:

  • supports IEEE 802.15.4e/g standards for WPAN connectivity

  • operates on Cisco IR8100 Series Routers running Cisco IOS-XE software, and

  • requires configuration and management exclusively through IoT FND with no CLI or graphical user interface for direct configuration.

Configuration and management reference

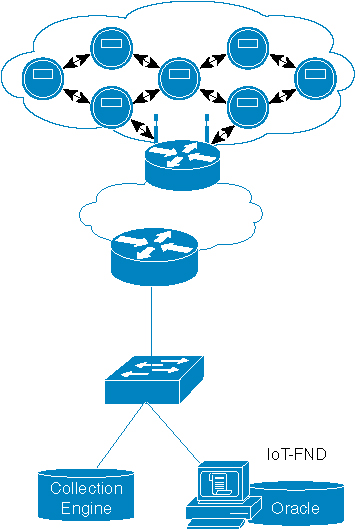
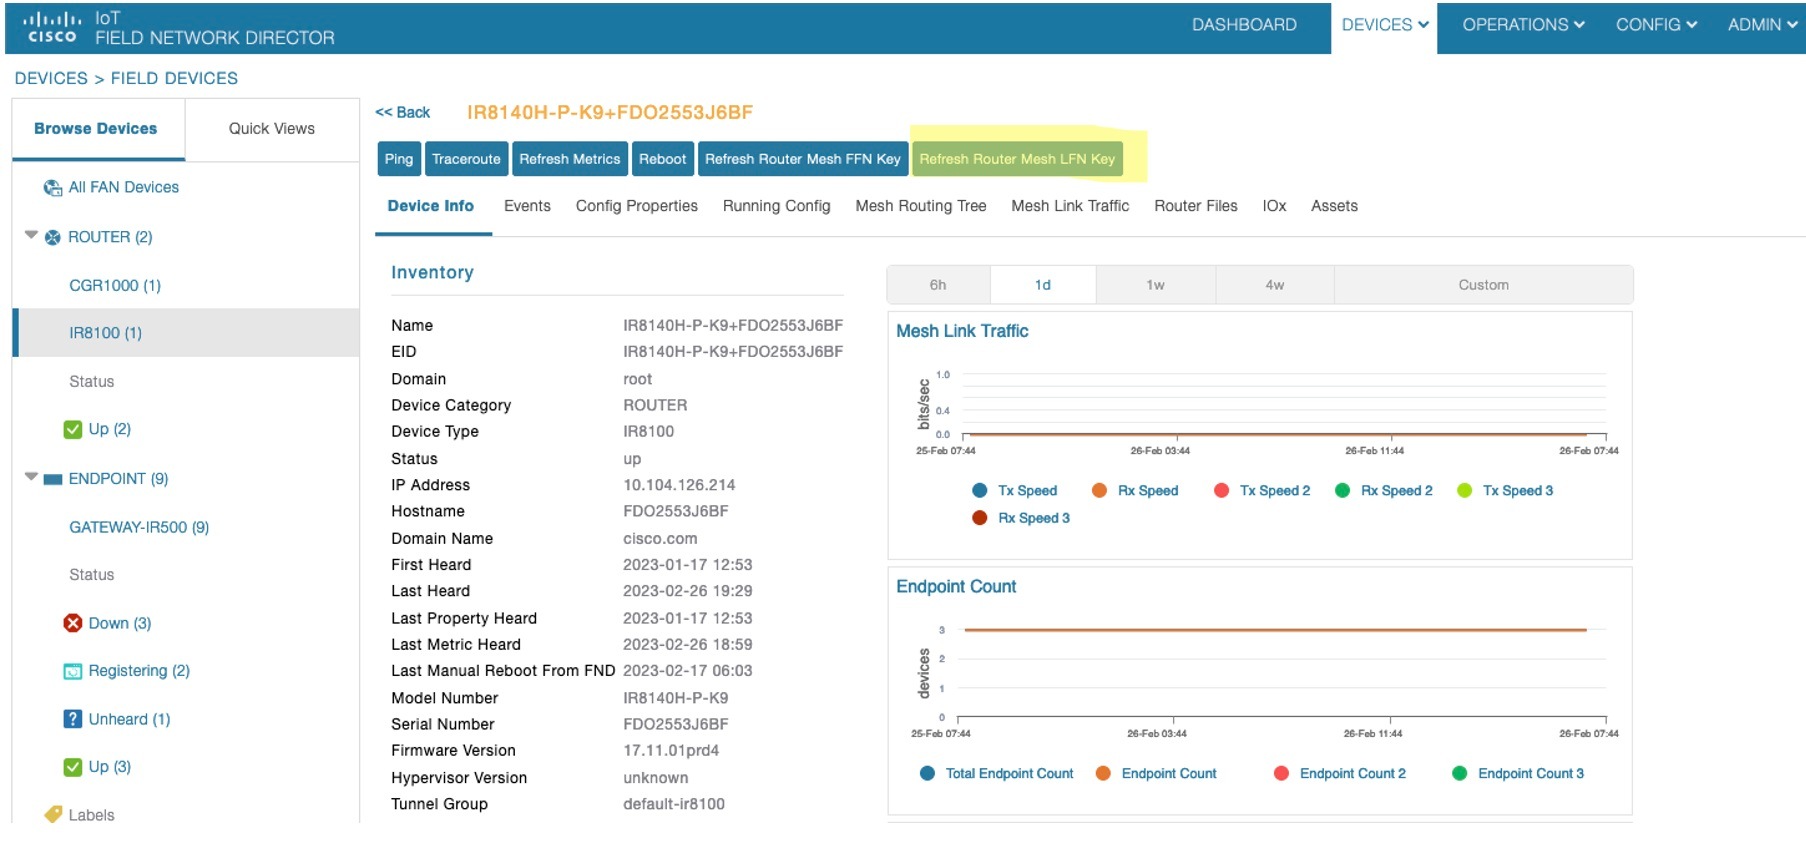
Cisco IoT FND provides the user interface for configuring and managing Cisco Resilient Mesh. Typically, Cisco IoT FND handles all configuration and management tasks by communicating with the IR8140H Series WPAN module using Cisco IOS software commands and CoAP Simple Management Protocol (CSMP) TLVs.


Note


TIP: Cisco Resilient Mesh has no native CLI and no graphical user interface for configuration or management. Cisco IoT FND and CSMP TLVs are used for configuration and management.


For a description of Cisco Resilient Mesh operation, see Information About Cisco Resilient Mesh and WPAN.

The module serial PID is displayed in IOS-XE as IRMH-WPAN-NA:

Router#sh inv

+++++++++++++++++++++++++++++++++++++++++++++++++++++++++++++++++++++++
INFO: Please use "show license UDI" to get serial number for licensing.
+++++++++++++++++++++++++++++++++++++++++++++++++++++++++++++++++++++++

NAME: "Chassis", DESCR: "Cisco Catalyst IR8140H Heavy Duty Series Router with PoE"
PID: IR8140H-P-K9      , VID: V00  , SN: FDO2441J91D

NAME: "Power Supply Module 0", DESCR: "60W AC Power Supply module"
PID: IRMH-PWR60W-AC    , VID: V01  , SN: LIT22503LDK

NAME: "module 0", DESCR: "Cisco Catalyst IR8140H-P-K9 Fixed and pluggable Interface Module controller"
PID: IR8140H-P-K9      , VID:      , SN:

NAME: "NIM subslot 0/1", DESCR: "IRMH-WPAN-NA Module"
PID: IRMH-WPAN-NA      , VID: V00  , SN: FDO24350D18

Configure the WPAN interface

Procedure


Step 1

Use the configure terminal command to enter global configuration mode.

Example:

Router# configure terminal

Step 2

Use the interface wpan slot//port command to specify the slot and port of the WPAN module.

Example:

Router(config)# interface wpan 0/1/0

Note


The WPAN slot is 1 and the port is 0/1.


Enable dot1x, mesh-security and DHCPv6

You must enable the dot1x (802.1X), mesh-security, and DHCPv6 features to configure the WPAN interface. Follow these steps to enable dot1x, mesh-security and DHCPv6:

Procedure


Step 1

Use the configure terminal command to enter global configuration mode.

Example:

Router# configure terminal

Step 2

Use the dot1x system-auth-control command to enable 802.1X authentication globally on the router.

Example:

Router(config)# dot1x system-auth-control

Step 3

Use the interface wpan 0/1/0 command to enter interface configuration mode and specify the WPAN interface.

Example:

Router(config)# interface WPAN 0/1/0

Step 4

Use the dot1x pae authenticator command to enable the WPAN interface to respond to messages meant for an IEEE 802.1x authenticator.

Example:

Router(config-if)# dot1x pae authenticator

Step 5

Use the authentication host-mode multi-auth command to set the authentication host mode.

Example:

Router(config-if)# authentication host-mode multi-auth

Step 6

Use the authentication port-control auto command to set the authentication port control.

Example:

Router(config-if)# authentication port-control auto

Step 7

Use the ipv6 enable command to enable IPv6 on the interface.

Example:

Router(config-if)# ipv6 enable

Step 8

Use the ipv6 dhcp relay destination ipv6-address command to specify a destination address to which client messages are forwarded and to enable DHCP for IPv6 relay service on the interface.

Example:

Router(config-if)# ipv6 dhcp relay destination 2001:db8::1

Configure IEEE154 settings

Follow these steps to configure WPAN radio-related settings:

Procedure


Step 1

Use the configure terminal command to enter global configuration mode.

Example:

Router# configure terminal

Step 2

Use the interface wpan 0/1/0 command to enter interface configuration mode and specify the WPAN interface.

Example:

Router(config)# interface WPAN 0/1/0

Step 3

Use the ieee154 panid id command to configure the IEEE 802.15.4 Personal Area Network Identifier (PAN ID).

Example:

Router(config-if)# ieee154 panid 121

Step 4

Use the ieee154 ssid word command to configure the Service Set Identifier (SSID).

Example:

Router(config-if)# ieee154 ssid myWPANssid

Step 5

Use the ieee154 notch x-y command to configure the channel notch list.

Example:

Router(config-if)# ieee154 notch 10-15

Note


A notch is a list of disabled channels from the 902-to-928 MHz range. Ensure your configuration complies with regional regulations.

Step 6

Use the show wpan 0/1/0 hardware channel-list command in privileged EXEC mode to verify the notch configuration.

Example:

Router# show wpan 0/1/0 hardware channel-list

Step 7

Use the ieee154 phy-mode mode-list command to specify the IEEE 802.15.4 PHY mode.

Example:

Router(config-if)# ieee154 phy-mode 166 165 164 163

Note


The PHY mode setting selects adaptive modulation. Supported modes range from 1 to 255. Refer to the product documentation for specific modulation indices and rates supported by your hardware.

Step 8

Use the show wpan 0/1/0 hardware config command in privileged EXEC mode to verify the PHY mode configuration.

Example:

Router# show wpan 0/1/0 hardware config

Configure Group Multicast

Group multicast allows the router to forward multicast traffic to a specific group of devices, which can span multiple PANs.


Note


This feature is not supported in Cisco Resilient Mesh Release 6.3.


Procedure


Step 1

Use the configure terminal command to enter global configuration mode.

Example:

Router# configure terminal

Step 2

Use the ipv6 multicast-routing command to enable IPv6 multicast routing.

Example:

Router(config)# ipv6 multicast-routing

Step 3

Use the fan-mpl domain domain-number command to enable MPL.

Example:

Router(config)# fan-mpl domain 0
            Router(config-mpl)# data-imin 10000
            Router(config-mpl)# data-imax 80000
            Router(config-mpl)# data-e 1

Step 4

Verify the multicast address reported by the node using the show wpan interface-id rpl mcast-info {domains | groups} commands.

Example:

Router# show wpan 0/1/0 rpl mcast-info domains
            Router# show wpan 0/1/0 rpl mcast-info groups

Step 5

Use the interface wpan interface-id command to enter interface configuration mode, then use the mcast-agent interface uplink-interface command to add the multicast agent interface.

Example:

Router(config)# interface WPAN 0/1/0
            Router(config-if)# mcast-agent interface gi0/0/0

Step 6

Use the mcast-agent port command to add the multicast agent port.

Example:

Router(config-if)# mcast-agent port

Step 7

Use the mcast-agent group-join multicast-group-address command to add the multicast agent group.

Example:

Router(config-if)# mcast-agent group-join X:X:X:X::X

Step 8

Use the show wpan interface-id mcast-agent {group-join | interface | ports} command to verify the multicast agent configuration.

Example:

Router# show wpan 0/1/0 mcast-agent group-join X:X:X:X::X

Configure RPL

Resilient Mesh Endpoints perform routing at the network layer using RPL. For detailed information, refer to RFC 6550.

Procedure


Step 1

Use the interface wpan 0/1/0 command to enter interface configuration mode.

Example:

Router(config)# interface WPAN 0/1/0

Step 2

Use the rpl parameter command to configure specific RPL settings.

Available parameters include dag-lifetime, dag-lifetime-unit, dio-dbl, dio-min, pon, route-poisoning, storing-mode, and version-incr-time.

Step 3

Use the rpl pon instance command to enable the Power Outage Notification (PON) instance.

Example:

Router(config-if)# rpl pon instance

Note


This option is supported only in WiSUN mode. If enabled, the node uses the new PON instance for outage reports.

Step 4

Use the redistribute rpl command within a routing protocol configuration to redistribute RPL routes.

Example:

Router(config)# ipv6 router ospf 100
            Router(config-rtr)# redistribute rpl metric 3

Configure the power outage server

In the event of a power outage, Mesh Endpoints (MEs) perform the necessary functions to conserve energy and notify neighboring nodes of the outage. Routers relay the power outage notification to a power notification server, which then issues push notifications to customers to relate information on the outage. In most cases, the outage server is your IoT FND server.

Procedure


Step 1

Use the interface wpan 0/1/0 command to enter interface configuration mode.

Example:

Router(config)# interface WPAN 0/1/0

Step 2

Use the outage server ipv6-address-or-fqdn command to specify the IPv6 address or the fully qualified domain name (FQDN) of the power outage server.

Example:

Router(config-if)# outage server 2001:c1::8a43:e1ff:fec3:2aa
Router(config-if)# outage server fnd.cisco.com

Configuring Cisco Resilient Mesh Security

Cisco Resilient Mesh security utilizes the IEEE 802.1X protocol, also known as Extensible Authentication Protocol over LAN (EAPOL), to manage authentication processes within the mesh network.


Note


Cisco Resilient Mesh does not support TLS 1.1. If the RADIUS server does not support TLS 1.2, you must disable TLS 1.1 on the RADIUS server for compatibility.


Configure mesh key

Procedure


Step 1

Use the mesh-security set mesh-key interface wpan slot/port key hex-string command to set the mesh key.

Example:

Router# mesh-security set mesh-key interface wpan 0/1/0 key 1234567891234567

The hex-string must be an even number of hex digits, up to 32.

Step 2

Use the mesh-security set mesh-lfn-key interface wpan slot/port key hex-string command to configure the mesh LFN key.

Example:

Router# mesh-security set mesh-lfn-key interface wpan 0/1/0 key 12312311

Step 3

Use the interface wpan slot/port and mesh-security mesh-key lifetime value commands to configure the mesh key lifetime.

Example:

Router(config)# int wpan 0/1/0
            Router(config-if)# mesh-security mesh-key lifetime 60

Note

 
  • The mesh-key lifetime value should be less than 120 days (10,368,000 seconds).

  • This command should only be used by an expert mesh-security administrator.

  • Mesh-Security configuration and keys do not appear in show running-config or show startup-config command output.

Step 4

Use these commands to configure LFN mesh-key lifetime parameters:

Example:

Router(config-if)# mesh-security mesh-lfn-key revocation-lifetime-reduction 30
            Router(config-if)# mesh-security mesh-lfn-key rollover-ratio 180
            Router(config-if)# mesh-security mesh-lfn-key lifetime 7776000 ptk-lifetime 31104000 pmk-lifetime 46656000

Cisco Resilient Mesh Security configuration example

The example shows what is required for mesh-security.


Note


The MTU setting on the AAA server must be set to 800 bytes or lower, because IEEE802.1x implementation in RMEs limits the MTU to 800 bytes. RADIUS servers can use auth-port 1812 and acct-port 1813 instead of 1645 and 1646, respectively.


!
aaa new-model
!
!
aaa group server radius nps-group
 server name nps-radius
!
aaa authentication enable default none
aaa authentication dot1x default group nps-group
<...snip...>
dot1x system-auth-control
!
<...snip...>
!
!
interface Wpan0/1/0
 no ip address
 ip broadcast-address 0.0.0.0
 no ip route-cache
 ieee154 beacon-async min-interval 120 max-interval 900 suppression-coefficient 1
 ieee154 panid 7224
 ieee154 ssid migration_far2
 ieee154 txpower -30
 authentication host-mode multi-auth
 authentication port-control auto
 ipv6 address 2092:1:1:1::/64
 ipv6 enable
 ipv6 dhcp relay destination  2010:A0B0:1001:22::2
 dot1x pae authenticator
mesh-security mesh-key lifetime 259200
end
!
!
radius server nps-radius
 address ipv4 <IP address> auth-port 1645 acct-port 1646
 key <RADIUS key>
!

Verifying Cisco Resilient Mesh Security configuration

Procedure


Step 1

Use the enable command to enable the router and enter the privileged EXEC mode.

Example:

Router> enable

Step 2

Use the show dot1x all details command to verify the 802.1X security configuration.

Note


The output for this command shows only new or re-authentications. It does not show nodes that are in the process of warm-starting (and have cached the security credentials).

It displays the configuration and clients of the Cisco Resilient Mesh 802.1X security configuration.

Example:

Router# show dot1x all details
Sysauthcontrol                 Enabled
Dot1x Protocol Version               3
Dot1x Info for WPAN0/1/0
--------------------------------------------
PAE                       = AUTHENTICATOR
QuietPeriod               = 60
ServerTimeout             = 0
SuppTimeout               = 30
ReAuthMax                 = 2
MaxReq                    = 2
TxPeriod                  = 30
Dot1x Authenticator Client List Empty

Step 3

Use the show mesh-security keys lfn command to verify the LFN mesh security keys.

Example:

Router# show mesh-security keys lfn
Mesh Interface: WPAN0/1/0
LFN Pairwise Master Key Lifetime : 540 Days 0 Hours 0 Minutes 0 Seconds
LFN Pairwise Temporal Key Lifetime: 360 Days 0 Hours 0 Minutes 0 Seconds
LFN Mesh Key Lifetime : 90 Days 0 Hours 0 Minutes 0 Seconds
Rollover ratio: 180
Revocation reduction: 30
LFN Key ID : 0 *
Key expiry : Wed Jun 7 11:35:37 2023
Time remaining : 81 Days 21 Hours 23 Minutes 21 Seconds
LFN Key ID : 1
Key expiry : Tue Sep 5 11:35:37 2023
Time remaining : 171 Days 21 Hours 23 Minutes 21 Seconds

Step 4

Use the show mesh-security keys command to verify the mesh-security set-key configuration.

Example:

Router# show mesh-security keys
Mesh Interface: WPAN0/1/0
Pairwise Master Key Lifetime  : 120 Days 0 Hours 0 Minutes 0 Seconds
Pairwise Temporal Key Lifetime: 60 Days 0 Hours 0 Minutes 0 Seconds
Mesh Key Lifetime    : 30 Days 0 Hours 0 Minutes 0 Seconds
Key ID         : 3 *
Key expiry     : Sun Dec  6 20:28:12 2020
Time remaining : 0 Days 1 Hours 5 Minutes 11 Seconds

Step 5

Use the show mesh-security session all command to verify the mesh security session details.

Note


The output for this command shows only new or re-authentications. It does not show nodes that are in the process of warm-starting (and have cached the security credentials).

Example:

Router# show mesh-security session all
MAC Address              State                    Mesh Keys
00:07:81:08:00:3C:25:03  Encryption Enabled       11..
00:17:3B:0B:00:21:00:2F  Encryption Enabled       .1..
00:07:81:08:00:3C:22:02  Encryption Enabled       11..
00:07:81:08:00:3C:25:02  Encryption Enabled       11..
00:07:81:08:00:3C:22:0A  Encryption Enabled       11..
00:07:81:08:00:3C:22:06  Encryption Enabled       11..
00:07:81:08:00:3C:24:05  Encryption Enabled       ....
00:07:81:08:00:3C:24:08  Encryption Enabled       ....
00:07:81:08:00:3C:23:01  Encryption Enabled       11..

Step 6

Use the show mesh-security interface wpan <slot>/<port> command to verify the mesh security interface status.


IPv6 multicast agents

An IPv6 multicast agent is a network configuration component that

  • enables multicasting traffic between IoT FND, or the Advanced-Metering Infrastructure (AMI) application server in a Network Operations Center (NOC), and the Cisco Resilient Mesh network

  • requires proper configuration on the head-end router (Cisco ASR 1000) as well as on IoT FND and the AMI head-end server, and

  • facilitates IPv6 multicast communication for software upgrades, demand reset messages, demand response messages, targeted pings, and meter group operations.

IPv6 multicast configuration characteristics

The IPv6 FAN with a multicast configuration displays the following architecture:

Figure 1. IPv6 FAN with multicast configuration

The IPv6 multicast configuration has the following characteristics:

  • IPv6 Multicast is used between the IoT FND or CE and the Cisco Resilient Mesh endpoints when performing:

    • Software upgrade of the endpoints

    • Demand reset messages

    • Demand response messages (there could be more than one group for this per meter)

    • Targeted pings (group of meters on a given feeder, for example)

    • Group of meters with the same read time/cycle

  • Each PAN is a multicast group with the unicast-prefix-based multicast address (RFC 3306)

  • The head-end router routes (PIMv6 SSM) all multicast traffic to the unicast-prefix-based multicast address to the IR8100 (MLDv2)

  • IR8100 multicast agent receives the multicast

The multicast operation in an IPv6 FAN operates as follows:

Figure 2. Multicast operation overview in IPv6 FAN

There are two ways to forward multicast traffic to an IR8100 running Cisco IOS-XE from the head-end:

  • Configure the IR8100 as a multicast client where the tunnel is configured with ipv6 mld join-group .

    For this method, configure the IR8100 tunnel interface with MLD as follows:

    Router (config)# interface Tunnel100
    Router (config-if)# ipv6 mld join-group ff38:40:2001:0db8:beef:cafe:0:1
  • Enable IPv6 multicast routing on the and configure it as a PIM6 router. This is the preferred method and is shown in the next section.


Note


Note: In above example, the IP address is constructed from the the IPv6 subnet of WPAN.


Configure IR8100 as PIM6 router

The preferred method of forwarding multicast traffic to the IR8100 is to enable IPv6 multicast routing and configure the device as a PIM6 router. Because the unicast-prefix-based multicast address is required for WPAN, it must be configured under loopback0, and the IR8100 must be configured to become a PIM-neighbor with the ASR head-end.

Procedure


Step 1

Use the ipv6 multicast-routing command to enable IPv6 multicast routing.

Example:

Router(config)# ipv6 multicast-routing

Step 2

Use the interface loopback 0 and ipv6 mld join-group multicast-address commands to configure MLD under loopback0.

Example:

Router(config)# interface loopback 0
Router(config-if)# ipv6 mld join-group ff38:40:2001:0db8:beef:cafe:0:1

Step 3

Use the ipv6 pim rp-address address command to configure the IPv6 PIM Rendezvous Point (RP).

Example:

Router(config)# ipv6 pim rp-address 2333::1

Step 4

Configure the ASR/CSR head-end to support the PIM neighbor relationship.

Example:

ipv6 pim rp-address 2001:DB9::1 bidir
ipv6 pim spt-threshold infinity
!
interface Loopback0
ipv6 address 2001:DB9::1/128
ipv6 pim hello-interval 500
ipv6 pim
!
interface GigabitEthernet0/0/0
ipv6 pim

Configure DTLS relay for EST

Cisco Resilient Mesh uses EST over CoAP/DTLS/UDP for certificate enrollment. During the initial bootstrapping process, nodes that have already joined the network act as DTLS relays for nodes being bootstrapped.

Procedure


Step 1

Use the interface wpan 0/1/0 command to enter interface configuration mode for the WPAN interface.

Example:

Router(config)# interface wpan 0/1/0

Step 2

Use the dtls-relay ipv6-address [port port-number] [max-sessions number] [lifetime seconds] command to configure the DTLS relay.

Example:

Router(config-if)# dtls-relay 2060:FACD::6 port 61629 max-sessions 10 lifetime 300

Step 3

Use the show wpan 0/1/0 config command to verify the DTLS relay configuration.

Example:

Router# show wpan 0/1/0 config

Mesh stack modes

Mesh stack modes let you choose between a Cisco proprietary mesh implementation (CG-Mesh mode) and an implementation based on Wi-SUN open-standards (Wi-SUN mode) for device communication.

  • Push the stack mode and scheduled switch time configurations to all the meters using Cisco IoT FND, leveraging CSMP TLVs 340, 343, and 344.

  • Ensure all meters are connected to the Mesh and Cisco IoT FND, so they receive these configurations. Verify that every meter has the latest stack mode settings before switching the border router to a different stack mode.

  • If a meter does not receive the stack mode switch time, it will automatically switch to the configured new stack mode after being offline for a maximum of 24 hours.

Configure CG-Mesh stack mode

CG-Mesh mode refers to CR-Mesh operation using Cisco proprietary mesh networking implementation instead of Wi-SUN open-standards based implementation.


Note


  • Cisco Resilient Mesh Release 6.2 supports both CG-Mesh and Wi-SUN stack modes. CR-Mesh Release 6.3 and above supports only Wi-SUN mode.

  • Changing stack mode requires a WPAN module reload.


Procedure


Step 1

Use the configure terminal command to enter global configuration mode.

Example:

Router# configure terminal

Step 2

Use the interface wpan 0/1/0 command to specify the WPAN interface and enter interface configuration mode.

Example:

Router(config)# interface wpan 0/1/0

Step 3

Use the no wisun-mode command to enable CG-Mesh mode.

Example:

Router(config-if)# no wisun-mode

Step 4

Use the ieee154 beacon-ver-incr-time 60 command to set the beacon version increase interval.

Example:

Router(config-if)# ieee154 beacon-ver-incr-time 60

Step 5

Use the hw-module subslot 0/1 reload command to reload the WPAN interface.

Example:

Router# hw-module subslot 0/1 reload

Step 6

Use the ieee154 phy-mode 2 command to set the PHY mode to a supported value.

Example:

Router(config-if)# ieee154 phy-mode 2

Step 7

Use the ieee154 wisun-dwell ucast-dwell-int value bcast-dwell-int value bcast-int value command to change the unicast dwell, broadcast dwell, and broadcast interval.

Example:

Router(config-if)# ieee154 wisun-dwell ucast-dwell-int 125 bcast-dwell-int 125 bcast-int 500

Note


If not configured, all parameters use default values.


You have successfully configured the CR-Mesh mode.

Configure Wi-SUN stack mode

Wireless Smart Utility Network (Wi-SUN) mode is supported from Cisco Resilient Mesh Release 6.1 and later releases.


Note


  • Cisco Resilient Mesh Release 6.2 supports both CG-Mesh and Wi-SUN modes. CR-Mesh Release 6.3 and above supports only Wi-SUN mode.

  • Changing Wi-SUN mode requires a module reload.

  • In Wi-SUN mode, storing mode is not supported.

  • In Wi-SUN mode, the mesh key should be reconfigured after changing PANID.


When the IR8100 is in Wi-SUN mode, if there are nodes in the WPAN route table and route poisoning is not enabled, changing the PANID will enable temporary RPL poisoning. It will be disabled automatically. The new PANID will take effect after 3 DIO messages are sent. Validate the connectivity to the IR8100 router.

Procedure


Step 1

Use the configure terminal command to enter global configuration mode.

Example:

Router# configure terminal

Step 2

Use the interface wpan 0/1/0 command to specify the WPAN interface and enter interface configuration mode.

Example:

Router(config)# interface wpan 0/1/0

Step 3

Use the wisun-mode command to enable Wi-SUN mode.

Example:

Router(config-if)# wisun-mode

Step 4

Use the ieee154 beacon-ver-incr-time 0 command to set the beacon version increase interval.

Example:

Router(config-if)# ieee154 beacon-ver-incr-time 0

Step 5

Use the hw-module subslot 0/1 reload command to reload the WPAN interface.

Example:

Router# hw-module subslot 0/1 reload

Step 6

Use the ieee154 phy-mode 66 command to set the PHY mode to a Wi-SUN supported value.

Example:

Router(config-if)# ieee154 phy-mode 66

Step 7

(Optional) Use the ieee154 wisun-dwell ucast-dwell-int value bcast-dwell-int value bcast-int value command to change the unicast dwell, broadcast dwell, and broadcast interval.

If not configured, all parameters use default values.

Example:

Router(config-if)# ieee154 wisun-dwell ucast-dwell-int 125 bcast-dwell-int 125 bcast-int 500

Modulation and data rate

Modulation and data rate (MDR) is a FAN network feature that

  • enables devices to adapt data rates or RF modulation based on environmental conditions and neighboring device capabilities

  • supports multiple PHY mode configurations in Border Router (BR) and endpoints to handle varying wireless link conditions, and

  • advertises configured PHY modes through POM IE (PHY Operating Mode Information Element) as specified in FAN 1.1v5 spec 6.3.4.7.1.

MDR configuration and operation details

FAN networks typically consist of devices with different physical layer capabilities. The wireless links between different devices in the network may vary greatly due to distance, transmission power, noise, or other interference. Because of these differences, devices should be able to adapt the data rate or RF modulation based on the environment conditions and the neighboring devices communicated with. Multiple PHY mode configuration in Border Router (BR) and End points will help to achieve the above use case. MDR feature is an already supported feature (spec 1.1v2) with PCAP IE as a header for advertising the configured PHY mode. In FAN 1.1v5, this PCAP IE been advertised as POM IE (Phy Operating Mode Information Element). Refer to FAN 1.1v5 spec 6.3.4.7.1 PHY Operating Mode Discovery.

Supported platforms and software releases:

  • Border Router: IR8140H, Cisco IOS XE Dulin 17.11.1

  • Endpoint: IR510, IR530, WPAN (OFDM and FSK modules), Cisco Resilient Mesh Release 6.6

PHY operating mode selection and switching process:

Based on the set of PHY operating modes advertised by both of a mesh node and a neighbour (indicated by their respective POM-IEs), the intersection of those PHY sets (including the base mode) are candidates for operating mode switching between the two nodes.

Prerequisites for MDR implementation:

All nodes in a PAN must be administratively configured to use the same base PHY operating mode. Neighbor nodes are able to mutually discover each other's PHY operating modes and make application layer decisions to temporarily "switch" to one of the non-base PHY operating modes.

The following combinations alone supported:

  • FSK + FSK

  • FSK + OFDM option1

  • FSK + OFDM option2

  • FSK + OFDM option3

  • FSK + OFDM option4

  • OFDM option1

  • OFDM option2

  • OFDM option3

  • OFDM option4

Combination of different OFDM options are not supported for configuration.

MDR feature limitations:

  • Up to 4 phy mode configurations are supported on the Border Router.

  • Up to 15 PHY operating modes in a POM IE can be processed, as specified in the Wi-SUN Spec.

  • CR-Mesh 6.6 MDR feature cannot work with CR-Mesh 6.5 Release.

  • CR-Mesh 6.6 supports Wi-SUN mode only.

Configuration requirements:

When configuring multiple PHY modes, the first mode MUST be the base mode. On the mesh endpoint, it should be the same base mode.

On IR8140H, use the ieee154 phy-mode command to configure PHY mode:

FDO2553J6BF(config)#interface wpan 0/1/0
FDO2553J6BF(config-if)#ieee154 phy-mode ?
Supported Phy-Modes:
64:Rate=50 kb/s; Modulation=2FSK; Modulation Index=1.0; FEC=OFF; Channel Spacing=200 kHz
66:Rate=150 kb/s; Modulation=2FSK; Modulation Index=0.5; FEC=OFF; Channel Spacing=400 kHz
134:Rate=2400 kb/s; Modulation=OFDM; Option=1; MCS=6; Channel Spacing=1200 kHz
144:Rate=50 kb/s; Modulation=OFDM; Option=2; MCS=0; Channel Spacing=800 kHz
147:Rate=400 kb/s; Modulation=OFDM; Option=2; MCS=3; Channel Spacing=800 kHz
149:Rate=800 kb/s; Modulation=OFDM; Option=2; MCS=5; Channel Spacing=800 kHz
150:Rate=1200 kb/s; Modulation=OFDM; Option=2; MCS=6; Channel Spacing=800 kHz
161:Rate=50 kb/s; Modulation=OFDM; Option=3; MCS=1; Channel Spacing=400 kHz
163:Rate=200 kb/s; Modulation=OFDM; Option=3; MCS=3; Channel Spacing=400 kHz
165:Rate=400 kb/s; Modulation=OFDM; Option=3; MCS=5; Channel Spacing=400 kHz
166:Rate=600 kb/s; Modulation=OFDM; Option=3; MCS=6; Channel Spacing=400 kHz
182:Rate=300 kb/s; Modulation=OFDM; Option=4; MCS=6; Channel Spacing=200 kHz

  <1-255>  Enter a value from the list given by: <config-if>ieee154 phy-mode ?

FDO2553J6BF(config-if)#ieee154 phy-mode
FDO2553J6BF(config-if)#ieee154 phy-mode 64 144 147 150

PHY mode configured on Endpoint(IR510) – tlv 35 output

MDR configuration verification

The following command shows the operating on base PHY mode.

The following example shows that the node operating PHY mode is switched from 64 to 147, which is the common highest operating mode between BR and IR510.

Limited Function Nodes

A Limited Function Node (LFN) is a battery-powered end device that

  • operates as RPL leaf nodes in the mesh network, relieved of RPL routing functionality

  • provides battery lifetime expected in the range of 15 to 20 years

  • cannot be the parent of other nodes in the mesh network, and

  • has its own unicast interval, broadcast schedule, and mesh keys in a FAN.

LFN implementation details

Wi-SUN FAN 1.1v5 details the implementation of LFN node in a FAN Mesh network. CR-Mesh 6.6 release enhances LFN support in IR8140 (CABO) WPAN Border router and IR510. IOS XE 17.11 release implements the authentication of LFN node in a FAN.

Supported platforms:

  • IR8140H, Cisco IOS XE Dulin 17.11.1

  • WPAN-OFDM module, Cisco Resilient Mesh Release 6.6

LFN configuration commands:

Cisco IOS XE Dulin 17.11.1 support both FAN 1.0 and FAN 1.1 specifications. In order to have LFN in the Border Router, enable LFN for onboarding LFN mesh nodes in your PAN by using the following commands:

FDO2553J6BF(config)#interface wpan 0/1/0
FDO2553J6BF(config-if)#lfn

LFN follows different PAN version in the FAN network and it has its own unicast interval and broadcast schedule. From Border Router, you can configure the broadcast interval for LFN by using the following commands:

FDO2553J6BF(config)#interface wpan 0/1/0
FDO2553J6BF(config-if)#ieee154 lfn-bcast interval 300000 sync-period 1

Configure LFN mesh key in Border Router:

FDO2553J6BF#mesh-security set mesh-lfn-key interface wpaN 0/1/0 key 12312312

Configure LFN mesh key lifetime in Border Router under global CLI:

FDO2553J6BF#mesh-security mesh-lfn-key lifetime 7776000 ptk-lifetime 31104000 pmk-lifetime 46656000

Configure LFN mesh rollover-ratio and revocation-lifetime-reduction:

FDO2553J6BF(config)#interface wpan 0/1/0
FDO2553J6BF(config-if)#mesh-security mesh-lfn-key revocation-lifetime-reduction 30
FDO2553J6BF(config-if)#mesh-security mesh-lfn-key rollover-ratio 180

Configure Mesh-key-exchange timeout:

By default, retry timer of LFN node is 10s during key exchange. Use the following commands to increase the key exchange timeout retry.

FDO2553J6BF(config)#interface wpan 0/1/0
FDO2553J6BF(config-if)#mesh-security key-exchange-message-timeout 30

Configure Routing Lifetime for LFN:

LFN nodes are battery powered node. By default, the recommended Registration-lifetime is 24hrs. In Border Router, LFN needs to be maintained in routing table for 24hrs by using the following commands:

FDO2553J6BF(config)#interface wpan 0/1/0
FDO2553J6BF(config-if)#rpl dag-lifetime 60
FDO2553J6BF(config-if)#rpl dag-lifetime-unit 1440

Configuring mesh refresh key for LFN from FND:

Verification commands:

To check the LFN version in Border Router:

FDO2553J6BF#show wpan 0/1/0 config | i LFN
LFN version: 8929 (2232)
FDO2553J6BF#

To check LFN broadcast interval:

FDO2553J6BF#show wpan 0/1/0 hardware config | i lfn
lfn_bcast:      interval 300000 sync-period 1
FDO2553J6BF#

Border router supports up to 3 keys for LFN. To check LFN Mesh-security Key:

FDO2553J6BF#show mesh-security keys lfn

Limitations:

  • LFNs are battery powered nodes and work in their own unicast schedule. It is recommended to use long timeout values (180s) when trying to onboard LFN from Border Router.

  • IR8140H does not support direct parenting of LFN.

Direct parenting of LFN support in Wi-SUN mesh deployment

Direct parenting of LFN support in Wi-SUN mesh deployment is a network capability that

  • enables IR8140 routers to directly parent Limited Function Nodes (LFNs) in Wi-SUN mesh deployments

  • supports battery-powered low-energy endpoints typically used for utility metering of electricity, gas, and water

  • allows LFN endpoints to connect to IR8140 as a child but prevents them from parenting other devices in a mesh network.

Implementation and verification details

From Cisco IOS-XE Release 17.14.1, the IR8140 routers support direct parenting of Limited Function Nodes (LFNs) in Wi-SUN Mesh deployments. Several such LFN endpoints connect to a border router forming a sensor network to implement an Advanced Metering Infrastructure (AMI) deployment.

Previous releases supported IR8140 indirectly parenting LFNs through a partner Full Function Node (FFN) device. For more information, see Limited Function Node.

Use this command given as example to determine if the router has enabled LFN support:

IR8140#show wpan 0/2/0 hardware configuration
lfn support: Enabled

Use this command given as example to verify the node connected to the router is an LFN or FFN:

IR8140#show wpan 0/2/0 link-neighbors ns 
------------------------- WPAN LINK NEIGHBOR TABLE WITH NS [2] -------------------------
EUI64            IPV6 address                              Lifetime   Last NS   Node Type
00173B05004D0030 2001:1111:1111:1111:55DC:BEF3:4D9C:FD87   240        15:29:08   LFN
Number of Entries in WPAN LINK NEIGHBOR TABLE: 1
Current time : 15:30:29

Verify WPAN

Procedure


Step 1

Use the configure terminal command to enter global configuration mode.

Example:

Router# configure terminal

Step 2

Use the show wpan interface-id command to view all available WPAN show commands.

Example:

Router# show wpan 0/1/0 ?

Note


You can use these commands to display specific WPAN configuration and status information:

Command Description
show wpan config Displays the WPAN basic configuration.
show wpan hardware Displays WPAN hardware information. Use show wpan 0/1/0 hardware ? for options.
show wpan packet-count Displays incoming and outgoing packet counts for WPAN traffic.
show wpan link-neighbors Displays information about WPAN link neighbors (1-hop range). Note: Minimum RSSI to join is -95 dBm.
show wpan outage-table Displays recent power-outage notification (PON) events in the PAN during the past hour.
show wpan restoration-table Displays recent power restoration notification (PRN) events in the PAN during the past hour.
show wpan rpl Displays WPAN RPL information.
debug wpan all Displays all WPAN debugging messages, including errors, fan-mpl, info, packets, and rpl.

IR8100 basic WPAN configurations

An IR8100 basic WPAN configuration is a network setup that

  • includes Wi-SUN mode operation on the WPAN interface

  • configures IEEE 802.15.4 physical layer settings and beacon parameters, and

  • enables IPv6 addressing with DHCP server functionality for connected devices.

WPAN configuration details

The WPAN interface configuration includes several key components:

  • wisun-mode: Enables Wi-SUN (Wireless Smart Utility Network) operation mode

  • ieee154 phy-mode 66: Sets the IEEE 802.15.4 physical layer mode

  • ieee154 beacon-async: Configures asynchronous beacon intervals and suppression

  • ieee154 panid: Defines the Personal Area Network identifier

  • ieee154 ssid: Sets the network service set identifier

  • rpl dag-lifetime: Configures RPL (Routing Protocol for Low-Power and Lossy Networks) parameters


Note


The dwell attribute indicates the maximum transmission time on a channel to comply with government regulations, most of which limit transmissions on a channel to X ms within Y ms (minimum and maximum duration). The dwell command allows you to set both X and Y . In the U.S., they are typically 400 ms to 20000 ms.


Basic WPAN interface configuration

The example shows a typical WPAN interface configuration on the IR8100:
interface WPAN0/1/0
 wisun-mode
 ieee154 phy-mode 66
 ieee154 beacon-async min-interval 15 max-interval 60 suppression-coefficient 1
 ieee154 panid 12571
 ieee154 ssid sit-cabo
 ieee154 beacon-ver-incr-time 0
 rpl dag-lifetime 60
 rpl dio-min 14
 rpl version-incr-time 10
 ipv6 address AAAA:BBBB:CCCC:3::1/64
 ipv6 dhcp server MeterNetwork rapid-commit
 authentication host-mode multi-auth
 authentication port-control auto
 dot1x pae authenticator

Example of IR8100 configuration settings for CR-Mesh

The configuration settings for an IR8100 router in a Cisco Resilient Mesh network is given in the example.

IR8100#sh run
Building configuration...

Current configuration : 9107 bytes
!
! Last configuration change at 16:53:48 CST Tue Feb 16 2021 by cisc0
!
version 17.5
service timestamps debug datetime msec localtime show-timezone year
service timestamps log datetime msec
service call-home
service unsupported-transceiver
platform qfp utilization monitor load 80
platform punt-keepalive disable-kernel-core
platform shell
!
hostname IR8100
!
boot-start-marker
boot system flash:ir8100-universalk9.BLD_V175_THROTTLE_LATEST_20210207_015223_V17_5_0_161.SSA.bin
boot-end-marker
!
!
logging buffered 1000000
no logging console
enable password cisc0
!
aaa new-model
!
!
aaa group server radius CGCDN
server name wisun_radius
!
aaa authentication login default local
aaa authentication dot1x default group CGCDN
aaa authorization exec default local
!
aaa common-criteria policy iiot_policy
min-length 10
max-length 127
numeric-count 1
upper-case 1
lower-case 1
char-changes 4
!
!
aaa session-id common
clock timezone CST 8 0
!
!
login on-success log
no ipv6 address-validate
ipv6 unicast-routing
ipv6 dhcp pool dhcp-node
address prefix 2001:CABB::/64 lifetime 60000 36000
vendor-specific 26484
suboption 1 address 2060:FACD::50
suboption 2 address 2060:FACD::50
!
ipv6 multicast-routing
!
!
subscriber templating
!
!
multilink bundle-name authenticated
!
!
crypto pki trustpoint SLA-TrustPoint
enrollment pkcs12
revocation-check crl
!
crypto pki trustpoint TP-self-signed-3764981121
enrollment selfsigned
subject-name cn=IOS-Self-Signed-Certificate-3764981121
revocation-check none
rsakeypair TP-self-signed-3764981121
!
!
crypto pki certificate chain SLA-TrustPoint
certificate ca 01
30820321 30820209 A0030201 02020101 300D0609 2A864886 F70D0101 0B050030
32310E30 0C060355 040A1305 43697363 6F312030 1E060355 04031317 43697363
6F204C69 63656E73 696E6720 526F6F74 20434130 1E170D31 33303533 30313934
3834375A 170D3338 30353330 31393438 34375A30 32310E30 0C060355 040A1305
43697363 6F312030 1E060355 04031317 43697363 6F204C69 63656E73 696E6720
526F6F74 20434130 82012230 0D06092A 864886F7 0D010101 05000382 010F0030
82010A02 82010100 A6BCBD96 131E05F7 145EA72C 2CD686E6 17222EA1 F1EFF64D
CBB4C798 212AA147 C655D8D7 9471380D 8711441E 1AAF071A 9CAE6388 8A38E520
1C394D78 462EF239 C659F715 B98C0A59 5BBB5CBD 0CFEBEA3 700A8BF7 D8F256EE
4AA4E80D DB6FD1C9 60B1FD18 FFC69C96 6FA68957 A2617DE7 104FDC5F EA2956AC
7390A3EB 2B5436AD C847A2C5 DAB553EB 69A9A535 58E9F3E3 C0BD23CF 58BD7188
68E69491 20F320E7 948E71D7 AE3BCC84 F10684C7 4BC8E00F 539BA42B 42C68BB7
C7479096 B4CB2D62 EA2F505D C7B062A4 6811D95B E8250FC4 5D5D5FB8 8F27D191
C55F0D76 61F9A4CD 3D992327 A8BB03BD 4E6D7069 7CBADF8B DF5F4368 95135E44
DFC7C6CF 04DD7FD1 02030100 01A34230 40300E06 03551D0F 0101FF04 04030201
06300F06 03551D13 0101FF04 05300301 01FF301D 0603551D 0E041604 1449DC85
4B3D31E5 1B3E6A17 606AF333 3D3B4C73 E8300D06 092A8648 86F70D01 010B0500
03820101 00507F24 D3932A66 86025D9F E838AE5C 6D4DF6B0 49631C78 240DA905
604EDCDE FF4FED2B 77FC460E CD636FDB DD44681E 3A5673AB 9093D3B1 6C9E3D8B
D98987BF E40CBD9E 1AECA0C2 2189BB5C 8FA85686 CD98B646 5575B146 8DFC66A8
467A3DF4 4D565700 6ADF0F0D CF835015 3C04FF7C 21E878AC 11BA9CD2 55A9232C
7CA7B7E6 C1AF74F6 152E99B7 B1FCF9BB E973DE7F 5BDDEB86 C71E3B49 1765308B
5FB0DA06 B92AFE7F 494E8A9E 07B85737 F3A58BE1 1A48A229 C37C1E69 39F08678
80DDCD16 D6BACECA EEBC7CF9 8428787B 35202CDC 60E4616A B623CDBD 230E3AFB
418616A9 4093E049 4D10AB75 27E86F73 932E35B5 8862FDAE 0275156F 719BB2F0
D697DF7F 28
quit
crypto pki certificate chain TP-self-signed-3764981121
certificate self-signed 01
30820330 30820218 A0030201 02020101 300D0609 2A864886 F70D0101 05050030
31312F30 2D060355 04031326 494F532D 53656C66 2D536967 6E65642D 43657274
69666963 6174652D 33373634 39383131 3231301E 170D3230 31313130 30373239
31385A17 0D333031 31313030 37323931 385A3031 312F302D 06035504 03132649
4F532D53 656C662D 5369676E 65642D43 65727469 66696361 74652D33 37363439
38313132 31308201 22300D06 092A8648 86F70D01 01010500 0382010F 00308201
0A028201 0100E821 301D5675 0B3BA0B8 81273D9F B82581E9 9BACAE41 D501A5E9
A8E98EFB 2C25B7C9 A0E0CF17 C39FEBBA E673C855 BDA9379C BDDC68DC 377C2589
21CD8189 6AC98A97 9B5FA5D5 17E51A1F 3DB8BC88 1A844B1E EE69DA60 8D84620A
8A023D87 D93F3ADF 75D99D81 E06BCEF6 AC7C3A2E D70C79F1 C7E8E893 F08BE954
E0184F0D 0E0112BD 497C87E8 5E4788C4 ACF56F92 9134B85B 7D08F6BA 703CF11B
BC8E1377 DC0450E0 A9939952 90F1D84F F235BB5B D54517E9 B636D334 5569278A
3A629DC7 03CC08FF F067EE3F 0EADFAC0 A03C650C A2253E4C 13DD8910 E9726929
9ACD8403 CD16D710 6D5F1FA5 F7F0E310 9060340C 3309446B 99DC10E2 25908D03
D3FBA3E3 54D70203 010001A3 53305130 0F060355 1D130101 FF040530 030101FF
301F0603 551D2304 18301680 14C73ACD 622756FB EB532701 66D605BC 49F9FFF2
BE301D06 03551D0E 04160414 C73ACD62 2756FBEB 53270166 D605BC49 F9FFF2BE
300D0609 2A864886 F70D0101 05050003 82010100 DC4AC08A D11E0E05 239FEBCB
694CC50F E0712807 A52F5714 C1501C4A A8283929 23F00BD1 B6F5310E 917C7501
B585E8AE 4CC88BE4 ED5555BF F46F2917 621577D6 6E14E796 B9A24FC7 3191F259
D61C6718 05E2FCB6 443E5D34 CBB90C02 3066F77C 3E3361E0 F975FB8E C026F652
DF2F3B2F FBBF0ABF 6600FD3D 9DB94163 330239C0 3F948CB1 30CEA1EE 3730FDA1
83A37AD9 940D8240 3B5A6D11 2601E91B 401CAB81 7FCC7C6E F3C48F19 B225FBCE
02523D36 8EAA3D42 3C232231 138F8EB0 BD3FF413 5FB879BE 5511A0D2 5953DB50
06E5CC26 082013B8 39D83819 EAA03533 B242A46C 679BE60F 0D9ED9BD 20D03F09
71159FAC 4DFD2DA8 71C5A1DD 94397BA5 6D2CEB0B
quit
!
!
no license feature hseck9
license udi pid IR8140H-P-K9 sn FDO2438J7BK
memory free low-watermark processor 47507
!
diagnostic bootup level minimal
!
spanning-tree extend system-id
dot1x system-auth-control
!
username cisc0 password 0 cisc0
!
redundancy
mode none
!
!
interface Loopback1
no ip address
ipv6 address 4008::8/128
!
interface GigabitEthernet0/0/0
ip address 10.79.56.221 255.255.255.0
negotiation auto
ipv6 address 2060:FACD::221/64
ipv6 enable
!
interface GigabitEthernet0/0/1
ip address 192.168.254.101 255.255.255.0
load-interval 30
negotiation auto
ipv6 address 2111:ABCD::111/64
ipv6 enable
ipv6 nd ra suppress
ipv6 ospf 1 area 0
!
interface WPAN0/1/0
no ip address
wisun-mode
ieee154 beacon-async min-interval 15 max-interval 60 suppression-coefficient 1
ieee154 dwell window 12400 max-dwell 400
ieee154 notch 10-20
ieee154 panid 15294
ieee154 ssid regression
ieee154 beacon-ver-incr-time 0
rpl dag-lifetime 60
rpl dio-dbl 1
rpl dio-min 14
rpl version-incr-time 10
ipv6 address 2001:CABB::1/64
ipv6 enable
ipv6 mld join-group FF38:40:2001:CABB::1
ipv6 dhcp server dhcp-node rapid-commit
authentication host-mode multi-auth
authentication port-control auto
dot1x pae authenticator
!
no ip http server
ip http auth-retry 3 time-window 1
ip http authentication local
ip http secure-server
ip forward-protocol nd
ip tftp blocksize 8192
ip route 10.0.0.0 255.0.0.0 10.79.56.254
ip route 10.79.0.0 255.255.0.0 10.79.56.254
!
!
ipv6 route 2001:DB8:6:D6FF::/64 2111:ABCD::200
ipv6 route 2001:DB8:7:D7FF::/64 2111:ABCD::200
ipv6 route 2015:ABCD::/64 2111:ABCD::200
ipv6 route 3001:DB8:7:D7FF::/64 2111:ABCD::200
ipv6 route 3002:DB8:7:D7FF::/64 2111:ABCD::200
ipv6 route 3002:ABCD::/64 2111:ABCD::200
ipv6 route 9001:DB8:7:D7FF::/64 2111:ABCD::200
ipv6 route 9002:DB8:7:D7FF::/64 2111:ABCD::200
ipv6 router ospf 1
redistribute rpl
!

tftp-server bootflash:cg-mesh-bridge-6.4weekly-6404-ir510-8546385.bin
!
!
radius server wisun_radius
address ipv4 10.79.42.79 auth-port 1812 acct-port 1813
key Wi-SUN_radius
!
!
control-plane
!
!
line con 0
exec-timeout 0 0
transport preferred none
stopbits 1
speed 115200
line vty 0 4
exec-timeout 0 0
password cisc0
transport input telnet
line vty 5 15
exec-timeout 0 0
password cisc0
transport input telnet
!
call-home
! If contact email address in call-home is configured as sch-smart-licensing@cisco.com
! the email address configured in Cisco Smart License Portal will be used as contact email address to send SCH notifications.
contact-email-addr sch-smart-licensing@cisco.com
profile "CiscoTAC-1"
active
destination transport-method http
ntp server 171.68.38.66
ntp server 10.64.58.51
!
end

ASR configuration example for CR-Mesh

The following example shows the configuration for an ASR in a Cisco Resilient Mesh network.

SOL-ASR-7# show run brief
Building configuration...
Current configuration : 5512 bytes
!
! Last configuration change at 10:38:26 PST Fri May 16 2014 by admin
! NVRAM config last updated at 13:44:36 PST Thu May 15 2014 by admin
!
version 15.4
service timestamps debug datetime msec
service timestamps log datetime localtime
no platform punt-keepalive disable-kernel-core
!
hostname SOL-ASR-7
!
boot-start-marker
boot system flash:asr1000rp1-adventerprisek9.03.11.00.S.154-1.S-std.bin
boot-end-marker
!
aqm-register-fnf
!
vrf definition Mgmt-intf
 !
 address-family ipv4
 exit-address-family
 !
 address-family ipv6
 exit-address-family
!
no logging console
!
aaa new-model
!
!
aaa authentication login default local
aaa authorization exec default local 
aaa authorization network FlexVPN_Author local 
!
!
!
!
!
aaa session-id common
clock timezone PST -8 0
!
!
!
!
!
!
!
no ip domain lookup
ip domain name ipv6lab.com
!
!
!
ipv6 unicast-routing
ipv6 multicast-routing
!
!
!
!
!
!
!
subscriber templating
!
multilink bundle-name authenticated
!
!
!
!
!
!
!
!
crypto pki trustpoint LDevID
 enrollment retry count 10
 enrollment retry period 2
 enrollment mode ra
 enrollment profile LDevID
 serial-number
 ip-address none
 password
 fingerprint F23314787BD98B99AF1FE0B2D338961D125EAE51
 revocation-check none
 rsakeypair LDevID
!
crypto pki profile enrollment LDevID
 enrollment url  http://192.168.100.120/certsrv/mscep/mscep.dll
!
!
!
crypto pki certificate map FlexVPN_Cert_Map 1
 issuer-name co cn = ipv6lab-sol-radius1-ca
!
crypto pki certificate chain LDevID
 certificate 4B8801480001000000FC
 certificate ca 2539E6B5CFF2FB894AC90A73EA69A645
spanning-tree extend system-id
!
username admin privilege 15 password 0 cisco
!
redundancy
 mode none
!
crypto ikev2 authorization policy FlexVPN_Author_Policy 
 route set interface
 route set access-list FlexVPN_Client_Default_IPv4_Route
 route set access-list ipv6 FlexVPN_Client_Default_IPv6_Route
!
crypto ikev2 redirect gateway init
crypto ikev2 proposal FlexVPN_IKEv2_Proposal 
 encryption aes-cbc-128
 integrity sha1
 group 5
!
crypto ikev2 policy FLexVPN_IKEv2_Policy 
 proposal FlexVPN_IKEv2_Proposal
!
!
crypto ikev2 profile FlexVPN_IKEv2_Profile
 match certificate FlexVPN_Cert_Map
 identity local dn 
 authentication remote rsa-sig
 authentication local rsa-sig
 pki trustpoint LDevID
 aaa authorization group cert list FlexVPN_Author FlexVPN_Author_Policy
 virtual-template 1
!
!
crypto ikev2 cluster
 port 2000
 standby-group group1
 slave priority 90
 slave max-session 10
 no shutdown
!
!
cdp run
!
ip tftp source-interface GigabitEthernet0/0/3
ip ssh version 2
!
! 
!
!
!
!
!
!
crypto ipsec transform-set AES_128_SHA1 esp-aes esp-sha-hmac 
 mode transport
!
crypto ipsec profile FlexVPN_IPsec_Profile
 set transform-set AES_128_SHA1 
 set ikev2-profile FlexVPN_IKEv2_Profile
 responder-only
!
!
!
!
!
!
! 
!
interface Loopback0
 ip address 20.0.0.3 255.255.0.0
 ipv6 address 2003:20::1/128
 ipv6 address 2333::1/64
 ipv6 enable
 ipv6 ospf 1 area 1
!
interface GigabitEthernet0/0/0
 ip address 173.36.248.224 255.255.255.192
 negotiation auto
 cdp enable
!
interface GigabitEthernet0/0/1
 ip address 10.0.2.70 255.255.255.0
 ip pim sparse-mode
 negotiation auto
 ipv6 address 2001:A02::A00:246/64
 ipv6 enable
 ipv6 ospf 1 area 1
 ipv6 ospf mtu-ignore
 cdp enable
!
interface GigabitEthernet0/0/2
 ip address 11.0.0.70 255.255.255.0
 standby 1 ip 11.0.0.100
 standby 1 priority 110
 standby 1 name group1
 negotiation auto
 ipv6 enable
 cdp enable
!
interface GigabitEthernet0/0/3
 ip address 11.0.1.70 255.255.255.0
 negotiation auto
 cdp enable
!
interface GigabitEthernet0/1/0
 description WIMAX-BASESTATION
 ip address 192.10.0.88 255.255.255.0
 negotiation auto
!
interface GigabitEthernet0/1/1
 no ip address
 ip pim sparse-mode
 negotiation auto
 ipv6 address 2010:DEAD:BEEF:CAFE::1/64
 ipv6 enable
 ipv6 ospf 1 area 1
 ipv6 ospf mtu-ignore
!
interface GigabitEthernet0/1/2
 no ip address
 ip pim sparse-mode
 negotiation auto
 ipv6 address 2011:DEAD:BEEF:CAFE::1/64
 ipv6 enable
 ipv6 ospf 1 area 1
 ipv6 ospf mtu-ignore
!
interface GigabitEthernet0/1/3
 no ip address
 shutdown
 negotiation auto
!
interface GigabitEthernet0/1/4
 no ip address
 shutdown
 negotiation auto
!
interface GigabitEthernet0
 vrf forwarding Mgmt-intf
 no ip address
 shutdown
 negotiation auto
!
interface Virtual-Template1 type tunnel
 description ip pim sparse-mode
 ip unnumbered Loopback0
 ipv6 address autoconfig
 ipv6 unnumbered Loopback0
 ipv6 enable
 ipv6 ospf 1 area 1
 ipv6 ospf mtu-ignore
 tunnel protection ipsec profile FlexVPN_IPsec_Profile
!
router ospf 1
 redistribute static subnets
 network 10.0.2.0 0.0.0.255 area 1
 network 11.0.0.0 0.0.0.255 area 1
 network 11.0.1.0 0.0.0.255 area 1
 network 173.36.0.0 0.0.255.255 area 1
 network 192.10.0.0 0.0.0.255 area 1
!
ip forward-protocol nd
!
no ip http server
no ip http secure-server
ip route 10.0.0.0 255.255.255.0 173.36.248.193
!
ip access-list standard FlexVPN_Client_Default_IPv4_Route
 permit any
!
ipv6 route 2005:DEAD:BEEF:CAFE::/64 2001:420:7BF:7E8::1
ipv6 route 2006:DEAD:BEEF:CAFE::/64 2001:420:7BF:7E8::B
ipv6 local pool IPV6_POOL 2001:10::/64 64
ipv6 pim rp-address 2333::1
ipv6 router ospf 1
 redistribute static
!
!
!
!
!
!
ipv6 access-list FlexVPN_Client_Default_IPv6_Route
 permit ipv6 any any
!
control-plane
!
 !
 !
 !
 !
!
!
!
!
!
line con 0
 exec-timeout 0 0
 privilege level 15
 stopbits 1
line aux 0
 stopbits 1
line vty 0 4
 privilege level 15
 transport input all
 transport output all
!
ntp server 192.168.100.250
netconf max-sessions 16
netconf ssh
!
end
SOL-ASR-7#

Check and upgrade the WPAN firmware version

For the IR8100, only the IRMH WPAN is supported, and the minimum required version is 6.2.19.


Note


WPAN firmware is not integrated into the IR8100 system firmware and must be upgraded separately.


Procedure


Step 1

Use the show wpan 0/1/0 hardware hwversion command to check the version of the WPAN hardware in slot 1.

Example:

Router# show wpan 0/1/0 hardware hwversion
hardware version: CGM-WPAN, 1.0, IRMH-WPAN/1.0/2.0

Step 2

Use the show wpan 0/1/0 hardware version command to check the installed CR-Mesh firmware version of the WPAN.

Example:

Router# show wpan 0/1/0 hardware version
firmware version: 6.2RC(6.2.20), cg-mesh-bridge, origin/master-6.2, 6dd02f0, Jul 22 2020

You can also display the WPAN firmware version using the show wpan 0/1/0 config command:

Router# show wpan 0/1/0 config
module type:    RF-WPAN (IEEE 802.15.4e/g RF 900MHz)
.
.
.
firmware version:      6.2RC(6.2.20)

Upgrade WPAN firmware

Before you begin

The appropriate WPAN firmware image must be copied and available on the IR8100 flash in the root directory.

Follow these steps to upgrade the WPAN firmware:

Procedure


Step 1

Use the install-firmware image command to install the firmware.

Example:

Router(config-if)# install-firmware image
Firmware upgrade starting. This may take several minutes. Please do not interrupt.
.....................
Installed the WPAN 6.0 firmware successfully (94 sec).
Please reload the WPAN module in slot 1!!

Step 2

Use the hw-module subslot 0/1 shutdown unpowered command to power down the WPAN module.

Example:

Router# configure terminal
Router(config)# hw-module subslot 0/1 shutdown unpowered

Step 3

Wait for power-down messages, wait 60–90 seconds, and then use the no hw-module subslot 0/1 shutdown unpowered command to power up the module.

Example:

Router(config)# no hw-module subslot 0/1 shutdown unpowered

Step 4

Wait for power-up messages and wait at least 500 seconds before proceeding. Verify the status and hardware version using the show ip interface brief and show wpan 0/1/0 hardware version commands.

Example:

Router# show ip interface brief | inc Wpan
Wpan0/10                   unassigned      YES unset  up                    up
Router# show wpan 0/1/0 hardware version
firmware version: 6.2RC(6.2.20), cg-mesh-bridge, origin/master-6.2, 6dd02f0, Jul 22 2020

Upgrade WPAN firmware (CG-Mesh to WiSUN)

Before you begin

The appropriate WPAN firmware image must be copied and available in the root directory of the IR8100 flash.

Procedure


Step 1

Use the install-firmware image command to install the firmware.

Example:

Router(config-if)# install-firmware image
Firmware upgrade starting. This may take several minutes. Please do not interrupt.
.....................
Installed the WPAN 6.0 firmware successfully (94 sec).
Please reload the WPAN module in slot 1!!

Step 2

Use the hw-module subslot 0/1 shutdown unpowered command to power down the WPAN module.

Example:

Router# configure terminal
Router(config)# hw-module subslot 0/1 shutdown unpowered

Step 3

Wait for power-down messages, wait 60–90 seconds, and then use the no hw-module subslot 0/1 shutdown unpowered command to power up the module.

Example:

Router(config)# no hw-module subslot 0/1 shutdown unpowered

Step 4

Wait for power-up messages and wait at least 500 seconds before proceeding. Verify the status and hardware version using the show ip interface brief and show wpan 0/1/0 hardware version commands.

Example:

Router# show ip interface brief | inc Wpan
Wpan0/10                   unassigned      YES unset  up                    up
Router# show wpan 0/1/0 hardware version
firmware version: 6.2RC(6.2.20), cg-mesh-bridge, origin/master-6.2, 6dd02f0, Jul 22 2020