Troubleshoot Router Setup and Upgrade

Use the procedures in this section to troubleshoot router bring-up, software upgrade or downgrade by understanding the problem, probable cause, and the solution.

The following image shows the tasks involved in finding solutions to router setup and upgrade issues:

Figure 1. Solutions to Troubleshoot Software Setup and Upgrade
Solutions to troubleshoot router setup and upgrade issues

This section contains the following topics:

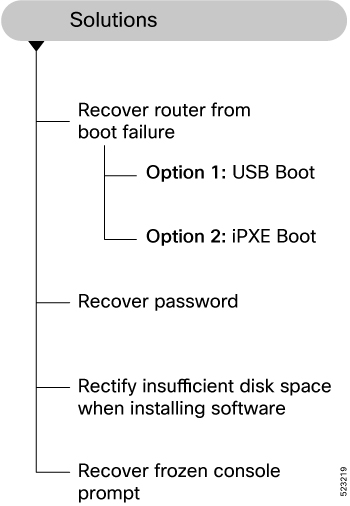
Recover router from boot failure

If the command line interface is not accessible, you can recover the router from a boot failure using one of these recovery methods.

Boot the router using USB drive

Problem:

After installing the hardware, you boot the router after connecting to the console port and powering ON the router. The router initiates the boot process using the pre-installed operating system (OS) image. But the router fails to boot, times out or stops responding after the boot process initializes.

Cause:

The router does not boot if an install image is not present on the router or the image is corrupt.

Solution:

Boot the router using a bootable USB flash drive.

The bootable USB flash drive is used to reimage the router during system upgrade or boot the router in case of boot failure. During the USB boot process, the router is re-imaged with the version available on the USB flash drive.

To boot the router using a USB flash drive, you need the following devices:

  • A local machine (Windows, Linux, or MAC) with USB Type-A.

  • USB flash drive with a storage capacity that is between 8GB (min) and 32 GB (max). USB 2.0 and USB 3.0 are supported.


    Note


    USB Type-C is not supported.


Procedure


Step 1

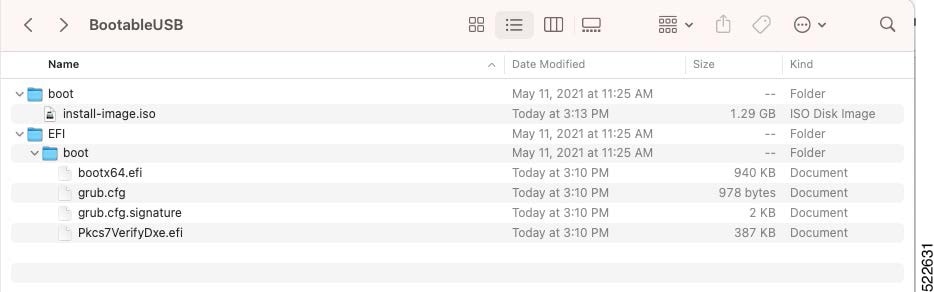
Create a bootable USB flash drive from your local machine (Windows or MAC):

  1. Connect the USB flash drive to your local machine and format it with File Allocation Table (FAT) 32 file system using the Windows Operating System or Apple MAC Disk Utility. Formatting the USB drive to FAT creates addressable sectors that ensures that each piece of information in the file can be found by the computer.

    After formatting the USB flash drive, right-click on the USB disk and view the properties.

  2. On the Software Download page, navigate to the required Cisco IOS XR product and release. The USB boot image is available in the format <platform>-usb-<version>.zip compressed file. For example, the USB boot image for Cisco 8000 series routers for release 7.10.1 is 8000-x64-usb-7.10.1.zip file.

  3. Download the compressed USB boot image from the Software Download page to your host computer.

  4. Verify that the copy operation is successful. To verify, compare the file size on the Software Download page and the copied file on your computer. You can also verify the MD5 checksum value. This value ensures that the copied file is valid and untampered.

  5. Unzip the file to extract the content of the compressed boot file inside the USB flash drive. This converts the USB flash drive to a bootable drive.

    Figure 2. Bootable USB Files
    Files in the bootable USB drive

    Note

     
    The content of the zipped file (EFI and boot directories) should be extracted directly into the root of the USB flash drive. If the unzipping application places the extracted files in a new folder, move the EFI and boot directories to the root folder of the USB flash drive.
  6. Remove the USB flash drive from your computer.

    The USB flash drive is ready to be used as a bootable disk to install and boot the Cisco IOS XR image.

Step 2

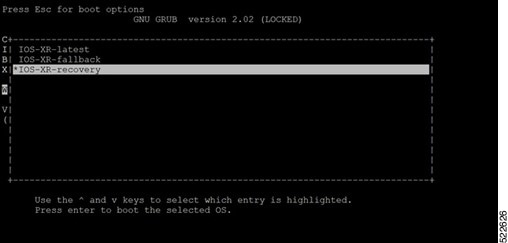
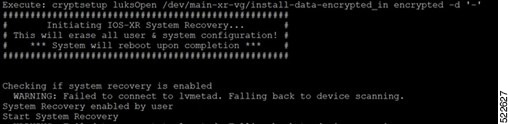
Boot the router using the bootable USB flash drive.

  1. Use this procedure only on active RP; the standby RP must either be powered OFF or removed from the chassis. After the active RP is installed with images from USB, insert or power ON the standby RP as appropriate.

  2. Connect to the console.

  3. Insert the USB flash drive in the USB Port Type-A on the router.

    Ensure that the router is powered ON. When the USB bootable drive is plugged into an operational router, the device is detected as disk2:. Verify using show media location all command.

    Router#show media location all
    Fri Jan 27 08:29:00.808 UTC
    
    Media Info for Location: node0_RP0_CPU0
    Partition         Size           Used          Percent        Avail
    --------------------------------------------------------------------
    rootfs:           54.4G          16.5G          30%           38G
    data:             77.3G          20.5G          27%           56.8G
    disk0:            3.9G           12M            1%            3.6G
    /var/lib/docker   6.6G           17M            1%            6.2G
    disk2:            15G            6.1G           42%           8.6G
    log:              5.3G           572M           12%           4.4G
    harddisk:         61G            19G            32%           39G
  4. View the contents of the USB drive.

    Example:

    Router#dir disk2:
  5. Initiate the reimage from the USB bootable drive.

    Example:

    Router#reload bootmedia usb noprompt

    Note


    If the router was powered OFF, power ON the router. Press the Esc key continuously to pause the boot process and get the RP to the BIOS menu. Use the arrow key and navigate to the USB Flash Memory option in the Boot Manager menu, and press the Enter key. The BIOS GRUB automatically detects the image from the USB flash drive, starts the installation, and displays the progress of the installation operation.

    The router reboots after the reimage with new version available in the USB drive. After the installation is complete, the router reboots and enters the prompt to configure the root username and password.


Boot the router using iPXE

Problem:

You connect to the console port and power ON the router. The router initiates the boot process using the pre-installed operating system (OS) image. But the router fails to boot, times out or stops responding after the boot process initializes.

Cause:

The router does not boot if an install image is not present on the router or the image is corrupt.

Solution:

Boot the router using the image from an iPXE server.

iPXE is a pre-boot execution environment that is included in the network card of the management interfaces. It works at the system firmware (UEFI) level of the router. iPXE enables network boot for a router that is offline. The bootloader downloads and installs the ISO image located on an HTTP, FTP, or TFTP server. iPXE boot re-images the router. iPXE acts as a boot loader and provides the flexibility to choose the image that the system will boot based on the Platform Identifier (PID), the serial number, or the management MAC address. iPXE must be defined in the DHCP server configuration file.

Procedure


Step 1

Configure the DHCP server for IPv4, IPv6, or both communication protocols before you use the iPXE boot.

  1. Create dhcpd.conf file in /etc/ or /etc/dhcp directory. This configuration file stores the network information such as the path to the script, location of the ISO install file, location of the provisioning configuration file, serial number, MAC address of the router. The following example shows a sample dhcpd.conf file.

    Example:

    allow bootp;
    allow booting;
    ddns-update-style interim;
    option domain-name "cisco.com";
    option time-offset -8;
    ignore client-updates;
    default-lease-time 21600;
    max-lease-time 43200;
    option domain-name-servers <ip-address-server1>, <ip-address-server2>;
    log-facility local0;
     :
    subnet <subnet> netmask <netmask> {
      option routers <ip-address>;
      option subnet-mask <subnet-mask>;
      next-server <server-addr>;
    }
      :
    host <hostname> {
      hardware ethernet e4:c7:22:be:10:ba;
      fixed-address <address>;
      filename "http://<address>/<path>/<image.bin>";
  2. Test the server once the DHCP server is running. For example, for IPv4 protocol:

  • Use the MAC address of the router:

    Note


    Using the host statement provides a fixed address that is used for DNS, however, verify that option 77 is set to iPXE in the request. This option is used to provide the boot file to the system when required.

    host <platform>
    {
    hardware ethernet <router-mac-address>;
    if exists user-class and option user-class = "iPXE" {
    	filename = "http://<httpserver-address>/<path-to-image>/<image>";
    }
    
    Ensure that the above configuration is successful.
  • Use the serial number of the router:
    host <platform> 
    {
    option dhcp-client-identifier "<router-serial-number>";
      filename "http://<IP-address>/<path-to-image>/<image>";
      fixed-address <IP-address>;
    }
    The serial number of the router is derived from the BIOS and is used as an identifier.

Step 2

Recover the router using iPXE boot.

  1. Connect to the console.

  2. Power ON the router.

  3. Press Esc key continuously to pause the boot process and get the RP to the BIOS menu.

  4. Use the arrow key and navigate to the Built-in EFI iPXE option in the Boot Manager menu, and press the Enter key.

    Example:

    iPXE> ifstat
    net0: 00:a0:c9:00:00:00 using i350-b on PCI01:00.0 (closed)
      [Link:up, TX:0 TXE:0 RX:0 RXE:0]
    net1: 00:a0:c9:00:00:01 using i350-b on PCI01:00.1 (closed)
      [Link:up, TX:0 TXE:0 RX:0 RXE:0]
    net2: 00:a0:c9:00:00:02 using i350-b on PCI01:00.2 (closed)
      [Link:down, TX:0 TXE:0 RX:0 RXE:0]
      [Link status: Down (http://ipxe.org/38086193)]
    net3: 00:a0:c9:00:00:03 using i350-b on PCI01:00.3 (closed)
      [Link:down, TX:0 TXE:0 RX:0 RXE:0]
      [Link status: Down (http://ipxe.org/38086193)]
    net4: 00:00:00:00:00:04 using dh8900cc on PCI02:00.1 (closed)
      [Link:down, TX:0 TXE:0 RX:0 RXE:0]
      [Link status: Down (http://ipxe.org/38086193)]
    net5: 00:00:00:00:00:05 using dh8900cc on PCI02:00.2 (closed)
      [Link:down, TX:0 TXE:0 RX:0 RXE:0]
      [Link status: Down (http://ipxe.org/38086193)]
    net6: 04:62:73:08:57:86 using dh8900cc on PCI02:00.3 (closed)
      [Link:up, TX:0 TXE:0 RX:0 RXE:0]
    
    iPXE> set net6/ip 10.0.0.0
    iPXE> set net6/netmask 255.0.0.0
    iPXE> set net6/gateway 10.48.42.1
    iPXE>
    iPXE> ifopen net6
    
    iPXE> ping 10.48.42.1
    64 bytes from 10.48.42.1: seq=1
    64 bytes from 10.48.42.1: seq=2
    Finished: Operation canceled (http://ipxe.org/0b072095)
    
  5. Boot the image using one of the following options:

    • Option 1: Boot with ISO image. After the reimage is successful, add optional RPMs, bug fixes and update running configuration file.

    • Option 2: [Preferred option] Boot with Golden ISO (GISO) image that contains the ISO image, optional RPMs, bug fixes and configuration file. Booting with GISO saves time by eleminating the need to update the files individually.

You must keep the standby RP in the BIOS while installing the image on the active RP.

BIOS Ver: 09.19 Date: xx/xx/xxxx 17:02:33

Press <DEL> or <ESC> to enter boot manager.                                     iPXE initialising devices...ok


iPXE 1.0.0+ (5fbe7) -- Open Source Network Boot Firmware -- http://ipxe.org
Features: DNS HTTP TFTP VLAN EFI ISO9660 NBI Menu
BootMode : 1
Trying net0...
net0: 00:00:01:1c:00:00 using i350-b on PCI01:00.0 (open)
  [Link:up, TX:0 TXE:0 RX:0 RXE:0]
Configuring (net0 00:00:01:1c:00:00).................. ok
net0: 127.0.0.28/255.0.0.0
net0: fe80::2a0:c9ff:fe00:0/64
net1: fe80::2a0:c9ff:fe00:1/64 (inaccessible)
net2: fe80::2a0:c9ff:fe00:2/64 (inaccessible)
net3: fe80::2a0:c9ff:fe00:3/64 (inaccessible)
net4: fe80::200:ff:fe00:4/64 (inaccessible)
net5: fe80::200:ff:fe00:5/64 (inaccessible)
net6: fe80::662:73ff:fe08:1dba/64 (inaccessible)
Next server: 127.0.0.27
Filename: http://127.1.1.27/system_image.iso
http://127.1.1.27/<image>... ok

The BIOS GRUB automatically detects the image from the iPXE server, starts the installation, and displays the progress of the installation operation. After the installation is complete, the router reboots and enters the prompt to configure the root username and password.

You can also boot the router from the iPXE server by using the hw-module location all bootmedia network reload command.

Router# hw-module location all bootmedia network reload
Wed Dec 23 15:29:57.376 UTC
Reload hardware module ? [no,yes]

This command configures the router to perform a network-based boot across all modules in the router before a restart. Upon reload, the router attempts to load the operating system image from the specified iPXE server.


Boot the router using install replace reimage

If the standard installation (install replace) fails, you can recover the router using the install replace reimage command.

Use this command to reimage the router with a fresh copy of the operating system. You can use this command to recover the router from a corrupt state or to upgrade the router to a new major version that requires a fresh install rather than an incremental package upgrade.


Router# install replace reimage /harddisk:/8000-64-24.2.11-owner.iso commit

Or


Router# install replace reimage /harddisk:/8000-64-24.2.11-owner.iso skip-implicit-owner-packages-checks commit

Note


The skip-implicit-owner-packages-checks parameter is only required if the ISO contains owner or partner RPMs.


Benefits

  • You can reimage the router without needing a PXE server setup or USB access.

  • The existing XR configuration is retained.

  • If the specified iso is a GISO containing its own configuration file, then that configuration is used.

  • The install replace reimage command resets all partitions and the filesystem on the router, which is useful during error recovery scenarios where you need to clear the existing XR configuration and all partitions from the router.

Limitations

If it is a standard upgrade, it is recommended to use the install replace command for upgrading devices rather than the install replace reimage command due to these limitations:

  • You cannot roll back the operation without an ISO when booting the router using the install replace reimage command.

  • Booting with the install replace reimage command removes all the third party apps installed on the router.


Note


Use the install replace reimage command only when the standard installation fails.


Recover password

Problem:

Unable to access the router due to incorrect login credentials.

Cause:

A root password is used to login to the router. If you forget this root password, you cannot access the router.

Solution:

If you lose your admin and root user credentials, the router becomes inaccessible. The system can be recovered using a router reimage using iPXE or USB boot. However, this approach is not scalable.

You can use the system recovery feature to recover the lost password.

With this feature, the system is recovered without the need to reimage the router. The system is recovered to its initial state with the current running software. The installed software and SMUs are retained after the system is recovered. The process complies with the Cisco Product Security Baseline (PSB) where user data is securely erased before recovering the router. The following data that are generated at run-time are erased:

  • XR and admin configuration including the password data

  • Cryptographic keys on the disk

  • Data on encrypted partition

  • Generated core files

  • SNMP interface index files

  • Third-party application (TPA) software and data

  • Files created by the user

Use the following procedure on both RP0 nd RP1 cards on the chassis to recover the password.


Note


This procedure is applicable only when you have already enabled the password recovery feature on your router.
Router(config)#system recovery

Procedure


Step 1

Power ON the router, and press the ESC on the RP console to enter the BIOS GRUB menu.

This procedure must be executed on each RP (RP0 and RP1) individually on a modular system.

Step 2

Boot on the standby RP. Press ESC key to enter the GRUB (bootstrap program) menu.

Step 3

On the RP0 card console select the IOS-XR-recovery option from the GRUB menu and press Enter.

Example:

RP0:
Figure 3. IOS XR Recovery Option in GRUB Menu
IOS XR recovery boot option in GRUB menu

Step 4

Select the IOS-XR-recovery option from the GRUB menu and press Enter on the RP1 card console when the Initiating IOS-XR System Recovery... message is displayed on the RP0 card console.

Note


Do not wait until the RP0 card reaches the Enter root-system username: prompt. If you reach this prompt, the RP1 card will reload automatically and exit the BIOS GRUB menu. The RP0 card will boot up as active and the RP1 card will boot up as a standby card post the recovery process.

Example:

RP0:
Figure 4. Recovery of RP0
RP0 recovery

Example:

RP1:
Figure 5. Recovery of RP1
RP1 recovery

Step 5

On the RP0 card, create a new root user and password. Log in to the router using the new root username and password.

The router boots with the default configuration. Proceed with configuring the router or load a configuration from a backup file if you had already taken a backup. It is recommended to backup data and save the configuration on an external server.

The password recovery procedure is complete.

The option to recover the system using console port is disabled on bootup because all the previous configurations are erased. With this configuration disabled, if you select IOS-XR-recovery option from GRUB menu to recover the system, the recovery is skipped. Enable the password recovery feature again using the system recovery command.


Rectify insufficient disk space when installing software

Problem:

The software installation terminates with the error:

Error on 0/1/CPU0: Insufficient disk space to install packages.

Cause:

There is not enough space available for installing the software. Therefore, the installation process terminates with this error syslog:

RP/0/RP0/CPU0:Feb 11 05:43:06.449 IST: instorch[415]: %INFRA-INSTALL-4-DISK_SPACE_CHECK_FAILED : Disk space check failed on nodes: 0/RP0/CPU0. Remove unnecessary files in the rootfs of the relevant nodes before retrying operation

Solution:

There must be enough unused disk space available on the router’s rootfs location to install the Cisco IOS XR software.

To free up the disk space, perform these steps:

Procedure


Step 1

show install request

Example:

Router# show install request
Fri Aug 23 09:50:37.418 UTC
 
User request: install package replace /harddisk:/8000.iso
Operation ID: 1.1.1
State: Failure since 2024-08-23 09:48:46 UTC+00:00
Disk space check failed on nodes: 0/RP0/CPU0. Remove unnecessary files 
in rootfs before retrying operation, or remove unnecessary rollback points 
using 'clear install rollback id <id>'. If a transaction is currently in 
progress, it may need to be ended in order to free up disk space from 
removed files or rollback points. Automatically recovered after failure, 
ready for next user request.
 
 
Location 0/RP0/CPU0
Last event: Error (Insufficient disk space to install packages)
Disk space pre-check failure:
Phase: Veto
Required space: 3099439239B
Available space: 2836786891B

Identifies the required disk space.

Step 2

show media location all

Example:

Router# show media location all
Wed Jan 8 08:29:00.808 UTC

Media Info for Location: node0_RP0_CPU0
Partition                            Size     Used  Percent    Avail
--------------------------------------------------------------------
rootfs:                             54.4G    16.5G      30%      38G
data:                               77.3G    20.5G      27%    56.8G
disk0:                               3.9G      12M       1%     3.6G
/var/lib/docker                      6.6G      17M       1%     6.2G
disk2:                                15G     6.1G      42%     8.6G
log:                                 5.3G     572M      12%     4.4G
harddisk:                             61G      19G      32%      39G

Media Info for Location: node0_RP1_CPU0
Partition                            Size     Used  Percent    Avail
--------------------------------------------------------------------
rootfs:                             54.3G    16.5G      30%    37.9G
data:                               77.4G    46.1G      60%    31.4G
disk0:                               3.9G     8.5M       1%     3.6G
/var/lib/docker                      6.6G      19M       1%     6.2G
log:                                 5.3G     492M      10%     4.5G
harddisk:                             61G      44G      78%      14G

Media Info for Location: node0_0_CPU0
Partition                            Size     Used  Percent    Avail
--------------------------------------------------------------------
rootfs:                             54.4G    10.1G      18%    44.4G
data:                               77.3G     1.9G       2%    75.5G
/var/lib/docker                      6.6G      16M       1%     6.2G
disk0:                               3.9G     8.2M       1%     3.6G
harddisk:                             61G     109M       1%      57G
log:                                 5.3G     372M       8%     4.6G
          
Media Info for Location: node0_6_CPU0
Partition                            Size     Used  Percent    Avail
--------------------------------------------------------------------
rootfs:                             54.4G    10.1G      18%    44.4G
data:                               77.3G     1.9G       2%    75.4G
disk0:                               3.9G     8.3M       1%     3.6G
/var/lib/docker                      6.6G      16M       1%     6.2G
harddisk:                             61G     154M       1%      57G
log:                                 5.3G     374M       8%     4.6G

Router#

Displays the space consumed by the rootfs: location.

Use the commands1 from the System Management Command Reference for Cisco 8000 Series Routers to move files from rootfs to harddisk:/ and free up the disk space for the software installation.

Note


The rootfs:/ includes everything under / that is not mounted elsewhere. For example, /misc/disk1, /var/log, /misc/scratch, and more locations are mounted elsewhere and do not affect the rootfs space usage.


The above procedure frees up the required disk space for installation.

What to do next

Retry the install operation once there is enough space.

Recover frozen console prompt

Problem:

The console access is frozen and does not respond. In this state, no output or input characters are displayed on the console.

Cause:

The Priority Flow Control (PFC) functionality is enabed on the console by default. The PFC is also referred to as Class-based Flow Control (CBFC) or Per Priority Pause (PPP) is a mechanism that prevents frame loss due to congestion. Pressing the Ctrl + S keys enables the flow control and no output will be seen on the XR console until resumed.

Solution:

Reset the console prompt.

Procedure


Press the Ctrl + Q keys to resume the console output.


1

The bash and run commands can launch a bash shell, which the users can use to move files around the device on the active RP.