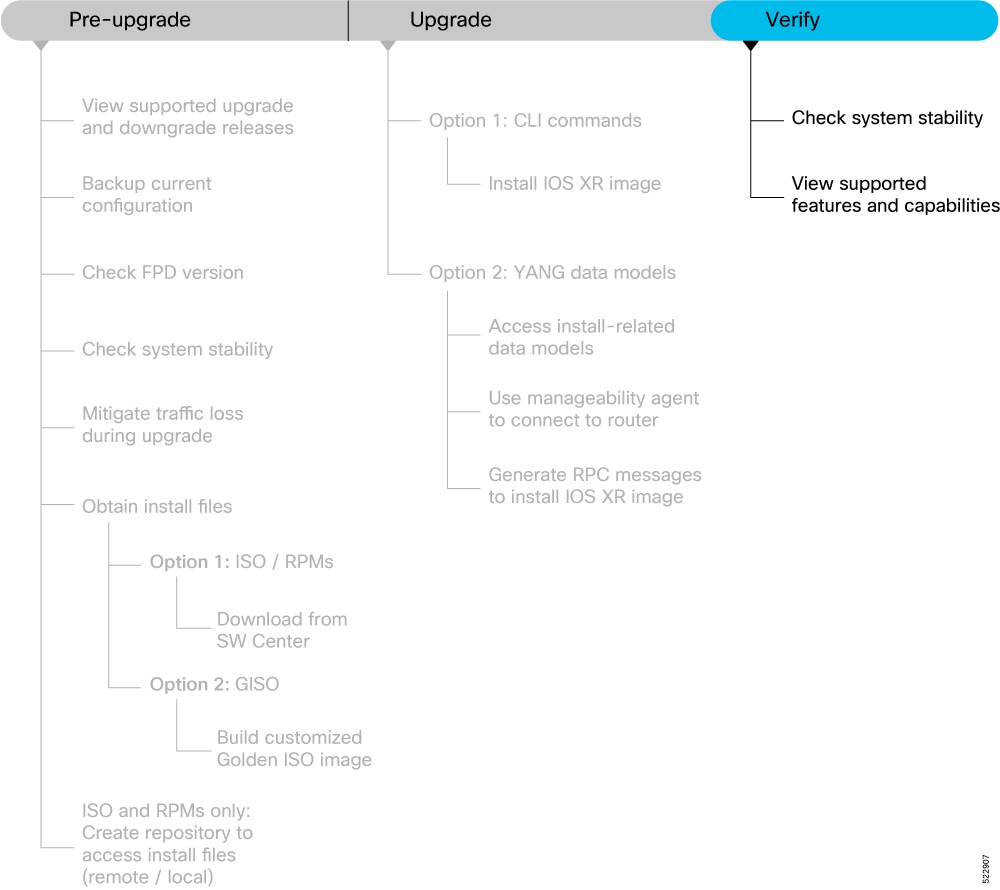
Plan the Software Upgrade
Before you upgrade the software version, prepare the router to ensure that the upgrade process is seamless.
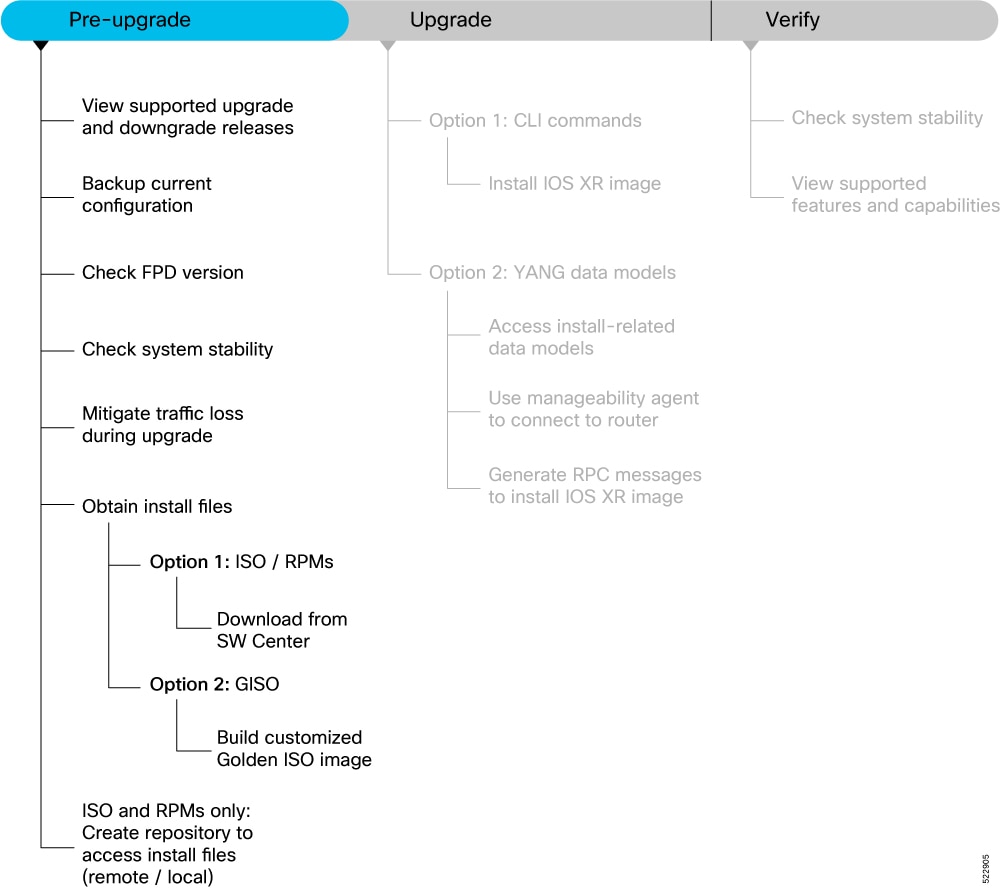
This section describes the following processes to prepare your router for an upgrade:
Supported upgrade and downgrade releases
Cisco routers come preinstalled with Cisco IOS XR software. You can upgrade the software to access new features and fixes, or downgrade it if needed. To take advantage of the latest features and software improvements, we recommend that you keep your router updated with the current version.
|
Feature Name |
Release Information |
Description |
|---|---|---|
|
Optimized IOS XR upgrade or downgrade process |
Release 25.3.1 |
Introduced in this release on: Fixed Systems (8200 [ASIC: Q200, P100], 8700 [ASIC: P100, K100], 8010 [ASIC: A100]); Centralized Systems (8600 [ASIC:Q200]) ; Modular Systems (8800 [LC ASIC: Q100, Q200, P100]) You can now upgrade Cisco IOS XR software from an earlier version to version 25.3.1 or later, and downgrade from version 25.3.1 or later to an earlier version, with certain limitations. These limitations are designed to help prevent failures during the upgrade or downgrade process. |
|
Changes to supported software upgrade or downgrade IOS-XR versions due to disk encryption |
Release 25.2.1 |
Introduced in this release on: Fixed Systems (8200 [ASIC: Q200, P100], 8700 [ASIC: P100, K100], 8010 [ASIC: A100]); Centralized Systems (8600 [ASIC:Q200]) ; Modular Systems (8800 [LC ASIC: Q100, Q200, P100]) Cisco IOS XR software versions that are supported on the router can now be upgraded to or dowgraded from version 25.2.1 or later within the scope and limitations of the disk encryption feature introduced in this release. |
|
View supported software upgrade or downgrade IOS XR versions |
Release 7.5.1 |
You can determine whether a software version can be upgraded or downgraded to another version using this functionality. Before an actual upgrade or downgrade process, you can also view the hardware or software limitations that could cause the upgrade or downgrade to fail. This feature helps you plan successful software upgrades or downgrades. This feature introduces the show install upgrade-matrix command. |
For release specific caveats see Release-specific Caveats and Workarounds section.
Prerequisites
Before you begin the upgrade, you must identify a Cisco IOS XR release that aligns with Cisco-recommended upgrade paths.
Use the show install upgrade-matrix running command to identify a supported target upgrade release, and prerequisites or limitations related to the specific software upgrade or downgrade. This command provides the following information:
-
Required bridging SMU RPMs
-
Blocking SMU RPMs
-
Unsupported hardware
-
Caveats or restrictions
Supported software upgrade from running version
Example:In this example, the output of the show install upgrade-matrix running command displays the upgrade restrictions.
Router#show install upgrade-matrix running
Matrix: XR version: 7.9.1, File version: 1.0
The upgrade matrix indicates that the following system upgrades are supported from the current XR version:

From                 To               Restrictions
7.9.1                7.7.1            CSCab54345
7.9.1                7.7.2            -
7.9.1                7.7.3            -
7.9.1                7.7.4            -
7.9.1                7.7.5            -
7.9.1                7.7.6            -
7.9.1                7.8.1            -
Router# show install upgrade-matrix running
Wed Aug  6 13:40:20.655 UTC
Matrix: XR version: 25.3.1, File version: 1.0, Version: N/A
The upgrade matrix indicates that the following system upgrades are supported from the current XR version:
From       To         Restrictions
---------- ---------- ----------------------------------------------------
25.3.1     24.1.2     Target fixes; Caveats; Replace performed via reimage
25.3.1     24.2.11    Target fixes; Caveats; Replace performed via reimage
25.3.1     24.2.2     Target fixes; Caveats; Replace performed via reimage
25.3.1     24.2.20    Caveats; Replace performed via reimage
25.3.1     24.2.200   Caveats; Replace performed via reimage
25.3.1     24.2.21    Caveats; Replace performed via reimage
25.3.1     24.3.1     Target fixes; Caveats; Replace performed via reimage
25.3.1     24.3.2     Target fixes; Caveats; Replace performed via reimage
25.3.1     24.3.20    Caveats; Replace performed via reimage
25.3.1     24.3.30    Caveats; Replace performed via reimage
25.3.1     24.4.1     Caveats; Replace performed via reimage
25.3.1     24.4.2     Caveats; Replace performed via reimage
25.3.1     25.1.1     Caveats; Replace performed via reimage
25.3.1     25.1.2     Caveats; Replace performed via reimage
25.3.1     25.2.1     Caveats; Replace performed via reimage
25.3.1     25.2.15    Caveats; Replace performed via reimage
25.3.1     25.2.2     Caveats; Replace performed via reimage
25.3.1     7.10.2     Target fixes; Caveats; Replace performed via reimage
25.3.1     7.11.2     Target fixes; Caveats; Replace performed via reimage
25.3.1     7.11.21    Target fixes; Caveats; Replace performed via reimage
Add the from and to versions to the end of the CLI command, for data on versions with additional restrictions
For example, to display restrictions for the 25.3.1->24.1.2 upgrade, use
        'show install upgrade-matrix running 25.3.1 24.1.2'
Router#
Supported releases to upgrade software from current version to target version
In this example, you provide the current version and the target version that you want to upgrade the router. The output of the command displays the support information and dependencies between these two releases:
Router#show install upgrade-matrix running 7.5.2 7.3.1
Tue May 10 19:33:59.135 UTC

Upgrade matrix information for system upgrade: 7.5.2->7.3.1

XR system upgrade is supported, with the following restrictions:

The following fixes must be installed if any version of the package is installed.
-----------------------------------------
Ddts              Name        Version
-----------------------------------------
CSCab54345        xr-bgp      7.5.2
Show commands for software upgrade and downgrade
You can view the software upgrade and downgrade information using the show commands in this table or through the operational data.
| Command | Description |
|---|---|
show install upgrade-matrix running |
Displays all supported software upgrades from the current version according to the support data installed on the running system |
show install upgrade-matrix running v1 v2 |
Displays details about the software upgrades from version 1 to version 2 according to the support data installed on the running system |
show install upgrade-matrix running all |
Displays all supported software upgrades from any version according to the support data installed on the running system |
show install upgrade-matrix iso path-to-ISO |
Displays details about the software upgrade from the current version to the version of the target ISO according to the support data in both the running system and the ISO image |
show install upgrade-matrix iso path-to-ISO v1 v2 |
Displays details about the software upgrade from version 1 to version 2 according to the support data in the target ISO image |
show install upgrade-matrix iso path-to-ISO all
|
Displays all supported software upgrades from any version according to the support data in the target ISO image |
show install upgrade-matrix iso path-to-ISO running |
Displays details about the software upgrade from the current version to the version of ISO according to the support matrices in both the running system and the target ISO image From Cisco IOS XR Release 25.2.1, the running keyword is deprecated from the show install upgrade-matrix iso command and replaced with the from-running keyword. This is applicable for routers with Cisco IOS XR7 network operating systems. |
show install upgrade-matrix rollback |
Displays details about the software upgrade from the current version to a version of a specific rollback point (indicated by an ID) according to the support matrices in both the running system and the rollback ID |
show install upgrade-matrix rollback ID v1 v2 |
Displays details about the software upgrade from version 1 to version 2 according to the support data in the specific rollback ID |
show install upgrade-matrix rollback ID all |
Displays all supported software upgrades from any version according to the support data in the specific rollback ID |
show install upgrade-matrix rollback running |
Displays details about the software upgrade from the current version to the version of the specific rollback ID according to the support matrices in both the running system and the rollback ID |
Backup Current Configuration
The ability to recover from a disaster is an essential part of any system maintenance plan. We recommend you backup the configurations in a secure remote location and verify that the transfer is a success, both before and after upgrade.
Procedure
|
Step 1 |
Create a backup of the running configuration to one of the following locations based on your requirement:
|
|
Step 2 |
Verify that the configuration is backed up. |
Check FPD Version
The router uses a number of Field Programmable Devices (FPDs) that are crucial for the function of route processors, line cards, shared port adapters (SPAs), SPA Interface Processors (SIPs), and fan trays. Before upgrading the software, check whether the latest FPDs are available on the router.
 Note |
FPD auto-upgrade is enabled by default on the Cisco 8000 series routers. However, we recommend that when updating to IOS XR Release 7.5.1, configure the fpd auto-upgrade enable command. |
Router#show hw-module fpd

                                                                       FPD Versions
                                                                      =================
Location       Card type   HWver    FPD device        ATR  Status     Running   Programd
-------------------------------------------------------------------------------------------
0/RP0/CPU0     8800-RP     0.51     Bios              S    CURRENT    1.15      1.15
0/RP0/CPU0     8800-RP     0.51     BiosGolden        BS   CURRENT    1.15

0/RP0/CPU0     8800-RP     0.51     EthSwitch              CURRENT    0.07      0.07
0/RP0/CPU0     8800-RP     0.51     EthSwitchGolden   BP   CURRENT    0.07
0/RP0/CPU0     8800-RP     0.51     TimingFpga             CURRENT    0.11      0.11
0/RP0/CPU0     8800-RP     0.51     TimingFpgaGolden  B    CURRENT    0.11
0/RP0/CPU0     8800-RP     0.51     x86Fpga           S    NEED UPGD  0.23      0.23
0/RP0/CPU0     8800-RP     0.51     x86FpgaGolden     BS   CURRENT    0.24
0/RP0/CPU0     8800-RP     0.51     x86TamFw          S    CURRENT    5.05      5.05
0/RP0/CPU0     8800-RP     0.51     x86TamFwGolden    BS   CURRENT    5.05
In this example, x86Fpga
FPD device needs an upgrade. You must ensure that FPDs are upgraded before upgrading the router.
Procedure
|
Step 1 |
To manually upgrade FPDs, use the upgrade hw-module fpd command.
|
||||
|
Step 2 |
Reload the individual nodes that require an upgrade by using the reload location node-location command.
|
||||
|
Step 3 |
You can enable automatic upgrade of FPD by using the fpd auto-upgrade enable command. To automatically upgrade all FPDs, use: Usage Guidelines—Online Insertion of IMs When an IM with a lower FPD version is inserted, one of the following scenarios apply:
Usage Guidelines—Online Insertion of RPs When fpd auto-upgrade is enabled and a new RP is inserted, the system upgrades the RP FPDs automatically with the latest FPDs. Verify that all nodes that required an upgrade show an updated status of
|
Upgrading FPDs Using Yang Data Models
YANG is a data modeling language that helps to create configurations, retrieve operational data and execute actions. The router acts on the data definition when these operations are requested using NETCONF RPCs. The data model handles the following types of requirements on the routers for FPD:
| Operational Data | Native Data Model |
|---|---|
| Auto Upgrade: Enabling or disabling of automatic upgrade of FPD. | Cisco-IOS-XR-fpd-infra-cfg.yang |
Check System Stability
System stability checks are essential to measure the efficiency and ability of an upgrade to function over an extended period.
At the EXEC prompt, execute the following commands to assess basic system stability checks before and after the software upgrade.
|
Command |
Reason |
Workaround |
|---|---|---|
|
Verify that all nodes are in |
NA |
|
|
Verify that a standby RP is available, and the system is in |
NA |
|
|
Or Or |
Verify that all necessary interfaces are |
NA |
|
Verify that the proper set of packages are active |
NA |
|
|
Verify that the proper set of committed packages are same as active |
Execute ‘install commit’ command |
|
|
Verify/fix configuration file system |
NA |
|
|
Ensure all the FPD versions status are CURRENT |
Execute |
|
|
Display the current state of the disk storage media |
To free up space, remove older .iso image files and bug fix .tar files. |
|
|
Display the current state of the root filesystem (rootfs). By default, the following files are stored in rootfs :
|
The installation is blocked if it utilizes more than 92% of the disk space on the rootfs . To avoid this, we recommend maintaining:
To free up space in rootfs :
|
|
|
Show chassis inventory information |
NA |
|
|
Capture show logging to check for any errors |
NA |
Mitigate Traffic Loss During Upgrade
During an upgrade, any traffic routed through the device is affected. To minimize traffic loss during the upgrade, do the following:
For OSPF, configure the router to advertise a maximum metric so that other devices do not prefer the router as an intermediate hop in their SPF calculations:
Router(config-ospf)#max-metric router-lsaFor ISIS, set the overload bit for a fixed amount of time. This ensures that the router does not receive transit traffic while the routing protocol is still converging:
Router(config-isis)#set-overload-bit on-startup <timeout>Optional packages
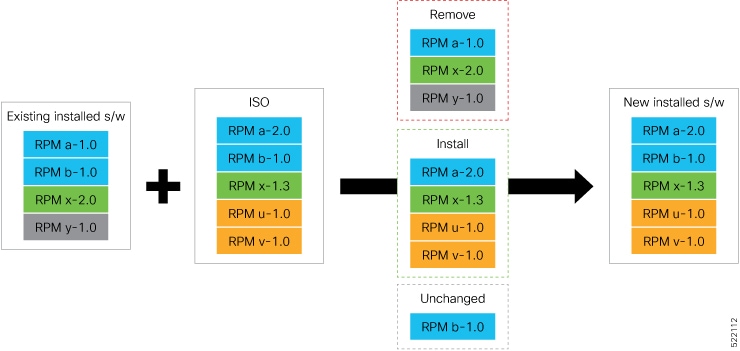
Cisco IOS XR software images are composed of a base image (ISO) that includes mandatory packages and optional packages (RPMs). Optional RPMs are software packages included in or available for the IOS XR image that provide additional features beyond the mandatory base functionality.
These optional RPMs can be included in the ISO image or provided separately for installation as needed. Optional RPMs enable specific features such as routing protocols such as OSPF, RIP, ISIS, and so on, security features such as k9sec for 802.1X, multicast, telemetry, and others.
Some optional RPMs are included in the base ISO image, while others are available as separate downloadable packages. Operators can add, upgrade, or remove optional RPMs using IOS XR software management commands, allowing flexible customization of the software features on the device.
|
Feature Name |
Release Information |
Description |
|---|---|---|
|
Deprecated insecure protocols in optional RPMs |
Release 26.2.1 |
Introduced in this release on: Fixed Systems (8200 [ASIC: Q200, P100], 8700 [ASIC: P100, K100], 8010 [ASIC: A100]); Centralized Systems (8600 [ASIC:Q200]) ; Modular Systems (8800 [LC ASIC: Q100, Q200, P100]) This feature improves platform security and reduces the threat surface of the Cisco Networking products by restricting the insecure protocol such as Telnet (deprecated in Cisco IOS XR Release 25.4.1) from Cisco IOS XR base package. In this release, Telnet is added to the optional RPM, We recommend you to migrate to secure alternatives such as SSH as Telnet is not supported anymore in the Cisco IOS XR base package. |
Starting with Cisco IOS XR Release 26.2.1, the insecure protocol such as Telnet is no longer part of Cisco IOS XR base packages. Instead, install the new optional RPM, Telnet.rpm, to use Telnet features.
You must install the Telnet.rpm only if it is obsolutely required as deprecation warnings continue to be generated once every 30 days as long as Telnet configurations
are used. The support for Telnet.rpm will be completely removed from Cisco IOS XR in future releases such that Telnet will no longer be supported in Cisco IOS
XR.
To avoid system failures or configuration inconsistencies, we strongly recommend you to migrate to a secure protocol such as SSHv2.
Limitations of optional packages
Without the optional Telnet.rpm:
-
Telnet configuration and execution commands cannot be used.
-
Telnet to Management ports is not supported.
-
Systems upgraded with existing insecure configurations may raise configuration inconsistency alarms.
You must clear inconsistencies before committing any new configuration.
Commands and YANG data models supported using optional RPMs
In Cisco IOS XR Release 26.2.1, you can continue to use the commands and YANG data models for the deprecated Telnet protocol
if you have installed the new Telnet.rpm.
The following table provides the supported configuration and execution commands and the YANG data models for Telnet in Telnet.rpm.
|
Telnet config commands |
Telnet exec commands |
|---|---|
|
telnet ipv4 client source-interface <> |
telnet <ipv4-address> |
|
telnet ipv4 dscp <> |
telnet <ipv6-address> |
|
telnet ipv4 server max-servers <> |
telnet <hostname> |
|
telnet ipv6 client source-interface <> |
telnet disconnect-char <WORD> |
|
telnet ipv6 server max-servers <> |
telnet vrf <WORD> |
|
telnet vrf <WORD> ipv4 dscp <> |
|
|
telnet vrf <WORD> ipv4 server max-servers <> |
|
|
telnet vrf <WORD> ipv6 dscp <> |
|
| telnet vrf <WORD> ipv6 server max-servers <> |
Supported Telnet YANG models in optional RPMs
-
Cisco-IOS-XR-ipv4-telnet-cfg
-
Cisco-IOS-XR-ipv4-telnet-mgmt-cfg
-
Cisco-IOS-XR-um-telnet-cfg
-
Cisco-IOS-XR-openconfig-system-terminal-ext
Obtain Install Files
You can obtain the install files based on one of the following options that is best suited to your network:
-
Base ISO and Optional RPMs: You can upgrade the software through the standard method where you install the ISO followed by the required RPMs.
-
Golden ISO: You can build a customized golden ISO (GISO) image with the base ISO and the required RPMs to automatically upgrade the software.
Standard ISO and RPMs
Standard ISO and RPMs are base components in the deployment, installation, and management of software systems in a Linux-based environment. They ensure consistency and reliability across diverse systems in a network by providing standardized formats for packaging, distributing, and installing software.
Download Install Files from Cisco Software Center
Procedure
|
Step 1 |
Access the Cisco Software Download page. For optimum website experience, we recommend any of the following browsers: Google Chrome, Mozilla Firefox or Internet Explorer. |
|
Step 2 |
Select the following:
|
|
Step 3 |
From the left pane, select the release. For the selected release, the Software Download page displays the downloadable files. For more information, see . |
|
Step 4 |
Use your Cisco login credentials to download the files. |
Golden ISO images
The Golden ISO (GISO) image is a custom-built IOS XR software image that
-
is based on a given IOS XR version
-
contains all mandatory packages
-
includes optional packages and SMUs requested by the GISO image owner, and
-
enables automated router boot using iPXE or system upgrade to a specified software version in a single operation.
Note |
When switching between Golden ISOs (GISOs) built on the same base version of IOS-XR, the install replace command automatically apples only the minimum required changes such as package additions, removals, and upgrades required for the transition. |
|
Feature Name |
Release Information |
Description |
|---|---|---|
|
Build a Golden ISO image using |
Release 24.4.1 |
Introduced in this release on: Fixed Systems (8200 [ASIC: P100], 8700 [ASIC: P100])(select variants only*); Modular Systems (8800 [LC ASIC: P100])(select variants only*) *This feature is supported on:
|
|
Build a Golden ISO image using |
Release 7.5.1 |
This feature facilitates faster deployment by allowing you to build your GISO image without the need to contact Cisco support. You can now select the install files, add your RPMs, repackage them as a custom image, and install the image. In previous releases, you were required to contact Cisco to have your GISO built. |
Build a Golden ISO image
This section provides the options that help you build a GISO image.
Procedure
|
Step 1 |
Build a GISO image using one of the following options:
|
|
Step 2 |
Execute this command to install the GISO image built from previous step similar to installing any other ISO image. Example: |
Create Repository to Access Install Files
A Repository is a directory where the ISO, RPMs, and their metadata are downloaded. The package manager uses this repository to query the packages.
The repository can either be created locally on the router, or on a remote location that can be accessed through FTP, HTTP, or HTTPS. In a repository, you can create directories based on different Cisco IOS XR platforms, releases or both. You can create and use multiple repositories. The files to be installed can saved in the local repository, remote repository or a combination of both.
Note |
The Golden ISO (GISO) method does not require you to create a repository. However, you can still install the GISO from a remote repository. |
Important |
Each package is named based on its name, version, software release, and architecture. Hence, any packages that have these attributes in common and differ only by platform are indistinguishable. We recommend that you create different repositories for different platforms and releases. |
Create Remote Repository
We recommend that you create an external remote repository that acts as a central repository to be used across devices. This eliminates the need to copy files for future updates to each router individually. It also serves as a single source when new RPMs (bug fixes, packages, updates) are made available.
The remote repository is available only through the Management Ethernet interface of the router. The server hosting the external repository must be able to reach the router using the address of the loopback interface in the VRF. If a VRF has more than one loopback interface, the loopback with the lowest-numbered loopback name is selected. For example, Loopback1 is selected over Loopback2. When using VRF, configure the repository to be reachable using a non-default VRF table. If the repository is reachable through an address in a VRF, specify the name of the VRF.
The following instructions are applicable to Linux distribution systems.
Procedure
|
Step 1 |
Create a directory on the server and copy the ISO and all RPMs. For example, name the directory as |
||
|
Step 2 |
Extract the files if the RPM files are archived (.tar format) or compressed (.tgz or .gz format). The files hierarchically arrange in sub directories under the main directory. |
||
|
Step 3 |
Convert the directory to a repository using Example:
|
||
|
Step 4 |
Configure the remote repository on the router. Example:where:
|
||
|
Step 5 |
Verify connectivity to the server and check the contents of the repository. Example:System logs record useful information during the creation of the repository. Check the logs to verify that the repository is valid. |
Create Local Repository on the Router
The router can also serve as a repository to host the RPMs. However, you must be a root-lr user with access to the router shell. Using a local repository removes the need to set up an external server for software
installation. In this method, the image files are copied directly to the router and used to create a repository locally.
Note |
We do not recommend creating a local repository if you are upgrading multiple routers. |
Procedure
|
Step 1 |
Create a new directory locally on the router's /harddisk:. For example, name the directory as |
|
Step 2 |
Copy the required RPMs and ISO files (using |
|
Step 3 |
Access the shell of the router and untar the RPMs. Example: |
|
Step 4 |
Exit from the shell. |
|
Step 5 |
Configure the local repository. Example:where:
|
|
Step 6 |
Check the contents of the repository. Example: |
What to do next
Disk encryption
Disk encryption is a data security mechanism that
-
protects sensitive customer information by encrypting data on the disk
-
ensures data security if a router leaves the customer premises, preventing unauthorized access to the data stored on the disks, and
-
adheres to compliance requirements, including PSB SEC-CRY-ALWAYS-2 and PSB SEC-DAT-CLNSTATE-2.
|
Feature Name |
Release Information |
Feature Description |
|---|---|---|
|
Disk encryption |
Release 25.4.1 |
Introduced in this release on: Fixed Systems (8010 [ASIC: A100])(select variants only*) *This feature is supported on the Cisco 8011-32Y8L2H2FH routers. |
|
Disk encryption |
Release 25.2.1 |
Introduced in this release on: Fixed Systems (8200 [ASIC: Q100, Q200, P100], 8700 [ASIC: P100, K100], 8010 [ASIC: A100]); Centralized Systems (8600 [ASIC:Q200]); Modular Systems (8800 [LC ASIC: Q100, Q200, P100]) To ensure data security even when a router leaves the customer's premises, we now provide Linux Unified Key Setup (LUKS) with AES-XTS encryption, robust encryption mechanisms, with keys securely stored in the hardware Trusted Authentication Module (TAM). This encryption capability, enabled by default across all router nodes and immutable, operates seamlessly in the background, allowing you to interact with the file system without impacting your experience, ensuring continuous and reliable data protection. The disk encryption feature impacts the IOS XR software upgrade process. For more information, refer the Cisco 8000 IOS XR Software - Upgrade/Downgrade docs for IOS XR Release 25.2.1, in the Cisco Software Download portal. |
How disk encryption works
Disk encryption ensures the security of customer data by encrypting specific partitions, safeguarding against unauthorized access, and providing secure data deletion mechanisms. This process is designed to be seamless and does not require user intervention.
Summary
The key components and features of the disk encryption process are:
-
Encryption: Disk encryption is applied to all nodes on the Cisco 8000 routers by default and cannot be disabled. Disk encryption is performed at the partition level, targeting all partitions that may contain customer data. Exceptions include the EFI, boot, and disaster recovery partitions, which remain unencrypted to allow BIOS access.
-
LUKS implementation: The encryption uses Linux Unified Key Setup (LUKS), leveraging AES-XTS for encryption.
-
Key storage: Encryption keys are securely stored in the hardware TAM (Trusted Authentication Module).
-
User interaction: The encryption process is not configurable and does not alter how you interact with the filesystem. The accessibility of files depends on whether or not you are logged in to the router. If you are logged in, every data read is automatically decrypted and appears unencrypted to authorized users. However, without logging in, the data remains inaccessible and cannot be decrypted.
-
Secure erase and factory reset: The secure erase and factory reset functionalities are enhanced to delete the encryption key, ensuring that data cannot be recovered after these operations.
Restrictions for disk encryption
Disk encryption introduces the following differences in the installation and upgrade experience in routers.
IOS-XR software upgrades from versions earlier than 25.2.1 to version 25.2.1 or later
-
Preservation of harddisk:/
-
The router disk partitions requires reformatting for switching between encrypted and unencrypted layouts, which may lead to data loss.
-
Upgrades across the encryption boundary temporarily save up to 1 GB of files in the
/harddisk:/partition, starting with the smallest. However, the IOS XR configurations in router is completely preserved. -
Downgrading from an encrypted IOS XR version to an unencrypted version erases all data on the
/harddisk:/partition.
-
-
Downgrades to .iso containing owner/partner rpms are not supported. Reinstall these rpms after completing the downgrade.
-
The docker partition contents are lost during the upgrade, potentially causing application state loss.
IOS-XR software upgrades starting 25.2.1
-
If the router reloads during the upgrade but before executing the install commit command, it will attempt to boot the target image instead of the original image.
-
FPD upgrade
-
The FPDs upgrade during or immediately after bootup instead of before the reload, increasing router unavailability.
-
Interfaces may experience downtime (flapping) for a few minutes after the install completes.
-
Verify the FPD upgrades are complete using the show FPD status command.
-
-
The upgrade using install ISO with control over reload timing (install package replace command) is not supported. Attempting to use it results in an error.
-
Rollbacks are no longer supported for release upgrades. Use the install replace command with the previous golden iso instead.
Guidelines for disk encryption
Disk encryption introduces the following differences in the installation and upgrade experience in routers.
IOS-XR software upgrades from versions earlier than 25.2.1 to version 25.2.1 or later
-
Preservation of /harddisk:/
-
Create an archive of
/harddisk:/contents and copy it to an external location before performing an upgrade or downgrade. -
Restore the archive after completing the operation upgrade or downgrade.
-
Move EEM scripts to
/harddisk:/eemor/harddisk:/mirror/eemto preserve them.
-
-
Interaction with other features
-
The contents of
/var/lib/dockerare erased during the upgrade. Reinstall any rpms installed using appmgr after the upgrade. -
Upgrades to images with owner/partner rpms may not guarantee full robustness in case of power outage.
-
Execute disk-encryption deactivate location all command to disable the partial disk encryption feature before starting the upgrade.
-
IOS-XR software upgrades starting 25.2.1
-
You must upgrade the router only using the install replace command with .iso or golden ISO.
-
Execute the show install upgrade-matrix command to identify the SMUs required to be included in golden iso or to be installed before the upgrade.
Transactionality for release upgrades and downgrades
Transactionality is a behaviour that facilitates a rollback to the original software
-
after a failed upgrade, or
-
if the router reloads before you commit the changes.
|
Feature Name |
Release Information |
Feature Description |
|---|---|---|
|
Transactionality for release upgrades and downgrades |
Release 25.4.1 |
Introduced in this release on: Fixed Systems (8200 [ASIC: Q200]); Centralized Systems (8600 [ASIC: Q200]) ; Modular Systems (8800 [LC ASIC: Q200]) This feature ensures reliable rollback and system recovery by enabling a robust transactionality capability to release upgrade and downgrade operations thus allowing to rollback to the original software version if the upgrade to a new software fails. This feature, which was removed in Cisco IOS XR Release 25.2.1 as part of the caveats associated with the disk encryption feature is supported again from this release. This feature is supported only in a reimage operation where both the original image and the target image support transactionality. |
The transactionality feature for IOS XR release upgrades and downgrades was removed due to an associated caveat in the disk encryption feature introduced in Cisco IOS XR Release 25.2.1. This feature is supported again starting from Cisco IOS XR Release 25.4.1.
The transactionality feature results in a roll back to the original image if the reimage operation is unsuccessful or the router reloads before the commit thus ensuring operational stability and a better user experience.
Benefits of transactionality
These are some benefits that the transactionality capability for release upgrades and downgrades provides:
-
Ensures the system recovers to a stable state on failed release upgrade or downgrades.
-
Ensures rollback and software state consistency across redundant RPs and multi-node configurations, including Route Processor Switch Over (RPSO) or Route Processor Fail Over (RPFO).
-
Preserves user configuration, logs, and package information to ensure a smooth rollback to the original software state and reduce the risk of data loss.
-
Lays the groundwork to extend the transactionality capability on additional platforms as they migrate to supported disk layouts.
Prerequistes for transactionality
The transactionality feature for release upgrades and downgrades should be supported on both the original software and the target software for successful upgrades.
Guidelines for transactionality
These are some guidelines for the transactionality feature for release upgrades and downgrades:
-
Confirm that both the original and target software support the transactionality feature.
-
Recover the system manually if rollback fails due to partition corruption or disk issues.
-
Do not use explicit or manual reimage commands (such as install replace reimage ) if you require transactional rollback.
Restrictions for transactionality
These are some restrictions on the transactionality feature for release upgrades and downgrades:
-
Supported only on platforms that have disk encrption.
-
The caveat for transactionality associated with the disk encryption feature is removed only if the original software and the target software support the transactionality capability for release upgrades and downgrades.
-
Supported only for install replace operations.
-
Rollback to original image is supported only before an install commit .
-
install commit or install replace reimage are the only operations allowed after performing install replace for a release upgrade or downgrade and the router restarts.

 Feedback