Configuring FC-SP and DHCHAP

\

This chapter includes the following sections:

About Fabric Authentication

Fibre Channel Security Protocol (FC-SP) capabilities provide switch-switch and host-switch authentication to overcome security challenges for enterprise-wide fabrics. Diffie-Hellman Challenge Handshake Authentication Protocol (DHCHAP) is an FC-SP protocol that provides authentication between Cisco MDS 9000 Family switches and other devices. DHCHAP consists of the CHAP protocol combined with the Diffie-Hellman exchange.


Note


Support for FC-SP on Cisco MDS 9710 begins in Cisco NX-OS Release 6.2(9).

To authenticate through VFC ports, FC-SP peers use the port VSAN for communication. Hence, the port VSAN needs to be the same and active on both the peers to send and receive authentication messages.

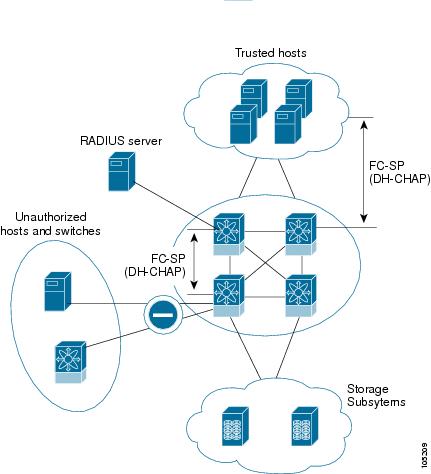
All switches in the Cisco MDS 9000 Family enable fabric-wide authentication from one switch to another switch, or from a switch to a host. These switch and host authentications are performed locally or remotely in each fabric. As storage islands are consolidated and migrated to enterprise-wide fabrics new security challenges arise. The approach of securing storage islands cannot always be guaranteed in enterprise-wide fabrics.

For example, in a campus environment with geographically distributed switches someone could maliciously interconnect incompatible switches or you could accidentally do so, resulting in Inter-Switch Link (ISL) isolation and link disruption. This need for physical security is addressed by switches in the Cisco MDS 9000 Family (see Switch and Host Authentication ).

Figure 1. Switch and Host Authentication

Note


Fibre Channel (FC) host bus adapters (HBAs) with appropriate firmware and drivers are required for host-switch authentication.

DHCHAP

DHCHAP is an authentication protocol that authenticates the devices connecting to a switch. Fibre Channel authentication allows only trusted devices to be added to a fabric, which prevents unauthorized devices from accessing the switch.


Note


The terms FC-SP and DHCHAP are used interchangeably in this chapter.

DHCHAP is a mandatory password-based, key-exchange authentication protocol. If DHCHAP is not enabled, devices connecting to the switch won't be authenticated, which could allow unauthorized access. It supports both switch-to-switch and host-to-switch authentication. DHCHAP negotiates hash algorithms and DH groups before performing authentication. It supports MD5 and SHA-1 algorithm-based authentication.

Configuring the DHCHAP feature requires the ENTERPRISE_PKG license (see the Cisco MDS 9000 Family NX-OS Licensing Guide).

To configure DHCHAP authentication using the local password database, follow these steps:

Procedure


Step 1

Enable DHCHAP.

Step 2

Identify and configure the DHCHAP authentication modes.

Step 3

Configure the hash algorithm and DH group.

Step 4

Configure the DHCHAP password for the local switch and other switches in the fabric.

Step 5

Configure the DHCHAP timeout value for reauthentication.

Step 6

Verify the DHCHAP configuration.


Example

This section includes the following topics:

DHCHAP Compatibility with Existing Cisco MDS Features

This section identifies the impact of configuring the DHCHAP feature along with existing Cisco MDS features:

  • PortChannel interfaces—If DHCHAP is enabled for ports belonging to a PortChannel, DHCHAP authentication is performed at the physical interface level, not at the PortChannel level.
  • FCIP interfaces—The DHCHAP protocol works with the FCIP interface just as it would with a physical interface.
  • Port security or fabric binding—Fabric binding policies are enforced based on identities authenticated by DHCHAP.
  • VSANs—DHCHAP authentication is not done on a per-VSAN basis.
  • High availability—DHCHAP authentication works transparently with existing HA features.

About Enabling DHCHAP

By default, the DHCHAP feature is disabled in all switches in the Cisco MDS 9000 Family.

You must explicitly enable the DHCHAP feature to access the configuration and verification commands for fabric authentication. When you disable this feature, all related configurations are automatically discarded.

Enabling DHCHAP

To enable DHCHAP for a Cisco MDS switch, follow these steps:

Procedure


Step 1

switch# configure terminal

Enters configuration mode.

Step 2

switch(config)# feature fcsp

Enables the DHCHAP in this switch.

Step 3

switch(config)# no feature fcsp

Disables (default) the DHCHAP in this switch.


About DHCHAP Authentication Modes

The DHCHAP authentication status for each interface depends on the configured DHCHAP port mode.

When the DHCHAP feature is enabled in a switch, each Fibre Channel interface or FCIP interface may be configured to be in one of four DHCHAP port modes:

  • On—During switch initialization, if the connecting device supports DHCHAP authentication, the software performs the authentication sequence. If the connecting device does not support DHCHAP authentication, the software moves the link to an isolated state.

  • Auto-Active—During switch initialization, if the connecting device supports DHCHAP authentication, the software performs the authentication sequence. If the connecting device does not support DHCHAP authentication, the software continues with the rest of the initialization sequence.

  • Auto-Passive (default)—The switch does not initiate DHCHAP authentication, but participates in DHCHAP authentication if the connecting device initiates DHCHAP authentication.

  • Off—The switch does not support DHCHAP authentication. Authentication messages sent to such ports return error messages to the initiating switch.

While performing non-disruptive software upgrades (NDSU/ISSU) on linecards, FC-SP reauthentication may fail for ISLs on the upgrading linecard, causing port suspension even though the dataplane remains operational.

To avoid this, temporarily disable the FC-SP reauthentication timer on the affected ISL interfaces on both ends of the link before starting the upgrade, and re-enable it after the upgrade is complete. This applies to all FC-SP modes that use reauthentication timers. Disabling and enabling FC-SP reauthentication timer is non disruptive.

Before performing non-disruptive linecard upgrades:

  • Temporarily remove the reauthentication interval on affected ISL interfaces on both sides of the link:

    switch(config)# interface fc<x/y>
    switch(config-if)# fcsp on 0
  • Perform the linecard upgrade.

  • Re-enable the reauthentication interval after the upgrade completes:

    switch(config)# interface fc<x/y>
    switch(config-if)# fcsp on <minutes>

Note


This limitation applies to all FC-SP modes with reauthentication timers such as fcsp on time , fcsp auto-active time , fcsp auto-passivetime on ISLs terminating on linecards undergoing control plane reload.


Note


Whenever DHCHAP port mode is changed to a mode other than the Off mode, reauthentication is performed.

Changing DHCHAP port mode for a VE link requires a port flap on both the ends.


The following table identifies the switch-to-switch authentication behavior between two Cisco MDS switches in various modes.

Table 1. DHCHAP Authentication Status Between Two MDS Switches

Switch N DHCHAP Modes

Switch 1 DHCHAP Modes

on

auto-active

auto-passive

off

on

FC-SP authentication is performed.

FC-SP authentication is performed.

FC-SP authentication is performed.

Link is brought down.

auto-active

FC-SP authentication is not performed.

auto-passive

FC-SP authentication is not performed.

off

Link is brought down.

FC-SP authentication is not performed.

Configuring the DHCHAP Mode

To configure the DHCHAP mode for a particular interface, follow these steps:

Procedure


Step 1

switch# configure terminal

Enters configuration mode.

Step 2

switch(config)# interface fc2/1-3

switch(config-if)#

Selects a range of interfaces and enters the interface configuration submode.

Step 3

switch(config-if)# fcsp on

Sets the DHCHAP mode for the selected interfaces to be in the on state.

Step 4

switch(config-if)# no fcsp on

(Optional) Reverts to the factory default of auto-passive for these three interfaces.

Step 5

switch(config-if)# fcsp auto-active 0

Changes the DHCHAP authentication mode for the selected interfaces to auto-active. Zero (0) indicates that the port does not perform reauthentication.

Step 6

switch(config-if)# fcsp auto-active 120

Changes the DHCHAP authentication mode to auto-active for the selected interfaces and enables reauthentication every two hours (120 minutes) after the initial authentication.

Step 7

switch(config-if)# fcsp auto-active

Changes the DHCHAP authentication mode to auto-active for the selected interfaces. Reauthentication is disabled (default).


About DHCHAP Hash Algorithm

Cisco MDS switches support a default hash algorithm priority list of MD5 followed by SHA-1 for DHCHAP authentication.


Tip


If you change the hash algorithm configuration, then change it globally for all switches in the fabric.


Caution


If AAA authentication for fcsp dhchap is enabled, the MD5 hash algorithm must be set if AAA authentication uses RADIUS or TACACS+. This is because RADIUS and TACACS+ applications do not support other hash algorithms.


Configuring the DHCHAP Hash Algorithm

To configure the hash algorithm, follow these steps:

Procedure


Step 1

switch# configure terminal

Enters configuration mode.

Step 2

switch(config)# fcsp dhchap hash sha1

Configures the use of only the SHA-1 hash algorithm.

Step 3

switch(config)# fcsp dhchap hash MD5

Configures the use of only the MD5 hash algorithm.

Step 4

switch(config)# fcsp dhchap hash md5 sha1

Defines the use of the default hash algorithm priority list of MD5 followed by SHA-1 for DHCHAP authentication.

Step 5

switch(config)# no fcsp dhchap hash sha1

Reverts to the default priority list of the MD5 hash algorithm followed by the SHA-1 hash algorithm.


About DHCHAP Group Settings

FC-SP supports multiple DHCHAP groups. The allowed groups may be changed from the default list. The list is configured in the order of highest to lowest priority to be used when negotiating with the FC-SP peer. Each side compares the list of groups received with the local group list and the highest priority group is used. Each group should be specified no more than once in the configuration command.

Refer to the fcsp dhchap dhgroup command in the Cisco MDS 9000 Series NX-OS Command Reference Guide for details about the groups.


Tip


If you change the DH group configuration, change it globally for all switches in the fabric.


Configuring the DHCHAP Group Settings

To change the DH group settings, follow these steps:

Procedure


Step 1

switch# configure terminal

Enters configuration mode.

Step 2

switch(config)# fcsp dhchap dhgroup 2 3 4

Specifies the list of DH groups to be use. The list is specified in order of descending priority. Unspecified groups are excluded from use by DHCHAP.

Step 3

switch(config)# no fcsp dhchap dhgroup 2 3 4

(Optional) Reverts to the DHCHAP default order.


About DHCHAP Password

DHCHAP authentication in each direction requires a shared secret password between the connected devices. To do this, you can use one of three approaches to manage passwords for all switches in the fabric that participate in DHCHAP.

  • Approach 1—Use the same password for all switches in the fabric. This is the simplest approach. When you add a new switch, you use the same password to authenticate that switch in this fabric. It is also the most vulnerable approach if someone from the outside maliciously attempts to access any one switch in the fabric.
  • Approach 2—Use a different password for each switch and maintain that password list in each switch in the fabric. When you add a new switch, you create a new password list and update all switches with the new list. Accessing one switch yields the password list for all switches in that fabric.
  • Approach 3—Use different passwords for different switches in the fabric. When you add a new switch, multiple new passwords corresponding to each switch in the fabric must be generated and configured in each switch. Even if one switch is compromised, the password of other switches are still protected. This approach requires considerable password maintenance by the user.

Note


All passwords are restricted to 64 alphanumeric characters and can be changed, but not deleted.

Tip


We recommend using RADIUS or TACACS+ for fabrics with more than five switches. If you need to use a local password database, you can continue to do so using Approach 3 and using the Cisco MDS 9000 Family Fabric Manager to manage the password database.


Configuring DHCHAP Passwords for the Local Switch

To configure the DHCHAP password for the local switch, follow these steps:

Procedure


Step 1

switch# configure terminal

Enters configuration mode.

Step 2

switch(config)# fcsp dhchap password 0 mypassword

Configures a clear text password for the local switch.

Step 3

switch(config)# fcsp dhchap password 0 mypassword 30:11:bb:cc:dd:33:11:22

Configures a clear text password for the local switch to be used for the device with the specified WWN.

Step 4

switch(config)# no fcsp dhchap password 0 mypassword 30:11:bb:cc:dd:33:11:22

(Optional) Removes the clear text password for the local switch to be used for the device with the specified WWN.

Step 5

switch(config)# fcsp dhchap password 7 sfsfdf

Configures a password entered in an encrypted format for the local switch.

Step 6

switch(config)# fcsp dhchap password 7 sfsfdf 29:11:bb:cc:dd:33:11:22

Configures a password entered in an encrypted format for the local switch to be used for the device with the specified WWN.

Step 7

switch(config)# no fcsp dhchap password 7 sfsfdf 29:11:bb:cc:dd:33:11:22

(Optional) Removes the password entered in an encrypted format for the local switch to be used for the device with the specified WWN.

Step 8

switch(config)# fcsp dhchap password mypassword1

Configures a clear text password for the local switch to be used with any connecting device.


About Password Configuration for Remote Devices

You can configure passwords in the local authentication database for other devices in a fabric. The other devices are identified by their device name, which is also known as the switch WWN or device WWN. The password is restricted to 64 characters and can be specified in clear text (0) or in encrypted text (7).


Note


The switch WWN identifies the physical switch. This WWN is used to authenticate the switch and is different from the VSAN node WWN.

Configuring DHCHAP Passwords for Remote Devices

To locally configure the remote DHCHAP password for another switch in the fabric, follow these steps:

Procedure


Step 1

switch# configure terminal

Enters configuration mode.

Step 2

switch(config)# fcsp dhchap devicename 00:11:22:33:44:aa:bb:cc password NewPassword

Configures a password for another switch in the fabric that is identified by the switch WWN device name.

Step 3

switch(config)# no fcsp dhchap devicename 00:11:22:33:44:aa:bb:cc password NewPassword

(Optional) Removes the password entry for this switch from the local authentication database.

Step 4

switch(config)# fcsp dhchap devicename 00:11:55:66:00:aa:bb:cc password 0 NewPassword

Configures a clear text password for another switch in the fabric that is identified by the switch WWN device name.

Step 5

switch(config)# fcsp dhchap devicename 00:11:22:33:55:aa:bb:cc password 7 asdflkjh

Configures a password entered in an encrypted format for another switch in the fabric that is identified by the switch WWN device name.


About DHCHAP Timeout Value

During the DHCHAP protocol exchange, if the MDS switch does not receive the expected DHCHAP message within a specified time interval, authentication failure is assumed. The time ranges from 20 (no authentication is performed) to 1000 seconds. The default is 30 seconds.

When changing the timeout value, consider the following factors:

  • The existing RADIUS and TACACS+ timeout values.
  • The same value must also be configured on all switches in the fabric.

Configuring the DHCHAP Timeout Value

To configure the DHCHAP timeout value, follow these steps:

Procedure


Step 1

switch# configure terminal

Enters configuration mode.

Step 2

switch(config)# fcsp timeout 60

Configures the reauthentication timeout to be 60 seconds.

Step 3

switch(config)# no fcsp timeout 60

(Optional) Reverts to the factory default of 30 seconds.


Configuring DHCHAP AAA Authentication

You can individually set authentication options. If authentication is not configured, local authentication is used by default.

To configure the AAA authentication follow these steps:

Procedure


Step 1

switch# configure terminal

Enters configuration mode.

Step 2

switch(config)# aaa authentication dhchap default group TacacsServer1

Enables DHCHAP to use the TACACS+ server group (in this example, TacacsServer1) for authentication.

Step 3

switch(config)# aaa authentication dhchap default local

Enables DHCHAP for local authentication.

Step 4

switch(config)# aaa authentication dhchap default group RadiusServer1

Enables DHCHAP to use the RADIUS server group (in this example, RadiusServer1) for authentication.


Displaying Protocol Security Information

Use the show fcsp commands to display configurations for the local database (see the following examples).

Displays DHCHAP Configurations in FC Interfaces

switch# show fcsp interface fc1/9
 
fc1/9:
        fcsp authentication mode:SEC_MODE_ON
        Status: Successfully authenticated
switch# show fcsp interface fc1/9 statistics 
 
fc1/9:
        fcsp authentication mode:SEC_MODE_ON
        Status: Successfully authenticated
        Statistics:
        FC-SP Authentication Succeeded:5
        FC-SP Authentication Failed:0
        FC-SP Authentication Bypassed:0
switch# show fcsp interface fc 2/1 wwn

fc2/1:
        fcsp authentication mode:SEC_MODE_ON
        Status: Successfully authenticated
        Other device's WWN:20:00:00:e0:8b:0a:5d:e7
switch# show fcsp dhchap

Supported Hash algorithms (in order of preference):
DHCHAP_HASH_MD5
DHCHAP_HASH_SHA_1
Supported Diffie Hellman group ids (in order of preference):
DHCHAP_GROUP_NULL
DHCHAP_GROUP_1536
DHCHAP_GROUP_1024
DHCHAP_GROUP_1280
DHCHAP_GROUP_2048
switch# show fcsp dhchap database

DHCHAP Local Password:
        Non-device specific password:**********
        Password for device with WWN:29:11:bb:cc:dd:33:11:22 is ******
        Password for device with WWN:30:11:bb:cc:dd:33:11:22 is *********
Other Devices' Passwords:
        Password for device with WWN:00:11:22:33:44:aa:bb:cc is ***********
switch# show fcsp asciiwwn 30:11:bb:cc:dd:33:11:22

Ascii representation of WWN to be used with AAA servers:Ox_3011bbccdd331122

Tip


Use the ASCII representation of the device WWN (identified in bold in Displays the ASCII Representation of the Device WWN example) to configure the switch information on RADIUS and TACACS+ servers.


Sample Configuration

This section provides the steps to configure the example illustrated in Sample DHCHAP Authentication.

Figure 2. Sample DHCHAP Authentication

To configure the authentication setup shown in Sample DHCHAP Authentication, follow these steps:

Procedure


Step 1

Obtain the device name of the MDS 9216 Switch in the fabric. The MDS 9216 Switch in the fabric is identified by the switch WWN.

MDS-9216# show wwn switch
Switch WWN is 20:00:00:05:30:00:54:de

Step 2

Explicitly enable DHCHAP in this switch.

MDS-9216(config)# feature fcsp

Note

 
When you disable DHCHAP, all related configurations are automatically discarded.

Step 3

Configure a clear text password for this switch. This password will be used by the connecting device.

MDS-9216(config)# fcsp dhchap password rtp9216

Step 4

Configures a password for another switch in the fabric that is identified by the switch WWN device name.

MDS-9216(config)# fcsp dhchap devicename 20:00:00:05:30:00:38:5e password rtp9509

Step 5

Enable the DHCHAP mode for the required Fibre Channel interface.

MDS-9216(config)# interface fc 1/16
MDS-9216(config-if)# fcsp on

Note

 
Whenever DHCHAP port mode is changed to a mode other than the Off mode, reauthentication is performed.

Step 6

Verify the protocol security information configured in this switch by displaying the DHCHAP local password database.

MDS-9216# show fcsp dhchap database
DHCHAP Local Password:
        Non-device specific password:*******
Other Devices' Passwords:
        Password for device with WWN:20:00:00:05:30:00:38:5e is *******

Step 7

Display the DHCHAP configuration in the Fibre Channel interface.

MDS-9216# show fcsp interface fc 1/6
fc1/6
        fcsp authentication mode:SEC_MODE_ON
        Status:Successfully authenticated

Step 8

Repeat these steps on the connecting MDS 9509 Switch.

MDS-9509# show wwn switch
Switch WWN is 20:00:00:05:30:00:38:5e

MDS-9509(config)# feature fcsp
MDS-9509(config)# fcsp dhchap password rtp9509
MDS-9509(config)# fcsp dhchap devicename 20:00:00:05:30:00:54:de password rtp9216
MDS-9509(config)# interface fc 4/5
MDS-9509(config-if)# fcsp on
MDS-9509# show fcsp dhchap database

DHCHAP Local Password:
        Non-device specific password:*******
Other Devices' Passwords:
        Password for device with WWN:20:00:00:05:30:00:54:de is *******

MDS-9509# show fcsp interface fc 4/5

Fc4/5
        fcsp authentication mode:SEC_MODE_ON
        Status:Successfully authenticated

You have now enabled and configured DHCHAP authentication for the sample setup in Sample DHCHAP Authentication.


Default Settings

The following table lists the default settings for all fabric security features in any switch.

Table 2. Default Fabric Security Settings

Parameters

Default

DHCHAP feature

Disabled

DHCHAP hash algorithm

A priority list of MD5 followed by SHA-1 for DHCHAP authentication

DHCHAP authentication mode

Auto-passive

DHCHAP group default priority exchange order

0, 4, 1, 2, and 3 respectively

DHCHAP timeout value

30 seconds