Configuring Certificate Authorities and Digital Certificates

This chapter includes the following sections:

About Certificate Authorities and Digital Certificates

Public Key Infrastructure (PKI) support provides the means for the Cisco MDS 9000 Family switches to obtain and use digital certificates for secure communication in the network. PKI support provides manageability and scalability for IPsec/IKE and SSH.

Purpose of Certificate Authorities and Digital Certificates

Certificate Authorities (CAs) manage certificate requests and issue certificates to participating entities such as hosts, network devices, or users. The CAs provide centralized key management for the participating entities.

Digital signatures, based on public key cryptography, digitally authenticate devices and individual users. In public key cryptography, such as the RSA encryption system, each device or user has a key-pair consisting of both a private key and a public key. The private key is kept secret and is known only to the owning device or user. However, the public key is known to everybody. The keys act as complements. Anything encrypted with one of the keys can be decrypted with the other. A signature is formed when data is encrypted with a sender’s private key. The receiver verifies the signature by decrypting the message with the sender’s public key. This process relies on the receiver having a copy of the sender’s public key and knowing with a high degree of certainty that it really does belong to the sender and not to someone pretending to be the sender.

Digital certificates link the digital signature to the sender. A digital certificate contains information to identify a user or device, such as the name, serial number, company, department, or IP address. It also contains a copy of the entity’s public key. The certificate is itself signed by a CA, a third party that is explicitly trusted by the receiver to validate identities and to create digital certificates.

To validate the signature of the CA, the receiver must first know the CA’s public key. Normally this process is handled out-of-band or through an operation done at installation. For instance, most web browsers are configured with the public keys of several CAs by default. Internet Key Exchange (IKE), an essential component of IPsec, can use digital signatures at scale to authenticate peer devices before setting up security associations.

Trust Model, Trust Points, and Identity Certificate Authorities

The trust model that is used in PKI support is hierarchical with multiple configurable trusted Certificate Authorities (CAs). Each participating entity is configured with a list of CAs to be trusted so that the peer’s certificate that is obtained during the security protocol exchanges can be verified, provided it has been issued by one of the locally trusted CAs. To accomplish this, the CA’s self-signed root certificate (or certificate chain for a subordinate CA) is locally stored. The process of securely obtaining and storing this locally is called CA authentication. This is a mandatory step in trusting a CA.

The information about a trusted CA that is locally configured is called the trust point and the CA itself is called a trust point CA. This information consists of CA certificate (or certificate chain in case of a subordinate CA) and the certificate revocation checking information.

An identity is the name of device. An identity certificate (also known as public key or digital certificates) is a public key certificate of a device that has been signed by a trust point. An identity CA is a trust point that can issue identity certificates.

The process of enrolling an MDS switch with a trust point to obtain an identity certificate for a set of applications (for example, IPsec/IKE) is called enrollment. This trust point is called an identity CA.

When a secure client makes a connection to a server, it does not offer an identity certificate to the server, but the server does offer an identity certificate to the client. Thus, for switch client applications such as the SSH or DHCP clients, it is required to have an authenticated CA, but not required to install identity certificates.

The client validates the incoming identity certificate chain from server using an authenticated CA. The CA is chosen from either the bundled trust pool (public root CA certificates prepackaged with the image) or the user installed trust points. User trust points may be used if the switch is air-gapped and cannot reach public root CAs or the user has a local trust domain with local root CAs.

Secure switch-based servers, such as the HTTPS NX-API service, need both an authenticated CA (trust point) and identity certificates.

RSA Key-Pairs and Identity Certificates

You can generate one or more RSA key-pairs and associate each RSA key-pair with a trust point CA where the MDS switch intends to enroll to obtain an identity certificate. The MDS switch needs only one identity per CA, which consists of one key-pair and one identity certificate per CA.

Cisco MDS NX-OS allows you to generate RSA key-pairs with a configurable key size (or modulus). Key-pairs may also be generated on other devices and imported on to the MDS switch. You can configure a label for each RSA key-pair. For information about RSA key-pair maximums and defaults, see the Table 1 Maximum Limits for CA and Digital Certificate and Table 2 Default CA and Digital Certificate Parameters.

The following list summarizes the relationship between trust points, RSA key-pairs, and identity certificates:

  • A trust point corresponds to a specific CA that the MDS switch trusts for peer certificate verification for any application (such as IKE or SSH).

  • An MDS switch can have many trust points and all applications on the switch can trust a peer certificate issued by any of the trust point CAs.

  • A trust point is not restricted to a specific application.

  • An MDS switch enrolls with the CA corresponding to the trust point to obtain an identity certificate. You can enroll your switch with multiple trust points thereby obtaining a separate identity certificate from each trust point. The identity certificates are used by applications depending upon the purposes specified in the certificate by the issuing CA. The purpose of a certificate is stored in the certificate as certificate extensions.

  • When enrolling with a trust point, you must specify an RSA key-pair to be certified. This key-pair must be generated and associated to the trust point before generating the enrollment request. The association between the trust point, key-pair, and identity certificate is valid until it is explicitly removed by deleting the certificate, key-pair, or trust point.

  • The subject name in the identity certificate is the fully qualified domain name for the MDS switch.

  • You can generate one or more RSA key-pairs on a switch and each can be associated to one or more trust points. But no more than one key-pair can be associated to a trust point, which means only one identity certificate is allowed from a CA.

  • If multiple identity certificates (each from a distinct CA) have been obtained, the certificate that an application selects to use in a security protocol exchange with a peer is application-specific.

  • You do not need to designate trust points for an application. Any application can use any certificate issued by any trust point as long as the certificate purpose satisfies the application requirements.

  • You do not need more than one identity certificate from a trust point or more than one key-pair to be associated to a trust point. A CA certifies a given identity (name) only once and does not issue multiple certificates with the same subject name. If you need more than one identity certificate for a CA, then define another trust point for the same CA, associate another key-pair to it, and have it certified, provided CA allows multiple certificates with the same subject name.

Multiple Trusted Certificate Authorities

Multiple trusted (Certificate Authorities) CA support enables a switch to verify the identity of devices enrolled in different CA domains. With multiple trusted CAs, you do not have to enroll a switch with the specific CA that issued a certificate to a peer. Instead, you configure the switch with multiple trusted CAs that the peer also trusts. A switch can then use a configured trusted CA to verify certificates offered by a peer that were not issued by the same CA defined in the identity certificate of the local switch. This can be used by IKE when establishing IPsec tunnels.

Multiple Identity Certificate Authorities

Multiple identity Certificate Authorities (CA) support enables a switch to enroll with more than one trust point. This results in multiple identity certificates; each from a distinct CA. This allows the switch to participate in IPsec and other applications with many peers using certificates issued by appropriate CAs that are acceptable to those peers.

The multiple RSA key-pair support feature allows the switch to maintain a distinct key-pair for each CA with which it is enrolled. Thus, it can match policy requirements for each CA without conflicting with the requirements specified by the other CAs, such as key length. When enrolling with a trust point, the associated key-pair is used to construct the certificate signing request.
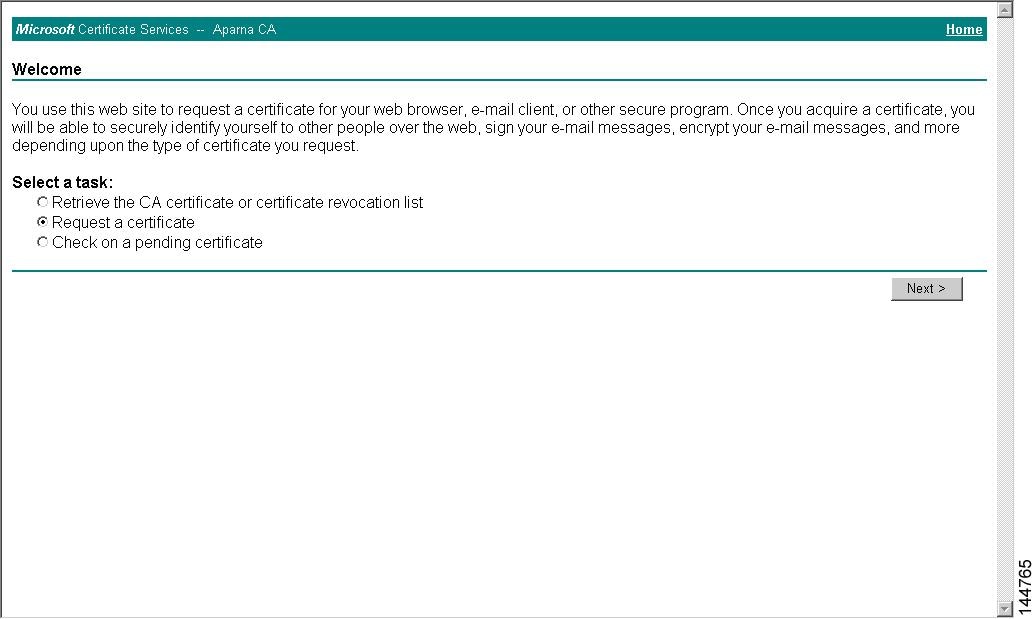
PKI Enrollment

Public Key Infrastructure (PKI) Enrollment is the process of obtaining an identity certificate for the switch that is used for applications such as IPsec/IKE or SSH. It occurs between the MDS switch requesting the certificate and the Certificate Authority.

The figure below and the following steps describe the certificate enrollment process.

Figure 1. Certificate Enrollment Process

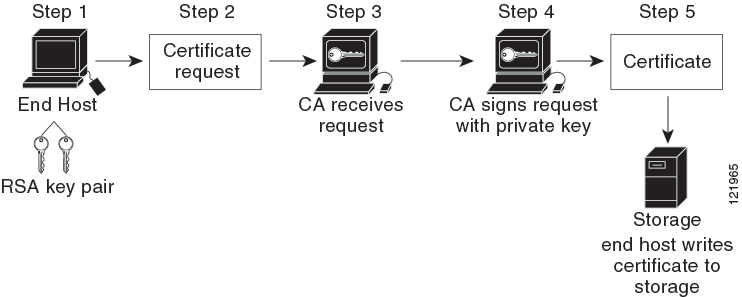
The process involves the following steps:

  1. Generate an RSA private and public key-pair.

  2. Generate a Certificate Signing Request (CSR) in standard format and forward it to the CA.

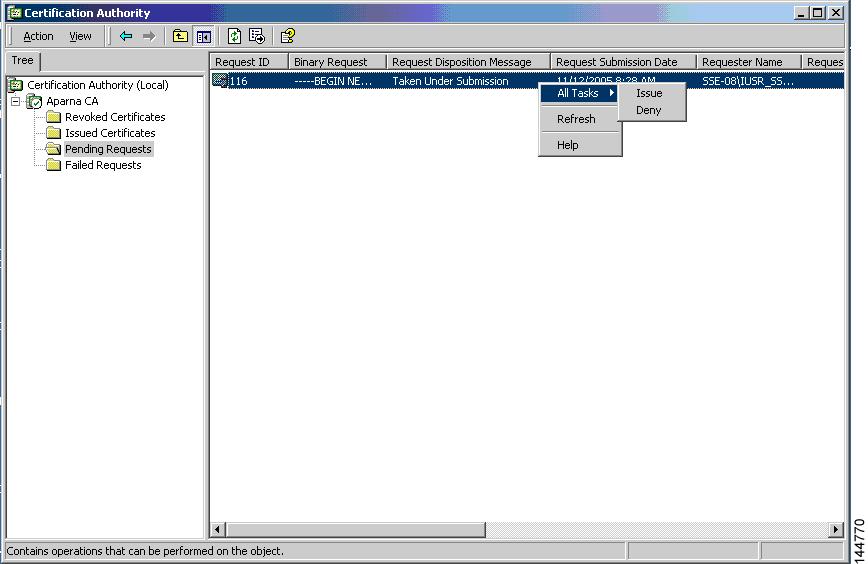
  3. Approve the CSR on the CA to generate the identity certificate, signed by the CA’s private key, and forward it to the MDS switch administrator. Manual intervention on the CA by the CA administrator may be required to approve the request.

  4. Install the identity certificate from the CA on the MDS switch.

  5. Save the certificate into a nonvolatile storage area on the MDS switch.

RSA key-pairs and CSRs may be generated either on the switch or on another device with suitable utilities. If key-pairs are generated on another device they must be installed on the MDS switch as well as the identity certificates. The MDS switch does not support all the possible fields for CSRs. CSR generating tools on other devices may allow specification of more fields than enrollment done from the MDS switch.

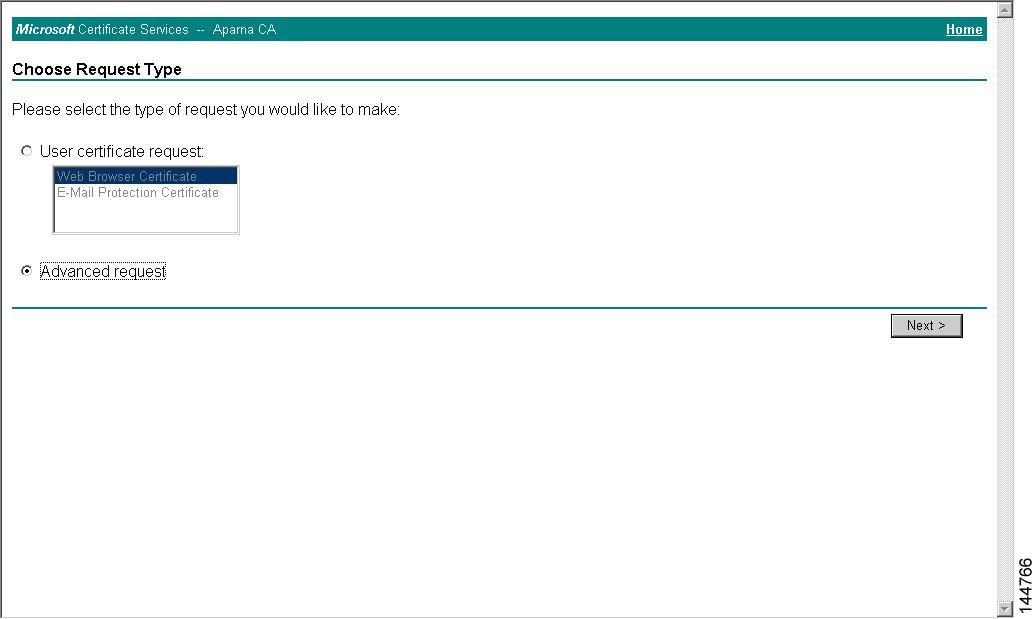
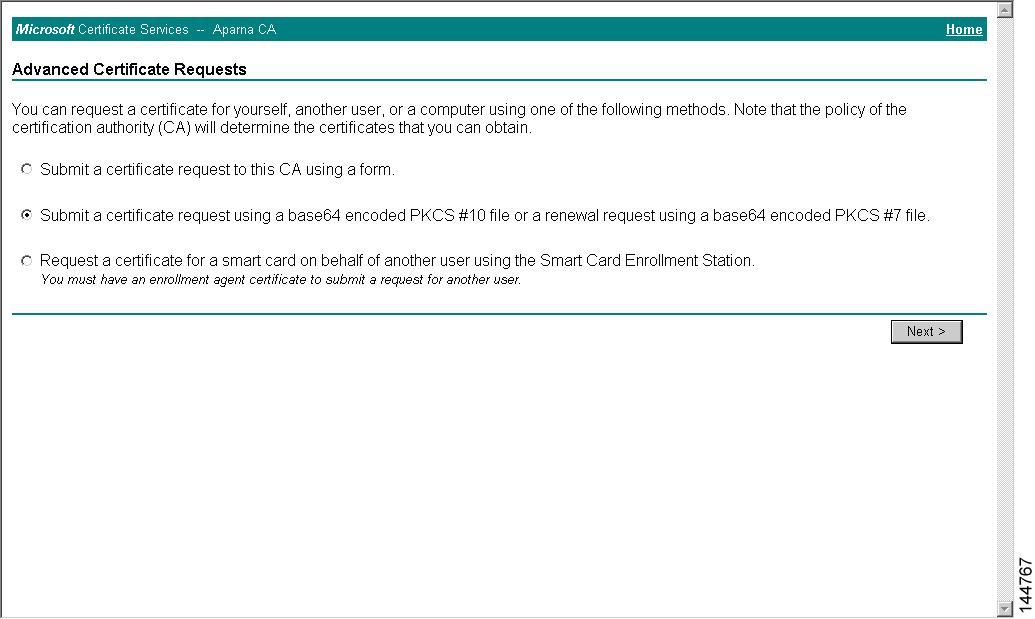
Manual Enrollment Using the Cut-and-Paste Method

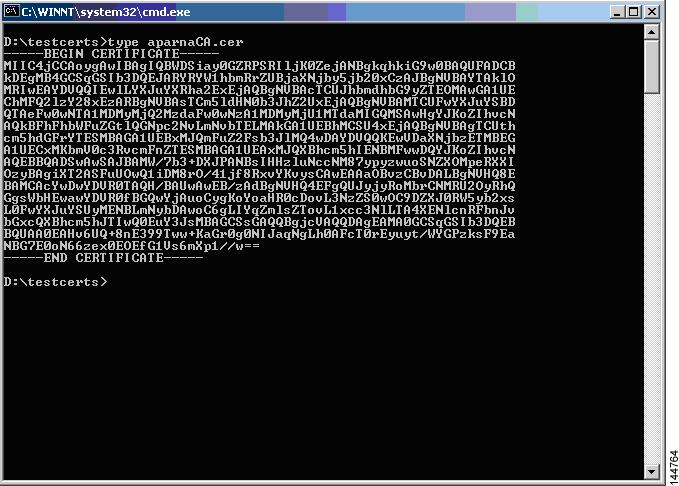
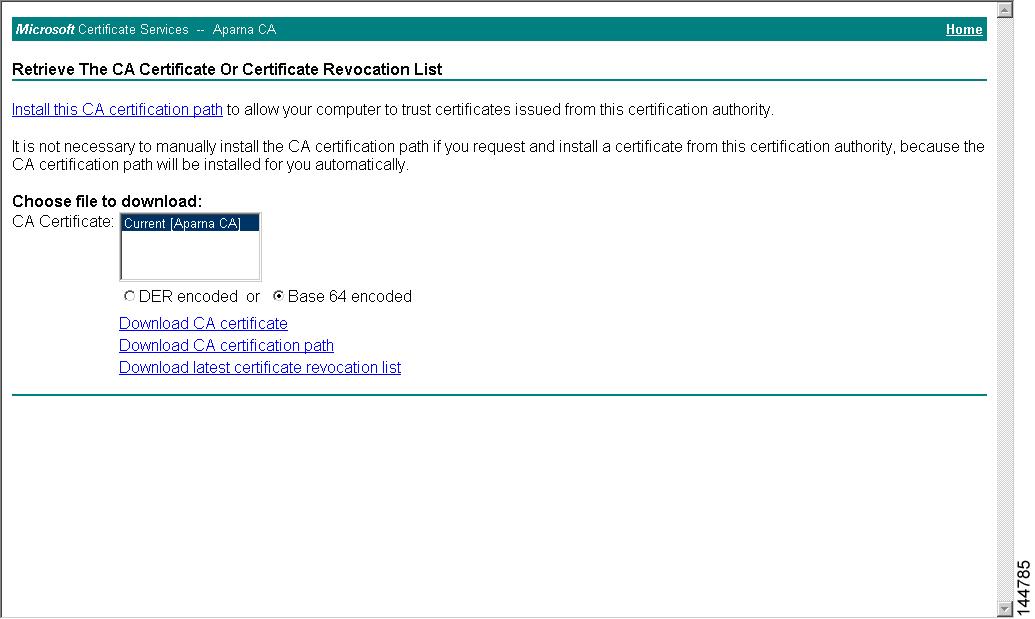
Cisco MDS NX-OS supports certificate retrieval and enrollment using the manual cut-and-paste method. Cut-and-paste enrollment means you must cut and paste the certificate requests and resulting certificates between the switch and the CA, as follows:

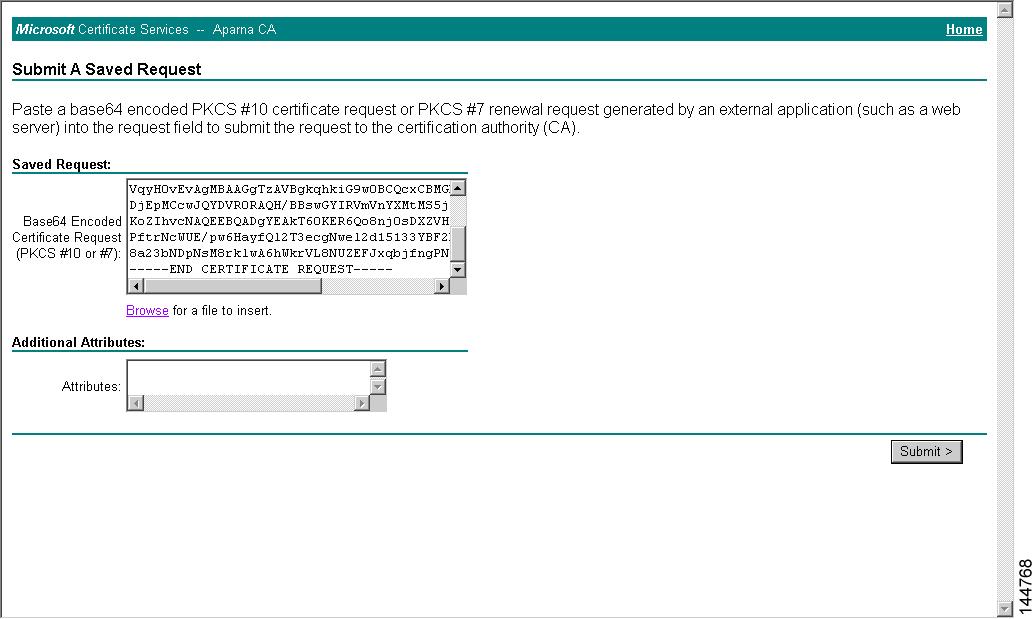
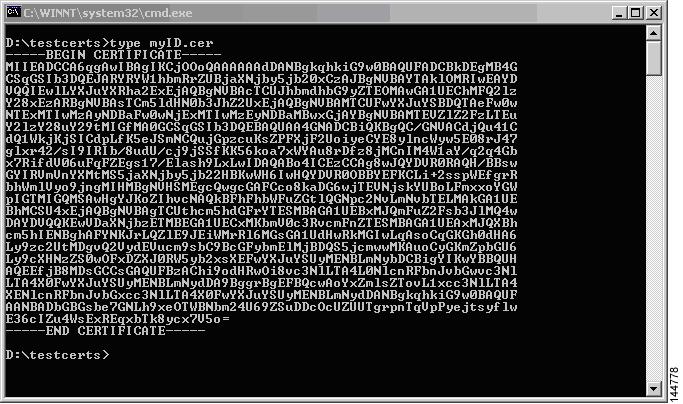
  1. Create an enrollment certificate signing request, which is displayed in base64 encoded textform.

  2. Cut and paste the encoded certificate request text in an e-mail message and send itto the CA or in a web form on the CA.

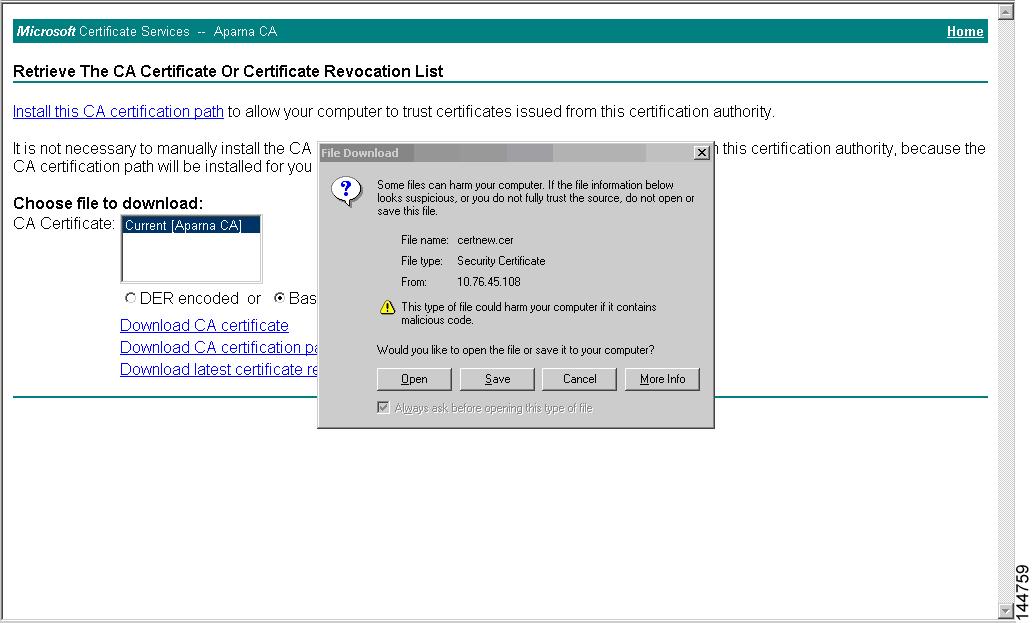
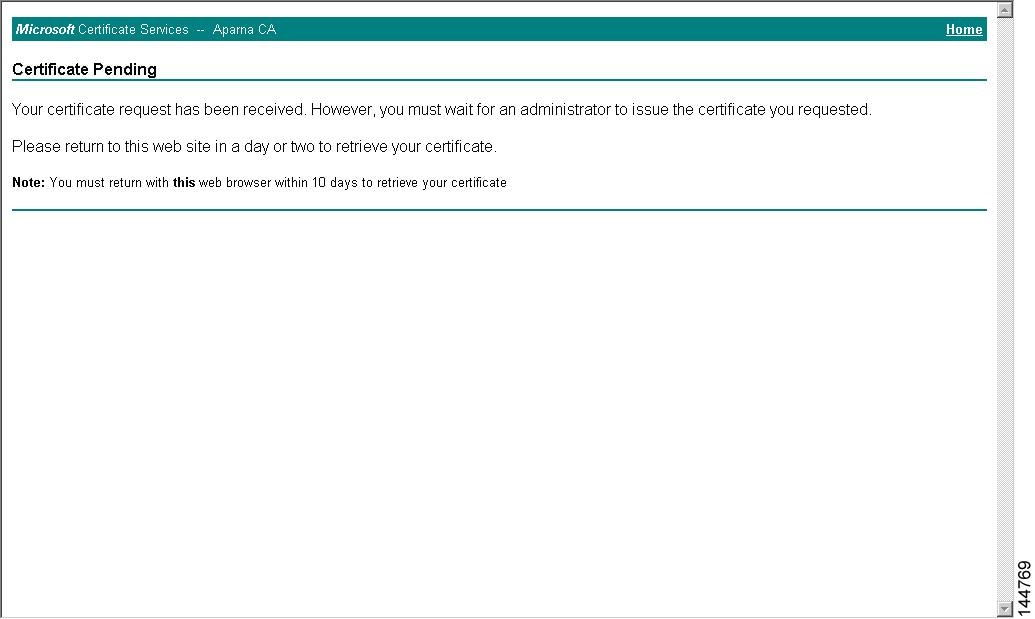
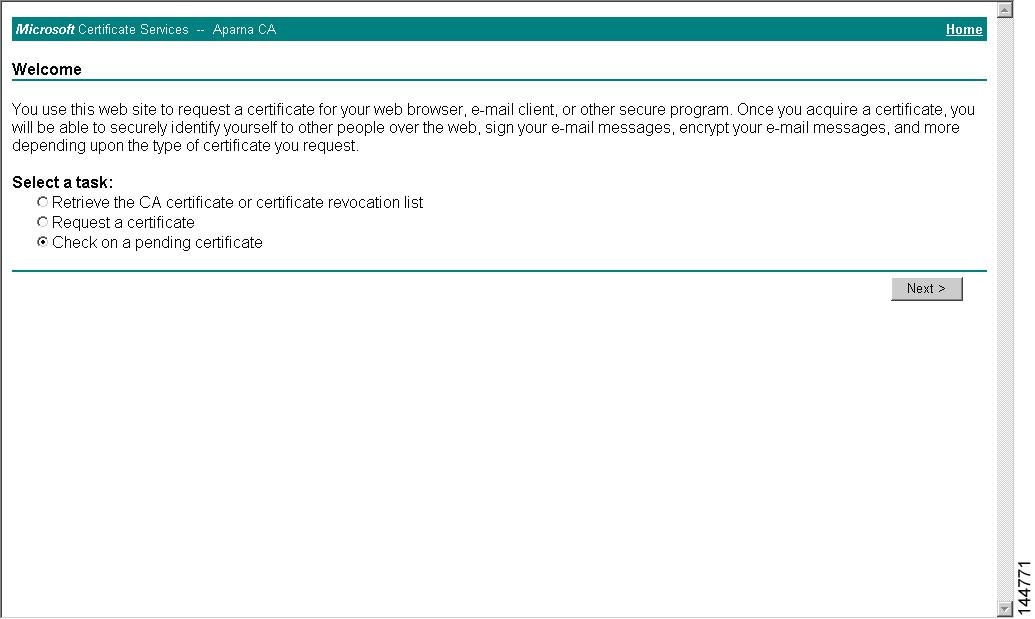
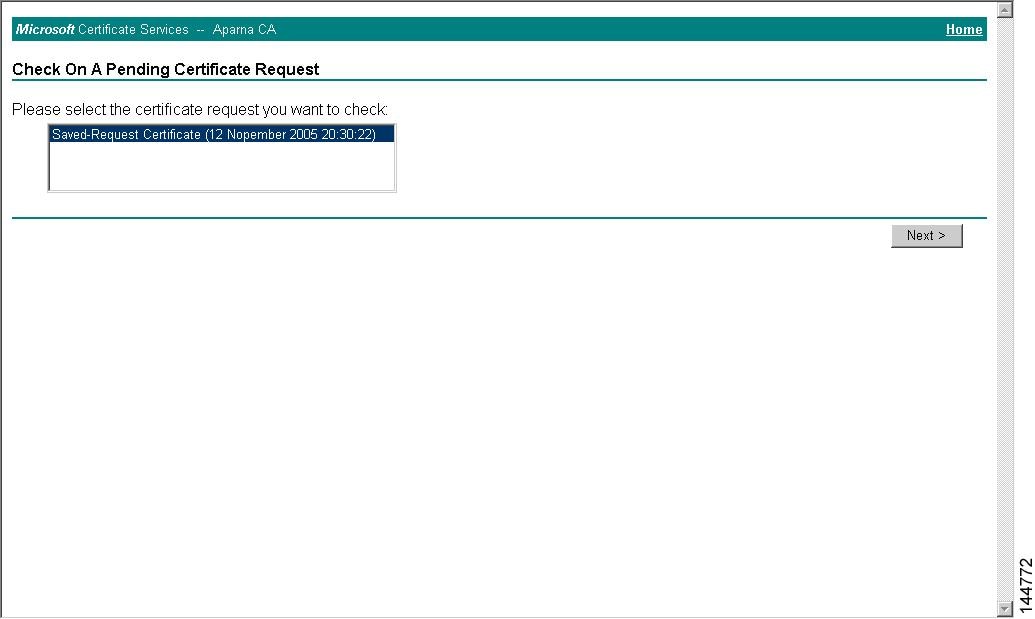
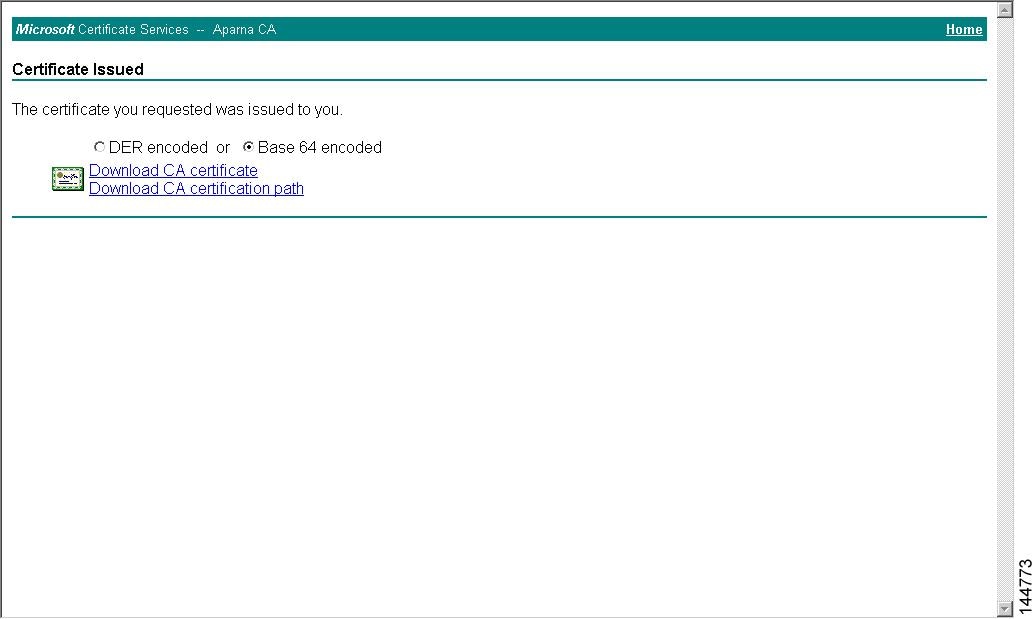
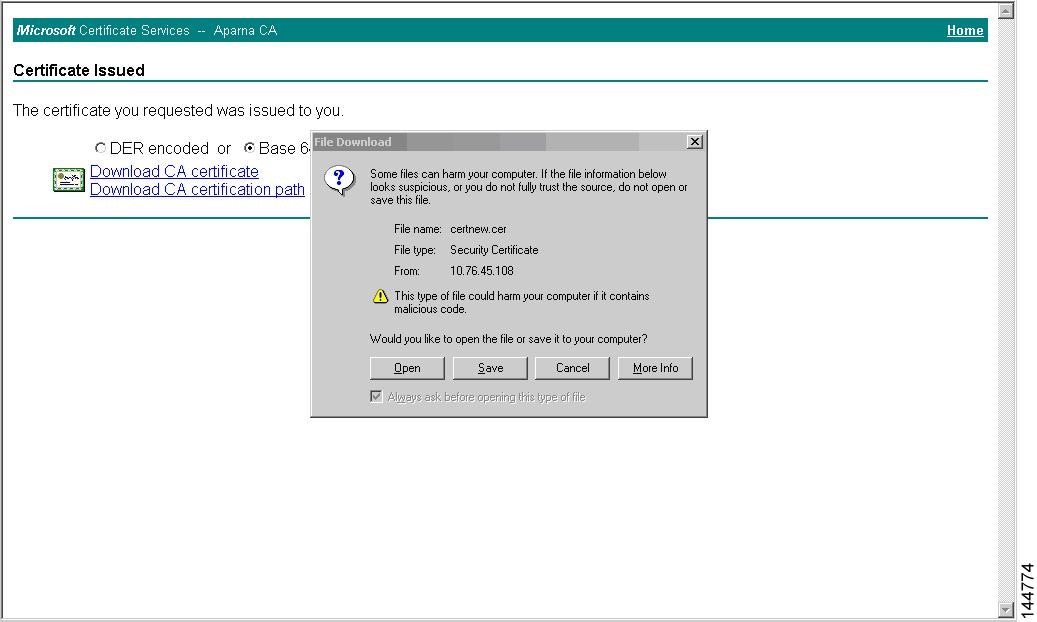
  3. Receive the issued certificate in base64 encoded text form from the CA in an e-mail message or ina web browser download.

  4. Cut and paste the issued certificate to the switch using the certificate import command.

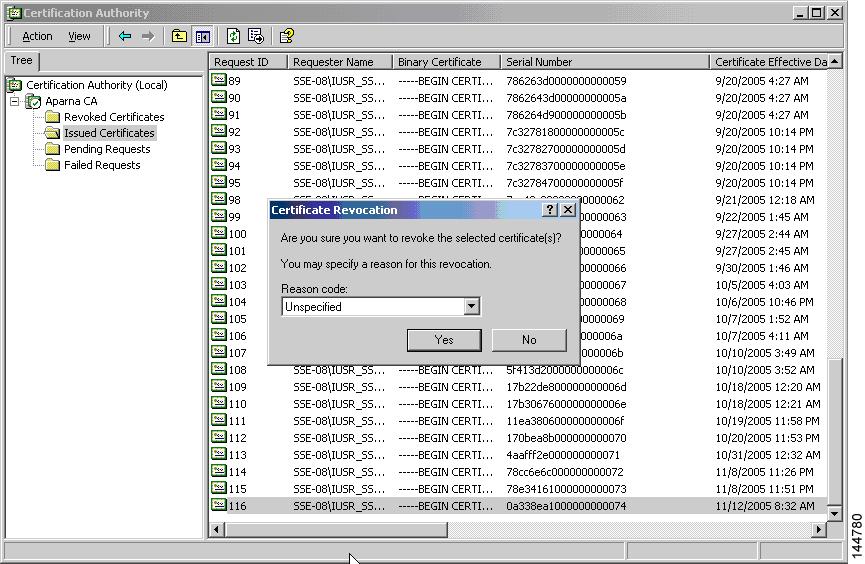
Peer Certificate Verification

PKI support on an MDS switch provides the means to verify peer certificates. The switch verifies certificates presented by peers during security exchanges for applications, such as IPsec/IKE and SSH. The applications verify the validity of the peer certificates presented to them. The peer certificate verification process involves the following steps:

  • Verifies that the peer certificate is issued by one of the locally trusted CAs.

  • Verifies that the peer certificate is valid (not expired) with respect to current time.

  • Verifies that the peer certificate is not yet revoked by the issuing CA.

For revocation checking, the switch can use the certificate revocation list (CRL) method. A trust point uses the CRL method to verify that the peer certificate has not been revoked.

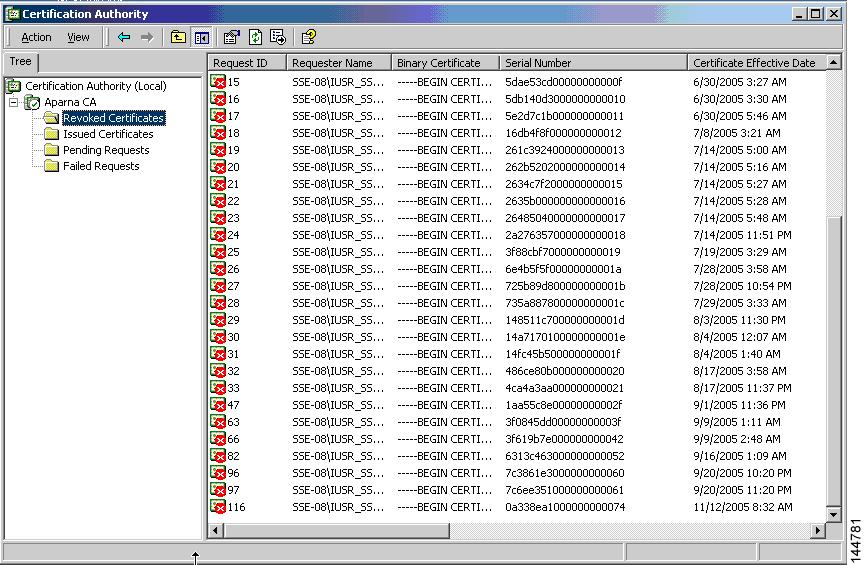
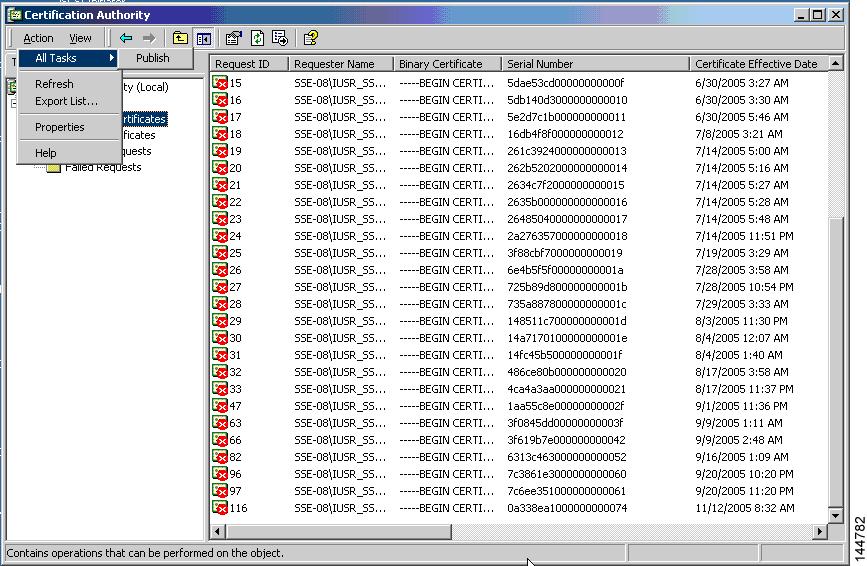
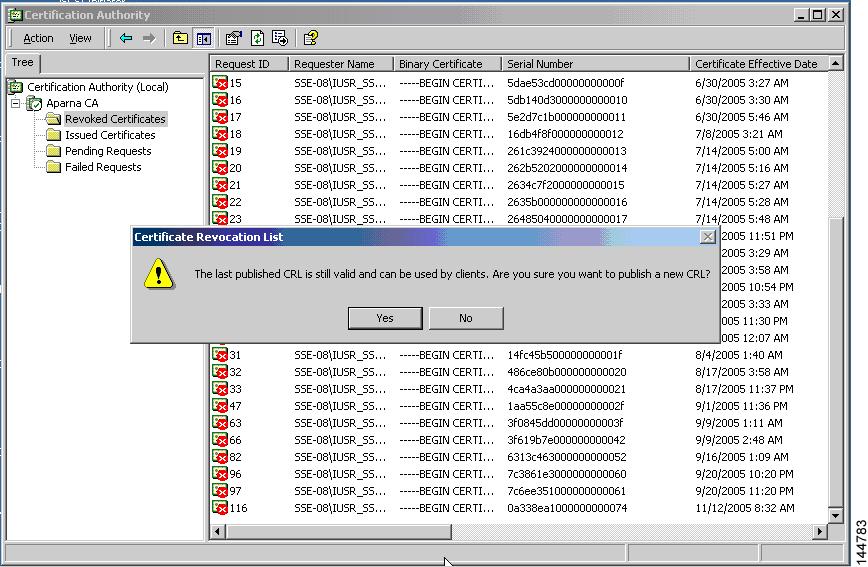
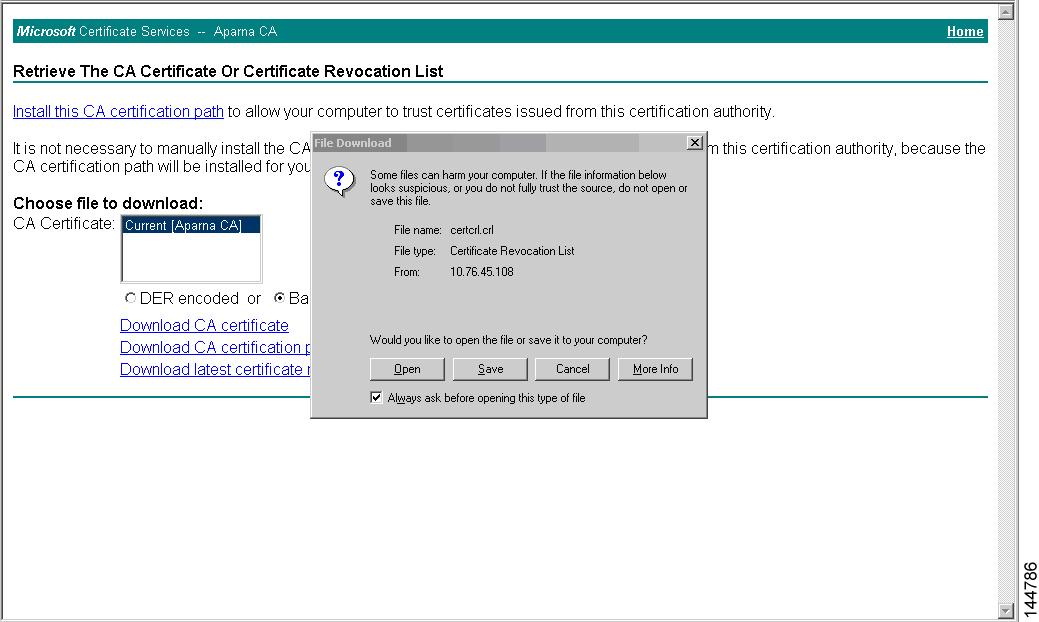
CRL Downloading, Caching, and Checking Support

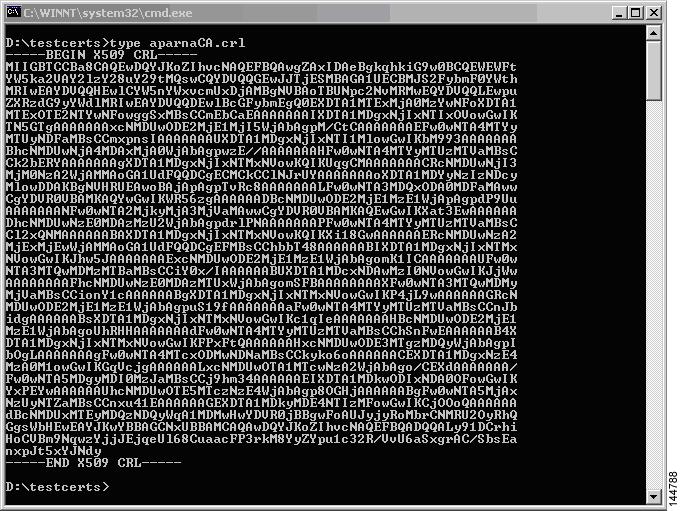
Certificate revocation lists (CRLs) are maintained by CAs to give information of revoked certificates, and are published in a repository. The download URL is made public and also specified in all issued certificates. A client verifying a peer’s certificate should obtain the latest CRL from the issuing CA and use it to determine if the certificate has been revoked. A client can cache the CRLs of some or all of its trusted CAs locally and use them later, if necessary, until the CRLs expire.

Cisco MDS NX-OS allows the manual configuration of pre-downloaded of CRLs for the trust points, and then caches them in the switch certificate store. During the verification of a peer certificate, the issuing CA’s CRL is consulted only if the CRL has already been cached locally and the revocation checking is configured to use CRL. Otherwise, CRL checking is not performed and the certificate is considered to be not revoked if no other revocation checking methods are configured. This mode of CRL checking is called CRL optional.

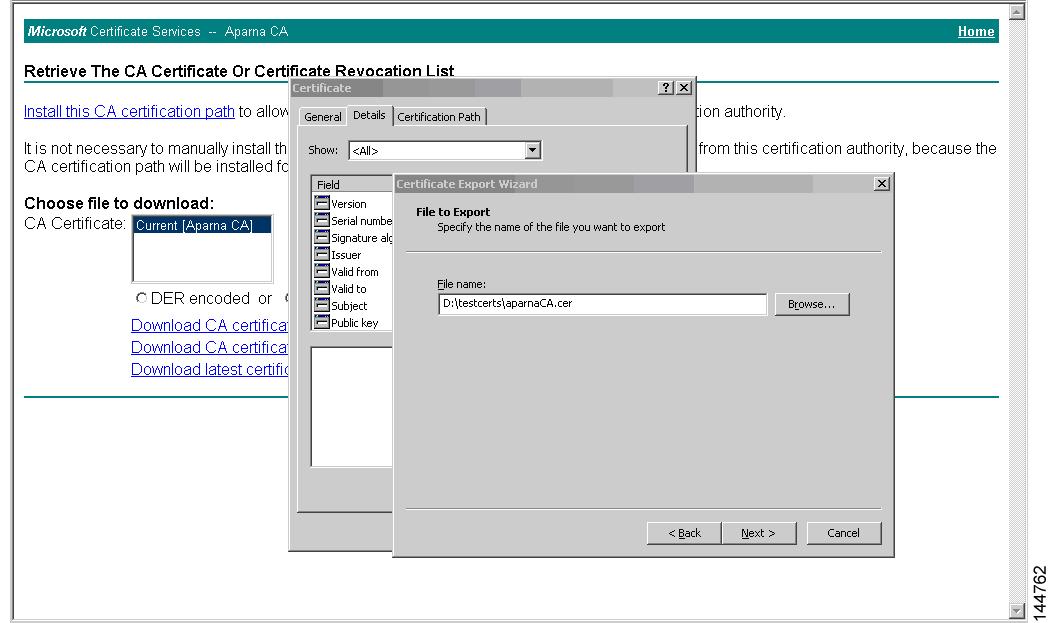
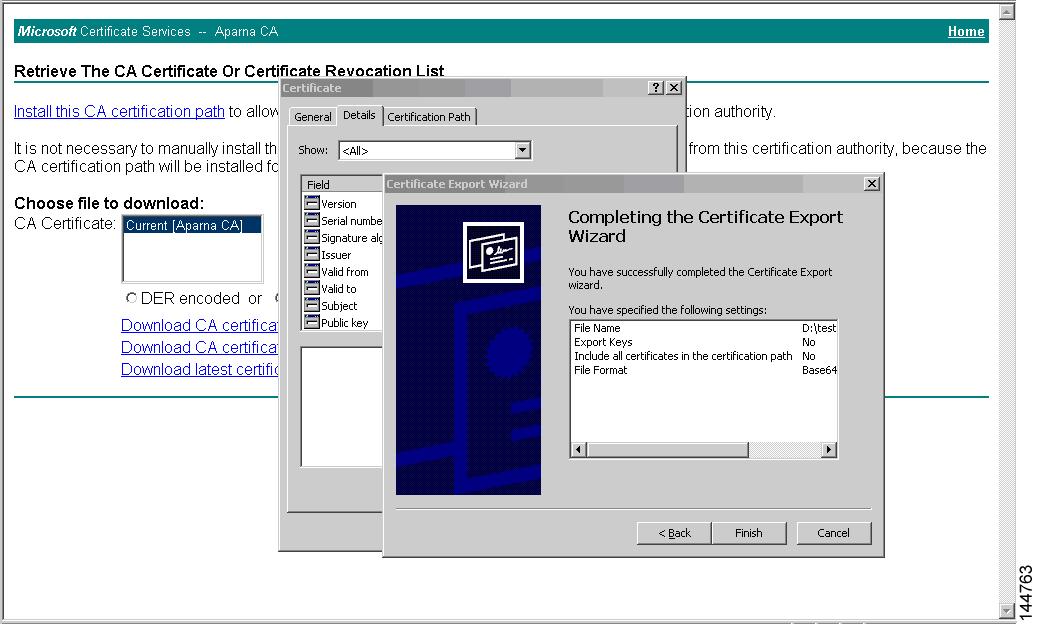
Import and Export of Certificates and Associated Key-Pairs

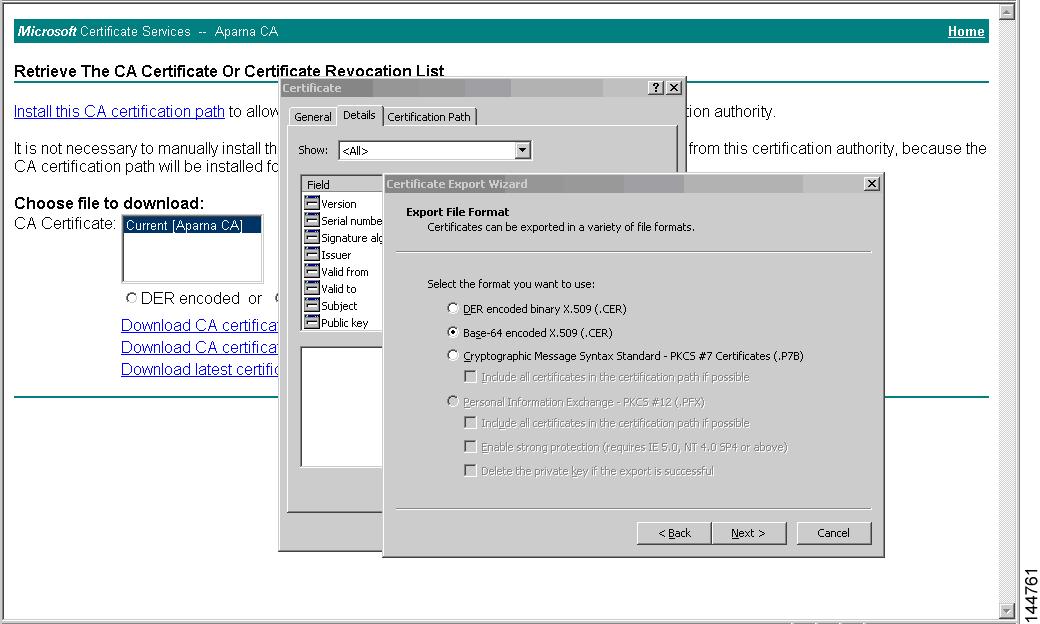
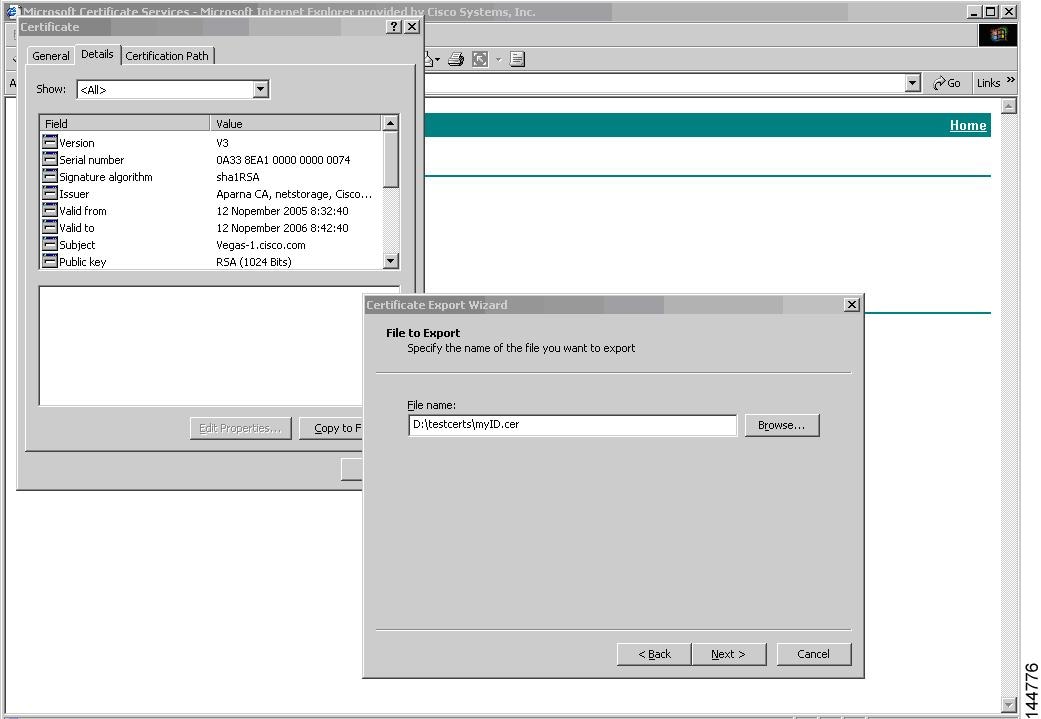
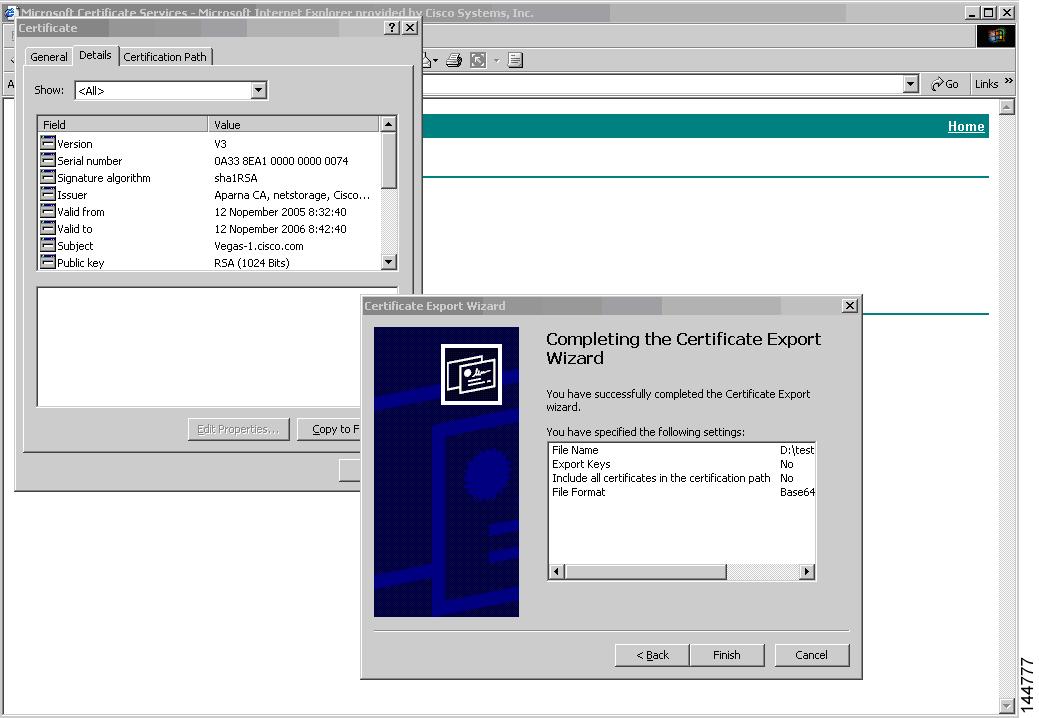
As part of the CA authentication and enrollment process, the subordinate CA certificate (or certificate chain) and identity certificates are imported in standard PEM (base64) format. If key-pairs have been externally generated they need to be imported in a separate step.

The complete identity information in a trust point can be exported to a file in the password-protected PKCS12 standard format. It can be later imported to the same switch (for example, after a system crash) or to a replacement switch. The information in a PKCS12 file consists of the RSA key-pair, the identity certificate, and the CA certificate (or chain).

Configuring Certificate Authorities and Digital Certificates

This section describes the tasks that you must perform to allow CAs and digital certificates for your Cisco MDS switch device to interoperate:

Configuring the Host Name and IP Domain Name

You must configure the host name and IP domain name of the switch if they are not already configured. This is required because the switch FQDN is used as the subject in the identity certificate. Also, the switch FQDN is used as a default key label when none is specified during key-pair generation. For example, a certificate named SwitchA.example.com is based on a switch host name of SwitchA and a switch IP domain name of example.com.


Caution


Changing the IP host name or IP domain name after generating the certificate can invalidate the certificate.


To configure the IP host name and IP domain name of the switch, follow these steps:

Procedure


Step 1

switch# configure terminal

switch(config)#

Enters configuration mode.

Step 2

switch(config)# switchname SwitchA

Configures the IP host name of the switch as "SwitchA".

Step 3

SwitchA(config)# ip domain-name example.com

Configures the IP domain name of the switch as "example.com".


Generating an RSA Key-Pair

RSA key-pairs are used to sign and/or encrypt and decrypt the security payload during security protocol exchanges for applications such as IKE/IPsec and SSH, and they are required before you can obtain a certificate for your switch.

To generate an RSA key-pair, follow these steps:

Procedure


Step 1

switch# configure terminal

switch(config)#

Enters configuration mode.

Step 2

switch(config)# crypto key generate rsa

Generates an RSA key-pair with the switch FQDN as the default label and 512 as the default modulus. By default, the key is not exportable.

Note

 
The security policy (or requirement) at the local site (MDS switch) and at the CA (where enrollment is planned) should be considered in deciding the appropriate key modulus.

For more information about the maximum RSA key-pairs supported, see the Maximum Limits section.

Step 3

switch(config)# crypto key generate rsa label SwitchA modulus 768

Generates an RSA key-pair with the label SwitchA and modulus 768. Valid modulus values are 512, 768, 1024, 1536, 2048, and 4096. By default, the key is not exportable.

.

Step 4

switch(config)# crypto key generate rsa exportable

Generates an RSA key-pair with the switch FQDN as the default label and 512 as the default modulus. The key is exportable.

Caution


The exportability of a key-pair cannot be changed after key-pair generation.

Note

 
Only exportable key-pairs can be exported in PKCS#12 format.

Creating a Trust Point Certificate Authority Association

You must associate the Cisco MDS device with a trust point CA.

To create a trust point CA association, follow these steps:

Procedure


Step 1

switch(config)# crypto ca trustpoint admin-ca

switch(config-trustpoint)#

Declares a trust point CA called "admin-ca" that the switch should trust and enters trust point configuration submode for this trust point.

Note

 
The maximum number of trust points that you can declare on a switch is 16.

Step 2

switch(config)# no crypto ca trustpoint admin-ca

(Optional) Removes the trust point CA.

Step 3

switch(config-trustpoint)# enroll terminal

Specifies manual cut-and-paste certificate enrollment (default).

Note

 
Manual cut-and-paste certificate enrollment is the only method supported for enrollment.

Step 4

switch(config-trustpoint)# rsakeypair SwitchA

Specifies the label of the RSA key-pair to be associated to this trust point for the purpose of enrollment. It was generated earlier in the Generating an RSA Key-Pair section. Only one RSA key-pair can be specified per CA.

Step 5

switch(config-trustpoint)# no rsakeypair SwitchA

(Optional) Disassociates the RSA key-pair from the trust point.

Step 6

switch(config-trustpoint)# end

switch#

Exits trust point configuration submode.

Step 7

switch# copy running-config startup-config

Copies the running configuration to the startup configuration so that the configuration is persistent across reboots.


Authenticating a Trust Point Certificate Authority

The configuration process of trusting a Certificate Authority (CA) is complete only when the CA is authenticated to the MDS switch. The switch must authenticate the CA. It does this by obtaining the self-signed certificate of the CA in PEM format, which contains the public key of the CA. Because the certificate of the CA is self-signed (the CA signs its own certificate) the public key of the CA should be manually authenticated by contacting the CA administrator to compare the fingerprint of the CA certificate.


Note


If the CA being authenticated is not a self-signed CA (that is, it is a subordinate CA to another CA, which itself may be a subordinate to yet another CA, and so on, finally ending in a self-signed CA), then the full list of the CA certificates of all the CAs in the certification chain needs to be input during the CA authentication step. This is called the CA certificate chain of the CA being authenticated. The maximum number of certificates in a CA certificate chain is 10.


To authenticate the certificate of the CA by cutting and pasting the certificate from an e-mail message or a website, follow these steps:

Procedure


Step 1

switch# configure terminal

switch(config)#

Enters configuration mode.

Step 2

switch(config)# crypto ca authenticate admin-ca

xEzARBgNVBAsTCm5ldHN0b3JhZ2UxEjAQBgNVBAMTCUFwYXJuYSBD
QTAeFw0wNTA1MDMyMjQ2MzdaFw0wNzA1MDMyMjU1MTdaMIGQMSAwHgYJKoZIhvcN
AQkBFhFhbWFuZGtlQGNpc2NvLmNvbTELMAkGA1UEBhMCSU4xEjAQBgNVBAgTCUth
cm5hdGFrYTESMBAGA1UEBxMJQmFuZ2Fsb3JlMQ4wDAYDVQQKEwVDaXNjbzETMBEG
A1UECxMKbmV0c3RvcmFnZTESMBAGA1UEAxMJQXBhcm5hIENBMFwwDQYJKoZIhvcN
AQEBBQADSwAwSAJBAMW/7b3+DXJPANBsIHHzluNccNM87ypyzwuoSNZXOMpeRXXI
OzyBAgiXT2ASFuUOwQ1iDM8rO/41jf8RxvYKvysCAwEAAaOBvzCBvDALBgNVHQ8E
BAMCAcYwDwYDVR0TAQH/BAUwAwEB/zAdBgNVHQ4EFgQUJyjyRoMbrCNMRU2OyRhQ
GgsWbHEwawYDVR0fBGQwYjAuoCygKoYoaHR0cDovL3NzZS0wOC9DZXJ0RW5yb2xs
L0FwYXJuYSUyMENBLmNybDAwoC6gLIYqZmlsZTovL1xcc3NlLTA4XENlcnRFbnJv
bGxcQXBhcm5hJTIwQ0EuY3JsMBAGCSsGAQQBgjcVAQQDAgEAMA0GCSqGSIb3DQEB
BQUAA0EAHv6UQ+8nE399Tww+KaGr0g0NIJaqNgLh0AFcT0rEyuyt/WYGPzksF9Ea
NBG7E0oN66zex0EOEfG1Vs6mXp1//w==
-----END CERTIFICATE-----
END OF INPUT
Fingerprint(s): MD5 Fingerprint=65:84:9A:27:D5:71:03:33:9C:12:23:92:38:6F:78:12


Do you accept this certificate? [yes/no]: y

Prompts you to cut and paste the certificate of the CA. Use the same name that you used when declaring the CA.

Note

 
The maximum number of trust points you can authenticate to a specific CA is 10.

Note

 
For subordinate CA authentication, the full chain of CA certificates ending in a self-signed CA is required because the CA chain is needed for certificate verification as well as for PKCS#12 format export.

Configuring Certificate Revocation Checking Methods

During security exchanges with a client (for example, an IKE peer or SSH user), the Cisco MDS switch performs the certificate verification of the peer certificate sent by the client. The verification process may involve certificate revocation status checking.

You can use different methods for checking revoked sender certificates. You can configure the switch to check the Certificate revocation lists (CRL) downloaded from the Certificate Authorities (CA) (see the Configuring a CRL section). Downloading the CRL and checking locally does not generate traffic in your network. However, certificates can be revoked between downloads and your switch would not be aware of the revocation. Using local CRL checking provides the most secure method for checking for revoked certificates.


Note


You must authenticate the CA before configuring certificate revocation checking.

To configure certificate revocation checking methods, follow these steps:

Procedure


Step 1

switch(config)# crypto ca trustpoint admin-ca

switch(config-trustpoint)#

Declares a trust point CA that the switch should trust and enters trust point configuration submode.

Step 2

switch(config-trustpoint)# revocation-check crl

Specifies CRL (default) as the revocation checking method to be employed during verification of peer certificates issued by the same CA as that of this trust point.

Step 3

switch(config-trustpoint)# revocation-check none

Does not check for revoked certificates.

Step 4

(Optional) switch(config-trustpoint)# no revocation-check

Reverts to default method.


Generating Certificate Signing Requests

You must generate a request to obtain identity certificates from a trust point CA for each of your switch’s RSA key-pairs. You must then cut and paste the displayed request into an e-mail message or in a website form for the CA.

Avoid using special characters like $ in passwords, as they can cause errors. Use a different character to avoid request failures.

To generate a request for signed certificates from the CA, follow these steps:

Procedure


Step 1

switch# configure terminal

switch(config)#

Enters configuration mode.

Step 2

switch(config)# crypto ca enroll admin-ca

switch(config)# crypto ca enroll admin-ca
 Create the certificate request ..
 Create a challenge password. You will need to verbally provide this
  password to the CA Administrator in order to revoke your certificate.
  For security reasons your password will not be saved in the configuration.
  Please make a note of it.
  Password:secret123
 The subject name in the certificate will be the name of the switch.
 Change default subject name? [yes/no]:yes
Enter Subject Name:mds1.example.com
 Include the switch serial number in the subject name? [yes/no]:yes
 The serial number in the certificate will be: ABC123456D7
 Include an IP address in the subject name [yes/no]:yes
ip address:192.168.1.2
 Include the Alternate Subject Name ? [yes/no]:yes
Enter Alternate Subject Name:DNS:mds1, IP Address:192.68.1.3
 Include DN fields? [yes/no]:yes
 Include Country Name ? [yes/no]:yes
Enter Country Code [XX]:AA
 Include State ? [yes/no]:yes
Enter State[1-128]:my_state
 Include Locality ? [yes/no]:yes
Enter Locality[1-128]:my_locality
 Include the Organization? [yes/no]:yes
Enter Organization[1-64]:my_organisation
 Include Organizational Unit ? [yes/no]:yes
Enter Organizational Unit[1-64]:my_ogranisation_unit
 The certificate request will be displayed...
-----BEGIN CERTIFICATE REQUEST-----
...snip...
-----END CERTIFICATE REQUEST-----

This command generates an identity certificate request (CSR) for the CA in the specified trust point. The CA must already be authenticated.

If required, the fields of the CSR may be changed. The Alternate Subject Name has special syntax. It is a comma separated set of fields prepended by either DNS: or email: or URI: or IP: as shown in the above example.

Note

 
The challenge password is not saved in the switch configuration. This password is required in the event that the certificate needs to be revoked so it must be archived securely.

Step 3

Submit the generated certificate to the CA.

The CA service issues an identity certificate for the switch that uses the parameters supplied in the certificate request.


Installing Root CA Certificate

You receive the SMTP certificate from a Certificate Authority (CA) service. You must install the SMTP certificate from the CA by cutting and pasting the encoded text using the CLI import facility.

Procedure


Step 1

switch# configure terminal

switch(config)#

Enters configuration mode.

Step 2

switch(config)# crypto ca trustpoint smtp-auth-server

Step 3

switch(config-trustpoint)# rsakeypair kp1

Step 4

switch(config-trustpoint)# exit

Step 5

switch(config)# crypto ca authenticate smtp-auth-server

input (cut & paste) CA certificate (chain) in PEM format;
end the input with a line containing only END OF INPUT :
-----BEGIN CERTIFICATE-----
MIIEEzCCAvugAwIBAgIUHJ46Zj09r6DwXT9Au/0n0+LGC44wDQYJKoZIhvcNAQEL
BQAwgZgxCzAJBgNVBAYTAklOMRIwEAYDVQQIDAlLQVJOQVRBS0ExEjAQBgNVBAcM
CUJFTkdBTFVSVTEOMAwGA1UECgwFQ0lTQ08xDjAMBgNVBAsMBU1EU1FBMRswGQYD
VQQDDBJtZHMtb2NzcC5jaXNjby5jb20xJDAiBgkqhkiG9w0BCQEWFW1kcy1kZXZ0
ZXN0QGNpc2NvLmNvbTAeFw0yNDAxMTkxMjE3NDlaFw0yODAxMTkxMjE3NDlaMIGY
MQswCQYDVQQGEwJJTjESMBAGA1UECAwJS0FSTkFUQUtBMRIwEAYDVQQHDAlCRU5H
QUxVUlUxDjAMBgNVBAoMBUNJU0NPMQ4wDAYDVQQLDAVNRFNRQTEbMBkGA1UEAwwS
bWRzLW9jc3AuY2lzY28uY29tMSQwIgYJKoZIhvcNAQkBFhVtZHMtZGV2dGVzdEBj
aXNjby5jb20wggEiMA0GCSqGSIb3DQEBAQUAA4IBDwAwggEKAoIBAQC6cVtjqW7e
p9R7GlRLNJG8j7nC0Ho94ZC4VHg1cfUC2AR11n1EhBbw9FBYucfjzZGRRToWeU3p
foUC4lURISV3jiFXXHnOsn9GZ9nLtyiP6PpvOJbDmEdOC6H1tqrMwhsQvmwfnKo2
QXytJDOZlT7TG2aLrcggjQffM3m9+My2YDXQGwwj3Ut84D0TUFuc1aytlhZvgGrT
25H1PG1ZwZyIQoYRCmJGJTUPCmsDvxdYRJL5lGbYprXXirkiUkspl7JMRHftMlGD
nwPeREeBoYQRXe0JNQe51w3wrX8LXMNPFmDZnKVvyK9XicMdDGGZ7sB00WvuzIUN
xn1302+qZsaJAgMBAAGjUzBRMB0GA1UdDgQWBBSpPgJ3nuzVCp5+JA4z00wPctIB
rzAfBgNVHSMEGDAWgBSpPgJ3nuzVCp5+JA4z00wPctIBrzAPBgNVHRMBAf8EBTAD
AQH/MA0GCSqGSIb3DQEBCwUAA4IBAQAXKVH4CLDeHJ6PkdX20FvcmK4jHYMYalxR
LOVoo9olWGeJ1/glrSmG+a5U4O568Hzgw+gDUWPiNReqwHzV2zH55KjPFBqqG5Z5
/z69TFdh32GkimtR3F8shRTZPv5IW/Nk++YR5oQbu1XsJXcOolOx0Pu62pbjrvUQ
gvvL7T0DdPQVl2K+7D5uNPmS2LVH6qfEmP27HKfsz5x/cjyb5hphjYpchNpFUfwk
XYj126nL1cOrOY661YyAPQerojjtpMyvSjRbQNID2auf+R+qtUQ3ED0P66/L77Oo
8qV0lAq37R6iyYm201wYEkUmmvZVnB9KbNe3Dq5+0FoUaOgfCNX9
-----END CERTIFICATE-----

Prompts you to cut and paste the root CA certificate of the smtp-auth server. If the certificate was not issued by a root CA, then this will have multiple “BEGIN CERTIFICATE” lines and end with the root CA certificate. Paste the whole certificate chain supplied by the CA and ensure that the text terminates with an “END CERTIFICATE” line.

Use the switch # sh crypto ca certificates command to verify if the certificate is installed.


Installing Identity Certificates

You receive the identity certificate from the CA by e-mail or through a web browser in base64 encoded text form. You must install the identity certificate from the CA by cutting and pasting the encoded text using the CLI import facility.

To install an identity certificate received from the CA by e-mail or through a web browser, follow these steps:

Procedure


Step 1

switch# configure terminal

switch(config)#

Enters configuration mode.

Step 2

switch(config)# crypto ca import admin-ca certificate

input (cut & paste) certificate in PEM format:
-----BEGIN CERTIFICATE-----
MIIEADCCA6qgAwIBAgIKCjOOoQAAAAAAdDANBgkqhkiG9w0BAQUFADCBkDEgMB4G
CSqGSIb3DQEJARYRYW1hbmRrZUBjaXNjby5jb20xCzAJBgNVBAYTAklOMRIwEAYD
VQQIEwlLYXJuYXRha2ExEjAQBgNVBAcTCUJhbmdhbG9yZTEOMAwGA1UEChMFQ2lz
Y28xEzARBgNVBAsTCm5ldHN0b3JhZ2UxEjAQBgNVBAMTCUFwYXJuYSBDQTAeFw0w
NTExMTIwMzAyNDBaFw0wNjExMTIwMzEyNDBaMBwxGjAYBgNVBAMTEVZlZ2FzLTEu
Y2lzY28uY29tMIGfMA0GCSqGSIb3DQEBAQUAA4GNADCBiQKBgQC/GNVACdjQu41C
dQ1WkjKjSICdpLfK5eJSmNCQujGpzcuKsZPFXjF2UoiyeCYE8ylncWyw5E08rJ47
glxr42/sI9IRIb/8udU/cj9jSSfKK56koa7xWYAu8rDfz8jMCnIM4W1aY/q2q4Gb
x7RifdV06uFqFZEgs17/Elash9LxLwIDAQABo4ICEzCCAg8wJQYDVR0RAQH/BBsw
GYIRVmVnYXMtMS5jaXNjby5jb22HBKwWH6IwHQYDVR0OBBYEFKCLi+2sspWEfgrR
bhWmlVyo9jngMIHMBgNVHSMEgcQwgcGAFCco8kaDG6wjTEVNjskYUBoLFmxxoYGW
pIGTMIGQMSAwHgYJKoZIhvcNAQkBFhFhbWFuZGtlQGNpc2NvLmNvbTELMAkGA1UE
BhMCSU4xEjAQBgNVBAgTCUthcm5hdGFrYTESMBAGA1UEBxMJQmFuZ2Fsb3JlMQ4w
DAYDVQQKEwVDaXNjbzETMBEGA1UECxMKbmV0c3RvcmFnZTESMBAGA1UEAxMJQXBh
cm5hIENBghAFYNKJrLQZlE9JEiWMrRl6MGsGA1UdHwRkMGIwLqAsoCqGKGh0dHA6
Ly9zc2UtMDgvQ2VydEVucm9sbC9BcGFybmElMjBDQS5jcmwwMKAuoCyGKmZpbGU6
Ly9cXHNzZS0wOFxDZXJ0RW5yb2xsXEFwYXJuYSUyMENBLmNybDCBigYIKwYBBQUH
AQEEfjB8MDsGCCsGAQUFBzAChi9odHRwOi8vc3NlLTA4L0NlcnRFbnJvbGwvc3Nl
LTA4X0FwYXJuYSUyMENBLmNydDA9BggrBgEFBQcwAoYxZmlsZTovL1xcc3NlLTA4
XENlcnRFbnJvbGxcc3NlLTA4X0FwYXJuYSUyMENBLmNydDANBgkqhkiG9w0BAQUF
AANBADbGBGsbe7GNLh9xeOTWBNbm24U69ZSuDDcOcUZUUTgrpnTqVpPyejtsyflw
E36cIZu4WsExREqxbTk8ycx7V5o=
-----END CERTIFICATE-----

Prompts you to cut and paste the identity certificate for the CA named "admin-ca". If the certificate was not issued by a root CA, then this will have multiple “BEGIN CERTIFICATE” lines and end with the root CA certificate. Paste the whole certificate chain supplied by the CA and ensure that the text terminates with an “END CERTIFICATE” line.

Note

 
The maximum number of identify certificates that you can configure on a switch are 16.

Ensuring Trust Point Configurations Persist Across Reboots

The trust point configuration is a normal Cisco NX-OS configuration that persists across system reboots only if you copy it explicitly to the startup configuration. The certificates, key-pairs, and CRL associated with a trust point are automatically persistent if you have already copied the trust point configuration in the startup configuration. Conversely, if the trust point configuration is not copied to the startup configuration, the certificates, key-pairs, and CRL associated with it are not persistent since they require the corresponding trust point configuration after a reboot. Always copy the running configuration to the startup configuration to ensure that the configured certificates, key-pairs, and CRLs are persistent. Also, save the running configuration after deleting a certificate or key-pair to ensure that the deletions are permanent.

The certificates and CRL associated with a trust point automatically become persistent when imported (that is, without an explicitly copying to the startup configuration) if the specific trust point is already saved in startup configuration.

We also recommend that you create a password-protected backup of the identity certificates and save it to an external server (see Exporting Identity Information in PKCS12 Format).


Note


Copying the running or startup configuration to an external server does include the certificates and key-pairs.
  • switch# copy running-config startup-config

    Saves the current configuration to startup configuration.

Alternate Method of Requesting a Certificate

The above method of generating a CSR on the switch requires the CA chain to be installed first. Some CAs do not provide the CA chain until the CSR has been processed. To work around this dependency, use non-Cisco tools to generate a CSR off-switch and submit this CSR to the CA. Download the generated CA chain and identity certificate, and install them using the crypto ca authenticate and crypto ca import trust point commands, as described in the Installing Root CA Certificate and Installing Identity Certificates sections above.

Generating A Key-Pair and Certificate Signing Request on Another Device

RSA key-pairs and CSRs may be generated on another device. For example, to generate these on a host using openssl, follow these steps:

  1. host$ openssl req -newkey rsa:2048 -keyout SwitchA.example.com-rsa-pem.privatekey -out SwitchA.example.com-pkcs10.csr
    Generating a 2048 bit RSA private key
    ...........................................+++
    ....................+++
    writing new private key to SwitchA.example.com-rsa-pem.privatekey'
    Enter PEM pass phrase:abc123
    Verifying - Enter PEM pass phrase:abc123
    -----
    You are about to be asked to enter information that will be incorporated
    into your certificate request.
    What you are about to enter is what is called a Distinguished Name or a DN.
    There are quite a few fields but you can leave some blank
    For some fields there will be a default value,
    If you enter '.', the field will be left blank.
    -----
    Country Name (2 letter code) []:BE
    State or Province Name (full name) []:Brussels
    Locality Name (eg, city) []:Brussels
    Organization Name (eg, company) []:Example
    Organizational Unit Name (eg, section) []:SAN
    Common Name (eg, fully qualified host name) []:SwitchA.example.com
    Email Address []:cert-admin@example.com
    
    Please enter the following 'extra' attributes
    to be sent with your certificate request
    A challenge password []:abc123


    Generates an RSA key-pair with a key modulus of 2048-bits and CSR using the switch FQDN.

  2. host$ cat SwitchA.example.com-pkcs10.csr

    -----BEGIN CERTIFICATE REQUEST-----
    ...
    -----END CERTIFICATE REQUEST-----
    

    Displays the generated base-64 format CSR for sending to the CA.

Monitoring and Maintaining Certificate Authorities and Certificates Configuration

The tasks in the section are optional.

Exporting Identity Information in PKCS12 Format

You can export the identity certificate along with the RSA key-pair and CA certificate (or the entire chain in the case of a subordinate CA) of a trust point to a PKCS12 file for backup purposes. You can later import the certificate and RSA key-pair to recover from a system crash on your switch or when you replace supervisor modules.


Note


Only the bootflash:filename format local syntax is supported when specifying the export and import URL.

To export a certificate and key-pair to a PKCS12 formatted file, follow these steps:

Procedure

Step 1

switch# configure terminal

switch(config)#

Enters configuration mode.

Step 2

switch(config)# crypto ca export admin-ca pkcs12 bootflash:adminid.p12 abc123

Exports the identity certificate and associated key-pair and CA certificates for trust point "admin-ca" to the file bootflash:adminid.p12 in PKCS12 format, protected using password "abc123".

Step 3

switch(config)# exit

switch#

Returns to EXEC mode.

Step 4

switch# copy bootflash:adminid.p12 tftp:adminid.p12

Copies the PKCS12 format file to a TFTP server.


Importing Identity Information in PKCS12 Format

To import a certificate and/or key-pair from a PKCS12 formatted file, follow these steps:

Procedure

Step 1

switch# copy tftp:adminid.p12 bootflash:adminid.p12

Copies the PKCS12 format file from a TFTP server.

Step 2

switch# configure terminal

switch(config)#

Enters configuration mode.

Step 3

switch(config)# crypto ca import admin-ca pkcs12 bootflash:adminid.p12 abc123

Imports the identity certificate and associated key-pair and CA certificates for trust point "admin-ca" from the file bootflash:adminid.p12 in PKCS12 format, protected using password "abc123".


Configuring a CRL

To import the CRL from a file to a trust point, follow these steps:

Procedure

Step 1

switch# copy tftp:adminca.crl bootflash:adminca.crl

Downloads the CRL.

Step 2

switch# configure terminal

switch(config)#

Enters configuration mode.

Step 3

switch(config)# crypto ca crl request admin-ca bootflash:adminca.crl

Configures or replaces the current CRL with the one specified in the file.


Deleting Certificates from the Certificate Authorities Configuration

You can delete the identity certificates and Certificate Authorities (CA) certificates that are configured in a trust point. You must first delete the identity certificate, followed by the CA certificates. After deleting the identity certificate, you can disassociate the RSA key-pair from a trust point. The certificate deletion is necessary to remove expired or revoked certificates, certificates whose key-pairs are compromised (or suspected to be compromised) or CAs that are no longer trusted.

To delete the CA certificate (or the entire chain in the case of a subordinate CA) from a trust point, follow these steps:

Procedure

Step 1

switch# configure terminal

switch(config)#

Enters configuration mode.

Step 2

switch(config)# crypto ca trustpoint myCA

Enters trustpoint configuration submode.

Step 3

switch(config-trustpoint)# delete ca-certificate

Deletes the CA certificate or certificate chain.

Step 4

switch(config-trustpoint)# delete certificate

Deletes the identity certificate.

Step 5

switch(config-trustpoint)# delete certificate force

Forces the deletion of the identity certificate.

Note

 
If the identity certificate being deleted is the last-most or only identity certificate in the device, you must use the force option to delete it. This ensures that the administrator does not mistakenly delete the last-most or only identity certificate and leave the applications (such as IKE and SSH) without a certificate to use.

Step 6

switch(config-trustpoint)# end

switch#

Returns to EXEC mode.

Step 7

switch# copy running-config startup-config

Copies the running configuration to the startup configuration to ensure the configuration is persistent across reboots.


Deleting RSA Key-Pairs from Your Switch

Under certain circumstances you may want to delete your switch’s RSA key-pairs. For example, if you believe the RSA key-pairs were compromised in some way and should no longer be used, you should delete the key-pairs.

To delete RSA key-pairs from your switch, follow these steps:

Procedure

Step 1

switch# configure terminal

switch(config)#

Enters configuration mode.

Step 2

switch(config)# crypto key zeroize rsa MyKey

Deletes the RSA key-pair whose label is MyKey.

Step 3

switch(config)# end

switch#

Returns to EXEC mode.

Step 4

switch# copy running-config startup-config

Copies the running configuration to the startup configuration to ensure the configuration is persistent across reboots.


Example

Note


After you delete RSA key-pairs from a switch, ask the CA administrator to revoke your switch’s certificates at the CA. You must supply the challenge password you created when you originally requested the certificates. See Generating Certificate Signing Requests.

Displaying Key-Pair and Certificate Authorities Information

To view key-pair and Certificate Authorities (CA) information, use the following commands:

Command

Purpose

switch# show crypto key mypubkey rsa

Displays information about the switch’s RSA public keys.

switch# show crypto ca certificates

Displays information on CA and identity certificates.

switch# show crypto ca crl

Displays information about CA CRLs.

switch# show crypto ca trustpoints

Displays information about CA trust points.

Displaying Root Certificates

To view the root CA certificates bundled in the NX-OS image, use the following command:

switch# show crypto ca trustpool
Trustpool download status : 
==================================================
CA certificate
Serial Number        :01
Subject              :Cisco Licensing Root CA
Issued By            :Cisco Licensing Root CA
Validity Start       :May 30 19:48:47 2013 GMT
Validity End         :May 30 19:48:47 2038 GMT
==================================================
CA certificate
Serial Number        :01A65AF15EE994EBE1
Subject              :Cisco Basic Assurance Root CA 2099
Issued By            :Cisco Basic Assurance Root CA 2099
Validity Start       :May 26 19:19:29 2017 GMT
Validity End         :May 26 19:19:29 2099 GMT
==================================================
CA certificate
Serial Number        :03
Subject              :Cisco ECC Root CA
Issued By            :Cisco ECC Root CA
Validity Start       :Apr  4 08:15:44 2013 GMT
Validity End         :Sep  7 16:24:07 2099 GMT
==================================================
CA certificate
Serial Number        :5FF87B282B54DC8D42A315B568C9ADFF
Subject              :Cisco Root CA 2048
Issued By            :Cisco Root CA 2048
Validity Start       :May 14 20:17:12 2004 GMT
Validity End         :May 14 20:25:42 2029 GMT
==================================================
CA certificate
Serial Number        :019A335878CE16C1C1
Subject              :Cisco Root CA 2099
Issued By            :Cisco Root CA 2099
Validity Start       :Aug  9 20:58:28 2016 GMT
Validity End         :Aug  9 20:58:28 2099 GMT
==================================================
CA certificate
Serial Number        :2ED20E7347D333834B4FDD0DD7B6967E
Subject              :Cisco Root CA M1
Issued By            :Cisco Root CA M1
Validity Start       :Nov 18 21:50:24 2008 GMT
Validity End         :Nov 18 21:59:46 2033 GMT
==================================================
CA certificate
Serial Number        :01
Subject              :Cisco Root CA M2
Issued By            :Cisco Root CA M2
Validity Start       :Nov 12 13:00:18 2012 GMT
Validity End         :Nov 12 13:00:18 2037 GMT
==================================================
CA certificate
Serial Number        :01
Subject              :Cisco RXC-R2
Issued By            :Cisco RXC-R2
Validity Start       :Jul  9 21:46:56 2014 GMT
Validity End         :Jul  9 21:46:56 2034 GMT
==================================================
CA certificate
Serial Number        :066C9FCF99BF8C0A39E2F0788A43E696365BCA
Subject              :Amazon Root CA 1
Issued By            :Amazon Root CA 1
Validity Start       :May 26 00:00:00 2015 GMT
Validity End         :Jan 17 00:00:00 2038 GMT
==================================================
CA certificate
Serial Number        :066C9FD29635869F0A0FE58678F85B26BB8A37
Subject              :Amazon Root CA 2
Issued By            :Amazon Root CA 2
Validity Start       :May 26 00:00:00 2015 GMT
Validity End         :May 26 00:00:00 2040 GMT
==================================================
CA certificate
Serial Number        :066C9FD5749736663F3B0B9AD9E89E7603F24A
Subject              :Amazon Root CA 3
Issued By            :Amazon Root CA 3
Validity Start       :May 26 00:00:00 2015 GMT
Validity End         :May 26 00:00:00 2040 GMT
==================================================
CA certificate
Serial Number        :066C9FD7C1BB104C2943E5717B7B2CC81AC10E
Subject              :Amazon Root CA 4
Issued By            :Amazon Root CA 4
Validity Start       :May 26 00:00:00 2015 GMT
Validity End         :May 26 00:00:00 2040 GMT
==================================================
CA certificate
Serial Number        :083BE056904246B1A1756AC95991C74A
Subject              :DigiCert Global Root CA
Issued By            :DigiCert Global Root CA
Validity Start       :Nov 10 00:00:00 2006 GMT
Validity End         :Nov 10 00:00:00 2031 GMT
==================================================
CA certificate
Serial Number        :0A0142800000014523C844B500000002
Subject              :IdenTrust Commercial Root CA 1
Issued By            :IdenTrust Commercial Root CA 1
Validity Start       :Jan 16 18:12:23 2014 GMT
Validity End         :Jan 16 18:12:23 2034 GMT
==================================================
CA certificate
Serial Number        :0509
Subject              :QuoVadis Root CA 2
Issued By            :QuoVadis Root CA 2
Validity Start       :Nov 24 18:27:00 2006 GMT
Validity End         :Nov 24 18:23:33 2031 GMT

To view the user-installed certificates, use the following command:

switch# show crypto ca certificates
Trustpoint: myCA
CA certificate 0:
subject= /O=Cisco Systems/CN=TEST-SSL-CA
issuer= /O=Cisco Systems/CN=TEST Root CA 2048
serial=54AEC560000000000043
notBefore=Feb 25 23:21:52 2009 GMT
notAfter=Feb 19 21:09:53 2034 GMT
SHA1 Fingerprint=C7:8E:BB:8D:ED:FD:CF:A0:14:C6:B3:D9:F2:FF:3F:F1:38:2A:0F:D4
purposes: sslserver sslclient
CA certificate 1:
subject= /O=Cisco Systems/CN=TEST Root CA 2048
issuer= /O=Cisco Systems/CN=TEST Root CA 2048
serial=228AFC0C5220CDA94E298AF8CDAD4243
notBefore=Feb 19 21:01:38 2004 GMT
notAfter=Aug 11 20:29:31 2034 GMT
SHA1 Fingerprint=91:AD:ED:70:CB:E0:1A:D5:9A:18:DC:EF:82:B2:1C:A9:60:7D:3C:2D
purposes: sslserver sslclient

Example Configurations

This section shows an example of the tasks that you can use to configure certificates and CRLs on the Cisco MDS 9000 Family switches using the Microsoft Windows Certificate server.

Configuring Certificates on the MDS Switch

To configure certificates on an MDS switch, follow these steps:

Procedure


Step 1

Configure the switch FQDN.

switch# configure terminal
Enter configuration commands, one per line. End with CNTL/Z.
switch(config)# switchname SwitchA
SwitchA(config)#

Step 2

Configure the DNS domain name for the switch.

SwitchA(config)# ip domain-name example.com
SwitchA(config)#

Step 3

Create a trust point.

SwitchA(config)# crypto ca trustpoint myCA
SwitchA(config-trustpoint)# exit
SwitchA(config)# show crypto ca trustpoints

trustpoint: myCA; key:
revokation methods: crl
SwitchA(config)#

Step 4

Create an RSA key-pair for the switch.

SwitchA(config)# crypto key generate rsa label myKey exportable modulus 1024
SwitchA(config)# show crypto key mypubkey rsa

key label: myKey
key size: 1024
exportable: yes
SwitchA(config)#

Step 5

Associate the RSA key-pair to the trust point.

SwitchA(config)# crypto ca trustpoint myCA
SwitchA(config-trustpoint)# rsakeypair myKey
SwitchA(config-trustpoint)# exit
SwitchA(config)# show crypto ca trustpoints

trustpoint: myCA; key: myKey
revokation methods: crl
SwitchA(config)#

Step 6

Download the CA certificate from the Microsoft Certificate Service web interface (see Downloading a Certificate Authorities Certificate)

Step 7

Authenticate the CA that you want to enroll to the trust point.

SwitchA(config)# crypto ca authenticate myCA

input (cut & paste) CA certificate (chain) in PEM format;
end the input with a line containing only END OF INPUT :
-----BEGIN CERTIFICATE-----
MIIC4jCCAoygAwIBAgIQBWDSiay0GZRPSRIljK0ZejANBgkqhkiG9w0BAQUFADCB
kDEgMB4GCSqGSIb3DQEJARYRYW1hbmRrZUBjaXNjby5jb20xCzAJBgNVBAYTAklO
MRIwEAYDVQQIEwlLYXJuYXRha2ExEjAQBgNVBAcTCUJhbmdhbG9yZTEOMAwGA1UE
ChMFQ2lzY28xEzARBgNVBAsTCm5ldHN0b3JhZ2UxEjAQBgNVBAMTCUFwYXJuYSBD
QTAeFw0wNTA1MDMyMjQ2MzdaFw0wNzA1MDMyMjU1MTdaMIGQMSAwHgYJKoZIhvcN
AQkBFhFhbWFuZGtlQGNpc2NvLmNvbTELMAkGA1UEBhMCSU4xEjAQBgNVBAgTCUth
cm5hdGFrYTESMBAGA1UEBxMJQmFuZ2Fsb3JlMQ4wDAYDVQQKEwVDaXNjbzETMBEG
A1UECxMKbmV0c3RvcmFnZTESMBAGA1UEAxMJQXBhcm5hIENBMFwwDQYJKoZIhvcN
AQEBBQADSwAwSAJBAMW/7b3+DXJPANBsIHHzluNccNM87ypyzwuoSNZXOMpeRXXI
OzyBAgiXT2ASFuUOwQ1iDM8rO/41jf8RxvYKvysCAwEAAaOBvzCBvDALBgNVHQ8E
BAMCAcYwDwYDVR0TAQH/BAUwAwEB/zAdBgNVHQ4EFgQUJyjyRoMbrCNMRU2OyRhQ
GgsWbHEwawYDVR0fBGQwYjAuoCygKoYoaHR0cDovL3NzZS0wOC9DZXJ0RW5yb2xs
L0FwYXJuYSUyMENBLmNybDAwoC6gLIYqZmlsZTovL1xcc3NlLTA4XENlcnRFbnJv
bGxcQXBhcm5hJTIwQ0EuY3JsMBAGCSsGAQQBgjcVAQQDAgEAMA0GCSqGSIb3DQEB
BQUAA0EAHv6UQ+8nE399Tww+KaGr0g0NIJaqNgLh0AFcT0rEyuyt/WYGPzksF9Ea
NBG7E0oN66zex0EOEfG1Vs6mXp1//w==
-----END CERTIFICATE-----
END OF INPUT
Fingerprint(s): MD5 Fingerprint=65:84:9A:27:D5:71:03:33:9C:12:23:92:38:6F:78:12


Do you accept this certificate? [yes/no]:y
SwitchA(config)#
SwitchA(config)# show crypto ca certificates

Trustpoint: myCA
CA certificate 0:
subject= /emailAddress=admin@yourcompany.com/C=IN/ST=Karnataka/L=Bangalore/O=Yourcompany/O
U=netstorage/CN=Aparna CA
issuer= /emailAddress=admin@yourcompany.com/C=IN/ST=Karnataka/L=Bangalore/O=Yourcompany/OU
=netstorage/CN=Aparna CA
serial=0560D289ACB419944F4912258CAD197A
notBefore=May 3 22:46:37 2005 GMT
notAfter=May 3 22:55:17 2007 GMT
MD5 Fingerprint=65:84:9A:27:D5:71:03:33:9C:12:23:92:38:6F:78:12
purposes: sslserver sslclient ike

Step 8

Generate a request certificate to use to enroll with a trust point.

SwitchA(config)# crypto ca enroll myCA

Create the certificate request..
Create a challenge password. You will need to verbally provide this
password to the CA Administrator in order to revoke your certificate.
For security reasons your password will not be saved in the configuration.
Please make a note of it.
Password:abc123
The subject name in the certificate will be: SwitchA.example.com
Include the switch serial number in the subject name? [yes/no]:no
Include an IP address in the subject name [yes/no]:yes
ip address:10.10.1.1
The certificate request will be displayed...
-----BEGIN CERTIFICATE REQUEST-----
MIIBqzCCARQCAQAwHDEaMBgGA1UEAxMRVmVnYXMtMS5jaXNjby5jb20wgZ8wDQYJ
KoZIhvcNAQEBBQADgY0AMIGJAoGBAL8Y1UAJ2NC7jUJ1DVaSMqNIgJ2kt8rl4lKY
0JC6ManNy4qxk8VeMXZSiLJ4JgTzKWdxbLDkTTysnjuCXGvjb+wj0hEhv/y51T9y
P2NJJ8ornqShrvFZgC7ysN/PyMwKcgzhbVpj+rargZvHtGJ91XTq4WoVkSCzXv8S
VqyH0vEvAgMBAAGgTzAVBgkqhkiG9w0BCQcxCBMGbmJ2MTIzMDYGCSqGSIb3DQEJ
DjEpMCcwJQYDVR0RAQH/BBswGYIRVmVnYXMtMS5jaXNjby5jb22HBKwWH6IwDQYJ
KoZIhvcNAQEEBQADgYEAkT60KER6Qo8nj0sDXZVHSfJZh6K6JtDz3Gkd99GlFWgt
PftrNcWUE/pw6HayfQl2T3ecgNwel2d15133YBF2bktExiI6Ul88nTOjglXMjja8
8a23bNDpNsM8rklwA6hWkrVL8NUZEFJxqbjfngPNTZacJCUS6ZqKCMetbKytUx0=
-----END CERTIFICATE REQUEST-----
 
SwitchA(config)#

Step 9

Request an identity certificate from the Microsoft Certificate Service web interface (see Requesting an Identity Certificate).

Step 10

Import the identity certificate.

SwitchA(config)# crypto ca import myCA certificate

input (cut & paste) certificate in PEM format:
-----BEGIN CERTIFICATE-----
MIIEADCCA6qgAwIBAgIKCjOOoQAAAAAAdDANBgkqhkiG9w0BAQUFADCBkDEgMB4G
CSqGSIb3DQEJARYRYW1hbmRrZUBjaXNjby5jb20xCzAJBgNVBAYTAklOMRIwEAYD
VQQIEwlLYXJuYXRha2ExEjAQBgNVBAcTCUJhbmdhbG9yZTEOMAwGA1UEChMFQ2lz
Y28xEzARBgNVBAsTCm5ldHN0b3JhZ2UxEjAQBgNVBAMTCUFwYXJuYSBDQTAeFw0w
NTExMTIwMzAyNDBaFw0wNjExMTIwMzEyNDBaMBwxGjAYBgNVBAMTEVZlZ2FzLTEu
Y2lzY28uY29tMIGfMA0GCSqGSIb3DQEBAQUAA4GNADCBiQKBgQC/GNVACdjQu41C
dQ1WkjKjSICdpLfK5eJSmNCQujGpzcuKsZPFXjF2UoiyeCYE8ylncWyw5E08rJ47
glxr42/sI9IRIb/8udU/cj9jSSfKK56koa7xWYAu8rDfz8jMCnIM4W1aY/q2q4Gb
x7RifdV06uFqFZEgs17/Elash9LxLwIDAQABo4ICEzCCAg8wJQYDVR0RAQH/BBsw
GYIRVmVnYXMtMS5jaXNjby5jb22HBKwWH6IwHQYDVR0OBBYEFKCLi+2sspWEfgrR
bhWmlVyo9jngMIHMBgNVHSMEgcQwgcGAFCco8kaDG6wjTEVNjskYUBoLFmxxoYGW
pIGTMIGQMSAwHgYJKoZIhvcNAQkBFhFhbWFuZGtlQGNpc2NvLmNvbTELMAkGA1UE
BhMCSU4xEjAQBgNVBAgTCUthcm5hdGFrYTESMBAGA1UEBxMJQmFuZ2Fsb3JlMQ4w
DAYDVQQKEwVDaXNjbzETMBEGA1UECxMKbmV0c3RvcmFnZTESMBAGA1UEAxMJQXBh
cm5hIENBghAFYNKJrLQZlE9JEiWMrRl6MGsGA1UdHwRkMGIwLqAsoCqGKGh0dHA6
Ly9zc2UtMDgvQ2VydEVucm9sbC9BcGFybmElMjBDQS5jcmwwMKAuoCyGKmZpbGU6
Ly9cXHNzZS0wOFxDZXJ0RW5yb2xsXEFwYXJuYSUyMENBLmNybDCBigYIKwYBBQUH
AQEEfjB8MDsGCCsGAQUFBzAChi9odHRwOi8vc3NlLTA4L0NlcnRFbnJvbGwvc3Nl
LTA4X0FwYXJuYSUyMENBLmNydDA9BggrBgEFBQcwAoYxZmlsZTovL1xcc3NlLTA4
XENlcnRFbnJvbGxcc3NlLTA4X0FwYXJuYSUyMENBLmNydDANBgkqhkiG9w0BAQUF
AANBADbGBGsbe7GNLh9xeOTWBNbm24U69ZSuDDcOcUZUUTgrpnTqVpPyejtsyflw
E36cIZu4WsExREqxbTk8ycx7V5o=
-----END CERTIFICATE-----
SwitchA(config)# exit
SwitchA#

Step 11

Verify the certificate configuration.

SwitchA# show crypto ca certificates

Trustpoint: myCA
certificate:
subject= /CN=SwitchA.example.com
issuer= /emailAddress=admin@yourcompany.com/C=IN/ST=Karnataka/L=Bangalore/O=Cisco/OU
=netstorage/CN=Aparna CA
serial=0A338EA1000000000074
notBefore=Nov 12 03:02:40 2005 GMT
notAfter=Nov 12 03:12:40 2006 GMT
MD5 Fingerprint=3D:33:62:3D:B4:D0:87:A0:70:DE:A3:87:B3:4E:24:BF
purposes: sslserver sslclient ike
 
CA certificate 0:
subject= /emailAddress=admin@yourcompany.com/C=IN/ST=Karnataka/L=Bangalore/O=Yourcompany/O
U=netstorage/CN=Aparna CA
issuer= /emailAddress=admin@yourcompany.com/C=IN/ST=Karnataka/L=Bangalore/O=Yourcompany/OU
=netstorage/CN=Aparna CA
serial=0560D289ACB419944F4912258CAD197A
notBefore=May 3 22:46:37 2005 GMT
notAfter=May 3 22:55:17 2007 GMT
MD5 Fingerprint=65:84:9A:27:D5:71:03:33:9C:12:23:92:38:6F:78:12
purposes: sslserver sslclient ike

Step 12

Save the certificate configuration to the startup configuration.

SwitchA# copy running-config startup-config

Downloading a Certificate Authorities Certificate

To download a Certificate Authorities (CA) certificate from the Microsoft Certificate Services web interface, follow these steps:

Procedure


Step 1

Click the Retrieve the CA certificate or certificate revocation task radio button in the Microsoft Certificate Services web interface and click the Next button.

Step 2

Select the CA certificate file to download from the displayed list. Click the Base 64 encoded radio button, and choose the Download CA certificate link.

Step 3

Click the Open button in the File Download dialog box.

Step 4

Click the Copy to File button in the Certificate dialog box and click OK.

Step 5

Select the Base-64 encoded X.509 (CER) on the Certificate Export Wizard dialog box and click Next.

Step 6

Enter the destination file name in the File name: text box on the Certificate Export Wizard dialog box and click Next.

Step 7

Click the Finish button on the Certificate Export Wizard dialog box.

Step 8

Display the CA certificate stored in Base-64 (PEM) format using the Microsoft Windows type command.


Requesting an Identity Certificate

To request an identify certificate from a Microsoft Certificate server using a PKCS#10 certificate signing request (CRS), follow these steps:

Procedure


Step 1

Choose the Request a certificate radio button on the Microsoft Certificate Services web interface and click Next.

Step 2

Choose the Advanced request radio button and click Next.

Step 3

Choose the Submit a certificate request using a base64 encoded PKCS#10 file or a renewal request using a base64 encoded PKCS#7 file radio button and click Next.

Step 4

Paste the base64 PKCS 10 certificate request in the Saved Request text box and click Next.

The certificate request is copied from the MDS switch console (see Generating Certificate Signing Requests and Configuring Certificates on the MDS Switch).

Step 5

Wait one or two days until the certificate is issued by the CA administrator.

Step 6

The CA administrator approves the certificate request.

Step 7

Choose the Check on a pending certificate radio button on the Microsoft Certificate Services web interface and click Next.

Step 8

Select the certificate request you want to check and click Next.

Step 9

Select Base 64 encoded and click the Download CA certificate link.

Step 10

Click Open on the File Download dialog box.

Step 11

Click the Details tab on the Certificate dialog and click the Copy to File button. Choose the Base-64 encoded X.509 (.CER) radio button on the Certificate Export Wizard dialog box and click Next.

Step 12

Enter the destination file name in the File name: text box on the Certificate Export Wizard dialog box, then click Next.

Step 13

Click Finish.

Step 14

Display the identity certificate in base64-encoded format using the Microsoft Windows type command.


Revoking a Certificate

To revoke a certificate using the Microsoft CA administrator program, follow these steps:

Procedure


Step 1

Click the Issued Certificates folder on the Certification Authority tree. From the list, right-click the certificate you want to revoke.

Step 2

Select All Tasks > Revoke Certificate.

Step 3

Select a reason for the revocation from the Reason code drop-down list, and click Yes.

Step 4

Click the Revoked Certificates folder to list and verify the certificate revocation.


Generating and Publishing the CRL

To generate and publish the CRL using the Microsoft CA administrator program, follow these steps:

Procedure


Step 1

Select Action > All Tasks > Publish on the Certification Authority screen.

Step 2

Click Yes on the Certificate Revocation List dialog box to publish the latest CRL.


Downloading the CRL

To download the CRL from the Microsoft CA website, follow these steps:

Procedure


Step 1

Choose Request the CA certificate or certificate revocation list radio button on the Microsoft Certificate Services web interface and click Next.

Step 2

Click the Download latest certificate revocation list link.

Step 3

Click Save in the File Download dialog box.

Step 4

Enter the destination file name in the Save As dialog box and click Save.

Step 5

Display the CRL using the Microsoft Windows type command.


Importing the CRL

To import the CRL to the trust point corresponding to the CA, follow these steps:

Procedure


Step 1

Copy the CRL file to the MDS switch bootflash.

SwitchA# copy tftp:apranaCA.crl bootflash:aparnaCA.crl

Step 2

Configure the CRL.

SwitchA# config terminal
SwitchA(config)# crypto ca crl request myCA bootflash:aparnaCA.crl
SwitchA(config)#

Step 3

Display the contents of the CRL.

SwitchA(config)# show crypto ca crl myCA

Trustpoint: myCA
CRL:
Certificate Revocation List (CRL):
        Version 2 (0x1)
        Signature Algorithm: sha1WithRSAEncryption
        Issuer: /emailAddress=admin@yourcompany.com/C=IN/ST=Karnatak
Yourcompany/OU=netstorage/CN=Aparna CA
        Last Update: Nov 12 04:36:04 2005 GMT
        Next Update: Nov 19 16:56:04 2005 GMT
        CRL extensions:
            X509v3 Authority Key Identifier:
            keyid:27:28:F2:46:83:1B:AC:23:4C:45:4D:8E:C9:18:50:1
            1.3.6.1.4.1.311.21.1:
                ...
Revoked Certificates:
    Serial Number: 611B09A1000000000002
        Revocation Date: Aug 16 21:52:19 2005 GMT
Serial Number: 4CDE464E000000000003
        Revocation Date: Aug 16 21:52:29 2005 GMT
    Serial Number: 4CFC2B42000000000004
        Revocation Date: Aug 16 21:52:41 2005 GMT
    Serial Number: 6C699EC2000000000005
        Revocation Date: Aug 16 21:52:52 2005 GMT
    Serial Number: 6CCF7DDC000000000006
        Revocation Date: Jun  8 00:12:04 2005 GMT
    Serial Number: 70CC4FFF000000000007
        Revocation Date: Aug 16 21:53:15 2005 GMT
    Serial Number: 4D9B1116000000000008
        Revocation Date: Aug 16 21:53:15 2005 GMT
    Serial Number: 52A80230000000000009
        Revocation Date: Jun 27 23:47:06 2005 GMT
        CRL entry extensions:
            X509v3 CRL Reason Code:
            CA Compromise
Serial Number: 5349AD4600000000000A
        Revocation Date: Jun 27 23:47:22 2005 GMT
        CRL entry extensions:
            X509v3 CRL Reason Code:
            CA Compromise
Serial Number: 53BD173C00000000000B
        Revocation Date: Jul  4 18:04:01 2005 GMT
        CRL entry extensions:
            X509v3 CRL Reason Code:
            Certificate Hold
Serial Number: 591E7ACE00000000000C
        Revocation Date: Aug 16 21:53:15 2005 GMT
    Serial Number: 5D3FD52E00000000000D
        Revocation Date: Jun 29 22:07:25 2005 GMT
        CRL entry extensions:
            X509v3 CRL Reason Code:
            Key Compromise
Serial Number: 5DAB771300000000000E
        Revocation Date: Jul 14 00:33:56 2005 GMT
    Serial Number: 5DAE53CD00000000000F
        Revocation Date: Aug 16 21:53:15 2005 GMT
    Serial Number: 5DB140D3000000000010
        Revocation Date: Aug 16 21:53:15 2005 GMT
    Serial Number: 5E2D7C1B000000000011
        Revocation Date: Jul  6 21:12:10 2005 GMT
        CRL entry extensions:
            X509v3 CRL Reason Code:
            Cessation Of Operation
Serial Number: 16DB4F8F000000000012
        Revocation Date: Aug 16 21:53:15 2005 GMT
    Serial Number: 261C3924000000000013
        Revocation Date: Aug 16 21:53:15 2005 GMT
    Serial Number: 262B5202000000000014
        Revocation Date: Jul 14 00:33:10 2005 GMT
    Serial Number: 2634C7F2000000000015
        Revocation Date: Jul 14 00:32:45 2005 GMT
    Serial Number: 2635B000000000000016
        Revocation Date: Jul 14 00:31:51 2005 GMT
    Serial Number: 26485040000000000017
        Revocation Date: Jul 14 00:32:25 2005 GMT
    Serial Number: 2A276357000000000018
Revocation Date: Aug 16 21:53:15 2005 GMT
    Serial Number: 3F88CBF7000000000019
        Revocation Date: Aug 16 21:53:15 2005 GMT
    Serial Number: 6E4B5F5F00000000001A
        Revocation Date: Aug 16 21:53:15 2005 GMT
    Serial Number: 725B89D800000000001B
        Revocation Date: Aug 16 21:53:15 2005 GMT
    Serial Number: 735A887800000000001C
        Revocation Date: Aug 16 21:53:15 2005 GMT
    Serial Number: 148511C700000000001D
        Revocation Date: Aug 16 21:53:15 2005 GMT
    Serial Number: 14A7170100000000001E
        Revocation Date: Aug 16 21:53:15 2005 GMT
    Serial Number: 14FC45B500000000001F
        Revocation Date: Aug 17 18:30:42 2005 GMT
    Serial Number: 486CE80B000000000020
        Revocation Date: Aug 17 18:30:43 2005 GMT
    Serial Number: 4CA4A3AA000000000021
        Revocation Date: Aug 17 18:30:43 2005 GMT
    Serial Number: 1AA55C8E00000000002F
        Revocation Date: Sep  5 17:07:06 2005 GMT
    Serial Number: 3F0845DD00000000003F
        Revocation Date: Sep  8 20:24:32 2005 GMT
    Serial Number: 3F619B7E000000000042
        Revocation Date: Sep  8 21:40:48 2005 GMT
    Serial Number: 6313C463000000000052
        Revocation Date: Sep 19 17:37:18 2005 GMT
Serial Number: 7C3861E3000000000060
        Revocation Date: Sep 20 17:52:56 2005 GMT
    Serial Number: 7C6EE351000000000061
        Revocation Date: Sep 20 18:52:30 2005 GMT
    Serial Number: 0A338EA1000000000074       <-- Revoked identity certificate
        Revocation Date: Nov 12 04:34:42 2005 GMT
    Signature Algorithm: sha1WithRSAEncryption
        0b:cb:dd:43:0a:b8:62:1e:80:95:06:6f:4d:ab:0c:d8:8e:32:
        44:8e:a7:94:97:af:02:b9:a6:9c:14:fd:eb:90:cf:18:c9:96:
        29:bb:57:37:d9:1f:d5:bd:4e:9a:4b:18:2b:00:2f:d2:6e:c1:
        1a:9f:1a:49:b7:9c:58:24:d7:72

Maximum Limits

The following table lists the maximum limits for CAs and digital certificate parameters.

Table 1. Maximum Limits for CA and Digital Certificate

Feature

Maximum Limit

Trust points declared on a switch

16

RSA key-pairs generated on a switch

16

RSA key-pair size

4096 bits

Identity certificates configured on a switch

16

Certificates in a CA certificate chain

10

Trust points authenticated to a specific CA

10

Default Settings

The following table lists the default settings for CAs and digital certificate parameters.

Table 2. Default CA and Digital Certificate Parameters

Parameters

Default

Trust point

None

RSA key-pair

None

RSA key-pair label

Switch FQDN

RSA key-pair modulus

1024

RSA key-pair exportable

Yes

Revocation check method of trust point

CRL