Device Onboarding

This section contains the following topics:

Preface

Abstract

This document is the user guide for the standalone version of Cisco Crosswork Workflow Manager Solutions Device Onboarding package.

Audience

This document describes how to configure and use Crosswork Workflow Manager Solutions Device Onboarding. This document is intended for Cisco Advanced Services developers, network engineers, and system engineers who configure and deliver Crosswork Workflow Manager Solutions functionalities to Cisco customers.

Additional Documentation

This documentation requires the reader to have a good understanding of Cisco Crosswork and Cisco NSO and its use, as described in the Cisco documentation. For more information on NSO products, go to: https://developer.cisco.com/docs/nso/.

Cisco Crosswork Workflow Manager Solutions

CWM Solutions is a collection of common use cases designed to make field customizations simple and straightforward. It is built using Cisco Crosswork Workflow Manager (CWM) and Cisco Network Services Orchestrator (NSO). This document explains how to use the Device Onboarding use case to improve the efficiency and speed with which you onboard new network devices.

Note: Click these links for more information using on Cisco CWM and Cisco NSO.

Device Onboarding Package

The CWM Solutions Device Onboarding use case is a functional package that utilizes the Cisco-ZTP application to remotely provision network devices by installing the boot image and the initial day-0 configuration.

Device Onboarding (DO) and Zero-Touch Provisioning (ZTP)

The Device Onboarding (DO) application uses Cisco Zero-Touch Provisioning (ZTP). ZTP automates software image installation and upgrade as well as installation of day-0 configuration files while deploying Cisco or third-party devices for the first time. The Cisco-ZTP solution offers flexibility by supporting a variety of devices, including Cisco IOS XR, IOS XE, and Nexus.

The Cisco-ZTP solution used in DO comprises four components: a DHCP server, a client (ZTP script), HTTP server, and NSO function pack.

Note: All components need to be installed and connected to the device. For details, see Device Onboarding Prerequisites.

Device Onboarding Prerequisites

For Device Onboarding to function properly, these prerequisites need to be present and functioning.

  • Devices enabled with ZTP.

  • Devices capable of running Python or Shell scripts as part of the ZTP process.

  • Network connectivity from devices to NSO, DHCP, and HTTP/TFTP servers.

  • IP address space is sufficient to accommodate all the devices needed.

  • The DHCP is configuration to detect the device type and provide the appropriate device agent script location.

  • Minimum NSO version 6.1 or higher.

  • The DO (Cisco-ztp) package is installed on NSO.

  • Python or Shell scripts are available, one for each type of ZTP device, that implement the DO (Cisco-ZTP) callbacks, device image upgrade, and Day-0 configuration.

  • (Optional) NED packages are available for device onboarding.

Device Onboarding Function Package

The Cisco Device Onboarding (DO) functional package defines the interface to both capture the ZTP intent and APIs for the DO client (bootstrap scripts running on the device) interactions. The DO data models enable you to build a catalog of role-based ZTP-profiles that each capture the day-0, software-image (optional), and device onboard settings. These profiles are then associated with the device thru a service model called a map. Each map entry should specify some uniquely identifiable information of the device (for example, a serial-number) along with the ZTP-profile used for the device. The unique ID enables you to verify and validate the device when using the NSO ZTP API endpoints. The DO functional package monitors the progress for a device and can be monitored using the ZTP map service plan data.

Package Components

  • Day-0 template: When you create a day-0 file, there are four variables that are auto- populated with specific values listed here. See Day-0 Template.

    • DEV_CUSTOMER_USERNAME

    • DEV_CUSTOMER_PASSWORD

    • DEV_CUSTOMER_ENABLED_PASSWORD

    • MGMT_IP_ADDRESS

Note: The variables DEV_CUSTOMER_ENABLED_PASSWORD and MGMT_IP_ADDRESS are dependent on the ZTP profile, the availability of management-ip-address, and sec- password variables.

  • Authgroup: The authgroup is needed for you to log in to NSO.

  • Device Onboarding Settings: These settings are verified and validated during the onboarding process.

  • (Optional) Software Image: The software itself that runs the device.

Device Onboarding Flow

Device Onboarding using the Cisco-ZTP agent flow has three phases.

  • Obtaining Bootstrap Information: The device issues a request to the DHCP server to obtain the location (URL) of the bootstrap file (script). The device then downloads and runs the script.

  • Checking Image Compliance and/or Upgrading: Once the bootstrap file (script) has run, the configuration is applied to the device either with a new configuration (if the device is newly added) or upgrades the existing device.

  • Validating and applying the new (day-0) configuration: The configuration then undergoes verification and validation processes based on the ZTP-role.

Note: The bootstrap file can be a simple script that applies a day-0 configuration or an elaborate script that acts as a Cisco-ZTP solution client. Usually, the script file is best suited for Cisco-ZTP solution implementations.

A diagram of a computer Description automatically generated

The ZTP process downloads the file and runs it. Cisco IOS XR, IOS XE, and Nexus devices support bash, python script, and a file containing iOS commands as the bootstrap file.

Note: The bootstrap file can be a simple script that applies a day-0 configuration or an elaborate script that acts as a Cisco-ZTP solution client. Usually, the script file is best suited for DO (Cisco-ZTP) solution implementations.

How Device Onboarding Works

This section describes how Device Onboarding operates. The next section guides you through the Steps for Onboarding a Managed Device.

Day-0 Template

The day-0 template is a reusable configuration template with multiple placeholder variables. The values for these variables are part of the profile definition. This template enables you to reuse day-0 configurations for other device onboarding projects. The placeholder values are defined during the ZTP map service (placeholder variables are device specific and are included in the ZTP-profile) when you create the ZTP map. These factors give you greater control over how a day-0 configuration template is rendered for a given device.

This is a sample of a day-0 template for a Cisco IOX XR device.


            <config xmlns="
http://tail-f.com/ns/config/1.0
">
            <ztp xmlns="
http://cisco.com/ns/nso/cfp/cisco-ztp
">
            <day0-template>
            <name>ncs540-day0</name>
            <template>
            !! IOS XR
            username ${DEV_CUSTOMER_USERNAME} group root-lr
            password 0 ${DEV_CUSTOMER_PASSWORD}
            !
            hostname ${HOST_NAME}
            !
            vrf Mgmt-intf
            address-family ipv4 unicast
            !
            domain name cisco.com
            domain name-server <ip_address>
            domain lookup source-interface MgmtEth0/RP0/CPU0/0 interface
            MgmtEth0/RP0/CPU0/0
            ipv4 address ${MGMT_IP_ADDRESS} 
255.255.255.0

            !
            router static
            address-family ipv4 unicast
            
0.0.0.0/0


<ip_address>

            !
            !
            !
            ssh server v2
            ssh server vrf Mgmt-intf
            </template>
            </day0-template>
            </ztp>
            </config>
          

Resource Pools

ZTP uses IP resources that are grouped in a common pool called a resource pool. A resource pool is configured with an IP address or subnet. The resource pool uses the resource-manager package in NSO to allocate the IP addresses.

The resource-manager provides a ZTP map service that handles the management IP-address assignment. You can also choose to explicitly provide the management-ip -address on the ZTP map service for a given device. In both cases, ZTP application auto populates the MGMT_IP_ADDRESS placeholder variable while rendering the day-0 configuration for a device.

Note: A resource-pool is only needed when you are using a dynamic IP address. If you are using a static IP address, the resource pool variable is not needed. For details, refer to the Load Resource Pool (Step 6).

Profiles and Service Map Information

The Profiles catalog contains a set of configuration parameters, such as the 0-day files, device onboarding settings, and the software version applied to the devices. The device onboarding solution associates the ZTP-profiles with the devices using the service map. The map contains the necessary information and applies that information to the device during the Device Onboarding (DO) process. Each map entry contains some uniquely identifiable information of the device along with the ZTP-profile used for the device. The map service plan data displays the progress for the device.

The OS software-version and image details defined in the ZTP-profile are available to the ZTP client script to compare software version and initiate image upgrade. The ZTP package does not process or use the configured OS information. Once the ZTP process is complete, the ZTP map service onboards the devices into the NSO device tree to continue to configure the devices with any available core function pack solutions.

To onboard the device, the managed attribute in the profile must be set to true, see step 8 Load Service (Map), and the device-type (NED, port, and authgroup) must also be set. If there is no authgroup setting under device-type, then the username, password and sec-password attributes must be provided.

Device Onboarding Bootstrap

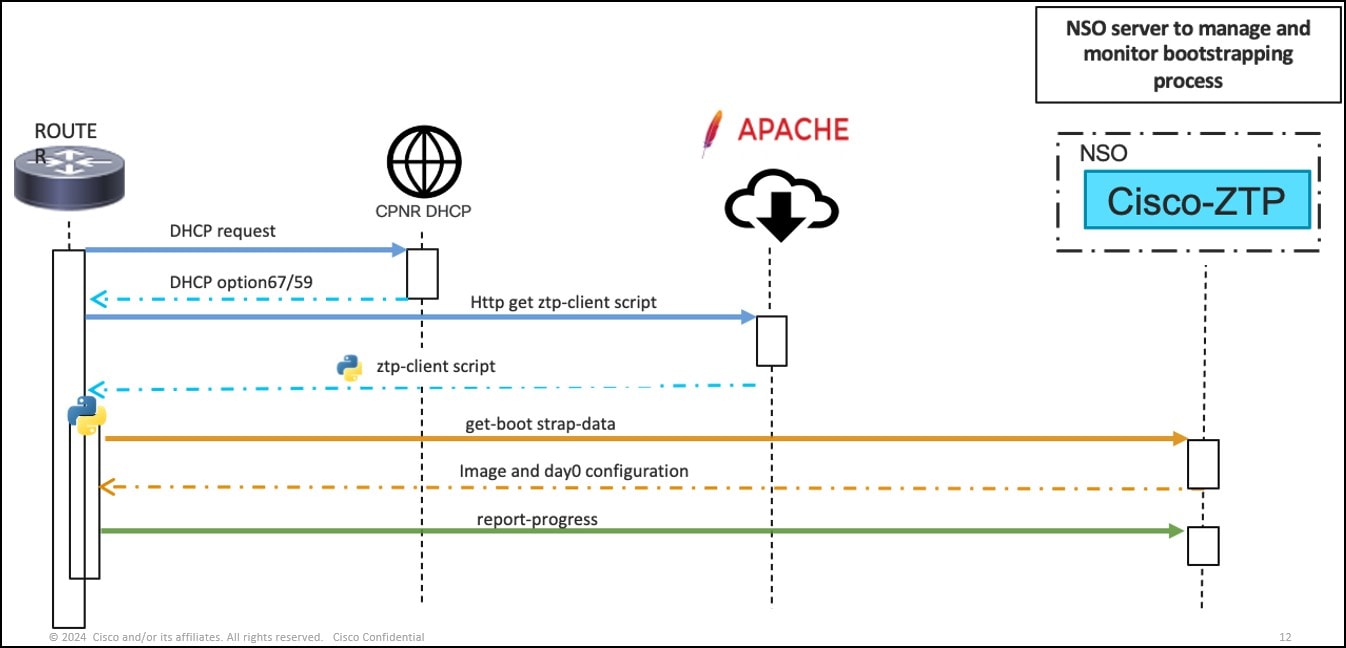
The Device Onboarding package defines two callback action APIs for the Device Onboarding- client interactions. The get-bootstrap-data callback action returns the bootstrapping configuration, the day-0 configuration generated for the device, and the OS image information as configured on the ZTP-profile. The Device Onboarding-client script then processes the OS image details and applies the day-0 configuration to the device.

During the bootstrap process, the Device Onboarding-client script reports the progress using the report-progress callback action. The get-bootstrap-data and report-progress actions must contain the unique identifier of the device. The get-bootstrap-data API call also includes the: device vendor, model, OS-name, and OS-version. Similarly, the report-progress API call includes an optional message.

If both the management resource pool and explicit management IP address configurations are not set and the Device Onboarding-profile defines the device as managed, the Device Onboarding-client script must retrieve the management IP address from the device and post it to NSO thru the report-progress action callback.

This is a sample of the get-bootstrapping-data call back script.


  curl -i -u ztpclient:topsecret \
  -H "Content-Type:application/yang-data+json" \
  -X POST \
  -d '{"input":{ "model" : "CSR1KV","os-name" : "cisco-ioxr","vendor" :
  "Cisco","unique-id" : "AAO124GF","os-version" : "12.1"}}' \
  http://nsoztpserver:8090/restconf/operations/cisco-ztp:ztp/classic/get-bootstrapping-data
  << Response body >>
  {
  "cisco-ztp:output": { "bootstrap-information": {
  "boot-image": {
  "os-name": "cisco-ioxr",
  "os-version": "12.3",
  "download-uri": "http://sample.domain/8894-235/ios-xr-
12.3.tar.gz",
  "md5-hash-value": "195b174c9a13de04ca44f51c222d14b0"
  },
  "day-0-configuration": "!! IOS XR\nusername admin\n group root-lr\n password 0 admin\n!\nhostname xr_2\n!\nvrf Mgmt-intf\n address-family ipv4 unicast\n!\ninterface MgmtEth0/RSP0/CPU0/0\n vrf Mgmt-intf\n ipv4 address 192.168.20.1 255.255.255.0\n!\nrouter static\n vrf Mgmt-intf\n address- family ipv4 unicast\n 0.0.0.0/0 192.168.122.1 110\n !\n!\nssh server v2\nssh server vrf Mgmt-intf\n\n"
  }
  }
  }
  ** report-progress callback **
  curl -i -u ztpclient:topsecret \
  -H "Content-Type:application/yang-data+json" \
  -X POST \
  -d '{"input" : {"unique-id": "AAO124GF","progress-type": "bootstrap- complete"}}' \
  http://nsoztpserver:8090/restconf/operations/cisco-ztp:ztp/classic/report-progress
  << Response header >>
  HTTP/1.1 204 No Content

Steps for Onboarding a Managed Device

This is the sequence of steps you use Device Onboarding to update a device managed by NSO using either a dynamic or static IP Address.

SUMMARY STEPS

  1. Edit/Update ncs.conf file
  2. Create a Local Authentication (for NSO)
  3. Create an Authgroup
  4. Create a Net Cam Rules file
  5. Load Onboarding Payload with Day-0 template
  6. Load Resource Pool (if using dynamic IP Address. If using a static IP Address, skip step 6.
  7. Load Profile
  8. Load Service (Map). If you are using a static IP address that is not managed by NSO, skip Step 6, and load a separate service map with the static IP address in Step 8.

DETAILED STEPS

  Command or Action Purpose

Step 1

Edit/Update ncs.conf file

Step 2

Create a Local Authentication (for NSO)

Step 3

Create an Authgroup

Step 4

Create a Net Cam Rules file

Step 5

Load Onboarding Payload with Day-0 template

Step 6

Load Resource Pool (if using dynamic IP Address. If using a static IP Address, skip step 6.

Step 7

Load Profile

Step 8

Load Service (Map). If you are using a static IP address that is not managed by NSO, skip Step 6, and load a separate service map with the static IP address in Step 8.

Edit/Update ncs.conf file

Use these samples to update the restconf with a new tcp port and local authentication to be able to log in to NSO.

Note: This sample uses 8080 for the port number and after updating file, restart nsc.

Add a tcp port (8080 default port)
<restconf>
<enabled>true</enabled>
<transport>
<tcp>
<enabled>true</enabled>
<port><8080></port>
</tcp>
</transport>
</restconf>

Create a Local Authentication

Local authentication

<local-authentication>
<enabled>true</enabled>
</local-authentication>

Create an Authgroup


            Default-authgroup.xml
            <config xmlns="
http://tail-f.com/ns/config/1.0
">
            <devices xmlns="
http://tail-f.com/ns/ncs
">
            <authgroups>
            <group>
            <name>default</name>
            <default-map>
            <remote-name><UserID></remote-name>
            <remote-password><password></remote-password>
            <remote-secondary-password>Cisco123#</remote-secondary-password>
            </default-map>
            </group>
            </authgroups>
            </devices>
            </config>


Create a Net Cam Rules


    <config xmlns="
http://tail-f.com/ns/config/1.0
">
    <aaa xmlns="
http://tail-f.com/ns/aaa/1.1
">
    <authentication>
    <users>
    <user>
    <name><userID></name>
    <uid>65534</uid> <!-- User nobody -->
    <gid>65534</gid> <!-- Group nobody -->
    <password><password></password>
    <!-- User ssh public keys, Set to random for ztp client
    -->
    <ssh_keydir>/var/ncs/homes/public/.ssh</ssh_keydir>
    <!-- User working directory for load mearg and other
    activity, set to random for ztp client -->
    <homedir>/var/ncs/homes/public</homedir>
    </user>
    </users>
    </authentication>
    </aaa>
    <nacm
    xmlns="urn:ietf:params:xml:ns:yang:ietf-netconf-acm">
    <read-default>deny</read-default>
    <write-default>deny</write-default>
    <exec-default>deny</exec-default>
    <groups>
    <group>
    <name>ztp</name>
    <user-name><userID></user-name>
    </group>
    </groups>
    <rule-list>
    <name>ztp</name>
    <group>ztp</group>
    <rule>
    <name>action-callback</name>
    <module-name>cisco-ztp</module-name>
    <path>/cisco-ztp:ztp/cisco-ztp:classic</path>
    <access-operations>*</access-operations>
    <action>permit</action>
    <context xmlns="
http://tail-f.com/yang/acm

">*</context>
    </rule>
    </rule-list>
    </nacm>
    </config>
    

Load Onboarding Payload with Day-0 template


            <config xmlns="
http://tail-f.com/ns/config/1.0
">
            <ztp xmlns="
http://cisco.com/ns/nso/cfp/cisco-ztp
">
            <day0-template>
            <name>ncs540-day0</name>
            <template>
            !! IOS XR
            username ${DEV_CUSTOMER_USERNAME} group root-lr
            password 0 ${DEV_CUSTOMER_PASSWORD}
            !
            hostname ${HOST_NAME}
            !
            vrf Mgmt-intf
            address-family ipv4 unicast
            !
            domain name cisco.com
            domain name-server 171.70.168.183
            domain lookup source-interface MgmtEth0/RP0/CPU0/0 interface
            MgmtEth0/RP0/CPU0/0
            ipv4 address ${MGMT_IP_ADDRESS} 
255.255.255.0

            !
            router static
            address-family ipv4 unicast
            
0.0.0.0/0

            <ip_address>
            !
            !
            !
            ssh server v2
            ssh server vrf Mgmt-intf
            </template>
            </day0-template>
            </ztp>
            </config>


Load Profile (for managed payload-dynamic IP Address)

 
  <config xmlns="http://tail-f.com/ns/config/1.0">
  <ztp xmlns="http://cisco.com/ns/nso/cfp/cisco-ztp">
  <profile>
  <id>ncs540-profile</id>
  <os-details>
  <os-name>cisco-ioxr</os-name>
  <os-version>7.10.2</os-version>
  <image-uri><image_drectory_pathi>
  <md5-hash><md_hash>>
  </os-details>
  <resource-pool>ztp-pool</resource-pool>
  <day0-template>ncs540-day0</day0-template>
  <username<user_id></username>
  <password><password></password>
  <sec-password>Cisco123#</sec-password>
  <managed>true</managed>
  <device-type>
  <cli>
  <ned-id>cisco-iosxr-cli-7.53</ned-id>
  </cli>
  </device-type>
  </profile>
  </ztp>
  </config>

Note


Profiles for static IP address payloads do not include the resource pool.

  <config xmlns="
http://tail-f.com/ns/config/1.0
">
  <ztp xmlns="
http://cisco.com/ns/nso/cfp/cisco-ztp
">
  <profile>
  <id>ncs540-profile</id>
  <os-details>
  <os-name>cisco-ioxr</os-name>
  <os-version>7.10.2</os-version>
  <image-uri>
<image_drectory_pathi
>
  <md5-hash><md_hash>>
  </os-details>
  <day0-template>ncs540-day0</day0-template>
  <username<user_id></username>
  <password><password></password>
  <sec-password><sec_password></sec-password>
  <managed>true</managed>
  <device-type>
  <cli>
  <ned-id>cisco-iosxr-cli-7.53</ned-id>
  </cli>
  </device-type>
  </profile>
  </ztp>
  </config>

Load Service Map (Static IP Address)


            <config xmlns="
http://tail-f.com/ns/config/1.0
">
            <ztp xmlns="
http://cisco.com/ns/nso/cfp/cisco-ztp
">
            <map>
            <id>ncs540</id>
            <unique-id>FOC2712R3D6</unique-id>
            <profile>ncs540-profile</profile>
            <variable>
            <name>HOST_NAME</name>
            <value>NCS540-2</value>
            </variable>
            <mgmt-ip-address><ip_address></ip_address></mgmt-ip-address>
            </map>
            </ztp>
            </config>
          

As an option, you can also onboard the device on to a remote NSO. A ZTP NSO server is a managed server that has NSO installed with the Device Onboarding application. A remote NSO is an unmanaged server where you can onboard a device after ZTP process. This alternate NSO server is used for onboarding unmanaged devices. Using an unmanaged NSO server segregates the Device Onboarding-specific functions from the broader network solution. To enable this functionality, Device Onboarding defines a YANG model that captures the remote-nso server.

Device Onboarding an Unmanaged Device

The procedure used to upgrade a device not managed by NSO is very similar to procedure for onboarding to a server managed by NSO. The only difference is setting the managed variable to either true (managed) or false (unmanaged) when downloading the Profile. This sample shows the management variable set to false for an unmanaged device.

<config xmlns="http://tail-f.com/ns/config/1.0">
          <ztp xmlns="http://cisco.com/ns/nso/cfp/cisco-ztp">
          <profile>
          <id>ncs540-profile</id>
          <os-details>
          <os-name>cisco-ioxr</os-name>
          <os-version>7.10.2</os-version>
          <image-uri><image_drectory_pathi>
          <md5-hash><md_hash>>
          </os-details>
          <resource-pool>ztp-pool</resource-pool>
          <day0-template>ncs540-day0</day0-template>
          <username<user_id></username>
          <password><password></password>
          <sec-password>Cisco123#</sec-password>
          <managed>false</managed>
          <device-type>
          <cli>
          <ned-id>cisco-iosxr-cli-7.53</ned-id>
          </cli>
          </device-type>
          </profile>
          </ztp>
          </config>
        

Example: Use Device Onboarding to Onboard a Network Device

This section provides an example of how to supply the Device Onboarding workflow.

Prerequisites

  • A Crosswork Workflow Manager (CWM) OVA is running.

  • A Network Service Orchestrator (NSO) system (version 6.1.9 or later) is installed and running.

  • An NSO server secret is created for use in the CWM.

  • The Map-service-create-poll-plan.sw.jason workflow is loaded in CWM.

Workflow Procedure

Procedure


Step 1

Create a resource pool using this payload.


                <config xmlns="http://tail-f.com/ns/config/1.0">
                <resource-pools xmlns="http://tail-f.com/pkg/resource-allocator">
                <ip-address-pool xmlns="http://tail-f.com/pkg/ipaddress-allocator">
                <name>ztp-pool</name>
                <range>
                <from><ip_address1></from>
                <to>ip_address2</to>
                </range>
                </ip-address-pool>
                </resource-pools>
                </config>
        

Step 2

Create an authgroup using this script.


  <config xmlns="http://tail-f.com/ns/config/1.0">
  <devices xmlns="http://tail-f.com/ns/ncs">
  <authgroups>
  <group>
  <name>default</name>
  <default-map>
  <remote-name>admin</remote-name>
  <remote-password><pwd></remote-password>
  <remote-secondary-password><pwd></remote-secondary-password>
  </default-map>
  </group>
  </authgroups>
  </devices>
  </config>
  

Step 3

Create a Day-0 template using this script.


  <config xmlns="http://tail-f.com/ns/config/1.0">
  <ztp xmlns="http://cisco.com/ns/nso/cfp/cisco-ztp">
  <day0-template>
  <name><name></name>
  <template>
  !! IOS XR
  username ${DEV_CUSTOMER_USERNAME} group root-lr
  password 0 ${DEV_CUSTOMER_PASSWORD}
  !
  hostname ${HOST_NAME}
  !
  vrf Mgmt-intf
  address-family ipv4 unicast
  !
  domain name cisco.com
  domain name-server <ip_address>
  domain lookup source-interface MgmtEth0/RP0/CPU0/0 interface MgmtEth0/RP0/CPU0/0
  ipv4 address ${MGMT_IP_ADDRESS} <ip_address>
  !
  router static
  address-family ipv4 unicast 0.0.0.0/0 <ip_address>
  !
  !
  !
  ssh server v2
  ssh server vrf Mgmt-intf
  </template>
  </day0-template>
  </ztp>
  </config>


Step 4

Create a ZTP-profile using this script.


  <config xmlns="http://tail-f.com/ns/config/1.0">
  <ztp xmlns="http://cisco.com/ns/nso/cfp/cisco-ztp">
  <profile>
  <id>ncs5501-profile</id>
  <os-details>
  <os-name>cisco-ioxr</os-name>
  <os-version>7.9.2</os-version>
  <image-uri>http://172.22.143.63/xr-5500-792/ncs5500-golden-x-
7.9.2-v1.iso</image-uri>
  <md5-hash>195b174c9a13de04ca44f51c222d14b0</md5-hash>
  </os-details>
  <resource-pool>ztp-pool</resource-pool>
  <day0-template>ncs5501-day0</day0-template>
  <username><userID></username>
  <password><pwd></password>
  <sec-password><pwd></sec-password>
  <managed>true</managed>
  <device-type>
  <cli>
  <ned-id>cisco-iosxr-cli-7.53</ned-id>
  </cli>
  </device-type>
  </profile>
  </ztp>
  </config>
  

Step 5

After the resource pool, authcode, day-0-template, and ZTP-profile have been created, create the ztp map service on nso using the CWM UI.

Step 6

Log into CWM and choose the Workflows tab.

Step 7

Click Create New Workflow.

  1. (Required) Type in the Workflow Name.

  2. (Required) Type in the Version of the workflow. A screenshot of a computer Description automatically generated

Step 8

Click Create Workflow. The Workflow is listed in the Workflow Table A screenshot of a computer Description automatically generated

Step 9

A white background with black lines Description automatically generated
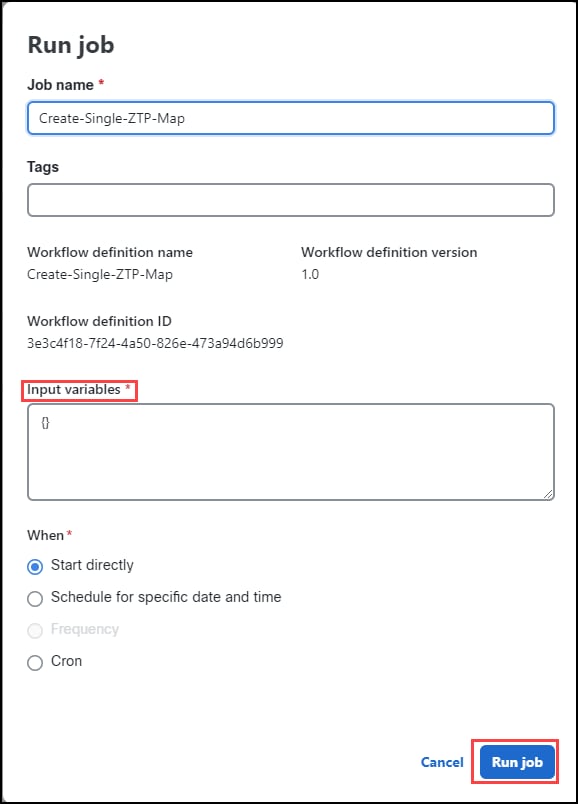
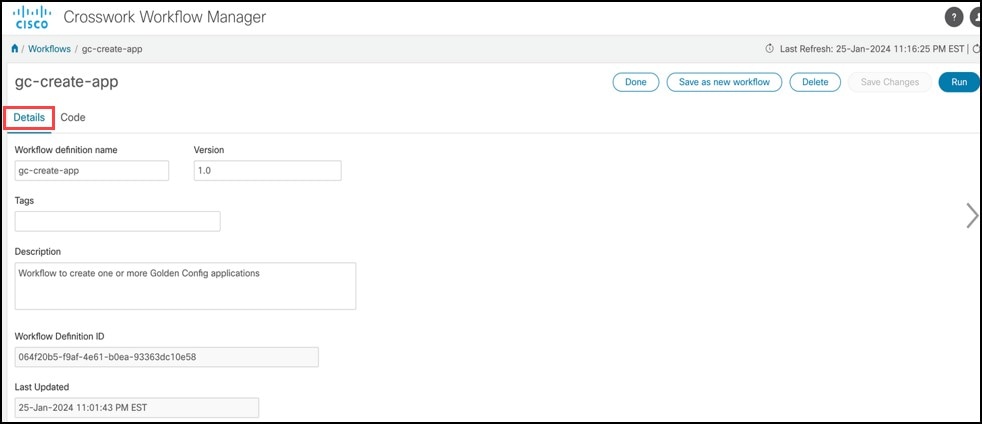
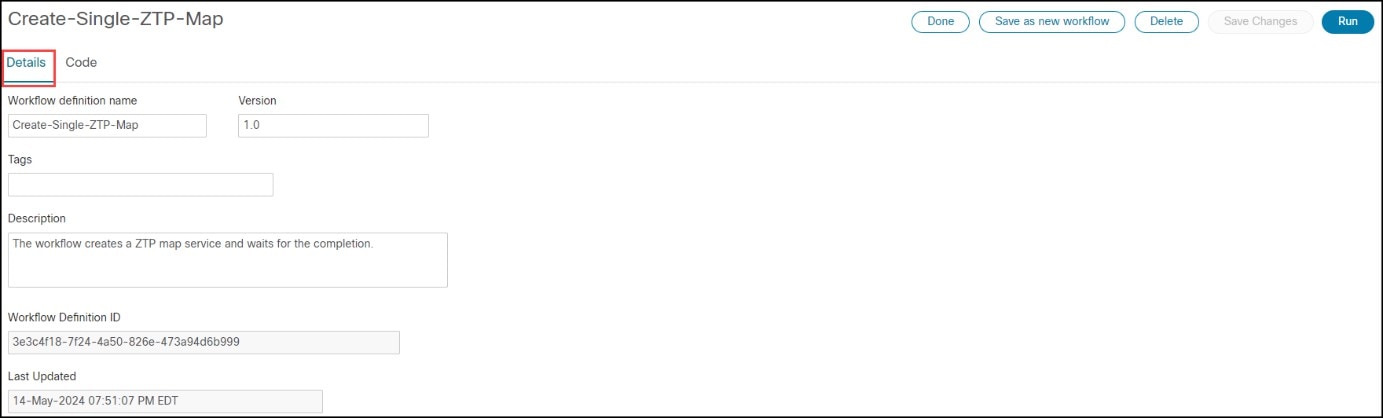
Click the Workflow Name to open the Workflow screen. (Details tab is the default.) The Workflow Definition ID and Update Date are auto filled.

Step 10

(Optional) Type any Tags.

Step 11

Click the Code tab to view the script for the map.

Step 12

Click Run the Run job window opens. A screenshot of a computer Description automatically generated

Step 13

(Optional) Type in any Tags.

Step 14

Type in the Input variables. Example is shown here:


                  {
                  "nsoInstance": "NSO",
                  "ztp": {
                  "map": {
                  "id": "NCS_5",
                  "unique-id": "FOC2712R3D6",
                  "profile": "ncs540-profile",
                  "variable": {
                  "name": "HOST_NAME",
                  "value": "NCS_5"
                  }
                  }
                  }
                  }
        

Step 15

(Optional) in the When section configure the time, frequency, and order that the map runs.

  1. (Optional) Start directly (default).

  2. Schedule for specific date and time.

  3. (If specific date and time is selected) Select Frequency.

  4. (If the script is to be run in chronological order) Select Cron.

Step 16

Click Run Job.


Running the Map

After you click Run Job.

Procedure


Step 1

Select Job Manager > Active Jobs.

Step 2

Click the job name you want to open it. (In this example, the job status is running.)

Step 3

Once the ZTP process is finished on the XR device. Choose Job Manager > Completed Jobs tab. The job is listed in the table.

Step 4

Click the Job Name. The Job page opens showing the job details and Job Event Log.

Step 5

In the Job Event Log section, click the plus (+) sign to the left of the WorkflowExecution (last event in the list).

Note


The MapCreatedStatus variable is set to true and the PlanStatusResult variable is set shows reached which means that the ZTP map is in the reached state.

Step 6

On NSO, the XR device is onboarded and the map; plan status is reached. The readout shows that the device is onboarded.