Resource Reservation Protocol (RSVP)

Resource Reservation Protocol

Resource Reservation Protocol is a signaling protocol that:

  • enables systems and local clients to request resource reservations from the network,

  • establishes explicit paths for data traffic, and

  • ensures that necessary bandwidth and network resources are allocated for critical applications to meet desired Quality of Service (QoS) standards.

Resource Reservation Protocol-Traffic Engineering (RSVP-TE) processes protocol messages from other systems, handles resource requests from local clients, and generates protocol messages. It manages the creation, maintenance, and deletion of resource reservations for data flows.

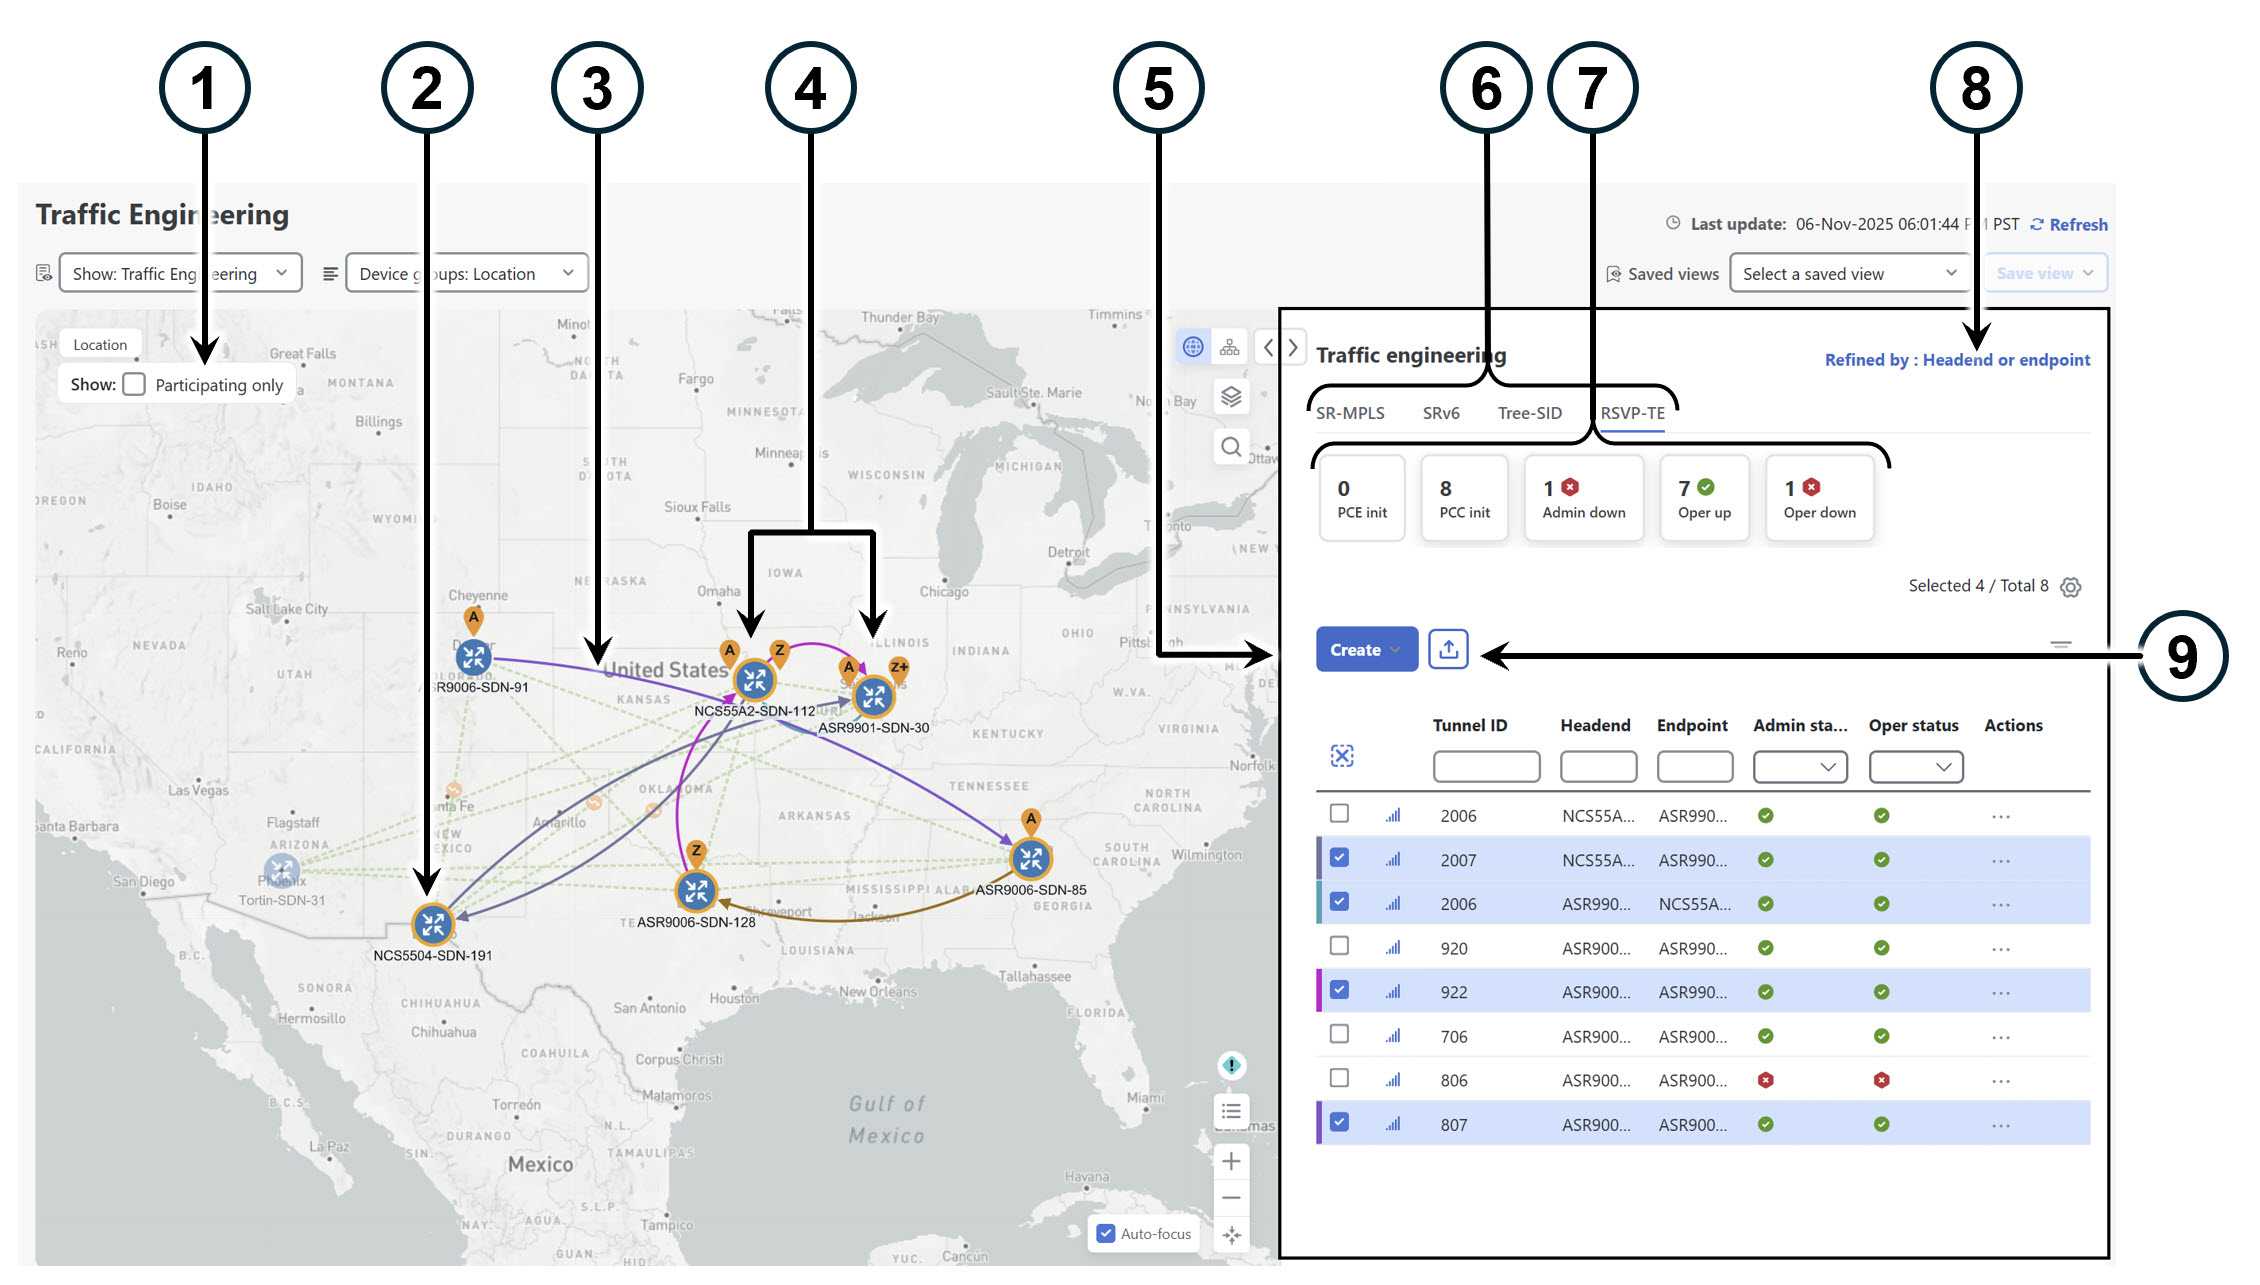
This section describes the RSVP-TE features that Crosswork Network Controller supports.

View RSVP-TE tunnels on the topology map

A Traffic Engineering topology map is a visualization tool that displays the network topology with clear emphasis on participating links and devices. The map distinguishes path types by representing Record Route Objects (RRO) as straight lines and Explicit Route Objects (ERO) as curved lines, while also marking adjacency segment IDs for precise identification. Device clusters are labeled to indicate tunnel sources and destinations, enhancing clarity. Additionally, the map features a mini dashboard that summarizes tunnel statuses and counts, providing a concise overview of network traffic engineering elements.

To open the Traffic Engineering topology map for RSVP-TE visualization, choose Services & Traffic Engineering > Traffic Engineering > RSVP-TE.

From the Traffic engineering table, select the RSVP-TE tunnels you want to view on the map. RSVP-TE tunnels appear as colored lines indicating their source and destination.

Figure 1. Traffic Engineering UI - RSVP-TE tunnels
Traffic Engineering UI - RSVP-TE tunnels

The table describes the callouts for the Traffic Engineering topology map for RSVP-TE tunnels.

Callout no. Description

1

Show Participating only: Displays only links belonging to the selected RSVP-TE tunnels. All other links and devices are hidden.

2

Device outlines:

  • A solid orange outline () indicates a device with a strict hop.

  • A dashed orange outline indicates a device with a loose hop.

    Note


    RSVP-TE tunnels cannot be configured with loose hops when provisioning in the UI.

3

Tunnel visualization: When you select RSVP-TE tunnels in the RSVP-TE Tunnel table, the map displays colored directional lines showing the source and destination.

  • Record Route Object (RRO) paths appear as straight lines.

  • Explicit Route Object (ERO) paths appear as curved lines.

    Note


    If both RRO and ERO paths are available, the RRO path is displayed by default.

  • An adjacency segment ID (SID) is shown as a green dot on a link along the path (adjacency SID).

If both A and Z are displayed in a device cluster, at least one node in the cluster is a source, and another is a destination.

  • A+ denotes multiple RSVP-TE tunnels originating from a node.

  • Z+ denotes multiple RSVP-TE tunnels terminating at a node.

4

RSVP-TE tunnel origin and destination: If both A and Z are displayed in a device cluster, at least one node in the cluster is a source, and another is a destination.

  • A+ denotes multiple RSVP-TE tunnels originating from a node.

  • Z+ denotes multiple RSVP-TE tunnels terminating at a node.

5

Window content: The window content depends on the selected or filtered items. In this example, the RSVP-TE tab shows RSVP-TE Tunnels table. Depending on the map selection, you can create, modify, or view RSVP-TE tunnels.

6

Tabs: Click the RSVP-TE tab to access RSVP-TE data.

7

Mini dashlets: Summarizes the operational RSVP-TE tunnel status and displays the number of PCC and PCE-initiated tunnels listed in the RSVP-TE table. When you select a dashlet, filters are applied and the policy table updates to display data corresponding to the filtered dashlet.

8

Group filter: Controls how group filters apply to table data. For example, if Headend only is selected, the table only displays policies where the policy’s headend device is in the selected group. This filter helps users efficiently manage policies in large networks.

Filter options:

  • Headend or Endpoint: Show policies with either the headend or endpoint device in the selected group.

  • Headend and Endpoint: Show policies if both the headend and endpoint are in the group.

  • Headend only: Show policies if the headend device of the policy is in the selected group.

  • Endpoint only: Show policies if the endpoint device of the policy is in the selected group.

9

Export function: Exports all data into a CSV file. You cannot export selected or filtered data.

View RSVP-TE tunnel details

You can view RSVP-TE tunnel details, including the binding label, delegated PCE, metric type, ERO/RRO, and delay. To view RSVP-TE tunnel details, complete these steps:

Before you begin

To ensure end-to-end delays on RSVP-TE tunnels, all inter-domain RSVP-TE tunnels must be explicit. This means that every interface along the path must be specified as an adjacency hop.

Procedure


Step 1

Click Performance metric icon to view performance metrics for the RSVP-TE tunnel. This data helps assess the policy health and indicates if any of the metrics violated SLAs defined in the Heuristic package. Delay and Delay Variance metrics for RSVP-TE policies are visible only when Crosswork Service Health is installed and SR-PM collection is enabled. The Loss metric provides detailed visibility into packet loss across core network links. You can set loss severity thresholds, in the System settings > Metric Thresholds page.

Note


The RSVP policy under Transport > RSVP tab in VPN Services and the Traffic Engineering > RSVP tab represent the same Traffic Engineering policy. Both pages display RSVP Performance Measurement (PM) metrics with identical values. However, the Threshold label appears only in the VPN Services – Transport tab when Service Health monitoring is enabled and the device has delay measurement configured for the policies. If data retention is enabled, historical data and trends are available in the History tab.

Figure 2. Performance metrics
Performance metrics

Step 2

Alternatively, from the Actions column, choose More icon > View details for one of the RSVP-TE tunnels.

Figure 3. RSVP-TE > View details
RSVP-TE > View details

Step 3

View RSVP-TE tunnel details.

Figure 4. RSVP-TE tunnel details
RSVP-TE tunnel details
Figure 5. RSVP-TE tunnel details (close-up)
RSVP-TE tunnel details (close-up)

Step 4

If the delay value is displayed, it is calculated for all policies every 10 minutes. Click the Details icon icon next to the delay value to see the last update time.


Create explicit RSVP-TE tunnels

This task creates RSVP-TE tunnels using an explicit (fixed) path, which consists of a list of prefix or adjacency Segment IDs (SID list). Each SID represents a node or link along the path. To create explicit RSVP-TE tunnels, complete these steps:

Before you begin

If your setup includes many nodes, policies, or interfaces, a timeout may occur during policy deployment. To configure timeout options, see Configure TE timeout settings.

Procedure


Step 1

From the main menu, choose Services & Traffic Engineering > Traffic Engineering > RSVP-TE.

Step 2

Click Create > PCE Init. To provision a PCC-initiated tunnel using NSO in the Crosswork Network Controller UI, see Create RSVP-TE tunnels (PCC-initiated).

Step 3

Under Tunnel details, enter the required RSVP-TE tunnel values. To see a description for each field, hover over Field Help icon.

Tip


If you have set up device groups, you can select the device group from the Device groups: Location drop-down menu. Then, navigate and zoom in on the topology map to click the device for headend or endpoint selection.

Step 4

Under Tunnel path, click Explicit path and enter a path name.

Step 5

Add the segments for the RSVP-TE path.

Step 6

Click Preview. The path is highlighted on the map.

Step 7

To commit the tunnel path, click Provision.

Step 8

Validate the RSVP-TE tunnel creation.

  1. Confirm that the new RSVP-TE tunnel appears in the RSVP-TE Tunnels table. To highlight the policy on the map, select the check box next to the policy.

    Note


    Depending on the network size and performance, the newly provisioned RSVP-TE tunnel may take some time to appear in the Traffic engineering table. The table refreshes every 30 seconds.

  2. View and confirm the new RSVP-TE tunnel details. From the Traffic engineering table, click More icon 
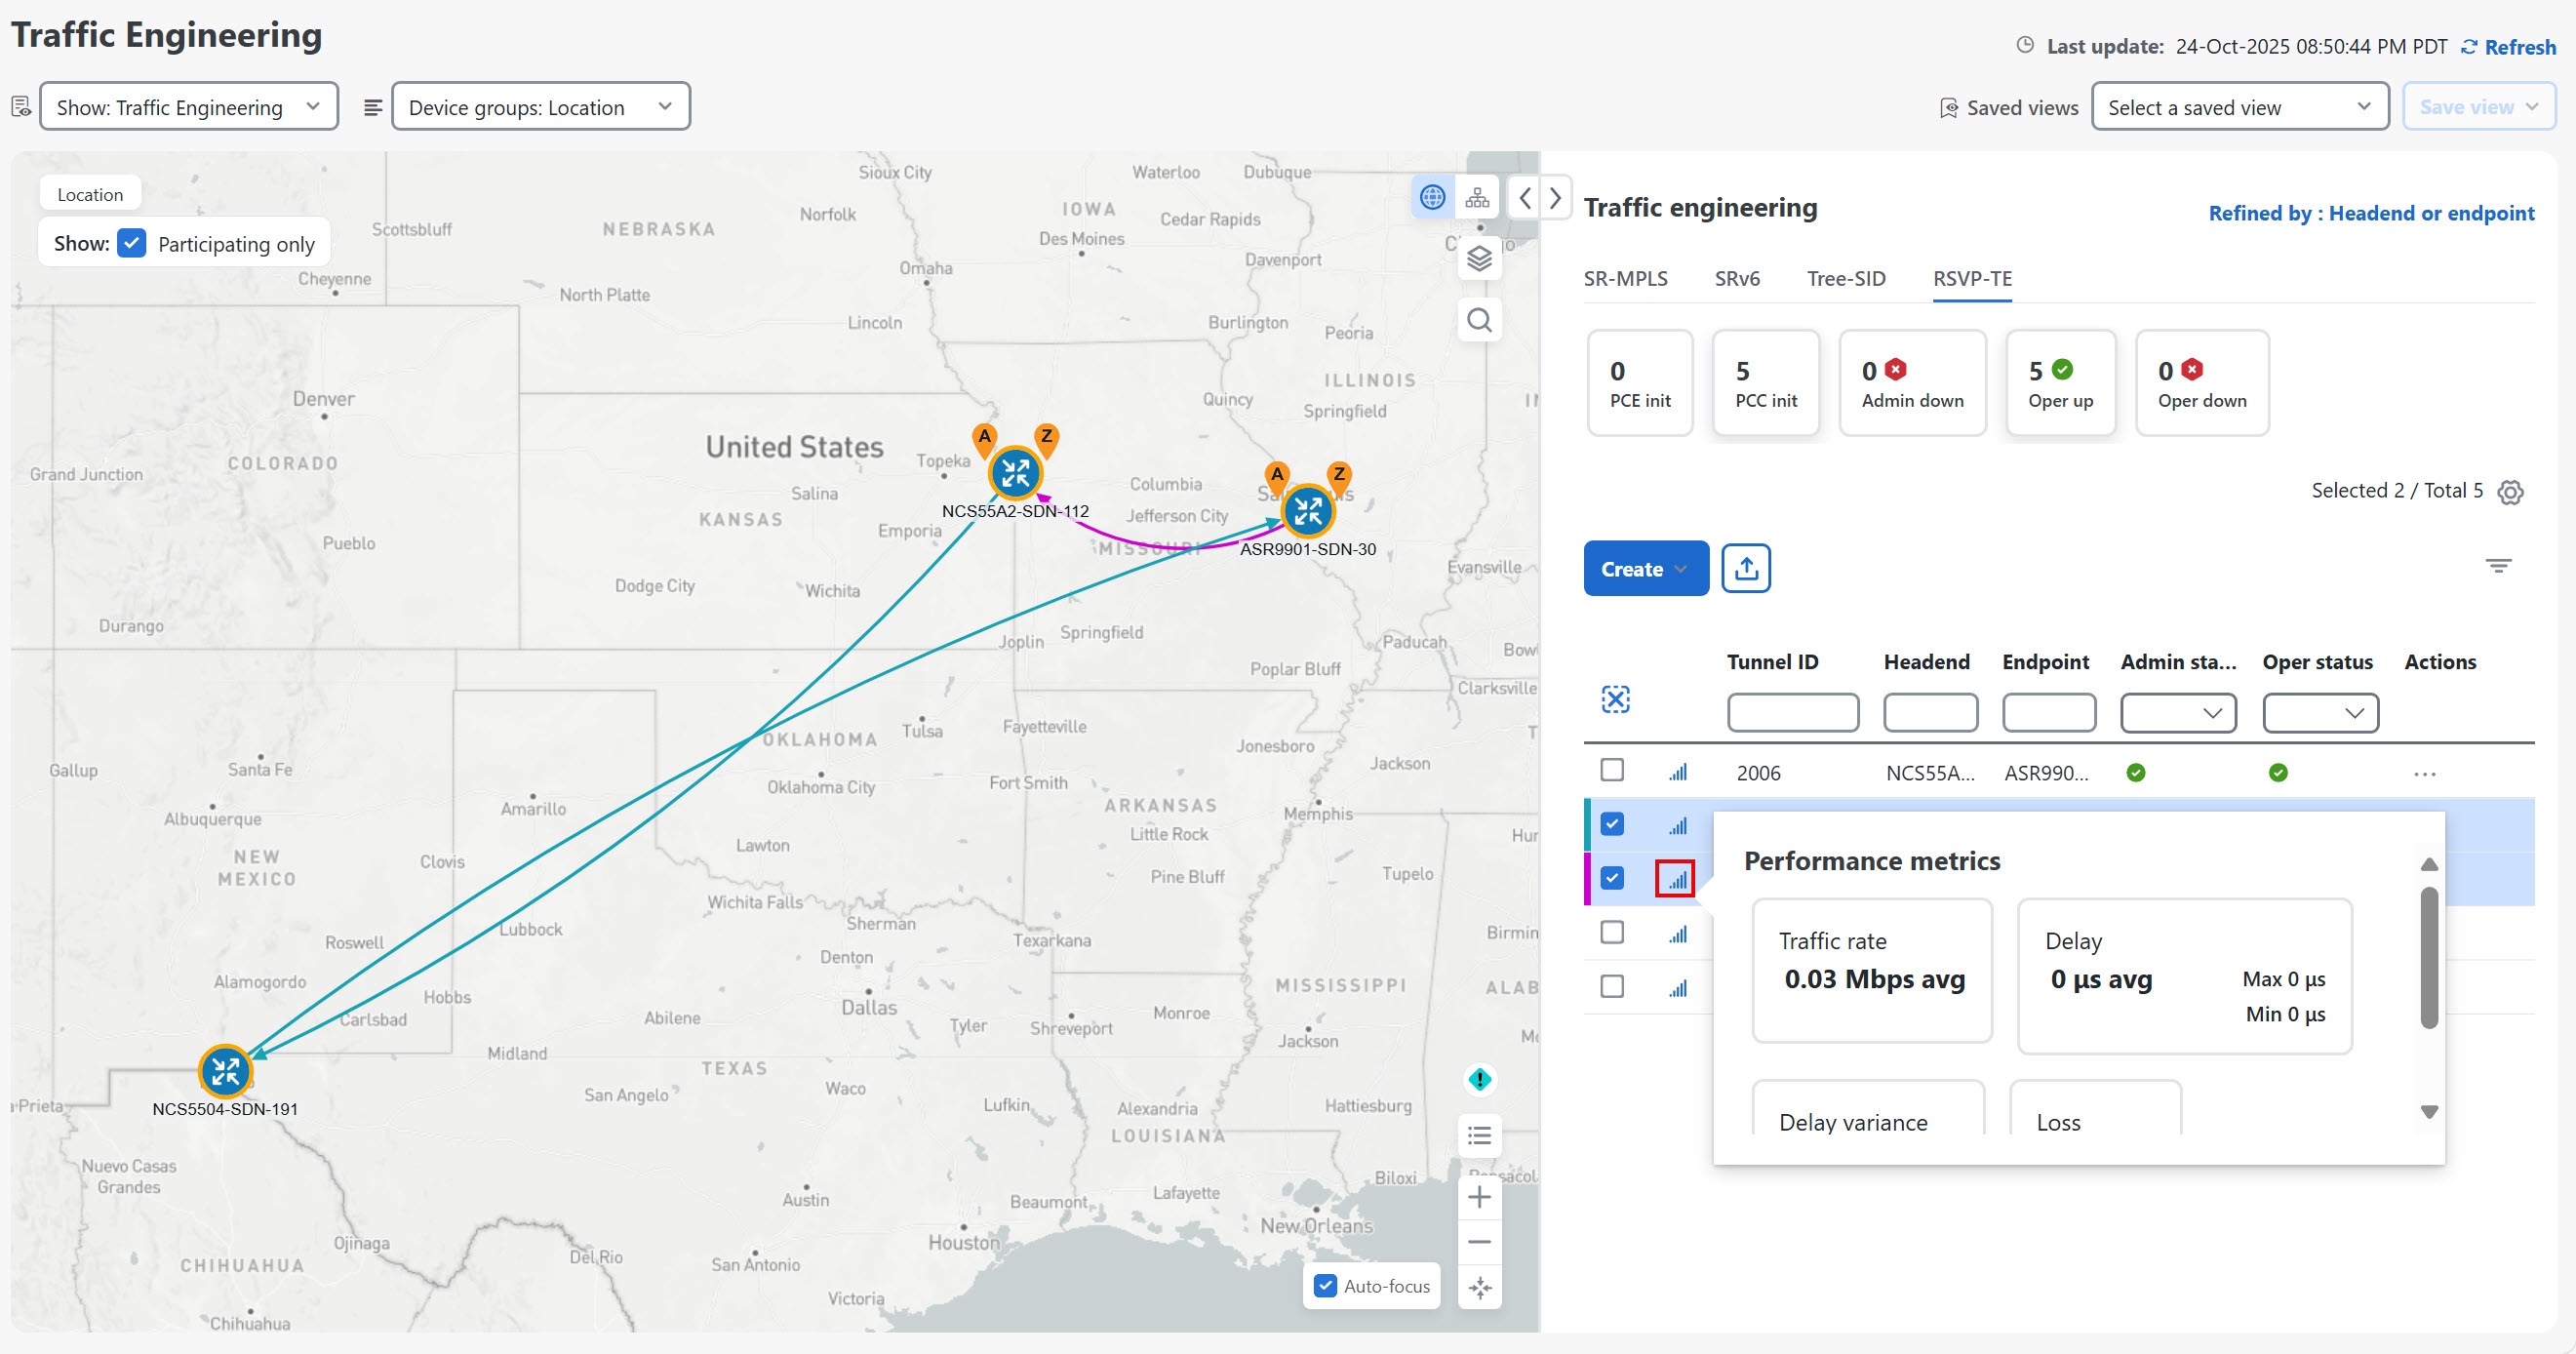
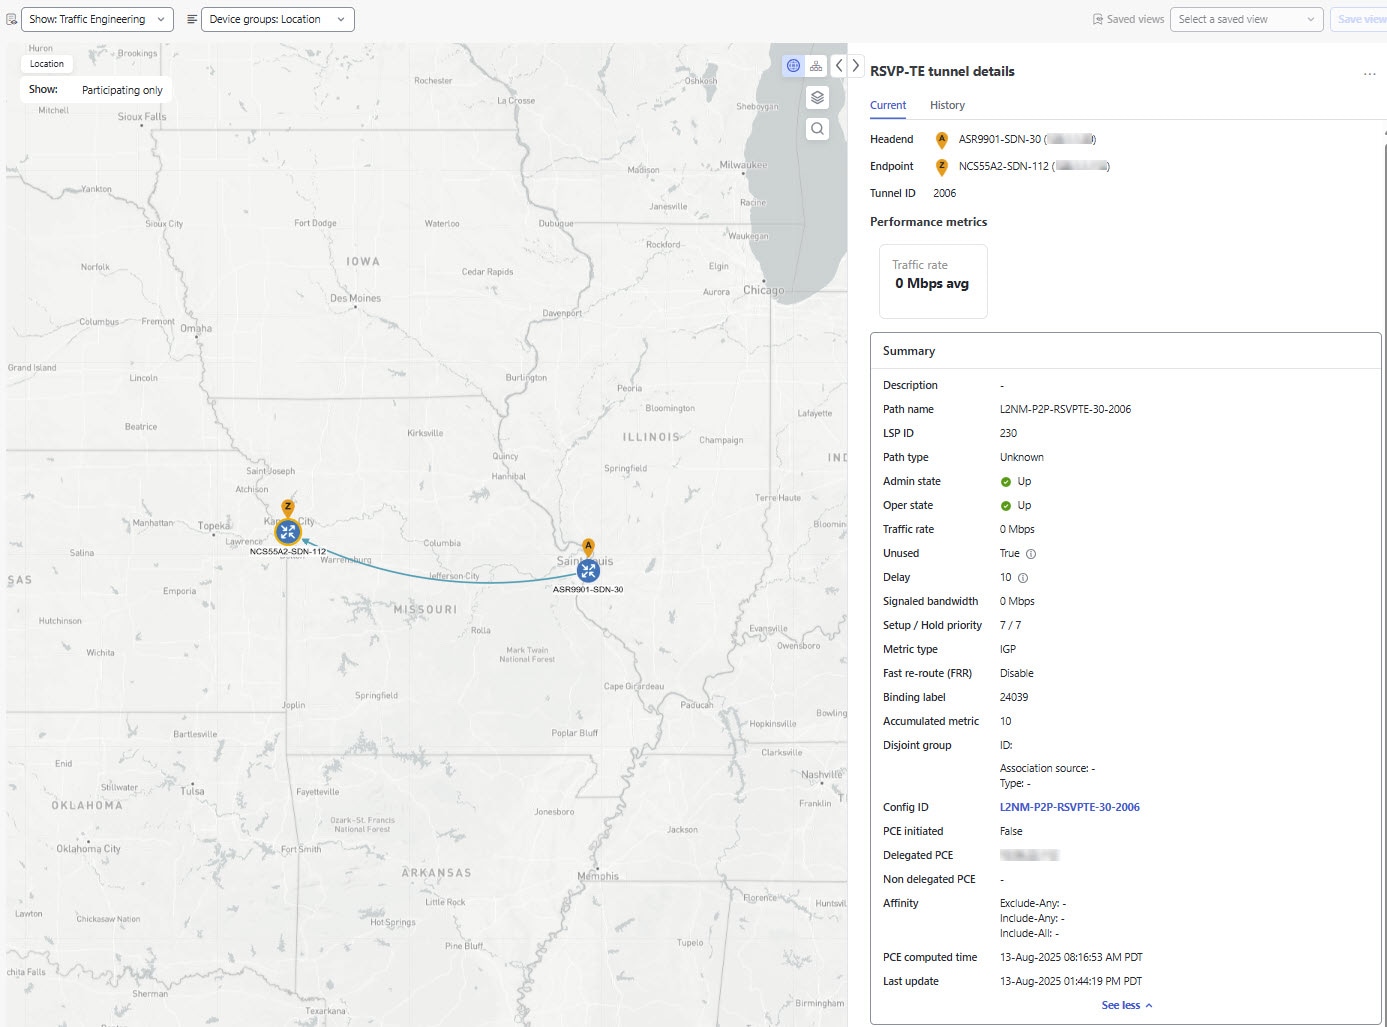
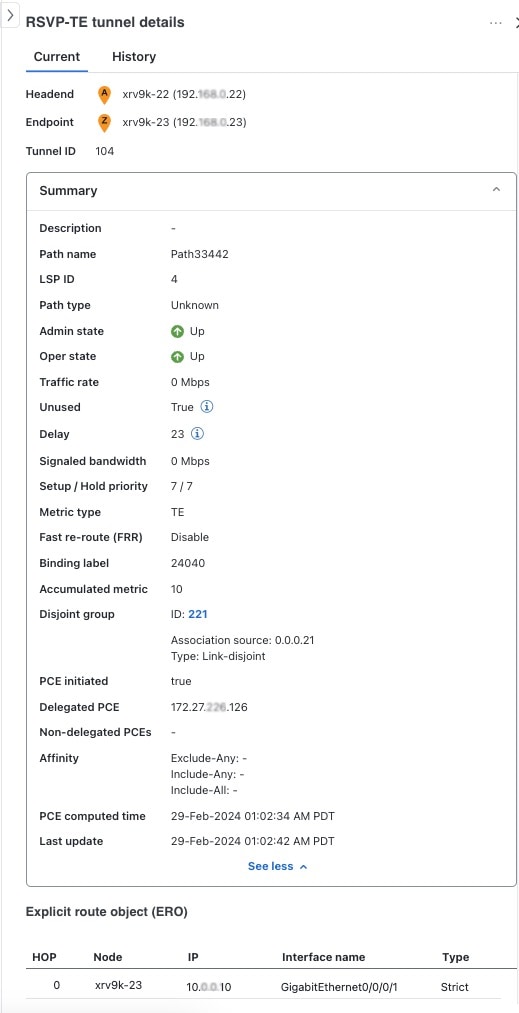
(in the same row as the RSVP-TE tunnel) and select View details.


Create dynamic RSVP-TE tunnels based on optimization intent

This task creates an RSVP-TE tunnel with a dynamic path. SR-PCE computes a tunnel path based on the metrics and path constraints, such as affinity or disjointness, that you define. You can select one of three available metrics to minimize in-path computation: IGP, TE, or delay. SR-PCE automatically re-optimizes the path when the topology changes.

Before you begin

Policy deployment considerations

  • If your setup includes many nodes, policies, or interfaces, a timeout may occur during policy deployment. To configure timeout options, see Configure TE timeout settings.

  • To improve visualization, you can optionally collect affinity information from devices. Map this information in Crosswork Network Controller before creating a dynamic SR-MPLS policy. See Configure TE link affinities.

Procedure


Step 1

Choose Services & Traffic Engineering > Traffic Engineering > RSVP-TE.

Step 2

Click Create > PCE init. To provision a PCC-initiated tunnel using NSO in the Crosswork Network Controller UI, see Create RSVP-TE tunnels (PCC-initiated).

Step 3

Under Tunnel details, enter the required RSVP-TE tunnel values. To see a description for each field, hover over Field Help icon.

Tip


If device groups are set up, select the device group from the Device groups: Location drop-down menu. Then, navigate and zoom in on the topology map to click the target device for headend or endpoint selection.

Step 4

Under Tunnel path, click Dynamic path and enter the path name.

Step 5

Under Optimization objective, select the metric you want to minimize.

Step 6

Define any applicable constraints and any required disjointness.

Affinity considerations
  • You cannot configure both affinity constraints and disjointness on the same RSVP-TE tunnel.

  • There can be up to two RSVP-TE tunnels in the same disjoint group or subgroup. If RSVP-TE tunnels exist in a disjoint group you define here, all tunnels in that group are shown during preview.

Step 7

Click Preview. The path is highlighted on the map.

Step 8

To commit the tunnel path, click Provision.

Step 9

Validate the RSVP-TE tunnel creation.

  1. Confirm that the new RSVP-TE tunnel appears in the RSVP-TE tunnels table. You can also click the check box next to the policy to see it highlighted in the map.

    Note


    Depending on network size and performance, the new RSVP-TE tunnel may take some time to appear in the Traffic engineering table. The table refreshes every 30 seconds.

  2. View and confirm the new RSVP-TE tunnel details. From the Traffic engineering table, click More icon and select View details.


Create RSVP-TE tunnels (PCC-initiated)

To create explicit or dynamic RSVP-TE tunnels using the Crosswork Network Controller UI, complete these steps:

Before you begin

An explicit (fixed) path consists of a list of prefix or adjacency segment IDs, each ID representing a node or link along on the path. To create explicit PCC-initiated RSVP-TE tunnels, you must create a list of Segment IDs using the menu option: Services & Traffic Engineering > Provisioning (NSO) > SR-TE > SID-List.

Procedure


Step 1

Choose Services & Traffic Engineering > Provisioning (NSO) > RSVP-TE > Tunnel.

Step 2

Click Add icon and enter a name for the tunnel. Click Continue.

Note

 
You may also click Import icon to import an existing RSVP-TE tunnel.

Step 3

Enter the required policy constraints and values.

Step 4

Click Dry run to validate and save your changes. Crosswork Network Controller will display your changes in a pop-up window.

Step 5

When you are ready to activate the policy, click Commit changes.


Modify RSVP-TE tunnels

You can modify or delete RSVP-TE tunnels created using the UI or the API.

To view, modify, or delete an RSVP-TE tunnel, complete these steps:

Procedure


Step 1

From the main menu, choose Services & Traffic Engineering > Traffic Engineering > RSVP-TE.

Step 2

Locate the RSVP-TE tunnel you want to modify, and click More icon.

Step 3

Choose View details or Edit/Delete. After you update the RSVP-TE tunnel details, preview the changes on the map, and save them.