Cisco Crosswork Change Automation and Health Insights 3.2.2 Installation Guide
Bias-Free Language
The documentation set for this product strives to use bias-free language. For the purposes of this documentation set, bias-free is defined as language that does not imply discrimination based on age, disability, gender, racial identity, ethnic identity, sexual orientation, socioeconomic status, and intersectionality. Exceptions may be present in the documentation due to language that is hardcoded in the user interfaces of the product software, language used based on RFP documentation, or language that is used by a referenced third-party product. Learn more about how Cisco is using Inclusive Language.
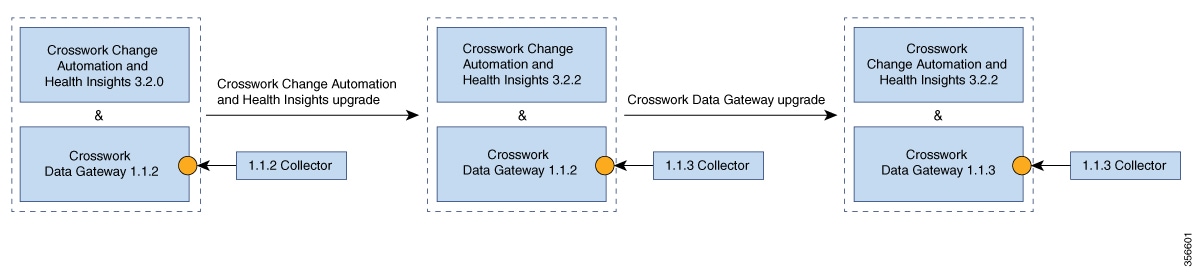
Post upgrade, the same Cisco Crosswork Data Gateway1.1.2 continues to work with Cisco Crosswork Change Automation and Health Insights3.2.2 while using the latest collector images.
Cisco Crosswork Data Gateway Upgrade:
The new Cisco Crosswork Data Gateway VM is installed.
Cisco Crosswork Data Gateway1.1.3 is enrolled on Cisco Crosswork Change Automation and Health Insights3.2.2.
All devices are detached from the old Cisco Crosswork Data Gateway VM and attached to the new Cisco Crosswork Data Gateway VM.
Jobs start again automatically from the new Cisco Crosswork Data Gateway. At this point, the old Cisco Crosswork Data Gateway VM can be discarded.
Note
It is not mandatory to upgrade Cisco Crosswork Data Gateway after upgrading Cisco Crosswork Change Automation and Health Insights. It can be performed later.
Upgrade Cisco Crosswork Change Automation and Health Insights
This section explains the procedure to upgrade the version of Cisco Crosswork Change Automation and Health Insights VM from 3.2 to 3.2.2.
The upgrade process retains the following:
User uploaded inventory (devices, providers, credential profiles, and tags).
Platform details (database credentials).
User configurations (Playbooks, Topology).
AAA server integration data, custom local roles and custom roles
Cisco Crosswork Change Automation and Health Insights 3.2 VM settings for any rollback scenario.
Note
The upgrade process for Cisco Crosswork Change Automation and Health Insights VM requires two instances (old and new) to exist at the same time. As a result you should plan to have resources (storage,
disk and memory) within your data center (even if only temporarily) to support two VMs.
Without adequate resources, the upgrade operation will be unable to load the services successfully, and will fail in the first
boot.
You have details of the Cisco Crosswork Change Automation and Health Insights 3.2 VM including the Management IP address, username and password.
You have a public IP address to assign to the Cisco Crosswork Change Automation and Health Insights 3.2.2 VM Management Network. This is a temporary address as the Management IP address from Cisco Crosswork Change Automation and Health Insights 3.2 VM is retained.
Note
It is preferred that the DNS and NTP servers are reachable using the Management Network. However, it is not mandatory. The
only requirement is that they are reachable on one of the networks connected to the server.
You have a public or private IP to assign to the Cisco Crosswork Change Automation and Health Insights VM's Data Network. This IP address must be able to reach your managed devices, Cisco Crosswork Data Gateway network, and, if applicable, be reachable by Cisco Network Services Orchestrator (NSO).
Note
Before upgrading, it is recommended to move the Cisco Crosswork Change Automation and Health Insights 3.2 VM to maintenance mode. The Health Insights KPIs and scheduled playbooks must be deactivated to stop any active collection on Cisco Crosswork Data Gateway.
Note
VMware vCenter supports vSphere Web Client (flash mode) and vSphere Client (HTML5 mode), however vSphere Web Client (flash
mode) is recommended for the Cisco Crosswork Change Automation and Health Insights VM deployment and is explained in this procedure. The vSphere Client (HTML5 mode) is supported only on VMware vCenter Server
6.7 Update 3g or later.
Note
The following preparations need to be followed if you have telemetry KPIs enabled on Cisco Crosswork Change Automation and Health Insights 3.2 VM.
Pre-upgrade:
Move the devices to ADMIN_DOWN state.
Ensure that all telemetry collection has stopped and remove the telemetry configurations from the devices.
Proceed with the upgrade instructions.
Post-upgrade:
Move the devices to ADMIN_UP state.
Configure the telemetry settings in the devices again and ensure that all telemetry collection has resumed.
Procedure
Step 1
Download the latest available Cisco Crosswork Change Automation and Health Insights image file (*.ova) to your system.
Warning
The default VMware vCenter deployment timeout is 15 minutes. The total time needed to deploy the OVA image file may take much
longer than 15 minutes, depending on your network speed and other factors. If vCenter times out during deployment, the resulting
VM will be unbootable. To prevent this, Cisco recommends that you either set the vCenter deployment timeout to a much longer
period (such as one hour), or unTAR the OVA file before continuing and then deploy using the OVA's three separate Open Virtualization
Format and Virtual Machine Disk component files: cw.ovf, cw_rootfs.vmdk, and cw_dockerfs.vmdk.
Step 2
With VMware ESXi running, log in to the VMware vSphere Web Client. On the left side, choose the ESXi host on which you want
to deploy the VM, then select Actions > Deploy OVF Template, as shown in the following figure.
Step 3
The VMware Deploy OVF Template window appears and highlights the first step, 1 - Select template, as shown in the following figure. Click Browse to navigate to the location where you downloaded the OVA image file and select it. Once selected, the file name is displayed
in the window.
Step 4
Click Next to go to 2 - Select name and location, as shown in the following figure. Enter a name for the Cisco Crosswork Change Automation and Health Insights VM you are creating.
Cisco recommends that you include the Cisco Crosswork Change Automation and Health Insights version and build number in the name (for example: Crosswork CA/HI 3.2.2 Build 283).
Step 5
Click Next to go to 3 - Select a resource, as shown in the following figure. Choose the Cisco Crosswork Change Automation and Health Insights VM’s host.
Step 6
Click Next. The VMware vCenter Server validates the OVA. Network speed will determine how long validation takes. When validation is
complete, the window moves to 4 - Review details, as shown in the following figure. Take a moment to review the OVF template you are deploying. Note that this information
is gathered from the OVF and cannot be modified.
Step 7
Click Next to go to 5 - Accept license agreements. Review the End User License Agreement and click on Accept before you continue.
Step 8
Click Next to go to 6 - Select configuration, as shown in the following figure. Select the desired deployment configuration (IPv4 or IPv4 Network on a Single Interface).
Note
The IPv4 on a Single Interfaceor IPv6 on a Single Interfaceconfiguration should only be used for demonstrations and lab installations.
Step 9
Click Next to go to 7 - Select Storage, as shown in the following figure. Select the relevant option from the Select virtual disk format drop-down list. From the table, choose the datastore you want to use and review its properties to ensure there is enough
available storage.
Note
For production deployment, consider choosing Thick provision eager zeroed as it will not have a penalty of allocating and initializing disk space at runtime. For demo or testing purposes, Thin provision is recommended as it saves disk space.
Step 10
Click Next to go to 8 - Select networks, as shown in the following figure. In the dropdown table at the top of the page, choose the appropriate destination network
for the source Data Network and Management Network, respectively.
Step 11
Click Next to go to 9 - Customize template, with the Crosswork Configuration settings already expanded, as shown in the following figure. Make entry in the Disclaimer field.
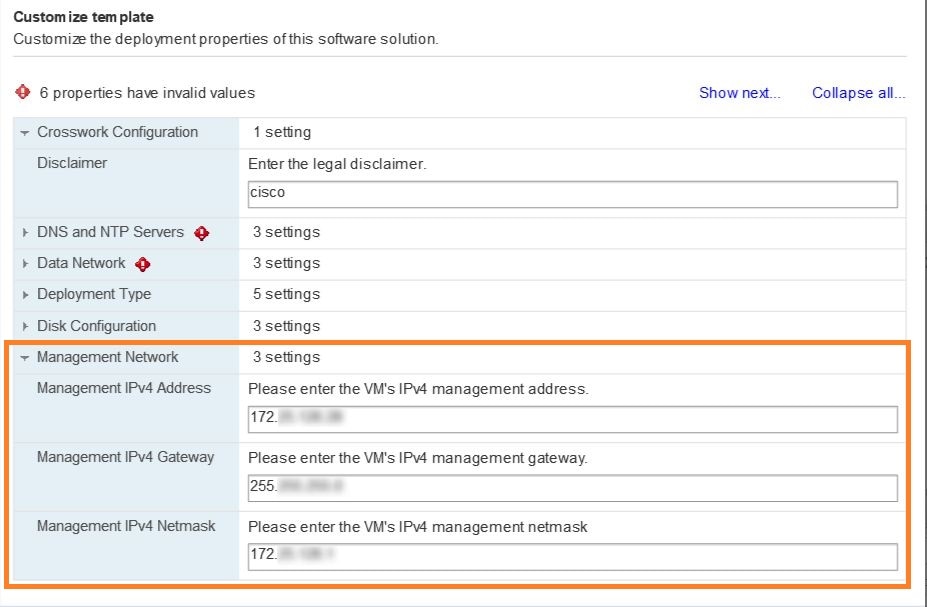
Step 12
Expand the Management Network settings. According to your deployment configuration, the fields displayed are different. Enter the temporary IP address
you want to be associated with the VM during the upgrade. If as part of the upgrade you want to keep this address associated
with the VM you can select this option later in the upgrade process. See how to customize the template (step 11).
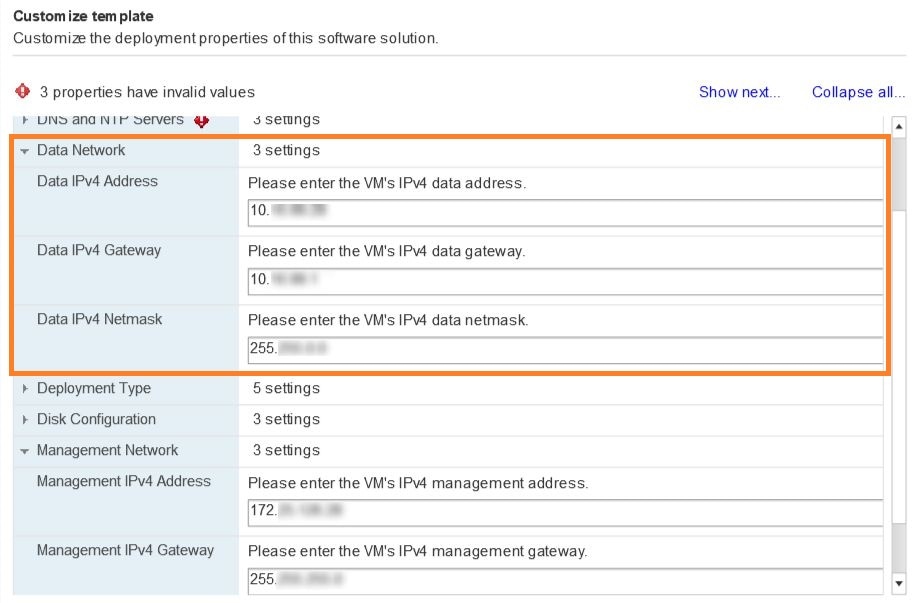
Step 13
Expand the Data Network settings. According to your deployment configuration, the fields displayed are different. Enter a temporary IP address and
other information for the data network. If you want to change the IP to this value you can choose to do that in the customizing
template section (step 11).
Step 14
Expand the DNS and NTP Servers settings, as shown in the following figure. According to your deployment configuration, the fields displayed are different.
Make entries in three fields:
DNS IP Address: The IPv4 addresses of the DNS servers you want the Cisco Crosswork Change Automation and Health Insights server to use. Separate multiple IP addresses with spaces.
DNS Search Domain: The name of the DNS search domain.
NTP Servers: The IP addresses or host names of the NTP servers you want to use. Separate multiple IPs or host names with spaces.
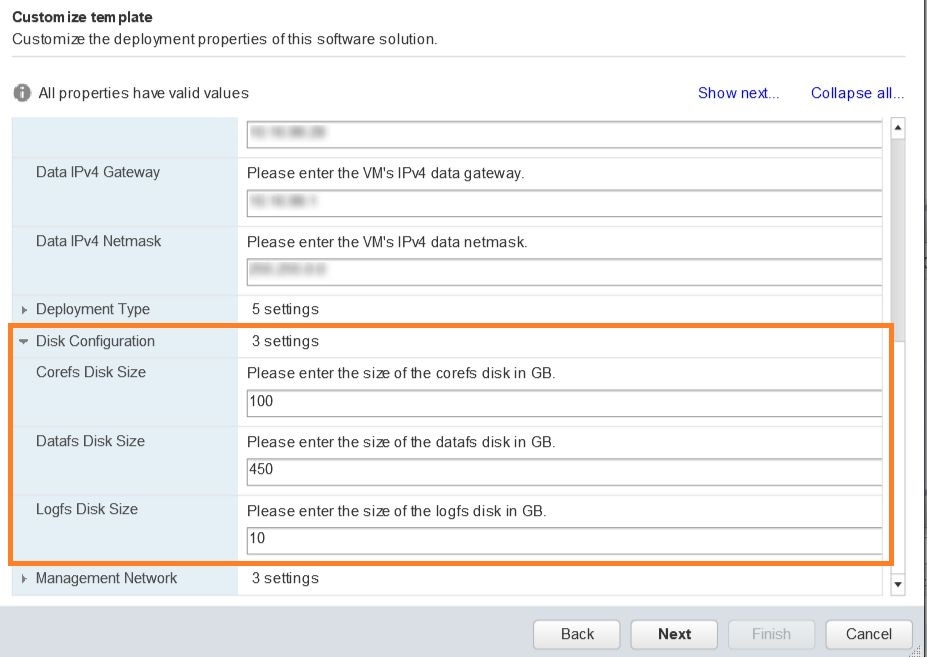
Step 15
Disk Configuration settings allows you to adjust the amount of storage space available to Cisco Crosswork Change Automation and Health Insights. The default settings should work for most environments. For assistance in adding additional storage, contact the Cisco Customer
Experience team.
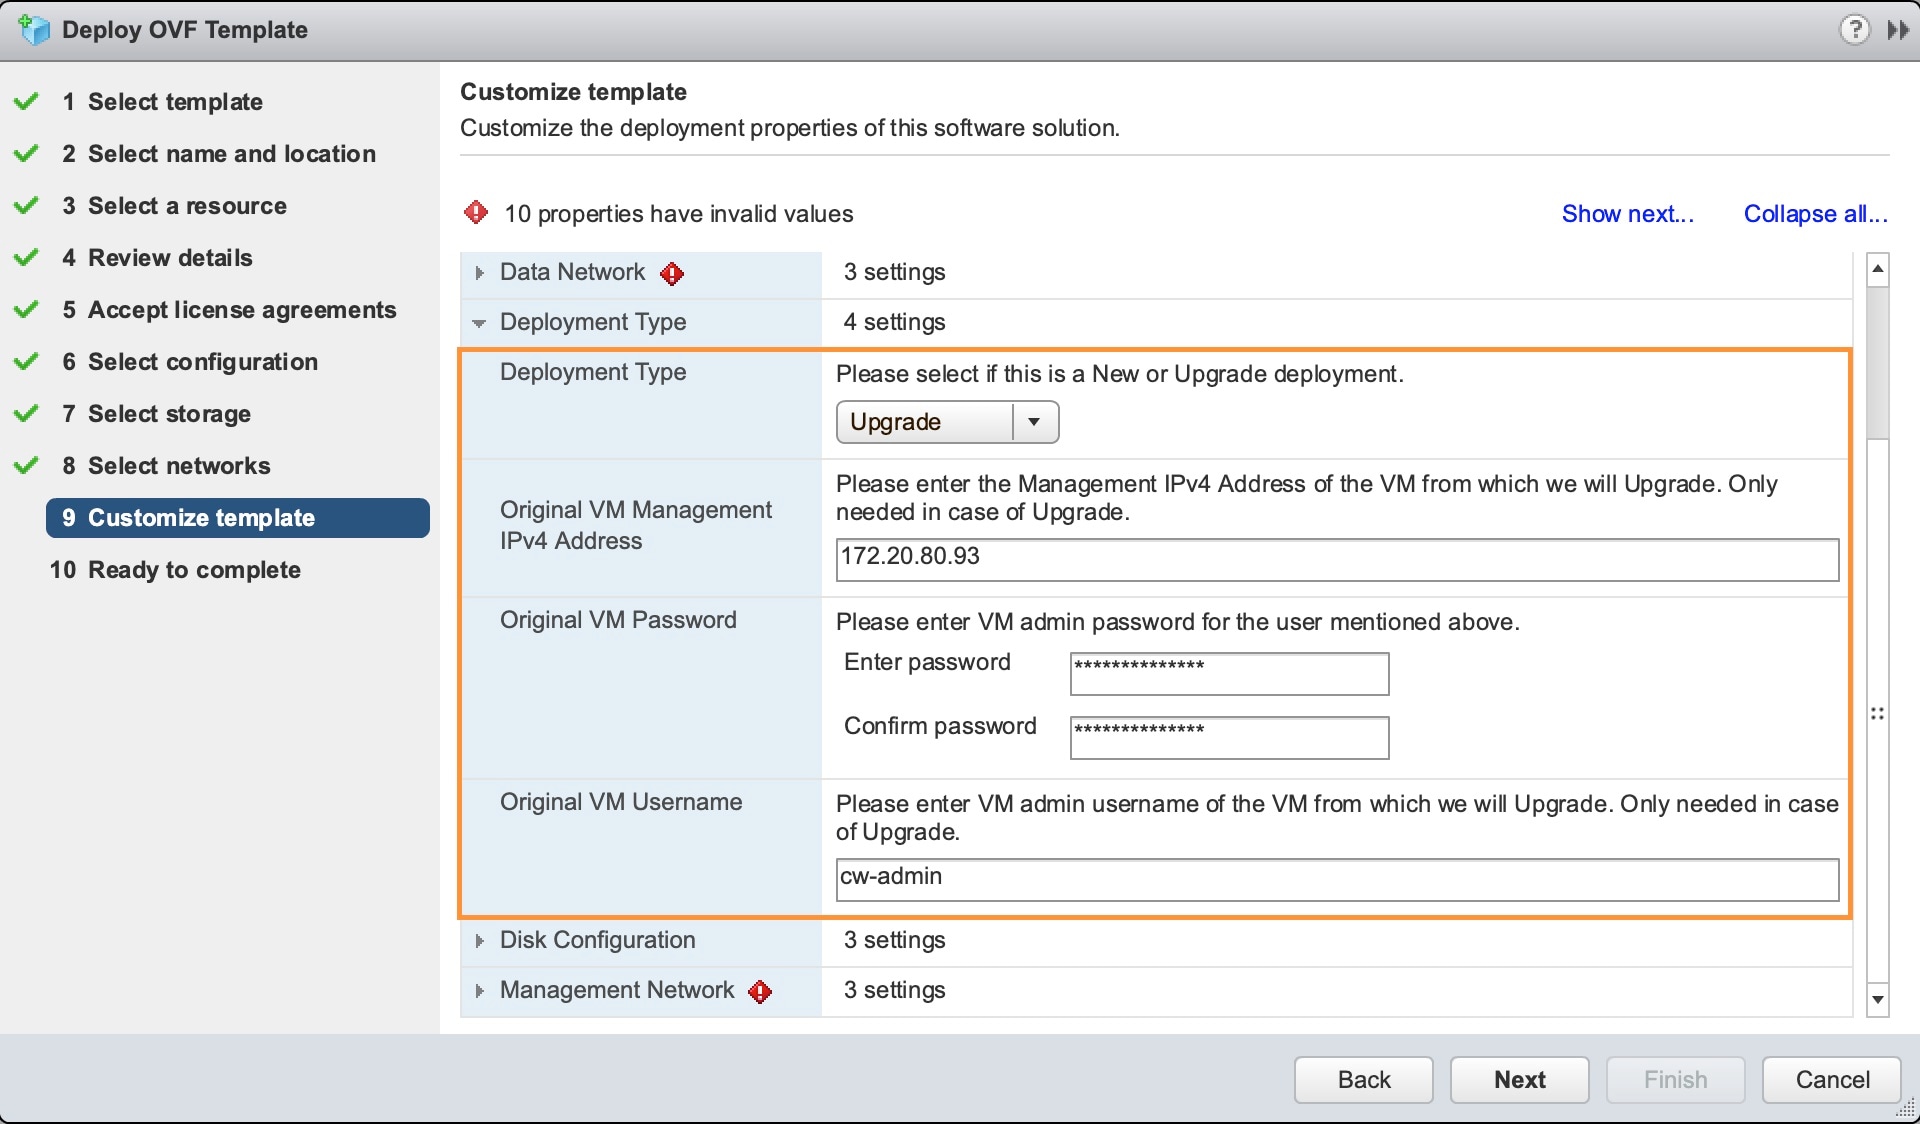
Step 16
Expand the Deployment Type settings, as shown in the following figure. In the Deployment Type dropdown, select Upgrade, and make relevant entries for the following fields:
Original VM Management IPv4 Address: Management IPv4 address of Cisco Crosswork Change Automation and Health Insights 3.2 VM.
Original VM Password: Provide the Cisco Crosswork Change Automation and Health Insights 3.2 VM password in the Enter Password and Confirm Password fields.
Original VM Username: Username of Cisco Crosswork Change Automation and Health Insights 3.2 VM. Typically, it is cw-admin unless it has been changed by your system administrator.
Note
Switching the Management or Data IPv4 address, or changing the IP stack from IPv4 to IPv6 is not supported during upgrade
owing to restrictions in Cisco Crosswork Change Automation and Health Insights and Cisco Crosswork Data Gateway certificates. For more information, see Supported TCP/IP Stack
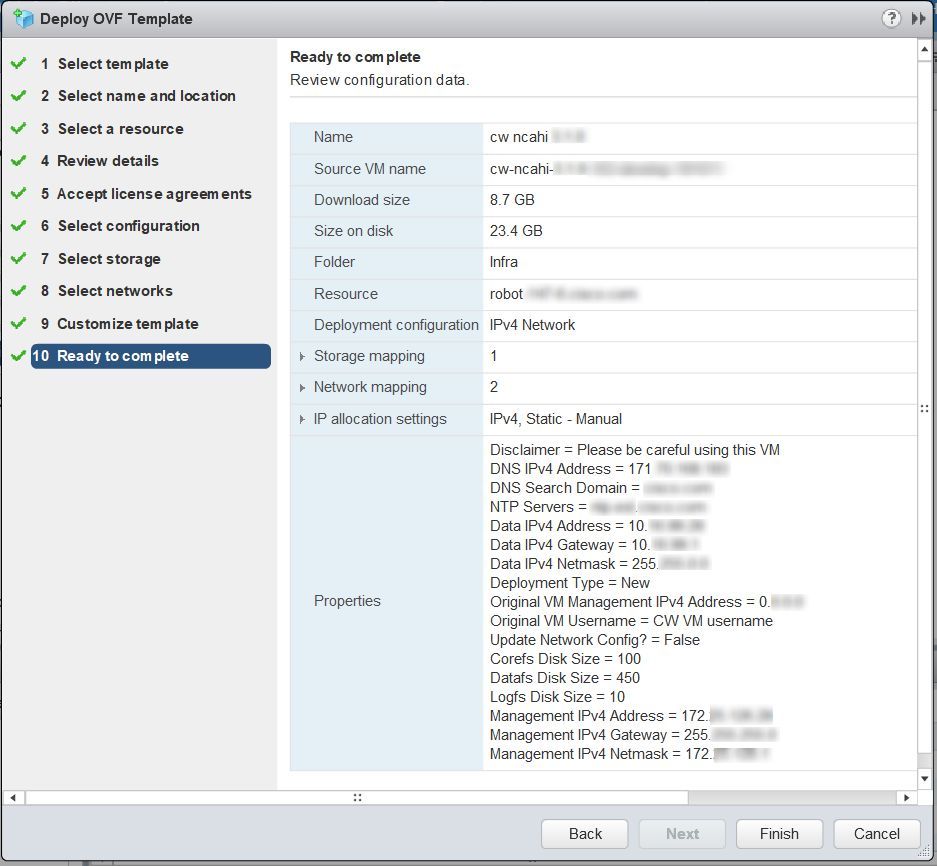
Step 17
Click Next to go to 10 - Ready to Complete, as shown in the following figure. Review your settings and then click Finish if you are ready to begin deployment.
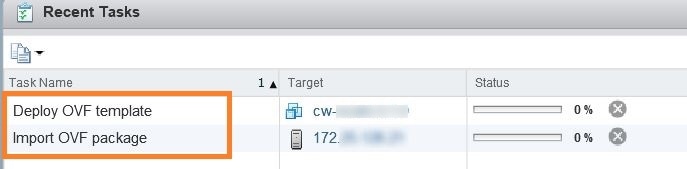
Step 18
Wait for the deployment to finish before continuing. To check on the deployment status:
Open a VMware vCenter client.
In the Recent Tasks tab for the host VM, view the status for the Deploy OVF template and Import OVF package jobs, as shown in the following figure.
Step 19
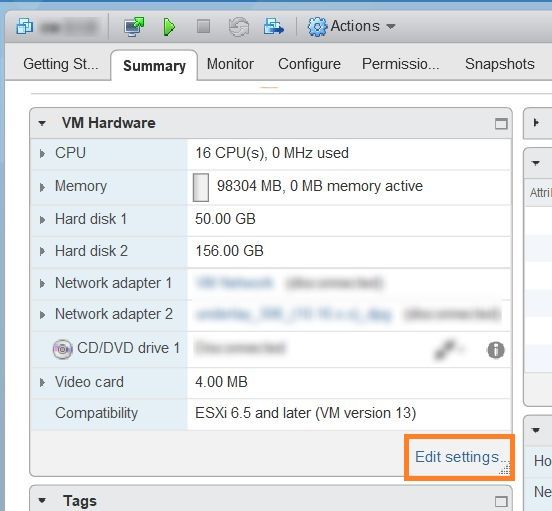
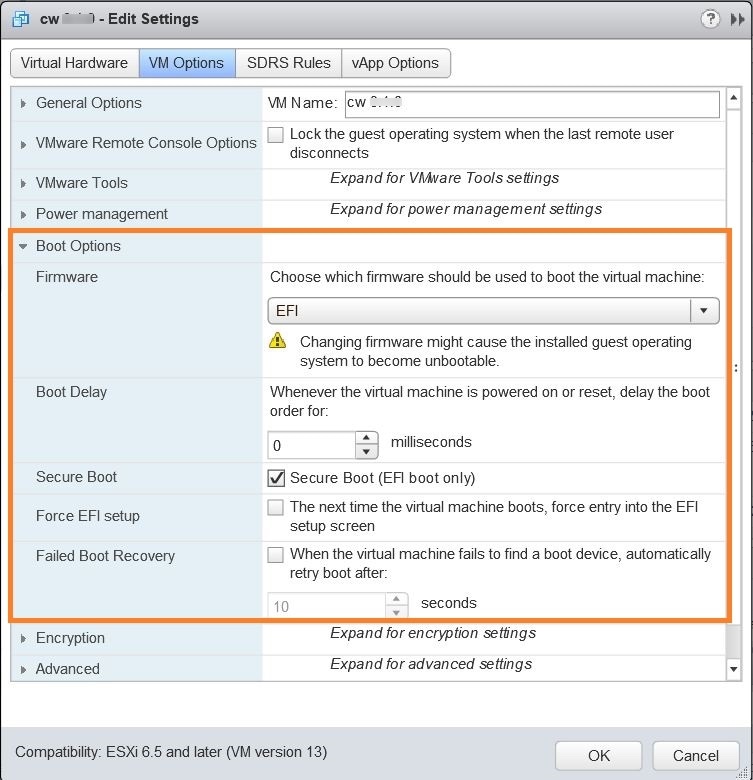
After the deployment tasks are complete, check the host's VM settings to permit boot from EFI Firmware:
On the host VM Summary tab, below the VM Hardware table, click Edit Settings, as shown in the following figure.
On the Edit Settings page, click the VM Options tab.
Expand the Boot Options dropdown list and change the Firmware setting to EFI, if it not set by default. When you are finished, click OK. You may want to take a snapshot of the VM at this point.
Step 20
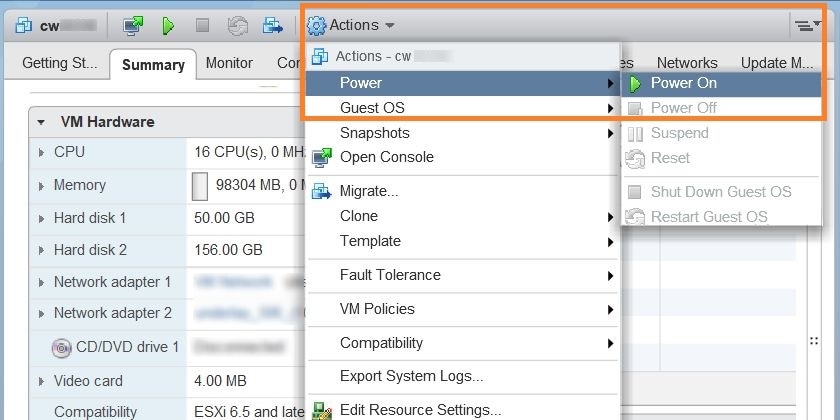
You can now power on the Cisco Crosswork Change Automation and Health Insights VM to complete the deployment process. Expand the host’s entry so you can click the Cisco Crosswork Change Automation and Health Insights VM and then choose Actions > Power > Power On, as shown in the following figure.
Figure 2. Power On
From this point, the upgrade is automatically triggered. The Data and IP configurations are transferred from the old Cisco Crosswork Change Automation and Health Insights VM to the new VM. Once the transfer is completed, the old Cisco Crosswork Change Automation and Health Insights VM will shut down. It will take 30 minutes or more for the new Cisco Crosswork Change Automation and Health Insights VM to become operational. Please wait for the process to finish before continuing.
To get the current status of the upgrade, login as the super user and use the cli upgrade status command on the VM.
Note
Each time the Cisco Crosswork Change Automation and Health Insights VM is re-imaged, you need to refresh the Cisco Crosswork Change Automation and Health Insights login page to accept the new certificate. Otherwise, the error message Http failure response for /crosswork/sso/v1/tickets: 0 Unknown Error is displayed on the login page.
Each time the Cisco Crosswork Change Automation and Health Insights VM is re-imaged, Cisco Crosswork Data Gateway must be restarted to re-initialize the certificates. Otherwise, the devices become unreachable and collection stops.
Enroll the Cisco Crosswork Data Gateway with Cisco Crosswork Change Automation and Health Insights as instructed in Enroll Cisco Crosswork Data Gateway. For information on adding devices to the Cisco Crosswork Data Gateway, see the Manage Crosswork Data Gateway Instances section in the Cisco Crosswork Change Automation and Health Insights User Guide
What to do next
Verify that you are able to login to Cisco Crosswork Change Automation and Health Insights 3.2.2 VM using the 3.2 VM credentials (cw-admin as username and password).
Verify if the inventory data, application configurations, and AAA user configurations from Cisco Crosswork Change Automation and Health Insights 3.2 VM have been retained in version 3.2.2.
While managing inventory in Cisco Crosswork Change Automation and Health Insights 3.2.2:
Make sure to use the latest CSV template for managing inventory.
Configured state of devices being onboarded needs to be marked as DOWN.
Note
The default policy behavior has changed in Cisco Crosswork Change Automation and Health Insights 3.2.2 with the removal of the node-ip field. You can use inventoryid, te-routerid, OspfRouterId, or IsisSystemId fields to onboard devices. After upgrade to 3.2.2 version, any devices with conflicting data are marked as DOWN and the conflict
values are assigned empty values, as per the new policy behavior. A report with the confict device's UUID, conflicted field
and value is generated at /mnt/robot_datafs/robot-dlminvmgr/1/conflictEntry.csv. You can check the report to identify the conflicted devices, and onboard them again after correcting the conflicting data.
Verify if the device details are visible in the Topology page.
Verify if Cisco Crosswork Data Gateway is onboarded and functioning properly.
Note
After upgrade to 3.2.2 version, all historical alerts will be available only for an hour. Future alerts will be available
once devices are mapped to Cisco Crosswork Data Gateway for the enabled KPIs.
Post upgrade, if helios fails to cleanup some of the nodes there will not be any impact, as the devices will be remapped to
the new Cisco Crosswork Data Gateway VM.
Post upgrade, and after enabling NSO, the devices need to be mapped to Cisco Crosswork Data Gateway for auto sync as the software type information is not migrated to 3.2.2 version.
Check the health status of the upgraded Cisco Crosswork Change Automation and Health Insights and Cisco Crosswork Data Gateway using the Crosswork Manager and Data Gateway Management windows in the GUI respectively.
For more information, see the Perform Administrative Tasks chapter in the Cisco Crosswork Change Automation and Health Insights User Guide.
Check if you are able to configure and use the applications in the upgraded Cisco Crosswork Change Automation and Health Insights. For more information on the GUI workflow, see the Cisco Crosswork Change Automation and Health Insights User Guide.
Upgrade Cisco Crosswork Data Gateway
Note
This procedure is required only for a Cisco Crosswork Data Gateway Base VM upgrade. Upgrade of other components, such as collectors,
is performed by Crosswork as explained is Section Crosswork Patch Framework.
Cisco Crosswork Data Gateway functions as a passive device in the network. As such, the upgrade process consists of stopping
the active Cisco Crosswork Data Gateway instance and replacing it with a Cisco Crosswork Data Gateway instance that is running
the new version of Cisco Crosswork Data Gateway software, essentially exchanging one Cisco Crosswork Data Gateway instance
for another.
Once the new Cisco Crosswork Data Gateway VM is Up, detach devices from the old Cisco Crosswork Data Gateway VM.
See Section Detach a Device from a Cisco Crosswork Data Gateway Instance in Cisco Crosswork Change Automation and Health Insights 3.2.2 User Guide.
Step 4
Attach the devices to the new Cisco Crosswork Data Gateway VM.
See Section Attach a Device to a Cisco Crosswork Data Gateway Instance in Cisco Crosswork Change Automation and Health Insights 3.2.2 User Guide.
Step 5
Set the administrative state of the old Cisco Crosswork Data Gateway VM to Maintenance.
See Section Change the Administration State of a Cisco Crosswork Data Gateway Instance in Cisco Crosswork Change Automation and Health Insights 3.2.2 User Guide.
Step 6
Confirm that the new Cisco Crosswork Data Gateway VM is operating properly. Time to monitor it is up to the operator, but
Cisco recommends at least an hour of normal operations before proceeding with Step 7.
See Section De-enroll Cisco Crosswork Data Gateway in Cisco Crosswork Change Automation and Health Insights 3.2.2 User Guide.
Step 7
Delete the old Cisco Crosswork Data Gateway VM from Crosswork.
See Section De-enroll Cisco Crosswork Data Gateway in Cisco Crosswork Change Automation and Health Insights 3.2.2 User Guide.
Step 8
From vCenter, power off the old Cisco Crosswork Data Gateway VM.
Step 9
Double check that all is still working correctly with the new Cisco Crosswork Data Gateway VM.
Step 10
From vCenter, delete the old Cisco Crosswork Data Gateway VM from the disk.
Crosswork Patch Framework
There are three types of patches in Cisco Crosswork Change Automation and Health Insights:
Crosswork Application Patching (PATCH_IMAGE): This is a patch on the Crosswork applications such as Change Automation and Health Insights, and the configuration packages within the application layer. One or more applications can be patched simultaneously.
Crosswork Data Gateway Patching (PATCH_CDG): This is a patch on the collector images for Cisco Crosswork Data Gateway VM.
Crosswork Data Patching (PATCH_DATA): This is a patch to dynamically update the pre-built set of fundamental data such as YANG models and system MIB packages
used by the Crosswork applications.
The patch versioning is done in the [MAJOR: MINOR: PATCH] format, where MAJOR corresponds to every major release of the Cisco Crosswork Change Automation and Health Insights, MINOR corresponds to every critical (backward incompatible) change made during a release, and PATCH corresponds to every
patch created in a release.
The unit of a patch is a TAR file. The TAR file consists of the patch metadata, list of docker images, checksum and signature.
The metadata contains platform and product details, patch version, type of patch and other creation details. Signature is
a security requirement in order to safeguard the patch; the signature is verified by the patch framework. It also helps to
perform error correction mechanisms and detect if the patch is corrupted or not.
The platform orchestrator (such as Robot orchestrator) maintains and manages the lifecycle of all applications in the Crosswork
platform. Each Crosswork product has its own centralized manifest file <orchmanifest.json> which contains the list of applications and the corresponding configurations. When the orchestrator is up, it goes through
the manifest. Along with the manifest, the dependency diagram <orch.yaml> explains the logical grouping of applications and their dependencies. Currently, simultaneous application patching is possible
as the applications are independent of each other. Patching the Collection Infra is a system-wide change and requires shutting
down other dependent applications. A patch on the Core Infra is not allowed and is considered as a VM upgrade. Schema changes
are not allowed during patching. Users are recommended to take backup of the system before patching, to restore in case of
any error.
Patching Activation Workflow:
Each stage of the patching workflow, performed using APIs, are explained below:
Validate
API: /crosswork/platform/v1/patch/validate
User downloads the patch to any reachable host from the Crosswork VM. After the download, the patch is validated for accuracy
and compatibility to the product version.
Add
API: /crosswork/platform/v1/patch/add
After the patch is validated, it is added to the corresponding registry in the system, such as updating the IMAGE registry
in case of an IMAGE patch. The add operation prepares the system for the patch to be activated. It is an asynchronous operation and may take around 15 mins.
Once add is initiated, user receives a corresponding job ID and the operation is performed in the background.
Status
There are 2 status APIs:
Status - which displays the current status of the Patch framework.
API: /crosswork/platform/v1/patch/status
This API displays the current status of the patch framework, such as if add is successful or ongoing, or if activate has been triggered.
Job Status - which displays the specific job status.
API: /crosswork/platform/v1/patch/jobstatus
This API return the status of a specific job based on the Job ID.
Activate
API: /crosswork/platform/v1/patch/activate
After successful addition, the patching is locked. If a patch is added, it needs to be activated before another patch can
be added to the application. Activate, like add, is an asynchronous operation that generates a job ID for the user and continues the process in the background. Activation
takes the backup of the current state and updates the configuration. If the patch fails, the auto-roll back functionality
rolls back to the previous version and the status is updated with the failure details.
Summary
API: /crosswork/platform/v1/patch/summary
Summary provides the overall summary of the Patch framework, and summary of the different patch types including patch version. This
information changes each time a new patch is added and activated:
PATCH_IMAGE - Patch version and the applications changed as part of the patch.
PATCH_CDG - Patch version
PATCH_DATA - Patch version and the applications to which the new data has been uploaded.
Remove
API: /crosswork/platform/v1/patch/remove
A patch can be removed in 2 ways:
Flow 1: A patch can be removed after it is validated and added. For example, if user chooses to cancels after the add is successful, remove can be used.
Flow 2: A patch can be removed after it is validated, added and activated. For example, if user chooses to go back to a previous
version after a patch is applied successfully, remove can be used.
Upon successful activation of a patch, user can verify the health of the application using the Crosswork Manager or Data Gateway Management feature in Cisco Crosswork Change Automation and Health Insights, depending on the type of the patch. For more information, see the Perform Administrative Tasks chapter in the
Cisco Crosswork Change Automation and Health Insights User Guide.

 Feedback