Configure Secure Web Appliance to Allow Guest Access
Available Languages
Contents
Introduction
This document describes steps to allow users which has not installed the decryption certificate to access the Internet via Secure Web Appliance (SWA).
Prerequisites
Requirements
Cisco recommends that you have knowledge of these topics:
- Physical or Virtual SWA Installed.
- License activated or installed.
- The setup wizard is completed.
- Administrative Access to the SWA Graphical User Interface (GUI).
Components Used
This document is not restricted to specific software and hardware versions.
The information in this document was created from the devices in a specific lab environment. All of the devices used in this document started with a cleared (default) configuration. If your network is live, ensure that you understand the potential impact of any command.
Scenario Overview
This article addresses a network access control scenario within the 10.10.10.0/24 Wi-Fi subnet. The environment consists of two distinct user groups requiring different security and access policies:
- Managed Devices: Company-issued laptops that are fully authenticated and have the SWA decryption certificate installed. These devices are trusted and typically subject to standard corporate access policies.
- Unmanaged/Guest Devices: Personal laptops and mobile devices that are unauthenticated and lack the SWA decryption certificate.
Objective
The company aims to implement restrictive web access policies for unmanaged devices, limiting their connectivity to a specific subset of allowed URLs while ensuring that corporate resources remain secure.
Configuration Steps
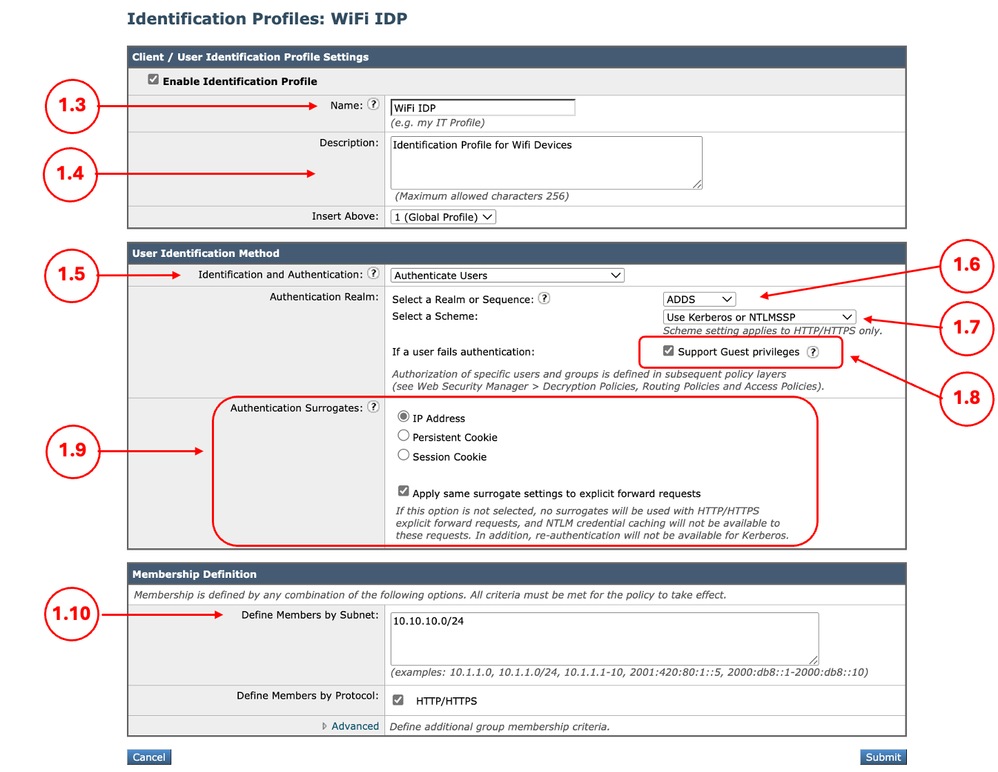
Step 1. Create Identification Profile. |
1.1. From the SWA GUI, navigate to Web Security Manager and select Identification Profile. 1.2. Click Add Identification Profile. 1.3. Define a Name for the Profile. 1.4. (Optional) Define the Description. 1.5. Choose Authenticate Users in Identification and Authentication. Step 1.6. Choose the Active Directory realm from Select a Realm or Sequence. Step 1.7. From Select a Scheme, select the desired authentication protocols. 1.8. Select the check box for Support Guest privileges. 1.9. (Optional) Depends on your design, you can enable the Surrogate, by enabling the Apply same surrogate settings to explicit forward requests. 1.10. Define the IP address subnet in, Define Members by Subnet. 1.11.Submit and Commit the changes.
|
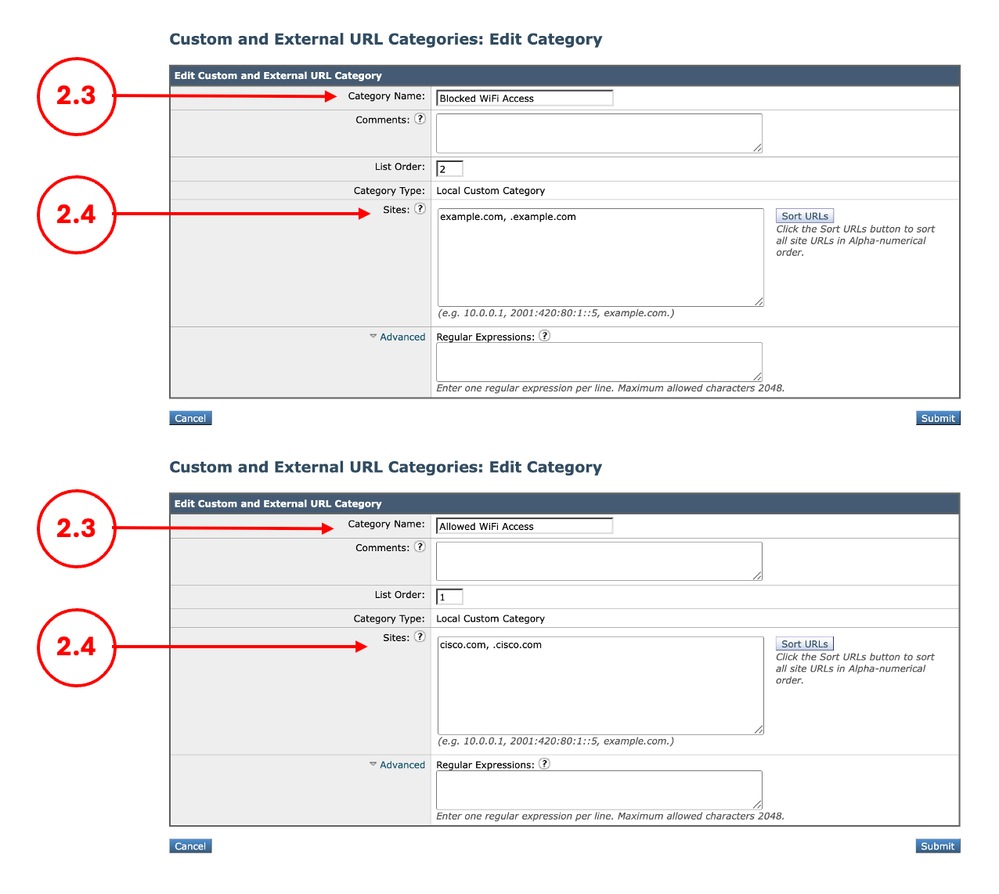
Step 2. (Optional) Create the Custom URL Categories for Allowed and Blocked URLs |
2.1.From the GUI Navigate toWeb Security Manager and chooseCustom and External URL Categories. 2.2. ClickAdd Category to create a new Custom URL Category. 2.3. EnterNamefor the new category. 2.4. Define the domain and/or subdomains of the websites that you want to block the access. 2.5. Submitthe changes. 2.6. Use the same steps to create a URL category foe the website that you are allowing the access.
|
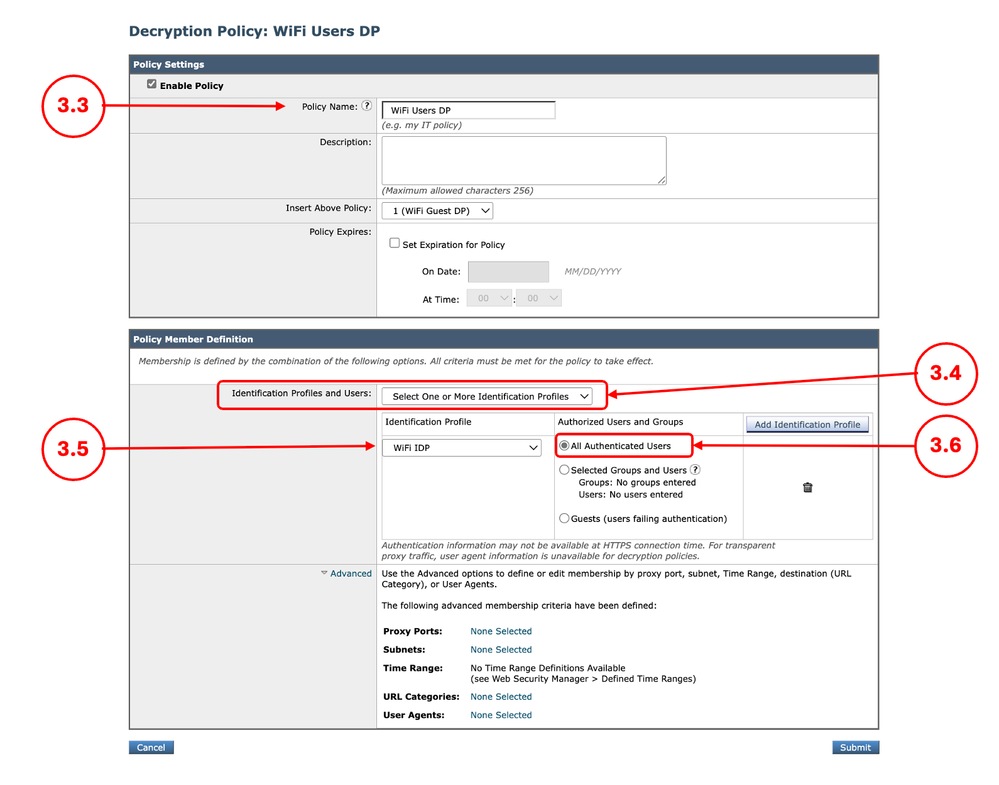
Step 3. Create Decryption Policy for Managed Devices |
3.1. From the GUI, Navigate toWeb Security Manager and chooseDecryption Policies 3.2. Click Add Policy. 3.3. EnterName for the new policy. 3.4. Choose Select One or More Identification Profiles from Identification Profiles and Users drop down menu. 3.5. Select theIdentification Profile that was created in Step 1. 3.6. Select All Authenticated Users. 3.7.ClickSubmit.
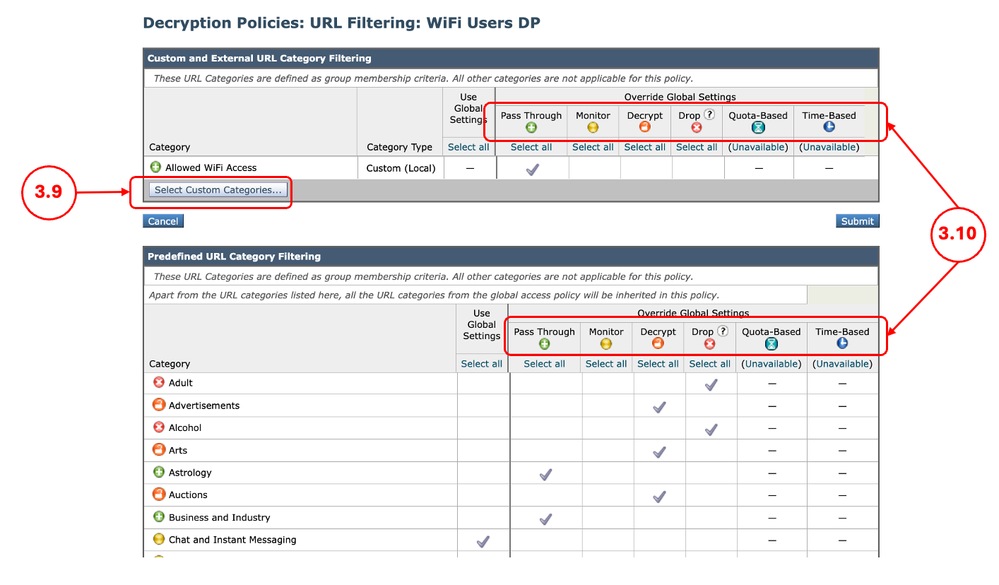
3.8. In Decryption Policies page, click the link from URL Filtering for the new policy. 3.9. (Optional) You can add any Custom URL Category by click on Select Custom Categories and choose Include in Policy in front of the category names 3.10. Configure the Action for each Custom and External URL Category Filtering and Predefined URL Category Filtering. 3.11. Click Submit
|
Step 4. Create Decryption Policy for Unmanaged Devices |
4.1. From the GUI, Navigate toWeb Security Manager and chooseDecryption Policies 4.2. Click Add Policy. 4.3. EnterName for the new policy. 4.4. Choose Select One or More Identification Profiles from Identification Profiles and Users drop down menu. 4.5. Select theIdentification Profile that was created in Step 1. 4.6. Select Guests (users failing authentication). 4.7. ClickSubmit.
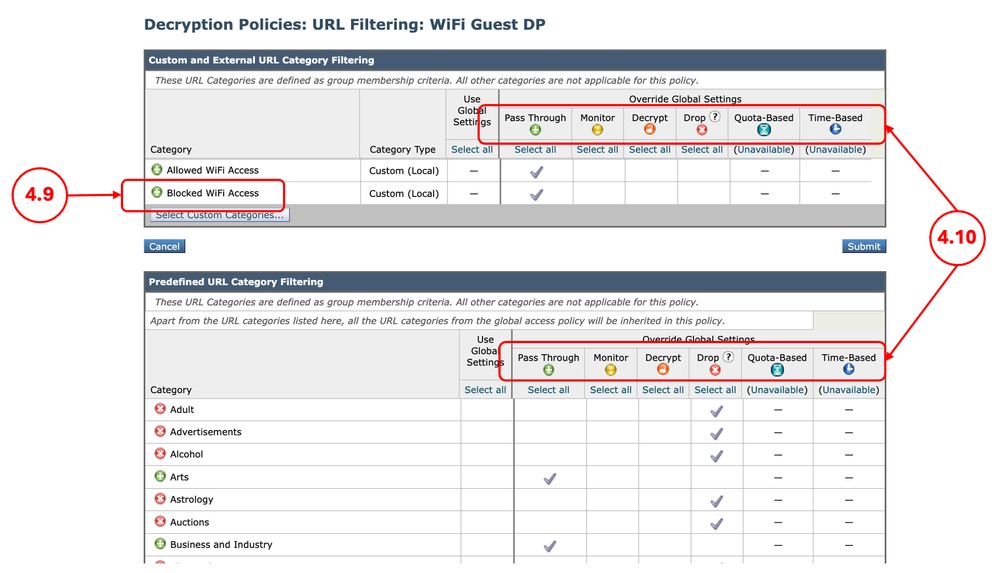
4.8. In Decryption Policies page, click the link from URL Filtering for the new policy. 4.9. (Optional) You can add any Custom URL Category by click on Select Custom Categories and choose Include in Policy in front of the category names 4.10. Configure the Action for each Custom and External URL Category Filtering and Predefined URL Category Filtering.
4.11. Scroll down on the Uncategorized URLs section choose the proper action.
4.12. Click Submit |
Step 5. Create Access Policy for Managed Devices |
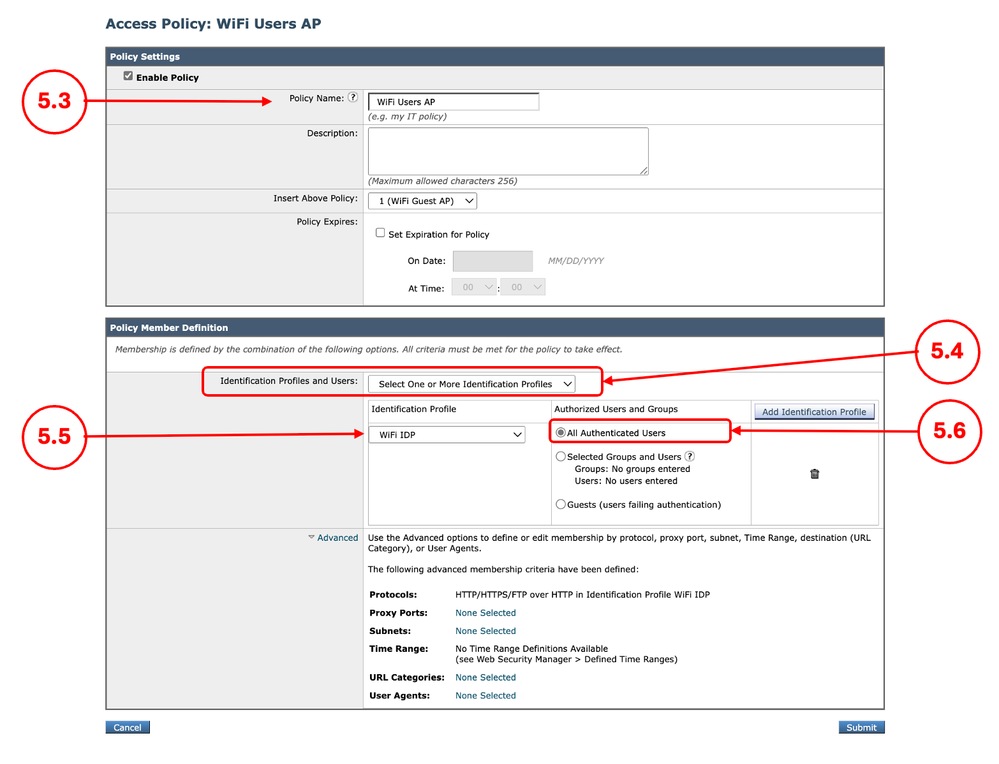
5.1. From the GUI, Navigate toWeb Security Manager and chooseAccess Policies 5.2.Click Add Policy. 5.3.EnterName for the new policy. 5.4. Choose Select One or More Identification Profiles from Identification Profiles and Users drop down menu. 5.5. Select theIdentification Profile that was created in Step 1. 5.6. Select All Authenticated Users. 5.7.ClickSubmit.
5.8. In Access Policies page, click the link from URL Filtering for the new policy. 5.9. (Optional) You can add any Custom URL Category by click on Select Custom Categories and choose Include in Policy in front of the category names 5.10. Configure the Action for each Custom and External URL Category Filtering and Predefined URL Category Filtering.
5.11. Click Submit. |
Step 6. Create Access Policy for Unmanaged Devices |
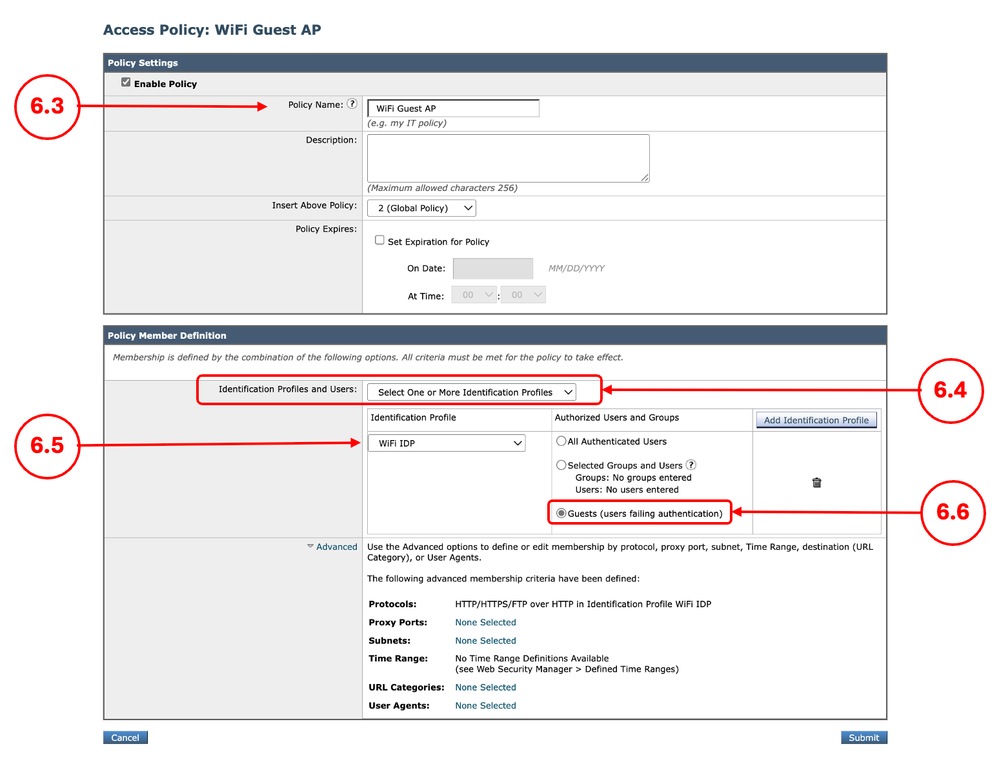
6.1. From the GUI, Navigate toWeb Security Manager and chooseAccess Policies 6.2. Click Add Policy. 6.3.EnterName for the new policy. 6.4. Choose Select One or More Identification Profiles from Identification Profiles and Users drop down menu. 6.5. Select theIdentification Profile that was created in Step 1. 6.6. Select Guests (users failing authentication). 6.7. ClickSubmit.
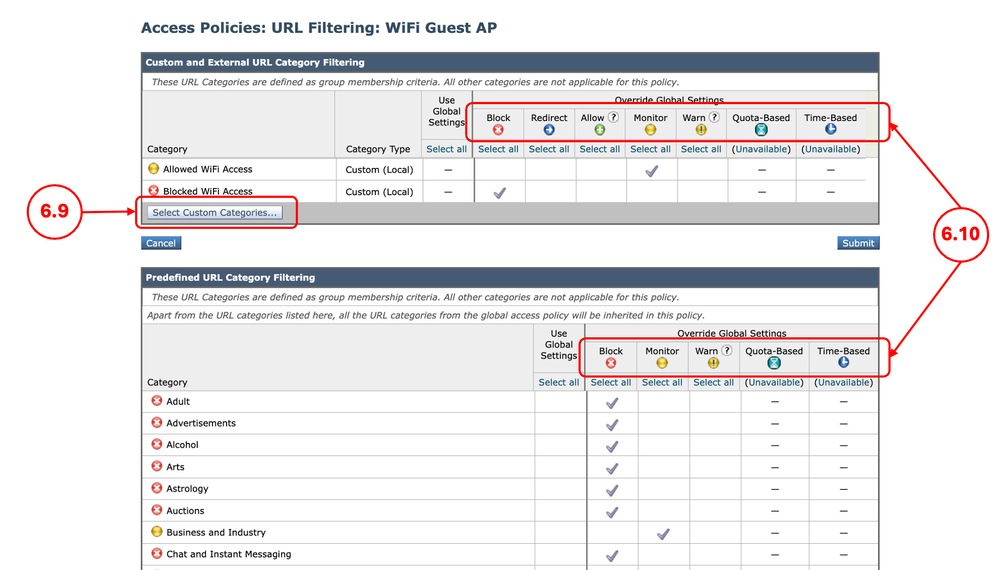
6.8. In Access Policies page, click the link from URL Filtering for the new policy. 6.9. (Optional) You can add any Custom URL Category by click on Select Custom Categories and choose Include in Policy in front of the category names 6.10. Configure the Action for each Custom and External URL Category Filtering and Predefined URL Category Filtering.
6.11. Scroll down on the Uncategorized URLs section choose the proper action.
6.12. Click Submit |
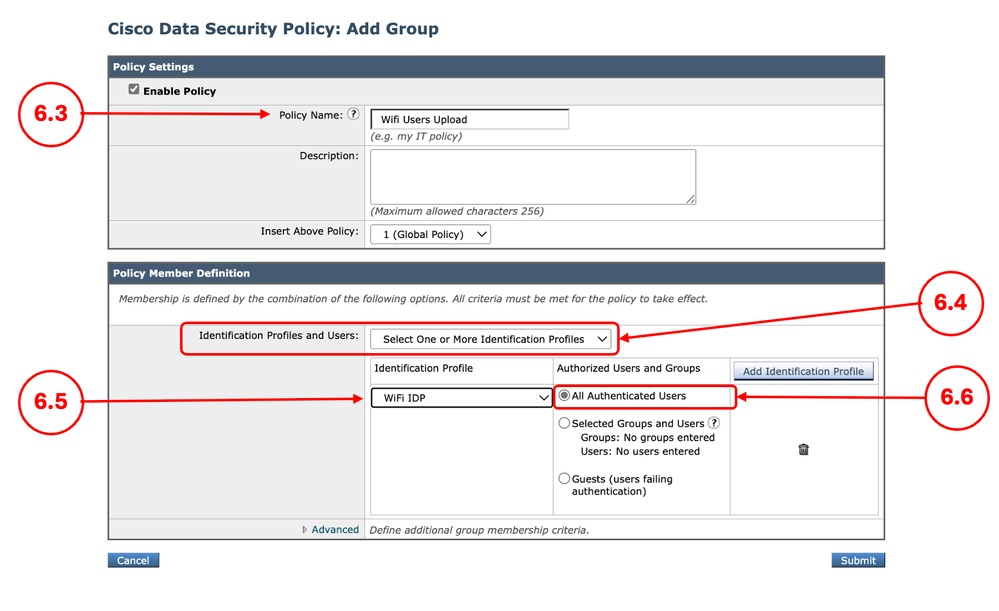
Step 7. (Optional) Create Cisco Data Security Policy for Managed Devices |
7.1. From the GUI, Navigate toWeb Security Manager and choose Cisco Data Security. 7.2. Click Add Policy. 7.3. EnterName for the new policy. 7.4. Choose Select One or More Identification Profiles from Identification Profiles and Users drop down menu. 7.5. Select theIdentification Profile that was created in Step 1. 7.6. Select All Authenticated Users.. 7.7. ClickSubmit.
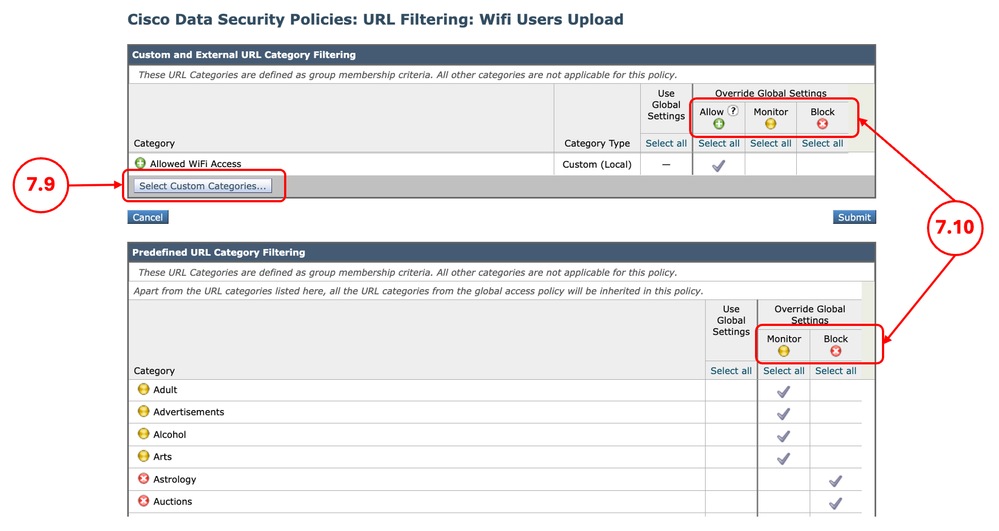
7.8. In Cisco Data Security Policies page, click the link from URL Filtering for the new policy. 7.9. (Optional) You can add any Custom URL Category by click on Select Custom Categories and choose Include in Policy in front of the category names 7.10. Configure the Action for each Custom and External URL Category Filtering and Predefined URL Category Filtering.
7.11. Click Submit. |
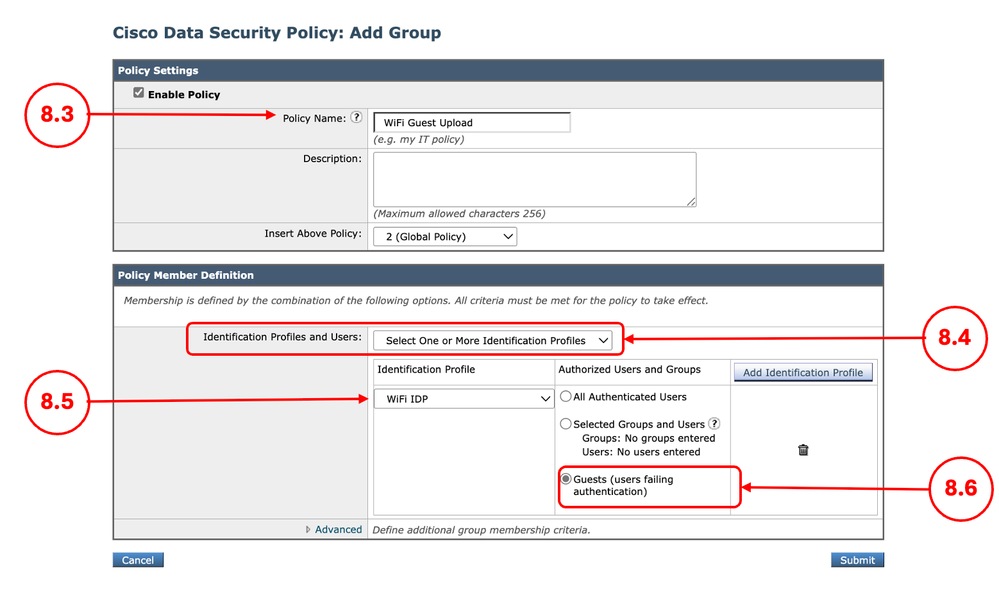
Step 8. (Optional) Create Cisco Data Security Policy for Unmanaged Devices |
8.1. From the GUI, Navigate toWeb Security Manager and choose Cisco Data Security. 8.2. Click Add Policy. 8.3. EnterName for the new policy. 8.4. Choose Select One or More Identification Profiles from Identification Profiles and Users drop down menu. 8.5. Select theIdentification Profile that was created in Step 1. 8.6. Select All Authenticated Users.. 8.7. ClickSubmit.
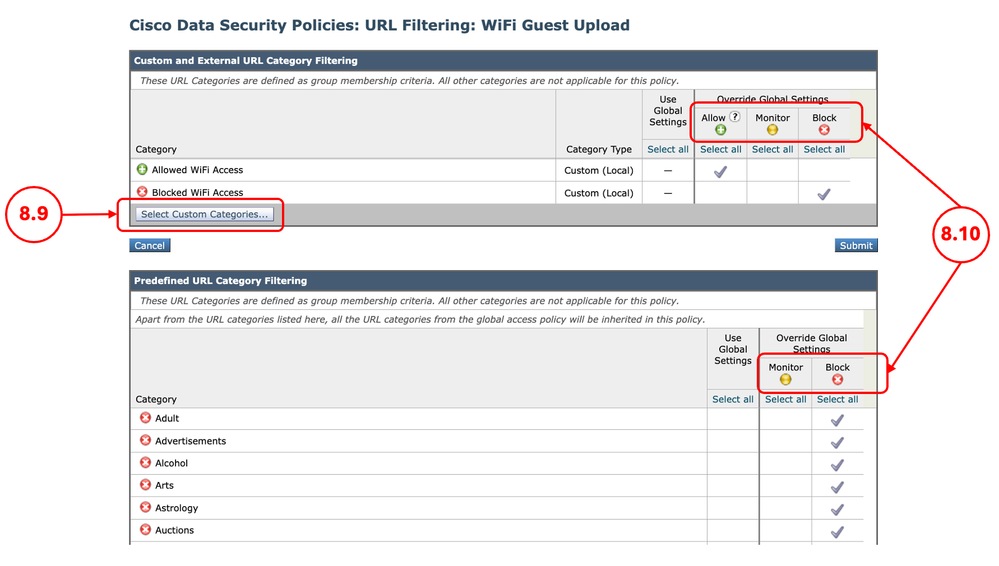
8.8. In Cisco Data Security Policies page, click the link from URL Filtering for the new policy. 8.9. (Optional) You can add any Custom URL Category by click on Select Custom Categories and choose Include in Policy in front of the category names 8.10. Configure the Action for each Custom and External URL Category Filtering and Predefined URL Category Filtering.
8.11. Scroll down on the Uncategorized URLs section choose the proper action.
8.12. Click Submit |
Step 9. Save the Changes |
9.1. Commit the changes |


Related Information
- User Guide for AsyncOS 15.0 for Cisco Secure Web Appliance - LD (Limited Deployment) - Troubleshooti...
- Block Executable File Download in SWA
- Block Upload Traffic in Secure Web Appliance
- Block Traffic in Secure Web Appliance
- Bypass Authentication in Secure Web Appliance
- Configure Microsoft O365 Tenant Restriction in SWA
- Configure Secure Web Appliance Initial Setup
- Bypass Microsoft Updates Traffic in Secure Web Appliance
Revision History
| Revision | Publish Date | Comments |
|---|---|---|
2.0 |
29-Jul-2026
|
Initial Release |
1.0 |
24-Mar-2026
|
Initial Release |
 Feedback
Contact Cisco
- Open a Support Case

- (Requires a Cisco Service Contract)