Cisco Secure Web Appliance
| Overview | Product Overview |
|---|---|
| Product Type | Web Security |
| Status | Available Order |
| Series Release Date | 30-JAN-2009 |
|
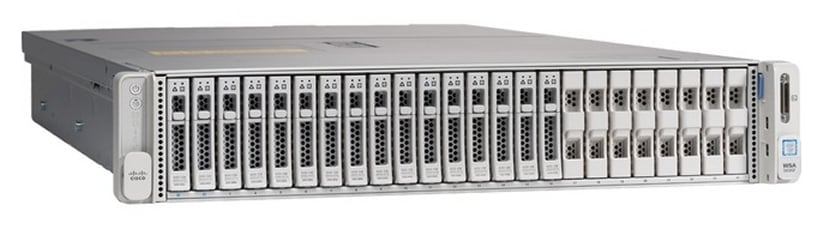
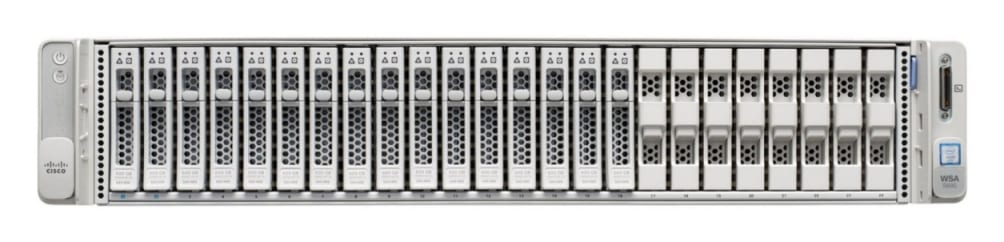
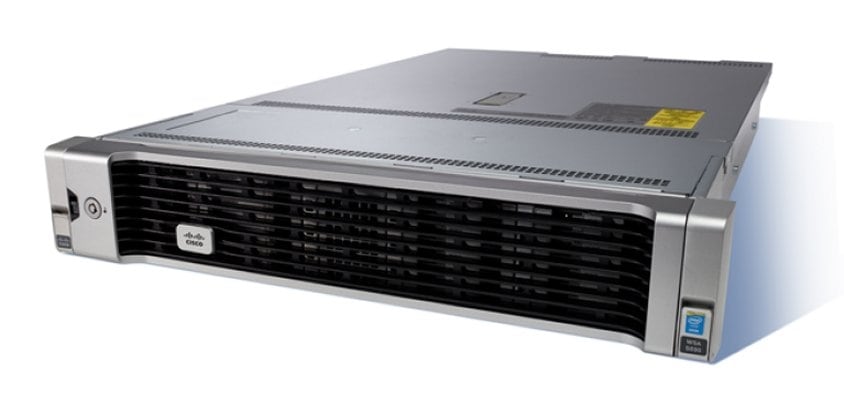
Supported Models: - Cisco Web Security Appliance S190 - Cisco Web Security Appliance S390 |
|

- US/Canada 800-553-2447
- Worldwide Support Phone Numbers
- All Tools
 Feedback
 Feedback
- Getting Started with Cisco Secure Web Appliance:
- Step-by-step Guide: Cisco Secure Web Setup | Cisco Talos IP & Domain Reputation Center
- Web Security Training Videos | Cisco Secure Web Appliance - Official YouTube Channel
- AsyncOS MIB Info for version 15.0: Web MIB | Mail MIB | SMI MIB
-
Top Search Results
Key Information
Customers Also Viewed
Saved Content
-
You can now save documents for easier access and future use. Saved documents for this product will be listed here, or visit the My Saved Content page to view and manage all saved content from across Cisco.com.
Log in to see your Saved Content.
Recent Security Notices
- 03-Feb-2026
Document Categories
-
Data Sheets and Product Information
- Cisco Secure Web Appliance: Protection, Control, Visibility, and Value At-a-Glance
- Cisco WSA Brochure (PDF - 2 MB)
At-a-Glance
- Cisco Secure Web Appliance Data Sheet
- Cisco Advanced Web Security Reporting Data Sheet
- Cisco Web Usage Control Filtering Categories Data Sheet
- Cisco Web Security Appliance Application and Visibility Control Data Sheet
- Cisco Security Virtual Appliance Licenses for Customers and Partners
- Cisco Web Security Virtual Appliance WSAV Licenses for Existing Customers and Partners Data Sheet
Data Sheets
- End-of-Sale and End-of-Life Announcement for the Cisco Secure Web x96 Hardware Appliances
- End-of-Sale and End-of-Life Announcement for the Cisco Secure Web Appliance (formerly Web Security Appliance) AsyncOS Releases 12.5, 14.0 and 14.1
- End-of-Sale and End-of-Life Announcement for the Cisco Email, Web and Security Management x90 Hardware Appliances
- End-of-Sale and End-of-Life Announcement for the Cisco Secure Web x95 Hardware Appliances
- End-of-Sale and End-of-Life Announcement for the Cisco Web Security and SMA Annuity Migration
- End-of-Sale and End-of-Life Announcement for the Cisco Web Security Appliance AsyncOS 12.0.x
- End-of-Sale and End-of-Life Announcement for the Cisco WSA Antimalware software license bundle - 5Y Subscription
- End-of-Sale and End-of-Life Announcement for the Cisco Web Security Appliance AsyncOS 11.7.x
- End-of-Sale and End-of-Life Announcement for the Cisco Email and Web Security Promotional PIDs
- Cisco Web Security Appliance AsyncOS 10.5.x Product Bulletin
- Cisco Web Security Appliance AsyncOS 11.5.x Product Bulletin
- End-of-Sale and End-of-Life Announcement for the Cisco x170 and x80 Email, Web, and Content Security Management Hardware Appliances
- Cisco Web Security Appliance AsyncOS 10.0.x and 10.1.x Product Bulletin
- End-of-Sale and End-of-Life Announcement for the Cisco Email, Web, and Security Management x70 Appliances
- End-of-Sale and End-of-Life Announcement for the AsyncOS 8.5.x, 9.0.x, and 9.1.x for Cisco Web Security Appliance
End-of-Life and End-of-Sale Notices
-
International English
- Secure Choice Enterprise Agreement FAQs
Q&A
-
Security Notices
- Cisco Web Security Appliance URL Categorization Product Bulletin
- Cisco Web Security Appliance AsyncOS 10.5.x Product Bulletin
- Cisco Web Security Appliance AsyncOS 11.5.x Product Bulletin
- Cisco Web Security Appliance AsyncOS 10.0.x and 10.1.x Product Bulletin
Bulletins
-
Applicable to Multiple Models
Field Notices
- Cisco Web Security Appliance Web Proxy Memory Exhaustion Denial of Service Vulnerability
- Cisco Web Security Appliance Reflected and Document Object Model-Based Cross-Site Scripting Vulnerability
- Cisco Web Security Appliance Cross-Site Scripting Vulnerability
- Cisco Web Security Appliance Layer 4 Traffic Monitor Security Bypass Vulnerability
- Cisco Web Security Appliance Reflected Cross-Site Scripting Vulnerability
- Cisco Web Security Appliance Advanced Malware Protection File Bypass Vulnerability
- Cisco Web Security Appliance Administrative Interface Access Control Bypass Vulnerability
- Cisco Web Security Appliance Static Credentials Vulnerability
- Cisco Web Security Appliance Stored Cross-Site Scripting Vulnerability
- Cisco Web Security Appliance Authenticated Command Injection and Privilege Escalation Vulnerability
- Cisco Web Security Appliance Command Injection and Privilege Escalation Vulnerability
- Cisco Email Security Appliance Content Filter Bypass Vulnerability
- Cisco Security Appliances AsyncOS Software Update Server Certificate Validation Vulnerability
- Cisco Web Security Appliance HTTP URL Denial of Service Vulnerability
- Cisco Web Security Appliance Drop Decrypt Policy Bypass Vulnerability
Security Advisories, Responses and Notices
-
Release and Compatibility
- ISE Compatibility Matrix for Secure Web Appliance
- Release Notes for AsyncOS 15.5 for Cisco Secure Web Appliance
- Release Notes for AsyncOS 15.5 Hot Patch 1 Refresh for Cisco Secure Web Appliances
- Release Notes for AsyncOS 16.0 for Cisco Secure Web Appliance
- List of Ciphers for AsyncOS 16.0 for Secure Web Appliance
- Release Notes for AsyncOS 15.5 Hot Patch 1 for Cisco Secure Web Appliances
- Release Notes for AsyncOS 15.2 for Cisco Secure Web Appliance
- Release Notes for AsyncOS 15.2.3 Hot Patch 1 for Cisco Secure Web Appliances
- Release Notes for AsyncOS 15.0 for Cisco Secure Web Appliance
- List of Ciphers for AsyncOS 15.5 for Secure Web Appliance
- Cisco Advanced Web Security Reporting v.7.x Release Notes
- List of Ciphers for AsyncOS 15.2 for Secure Web Appliance
- Release Notes for AsyncOS 14.5 for Cisco Secure Web Appliance
- Release Notes for AsyncOS 14.5.1 Hot Patch 1 Refresh for Cisco Secure Web Appliances
- Update CIMC Firmware on Cisco Secure Web Appliances
Release Notes
-
Reference
- Useful Links Cisco Web Security Appliance S195, S395, S695, and S695F
Documentation Roadmaps
- How to Configure Web Security Appliance Additional Passthrough Settings for the Webex Application
- Cisco AsyncOS 8.0 for Web Open Source Documentation (PDF - 1 MB)
Licensing Information
- Use Secure Web Appliance Best Practices
- Understand Secure Web Appliance Accesslogs
Technical References
-
Install and Upgrade
- Cisco Content Security Virtual Appliances on AWS EC2 Installation Guide
- Cisco Secure Web Virtual Appliance Installation Guide
- Cisco Secure Web Appliance S196, S396, S696, and S696F Hardware Installation Guide
- Regulatory Compliance and Safety Information - Cisco Secure Web Appliance S196, S396, S696, S696F (PDF)
- Cisco Secure Web Appliance S196, S396, S696, and S696F Getting Started Guide
- Cisco Web Security Appliance S195, S395, S695, and S695F Getting Started Guide
- Deploy Cisco Secure Web Appliance on Microsoft Azure Marketplace
- Cisco Web Security Appliance S195, S395, S695, and S695F Hardware Installation Guide
- Regulatory Compliance and Safety Information—Cisco Web Security Appliance S195, S395, S695, and S695F (PDF)
- Cisco x90 Series Content Security Appliances Installation and Maintenance Guide
- Cisco Advanced Web Security Reporting 6.2 - Installation, Setup, and User Guide (PDF)
- Cisco Advanced Web Security Reporting 6.1 - Installation, Setup, and User Guide (PDF)
- Cisco Advanced Web Security Reporting v. 6.0 Installation, Setup, and User Guide (PDF)
- Cisco Web Security Appliance S690 Quickstart Guide (PDF)
- Cisco Web Security Appliance S390 Quickstart Guide (PDF)
Install and Upgrade Guides
- Configure and Troubleshoot SWA, ESA and SMA Local Upgrade
- Upgrade Process for Secure Web Appliance
Install and Upgrade TechNotes
-
Configuration
- Block Google Consumer Accounts Access in the SWA
- Block Google AI Mode in the Secure Web Appliance
- Configure Active Directory Authentication in SWA
- Configure Upstream Proxy in Secure Web Appliance
- Configure Kerberos Single-Sign-On Authentication in SWA
- Configure Firewall for Secure Web Appliance
- Configure Backup in Secure Web Appliance
- Block Executable File Download in SWA
- Install Secure Web Appliance on Microsoft Hyper-V
- Configure Microsoft O365 Tenant Restriction in SWA
- Configure SWA Packet Capture Filters for Explicit Transparent Modes
- Configure Secure Web Appliance GUI Certificate
- Configure SCP Push Logs in SWA with Microsoft Server
- Configure and Examine SOCKS Proxy on Secure Web Appliance
- Configure Packet Capture on Content Security Appliance
Configuration Examples and TechNotes
-
AsyncOS API 16.0 for Cisco Secure Web Appliance
-
AsyncOS API 15.5 for Cisco Secure Web Appliance
-
AsyncOS 15.2 for Cisco Secure Web Appliance
-
AsyncOS 15.1 for Cisco Secure Web Appliance
-
AsyncOS 15.0 for Cisco Secure Web Appliance
-
AsyncOS 14.6 for Cisco Secure Web Appliance
-
AsyncOS 14.5 for Cisco Secure Web Appliance
-
AsyncOS 14.0 for Cisco Web Security Appliances
-
AsyncOS 12.5 for Cisco Web Security Appliances
Programming Guides
-
Maintain and Operate
- User Guide for AsyncOS 15.5 for Cisco Secure Web Appliance (General Deployment)
- User Guide for AsyncOS 16.0 for Cisco Secure Web Appliance (Limited Deployment)
- User Guide for AsyncOS 15.2 for Cisco Secure Web Appliance- MD (Maintenance Deployment)
- Cisco Advanced Web Security Reporting 7.5.3 Installation, Setup, and User Guide
- User Guide for AsyncOS 15.1 for Cisco Secure Web Appliance - GD (General Deployment)
- User Guide for AsyncOS 15.2 for Cisco Secure Web Appliance- GD (General Deployment)
- User Guide for AsyncOS 15.0 for Cisco Secure Web Appliance - GD(General Deployment)
- User Guide for AsyncOS 14.6 for Cisco Secure Web Appliance with Hybrid SWG - Limited Deployment
- User Guide for AsyncOS 11.8 for Cisco Web Security Appliances - GD (General Deployment)
- User Guide for AsyncOS 14.5 for Cisco Secure Web Appliance - GD (General Deployment)
- Cisco Advanced Web Security Reporting 7.5.2 Installation, Setup, and User Guide
- Cisco Advanced Web Security Reporting 6.3 - Installation, Setup, and User Guide (PDF)
- User Guide for AsyncOS 12.7 for Cisco Web Security Appliances - LD (Limited Deployment)
- User Guide for AsyncOS 14.0 for Cisco Web Security Appliances - GD (General Deployment)
- User Guide for AsyncOS 14.1 for Cisco Web Security Appliances - LD (Limited Deployment)
End-User Guides
-
Cisco Web Security Appliance S390
- Verify SWA Connectivity to the Internet
- How do you use regular expressions (regex) with grep to search logs?
Maintain and Operate TechNotes
-
Troubleshooting
- Reset Administrator Password and Unlock Administrator User Account
Password Recovery
- Use Enablediag Service Account to Access Secure Email Gateway
- Find a Contract Number and Add Access to It
- Cisco Hybrid Web Appliance FAQ
- What is the difference between transparent and forward proxy mode?
- WSA FAQ: How do I verify which category a URL belongs to and submit a change request?
- Web Reputation score (WBRS) and Web Categorization Engine Frequently Asked Questions (FAQ)
- What are cookies? What are the differences between them (session vs. persistent)?
- How to Install Feature Keys on Cisco ESA, WSA, and SMA?
- What should NTLM authentication look like at the packet level?
- How do you use pscp on Microsoft Windows?
- What is a PAC file and where is it located on WSA?
- How do I add / modify the Alerts that are emailed from the Cisco Web Security Appliance?
- Content Security Appliances FAQ: How do you perform a packet capture on a Cisco Content Security appliance?
Support FAQ
-
Troubleshooting Information in Online Help on the Appliance
Troubleshooting Guides
- Understand Secure Web Appliance Release Changes
- Troubleshoot vESA Unable to Download and Apply Antispam or Antivirus Updates
- FAQ for Remote Access on Cisco ESA/WSA/SMA
- Troubleshoot Secure Web Appliance Latency
- Fix EUN Page Display Errors on SWA for Explicit HTTPS Requests
- Bypass Microsoft Updates Traffic in Secure Web Appliance
- Troubleshoot Secure Web Appliance Performance with SHD Logs
- Integrate Secure Endpoint Private Cloud with Secure Web and Email
- Understand Packet Flow in Secure Web Appliance
- Access Secure Web Appliance Logs
- Clear Cache on Secure Web Appliance
- Understand HTTPS Accesslog Format in Secure Web Appliance
- Troubleshoot Smart License in Secure Web Appliance
- Troubleshoot Unusual Process States in SWA
- Determine Decryption Rate in SWA
Troubleshooting TechNotes
-
Literature
- Cisco Advanced Web Reporting Overview (PDF - 5 MB)
Presentations
-
- Isolate with Secure Web Appliance Solution Overview
- How to Enable Domain Map in AsyncOS for WSA (PDF)
- How to Enable Office 365 External Feeds in AsyncOS for Cisco Web Security Guide (PDF)
- Deployment Scenarios for Cisco Web Security Appliance on Amazon Web Services Guide
- Cisco WSA Integration with Menlo Security: Browser Isolation Technology Migration Guide (PDF)
- Integration of Cisco Web Security Appliance Web Traffic Tap with LogRhythm NetMon Guide (PDF)
Solution Overviews
-
Log in to see available downloads.
-
