Configure SCP Push Logs in SWA with Microsoft Server
Available Languages
Download Options
Bias-Free Language
The documentation set for this product strives to use bias-free language. For the purposes of this documentation set, bias-free is defined as language that does not imply discrimination based on age, disability, gender, racial identity, ethnic identity, sexual orientation, socioeconomic status, and intersectionality. Exceptions may be present in the documentation due to language that is hardcoded in the user interfaces of the product software, language used based on RFP documentation, or language that is used by a referenced third-party product. Learn more about how Cisco is using Inclusive Language.
Contents
Introduction
This document describes the steps to configure Secure Copy (SCP) to automatically copy logs in Secure Web Appliance (SWA) to another server.
Prerequisites
Requirements
Cisco recommends that you have knowledge of these topics:
- How SCP works
- SWA administration
- Administration of Microsoft Windows or Linux Operating system
Cisco recommends that you have:
- Physical or Virtual SWA installed.
- License activated or installed.
- The setup wizard is completed.
- Administrative Access to the SWA Graphical User Interface (GUI).
- Microsoft Windows ( at least Windows Server 2019 or Windows 10 (build 1809).) or Linux System Installed.
Components Used
This document is not restricted to specific software and hardware versions.
The information in this document was created from the devices in a specific lab environment. All of the devices used in this document started with a cleared (default) configuration. If your network is live, ensure that you understand the potential impact of any command.
SCP
The behavior of Secure Copy (SCP) is similar to that of remote copy (RCP), which comes from the Berkeley r-tools suite (Berkeley university own set of networking applications), except that SCP relies on Secure Shell (SSH) for security. In addition, SCP requires that authentication, authorization, and accounting (AAA) authorization be configured so that the device can determine whether the user has the correct privilege level
The SCP on Remote Server method (equivalent to SCP Push) periodically pushes log files by the secure copy protocol to a remote SCP server. This method requires an SSH SCP server on a remote computer with SSH2 protocol. The subscription requires a user name, SSH key, and destination directory on the remote computer. Log files are transferred based on a rollover schedule set by you.
SWA Log Subscription
You can create multiple log subscriptions for each type of log file. Subscriptions include configuration details for archiving and storage, including these:
- Rollover settings, which determine when log files are archived
- Compression settings for archived logs
- Retrieval settings for archived logs, which specify whether logs are archived onto a remote server or stored on the appliance
Archiving Log Files
AsyncOS archives (rolls over) log subscriptions when a current log file reaches a user-specified limit of maximum file size or maximum time since last rollover.
These archive settings are included in log subscriptions:
- Rollover by File Size
- Rollover by Time
- Log Compression
- Retrieval Method
You can also manually archive (rollover) log files.
Step 1. Choose System Administration > Log Subscriptions.
Step 2. Check the checkbox in the Rollover column of the log subscriptions to archive, or check the All checkbox to select all the subscriptions.
Step 3 .Click Rollover Now to archive the selected logs.
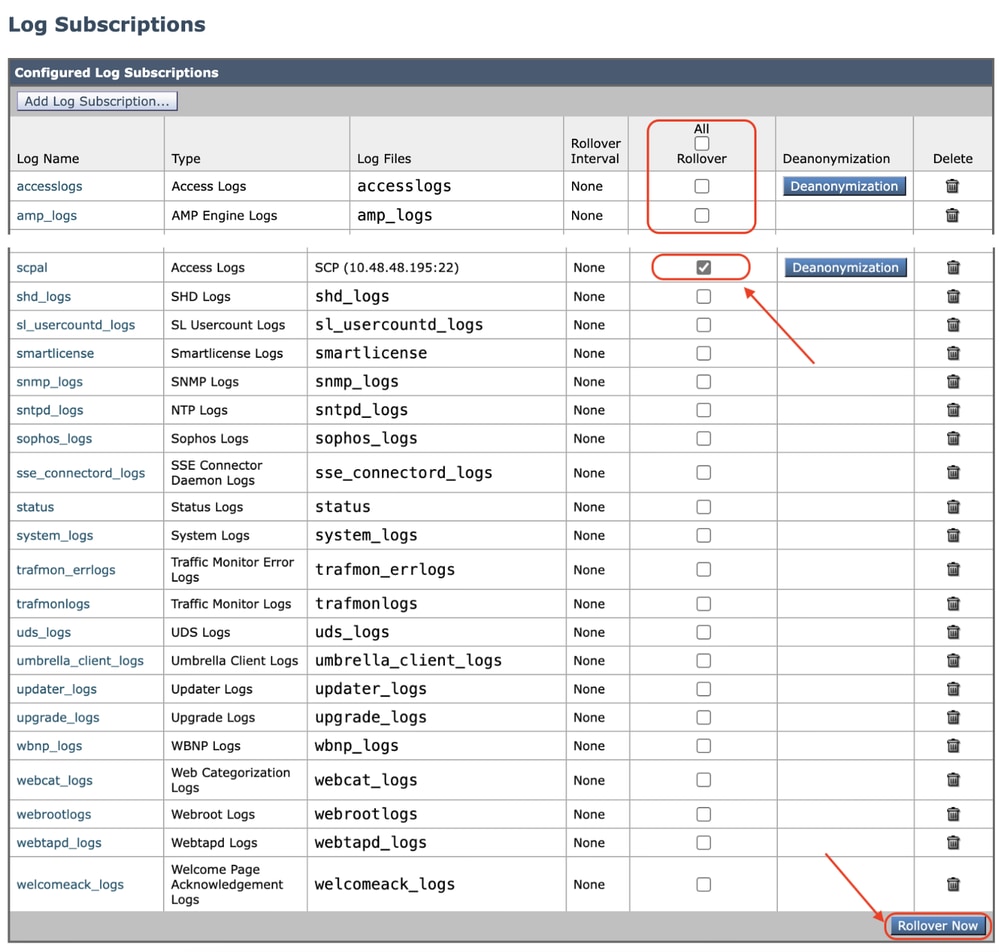 Image - Rollover now GUI
Configure Log Retrieval via SCP on Remote Server
There are two main steps to have log retrieval to a remote server with SCP from SWA:
- Configure SWA to push the logs.
- Configure remote server to receive the logs.
Configure SWA to Send The Logs to SCP Remote Server From GUI
Step 1. Log in to SWA and, from System Administration, choose Log Subscriptions.
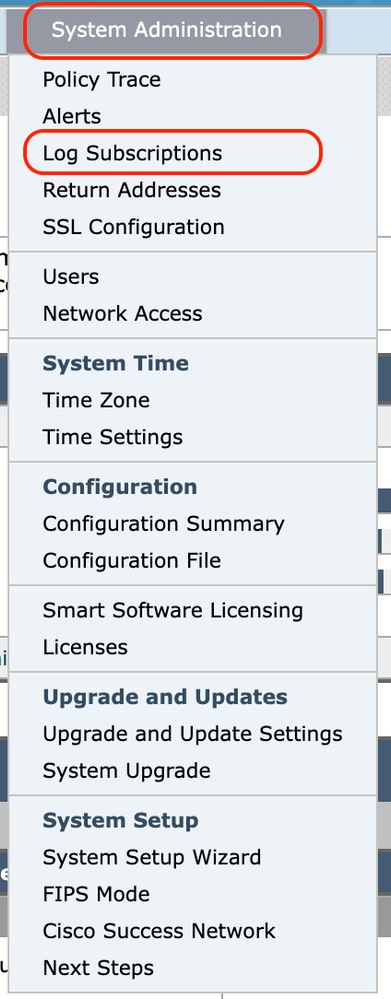 Image- Choose Log Subscriptions
Step 2. On Log Subscriptions page, choose Add Log Subscription:
 Image - Choose Add Log Subscription
Step 3. Choose Log type. In this example, Access log has been selected.
Step 4. Enter a name for your Log Subscription .
Step 5. (Optional) You can change the Rollover by File Size.
Step 6. From Retrieval method, choose SCP on Remote Server.
Step 7. Enter this information for your Remote servers :
- The SCP hostname or IP address
- The listen port number on the Remote server listening to SSH ( Default is TCP/22)
- Directory name
- Username to connect to Remote server
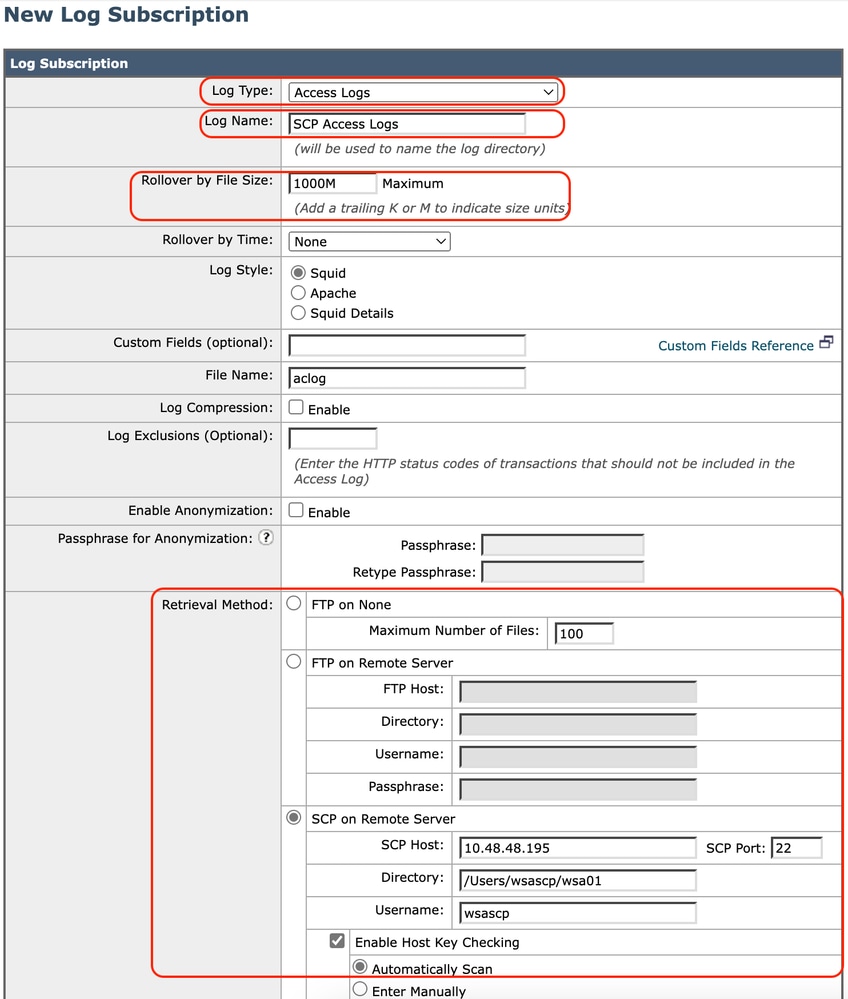 Image - Configure Log Parameters

Note: In this example, the username is wsascp and the remote server is Microsoft Windows operating system. A folder wsa01 was created in the c:\users\wccpscp folder (which is the user profile folder in Microsoft).

Tip: You can simply type the folder name; in this example, it is wsa01.
Step 8. Submit changes.
Step 9. Save the SSH key in a text file for further use on remote SCP server configuration section.
Note: You need to copy both lines starting with ssh- and ending with root@<SWA hostname> .
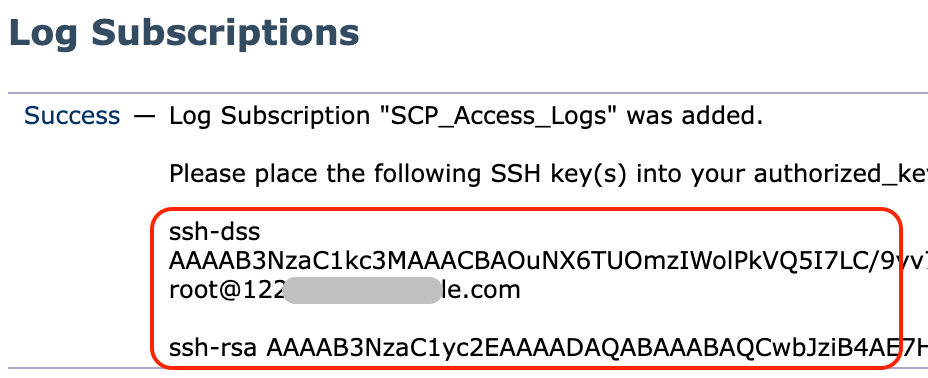 Image - Save the SSH Key for further use.
Step 10. Commit changes.
Configure Microsoft Windows as SCP Remote Server
Step 10. To Create a user for your SCP service navigate to Computer Management:
Note: If you already have a user for SCP, skip to Step 16.
Step 11. Select Local Users and Groups, then choose Users from the left pane.
Step 12. Right-click on the main page and choose new user.
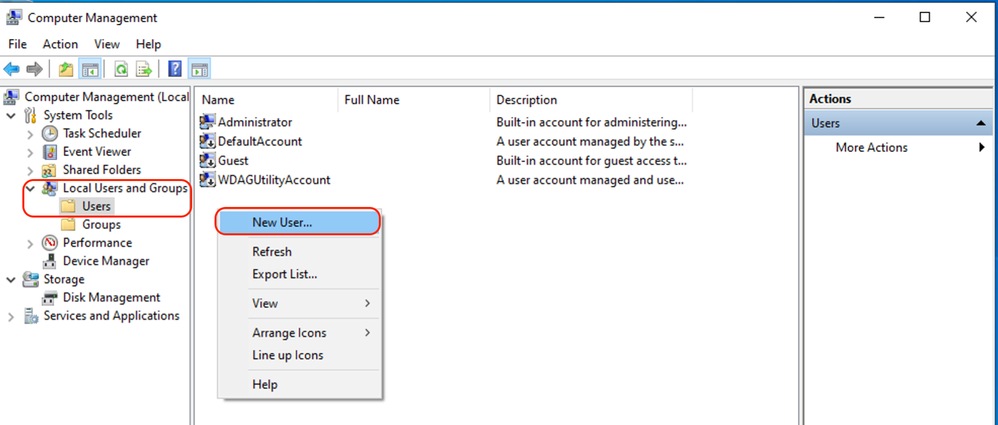 Image - Crate a User for SCP service.
Step 13. Enter the username and desired password.
Step 14. Choose Password Never Expired.
Step 15. Click Create and then close the window.
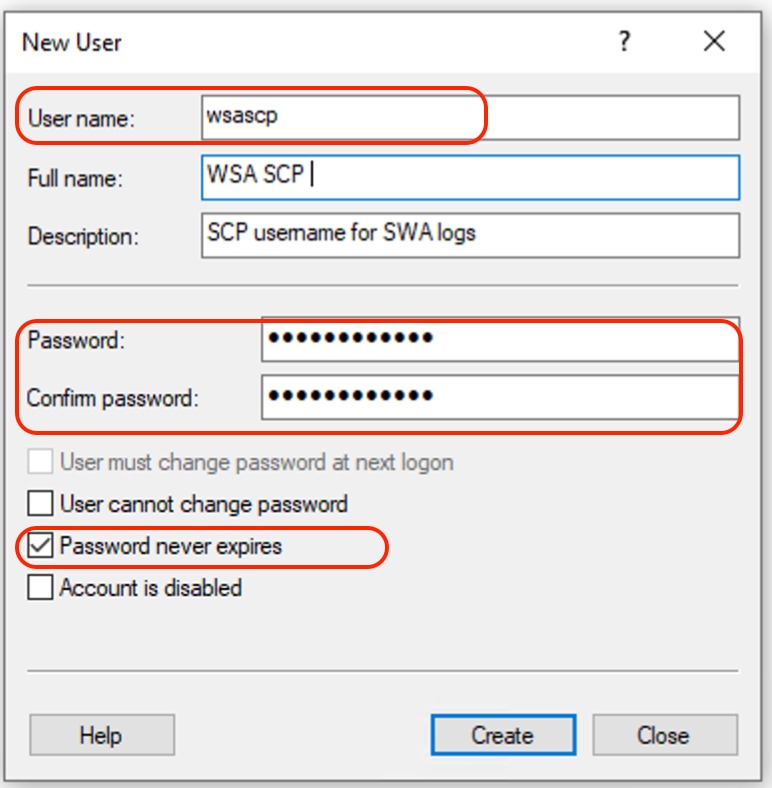 Image - Enter New user information.
Step 16. Log in to the Remote SCP server with the newly created user to have the profile directory created.
Note: If you have OpenSSL installed on your Remote SCP server, skip to step 19.
Step 17. Open PowerShell with Administrator privileges (Run as Administrator) and run this command to check the prerequisites:
(New-Object Security.Principal.WindowsPrincipal([Security.Principal.WindowsIdentity]::GetCurrent())).IsInRole([Security.Principal.WindowsBuiltInRole]::Administrator)If the output is True, you can proceed. Otherwise, check with the Microsoft support team,
Step 18. To install OpenSSH using PowerShell with Administrator privilege (Run as Administrator), run:
# Install the OpenSSH Client
Add-WindowsCapability -Online -Name OpenSSH.Client~~~~0.0.1.0

# Install the OpenSSH Server
Add-WindowsCapability -Online -Name OpenSSH.Server~~~~0.0.1.0
Here is a sample of successful results:
Path :
Online : True
RestartNeeded : False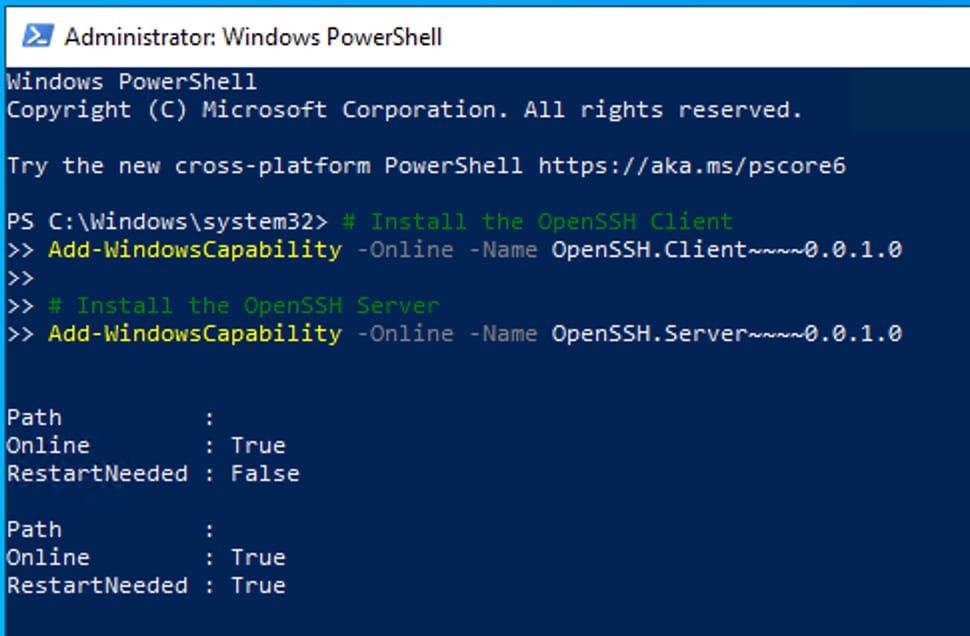 Image- Install OpenSSH in PowerShell

Caution: If RestartNeeded is set to True, please reboot Windows.
For more information about the installation on other versions of Microsoft Windows, visit Get started with OpenSSH for Windows | Microsoft Learn.
Step 19.Open a normal (non-elevated) PowerShell session and generate a pair of RSA keys by using the command:
ssh-keygen -t RSAAfter the command is finished, you can see the .ssh folder has created your user profile directory.
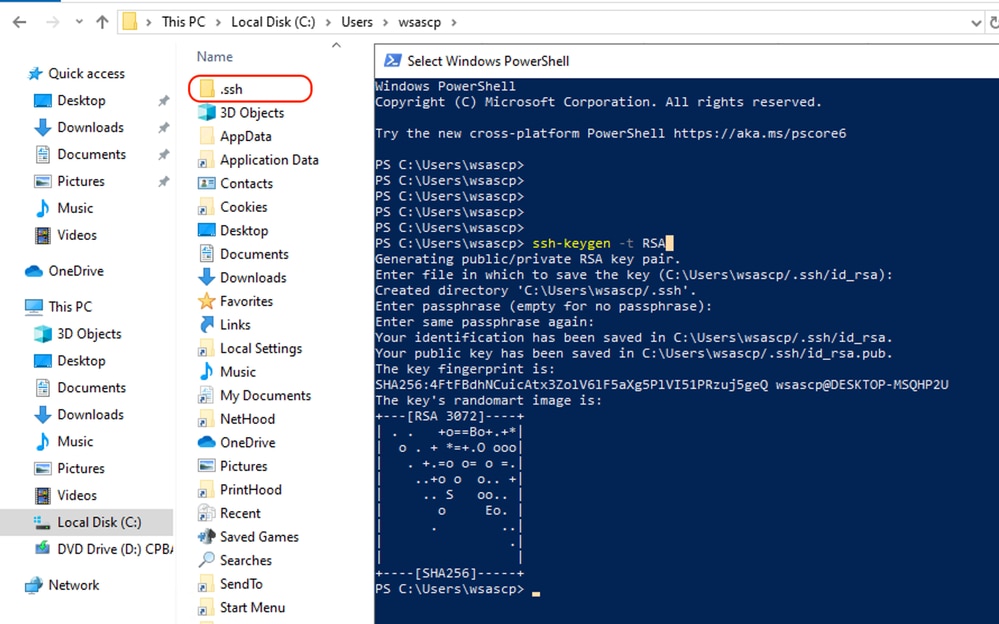 Image - Generate RSA Key
Step 20. Start the SSH service from PowerShell with Administrator privilege ( Run as Administrator ).
Start-Service sshd
Step 21. (Optional but recommended) Change the service Startup type to Automatic, with Administrator privilege Run as Administrator).
Set-Service -Name sshd -StartupType 'Automatic'
Step 22. Confirm the firewall rule to allow access to TCP port 22 has been created.
if (!(Get-NetFirewallRule -Name "OpenSSH-Server-In-TCP" -ErrorAction SilentlyContinue | Select-Object Name, Enabled)) {
    Write-Output "Firewall Rule 'OpenSSH-Server-In-TCP' does not exist, creating it..."
    New-NetFirewallRule -Name 'OpenSSH-Server-In-TCP' -DisplayName 'OpenSSH Server (sshd)' -Enabled True -Direction Inbound -Protocol TCP -Action Allow -LocalPort 22
} else {
    Write-Output "Firewall rule 'OpenSSH-Server-In-TCP' has been created and exists."
}
Step 23. Edit the SSH configuration file located in : %programdata%\ssh\sshd_config in Notepad, removing the # for both RSA and DSA.
HostKey __PROGRAMDATA__/ssh/ssh_host_rsa_key
HostKey __PROGRAMDATA__/ssh/ssh_host_dsa_key
#HostKey __PROGRAMDATA__/ssh/ssh_host_ecdsa_key
#HostKey __PROGRAMDATA__/ssh/ssh_host_ed25519_key
Step 24. Edit the connection conditions in %programdata%\ssh\sshd_config. In this example, the listen address is for all interfaces address. You can customize it due to your design.
Port 22
#AddressFamily any
ListenAddress 0.0.0.0
Step 25. Mark these two lines at the end of the %programdata%\ssh\sshd_config file by adding # at the beginning of each line:
# Match Group administrators
#       AuthorizedKeysFile __PROGRAMDATA__/ssh/administrators_authorized_keys
Step 26.(Optional) Edit the Strict Modes in %programdata%\ssh\sshd_config, By default, this mode is enabled and prevents SSH key-based authentication if private and public keys are not properly protected.
Un-comment the line #StrictModes yes and change it to StrictModes no:
StrictModes NoStep 27. Remove the # from this line to %programdata%\ssh\sshd_config to permit Public Key Authentication
PubkeyAuthentication yesStep 28. Create a text file authorized_keys in .ssh folder and paste the SWA public RSA key (which was collected on step 9):
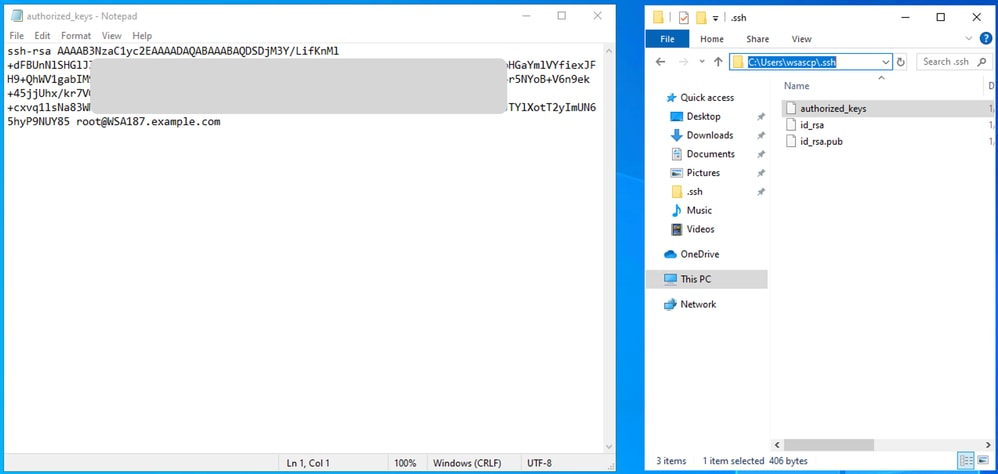 Image - SWA Public Key
Note: copy the whole line, starting with ssh-rsa and ending with root@<your_SWA_hostname>.
Tip: Since RSA is installed on the SCP server, there is no need to paste the ssh-dss key.
Step 29. Enable the OpenSSH Authentication Agent in PowerShell with Administrator privilege (Run as Administrator).
Set-Service -Name ssh-agent -StartupType 'Automatic'
Start-Service ssh-agent
 Image - Enable Open SSH Authentication Agent
Step 30.(Optional) Add this line to %programdata%\ssh\sshd_config to permit key types:
PubkeyAcceptedKeyTypes ssh-ed25519-cert-v01@openssh.com,ssh-rsa-cert-v01@openssh.com,ssh-ed25519,ssh-rsa,ssh-dssStep 31. Restart the SSH service. You can use this command from PowerShell with Administrator privilege (Run as Administrator
restart-Service -Name sshdStep 32. To test if the SCP push is configured correct, rollover the configured logs, you can do it from both GUI or CLI (rollovernow command):
WSA_CLI> rollovernow scpalNote: In this example the log name is "scpal".
You can confirm the logs are copied to the defined folder, which in this example was c:/Users/wsascp/wsa01.
Push SCP Logs to Different Drive
in case you need to push the logs to a different drive other than C:, create a link from user profile folder to desired drive. In this example the logs are pushed to D:\WSA_Logs\WSA01 .
Step 1. Create the folders in desired drive.
Step 2. Open the Command Prompt with Administrator privilege (Run as Administrator).
Step 3. Run this command to create the link:
mklink /d c:\users\wsascp\wsa01 D:\WSA_Logs\WSA01 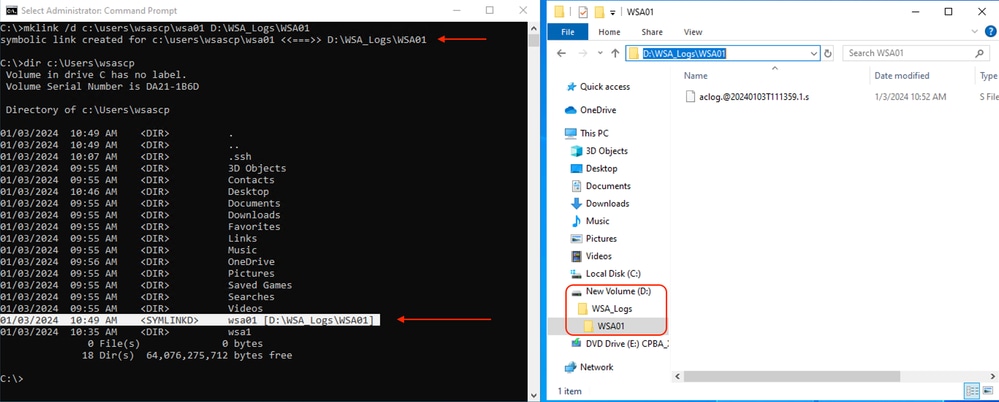 Image - Create SYM link
Note: In this example, SWA is configured to push the logs to WSA01 folder in C:\Users\wsascp , and the SCP server has the WSA01 folder as Symbolic link to D:\WSA_Logs\WSA01.
For more information about Microsoft Symbol Link please visit : mklink | Microsoft Learn
Troubleshoot SCP Log Push
View Logs in SWA
To troubleshoot the SCP log push, check the errors in:
1. CLI > displayalerts
2. System_logs
Note: To read system_logs, you can use the grep command in the CLI . Choose the number associated with system_logs and answer the question in the wizard.
View Logs in SCP Server
You can read the SCP server logs in Microsoft Event Viewer, in Applicataions and Services Logs > OpenSSH > Operational:
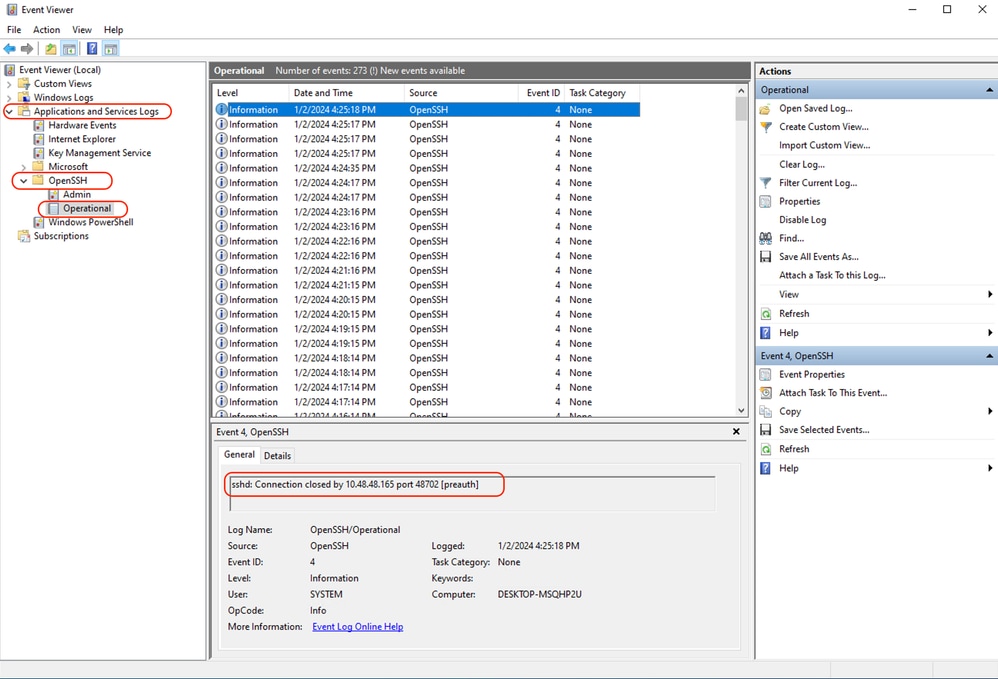 Image - PreAuth Failed
"Host Key verification failed"
This error indicates that the SCP server public key stored in SWA is invalid.
Here is a sample of error from displayalerts output in CLI:
02 Jan 2024 16:52:35 +0100    Log Error: Push error for subscription scpal: SCP failed to transfer to 10.48.48.195:22:
Last message occurred 68 times between Tue Jan  2 15:53:01 2024 and Tue Jan  2 16:52:31 2024.

Log Error: Push error for subscription scpal: SCP failed to transfer to 10.48.48.195:22: Host key verification failed.
Last message occurred 46 times between Tue Jan  2 16:30:19 2024 and Tue Jan  2 16:52:31 2024.

Log Error: Push error for subscription scpal: SCP failed to transfer to 10.48.48.195:22: lost connection
Last message occurred 68 times between Tue Jan  2 15:53:01 2024 and Tue Jan  2 16:52:31 2024.

Log Error: Push error for subscription scpal: SCP failed to transfer to 10.48.48.195:22: ssh: connect to host 10.48.48.195 port 22: Operation timed out
Last message occurred 22 times between Tue Jan  2 15:53:01 2024 and Tue Jan  2 16:29:18 2024.
Here are some sample of the error in system_logs :
Tue Jan  2 19:49:50 2024 Critical: Log Error: Push error for subscription scp: SCP failed to transfer to 10.48.48.195:22:
Tue Jan  2 19:49:50 2024 Critical: Log Error: Push error for subscription scp: SCP failed to transfer to 10.48.48.195:22: lost connection
Tue Jan  2 19:49:50 2024 Critical: Log Error: Push error for subscription scp: SCP failed to transfer to 10.48.48.195:22: Host key verification failed.
To solve this issue, you can copy the Host from SCP server and paste it in SCP logs subscription page. Refer to step 7 in Configure SWA to Send The Logs to SCP Remote Server From GUI or you can contact Cisco TAC to remove the Host Key from backend.
"Permission denied (publickey,password,keyboard-interactive)"
This error usually indicates that the username provided in SWA is invalid.
Here is a sample of error log in system_logs :
Tue Jan  2 20:41:40 2024 Critical: Log Error: Push error for subscription scpal: SCP failed to transfer to 10.48.48.195:22:
Tue Jan  2 20:41:40 2024 Critical: Log Error: Push error for subscription scpal: SCP failed to transfer to 10.48.48.195:22: lost connection
Tue Jan  2 20:41:40 2024 Critical: Log Error: Push error for subscription scpal: SCP failed to transfer to 10.48.48.195:22: scp@10.48.48.195: Permission denied (publickey,password,keyboard-interactive).
Here is a sample of error from SCP server: "Invalid user SCP from <SWA_IP address> port <TCP port SWA conencts to SCP server>".
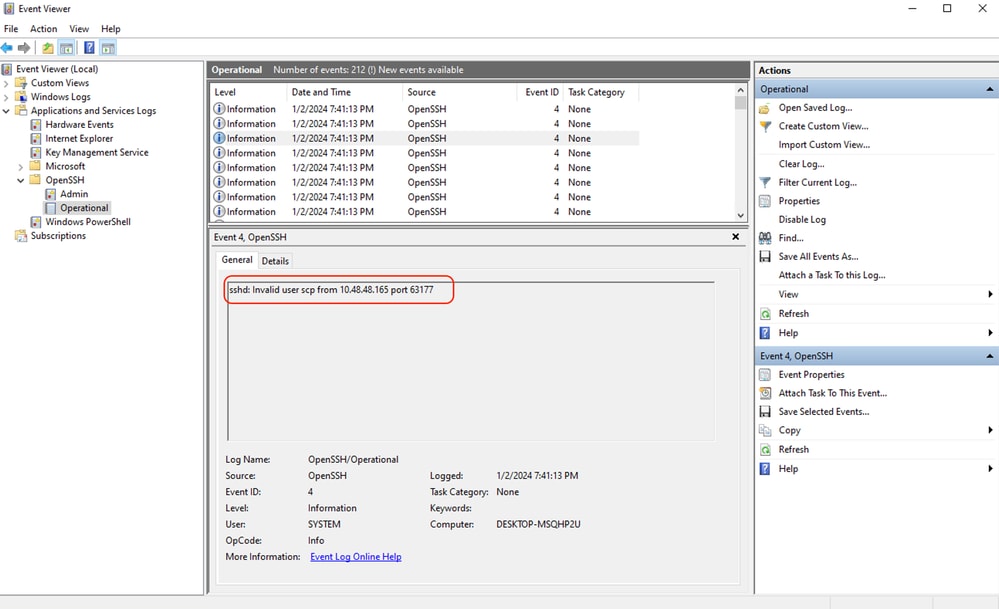 Image- Invalid User
To solve this error, please check the spelling and verify that the user (configured in SWA to push the logs) is Enabled in SCP server.
"No such file or directory"
This error Indicates that the path provided in SWA logs subscription section is not valid,
Here is a sample of error from system_logs:
Tue Jan  2 20:47:18 2024 Critical: Log Error: Push error for subscription scpal: SCP failed to transfer to 10.48.48.195:22:
Tue Jan  2 20:47:18 2024 Critical: Log Error: Push error for subscription scpal: SCP failed to transfer to 10.48.48.195:22: scp: Userswsascpwsa01/aclog.@20240102T204508.s: No such file or directory
Tue Jan  2 20:47:18 2024 Critical: Log Error: Push error for subscription scpal: SCP failed to transfer to 10.48.48.195:22: Sink: C0660 255 aclog.@20240102T204508.s
To solve this issue, verify the spelling and make sure the path is correct and valid in SCP server.
"SCP failed to transfer"
This error could be an indicator of a communication error. Here is the sample of error:
03 Jan 2024 13:23:27 +0100 Log Error: Push error for subscription scp: SCP failed to transfer to 10.48.48.195:22:To troubleshoot the connectivity, use the telnet command in SWA CLI:
SWA_CLI> telnet

Please select which interface you want to telnet from.
1. Auto
2. Management (10.48.48.187/24: SWA_man.csico.com)
[1]> 2

Enter the remote hostname or IP address.
[]> 10.48.48.195

Enter the remote port.
[23]> 22

Trying 10.48.48.195...
In this example the connection is not established. The successful connection out is like:
SWA_CLI> telnet

Please select which interface you want to telnet from.
1. Auto
2. Management (10.48.48.187/24: rishi2Man.calo.lab)
[1]> 2
Enter the remote hostname or IP address.
[]> 10.48.48.195
Enter the remote port.
[23]> 22

Trying 10.48.48.195...
Connected to 10.48.48.195.
Escape character is '^]'.
SSH-2.0-OpenSSH_for_Windows_SCP
If the telnet is not connected:
- Check If the SCP server firewall is blocking the access.
- [Check if there are any firewalls in the path from SWA to SCP server blocking the access.
- Check if the TCP port 22 is in a listen state in SCP server .
- Run packet capture in both SWA ans SCP server for further analysis.
Here is a sample of Packet Capture of successful connection:
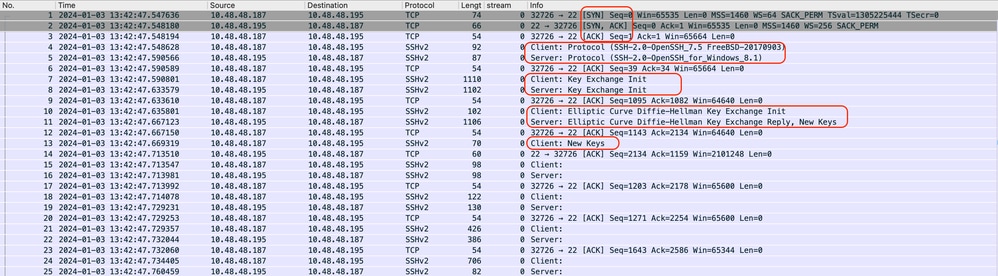 Image - Successful Connection Packet Capture
"No matching host key type found"
This error indicates that the Host Key Algorithms, provides by SWA in the Client Key Exchange phase has no match in the SCP server.
Wed Feb 12 20:21:40 2025 Critical: Log Error: Push error for subscription al: SCP failed to transfer to 10.48.48.192:22:
Wed Feb 12 20:21:40 2025 Critical: Log Error: Push error for subscription al: SCP failed to transfer to 10.48.48.192:22: lost connection
Wed Feb 12 20:21:40 2025 Critical: Log Error: Push error for subscription al: SCP failed to transfer to 10.48.48.192:22: info: Unable to negotiate with 10.48.48.192 port 22: no matching host key type found. Their offer: rsa-sha2-512,rsa-sha2-256,ecdsa-sha2-nistp256,ssh-ed25519
To resolve this issue, you can use these steps:
Step 1. Start a packet capture in SWA and filter for the SCP server IP address
Step 2. Rollover the log file to make sure SWA is sending the files to the SCP server
Step 3. Stop the packet capture and open the file.
Step 4. In the capture file, look for a packet with "Client: Key Exchange Init" in the Info section.
Step 5. Expand the SSH Protocol, and navigate to the "Algorithms" section.
Step 6. Check the server_host_key_algorithms string (for example: server_host_key_algorithms string: ssh-rsa)
Step 7. Navigate to the SCP server and edit the sshd_config file.
Step 8. Find a line that starts with HostKeyAlgorithms and add the supported host key mentioned in "Step 6" to the file. (In this Example: HostKeyAlgorithms ssh-rsa)
Note: If there are no lines started with HostKeyAlgorithms, you can add the line to the end of the file.
Step 9. Save the changes and restart the SSHD service.
References
- Cisco Web Security Appliance Best Practices Guidelines - Cisco
- BRKSEC-3303 (ciscolive)
- User Guide for AsyncOS 14.5 for Cisco Secure Web Appliance - GD (General Deployment) - Connect, Install, and Configure [Cisco Secure Web Appliance] - Cisco
- Get started with OpenSSH for Windows | Microsoft Learn
- Configuring SSH Public Key Authentication on Windows | Windows OS Hub (woshub.com)
- Key-based authentication in OpenSSH for Windows | Microsoft Learn
Revision History
| Revision | Publish Date | Comments |
|---|---|---|
2.0 |
13-Feb-2025
|
Formatting, punctuation, grammar, style, SEO. |
1.0 |
11-Jan-2024
|
Initial Release |
Contributed by Cisco Engineers
- Amirhossein Mojarrad
 Feedback
Contact Cisco
- Open a Support Case

- (Requires a Cisco Service Contract)