Block Traffic in Secure Web Appliance
Available Languages
Introduction
This document describes the steps to block traffic in Secure Web Appliance (SWA).
Prerequisites
Requirements
Cisco recommends that you have knowledge of these topics:
- SWA administration.
Cisco recommends that you have:
- Physical or Virtual SWA Installed.
- Administrative Access to the SWA Graphical User Interface (GUI).
Components Used
This document is not restricted to specific software and hardware versions.
The information in this document was created from the devices in a specific lab environment. All of the devices used in this document started with a cleared (default) configuration. If your network is live, ensure that you understand the potential impact of any command.
Block Traffic
Blocking traffic in the SWA is a crucial step to ensure network security, maintain compliance with internal policies, and protect against malicious activities. Here are some common reasons for blocking traffic:
Reasons for Blocking by Source
- Flooding by Single or Multiple Users: When one or more users generate excessive traffic, it can overwhelm the network, leading to performance degradation and potential service disruptions.
- Untrusted Resource Access by Applications (User-Agents): Certain applications could attempt to access untrusted or potentially harmful resources. Blocking these user-agents helps prevent security breaches and data leaks.
- Restricting Internet Access for Specific IP Ranges: Some IP addresses or ranges possibly need to be restricted from accessing the Internet due to security policies or to prevent unauthorized usage.
- Suspicious Traffic Behavior: Traffic exhibiting unusual patterns or behaviors that could indicate malicious activity or security threats must be blocked to protect the network.
Reasons for Blocking by Destination
- Compliance with Internal Company Policies: Organizations often have policies that restrict access to certain websites or online resources to ensure productivity and compliance with legal or regulatory requirements.
- Untrusted Sites: Blocking access to websites that are deemed untrustworthy or potentially harmful helps protect users from phishing, malware, and other online threats.
- Malicious Behavior: Sites known for hosting malicious content or engaging in harmful activities must be blocked to prevent security incidents and data breaches.
.
Steps to Block Traffic
In general, there are 3 main stages to block traffic in SWA:
- Create an Identification Profile for the user(s).
- Block the HTTPS traffic in the Decryption Policy.
- Block the HTTP traffic in the Access Policy.
| Stages |
Block Specific Users from Accessing Any Websites |
Block Specific Users from Accessing Certain Websites |
| Custom URL Category |
Not Applicable. |
Create a Custom URL Category for the sites you are planning to block access to them. For more information, please visit: Configure Custom URL Categories in Secure Web Appliance - Cisco. |
| Identification Profile |
Step 1. From GUI, Choose Web Security Manager and then click Identification Profiles. Step 7. In the User Identification Method section, choose Exempt from authentication/ identification. Step 8. In the Define Members by Subnet, Enter the IP addresses or Subnets that this Identification Profile must apply. You can use IP addresses, Classless Inter-Domain Routing (CIDR) blocks, and subnets. |

Note: For blocking access to certain websites for all users, there is no requirement to create a separate ID profile. This can be efficiently managed through the Global Decryption/Access Policy. Step 1. From GUI, Choose Web Security Manager and then click Identification Profiles. Step 7. In the User Identification Method section, choose Exempt from authentication/ identification. Step 8. In the Define Members by Subnet, Enter the IP addresses or Subnets that this Identification Profile must apply. You can use IP addresses, Classless Inter-Domain Routing (CIDR) blocks, and subnets. Step 9. Click on Advanced and add the URL Category that you would like to block access to it. |
| Decryption Policy |
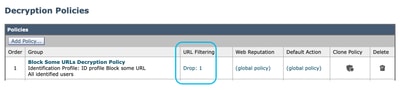
Step 1. From GUI, Choose Web Security Manager and then click Decryption Policy. Step 2. Click Add Policy to add a Decryption Policy. Step 3. Use the Enable Policy check box to enable this policy. Step 7. From the Identification Profiles and Users, choose the Identification Profile that you created in the previous steps. Step 8. Submit. Step 9. In the Decryption Policies page, under URL Filtering, click on the link associated with this new Decryption Policy. 
Tip: Given that you are blocking all URL categories, you can optimize the policy by removing Custom URL Categories and using only the predefined URL categories. This reduces the processing load on the SWA by avoiding the additional step of matching URLs with Custom URL Categories. Step 10. Select Drop as the action for every URL category. Step 11. On the same page, scroll down to Uncategorized URLs and choose Drop from drop-down list. Step 12. Submit.
|
Step 1. From GUI, Choose Web Security Manager and then click Decryption Policy. Step 2. Click Add Policy to add a Decryption Policy. Step 3. Use the Enable Policy check box to enable this policy. Step 7. From the Identification Profiles and Users, choose the Identification Profile that you created in the previous steps. Step 8. Submit. Step 9. On the Decryption Policies page, under URL Filtering, click on the link associated with this new Decryption Policy. Step 10. Select Drop as the action for the Custom URL category created for the blocked websites. Step 11. Click Submit.
|
| Access Policy |
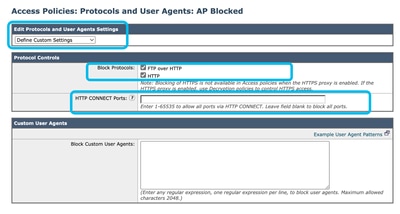
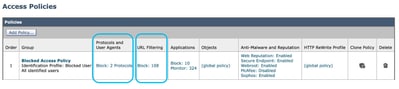
Step 1. From GUI, Choose Web Security Manager and then click Access Policy. Step 2. Click Add Policy to add an Access Policy. Step 3. Use the Enable Policy check box to enable this policy. Step 7. From the Identification Profiles and Users, choose the Identification Profile that you created in the previous steps. Step 8. Submit. Step 9. On the Access Policies page, under Protocols and User Agents, click on the link associated with this new Access Policy. Step 10. In Edit Protocols and User Agents Settings drop-down list choose Define Custom Settings. Step 11. In Block Protocols select the check box for both FTP over HTTP and HTTP. Step 12. In HTTP CONNECT Ports, remove every port number to block all ports.
Step 13. Submit. Step 14. (Optional) In the Access Policies page, under URL Filtering, click on the link associated with this new Access Policy and select Block as the action for every URL category and the Uncategorized URLs then Submit.
Tip: Given that you are blocking all URL categories, you can optimize the policy by removing Custom URL Categories and using only the predefined URL categories. This reduces the processing load on the SWA by avoiding the additional step of matching URLs with Custom URL Categories. Step 16. Commit Changes.
|
Step 1. From GUI, Choose Web Security Manager and then click Access Policy. Step 2. Click Add Policy to add an Access Policy. Step 3. Use the Enable Policy check box to enable this policy. Step 7. From the Identification Profiles and Users, choose the Identification Profile that you created in the previous steps. Step 8. Submit. Step 9. On the Access Policies page, under URL Filtering, click on the link associated with this new Access Policy Step 10. Select Block as the action for the Custom URL category created for the blocked websites. Step 11. Submit. Step 12. Commit Changes. |



Caution: In transparent proxy deployment, SWA cannot read user agents or the full URL for HTTPS traffic unless the traffic is decrypted. As a result, if you configure the Identification Profile using User Agents or a Custom URL Category with regular expressions, This traffic fails to match the Identification Profile.
Block Sites Using Regular Expressions in Transparent Proxy Deployment
In Transparent proxy deployment, if you are planing to block a Custom URL Category which has Regular Expressions condition - for example you are blocking access to some YouTube channels - you can use these steps:
Step 1. Create a Custom URL Category for the main site. (In this Example: YouTube.com).
Step 2. Create a Decryption Policy, assign this Custom URL Category and set the Action to Decrypt.
Step 3. Create an Access Policy, assign the Custom URL Category whit the Regular Expressions (In this Example the Custom URL Category for the YouTube channels), and set the Action to Block.
Related Information
- User Guide for AsyncOS 15.0 for Cisco Secure Web Appliance - GD(General Deployment) - Classify End-Users for Policy Application [Cisco Secure Web Appliance] - Cisco
- Configure Custom URL Categories in Secure Web Appliance - Cisco
- How To Exempt Office 365 Traffic From Authentication and Decryption on Cisco Web Security Appliance (WSA) - Cisco
Revision History
| Revision | Publish Date | Comments |
|---|---|---|
2.0 |
30-Jul-2026
|
Recertification |
1.0 |
11-Oct-2024
|
Initial Release |

 Feedback
Contact Cisco
- Open a Support Case

- (Requires a Cisco Service Contract)