Configure Upstream Proxy in Secure Web Appliance
Available Languages
Contents
Introduction
This document describes the steps to Configure Upstream Proxy in Secure Web Appliance (SWA).
Prerequisites
Requirements
Cisco recommends that you have knowledge of these topics:
- SWA administration.
- Basic Networking and Proxy protocols.
Cisco recommends that you have these tools installed:
- Physical or Virtual SWA
- Administrative Access to the SWA Graphical User Interface (GUI)
- Administrative Access to the SWA Command Line Interface (CLI)
Components Used
This document is not restricted to specific software and hardware versions.
The information in this document was created from the devices in a specific lab environment. All of the devices used in this document started with a cleared (default) configuration. If your network is live, ensure that you understand the potential impact of any command.
Configuring Upstream Proxy
Use these steps to configure an Upstream Proxy in SWA.
| Steps |
Steps |
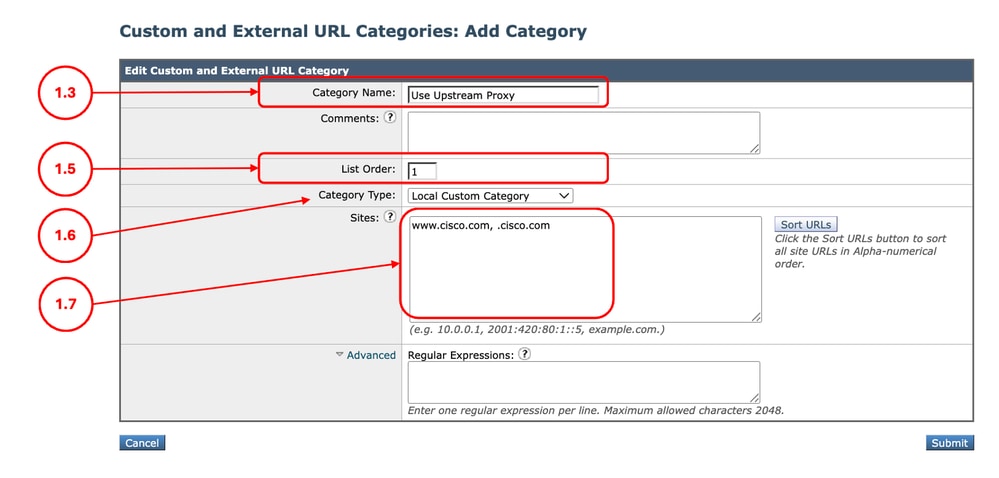
| Step 1. (Optional) Create a Custom URL Category for the URLs |
Step 1.1.FromGUI, ChooseWeb Security Manager and then click Custom and External URL Categories. Step 1.5. From List Order, choose the first category to position on top. Step 1.6. From Category Typedrop-down list, choose Local Custom Category. Step 1.7. Add desired URLs in the Sites Section. Step 1.8. Submit.
|
Step 2. (Optional) Create an Identification Profile to Use the Upstream Proxy |
Step 2.1.FromGUI, ChooseWeb Security Manager and then click Identification Profiles. Step 2.7. If you would like to not authenticate the users hitting this policy, In theUser Identification Methodsection, chooseExempt from authentication/ identification, else configure the authentication parameters. Step 2.8.In the Define Members by Subnet, leave this field blank to include all Client IP address unless you would like to Pass Through the traffic for a certain IP addresses. Step 2.9. (Optional: If you need to use an upstream proxy for specific users accessing certain websites, complete this step.) From Advanced section, choose Custom URL Categories, and Add the Custom URL Category that was created on Step 1 Step 2.10. Submit.
|
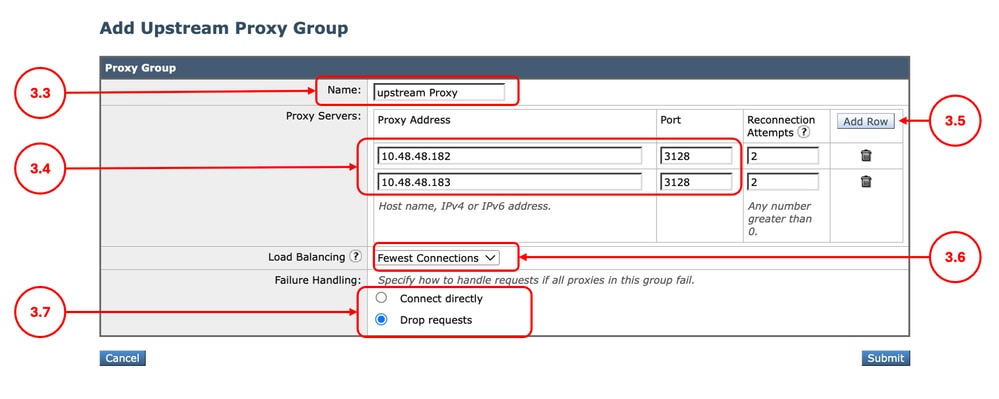
Step 3. Create the Upstream Proxy |
Step 3.1.FromGUI, ChooseNetwork and then click Upstream Proxy. Step 3.2. ClickAdd Group. Step 3.3.Assign a uniqueName. Step 3.6. (Optional) If you entered more than one Upstream Proxy from the Load Balancing section, define the desired Load Balancing method,
Step 3.7. Choose the Failure Handling option depends on your internal policy.
Step 3.8. Submit.
|
Step 4. (Optional) Upload the Decryption Certificate |
Step 4.1.FromGUI, ChooseNetwork and then clickCertificate Management. Step 4.2. From the Certificate Management section, click Manage Trusted Root Certificates.
Step 4.3. Submit and Commit changes. |
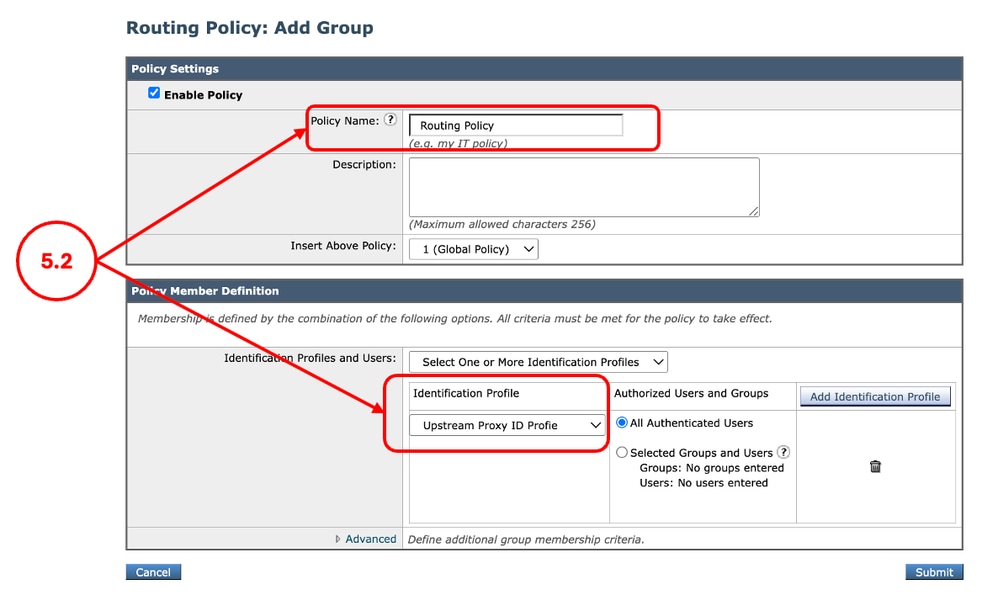
Step 5. Configure the Routing Policy |
Step 5.1. FromGUI, ChooseWeb Security Manager and then click Routing Policy. Step 5.2. (Optional) If you would like to use the upstream proxy for specific users or websites, click Add Policy, and select the Identification Profile that you created on Step 2.
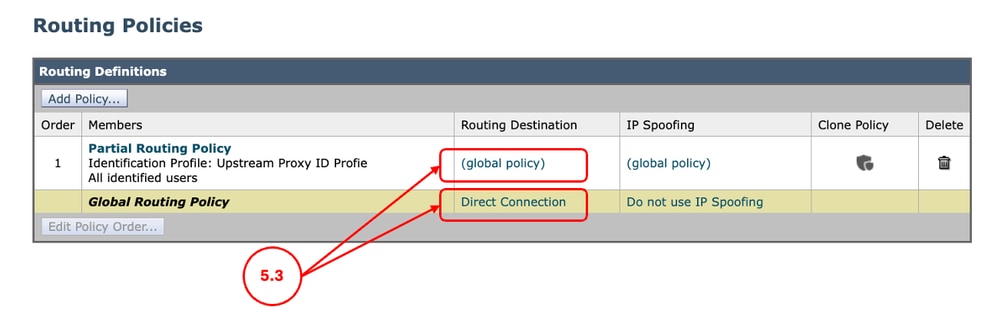
Step 5.3. For the desired conditions, that you would like to use the upstream proxy, click on Routing Destination link and select the Upstream Proxy Group you created on Step 3.
Step 5.4. Submit and Commit the changes. |
Step 6. (Optional) Configuring the Upstream Proxy Unresponsive Timeout Settings |
Step 6.1. Log in to the CLI and run advancedproxyconfig Step 6.2. Select MISCELLANEOUS Step 6.3. Press Enter until you see Enter minimum idle timeout for checking unresponsive upstream proxy (in seconds). you can configure the minimum amount of time, SWA waits to retry the upstream proxy that was previously declared Sick. The default value is 10 seconds. Step 6.4. Press Enter to proceed to the next setting. When defining the maximum idle timeout for checking an unresponsive upstream proxy, note that if this timeout value is reached before the configured number of reconnection attempts is exhausted (Step 3), the SWA consider the upstream proxy offline. Step 6.7. Keep pressing Enter, until you exit the wizard, run commit to save the changes. |


Logging
Accesslogs
In the Accesslogs, the traffic that was routed to upstream proxy are shown as DEFAULT_PARENT followed by the name of the upstream proxy. here is an example:
1775659642.780 462 10.20.3.15 TCP_MISS_SSL/200 129 CONNECT tunnel://www.cisco.com:443/ "AMOJARRA\amojarra" DEFAULT_PARENT/10.48.48.182 - DECRYPT_WEBCAT_7-DPurl-Auith-NONE-NONE-NONE-DefaultGroup-NONE <"IW_comp",8.7,1,"-",-,-,-,-,"-",-,-,-,"-",-,-,"-","-",-,-,"IW_comp",-,"-","Computers and Internet","-","Unknown","Unknown","-","-",2.23,0,-,"-","-",-,"-",-,-,"-","-",-,-,"-",-,-> - -Proxylogs
From the proxylogs, you can verify the health status of the upstream proxies.
Here are some examples, since we configured the Reconnecting Attempts on Step 3 to two times, after two failure connecting to the upstream proxy, the upstream proxy is declared dad and SWA removes this upstream proxy from the list until the proxy process is restarted.
Thu Apr  2 13:52:35 2026 Info: PROX_CONNTRACK : 940 : [15968:0] Peer-upstream 10.48.48.182:3128 was healthy, now sick.
Thu Apr  2 13:52:36 2026 Info: PROX_CONNTRACK : 940 : [15968:0] Peer 10.48.48.182:3128 was sick, now healthy.
...
Thu Apr  2 13:59:37 2026 Info: PROX_CONNTRACK : 60 : [71197:0] Peer 10.48.48.183:3128 remains sick after 2 failures.
Thu Apr 2 13:59:39 2026 Warning: PROX_CONNTRACK : 70 : [71197:0] Peer-upstream 10.48.48.183:3128 declared dead.Related Information
- User Guide for AsyncOS 15.0 for Cisco Secure Web Appliance
- Configure Custom URL Categories in Secure Web Appliance - Cisco
- How To Exempt Office 365 Traffic From Authentication and Decryption on Cisco Web Security Appliance (WSA) - Cisco
- Use Secure Web Appliance Best Practices - Cisco
- Block Traffic in Secure Web Appliance
- Block Upload Traffic in Secure Web Appliance
- Block Executable File Download in SWA
- Bypass Microsoft Updates Traffic in Secure Web Appliance
- Bypass Authentication in Secure Web Appliance - Cisco
Revision History
| Revision | Publish Date | Comments |
|---|---|---|
1.0 |
28-Apr-2026
|
Initial Release |
 Feedback