Configure Universal ZTNA for Private Resource Access on Secure Access
Available Languages
Contents
Introduction
In this document we will cover the configuration for Private Resource Access via Universal ZTNA with different traffic paths.
Prerequisites
Following configuration must be completed prior to Universal ZTNA configuration
- Identity Provider on Cisco Secure Access
- Enroll Devices in Zero Trust Access Using Certificates
- Configure Tunnels with Cisco Secure Firewall
- Remote Access Virtual Private Network
- Resource Connector on Secure Access
- FTD onboarding on Security Cloud Control
- Hybrid ZTNA feature flag should be enabled for respective Secure Access Tenant , contact Cisco TAC to enable the flag
Requirements
Cisco recommends that you have knowledge of these topics:
- IPsec VPN configuration on Cisco Secure Access and Firewall Threat Defense
- Identity Provide (IdP) - User Provisioning from Active Directory
- Remote VPN configuration on Cisco Secure Access
- Resource Connector Deployment on Cisco Secure Access
- ZTA Certificate based Enrollment
- Certificate - OpenSSL , CSR generation , Certificate Templates etc.
Components Used
The information in this document is based on these software and hardware versions:
- Cisco Secure Firewall Threat Defense ( Version 7.7.10 )
- Cisco Secure Firepower Management Center ( Version 7.7.10)
- Cisco Secure Client ( ZTA Version 5.1.10.1720)
- Windows 11
- Windows 2019 Server - Certificate Authority
- Resource Connector on ESXi
The information in this document was created from the devices in a specific lab environment. All of the devices used in this document started with a cleared (default) configuration. If your network is live, ensure that you understand the potential impact of any command.
Background Information
About Universal ZTNA
Universal zero trust network access (uZTNA) enables administrators to specifically allow access to internal network resources according to user identity (including user trust and posture), and without granting access to the entire network as with RA-VPN. uZTNA enables administrators to secure internal resources and applications for both remote and on-premises users.
Because uZTNA does not assume that access granted to one application implicitly authorizes access to other applications, the network attack surface is reduced.
Secure Access evaluates the access policy. Any access control policies deployed to devices from the Secure Firewall Management Center are ignored.
Traffic proxying, as well as IPS, file, and malware policy enforcement, is performed on the Firepower Threat Defense (FTD).
Single Policy, Distributed Enforcement
Network Detection
Determine Cloud or Local Enforcement
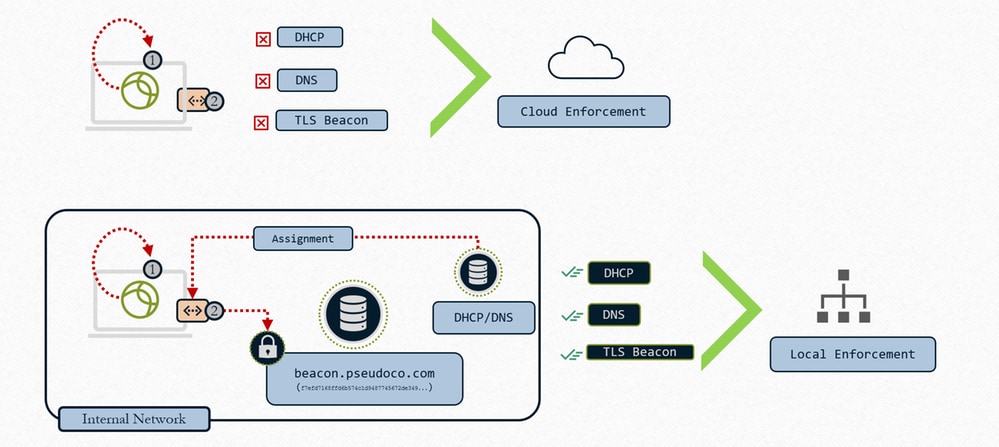
Universal ZTNA - Determine Cloud or Local Enforcement
1- Client interrogates local Interface for Network configuration
2- Client searches for TLS Beacon
3- If condition matches – Local Enforcement
4- If condition does not match – Cloud Enforcement
When we configure the resource with "Cloud or Local Enforcement" and associate the TND rule with FTD , what it actually does is the set of intercept rules that gets sent to the client will include the TND rule evaluation. So, that client will be told by cloud to evaluate the TND rule. When we send the connect, we put the result of that TND - network fingerprint evaluation in HTTP header so, that will tell the proxy whether we are on-perm or on untrusted network and then the proxy uses that information and redirect the traffic accordingly. In case the fingerprint matches , Zproxy tells the client to redirect the traffic to FTD and if the fingerprint doesn't match it redirects the traffic to the cloud. Refer Configure Zero Trust Network Access with Trusted Network Detection
Types for Enforcement
- Local Enforcement path: Firewall Enforcement
Universal ZTNA - Local Enforcement
- User Requests App, client captures and resolves request to ephemeral IP (localhost range)
- Authentication Control traffic is sent to Secure Access Cloud for policy evaluation
- Cloud returns redirect to FTD for data plan enforcement (if policy allows)
- Traffic steered to firewall configured headend (interface)
- Policy defined in cloud is enforced (IPS, Malware, Decryption) using local proxy data plane
- Event logged and duplicate shipped to cloud for consistent reporting
- Firewall does DNS resolution on local network to route resource traffic (if allowed)
- Firewall builds connection to resource(new connection built to resource) as the firewall behaves as a TCP proxy
- Cloud Enforcement path : OFF Network
Universal ZTNA : Cloud Enforcement
- User Requests App, client captures and resolves request to ephemeral IP (localhost range)
- Traffic is transported to Zero Trust Proxy in Secure Access
- TCP connection is proxied and built to the mapped resource connector, Policy is enforced on traffic
- Gateway establishes connection to resource connector
- Resource connector resolves resource IP
- Local DNS responds with resource IP
- Resource connector establishes connection to resource
Use Cases
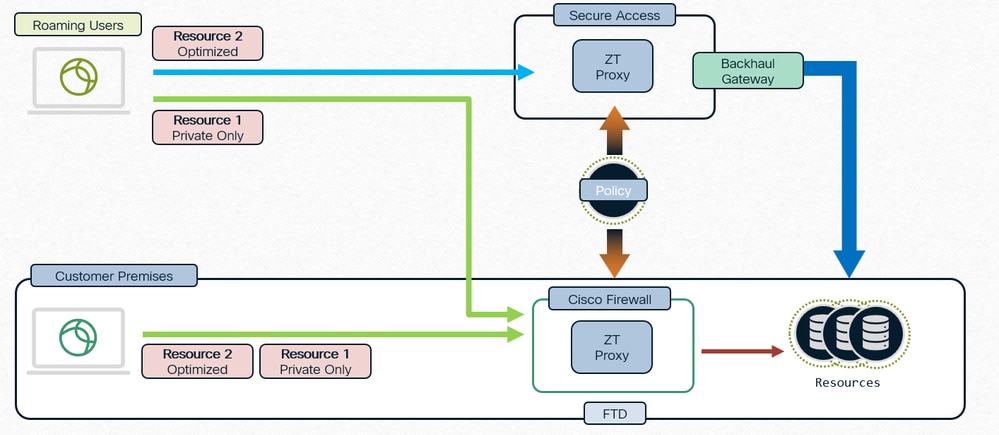
Case 1 : Consistent and Optimized ZTNA for users when on premise
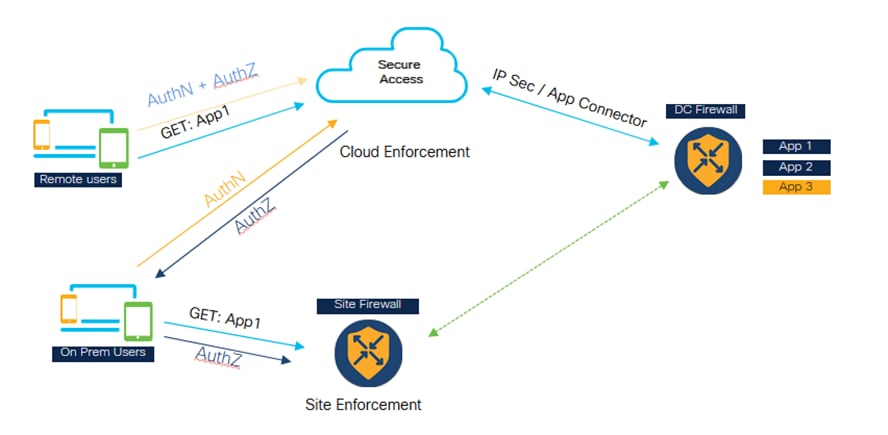
Universal ZTNA - Consistent and Optimized ZTNA ( On-premise user)
- Secure Access and Firewall both are configured to protect the application.
- If the user is remote, then they will go to Secure Access for policy evaluation and inspection.
- If the user is Internal/On premises then they will go to the firewall for private traffic inspection.
- On premise user can still go to Secure for authentication and evaluation just the Datapath traffic goes to the Firewall and inspected as per the policy configuration.
- The internal user accessing the application through the firewall has a performance advantage as it avoids the traffic going to cloud and then backhauling to the datacenter
Case 2 : Private Inspection for Sensitive applications
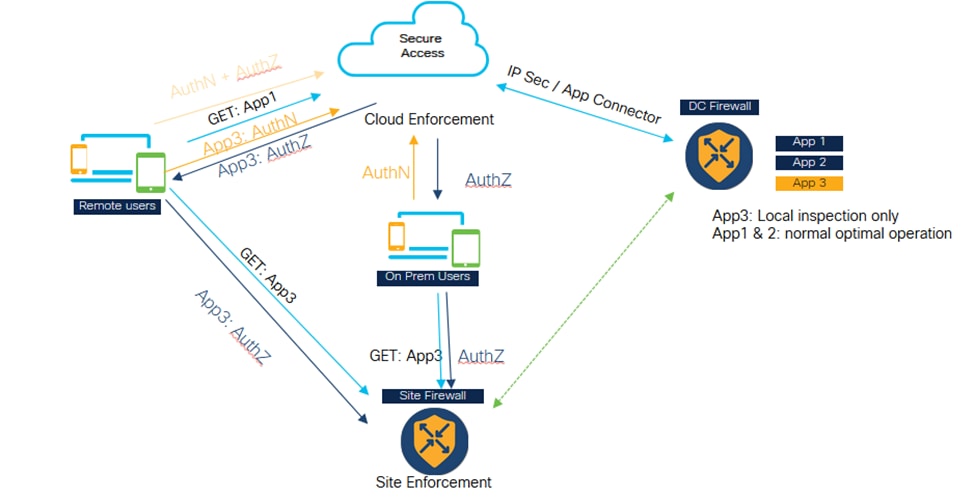
Universal ZTNA - Private Inspection for Sensitive Applications
- Certain critical applications can be configured to always be accessed through the firewall.
- The app data traffic does not need to go to cloud. Example, there might be sensitive data application like source code, which customer doesn't want to go to cloud.
- In such scenarios, both remote and on-perm user traffic always goes through the firewall and gets inspected. However, again, in this scenario, authentication and policy evaluation is always happening in the cloud, only the data part traffic goes through the firewall.
Architectural Components
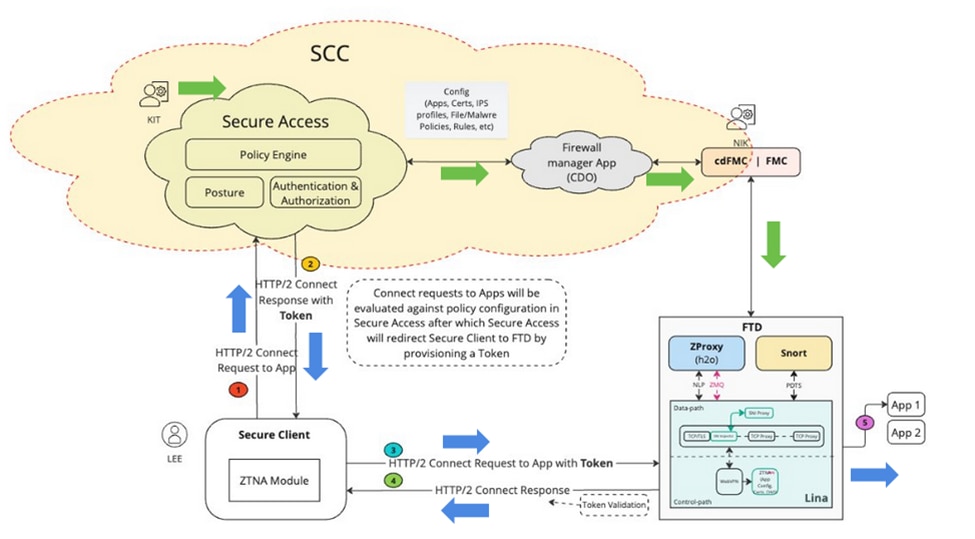
Universal ZTA - Architectural Components
Security Cloud Control (SCC) is the primary manager for uZTNA solution. uZTNA is the first feature to be built on top of SCC.
In SCC , we have two micro-application Secure Access and Firewall. Once , SCC is provisioned and the required feature flags are enabled, we will be able to see these micro-applications on the left side of the SCC panel.
Secure Client: In Secure Client we will have to enable Zero Trust Access Module ( ZTNA ) we need to enroll into ZTNA module to be able to access the applications.
Firewall Threat Defense : FTD protecting these applications. FTD runs a ZT proxy which is also known as H2O ( same as the proxy runs in Secure Access Cloud)
Now when a user (e.g KIT) configures a private resource and policy on Secure Access micro-application, this configuration will be pushed to Firewall micro-application in SCC. Firewall application understands the internals of FTD , FTD configuration, how to deploy and manage the configuration on FTD. So, Firewall app validates this configuration, and it invokes the FMC APIs to push the configuration to FMC and then eventually get it deployed on FTD. FTD can have an auto deployment option enabled so that Admins (e.g Nick) don't have to do manual deployment.
1. When a user (e.g Lee) tries to access an application, secure client connects to Secure Access using mTLS channel. Secure Access authenticates the user using the client device certificate. It then evaluates the authorization, posture and other policies that are configured for that user and for that application.
2. Secure Access ,if it finally finds that the application is being protected by Firewall then it generates an auth token , which tells the firewall that this is already authenticated and authorized. The auth token is encrypted, signed by Secure Access
3. Secure Access redirects the Secure client towards FTD along with the auth token.
4. Secure Client establishes another connection to FTD , it is a HTTP2 connection over mTLS channel. It sends a CONNECT request for the application being accessed along with the Token.
5. FTD now validates the Token, if the Token is validated successfully then the user is allowed to access that application. FTD then sends the acknowledgment back to the Secure Client
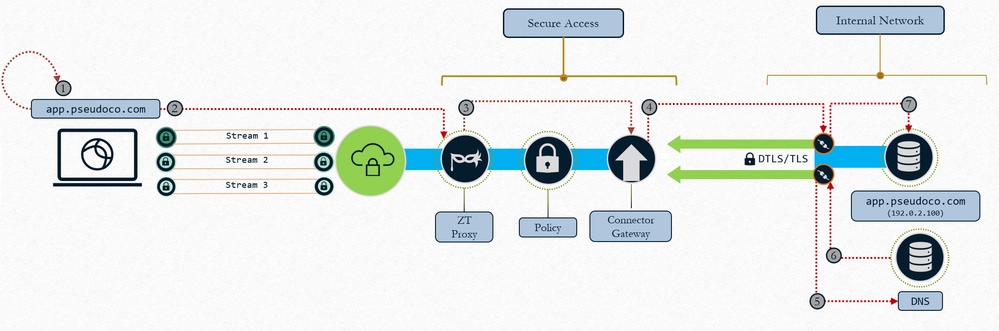
Packet Flow
Universal ZTNA detailed packet flow
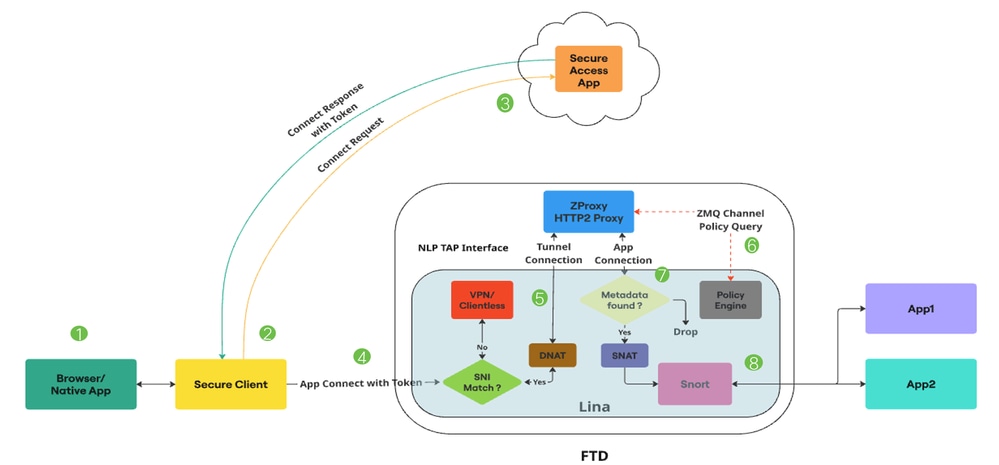
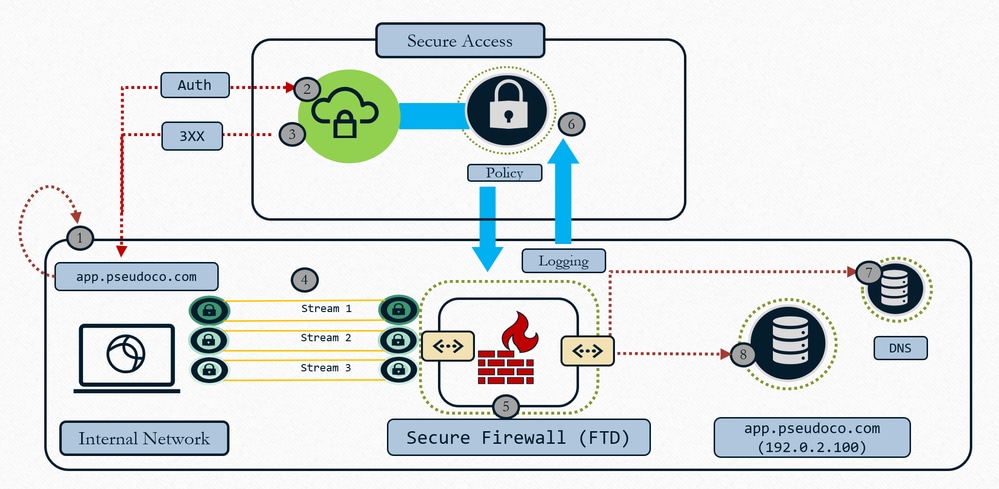
Universal ZTA - Packet flow
1. User attempts to access an application through a web browser or a native application.
2. The Secure Client intercepts the connection and identifies it as a user trying to access a Private Resource.
3. The Secure Client establishes a mTLS connection to Secure Access, requesting access to the application.Secure Access checks the Universal ZTNA policies and posture profiles for compliance.If everything is fine, Secure Access generates an Access Token containing essential information such as user details, application details, and IPS/File policy.
4. The Access Token is encrypted and signed by Secure Access. Secure Access then redirects the Secure Client along with the token to the FTD.
5. When packet reaches the Lina Datapath, the SNI checker intercepts the connection and verifies if the Server Name (SNI Extension) in the Client Hello matches the Proxy FQDN configured on the device.If SNI matches, connection is directed to ZProxy. If SNI does not match, the connection is directed to other features which can coexist with Universal ZTNA.
For Example : VPN, Captive Portal or Clientless ZTNA. ZProxy, which supports MASQUE over HTTP/2 protocol will be running on the FTD as a Non-Lina Process on dedicated cores. The communication between Lina and ZProxy utilizes the NLP Tap Interface, for handling data traffic.The destination IP of the connection is translated to the TAP interface IP by the SNI checker.
6. When the ZProxy receives the mTLS Tunnel Connection from Secure Client, it verifies the Client Device Certificate sent by Secure Client. It also verifies the Access Token sent with the APP Connect. There is a Zero MQ channel between Lina and ZProxy. It is primarily used to exchange control messages. ZProxy uses this channel for FQDN resolution of Private resources by communicating with Lina.
Zero MQ Channel is also used to propogate information present in the access token to Lina.(Example : Rule ID, Policy ID etc) Lina receives the access token information and stores it in a metadata db.
7. Once the control messages are exchanged, ZProxy initiates a new connection towards the private resource. This can be TCP or UDP. Lina then performs a metadata db lookup for this app connection. If the metadata is not found, Connection is dropped
8. Since the app connection is originating from ZProxy, it will have an Internal IP (example:169.251.1.2) as Source IP. This will be translated to the FTD egress interface IP, before sending it out. Lina then marks Universal Zero Trust flows for Snort inspection only if a File or IPS policy is present in the access token.The Rule ID obtained from the access token is passed to Snort in the connection metadata.
9. Universal Zero Trust rules and corresponding File and IPS policy mappings are pushed to the FTD via the FMC. The Zero Trust plugin in Snort will load these rules during initialization.Lina will mark the Universal Zero Trust stream flows for Snort inspection only if a File or IPS policy is mentioned in the access token obtained from Secure Access for accessing that Private Resource.
Rule ID obtained from the access token is passed to Snort via Conn Meta. For all Universal Zero Trust stream flows, the Zero Trust plugin in Snort will perform a rule lookup for the rule ID obtained from the Conn Meta. If a rule match is found, the flow will be allowed, and the IPS and File policies specific to that rule will be applied to the flow. If no rule match is found, the Zero Trust plugin in Snort will block the flow.
Configure
Network Diagram
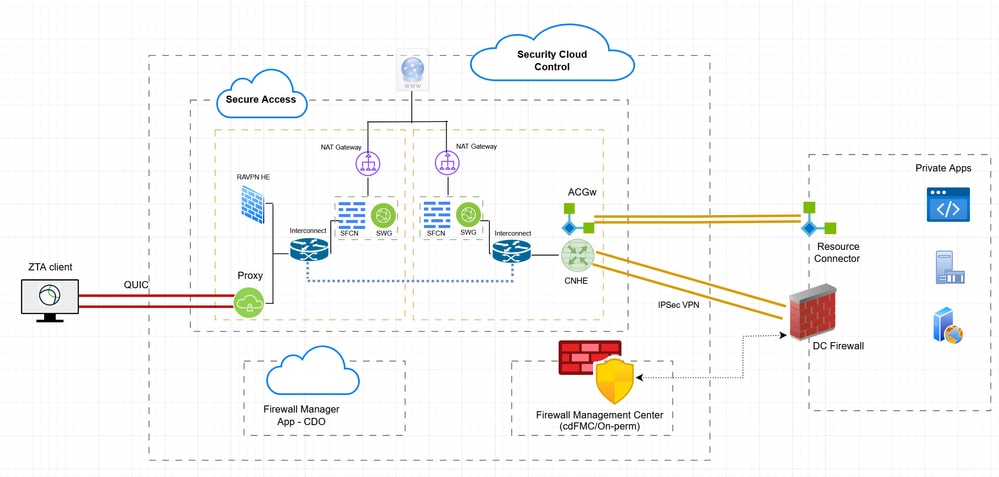
Hybrid ZTNA - Network Diagram
Test Cases
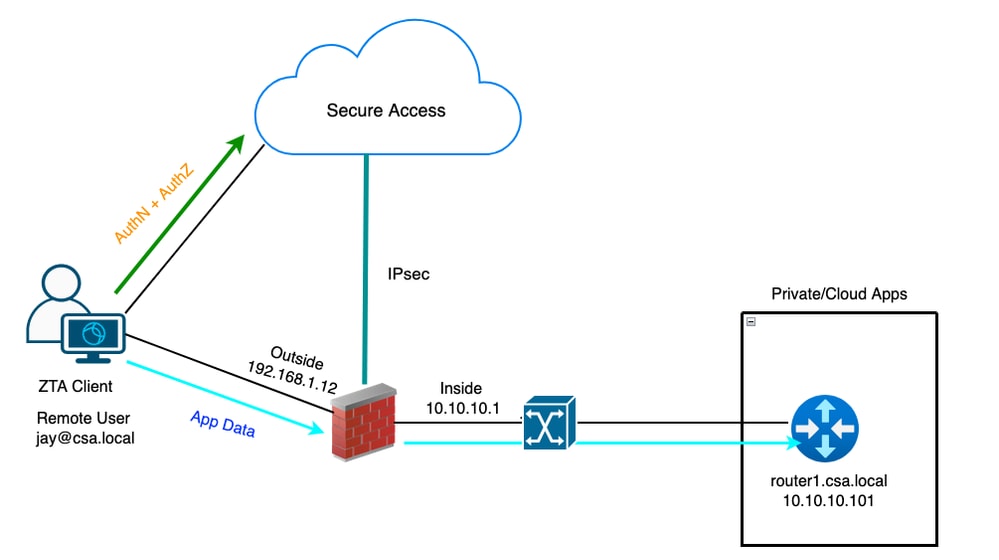
Test Case 1 : Remote User - Cloud Enforcement
In this test case, we will be accessing a private resource over Network Tunnel Group via Cloud Enforcement. In this case both policy evaluation and application data will be intercepted by Secure Access via ZTA module . This is a traditional flow where private application can we accessed from ZTA enrolled client via Network Tunnel Group or Resource Connector
Universal ZTA - Test case topology
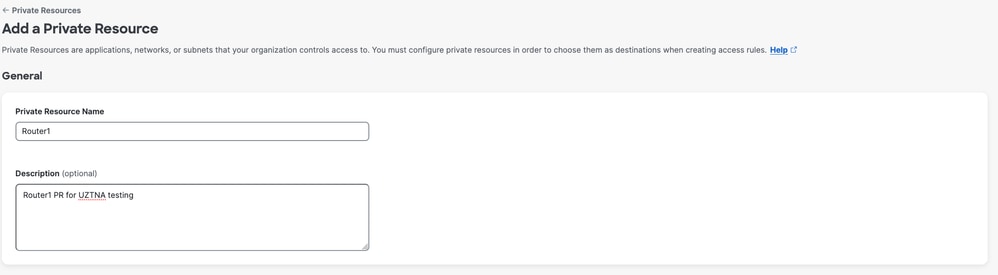
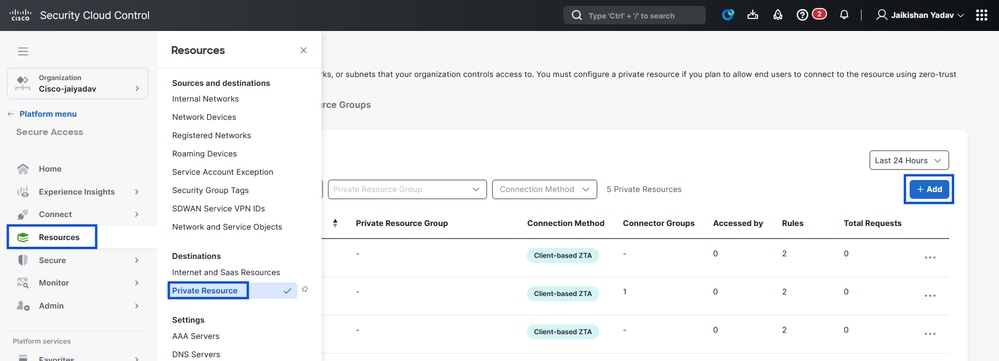
Step 1 - Define a Private Resource on Secure Access
Configure a private resource to be accessible via Zero Trust Access (ZTA) enrolled device with cloud enforcement
- Navigate to Resources > Destinations > Private Resources > Click on +Add

Secure Access - Private Resource Configuration
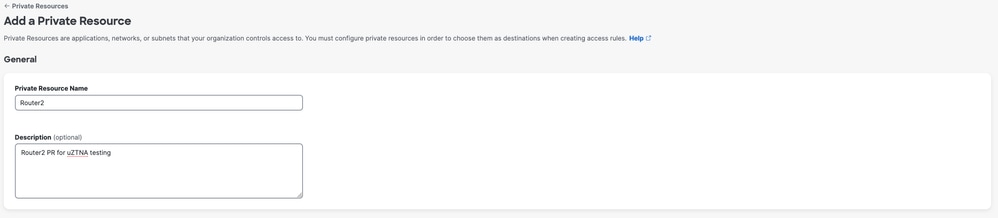
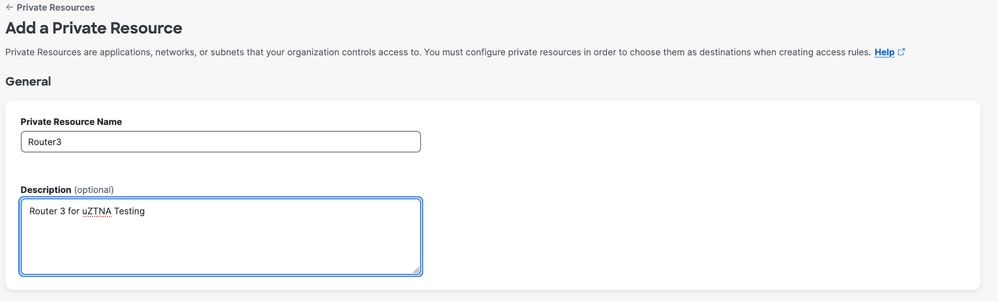
2. For Private Resource Name, enter a meaningful name for the resource. For Description, we recommend that you provide information such as the purpose of the resource or the name of the resource owner.
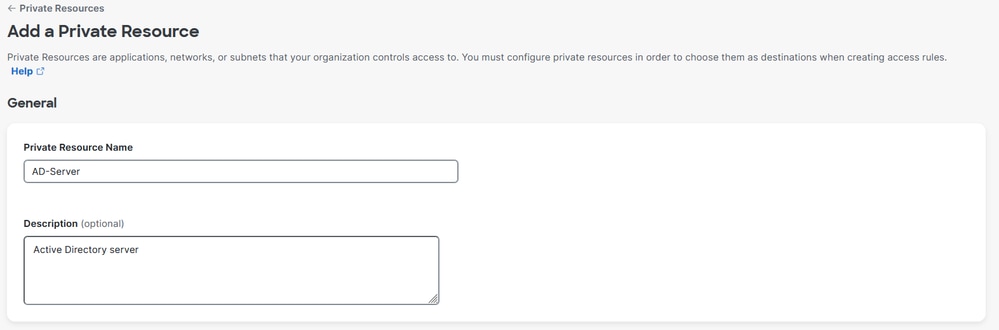
Secure Access - Private Resource Configuration
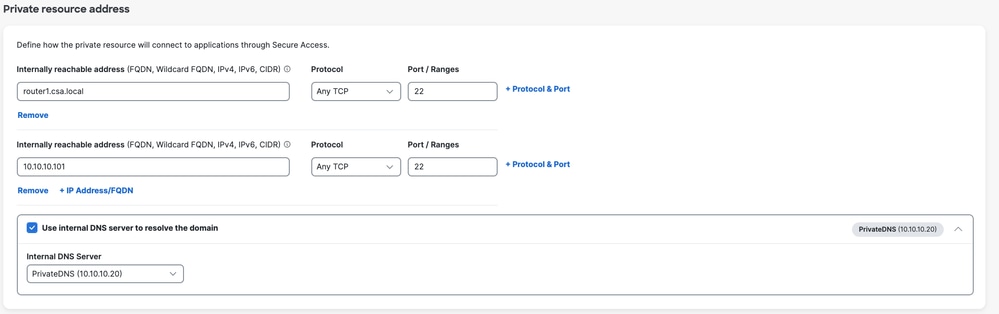
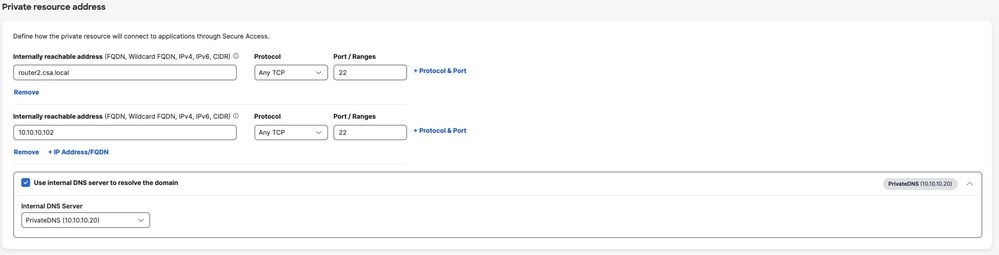
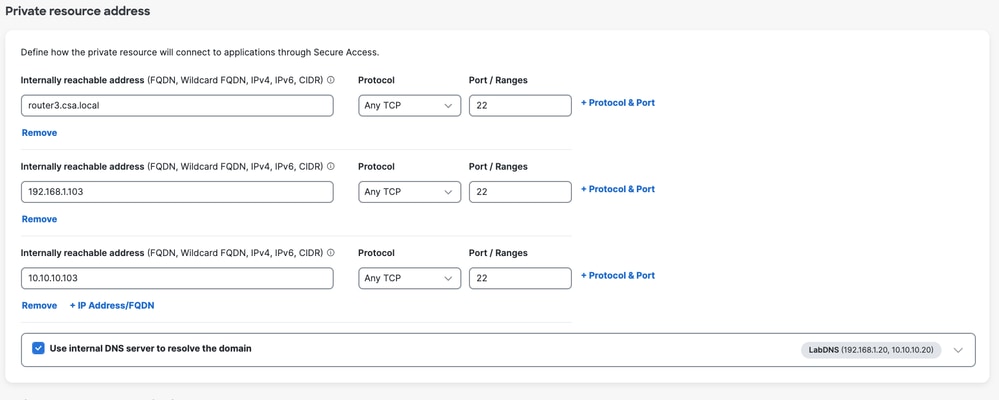
3. Enter the FQDN of the private resource you want to access . We can also define the IP address of the private resource . For more information see Add a Private Resource
4. Select the internal DNS server to resolve the domain

Secure Access - Private Resource Configuration
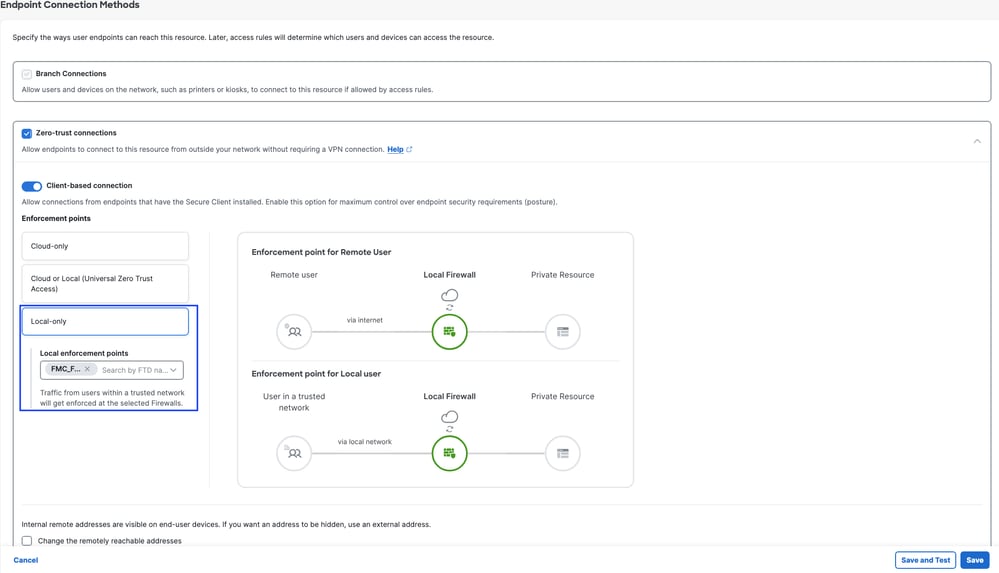
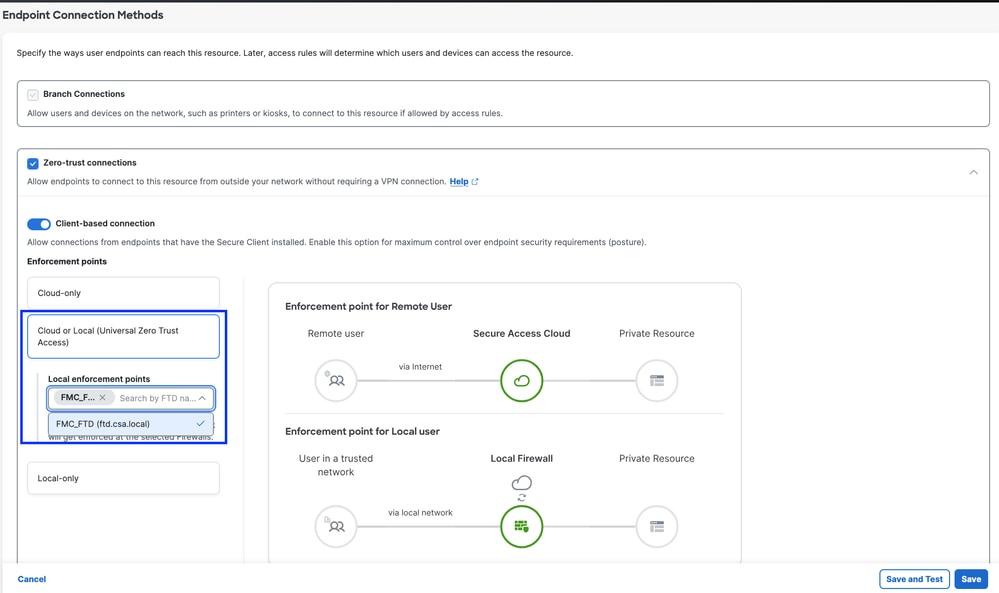
5. Select Endpoint Connection Methods
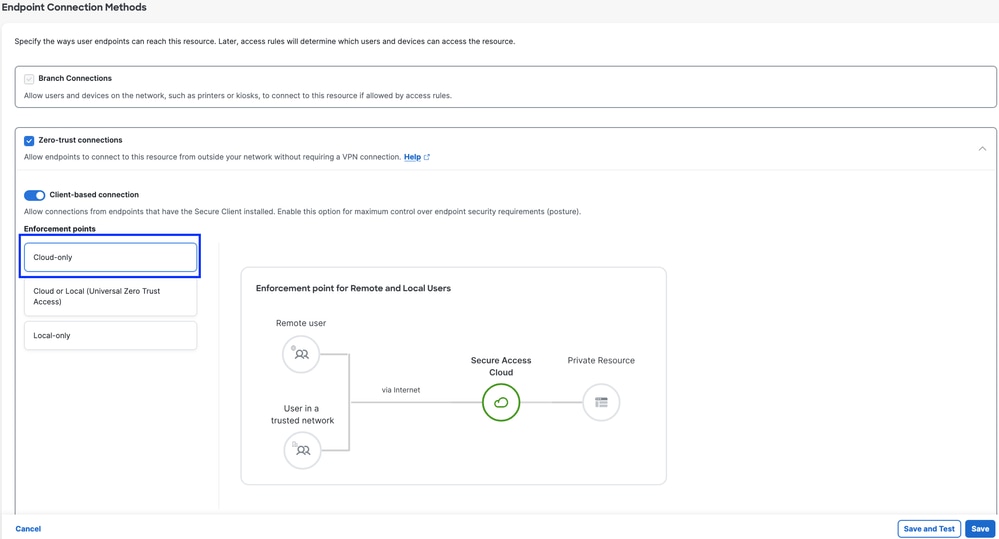
Secure Access - Private Resource Configuration
6. Click Save
Step 2 - Create Private Access Rule
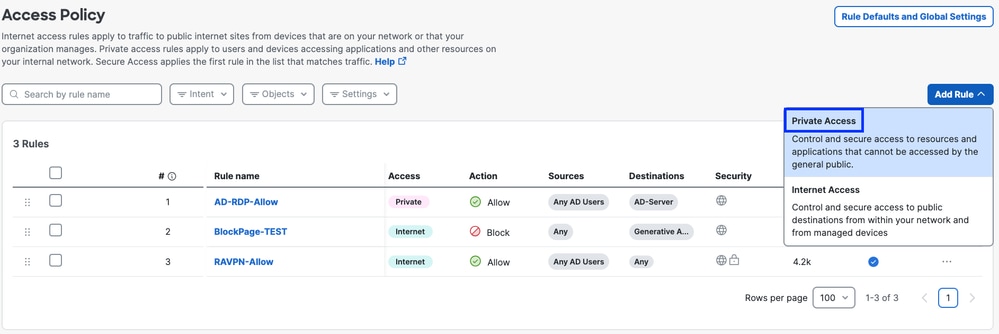
Configure a private access on Secure Access to be access by Universal ZTA enrolled users . For more information see Private Access Rule
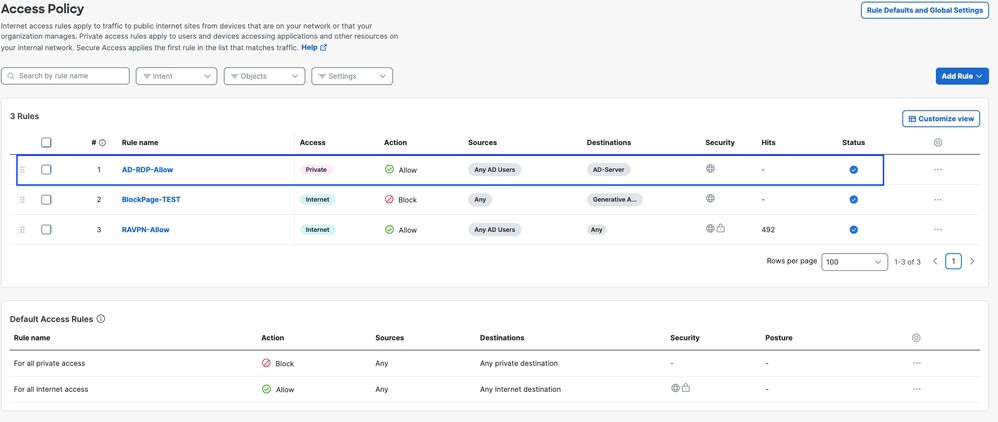
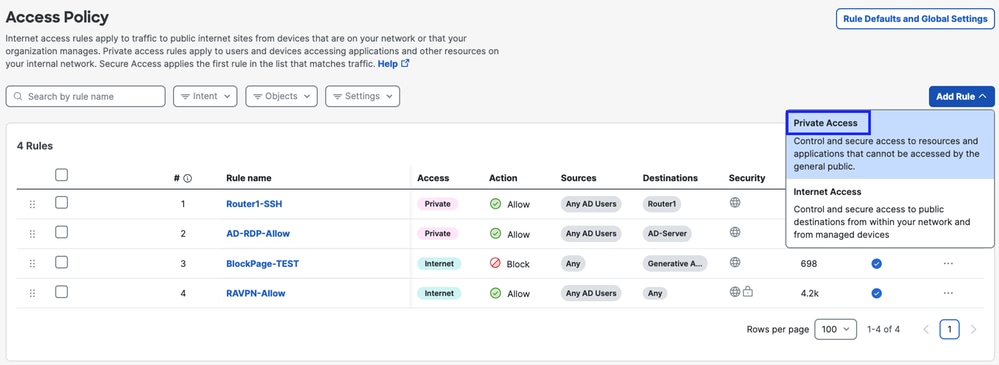
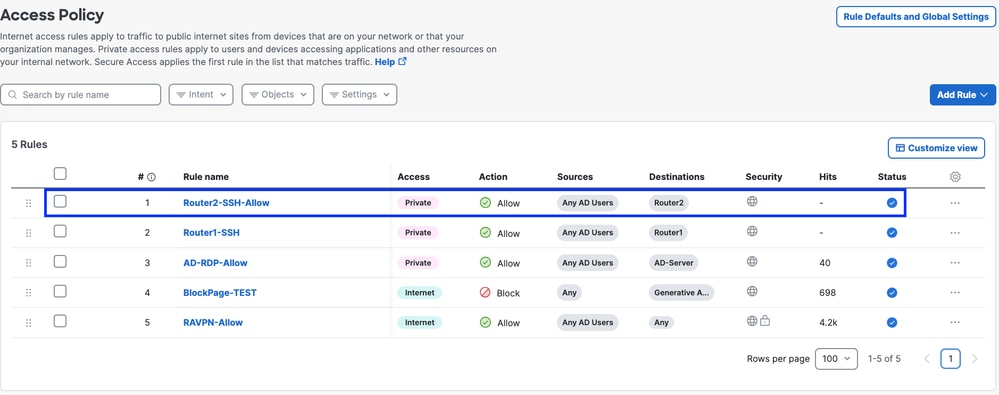
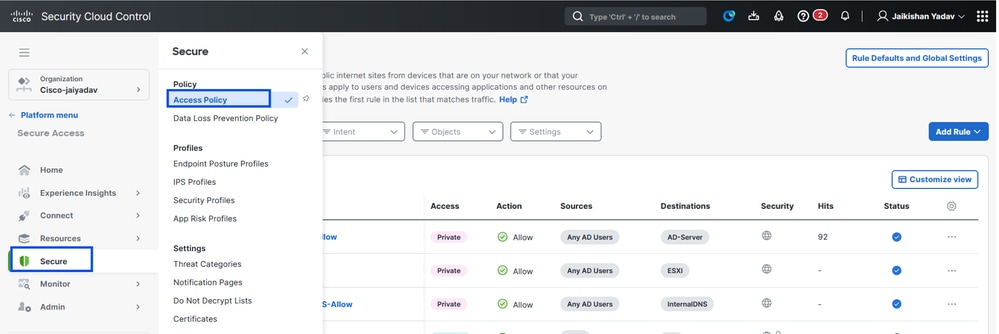
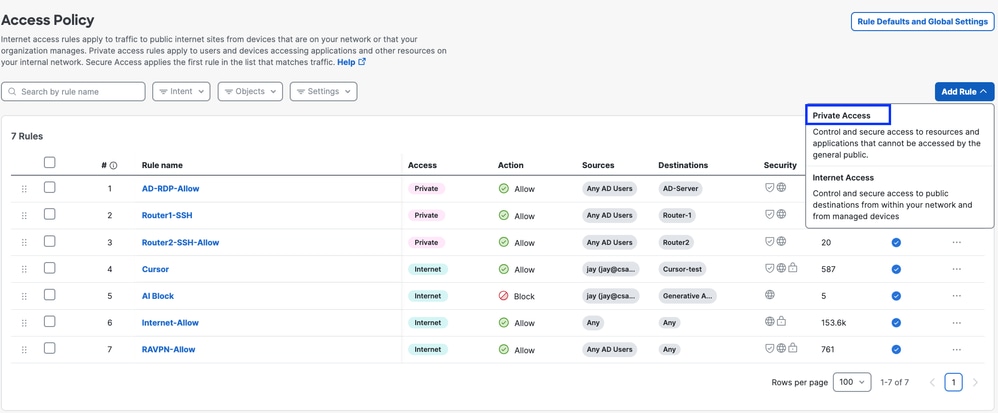
1. Navigate to Secure > Access Policy
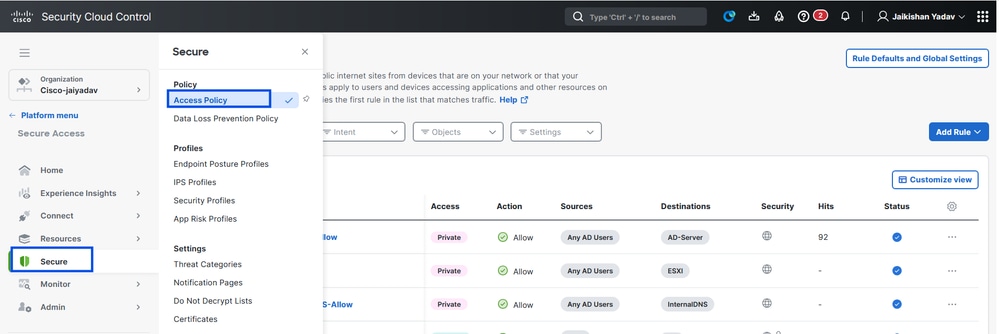
Secure Access - Access Policy Configuration
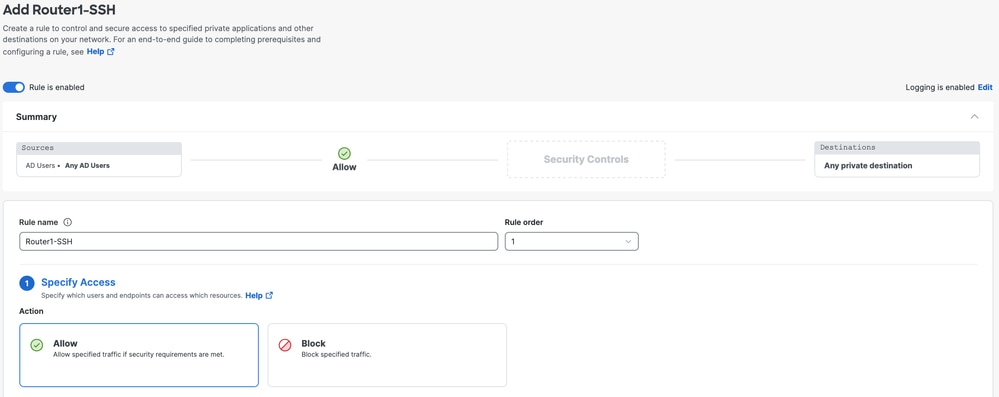
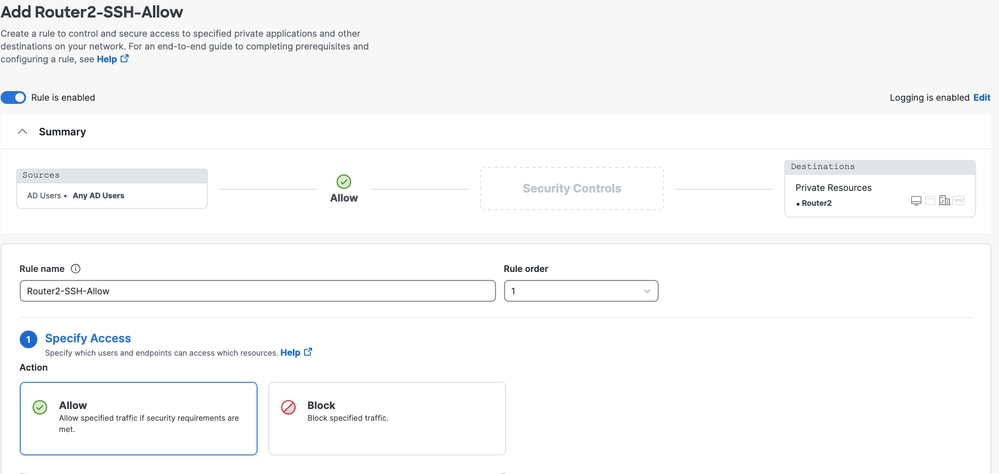
2. Click Add Rule, and then choose Private Access.
At the top of the rule is a summary that describes the configured components of your rule.
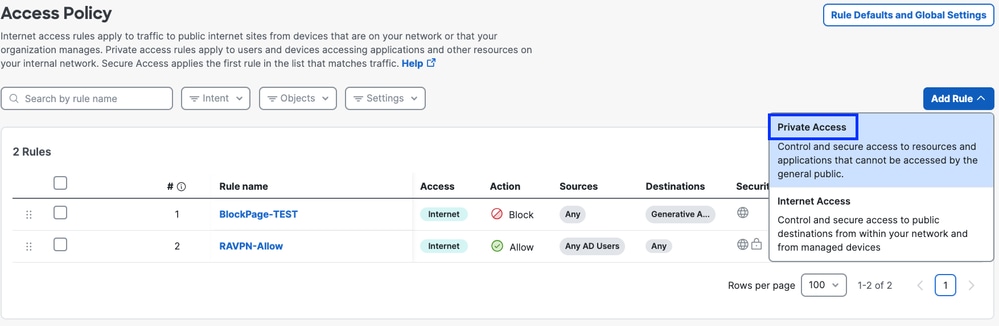
Secure Access - Access Policy Configuration
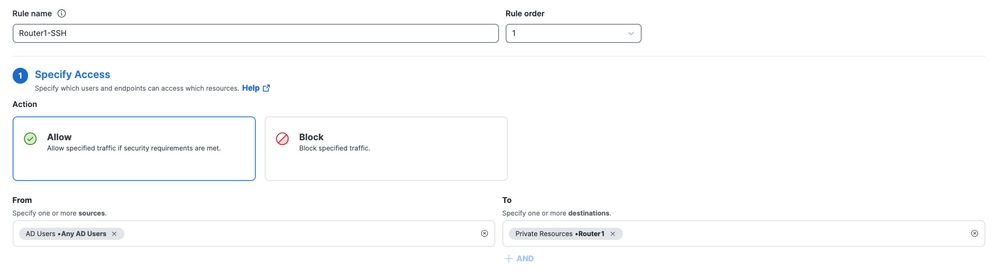
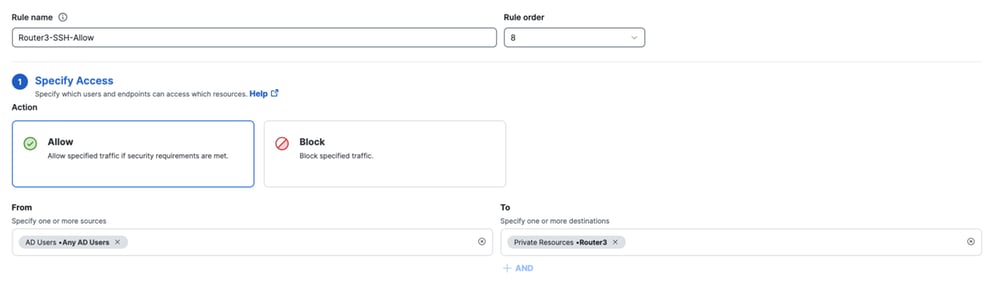
3. Add a Rule Name

Secure Access - Access Policy Configuration
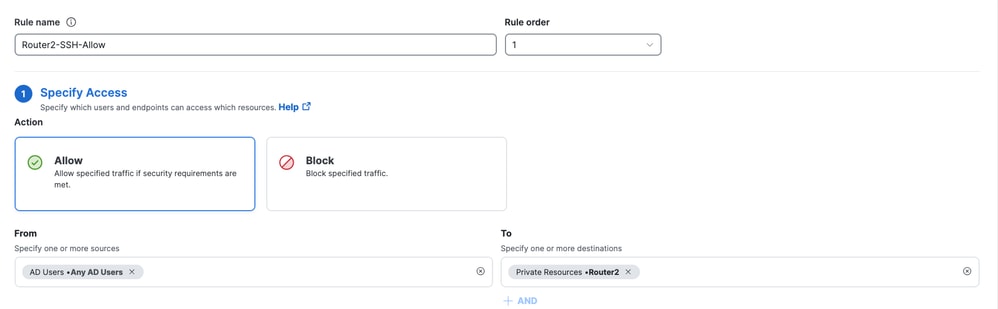
4. Select the rule action and select source and destination
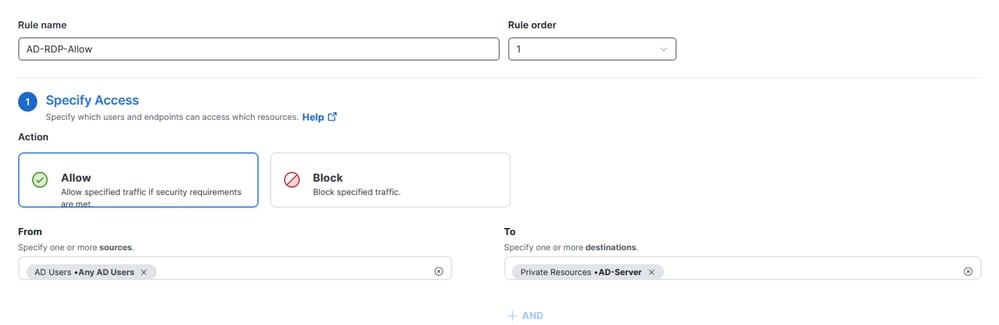
Secure Access - Access Policy Configuration
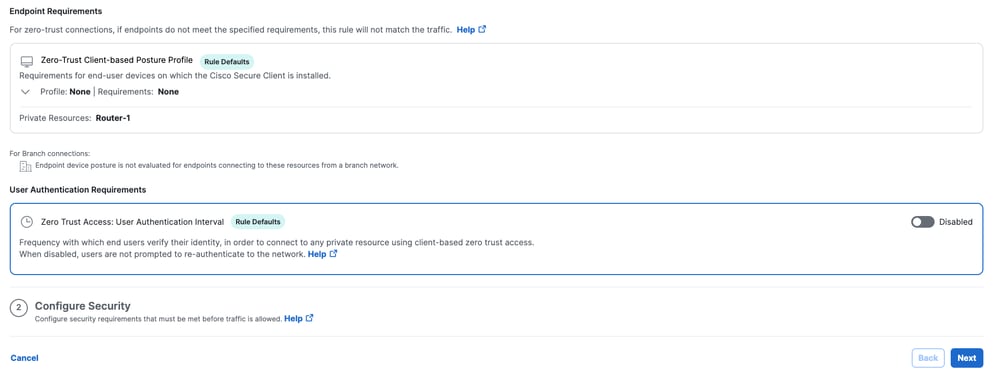
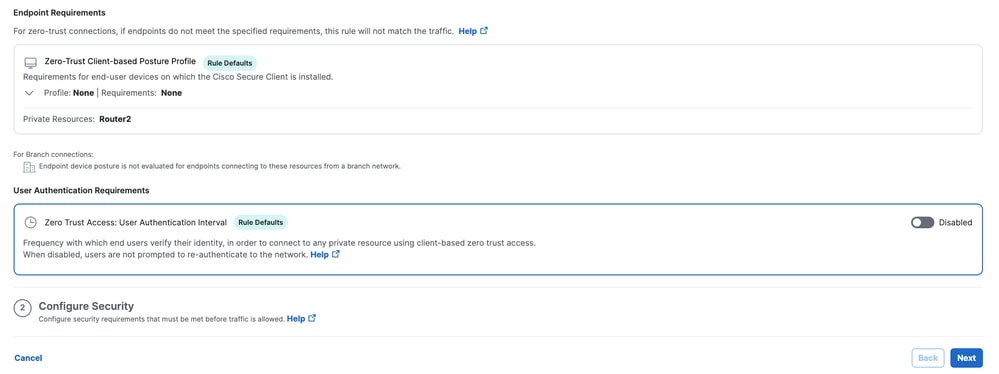
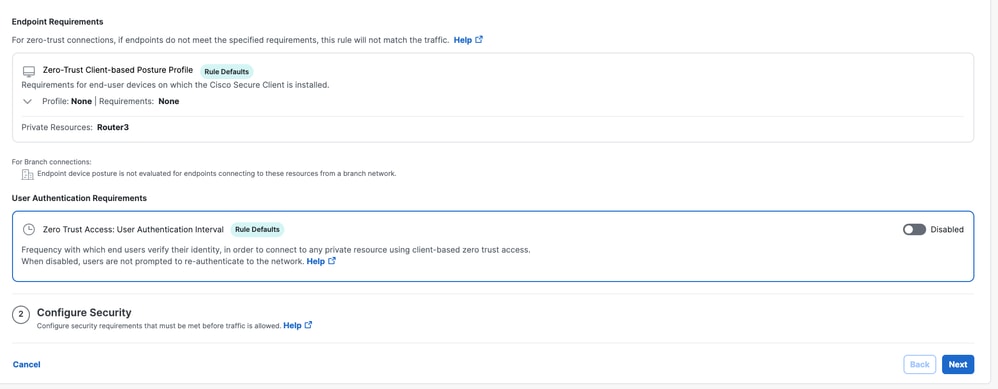
5. Configure Endpoint Requirements

Secure Access - Access Policy Configuration
6. Configure Security
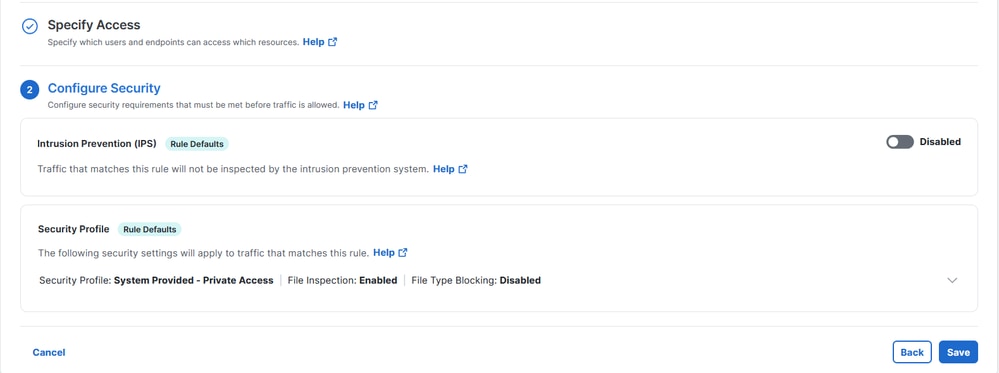
Secure Access - Access Policy Configuration
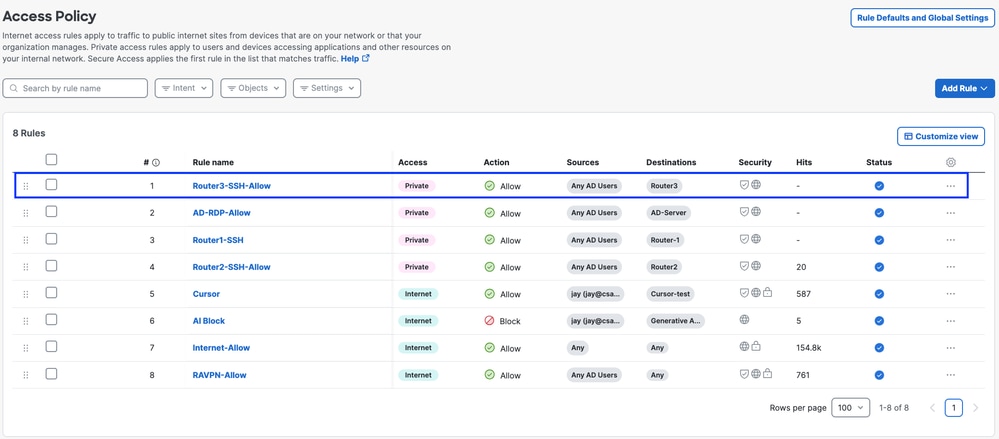
7. Click on Save
Secure Access - Access Policy Configuration
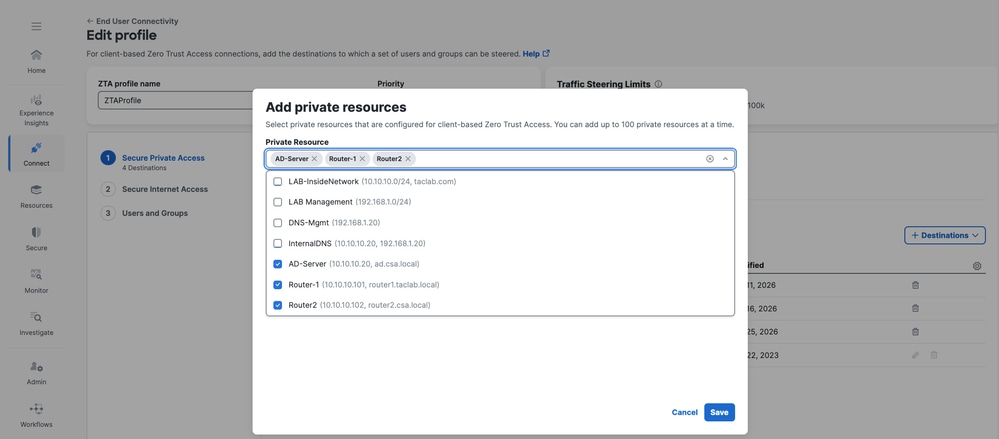
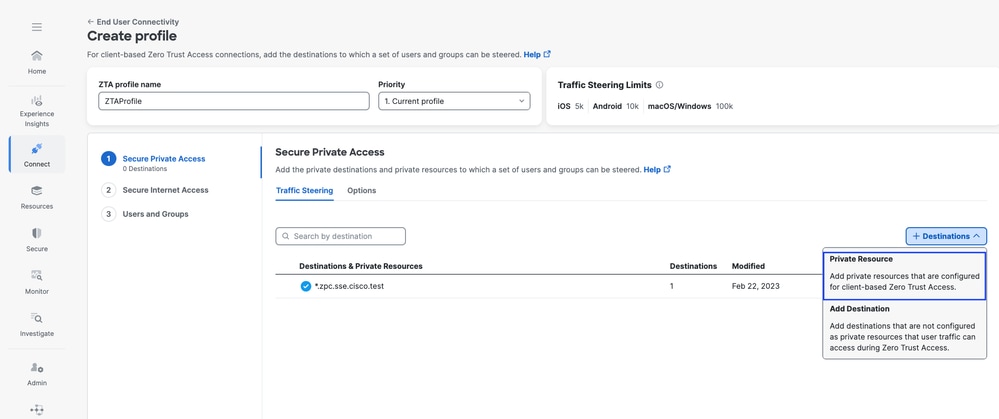
Step - 3 Add Private Resource to the ZTA Profile
If you are using a custom ZTA profile then you need to add the respective private resource to the ZTA profile
1. Navigate to Connect > End User Connectivity > Zero Trust Access and Click on +ZTA Profile
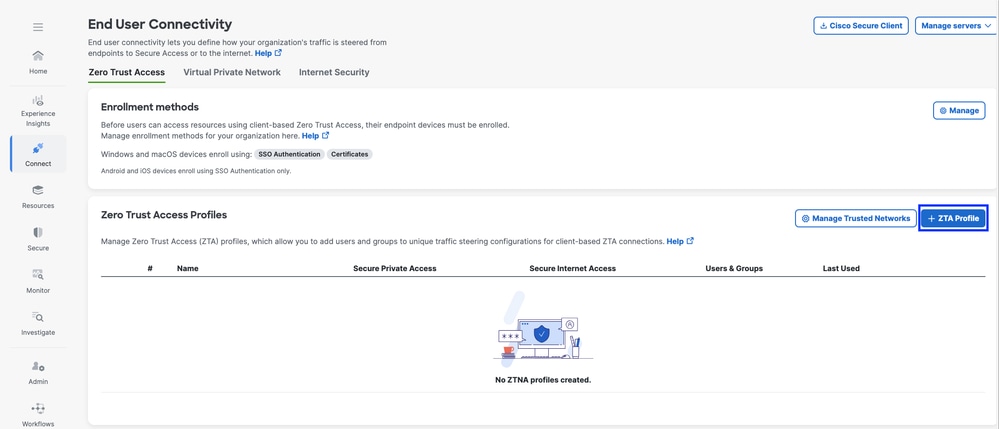
Secure Access - ZTA Profile
2. Add the Private Resource

Secure Access - ZTA Profile
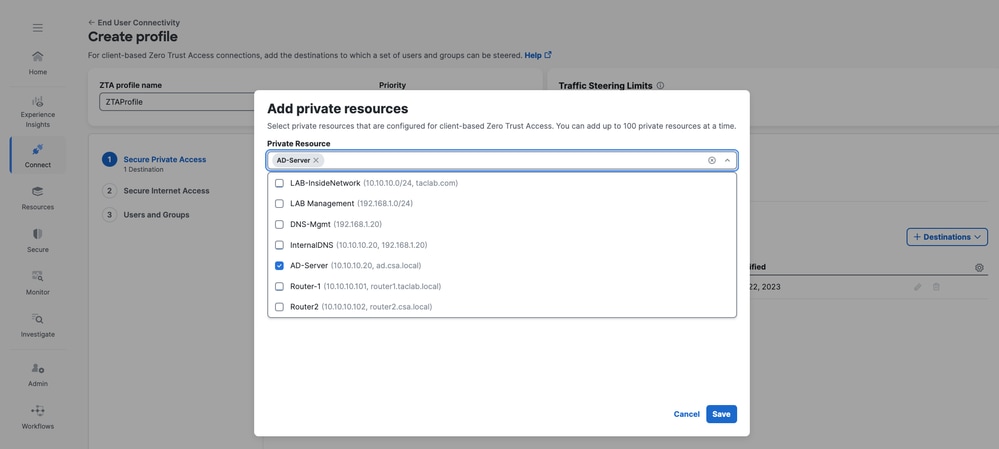
Secure Access - ZTA Profile
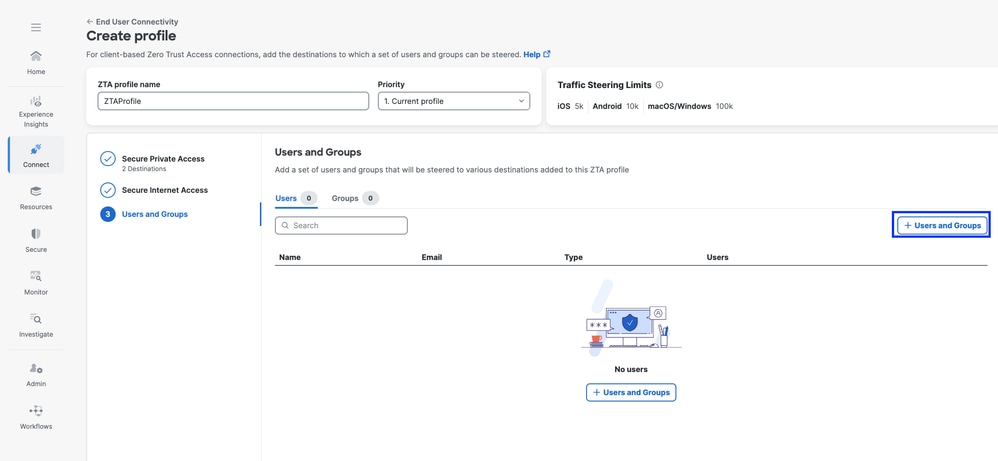
3 . Add Users and Groups


Secure Access - ZTA Profile

Note: It may take upto 15-20 minutes push and sync the configuration to the client for the assigned Private Resource
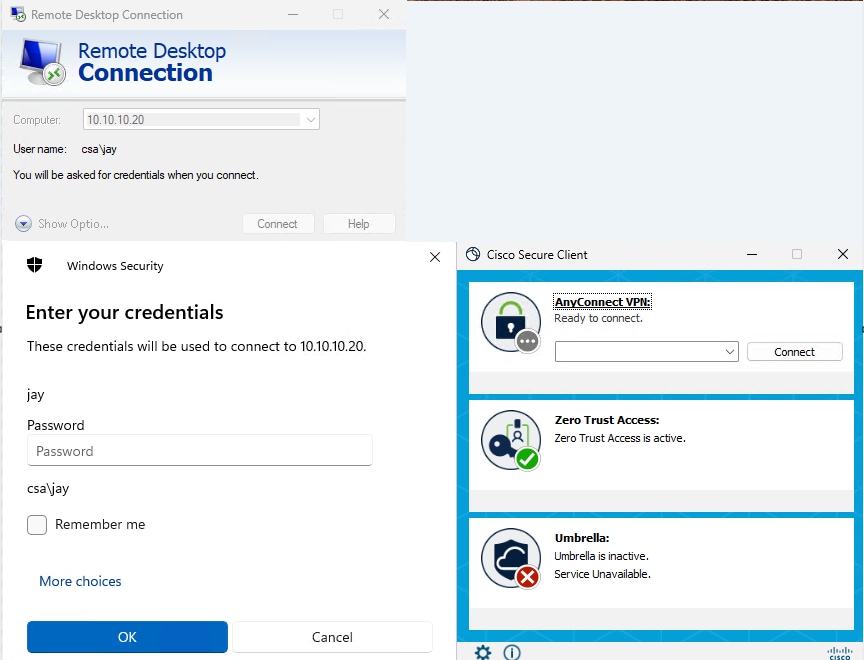
Step - 4 Verify access to the Private Resource
1. Access the Private Resource
Access the PR using FQDN

Secure Access - PR Testing
Access the PR using IP address
Secure Access - PR Testing
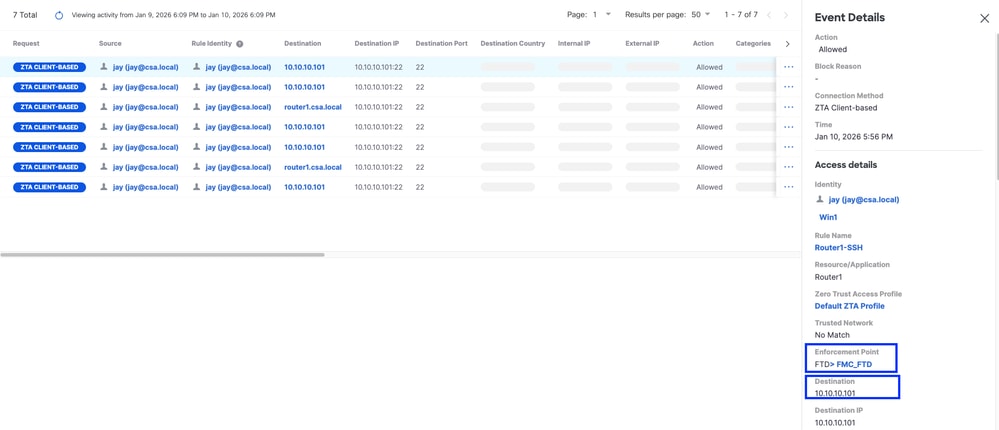
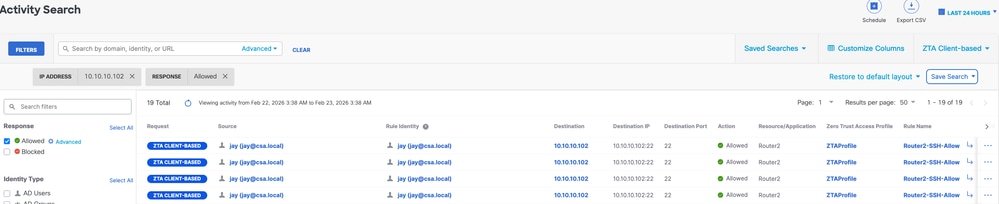
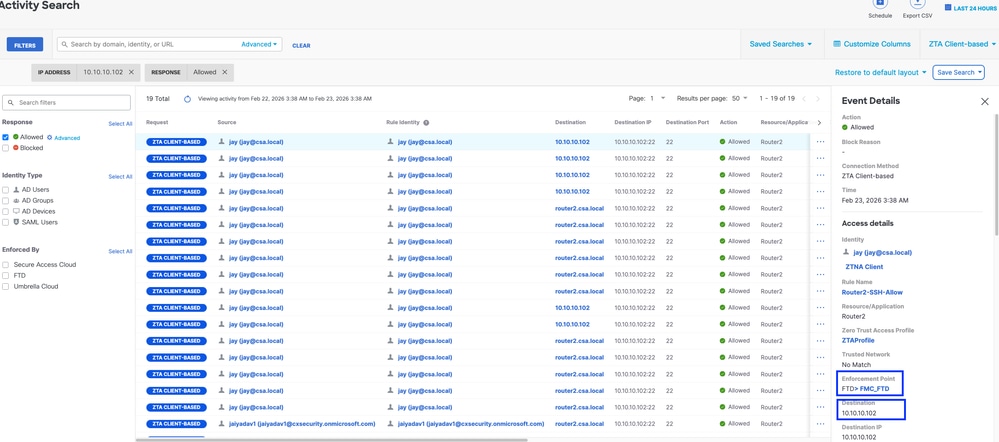
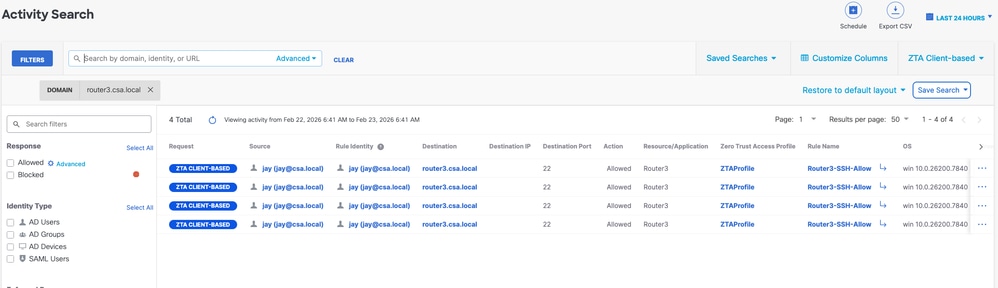
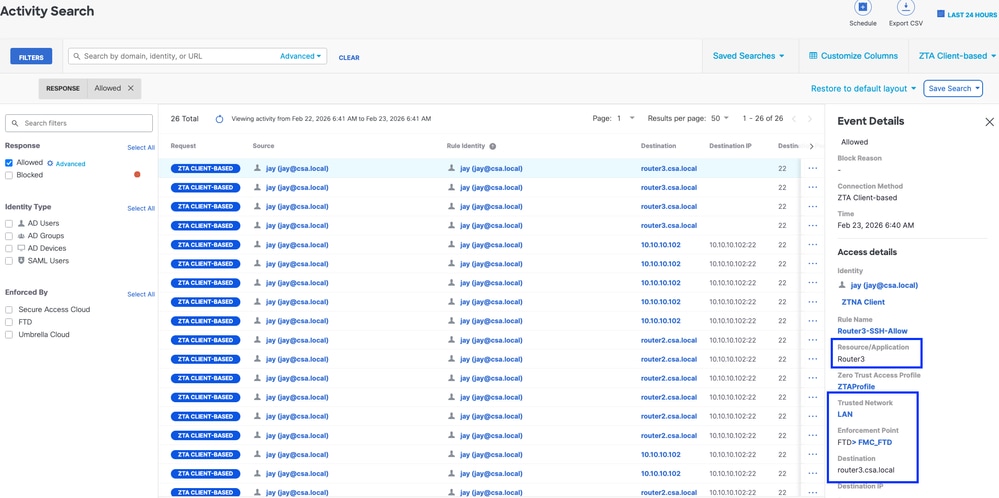
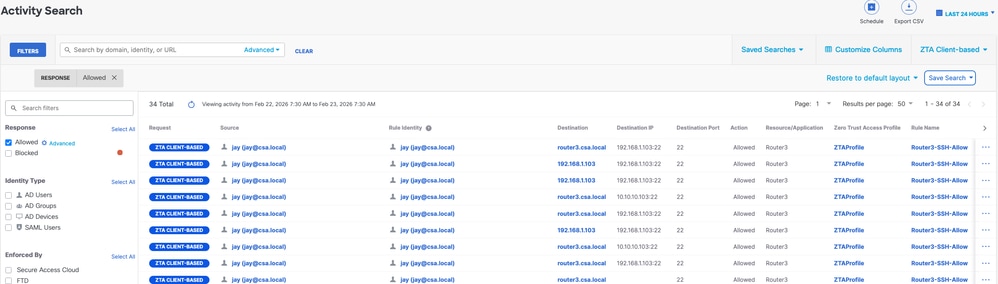
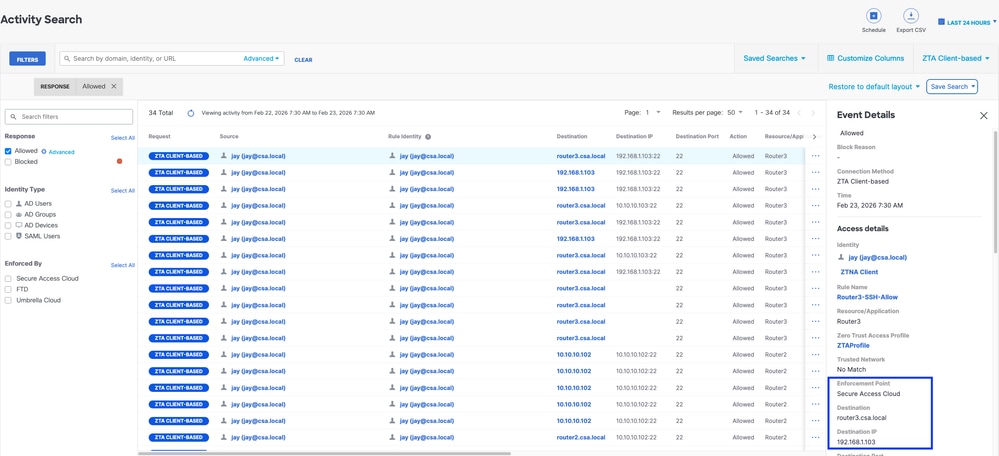
2. Verify with the Activity Search events
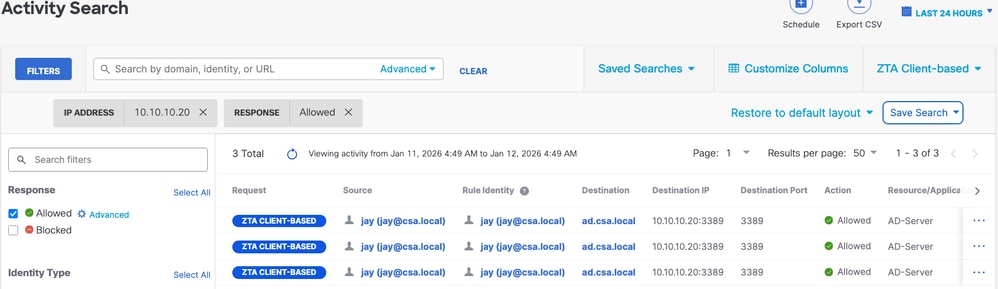
Secure Access - Activity Search
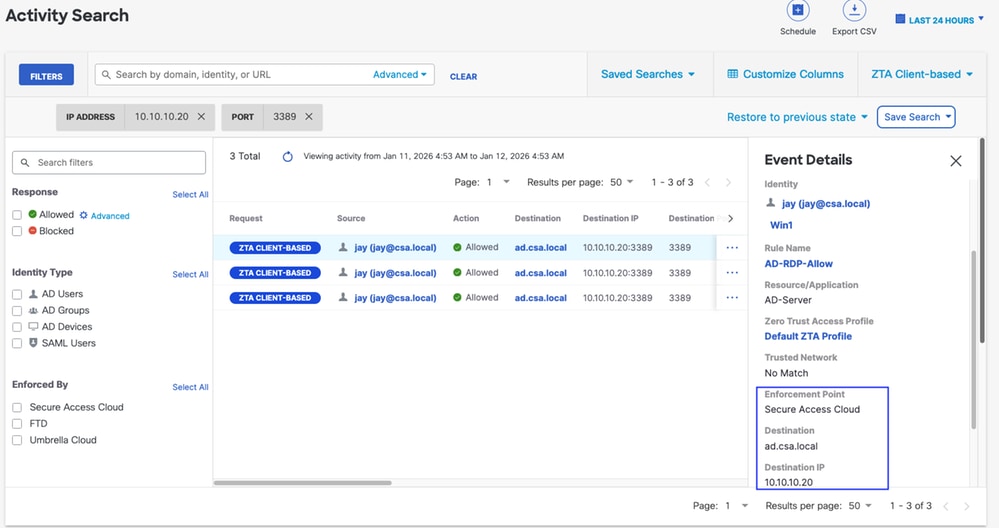
Secure Access - Activity Search
Secure Access - Activity Search
Secure Access - Activity Search
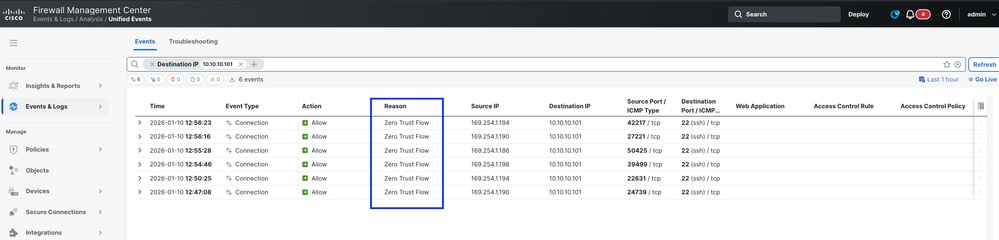
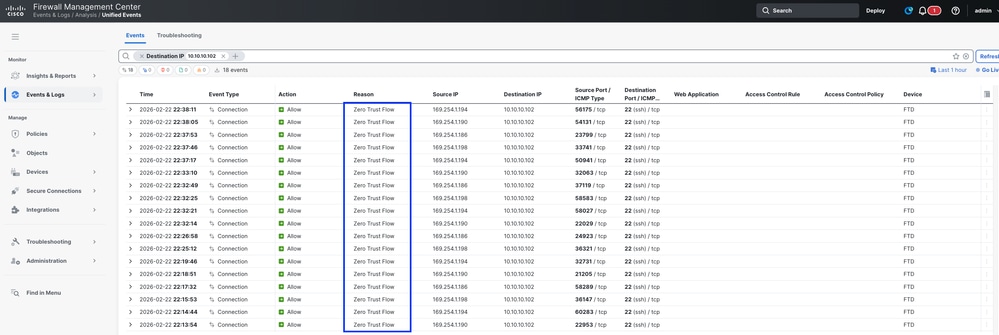
3. Verify FMC connection events

FMC Connection Events
Test Case 2 - Remote User - Local Enforcement
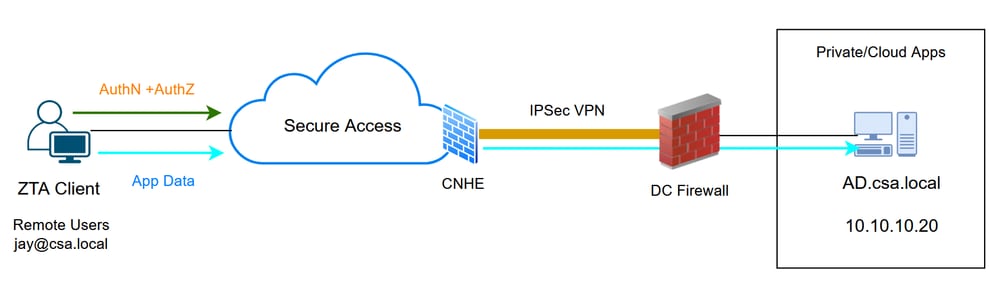
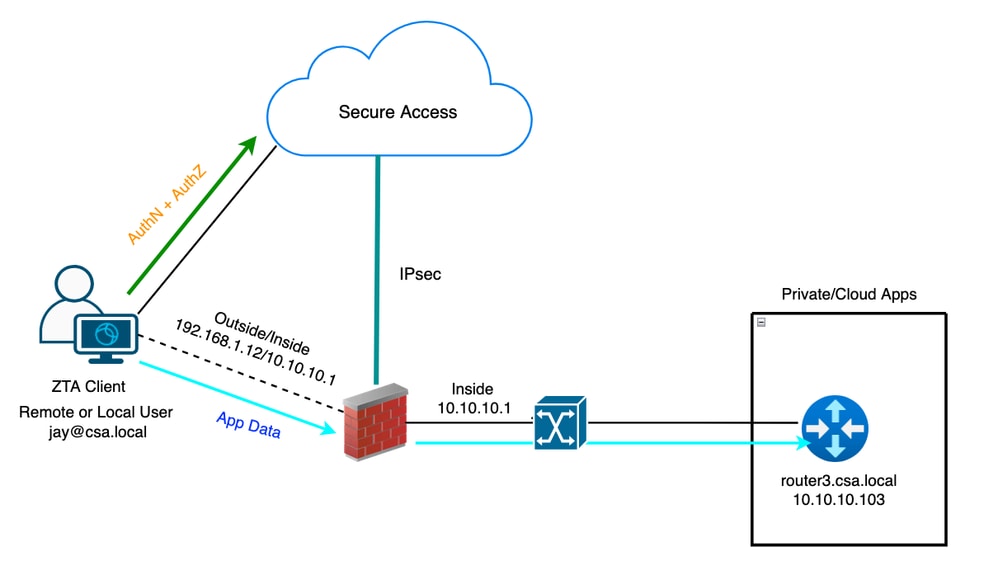
Accessing a Private Resource via Local enforcement , in this type of enforcement policy evaluation happens on Secure Access but the application data stays local to FTD. For example , a ZTA enrolled client or user connected to home network and trying to access a private resource which is behind FTD inside interface .
Universal ZTA - Test case topology
Step 1 - Define a Private Resource on Secure Access
Configure a private resource to be accessible via Zero Trust Access (ZTA) enrolled device with cloud enforcement
- Navigate to Resources > Destinations > Private Resources > Click on +Add

Secure Access - Private Resource Configuration
2. For Private Resource Name, enter a meaningful name for the resource. For Description, we recommend that you provide information such as the purpose of the resource or the name of the resource owner.
Secure Access - Private Resource Configuration
3. Enter the FQDN of the private resource you want to access . We can also define the IP address of the private resource . For more information see Add a Private Resource
4. Select the internal DNS server to resolve the domain
Secure Access - Private Resource Configuration
5. Select Endpoint Connection Methods
6. Select FTD as Local enforcement points

Secure Access - Private Resource Configuration
Note: Depending on the type of enrollment you select , this change will automatically associate the PR to the FTD and will trigger a policy deployment
7. Click Save
Step 2 - Create Private Access Rule
Configure a private access on Secure Access to be access by Universal ZTA enrolled users . For more information see Private Access Rule
1. Navigate to Secure > Access Policy

Secure Access - Private Resource Configuration
2. Click Add Rule, and then choose Private Access.
At the top of the rule is a summary that describes the configured components of your rule.
Secure Access - Access Policy Configuration
3. Add a Rule Name
Secure Access - Access Policy Configuration
4. Select the rule action and select source and destination
Secure Access - Access Policy Configuration
5. Configure Endpoint Requirements
Secure Access - Access Policy Configuration
6. Configure Security

Secure Access - Access Policy Configuration
7. Click on Save

Secure Access - Access Policy Configuration
Step 3 - Verify the association of PR on the FTD
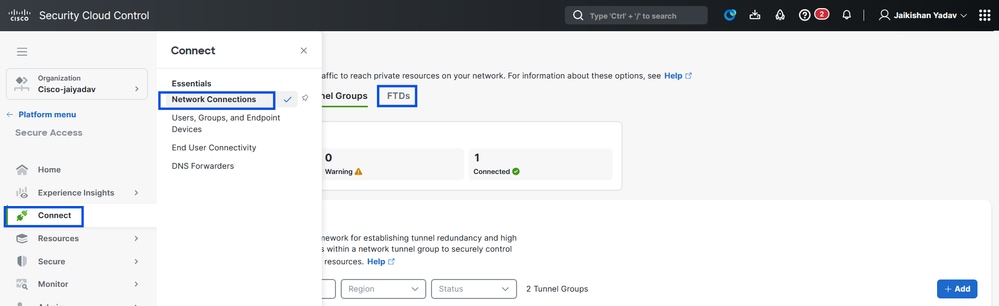
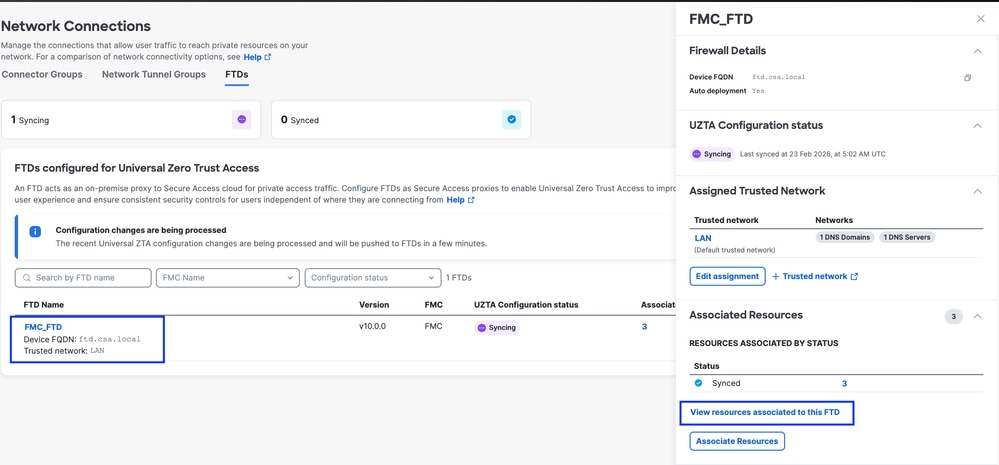
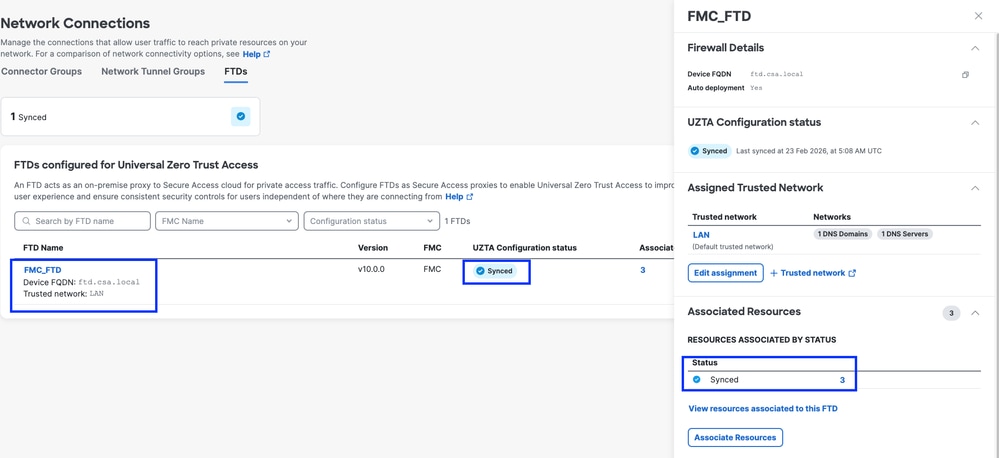
1. Navigate to Connect > Network Connections > FTDs

Secure Access - PR Verification
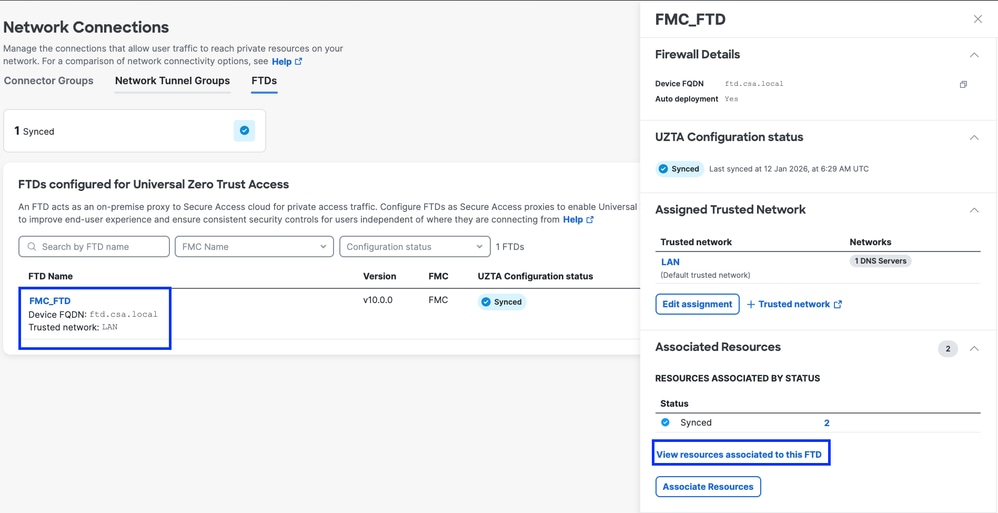
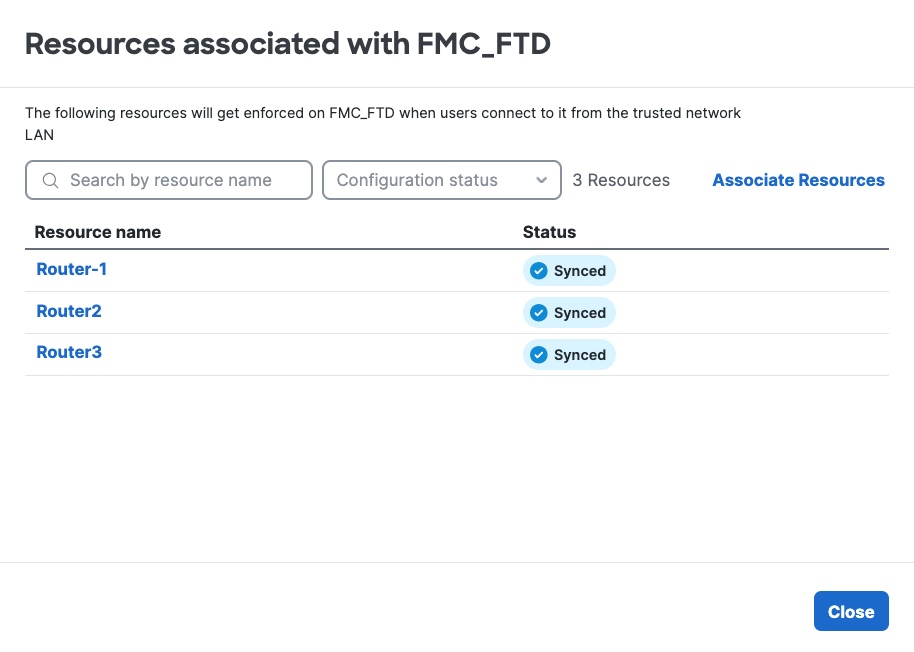
2. Click on the FTD > View resources associated to this FTD
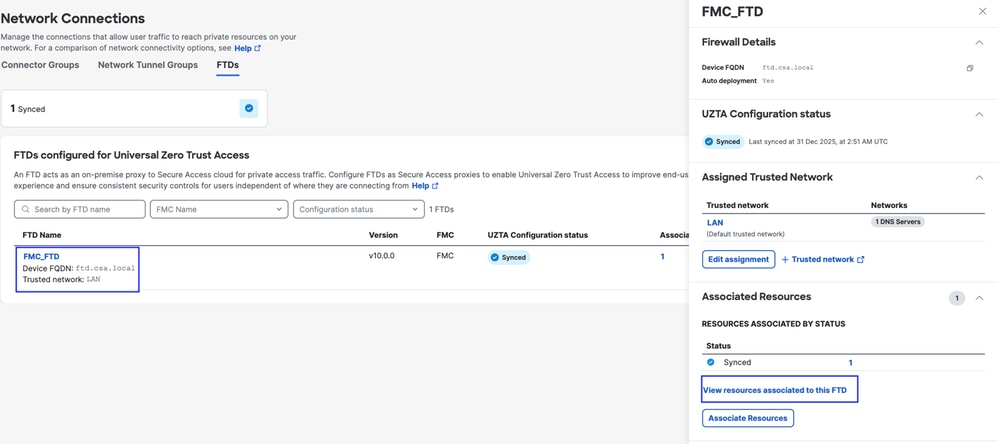
Secure Access - PR Verification
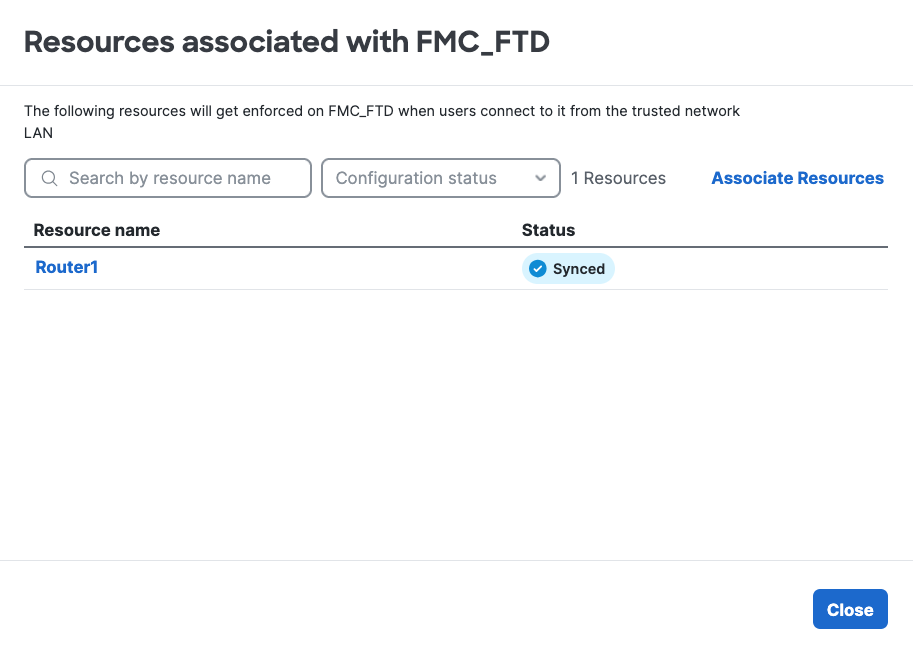
Secure Access - PR Verification
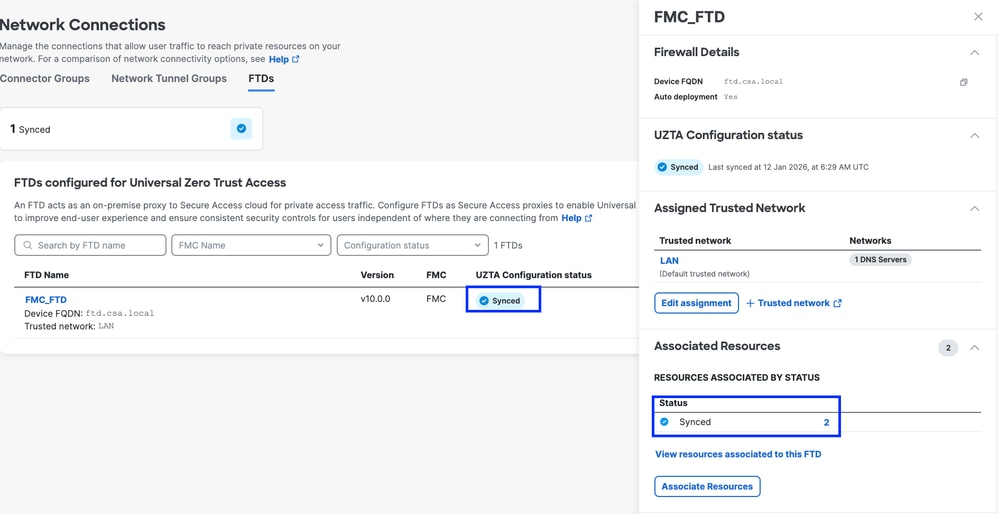
3. Click close
4. Verify the status , Associated Resource and Configuration should be in Synced state
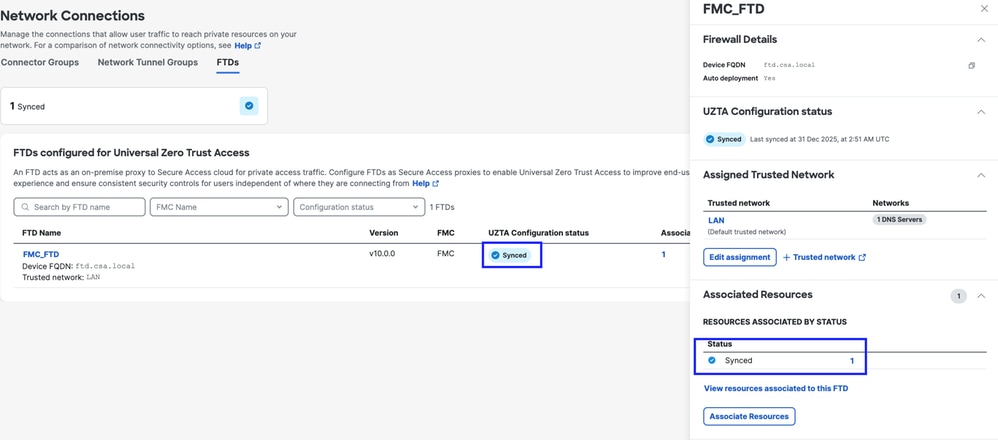
Secure Access - PR Verification
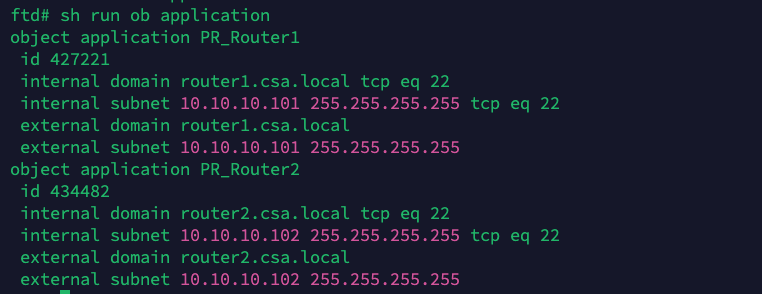
5. Verify the configuration has been pushed to FTD
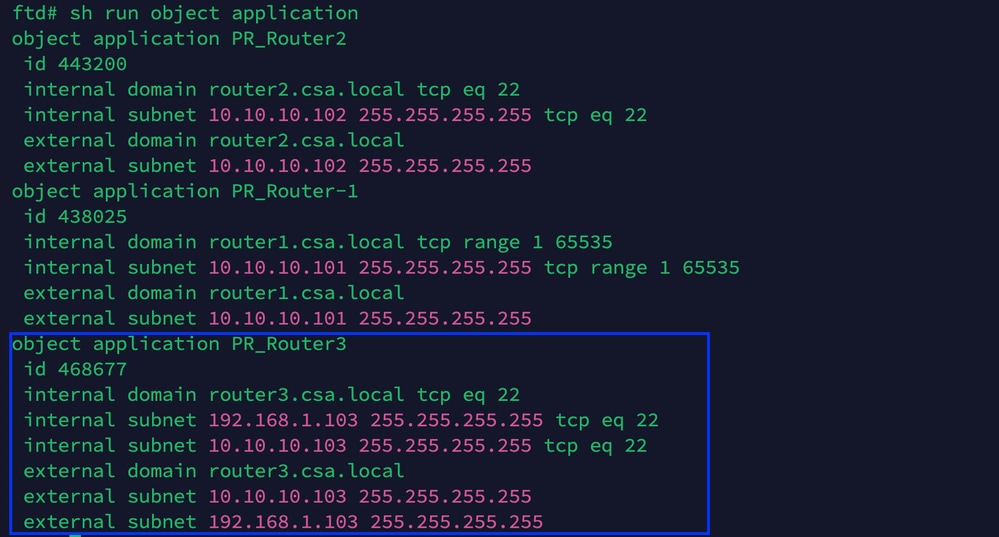
Login to FTD cli and navigate to LINA mode
# show running-config object application
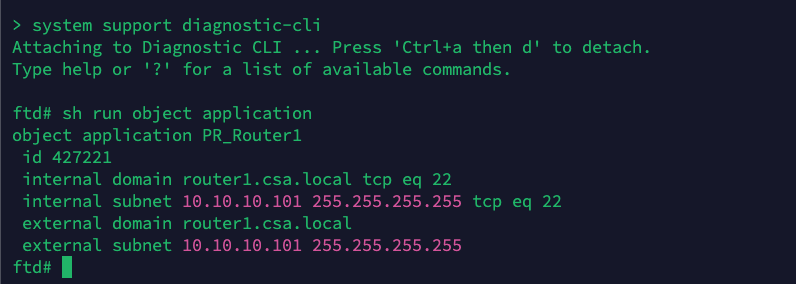
FTD - PR Verification
Step - 4 Add Private Resource to the ZTA Profile
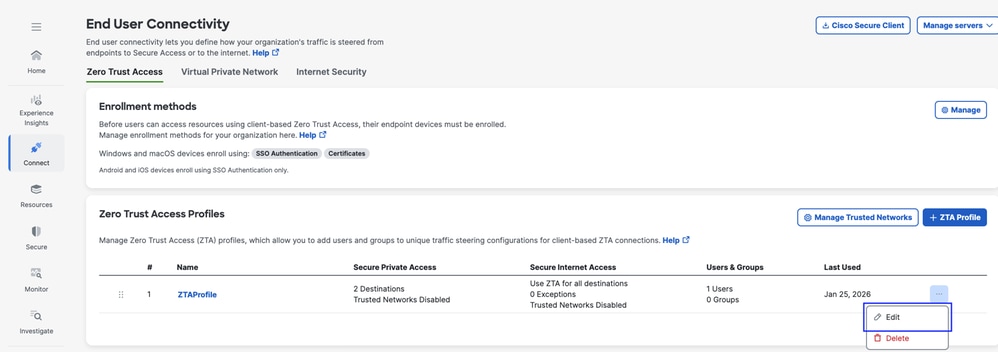
1. Navigate to Connect > End User Connectivity > Zero Trust Access and click 3 dots to edit ZTA profile

Secure Access - ZTA Profile
2. Add the Private Resource

Secure Access - ZTA Profile

Secure Access - ZTA Profile
3 . Add Users and Groups

Secure Access - ZTA Profile
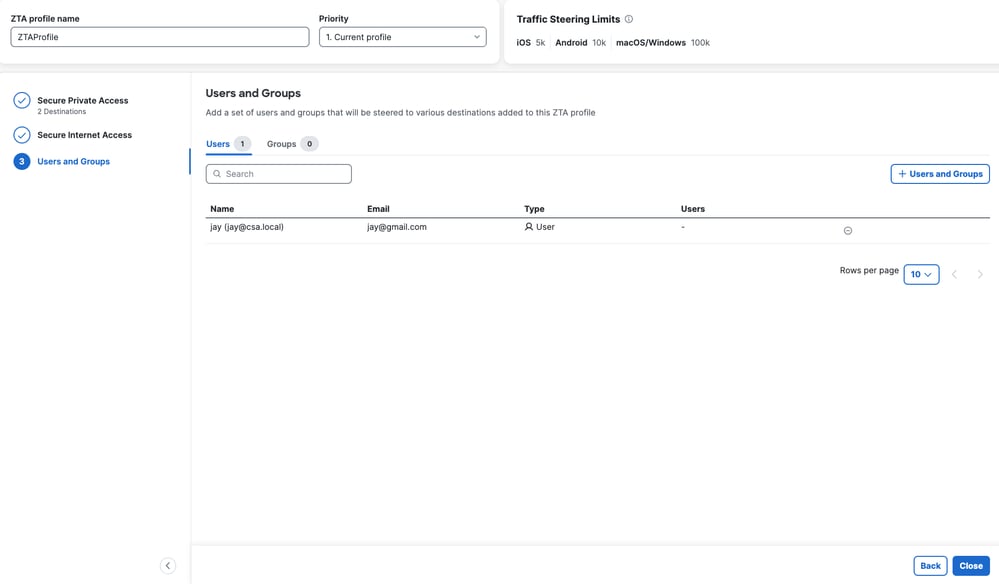
Secure Access - ZTA Profile
Step - 5 Verify access to the Private Resource
1. Verify the remote user can resolve FTD FQDN
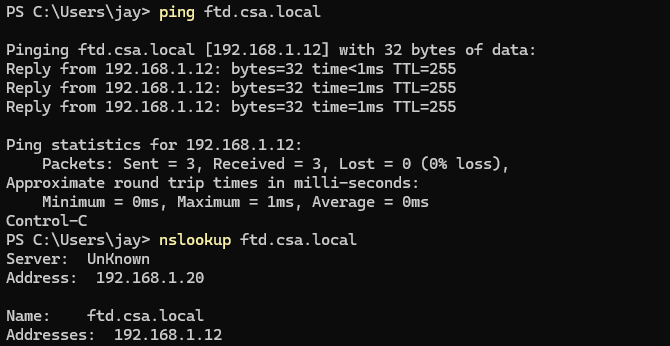
Secure Access - PR Testing
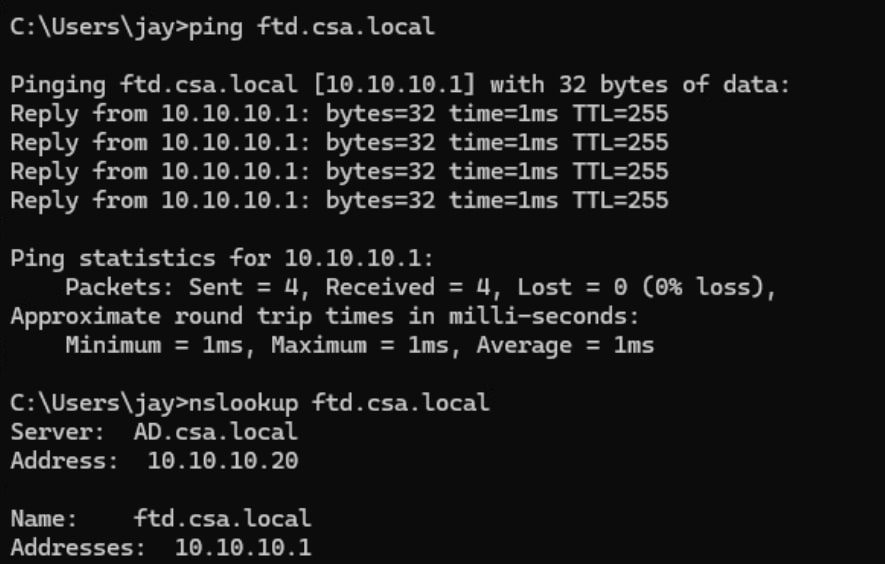
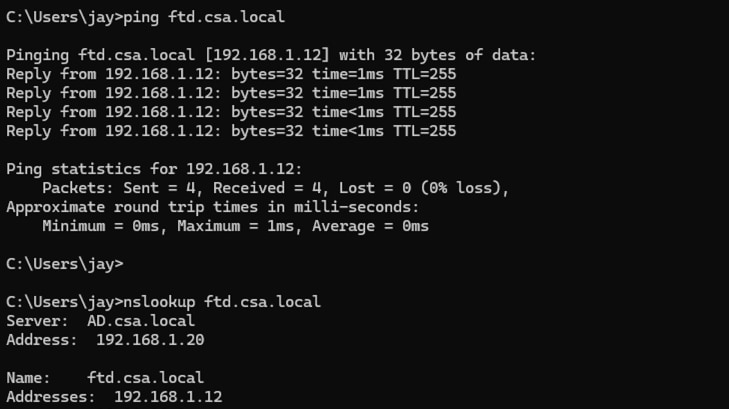
2. Verify FTD can reach to private resource using FQDN
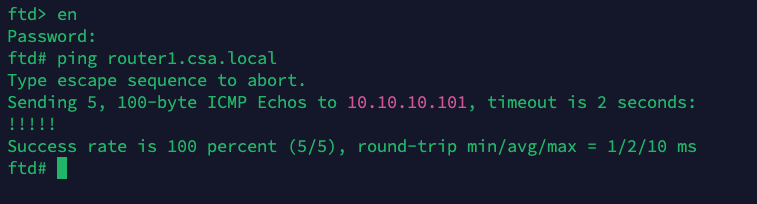
Secure Access - PR Testing
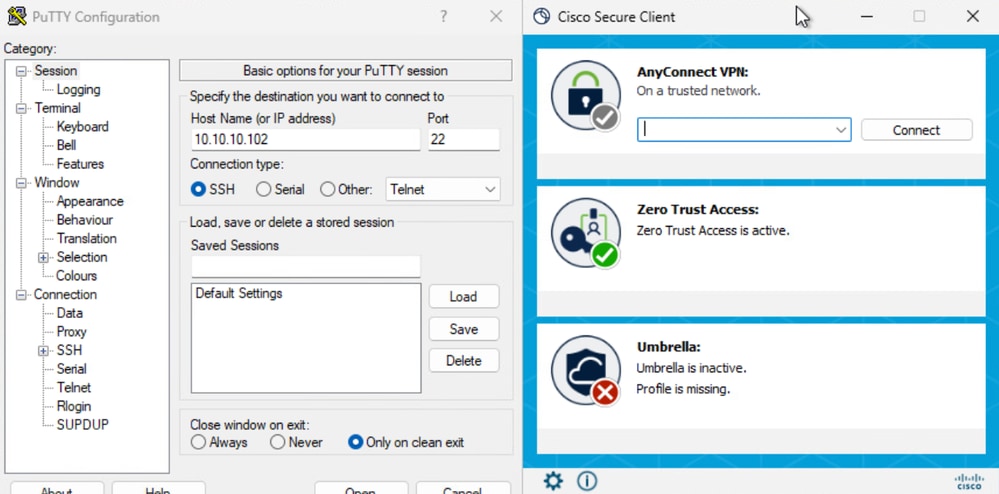
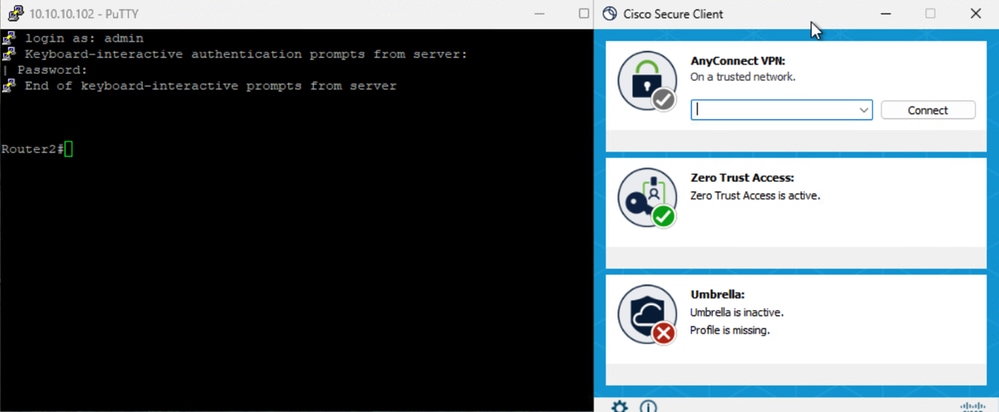
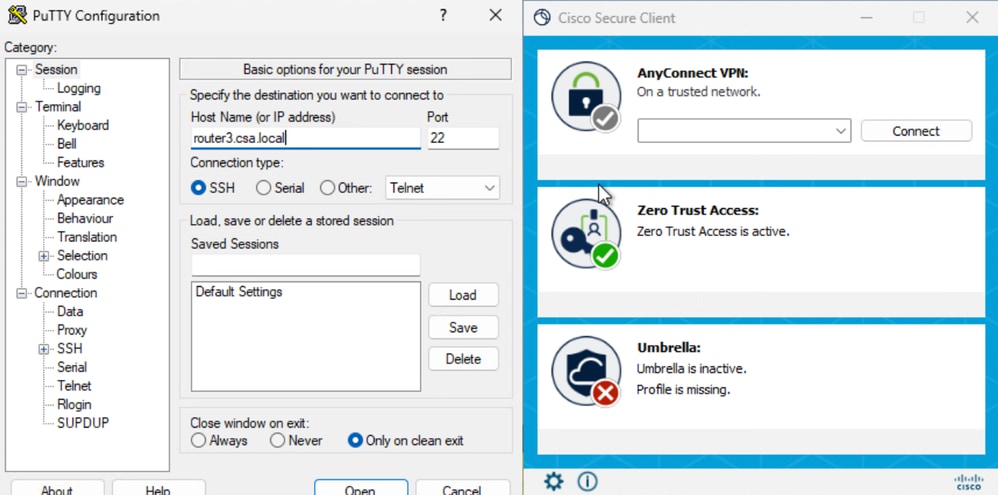
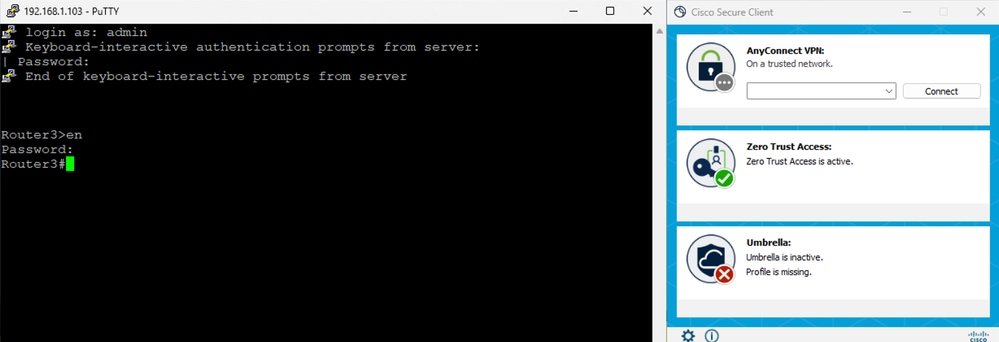
3. Test the SSH connection to the Private Resource
Access the PR using FQDN
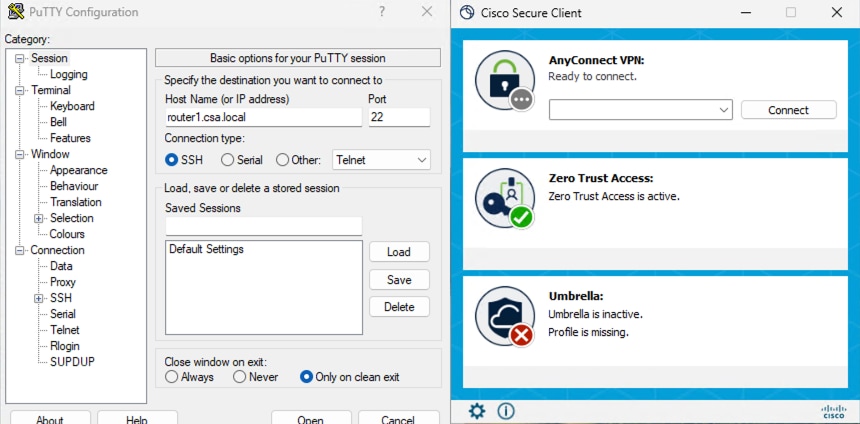
Secure Access - PR Testing

Secure Access - PR Testing
Access the PR using IP address
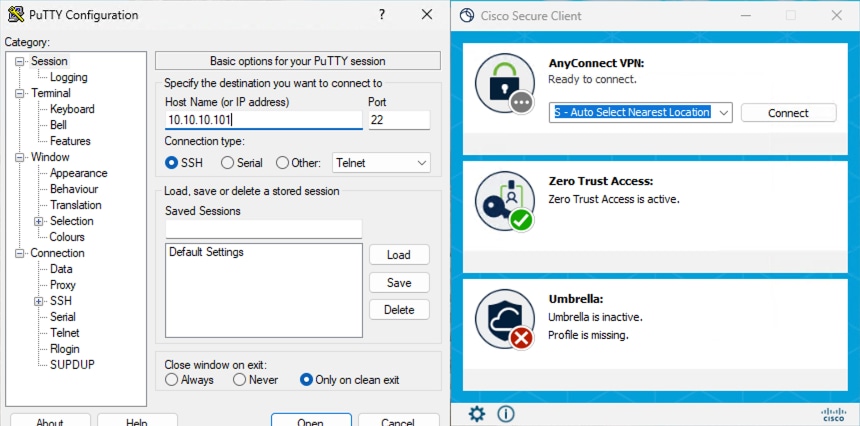
Secure Access - PR Testing
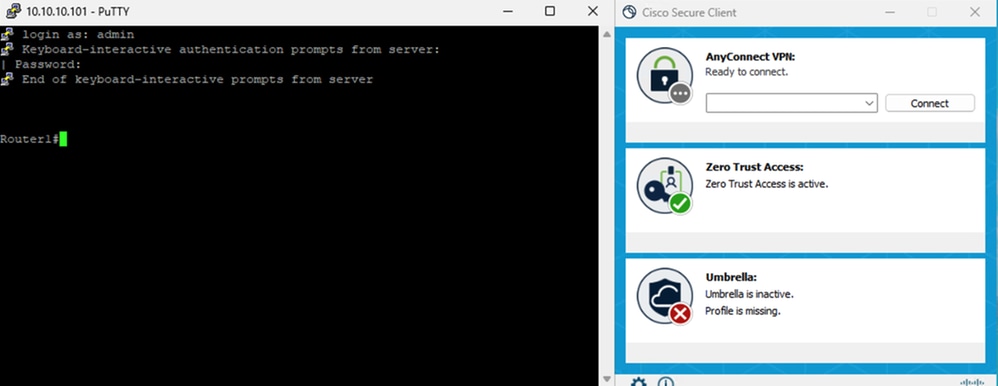
Secure Access - PR Testing
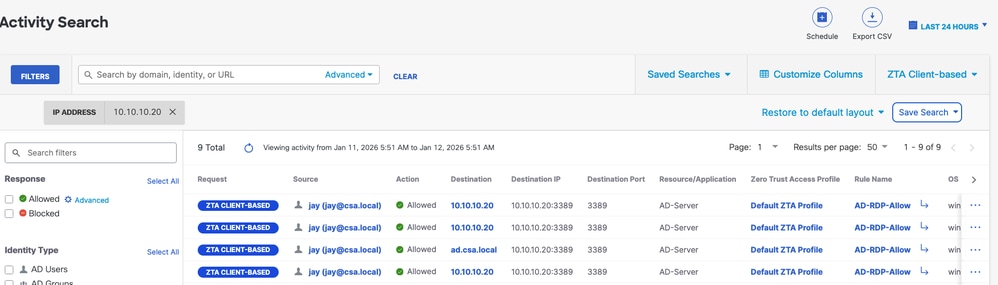
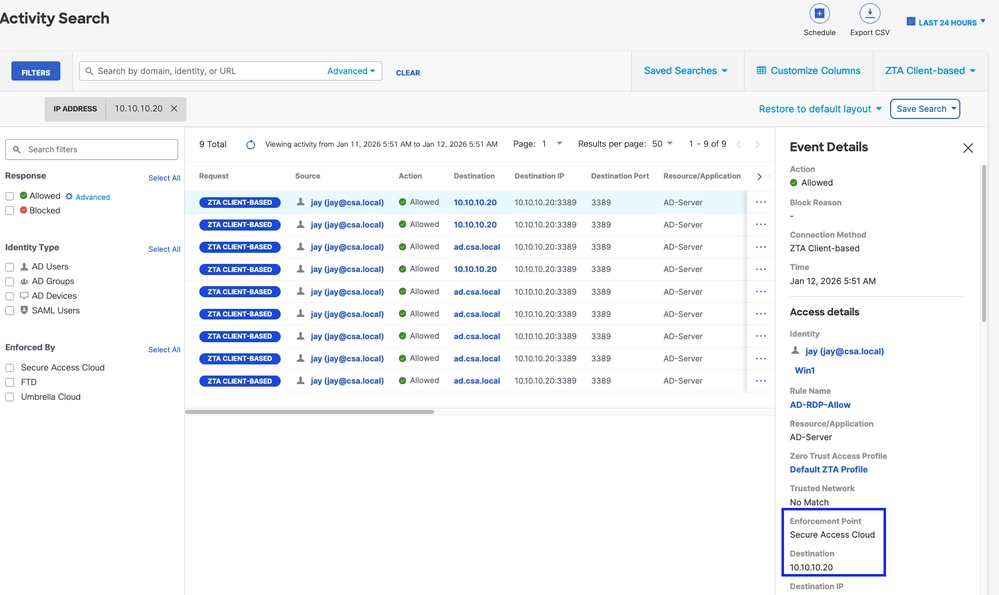
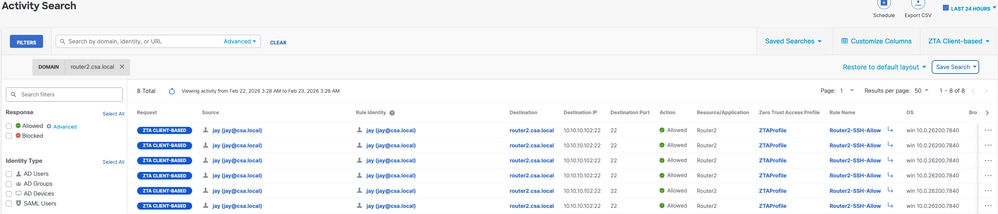
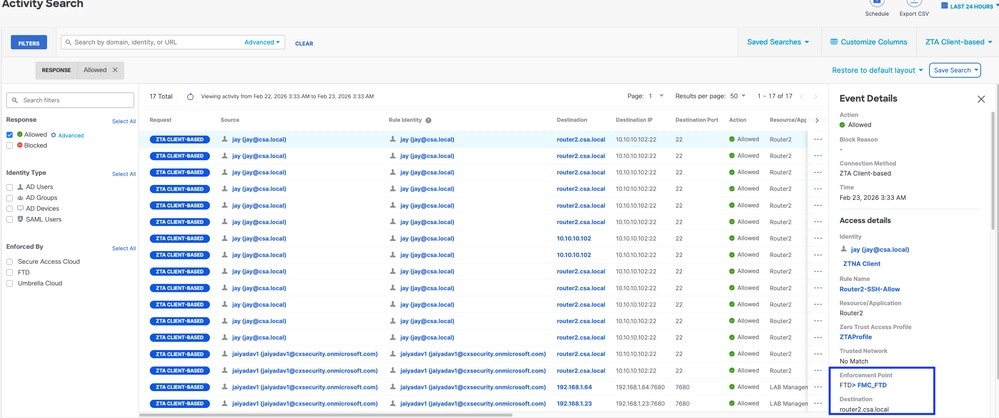
4. Verify Secure Access Activity Search logs
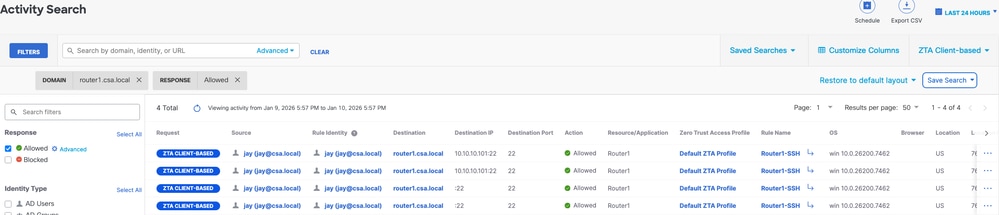
Secure Access - Activity Search
Secure Access - Activity Search
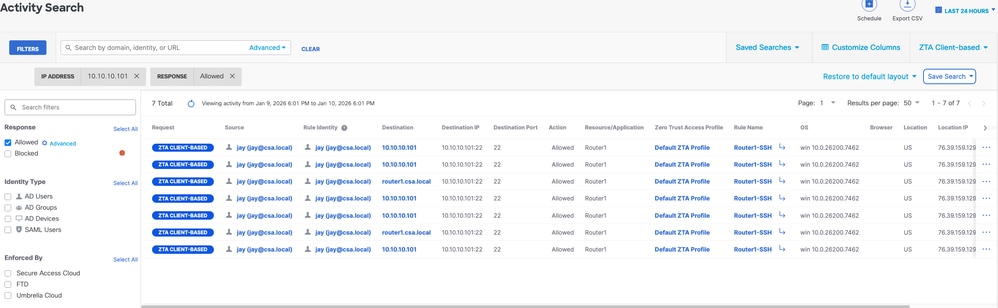
Secure Access - Activity Search
Secure Access - Activity Search
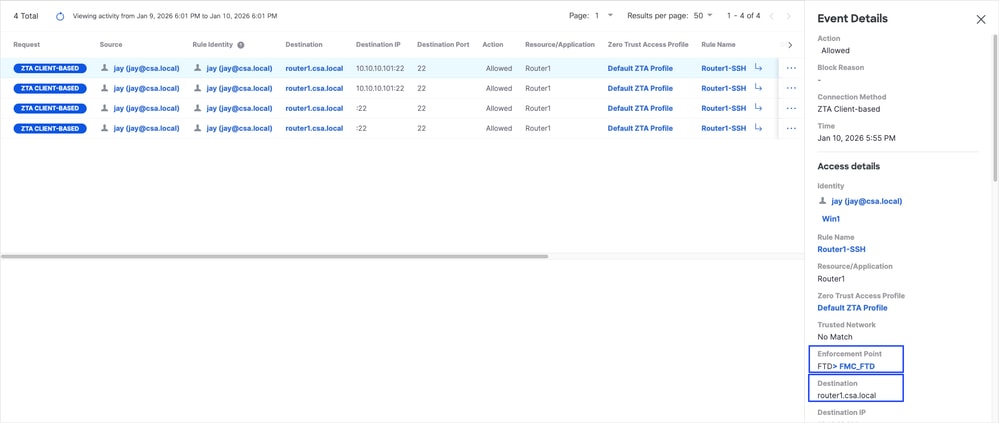
5. Verify FMC connection events
FMC Connection Events
Test Case 3 - Local User - Local Enforcement
Accessing a Private Resource via Local enforcement as a local user, in this type of enforcement policy evaluation happens on Secure Access but the application data stays local to FTD. For example , a ZTA enrolled client or user connected to home network and trying to access a private resource which is behind FTD inside interface . If the private resource is behind DMZ or any other interface of the FTD then we would have to create a access rule on the FTD to permit the traffic between Client IP or network and Private Resource.
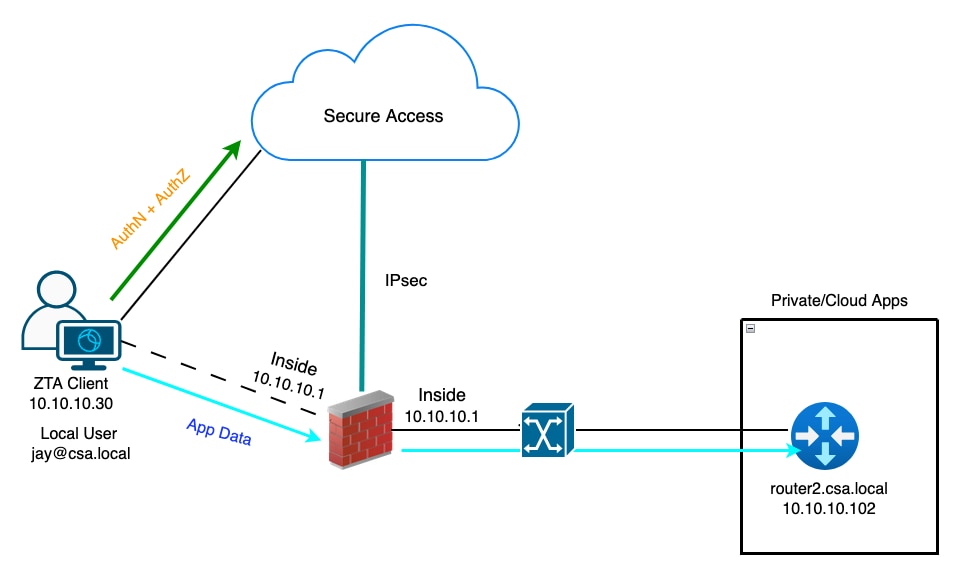
Universal ZTA - Test Case Topology
Step 1 - Define a Private Resource on Secure Access
Configure a private resource to be accessible via Zero Trust Access (ZTA) enrolled device with cloud enforcement
- Navigate to Resources > Destinations > Private Resources > Click on +Add
Secure Access - Private Resource Configuration
2. For Private Resource Name, enter a meaningful name for the resource. For Description, we recommend that you provide information such as the purpose of the resource or the name of the resource owner.
Secure Access - Private Resource Configuration
3. Enter the FQDN of the private resource you want to access . We can also define the IP address of the private resource . For more information see Add a Private Resource
4. Select the internal DNS server to resolve the domain
Secure Access - Private Resource Configuration
5. Select Endpoint Connection Methods
6. Select FTD as Local enforcement points
Secure Access - Private Resource Configuration

Note: Depending on the type of enrollment you select , this change will automatically associate the PR to the FTD and will trigger a policy deployment
7. Click Save
Step 2 - Create Private Access Rule
Configure a private access on Secure Access to be access by Universal ZTA enrolled users . For more information see Private Access Rule
1. Navigate to Secure > Access Policy

Secure Access - Access Policy Configuration
2. Click Add Rule, and then choose Private Access.
At the top of the rule is a summary that describes the configured components of your rule.
Secure Access - Access Policy Configuration
3. Add a Rule Name
Secure Access - Access Policy Configuration
4. Select the rule action and select source and destination
Secure Access - Access Policy Configuration
5. Configure Endpoint Requirements
Secure Access - Access Policy Configuration
6. Configure Security

Secure Access - Access Policy Configuration
7. Click on Save
Secure Access - Access Policy Configuration
Step 3 - Verify the association of PR on the FTD
1. Navigate to connect > Network Connections > FTDs
Secure Access - PR Verification
2. Click on the FTD > View resources associated to this FTD
Secure Access - PR Verification

Secure Access - PR Verification
3. Click close
4. Verify the status , Associated Resource and Configuration should be in Synced state
Secure Access - PR Verification
5. Verify the configuration has been pushed to FTD
Login to FTD cli and navigate to LINA mode
# show running-config object application
Secure Access - PR Verification
Step - 4 Configure " Manage Trusted Networks or ZTA Settings"
Navigate to Connect > End User Connectivity > Zero Trust Access > ZTA Settings and configure Trusted Networks
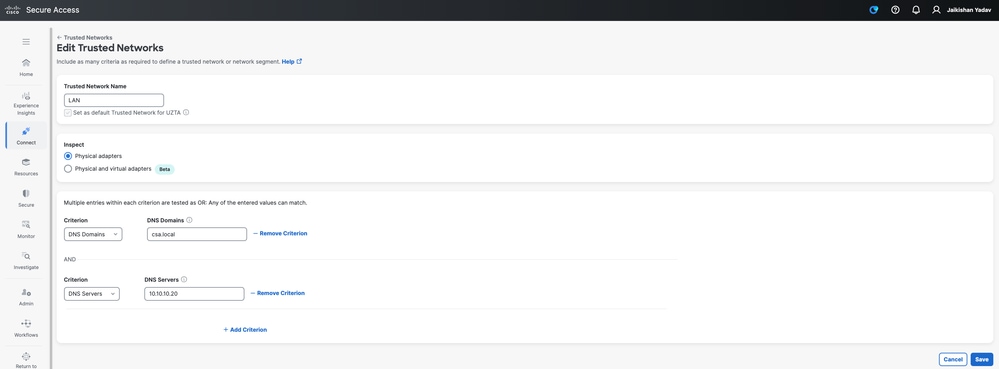
Secure Access - TND Configuration
Step -5 Add Private Resource to the ZTA Profile
1. Navigate to Connect > End User Connectivity > Zero Trust Access and click 3 dots to edit ZTA profile
Secure Access - ZTA Profile
2. Add the Private Resource

Secure Access - ZTA Profile
Secure Access - ZTA Profile
3 . Add Users and Groups


Secure Access - ZTA Profile
Step - 6 Verify access to the Private Resource
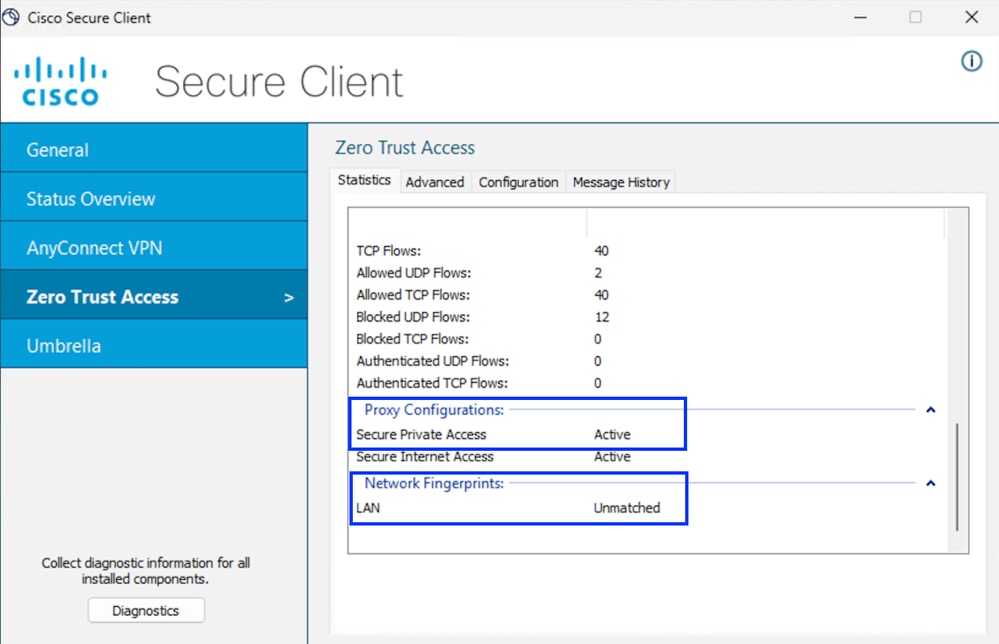
1. Verify the Network Fingerprint for ZTA TND

Secure Access - PR Testing
2. Verify the remote user can resolve FTD FQDN
Secure Access - PR Testing
3. Verify FTD can reach to private resource using FQDN

Secure Access - PR Testing
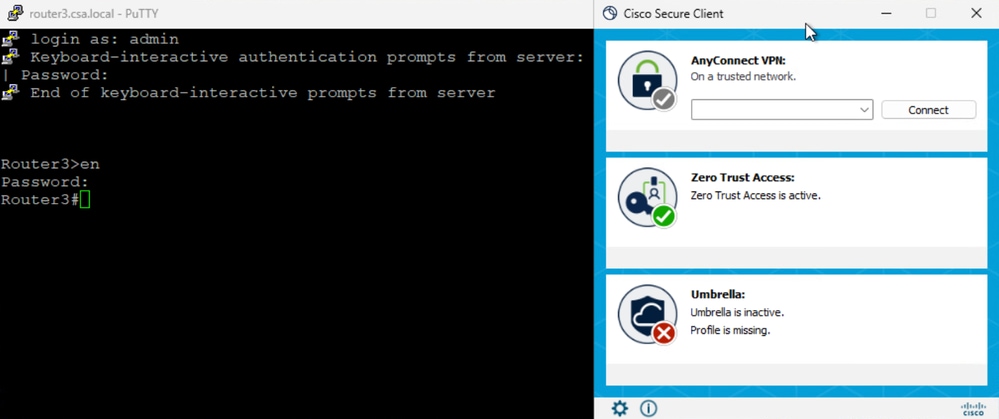
4. Test the SSH connection to the Private Resource
Access the PR using FQDN

Secure Access - PR Testing

Secure Access - PR Testing
Access the PR using IP address
Secure Access - PR Testing
Secure Access - PR Testing
5. Verify Secure Access Activity Serach logs
Secure Access - Activity Search
Secure Access - Activity Search
Secure Access - Activity Search
Secure Access - Activity Search
6. Verify FMC connection events
FMC Connection Events
Test Case 4 - Local and Remote User - Local or Cloud Enforcement with TND
In this case the type of enforcement depend on the user location, if the user is Local or behind a trusted FTD zone ( inside, DMZ etc.) then the enforcement would be Local ( Test case 3). SImilarly, if the user is remote then the enforcement would be Cloud ( Test Case 1). User location will be decided based on Network Fingerprint or TND setting, if the network fingerprint matches then the local of the user would be Local and if it is not a match then the user local would be considered as Remote .
Universal ZTA - Test Case Topology
Step 1 - Define a Private Resource on Secure Access
Configure a private resource to be accessible via Zero Trust Access (ZTA) enrolled device with cloud enforcement
- Navigate to Resources > Destinations > Private Resources > Click on +Add

Secure Access - Private Resource Configuration
2. For Private Resource Name, enter a meaningful name for the resource. For Description, we recommend that you provide information such as the purpose of the resource or the name of the resource owner.
Secure Access - Private Resource Configuration
3. Enter the FQDN of the private resource you want to access . We can also define the IP address of the private resource . For more information see Add a Private Resource
4. Select the DNS server to resolve the domain
Secure Access - Private Resource Configuration
5. Select Endpoint Connection Methods
6. Select FTD as Local enforcement points
Secure Access - Private Resource Configuration
Select RC if the Private Resource is accessible over RC , otherwise leave it blank if the Private Resource is accessible over Network Tunnel Group (IPsec Tunnel).

Secure Access - Private Resource Configuration

Note: Depending on the type of enrollment you select , this change will automatically associate the PR to the FTD and will trigger a policy deployment
7. Click Save
Step 2 - Create Private Access Rule
Configure a private access on Secure Access to be access by Universal ZTA enrolled users . For more information see Private Access Rule
1. Navigate to Secure > Access Policy
Secure Access - Access Policy Configuration
2. Click Add Rule, and then choose Private Access.
At the top of the rule is a summary that describes the configured components of your rule.
Secure Access - Access Policy Configuration
3. Add a Rule Name

Secure Access - Access Policy Configuration
4. Select the rule action and select source and destination
Secure Access - Access Policy Configuration
5. Configure Endpoint Requirements
Secure Access - Access Policy Configuration
6. Configure Security

Secure Access - Access Policy Configuration
7. Click on Save
Secure Access - Access Policy Configuration
Step 3 - Verify the association of PR on the FTD
1. Navigate to connect > Network Connections > FTDs

Secure Access - PR Verification
2. Click on the FTD > View resources associated to this FTD

Secure Access - PR Verification
Secure Access - PR Verification
Secure Access - PR Verification
Secure Access - PR Verification
3. Click close
4. Verify the status , Associated Resource and Configuration should be in Synced state
Secure Access - PR Verification
5. Verify the configuration has been pushed to FTD
Login to FTD cli and navigate to LINA mode
# show running-config object application
Secure Access - PR Verification
Step - 4 Configure or verify " Manage Trusted Networks or ZTA Settings"
Navigate to Connect > End User Connectivity > Zero Trust Access > ZTA Settings and configure Trusted Networks

Secure Access - ZTA TND Configuration
Step - 5 Add Private Resource to the ZTA Profile
1. Navigate to Connect > End User Connectivity > Zero Trust Access and click 3 dots to edit ZTA profile

Secure Access - ZTA Profile
2. Add the Private Resource
Secure Access - ZTA Profile

Secure Access - ZTA Profile
3 . Add Users and Groups
Secure Access - ZTA Profile

Secure Access - ZTA Profile
Step - 6 Verify access to the Private Resource
When the user is Local
1. Verify the Network Fingerprint for ZTA TND, it should match if the user is Local and Secure Private Access should be Active

Secure Access - PR Testing
2. Verify the remote user can resolve FTD FQDN

Secure Access - PR Testing
3. Verify FTD can reach to private resource using FQDN

Secure Access - PR Testing
4. Test the SSH connection to the Private Resource
Access the PR using FQDN
Secure Access - PR Testing

Secure Access - PR Testing
Access the PR using IP address

Secure Access - PR Testing

Secure Access - PR Testing
5. Verify Secure Access Activity Serach logs
Secure Access - Activity Search
Secure Access - Activity Search
6. Verify FMC connection events

FMC Connection Events
When the user is Remote
1. Verfiy the Network Fingerprint for ZTA TND, it should unmatch if the user is remote
Secure Access - PR Testing
2. Verify the remote user can resolve FTD FQDN

Secure Access - PR Testing
3. Test the SSH connection to the Private Resource
Access the PR using FQDN

Secure Access - PR Testing
Secure Access - PR Testing
Access the PR using IP address
Secure Access - PR Testing
Secure Access - PR Testing
5. Verify Secure Access Activity Serach logs
Secure Access - Activity Search
Secure Access - Activity Search
Troubleshoot
Useful Commands:
> show allocate-core profile
> show asp inspect-dp snort
> sh running-config universal-zero-trust
> show interface ip brief
> debug universal-zero-trust zproxy 7
! and then go to expert mode
# tail -f /ngfw/var/log/messages
# show conn all
# show nat detail
# show asp table socket
Revision History
| Revision | Publish Date | Comments |
|---|---|---|
1.0 |
06-May-2026
|
Initial Release |
 Feedback
Contact Cisco
- Open a Support Case

- (Requires a Cisco Service Contract)