Introduction
This document describes the required steps to configure the ZTNA for Certificate based auto enrollment.
Prerequisites
- Secure Client minimum version 5.1.9.x
- Trusted Platform Module (TPM) for Windows
- Secure Enclave coprocessor for Apple Devices
Requirements
Cisco recommends that you have knowledge of these topics:
Components Used
The information in this document is based on these software and hardware versions:
- Windows 11 with TPM version 2.0
- Secure Client version 5.1.10.17 with ZTNA and DUO Module Enabled.
- Microsoft Active Directory 2022
- Openssl tool for certificcate generation
The information in this document was created from the devices in a specific lab environment. All of the devices used in this document started with a cleared (default) configuration. If your network is live, ensure that you understand the potential impact of any command.
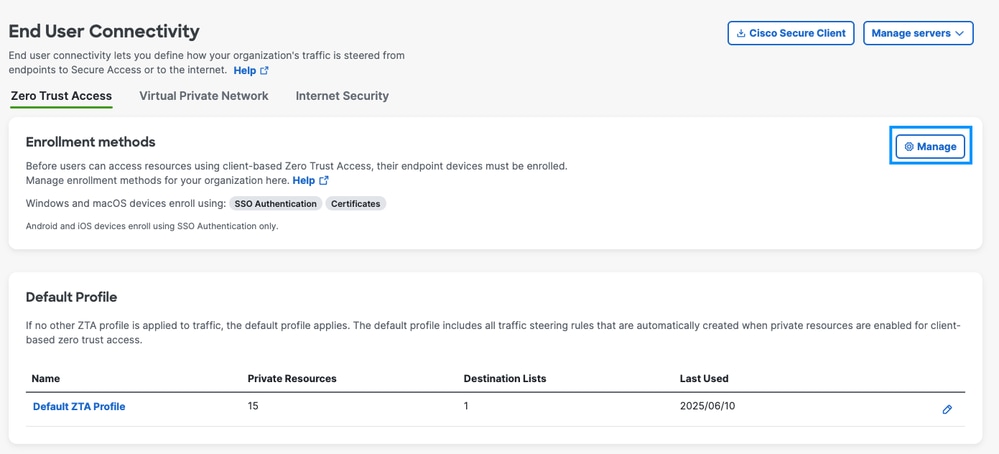
Enabling Auto-Enrollment on Secure Access Dashboard
First step in enabling this feature is to enable the Secure Access Auto-enrollment feature which includes:
1. Navigate to Dashboard -> Connect -> End User Connectivity -> Zero Trust
2. Click on Manage option.
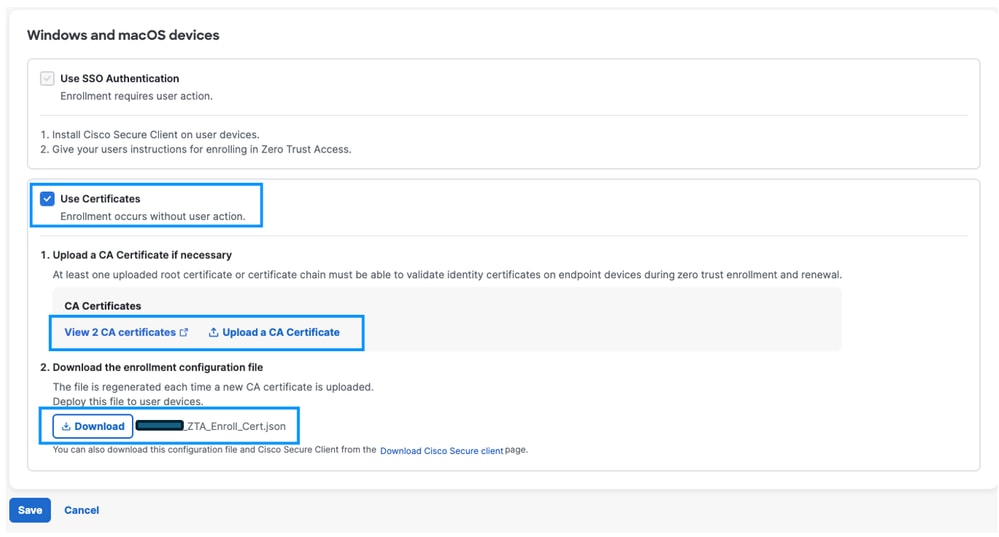
3. Enable Use Certificates.
4. Upload CA Certificate by downloading it from your local Certificate Authority.
5. Download the Enrollment Configuration and place it in the the directories based on operating system.
- Windows: C:\ProgramData\Cisco\Cisco Secure Client\ZTA\enrollment_choices
- macOS: /opt/cisco/secureclient/zta/enrollment_choices
6. Make sure to save your settings once completed.
Certificate Template and Installation
Secure Access require these mandatory Certificate Fields:
- Subject Alternative Name (SAN) to include the user RFC-822 complaint email address or User Principle Name (UPN)
Example:
Option 1: RFC822-compliant email
email.1 = username@domain.local
Option 2: (alternative): UPN (Microsoft-specific)
otherName:1.3.6.1.4.1.311.20.2.3;UTF8:username@domain.local
In this example we are using the user certificate template in Microsoft AD to generate the certificate.
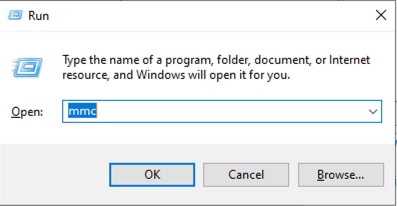
Step 1: Navigate to Microsoft AD and open Certificate Manager
Step 2: Open Run and enter Microsoft Management Console (mmc)
Step 3: Click on File then add/remove Snap-in
Step 4: Add certificate Templates
Step 5: Duplicate User Certificate
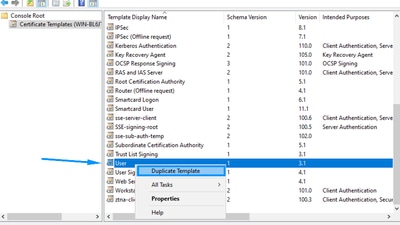
Step 6: Configure the settings as described
1. New Template name: ztna-client-enroll under (General) tab.
2. Select (Supply in the request) in (Subject Name) tab.

Note: This insure that the options provided by the openssl template such as Service Alternative Name (SAN) are accepted
Step 7: Click on OK to save the new template
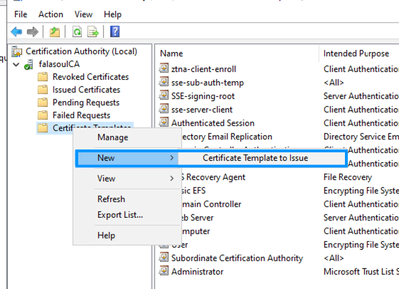
Step 8: Add the new Template to the AD template list by doing:
1. Run certsrv.msc
2. right click on Certificate Templates and select New -> certificate template to issue
3. Select your newly created template (ztna-client-enroll)
Creating Certificate using Openssl
Step 1: Create san.cnf file with content
[ req ]
default_bits       = 2048
prompt             = no
default_md         = sha256
distinguished_name = dn
req_extensions     = req_ext

[ dn ]
C  = US
ST = Texas
L  = Austin
O  = exampleusername
OU = IT
CN = exampleusername

[ req_ext ]
subjectAltName = @alt_names

[ alt_names ]
# Option 1: RFC822-compliant email
email.1 = user@domain.local

# Option 2 (alternative): UPN (Microsoft-specific)
#otherName:1.3.6.1.4.1.311.20.2.3;UTF8:user@domain.local
Step 2: create certificate using the template
openssl genrsa -out user.key 2048
openssl req -new -key user.key -out user.csr
openssl req -new -key user.key -out user.csr -config san.cnf
Sign user certificate with CA ZTNA Template
Step 1: Copy the content of the file user.csr
Step 2: go to your local AD signing authority (https:http://<ip-address>/certsrv/)
Step 3: Click on Request a Certificate -> Advanced Certificate Request -> select ztna-client-enroll template
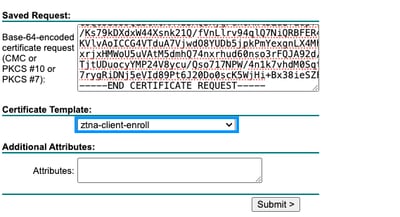
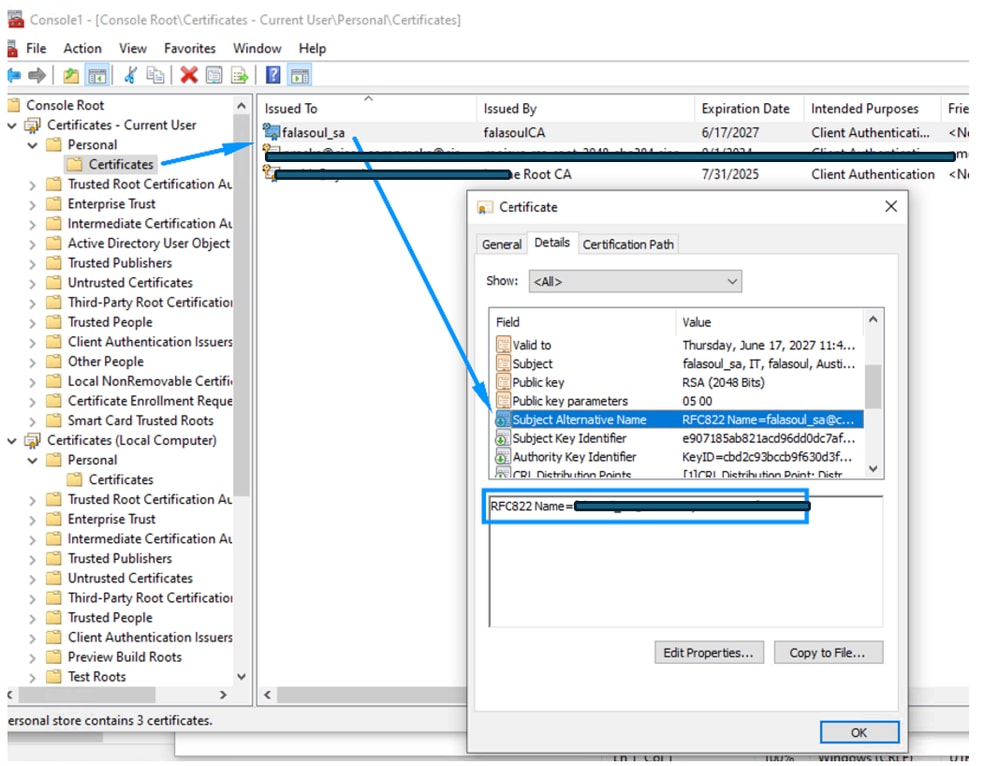
Step 4: Download the certificate in Base64 format and install in the user personal trusted store certificate.
Step 5: Confirm the right information exists in the certificate

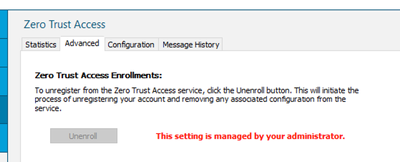
Step 6: Restart your ZTNA Module for the enrollment to start
Verify
Use this section to confirm that your configuration works properly.
Step 1: ZTNA Module message when configuring the enrollment choices file:
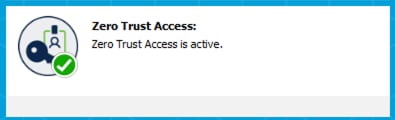
Step 2: After restarting the ZTNA Module for the first time you can see that you are auto-enrolled into ZTNA
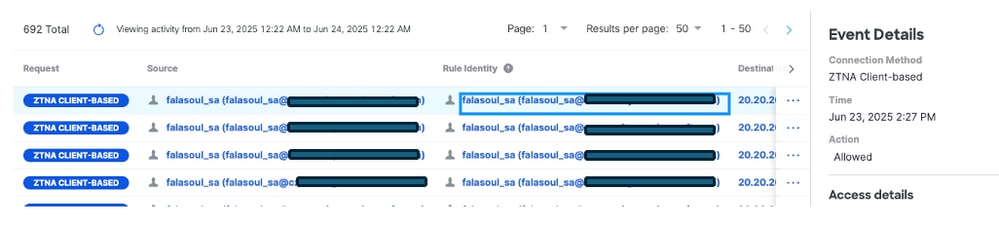
Step 3: Verify the right user showing up in activity search based on the SAN information
Step 4: Confirm the right information exists in the certificate
Troubleshoot
This section provides information you can use to troubleshoot your configuration.
Step 1: Confirm the right information exists in the certificate and its installed in the right certificate store.

Step 2: Confirm that enrollment is not failing on certificate requirements using DART
Step 3: Confirm you are able to resolve your FTD outside interface properly if UZTNA is being used.
common error:
2025-06-16 05:44:45.609237 csc_zta_agent[0x00001638, 0x00000e58] T/ NetworkTransportStateTracker.cpp:110 NetworkTransportStateTracker::transitionState()  transitoned state: Initialized->Connecting
2025-06-16 05:44:45.609237 csc_zta_agent[0x00001638, 0x00000e58] T/ AppSocketTransport.cpp:231 AppSocketTransport::OnNextTransportStateChange() tcp:51470__20.20.20.150 05411A30 stream=189 nextTransportState: Connecting
2025-06-16 05:44:45.609237 csc_zta_agent[0x00001638, 0x00000e58] T/ NetworkTransportStateTracker.cpp:110 NetworkTransportStateTracker::transitionState()  transitoned state: Initialized->Connecting
2025-06-16 05:44:45.609237 csc_zta_agent[0x00001638, 0x00000e58] I/ TcpTransport.cpp:114 TcpTransport::ConnectTransport()  headendInfo=TCP destination [ftd.marvel.local]:443
2025-06-16 05:44:45.609237 csc_zta_agent[0x00001638, 0x00000e58] T/ NetworkTransportStateTracker.cpp:110 NetworkTransportStateTracker::transitionState()  transitoned state: Initialized->Connecting
2025-06-16 05:44:45.610238 csc_zta_agent[0x00001638, 0x00000e58] T/ TcpTransport.cpp:150 TcpTransport::ConnectTransport() resolving dns for ftd.marvel.local
2025-06-16 05:44:45.610238 csc_zta_agent[0x00001638, 0x00000e58] E/ TcpTransport.cpp:166 TcpTransport::handleDnsResolveComplete()  dns resolve error No such host is known
Related Information
 Feedback