Optical Safety on EDFA2 Card

Table 1. Feature History

Feature Name

Release Information

Feature Description

Optical safety on EDFA2 card

Cisco IOS XR Release 25.1.1

You can configure the optical safety mode to implement an optical safety mechanism on the BST2 and PRE amplifiers of the EDFA2 card. It ensures safe power levels and facilitates system recovery across various configurations and scenarios during fiber breakdown.

This optical safety manages the shutdown and restart of the EDFA Laser using Automatic Laser Shutdown and Automatic Power Reduction mechanisms. This ensures that the Hazard Level 1 power limit is not exceeded, thereby ensuring personnel safety.

CLI commands are:

  • egress-ampli-safety-control-mode {auto | disabled}

  • egress-ampli-osri

  • egress-ampli-force-apr { off |on }

Optical safety on EDFA2 card

The optical safety mechanism applies to various components of the EDFA2 card, such as BST2 and PRE amplifiers, ensuring safe power levels and facilitating system recovery across different configurations and scenarios.

The BST1 amplifier is an internal booster within the card and does not require safety considerations because no LC fiber is connected to an external connector. This design eliminates any risk of harm to people or damage to property, so BST1 amplifier does not require optical safety measures.

When you enable the optical safety mode through the CLI command, the optical safety feature manages these main functionalities:

  • EDFA Laser shutdown: If a fiber break occurs on the network, a network safety mechanism is implemented through the automatic laser shutdown (ALS). The ALS automatically shuts down the laser output power of amplifiers BST2 and PRE contained in the EDFA2 card.

  • EDFA Laser restart: This depends on:

    • The condition of the optical input.

    • The provisioned safety operative mode and port status.

Optical safety on the BST2 amplifier

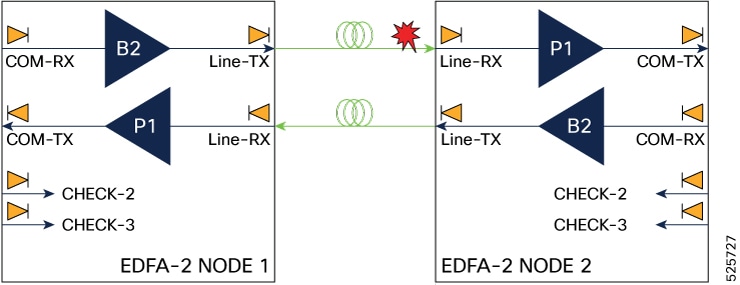
Optical safety on the BST2 amplifier in the Line-TX side, involves implementing the shutdown and automatic restart of the amplifier to prevent hazardous exposure to laser emissions.

BST2 amplifier shutdown process

The BST2 shutdown process outlines the step-by-step sequence of powering down the amplifiers.

Figure 1. BST2 shutdown sequence
Figure 2. LOC alarm generation
  1. Fiber is cut from Node1 to Node2.

  2. In Node2, the Line-RX photodiode detects an LOS-P event. After 50 ms of soaking, the ALS mechanism shuts down the B2 amplifier in Node2.


    Note


    When a fiber cut occurs, both the communication channels and the OSC signal are lost, leading to an LOC alarm. However, if only the communication channels are lost and the OSC signal remains intact, an LOS-P) alarm is triggered.


  3. This in turn causes a LOS-P event detected by the Node 1 Line-RX photodiode. After 50 ms of soaking, B1 in Node1 shuts down.

  4. No power is present on the open fiber.

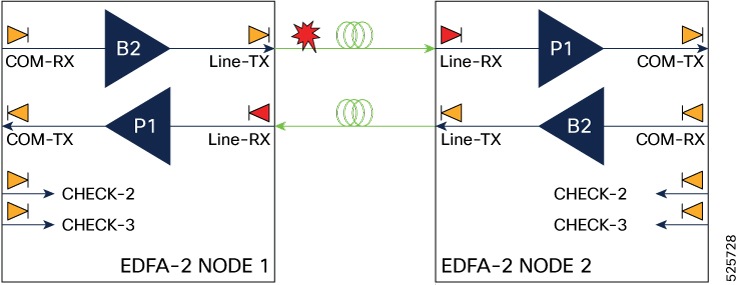
BST2 amplifier restart process

During amplifier restart, the system operates in pulse mode with Automatic Power Reduction (APR) activated. This ensures the Hazard Level 1 power limit is not exceeded while allowing safe system recovery.

  1. At this point, the Line-TX port in Node 1 attempts to establish communication to Line-RX in Node 2 by emitting a pulse. The pulse cycle consists of 100 seconds with the laser off, followed by 5 to 15 seconds with the laser on at an output power of +8 dBm.

  2. The Line-RX port in Node1 waits for a similar pulse in response from the Line-TX port of Node 2.

  3. If no response is received within some seconds, the Node 1 tries again and again until it receives a response pulse from Line-TX port of Node2, indicating the system failure is corrected and full continuity in the fiber between the two ends exists.

  4. The Node 1 amplifier operates in pulse mode at a reduced power level. It emits a laser pulse with an automatic power reduction to +20 dBm. This level assures that Hazard Level 1 is not exceeded, for personnel safety, even though the establishment of successful OSC communication is assurance that any broken fiber is fixed.

  5. If Line-TX port of Node2 amplifier responds with a longer pulse within a particular duration, both amplifiers are changed from pulse mode at reduced power to normal operating power mode.

Optical safety on the PRE amplifier

PRE amplifier safety schema

In the context of PRE amplifier, the devices that receive its signal are demultiplexers. These are external components that require fiber connections. To ensure safety, they must be connected between the EDFA and the Demux monitor port. Therefore, the safety schema shown in these images is essential.There are two type of safety schema layouts:
  • Double passive layout: Utilizes both passive modules, NCS1K-MD-32O-CE and NCS1K-MD-32E-CE.

    Figure 3. EDFA2 with double passive layout
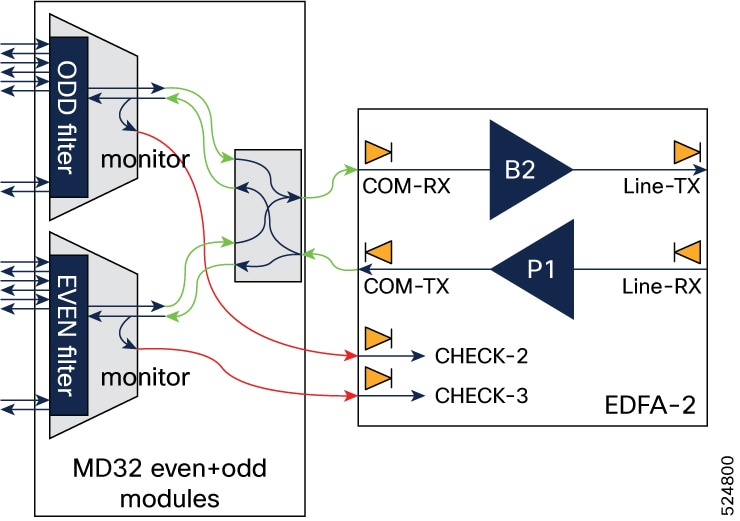
  • Single passive layout: Utilizes one of the passive modules

    Figure 4. EDFA2 with single passive layout

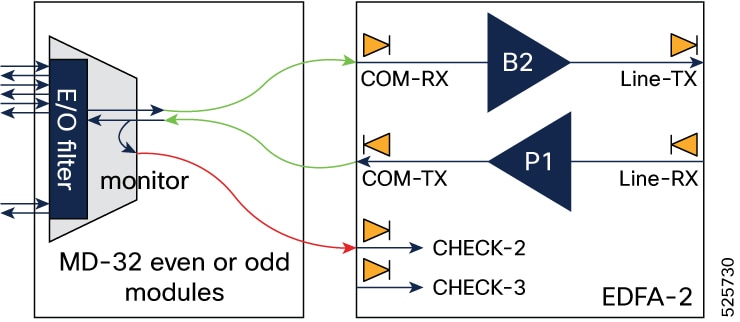
Safety schema implementation

To detect any open connection between the PRE amplifier output and the COM RX port on the passive module, connect the monitor ports on passive modules to the CHECK-RX ports of the EDFA2 card using cables indicated by red links.

  • Double passive module setup: When both NCS1K-MD-32O-CE and NCS1K-MD-32E-CE modules are present, connect loopbacks between their monitor ports using the two check ports.

  • Single Passive Module Setup: If only one module (either ODD or EVEN) is present, connect a single loopback to one check port and shut down the other port.

PRE amplifier shutdown behavior


Note


Only the CHECK ports that are configured as In-Service (IS) participate in PRE amplifier safety operations.


  • Double passive layout : Both ports must be configured as IS. The PRE amplifier shuts down only if one of the CHECK-2 and CHECK-3 ports detect power below the threshold.

  • Single passive layout: The EDFA2 CHECK2 port connected to the MD32 MON-E-DMX port must be configured as IS, while the other CHECK port should be Out of Service (OOS).

    • The PRE amplifier shuts down when the CHECK2 port in IS detects power below the threshold.

    • When both CHECK 2 and CHECK 3 ports are Out of Service (OOS), the PRE amplifier remains on, maintaining a power level of up to 20 dBm.

PRE amplifier restart procedure

To restart the PRE amplifier, create a loop connection between the Demux monitor port and one of the CHECK ports. After shutdown, the PRE amplifier can return to operation based on the loop connection evaluation to determine if one or both ports need to be alarm-free before restarting.

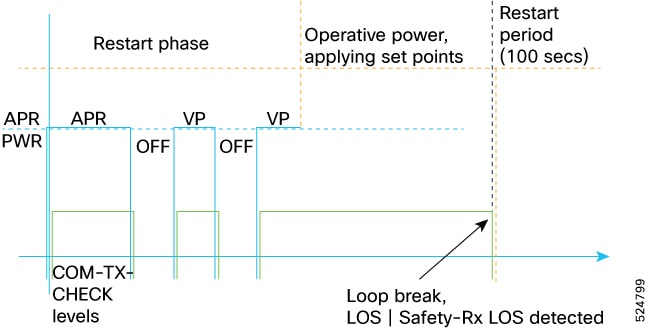
  1. The PRE amplifier activates in APR mode with output power set to a safe level of 8 dBm.

  2. The check starts with an 8-second APR pulse. If power is present on the CHECK port at the end, a Verification Phase (VP) begins:

    • Two off/on cycles are performed, monitoring expected alarm transitions.

      • Double passive layout : The alarm pattern must be detected on both CHECK2 and CHECK3 ports for PRE amplifier restart.

      • Single passive layout: The alarm pattern must be detected only on the CHECK port configured as IS.

    • Alarm transitions during cycles are verified to ensure proper responses. If transitions are not as expected, the process pauses, retrying after 100 seconds

The restart procedure is completely safe because PRE amplifier is operating at low power level (APR).

This picture demonstrates PRE amplifier power levels and alarm levels during a successful restart and subsequent shutdown event.

Figure 5. PRE amplifier restart process

Configure optical safety for the EDFA2 card

Use this task to configure various optical safety parameters on the COM-TX and LINE-TX ports of the EDFA2 card.

The optical safety parameters are:

Table 2. Optical safety parameters

Parameters

Description

egress-ampli-safety-control-mode

Configures the safety mode. The available options are:

  • auto: This is the default option.

  • disabled: Use this option to work in ALS disabled mode where the EDFA maximum output power is clamped to 20dBm.

egress-ampli-osri

Configures the Optical Safety Remote Interlock (OSRI). Use the no form of the command to disable OSRI.

The OSRI will turn off the EDFA, regardless of any power settings, regular configurations, or other maintenance settings, such as force APR or safety mode disable.

egress-ampli-force-apr

Forces the Automatic Power Reduction (APR). The available options are:

  • off: This is the default option and re-enables the safety check mechanism starting from the Laser OFF condition.

  • on: Use this option to forcibly enable the EDFA pump lasers, regardless of safety mode and LOS alarms. It also maintains the EDFA output power at a constant 'safe' level of +8 dBm.

Procedure


Step 1

Use the command controller Ots R/S/I/P egress-ampli-safety-control-mode {auto | disabled} to enable or disable the optical safety mode on the EDFA2 card.

Example:

Enable and disable safety-control-mode on BST2 amplifiers (LINE-TX port):

RP/0/RP0/CPU0:ios(config)#controller ots 0/0/0/0 egress-ampli-safety-control-mode auto
  
RP/0/RP0/CPU0:ios(config)#controller ots 0/0/0/0 egress-ampli-safety-control-mode disabled
 

Enable and disable safety-control-mode on PRE amplifier (COM-TX port):

RP/0/RP0/CPU0:ios(config)#controller ots 0/0/0/1 egress-ampli-safety-control-mode auto
  
RP/0/RP0/CPU0:ios(config)#controller ots 0/0/0/1 egress-ampli-safety-control-mode disabled
 

Step 2

Use the command controller Ots R/S/I/P admin-state {in-service | out-of-service} to configure the transport administration state on the CHECK-2 and CHECK-3 ports of the EDFA2 card, for PRE1 amplifier safety.

Example:

When both the CHECK ports are connected to the monitor ports of the NCS1K-MD-32O-CE and NCS1K-MD-32E-CE passive modules:

RP/0/RP0/CPU0:ios(config)#controller ots 0/0/0/2 admin-state in-service
RP/0/RP0/CPU0:ios(config)#controller ots 0/0/0/3 admin-state in-service

When any one of the passive modules, configure one port in- service and other in out-of-service.

RP/0/RP0/CPU0:ios(config)#controller ots 0/0/0/2 admin-state in-service
RP/0/RP0/CPU0:ios(config)#controller ots 0/0/0/3 admin-state out-of-service

Step 3

If you want to enable the OSRI on the EDFA2 card, use the controller Ots R/S/I/P egress-ampli-osri command.

Example:

Enable and disable OSRI on BST2 amplifiers (LINE-TX port):

RP/0/RP0/CPU0:ios(config)#controller ots 0/0/0/0 egress-ampli-osri
  
RP/0/RP0/CPU0:ios(config)#no controller ots 0/0/0/0 egress-ampli-osri
 

Enable and disable OSRI on PRE amplifier (COM-TX port):

RP/0/RP0/CPU0:ios(config)#controller ots 0/0/0/1 egress-ampli-osri
  
RP/0/RP0/CPU0:ios(config)#no controller ots 0/0/0/1 egress-ampli-osri
 

Step 4

If you want to force APR or disable the APR, use the command controller Ots R/S/I/P egress-ampli-force-apr { off | on } to enable or disable the APR on the EDFA2 card.

Example:

Enable and disable APR on amplifiers (LINE-TX port):

RP/0/RP0/CPU0:ios(config)#controller ots 0/0/0/0 egress-ampli-force-apr on
  
RP/0/RP0/CPU0:ios(config)#controller ots 0/0/0/0 egress-ampli-force-apr off
  

Enable and disable APR on PRE amplifier (COM-TX port):

RP/0/RP0/CPU0:ios(config)#controller ots 0/0/0/1 egress-ampli-force-apr on
  
RP/0/RP0/CPU0:ios(config)#controller ots 0/0/0/1 egress-ampli-force-apr off
  

Verify the optical safety configurations on the EDFA2 card

Use this task to verify various optical safety parameters configured on the COM-TX and LINE-TX ports of the EDFA2 card.

Procedure


Use the show controllers ots R/S/I/P to verify the optical safety parameters configured on the COM-TX and LINE-TX ports of the EDFA2 card.

Example:

Verify the safety parameters configured on the BST2 amplifiers (LINE-TX port):

RP/0/RP0/CPU0:ios#show controllers ots 0/0/0/0 
Tue Feb 25 14:40:05.324 IST

 Controller State: Up 

 Transport Admin State: In Service 

 LED State: Green 

 Last link flapped: 3d20h

         Alarm Status:
         -------------
         Detected Alarms: None


         Alarm Statistics:
         -----------------
         RX-LOS-P = 1          
         RX-LOC = 1          
         TX-POWER-FAIL-LOW = 0          
         INGRESS-AUTO-LASER-SHUT = 0          
         INGRESS-AUTO-POW-RED = 0          
         INGRESS-AMPLI-GAIN-LOW = 0          
         INGRESS-AMPLI-GAIN-HIGH = 0          
         EGRESS-AUTO-LASER-SHUT = 0          
         EGRESS-AUTO-POW-RED = 1          
         EGRESS-AMPLI-GAIN-LOW = 0          
         EGRESS-AMPLI-GAIN-HIGH = 0          
         HIGH-TX-BR-PWR = 0          
         HIGH-RX-BR-PWR = 0          
         SPAN-TOO-SHORT-TX = 0          
         SPAN-TOO-SHORT-RX = 0          
         INGRESS-AMPLI-LASER-OFF = 0          
         EGRESS-AMPLI-LASER-OFF = 0          

         Parameter Statistics:
         ---------------------
         Total Rx Power = -5.11 dBm 
         Total Tx Power = 3.40 dBm 
         Rx Signal Power = -5.82 dBm 
         Tx Signal Power = -0.31 dBm 
         Tx Voa Attenuation = 9.2 dB 
         Egress Ampli Mode = Gain
         Egress Ampli Gain = 23.0 dB
         Egress Ampli Tilt = 0.0 dB
         Egress Ampli Safety Control mode = auto 
         Egress Ampli OSRI = OFF 
         Egress Ampli Force APR = OFF 
         Egress Ampli BR Power = -18.73 dBm 
         Egress Ampli BR Ratio = -18.40 dB 


         Configured Parameters:
         -------------
         Tx Voa Attenuation = 0.0 dB 
         Egress Ampli Mode = Gain
         Egress Ampli Gain = 23.0 dB 
         Egress Ampli Power = -2.0 dBm
         Egress Ampli Tilt = 0.0 dB
         Egress Ampli Safety Control mode = auto 
         Egress Ampli OSRI = Off 
         Egress Ampli Force APR = off
                  BR High Threshold = 0.0 dBm 
               

Verify the safety parameters configured on the PRE amplifier (COM-TX port):

RP/0/RP0/CPU0:ios##show controllers ots0/0/0/1
Wed Oct  2 16:47:25.596 UTC
 
 Controller State: Up
 
 Transport Admin State: In Service
 
 LED State: Green
 
         Alarm Status:
         -------------
         Detected Alarms: None
 
 
         Alarm Statistics:
         -----------------
         RX-LOS-P = 0
         RX-LOC = 0
         TX-POWER-FAIL-LOW = 0
         INGRESS-AUTO-LASER-SHUT = 0
         INGRESS-AUTO-POW-RED = 0
         INGRESS-AMPLI-GAIN-LOW = 0
         INGRESS-AMPLI-GAIN-HIGH = 0
         EGRESS-AUTO-LASER-SHUT = 0
         EGRESS-AUTO-POW-RED = 0
         EGRESS-AMPLI-GAIN-LOW = 0
         EGRESS-AMPLI-GAIN-HIGH = 0
         HIGH-TX-BR-PWR = 0
         HIGH-RX-BR-PWR = 0
         SPAN-TOO-SHORT-TX = 0
         SPAN-TOO-SHORT-RX = 0
 
         Parameter Statistics:
         ---------------------
         Total Rx Power = -11.89 dBm
         Total Tx Power = 3.99 dBm
 
 
         Tx Voa Attenuation = 1.0 dB
         Ingress Ampli Mode = Gain
         Ingress Ampli Gain = 8.0 dB
         Ingress Ampli Gain Range = Normal
         Egress Ampli Mode = Power
         Egress Ampli Gain = 19.0 dB
         Egress Ampli Tilt = 0.0 dB
         Egress Ampli Gain Range = Normal
         Egress Ampli Safety Control mode = auto
         Egress Ampli OSRI = OFF
         Egress Ampli Force APR = OFF
         Egress Ampli BR Power = -20.20 dBm
         Egress Ampli BR Ratio = -24.20 dB


         Configured Parameters:
         -------------
         Tx Voa Attenuation = 1.0 dB
         Ingress Ampli Gain = 8.0 dB
         Ingress Ampli Gain Range = Normal
         Egress Ampli Mode = Gain
         Egress Ampli Gain = 21.0 dB
         Egress Ampli Power = -5.0 dBm
         Egress Ampli Tilt = 0.0 dB
         Egress Ampli Gain Range = Normal
        Egress Ampli Safety Control mode = auto
         Egress Ampli OSRI = off
         Egress Ampli Force APR = off
         BR High Threshold = -17.0 dBm
               

The entries highlighted in bold show the optical safety parameters configured.


Troubleshooting EDFA-BST2 and pre-amplifier EDFA

Troubleshoot the booster amplifier (EDFA-BST2) issues

When the BST2 amplifier switches off for safety reasons, follow these steps to diagnose and resolve the issue:

  1. Disable the safety feature on BST2: Set the safety disable option on the BST2 amplifier to allow for further investigation and configuration.Disable the safety feature on the BST2 amplifier to allow further investigation and configuration.

  2. Check the received power value:

    • Examine the received power on the RX line of the remote node (the node where the fiber span physically terminates at BST2).

    • Compare the observed value with the expected operational thresholds.

  3. Analyze threshold and power values:

    • If the observed RX power is below the threshold but matches expected operational values:

      • Reconfigure the threshold to align with the expected RX power.

    • If the observed RX power and Total RX Power are both -40 dBm:

      • This indicates a physical fiber interruption between the two sites. Inspect the fiber span for possible damage or disconnection.

Troubleshoot the pre-amplifier EDFA issues

When the Pre-Amplifier switches off for safety reasons, follow these steps:

  1. Disable safety mode on the pre-amplifier: set the safety disable option on the pre-amplifier.

  2. Verify received power on CHECK-2 and CHECK-3 ports:Check the power levels received on both CHECK-2 and CHECK-3 ports.


    Note


    These are typically monitor ports on the demux, with an expected attenuation of approximately -20 dBm from the demux output.


  3. Analyze power levels:

    • If power levels on both CHECK ports are below threshold, reset both thresholds to the correct values.

    • If optical power is present on only one CHECK port but should be present on both, check the physical connection between the CHECK port (alarmed) and its corresponding demux monitor port.

    • If optical power is present on only one CHECK port as expected (e.g., only one mux/demux is connected), shut down the CHECK port that is not in use (to avoid unnecessary alarms).

  4. Restore safety mode:Once the checks and adjustments are complete, set the Pre-Amplifier safety mode back to automatic.


    Note


    If you need to operate with the safety feature disabled, both CHECK ports must be configured in shutdown mode.