デバイスに基本ネットワーク設定を行い、Security Cloud Control に登録できるように、手動プロビジョニング向けの Cisco Secure Firewall 1210/20 初期セットアップを完了する方法。
手動でプロビジョニングを行う場合は、Cisco Secure Firewall Device Manager または CLI を使用して、ファイアウォールの初期設定を実行します。
Cisco Secure Firewall 1210/20 Threat Defense スタートアップガイド:クラウド提供型 Firewall Management Center
デバイスに基本ネットワーク設定を行い、Security Cloud Control に登録できるように、手動プロビジョニング向けの Cisco Secure Firewall 1210/20 初期セットアップを完了する方法。
手動でプロビジョニングを行う場合は、Cisco Secure Firewall Device Manager または CLI を使用して、ファイアウォールの初期設定を実行します。
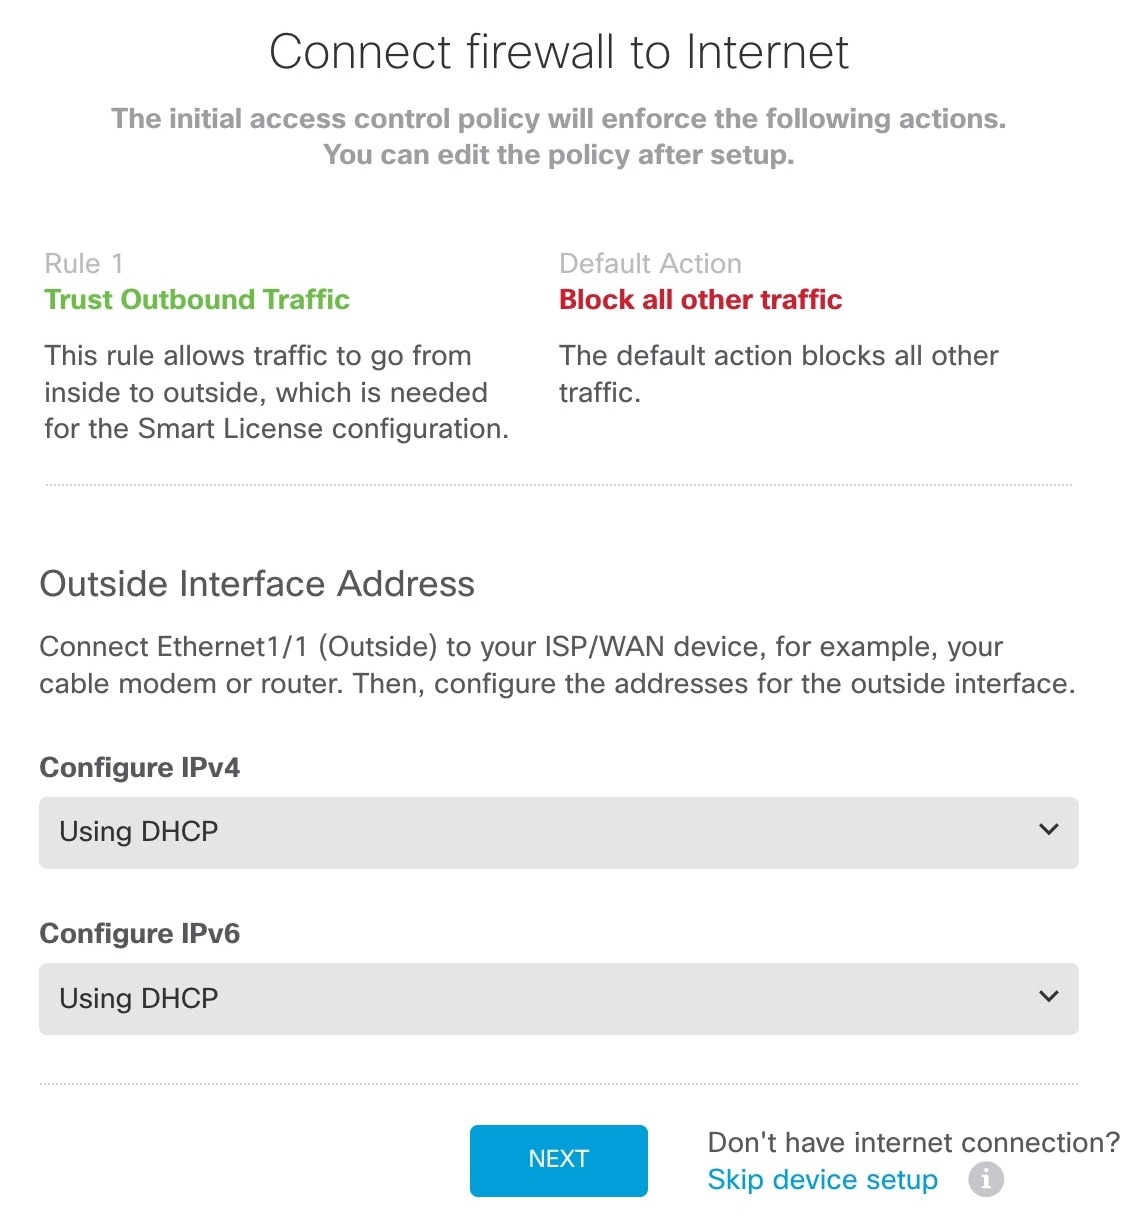
この方法を使用すると、ファイアウォールを登録した後、管理インターフェイスに加えて次のインターフェイスが事前設定されます。
イーサネット 1/1:「外部」、DHCP からの IP アドレス、IPv6 自動設定
VLAN1:「内部」、192.168.95.1/24
デフォルトルート:外部インターフェイスで DHCP を介して取得
追加インターフェイス:Firewall Device Manager からのインターフェイス設定はすべて保持されます。
他の設定(内部の DHCP サーバー、アクセス コントロール ポリシー、セキュリティゾーンなど)は保持されません。
| 1. | コンピュータを内部インターフェイス(Ethernet 1/2 ~ 1/8 または Cisco Secure Firewall 1220 の場合は 1/2 ~ 1/10)に接続します。 |
|
| 2. | Firewall Device Manager にログインします。
|
|
| 3. | セットアップウィザードを使用します。 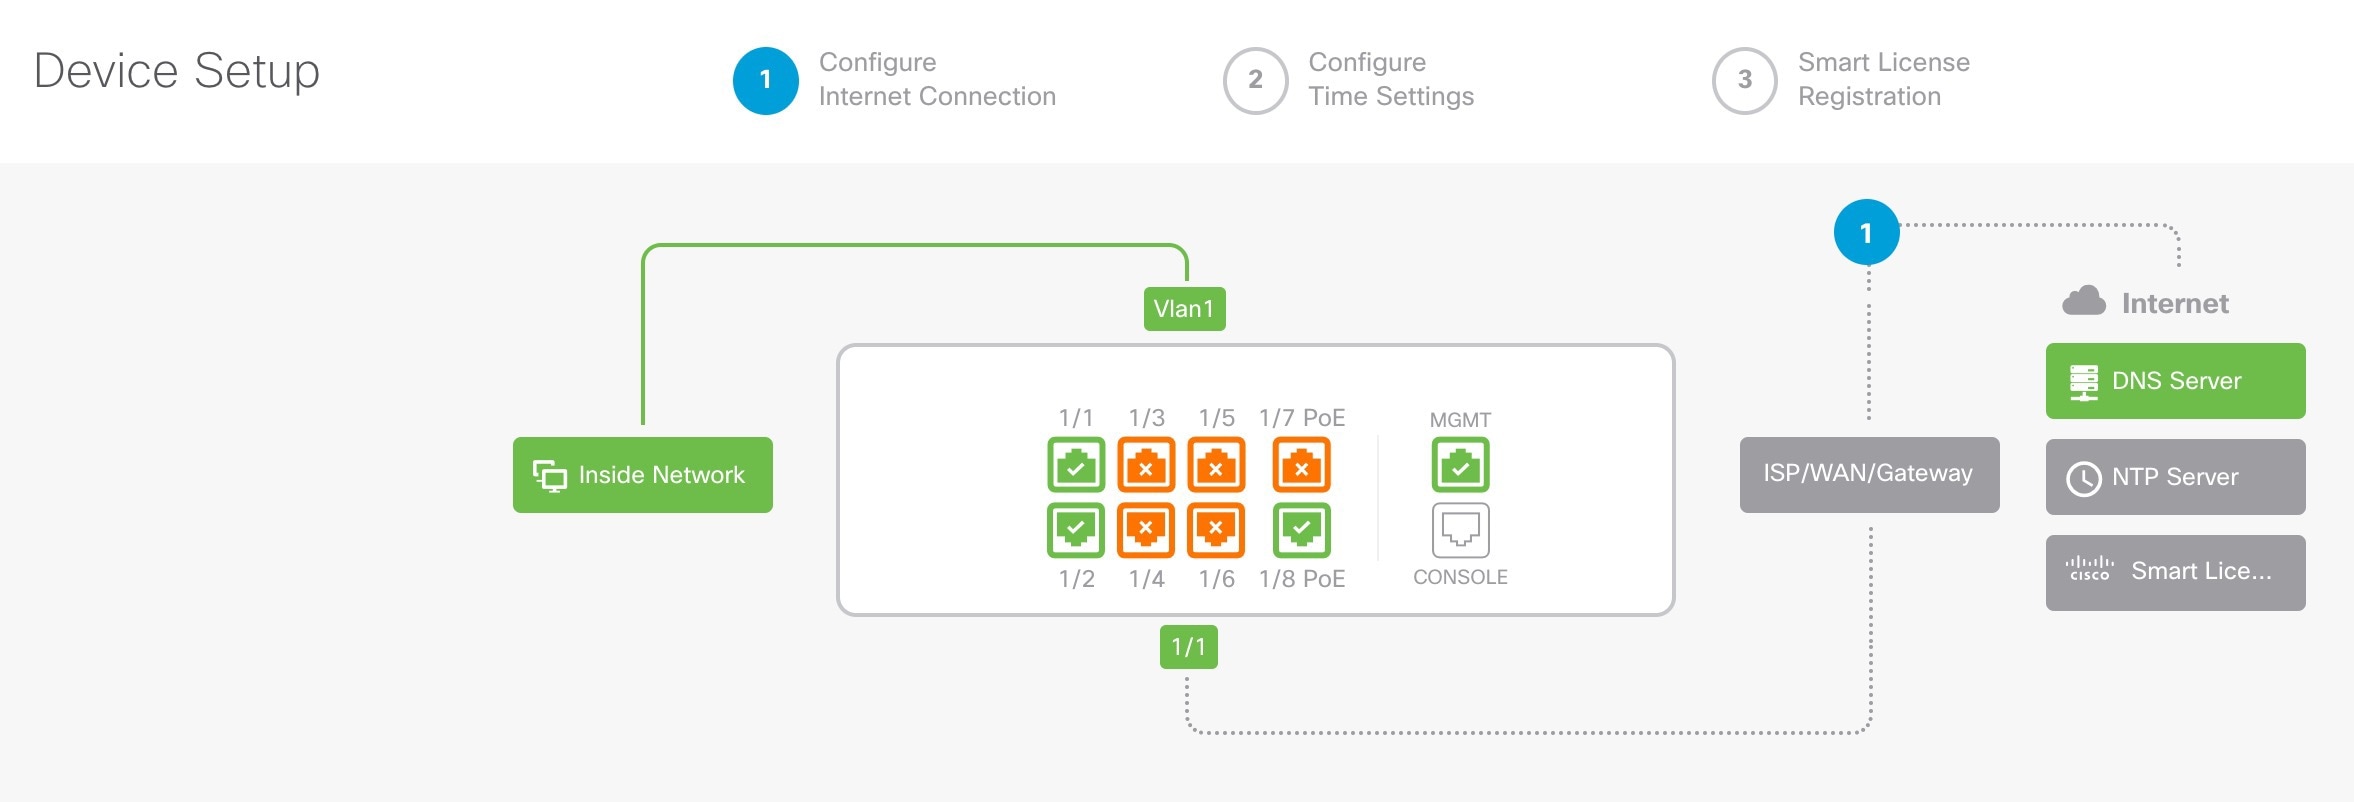
|
|
| 4. | 追加のインターフェイスを設定する場合は、[デバイス(Device)] を選択し、[インターフェイス(Interface)] のサマリーにあるリンクをクリックします。 |
|
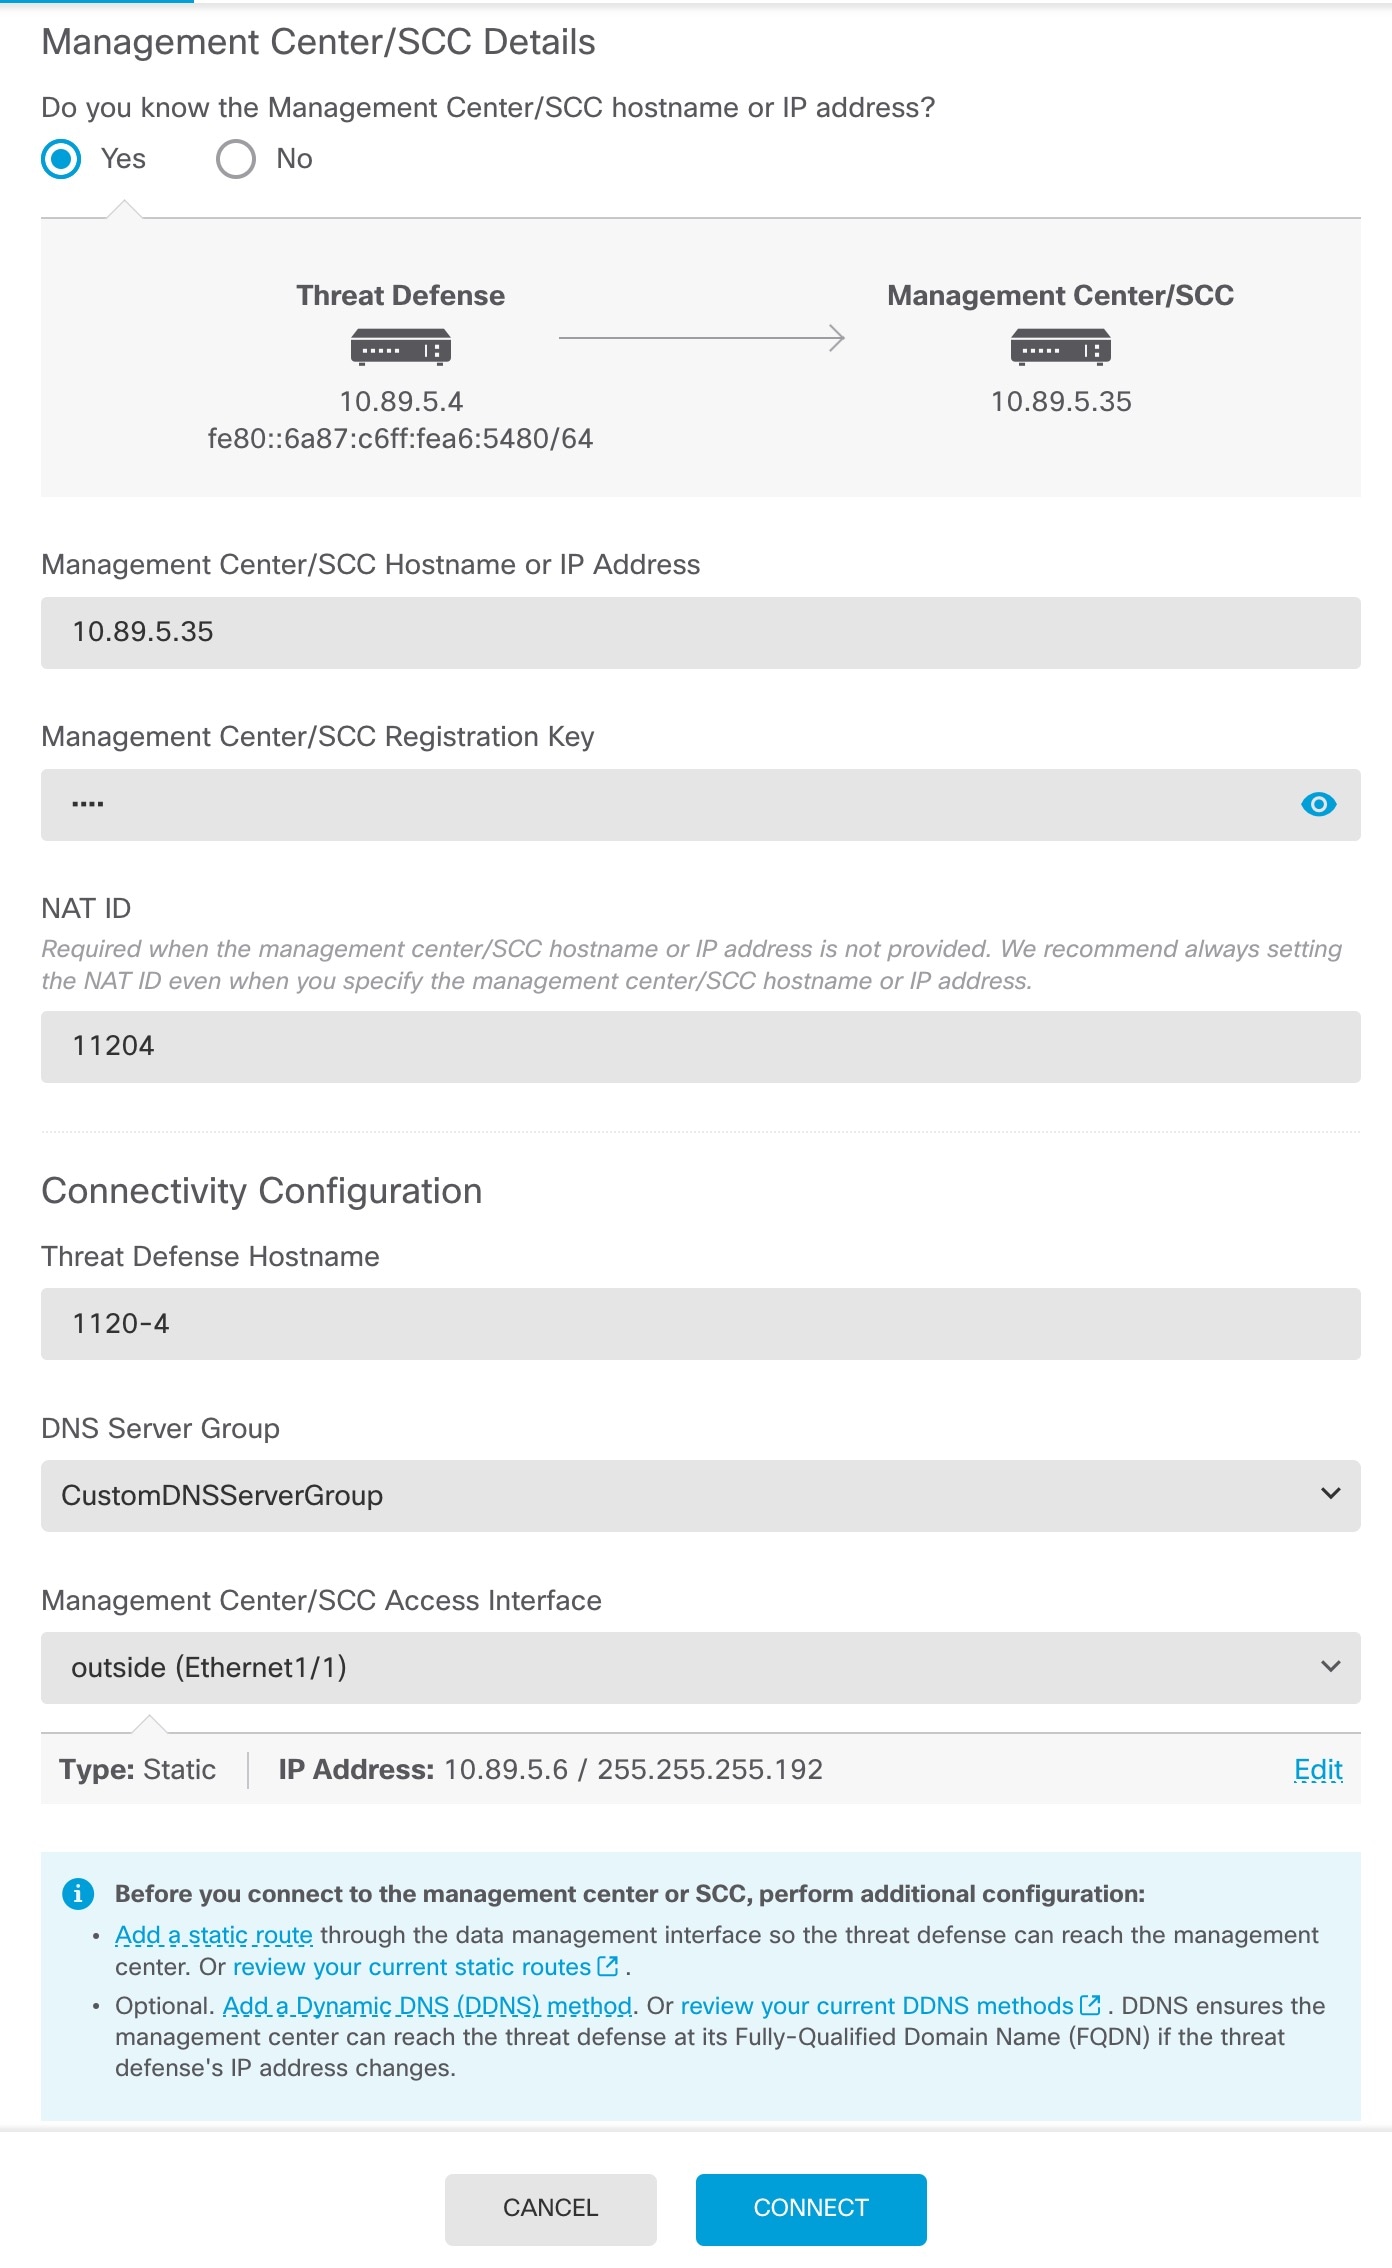
| 5. | の順に選択し、[続行(Proceed)] をクリックして Security Cloud Control に登録します。 [Management Center/SCC/Details] を設定します。
|
|
| 6. | [接続の設定(Connectivity Configuration)] を設定します。 |
|
| 7. | (任意) [ダイナミックDNS(DDNS)方式の追加(Add a Dynamic DNS (DDNS) method)] をクリックします。 DDNS は、Firewall Threat Defense の IP アドレスが変更された場合に クラウド提供型 Firewall Management Center が FQDN で Firewall Threat Defense に到達できるようにします。 |
|
| 8. | [接続(Connect)] をクリックします。 [登録ステータス(Registration Status)] ダイアログボックスに、Security Cloud Control 登録の現在のステータスが表示されます。 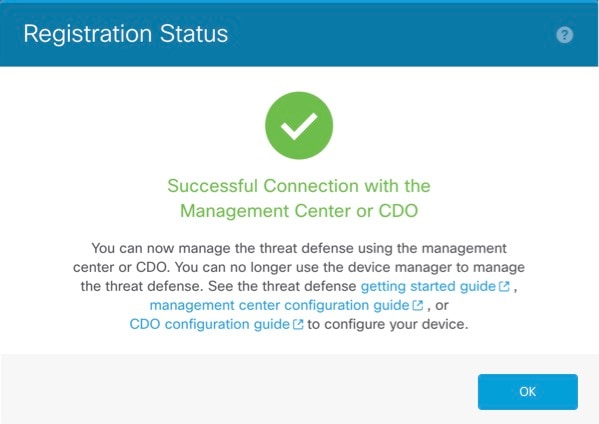
|
|
| 9. | ステータス画面で [Saving Management Center/ Registration Settings] の手順を実行したら Security Cloud Control に移動し、ファイアウォールを追加します。手動プロビジョニングによるファイアウォールのオンボーディングを参照してください。 |
CLI セットアップスクリプトを使用して、専用の管理 IP アドレス、ゲートウェイ、およびその他の基本ネットワーク設定を行います。
| 1. | コンソールポートに接続して Firewall Threat Defense CLI にアクセスします。Firewall Threat Defense CLI へのアクセスを参照してください。 |
|
| 2. | 管理インターフェイスの設定用の CLI セットアップスクリプトを完了します。
ガイダンス:これらのタイプのアドレスの少なくとも 1 つについて y を入力します。管理インターフェイスを使用する予定がない場合でも、プライベートアドレスなどの IP アドレスを設定する必要があります。 ガイダンス:[手動(manual)] を選択します。マネージャアクセスに外部インターフェイスを使用する場合、DHCP はサポートされません。ルーティングの問題を防ぐために、このインターフェイスがマネージャ アクセス インターフェイスとは異なるサブネット上にあることを確認してください。 ガイダンス:ゲートウェイを data-interfaces に設定します。この設定は、外部インターフェイスを通じてルーティングできるように、バックプレーンを介して管理トラフィックを転送します。 ガイダンス:管理インターフェイスの DNS サーバーを設定します。これらは、両方とも外部インターフェイスからアクセスされるため、後で設定する外部インターフェイスの DNS サーバーと一致する可能性があります。 ガイダンス: クラウド提供型 Firewall Management Center を使用する場合は、no と入力します。 ガイダンス:routed と入力します。外部マネージャアクセスは、ルーテッド ファイアウォール モードでのみサポートされています。 |
|
| 3. | マネージャアクセス用の外部インターフェイスを設定します。 configure network management-data-interface Enter を押すと、外部インターフェイスの基本的なネットワーク設定を行うように求めるプロンプトが表示されます。 手動 IP アドレス ガイダンス:登録後に外部 DNS サーバーを保持するには、クラウド提供型 Firewall Management Center で DNS プラットフォーム設定を再設定する必要があります。 DHCP からの IP アドレス |
|
| 4. | Security Cloud Control が生成した configure manager add コマンドを使用して、この Firewall Threat Defense を管理する Security Cloud Control を識別します。コマンドの生成については、手動プロビジョニングによるファイアウォールのオンボーディング を参照してください。 例: |
|
| 5. | デバイスをリモート支社に送信できるように Firewall Threat Defense をシャットダウンします。 システムを適切にシャットダウンすることが重要です。単純に電源プラグを抜いたり、電源スイッチを押したりすると、重大なファイル システムの損傷を引き起こすことがあります。バックグラウンドでは常に多数のプロセスが実行されており、電源プラグを抜いたり、電源を切断したりすると、システムをグレースフルシャットダウンできないことを覚えておいてください。
|