Authentication steps for customers
Customers must complete authentication steps to provision internet service for each authentication type.
Steps for SMS with link verification authentication
To complete SMS authentication with link verification, perform these steps:
Procedure
|
Step 1 |
In the captive portal, click or tap any menu item. |
||
|
Step 2 |
In the Log In screen that appears, enter the mobile number.
|
||
|
Step 3 |
Enter the mobile number, and all the mandatory fields in the Data Capture form, and press Accept Terms and Continue. The internet is provisioned, and a SMS with a link to access the portal is sent to the mobile number provided. |
||
|
Step 4 |
Click the link in the SMS for finger print verification. For more information on fingerprint verification, refer to the Fingerprint Verification.
|
Authentication steps for a repeat user for SMS with link verification
The authentication steps for a repeat user for various scenarios are as follows:
-
Completed the finger print verification (Data Capture module is not configured): the internet is provisioned when the customer clicks or taps any menu item.
-
Completed the finger print verification(Data Capture module is configured, the Data Capture form is filled): the internet is provisioned when the customer clicks or taps any menu item.
-
Completed the finger print verification, bit Data capture form is not filled or partially filled( for non mandatory fields): the internet is provisioned when the customer clicks or taps any menu item. However, the Data Capture form appears if any information has changed.
-
Not completed the finger print verification, but filled the Data Capture form: When the customer clicks or tap any menu item, the mobile number field appears along with the pre-filled Data Capture form. The customer must enter the mobile number again to access the internet. This process repeats for all internet access attempts until fingerprint verification is complete.
-
Mobile number verification process was not completed during previous internet access: If the verification process is not complete within a limited time, the internet is provisioned even for invalid mobile numbers. For such users, when the captive portal loads and the customer clicks any menu item or link, the login screen appears with the mobile number field. The customer must enter a valid mobile number.
-
The Data Capture module is configured, and the registration details are outdated: When the captive portal loads, and the customer click any menu item or link in the portal, the registration form appears with the previously filled data. The customer can update the form and press Connect to access the internet
These are some of the scenarios when the registration details become outdated:
-
Added new mandatory fields: Added a new mandatory field in the Data Capture module. For example, if you configure the Data Capture module without a Gender field and later add it as mandatory.
-
Optional field becomes mandatory: The Data Capture module was modified to make an optional field that the customer skipped during registration mandatory. For example, you have configured a Data Capture module with the last name as optional. The customer connected to the SSID and completed the registration without mentioning the last name. Now, you modified the Data Capture module and made the last name mandatory for registration.
-
Modified the choice options: Removed or replaced a choice option that was available for selection. For example, you configured a mandatory business tag, 'Age Criteria,' with 'Child' and 'Adult' as choice options. The customer completed registration by selecting 'Child.' Later, you modified the choices to display as 'Kids' and 'Adult.
-
 Note |
If the Terms and Conditions change in any of these scenarios, the 'Accept Terms and Continue' button appears. The customer must press the 'Accept Terms and Continue' button to access the internet or continue to the next authentication step. |
Fingerprint Verification
A fingerprint verification is a customer authentication mechanism that
-
verifies the identity of a customer when they access a link sent via SMS
-
determines whether the customer is identified as a repeat or first-time user based on verification results, and
-
provides options to bypass verification, affecting subsequent login status.
Fingerprint verification occurs when the customer clicks the link in the message. If the customer does not click the link within a specific time, a temporary page with a 'SKIP' option appears. The customer can select the 'Skip' option to access the internet without fingerprint verification.
The fingerprint verification status for various scenarios is as follows:
-
When the customer clicks the link in the message and the fingerprint matches, the customer is acquired and redirected to the portal page. On their next visit, the customer will be considered a repeat user.
-
When the customer clicks the link in the message and fingerprint verification fails (for example, if the link is opened in a different browser than used for SMS authentication), a confirmation page appears. If the customer selects 'Confirm', customer acquisition occurs and the customer is redirected to the portal page. On their next visit, the customer will be considered a repeat user.
-
When the customer clicks the link in the message and fingerprint verification fails, a confirmation page appears. If the customer selects 'Cancel', the customer will be considered a first-time user on their next visit, and the login screen will display a blank mobile number field.
-
If the customer selects 'Skip' on the temporary page, the customer is considered a first-time user on their next visit, and the login screen will display a blank mobile number field.
Steps for SMS with password verification authentication
To complete SMS authentication with password verification, follow these steps:
Procedure
|
Step 1 |
In the captive portal, select any menu item. |
||||
|
Step 2 |
In the Log In screen that appears, enter the mobile number.
|
||||
|
Step 3 |
To stop receiving notifications, clear the Opt In to Receive notification check box.
|
||||
|
Step 4 |
Press Accept Terms and Continue. |
||||
|
Step 5 |
In the screen that appears, enter the verification code received through the SMS. |
||||
|
Step 6 |
Press Verify. f Data Capture is enabled, the Data Capture form appears after successful verification of the code. |
||||
|
Step 7 |
Enter all the mandatory fields in the Data Capture form, and press Connect.
After successful registration, internet provisioning begins. If Data Capture is not enabled, provisioning occurs immediately after verification.
|
Steps for E-mail authentication
To complete the e-mail authentication, perform these steps:
Procedure
|
Step 1 |
In the captive portal, click/tap any menu item. |
||
|
Step 2 |
In the Log In screen that appears, enter the e-mail ID. |
||
|
Step 3 |
To unsubscribe from notifications, the customer must uncheck the Opt In to Receive notification check box.
|
||
|
Step 4 |
Press Accept Terms and Continue. If the e-mail ID entered is valid, the internet is provisioned. |
||
|
Step 5 |
If the Data Capture is enabled on the Authentication screen of the captive portal, a Data Capture form appears when the customer press Accept Terms and Continue. |
||
|
Step 6 |
Enter all mandatory fields in the Data Capture form, and press Connect.
The internet provisioning process starts, and the internet becomes available. |
Authentication steps for a repeat user for email verification
In Cisco Spaces, as part of the authentication workflow for a new user, you need to enter the email address only once. All domain-related validations and MX record checks are cached for a specific duration. These checks are not repeated for other users from the same domain within the cached duration.
For example, if 10 users connect to the Captive Portal at the same time and enter email addresses from the same domain (such as xyz@abc.com), the domain validation and MX record check occur only once during the specified caching period. However, SMTP connection and mailbox checks are performed for all 10 users to verify whether each user ID is valid.
To make a SMTP connection:
-
Establish a socket connection to the SMTP server and verify the response.
-
Run the ELHO command and verify the response.
-
Run the MAIL FROM command and verify the response.
-
Run the RCPT TO command and verify the response.
Note |
As part of the Captive Portal new user onboard workflow, the email address of a user is recorded only once. You can authenticate to Cisco Spaces even if no response was received from the mailbox check. However, you must enter your email address again during your next visit. As part of the mailbox check process, Cisco Spaces will never send an email request to the email address provided by the user. 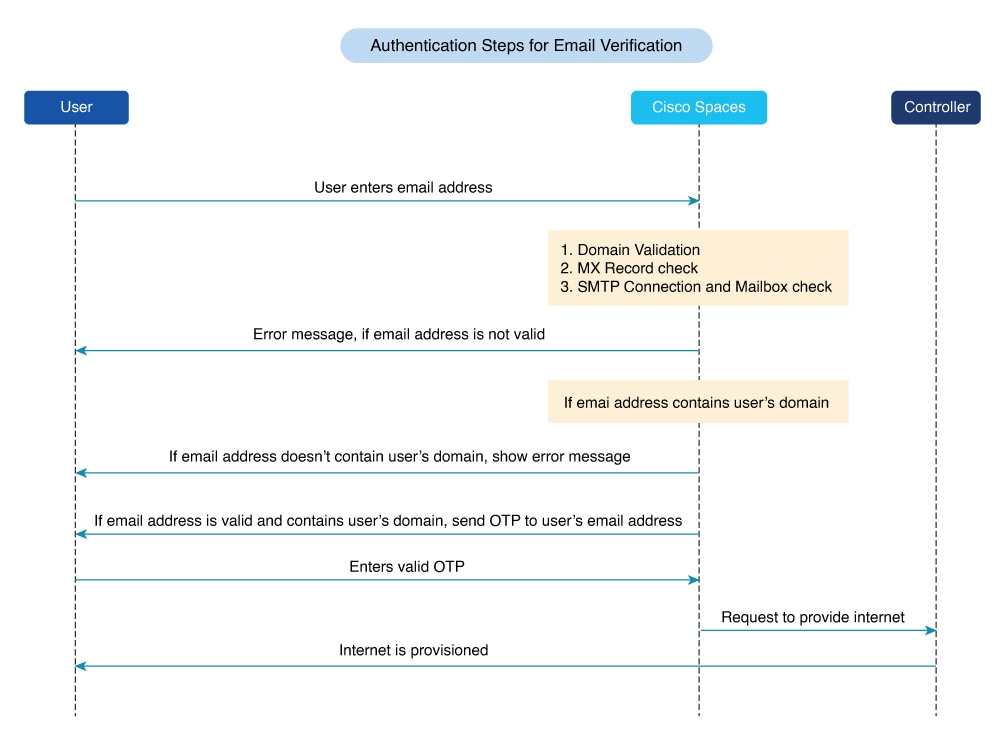
|
Authentication Scenarios
The authentication steps for a repeat user in various scenarios are:
-
Entered invalid e-mail ID during previous log in: When the captive portal loads and you click any menu item or link, the login window is displayed with the invalid email ID from the previous session. You must enter a valid email ID to proceed.
-
Data Capture is not enabled: When the captive portal loads and you click any menu item or link, internet access is provisioned.
-
Data Capture is enabled, and the customer completed the registration: When the captive portal loads and you click any menu item or link, internet access is provisioned.
-
Data Capture is enabled, and the registration details are outdated: When the captive portal loads and you click any menu item or link, the Data Capture form is displayed with the previously entered data. You can update the form and click Connect to access to the internet.
Registration Information
These are some of the scenarios when the registration details become outdated:
-
Added new mandatory fields: You added a new mandatory field in the Data Capture form. For example, you configured the form without a Gender field, and the registration was completed. Later, you added the Gender field to the Data Capture form and marked it as mandatory.
-
'Optional field becomes mandatory: You modified the Data Capture form to make a previously optional field mandatory. For example, if the last name was optional and a customer registered without entering it, you can later update the form to require this field.
-
Modified the choice options: You removed or replaced a choice option that was available for selection. For example, you originally had choice options as Child and Adult for the Age Criteria field. A customer selected Child during registration. Later, you changed the options to Kids and Adult.
Note |
If there is any change in the Terms & Conditions in these scenarios, the Accept Terms and Continue option is displayed. You must select the Accept Terms and Continue option to access the internet or proceed to the next authentication step. |
Steps for access code authentication
To complete the Access Code authentication, perform these steps:
Procedure
|
Step 1 |
In the captive portal, click or tap any menu item. |
||
|
Step 2 |
In the Log In window, enter the access code. |
||
|
Step 3 |
To unsubscribe from notifications, the customer should uncheck the Opt In to Receive notification check box.
|
||
|
Step 4 |
Press Accept Terms and Continue. |
||
|
Step 5 |
Press Verify. If Data Capture is enabled, the Data Capture form appears after the access code is successfully verified. |
||
|
Step 6 |
Complete all mandatory fields in the Data Capture form, then press Connect.
|
Authentication steps for a repeat user for access code authentication
The authentication process for repeat users varies according to the scenario.
-
Data Capture is not configured: When the captive portal loads and the customer clicks any menu item or link in the portal, the internet is provisioned.
-
Data Capture is configured, and the customer completed the registration: When the captive portal loads, and the customer click any menu item or link in the portal, the internet is provisioned.
-
Data Capture is configured, and the registration details are outdated: When the captive portal loads, and the customer click any menu item or link in the portal, the Data Capture form appears with the previously filled data. The customer can update the form, and press the “Connect” button to get access to the internet.
These scenarios can cause the registration details to become outdated.
-
Added new mandatory fields: For example, you configured the Data Capture form without a Gender field. The customer completes registration. Later, you add the Gender field and mark it as mandatory.
-
Optional field becomes mandatory: For example, you configure a Data Capture form with the last name as optional. The customer connects to the SSID and completes registration without entering the last name. Later, you modify the form and make the last name mandatory.
-
Modified the choice options: Modified the choice options. For example, you configure a mandatory business tag “Age Criteria” with the choice options “Child” and “Adult.” The customer completes registration by selecting “Child” for Age Criteria. Later, you modify the options to display “Kids” and “Adult.
-
Entered invalid e-mail ID during previous log in: When the captive portal loads and the customer clicks any menu item or link in the portal, the Data Capture form appears with the invalid e-mail ID entered previously. The customer must enter a valid e-mail ID to continue.
-
Note |
If the Terms and Conditions change in any of these scenarios, the Accept Terms and Continue button appears. The customer must press this button to access the internet or proceed to the next authentication step. |
Steps for no authentication with terms and conditions
You can configure the system to provide internet access to customers when they accept the terms and conditions.
To complete authentication that requires only acceptance of the terms and conditions, complete these steps:
Procedure
|
Step 1 |
In the captive portal, click or tap any menu item. |
|
Step 2 |
In the Log In screen that appears, press Accept Terms and Continue. The system then initiates internet provisioning, and the user receives access. |
Authentication steps for a repeat user with terms and conditions authentication
When the captive portal loads and the customer clicks any menu item or link in the portal, the internet is provisioned.
Note |
If the Terms and Conditions change, the “Accept Terms and Continue” button appears. The customer must press the “Accept Terms and Continue” button to get access to the internet or to move to the next authentication step. |
Steps for social authentication
To complete the social authentication for a portal, perform these steps:
Procedure
|
Step 1 |
When a customer clicks any menu item or link in the captive portal, a screen appears showing all the available social sign-in options for the portal.
|
||
|
Step 2 |
Click the sign-in option for the social network you want to use for authentication. The log in page for the social network appears. For example, click the sign-in option for LinkedIn. The login screen for LinkedIn appears. |
||
|
Step 3 |
Enter the login credentials for the social network. Press the login button. |
||
|
Step 4 |
In the screen that appears, press Allow. The redirect URI loads, then the Terms and Conditions screen appears. |
||
|
Step 5 |
Press Accept Terms and Continue.
|
||
|
Step 6 |
After provisioning internet access, a Continue window appears. |
||
|
Step 7 |
Press Continue to view the page for the link you clicked earlier. |
Authentication steps for a repeat user with social authentication
When the captive portal loads and the customer clicks any menu item or link, options to connect with all the configured social networks appear. Social networks that the customer has used previously for authentication are labeled as Continue with [social network]. For instance, if the customer previously used Facebook authentication to access the internet through the captive portal, the Facebook option is labeled as “Continue with Facebook. For social networks that have not been used previously for authentication, a sign-in option appears, such as “Sign in with LinkedIn.”
-
If the customer selects a social network previously used for authentication, internet access is provisioned without requiring authentication. However, if the Terms and Conditions have changed, the Terms and Conditions screen appears. The customer must then press the “Accept Terms and Continue” button to access the internet.
-
If the customer signs in using a social network that was not used previously for authentication, the complete authentication process must be finished for that social network. If the customer has accessed the internet using social authentication through any social network, the Terms and Conditions screen is not displayed during authentication. However, if the terms and conditions have changed, the Terms and Conditions screen appears during authentication. The customer must press the “Accept Terms and Continue” button to access the internet.
 Feedback