Asset Tracker Mobile Application

Cisco Asset Tracker Mobile App

The Cisco Asset Tracker mobile app is the field-facing application for onboarding, locating, and confirming tracked assets.

  • Authorized users can associate a Cisco Asset Tag with an existing asset record through NFC, select the applicable asset category, and add an identifying photo.

  • Users can search for assets and categories, view asset details and mapped locations, and follow indoor directions.

  • Users can use UWB Nearby mode for higher-precision guidance when supported and use NFC confirmation to verify the physical tag attached to an asset.

The app provides location-aware access to the buildings, floors, asset categories, and actions permitted for the signed-in user.

Cisco Asset Tracker Mobile App capabilities

The Cisco Asset Tracker mobile app supports the following end-user workflows:

  • Sign in through the identity provider configured for the user.

  • Detect or manually select an accessible building and floor.

  • Onboard a Cisco Asset Tag and associate it with an existing asset.

  • Search for assets and categories and view asset information on a map.

  • Navigate to an asset by using indoor directions.

  • Use UWB Nearby mode for higher-precision guidance during the final approach when supported.

  • Confirm the correct physical asset by scanning its Cisco Asset Tag with NFC.

  • View account information, app permissions, frequently asked questions, privacy information, and terms of use from the user profile.


Note


The buildings, asset categories, and actions available to each user are determined by their assigned access and permissions.


Figure 1. App Worlflow

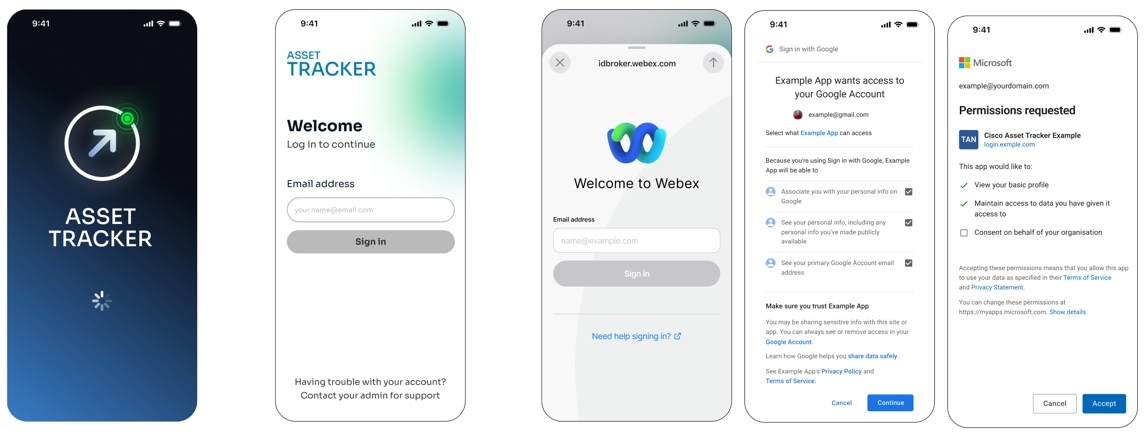
Log in to Cisco Asset Tracker

Log in to access the buildings, asset categories, and mobile app actions assigned to your account.

The Identity Provider is set per user in the Asset Tracking Dashboard. If an Identity Provider is assigned to your account, the app routes you directly to that provider after you enter your email address. If no provider is assigned, the app displays the available provider options.

  • Webex

  • Microsoft

  • Google

Before you begin

Before you log in, verify the following requirements:

  • Your corporate email address is registered by an administrator in the Asset Tracking Dashboard.

  • Your mobile device has a stable internet connection.

Procedure


Step 1

Open the Cisco Asset Tracker mobile app.

Step 2

Enter your corporate email address.

Step 3

Select Sign in.

Step 4

If the app displays multiple Identity Provider options, select the provider that your organization uses.

Step 5

Complete the authentication process.

The Cisco Asset Tracker home screen appears.


You are logged in and can access the locations and mobile app features assigned to your account.

What to do next

If this is your first login, grant the requested Location, Bluetooth, and Motion & Fitness permissions.

  • If the app displays Failed to start session, verify that you entered the registered corporate email address.

  • If the problem continues, contact your administrator.

Login FAQs

Login questions and answers

Use these answers to resolve common login questions and problems.

  1. Why can't I create an account directly from the mobile app?

    User provisioning is handled centrally to ensure that only authorized corporate users access the platform. New accounts must be registered by an ADMIN through the Asset Tracking Dashboard. If you can't sign in, contact your administrator and confirm that your corporate email has been added to the Dashboard.

  2. I entered my email and got "Failed to start session." What should I do?

    This error usually means one of two things: your email hasn't been registered in the Asset Tracking Dashboard yet, or there was a temporary issue communicating with the login service. Double-check that you're using the exact corporate email registered by your ADMIN, then try again. If the error persists, ask your administrator to confirm your registration in the Dashboard.

  3. Why am I sometimes asked to choose between Webex, Google, and Microsoft, and other times not?

    The Identity Provider is set per user in the Asset Tracking Dashboard. When your ADMIN has already assigned one to your account, the app routes you directly to that provider after you enter your email. When no provider has been assigned yet, the app shows all three options so you can pick the one your organization uses, and authentication continues normally from there.

  4. The app keeps showing an error or won't let me log in. What should I try?

    First, make sure you have a stable internet connection. Connectivity issues will block authentication and the app will prompt you to retry once you're back online. If you see a generic application error, select Try again. If the problem continues, fully close the app and reopen it. If it still fails, confirm with your ADMIN that your email and Identity Provider are correctly configured in the Asset Tracking Dashboard.

These FAQs apply when you create or access an account and sign in to the Cisco Asset Tracker mobile app.

Accounts, identity providers, and access permissions are managed centrally in the Asset Tracking Dashboard.

You can identify common login issues and determine whether to retry or contact your administrator.

Verify your internet connection and registered corporate email address before you retry the login.

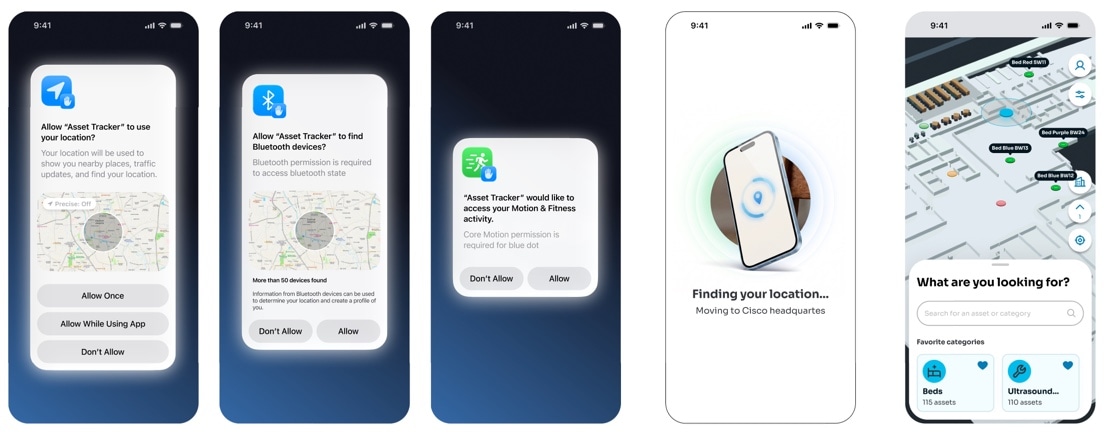
Select a building

Select an accessible building so that the app can display its map and tracked assets.

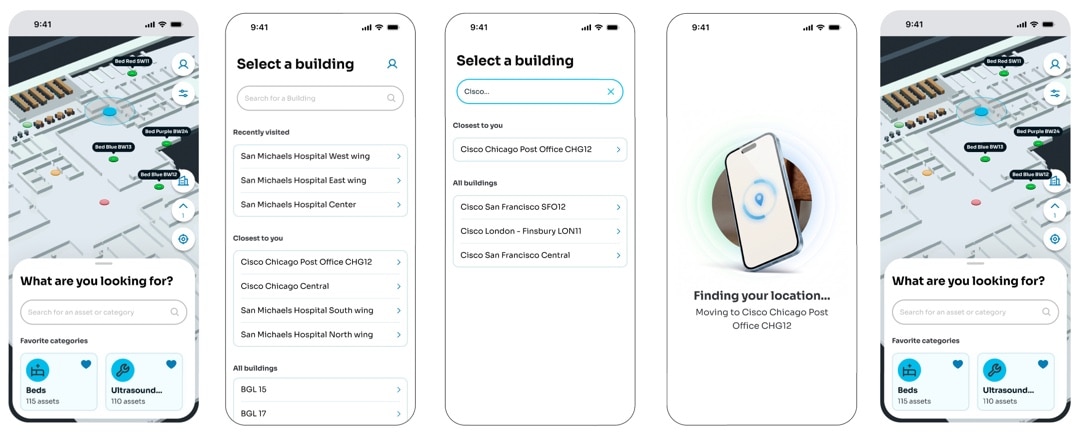
The app uses Location, Bluetooth, and Motion & Fitness permissions to detect your current building and floor. If you are in a building that you have access to, the corresponding map loads automatically.

If Bluetooth is turned off or you are not in an accessible building, the app opens the last building that you accessed. If you have not accessed a building before, the app opens the manual building selection screen.

Figure 2. Building Selection

Before you begin

Before you select a building, verify the following requirements:

  • You are logged in to the Cisco Asset Tracker mobile app.

  • Your administrator has granted you access to at least one building.

Procedure


Step 1

On the map, tap the building floating button.

Step 2

Review the buildings that you have access to.

Step 3

Search for a specific building, if necessary.

Support users can search by Tenant ID. The app filters the building list by the searched Tenant ID.

Step 4

Select the required building.

The app loads the selected building map.


You can view and search for assets on the selected building map, even when you are not physically in that building.

What to do next

Use the floor control to change floors when the required asset is not visible on the current floor.

Building selection FAQs

Building selection questions and answers

Use these answers when the app does not select the expected building or when you need to switch buildings.

  1. Why does the app ask for Location, Bluetooth, and Motion & Fitness permissions on my first login?

    These permissions are required for the app to detect your current location inside a building and show you on the correct floor of the map. Location (GPS) and Bluetooth work together to pinpoint your position, while Motion & Fitness helps the app understand your movement between floors and areas. Without these permissions, indoor positioning won't work.

  2. I logged in, but the app didn't open the building I'm currently in. Why?

    This usually happens for one of two reasons: either your Bluetooth is turned off, or you don't have access to the building you're in. Building access is granted by your ADMIN through the Asset Tracking Dashboard. In either case, the app will automatically open the last building you accessed. If you've never accessed a building before, you'll be taken to the manual building selection screen instead.

  3. How do I switch to a different building?

    Tap the building floating button in the map menu. You'll see a list of all the buildings you have access to, and you can search for a specific one. Once you select a building, the app loads its map so you can view and search for assets, even if you're not physically there.

  4. Why don't I see a building in my list that I'm supposed to have access to?

    The list only shows buildings that your ADMIN has granted you access to through the Asset Tracking Dashboard. If a building is missing, reach out to your ADMIN to confirm your access has been set up correctly.

These FAQs apply when the app requests location permissions, opens an unexpected building, or does not list a required building.

The app uses device permissions and administrator-defined building access to determine which location and map to display.

You can select an accessible building and understand why a building might not appear.

Enable the requested permissions and contact your administrator if a required building is not available.

Onboard a Cisco Asset Tag

Onboard a physical Cisco Asset Tag so that it can be associated with and used to locate an asset.

The mobile app supports Cisco Asset Tags only. Third-party tags cannot be onboarded through the mobile app.

  • Categories cannot be created through the mobile app.

  • New assets cannot be registered through the mobile app.

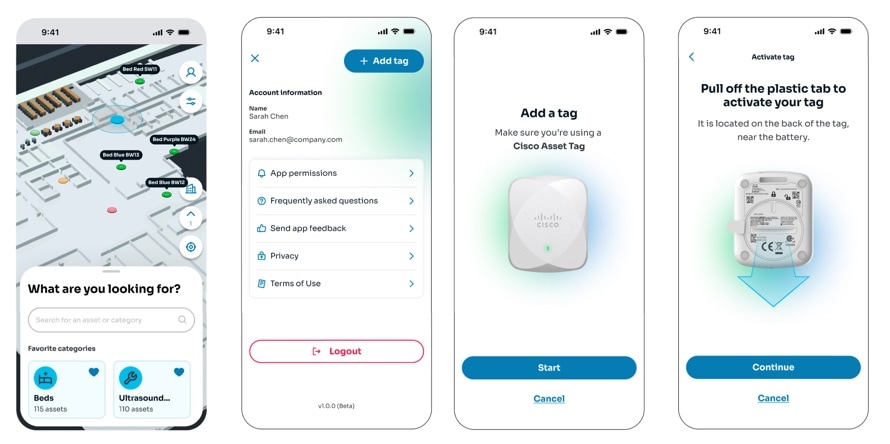
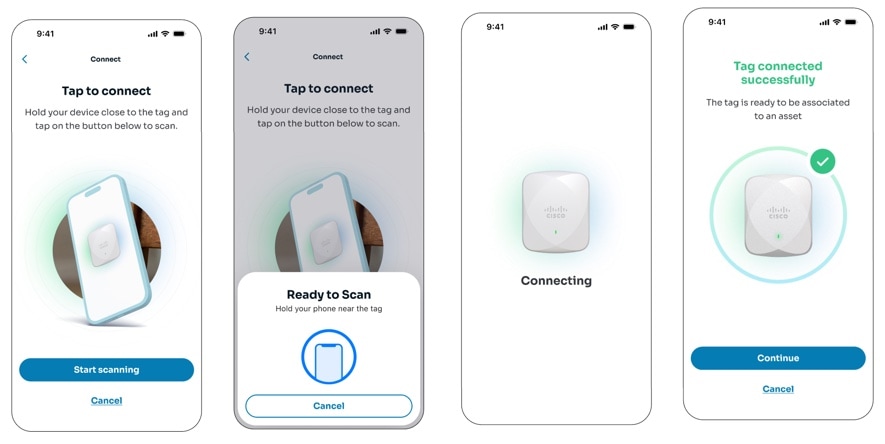
Figure 3. Onboard a Tag

Before you begin

Before you onboard a tag, verify the following requirements:

  • You are logged in and have permission to at least one asset category.

  • The asset record already exists.

  • You are using a Cisco Asset Tag that is not associated with another asset.

  • You are using an NFC-capable iOS device, iPhone 7 or newer.

Procedure


Step 1

From the Profile screen, select Add tag.

Step 2

Pull off the plastic tab on the back of the tag, near the battery, to activate the tag.

Step 3

On the Add a tag screen, select Start.

Step 4

On the Tap to connect screen, select Start scanning.

Step 5

Hold your phone near the NFC area on the tag.

The app displays Tag connected successfully.

Step 6

Select Continue.

Step 7

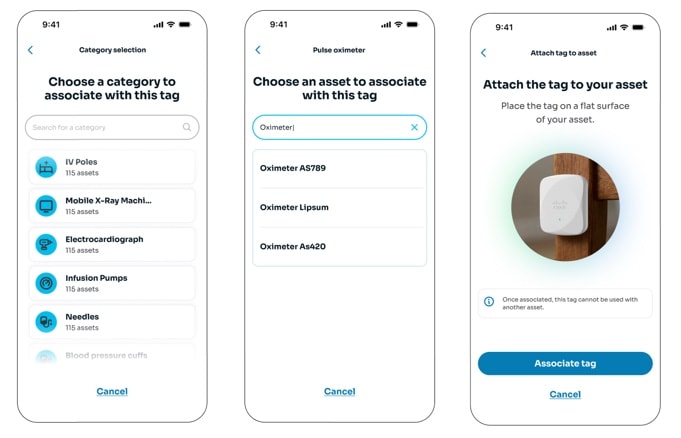
Choose a category to associate with the tag.

Figure 4. Select Category

Step 8

Choose an asset to associate with the tag.

Step 9

Place the tag on a flat surface of the asset, and select Associate tag.

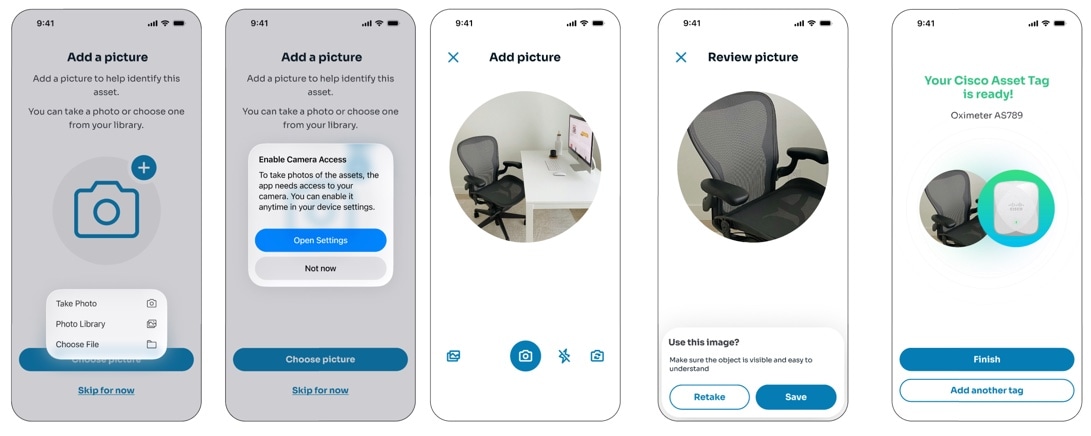
Step 10

Add a picture to help identify the asset, or select Skip for now.

You can take a photo or choose a picture from your library.

Step 11

Review the picture and select Save, or select Retake.

Step 12

When the app displays Your Cisco Asset Tag is ready, select Finish or Add another tag.


The Cisco Asset Tag is associated with the selected asset record.

What to do next

If the app cannot scan or associate the tag, retry the operation or contact your administrator.

  • If no categories are available, ask an administrator to update your category permissions.

  • If the tag is already in use, scan a different tag.

Tag onboarding FAQs

Tag onboarding questions and answers

Use these answers when you cannot start or complete Cisco Asset Tag onboarding.

  1. I don't see the "Add a tag" button in my Profile menu. What's wrong?

    The Add tag entry point is available to all authenticated users, but the flow can only be completed if you have permission to at least one asset category. If you reach the category step and see no categories, your account permissions need to be updated by an admin through the ADMIN panel.

  2. Which devices are supported?

    Any iOS device with NFC hardware, iPhone 7 and newer. NFC access does not require an explicit user permission inside the app. The system handles it natively when the scan is invoked.

  3. Do I need to enable NFC in my phone settings before using this feature?

    No. iOS does not expose an NFC toggle to end users. NFC is always available for app-initiated reads on supported devices. If the scanning sheet doesn't appear, the issue is usually device hardware support, not a setting you need to change.

  4. I see the error "Connection failed." What now?

    This means the NFC read didn't complete. Select Try again and re-scan. If it keeps failing, select Send Feedback to send feedback to the Cisco Team.

These FAQs apply when you onboard a Cisco Asset Tag by using the Cisco Asset Tracker mobile app.

Tag onboarding requires supported NFC hardware and permission to access at least one asset category.

You can confirm device support and resolve common NFC onboarding issues.

Verify the device requirements, category permissions, and tag position before you retry the NFC scan.

Search for an asset

Find a registered asset or view the assets associated with a category.

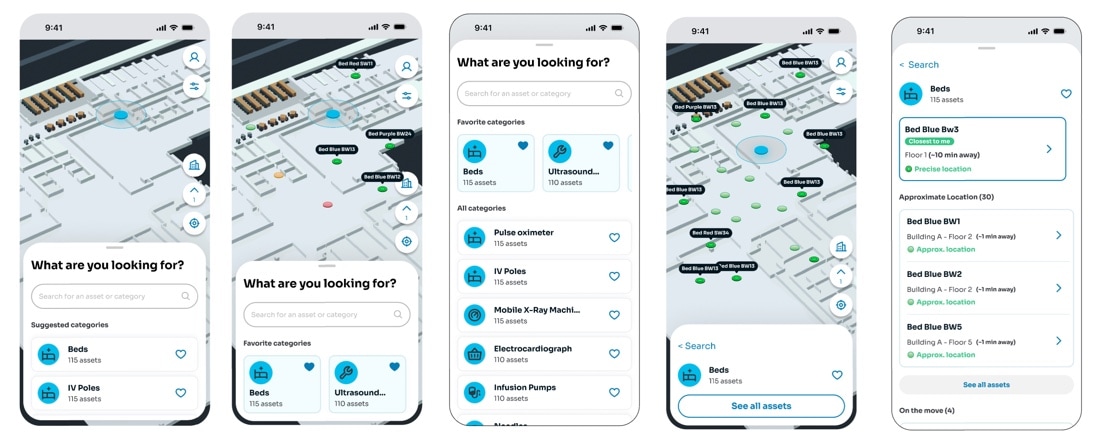
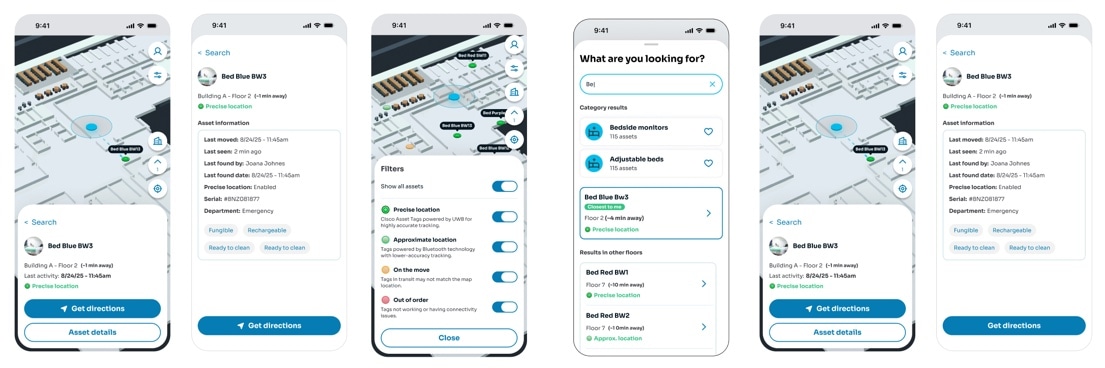
The search field is available from the action bottom sheet on the main home screen. Search results can show located assets, assets on the move, out-of-order assets, and assets on other floors.

  • Precise-location assets use Ultra Wide Band for higher-accuracy location.

  • Approximate-location assets use lower-accuracy location information.

Figure 5. Search for an asset

Before you begin

Before you search, verify the following requirements:

  • You are logged in to the Cisco Asset Tracker mobile app.

  • A building map is selected.

  • You have access to the applicable asset categories.

Procedure


Step 1

Tap What are you looking for?.

Step 2

Enter an asset name or category, or select a suggested or favorite category.

Step 3

Swipe up on the search bottom sheet to open the full-screen results view, if necessary.

Step 4

Select a category to show the available located assets on the current floor map.

Step 5

Select See all assets to expand a result section, if necessary.

Step 6

Select the filters icon to control which asset states appear on the map, if necessary.

Step 7

Tap an asset in the results list or on the map.

The asset detail screen appears.


You can review the selected asset's information and mapped location.

What to do next

Select Get directions to start navigating to the asset.

  • Use the floor control to browse another floor when no matching assets appear on the current map.

  • Tap the heart icon to add a category to your favorites.

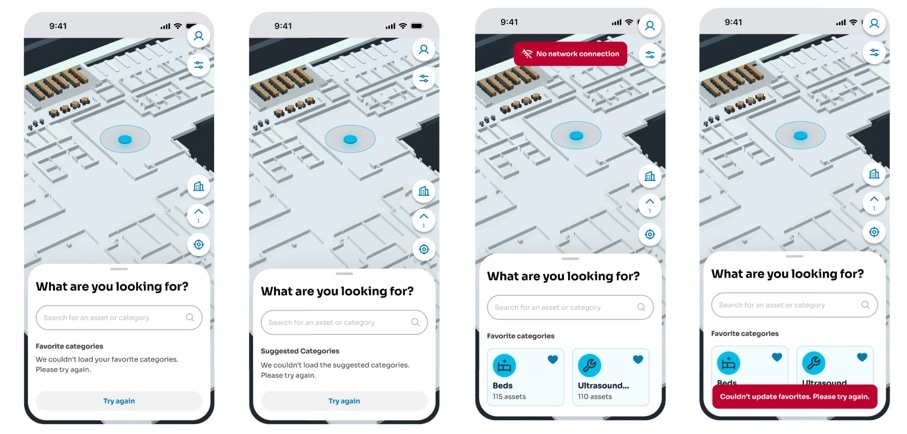
Figure 6. Edge Cases and Errors

Use Nearby mode

Use distance and directional guidance to locate a supported Cisco UWB Asset Tag.

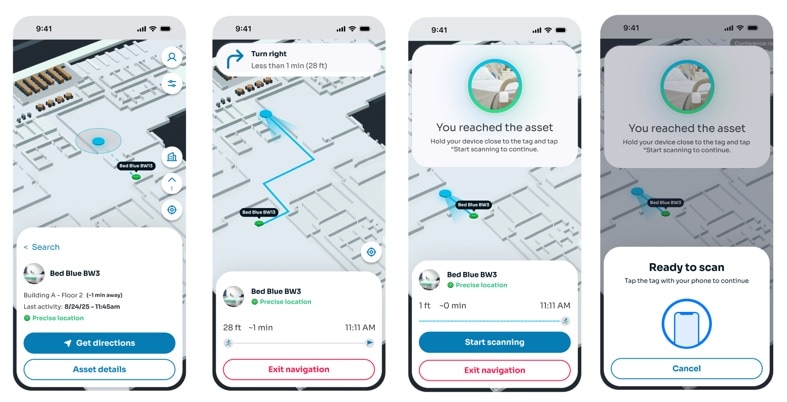
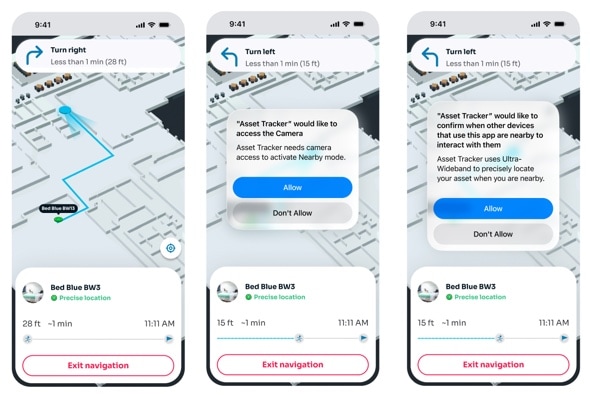
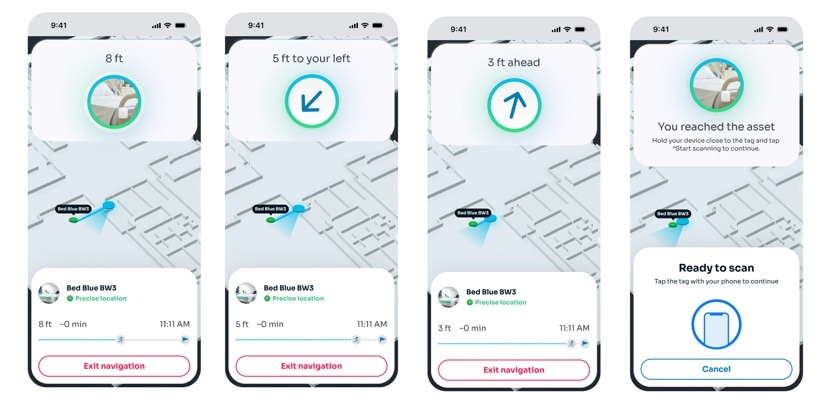
Nearby mode activates when the device detects the tag's UWB signal during navigation, typically within approximately 20 ft of the tag. If Nearby mode is unavailable, the app continues to provide turn-by-turn map navigation.

Figure 8. Nearby mode

Before you begin

Before you use Nearby mode, verify the following requirements:

  • You are using an iPhone with a U1 or U2 chip, iPhone 11 or later.

  • The asset uses a Cisco Asset Tag that supports UWB technology.

  • Camera and Nearby Interaction permissions are enabled.

  • Navigation to the asset is active.

Procedure


Step 1

Allow the app to access the camera and Nearby Interaction when prompted.

Step 2

Continue navigating until Nearby mode activates.

Step 3

Follow the distance and directional guidance, such as 5 ft to your left or 3 ft ahead.

If the directional arrow does not appear, move the device from side to side and make sure that nothing obstructs the camera or the top edge of the phone.

Step 4

When the app displays You reached the asset, select Start scanning.

Step 5

Tap the tag with your phone.


You have reached the asset and started NFC confirmation of its physical tag.

What to do next

If the UWB signal cannot recover, continue by using map navigation.

  • If another user is navigating to the same asset, the app displays an alert.

  • If the asset has an active Nearby request from the last 2 minutes, the app displays Nearby mode not available.

Nearby mode FAQs

Nearby mode questions and answers

Use these answers when UWB Nearby mode does not start or does not provide the expected guidance.

  1. Which devices and tags support Nearby mode?

    Nearby mode requires a modern iPhone with a U1 or U2 chip, iPhone 11 and later, and a Cisco Asset Tag that supports Cisco's UWB technology.

  2. How close does the user need to be for Nearby mode to start?

    Nearby mode activates as soon as the device detects the tag's UWB signal during navigation, typically within approximately 20 ft of the tag as the user approaches the asset.

  3. What if the user doesn't allow camera or Nearby Interaction?

    Nearby mode won't activate. The app keeps guiding the user with the turn-by-turn route on the map until it detects arrival and shows the You reached the asset confirmation with the Ready to Scan prompt.

  4. The arrow doesn't appear. What should the user do?

    Move the device side to side and make sure nothing is obstructing the camera or the top edge of the phone so that the directional arrow can lock onto the tag.

  5. What happens if the UWB signal drops during Nearby mode?

    If the signal can't recover, the app falls back to map navigation.

These FAQs apply during the final approach to an asset with a Cisco UWB Asset Tag.

Nearby mode depends on compatible hardware, UWB signal detection, camera access, and Nearby Interaction permission.

You can identify why Nearby mode is unavailable and continue locating the asset.

Confirm device compatibility and permissions, then continue with map navigation if the UWB signal is unavailable.

Confirm an asset by tapping its tag

Confirm the physical asset after navigation so that you verify the exact tagged item instead of only its approximate location.

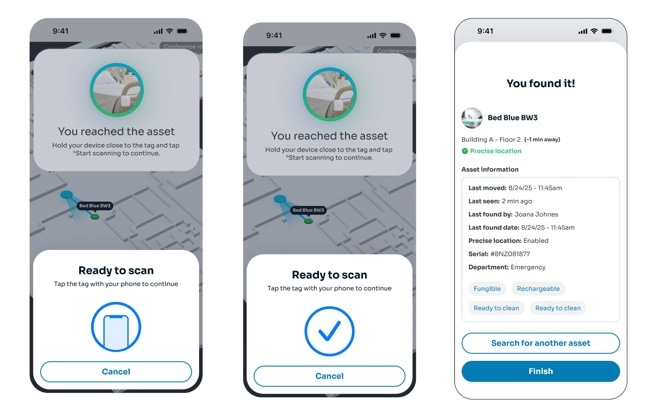
When you get within 3 ft of the target asset, the app displays You reached the asset and activates the device's NFC reader.

Figure 9. Tap a tag

Before you begin

Before you scan the tag, verify the following requirements:

  • The app displays the Ready to Scan prompt.

  • The physical asset has a Cisco Asset Tag attached.

Procedure


Step 1

Bring your phone close to the Cisco Asset Tag.

Step 2

Hold the phone near the tag until the app recognizes it.

The app displays the asset information and confirms that you found the asset.

Step 3

Select Finish to end navigation, or select Search for another asset.


The correct physical asset is confirmed.

What to do next

If the NFC scan does not complete, retry the scan.

  • If the app displays Connection failed, select Try again and slowly bring the phone close to the tag.

  • If the app displays Unsupported tag, verify that you are scanning a Cisco Asset Tag.

  • If the app displays You've tapped a different asset, select Use this asset instead or Return to navigation.

Tag confirmation FAQs

Tag confirmation questions and answers

Use these answers when you confirm a physical asset by scanning its Cisco Asset Tag.

  1. How does the app know I've reached the asset?

    When you get within 3 ft of the target asset, the app automatically detects that you've arrived and displays the You reached the asset confirmation. The device's NFC reader is then activated automatically so you can scan the tag to confirm the find.

  2. Why do I need to scan the NFC tag after reaching the asset?

    Scanning the tag confirms that you've located the correct physical asset, not just an area near it. Once the tag is recognized, you'll see the asset's information and can either end the navigation or start searching for a new asset.

  3. What should I do if I see the "Connection failed" screen?

    This usually means the NFC scan didn't complete successfully, most often because the device was moved toward the tag too abruptly. Select Try again and slowly bring the device close to the tag to retry the scan.

  4. Why am I seeing the "Unsupported tag" message?

    The NFC feature only supports Cisco Asset Tags. If you scan a tag from another manufacturer, the app won't be able to read it and will display the Unsupported tag message. Make sure you're scanning a Cisco-issued tag.

  5. What happens after the tag is successfully recognized?

    Once the tag is recognized, you'll be able to view detailed information about that asset. From there, you can finish the navigation session or search for another asset to navigate to.

These FAQs apply after you reach an asset and use NFC to confirm its physical Cisco Asset Tag.

NFC confirmation verifies the exact physical asset in environments where multiple assets might be close together.

You can complete tag confirmation or identify why the NFC scan failed.

Retry the scan slowly and verify that the tag is a supported Cisco Asset Tag.

Use the user profile

Use the profile to review your account and app permissions or access mobile app support and legal information.

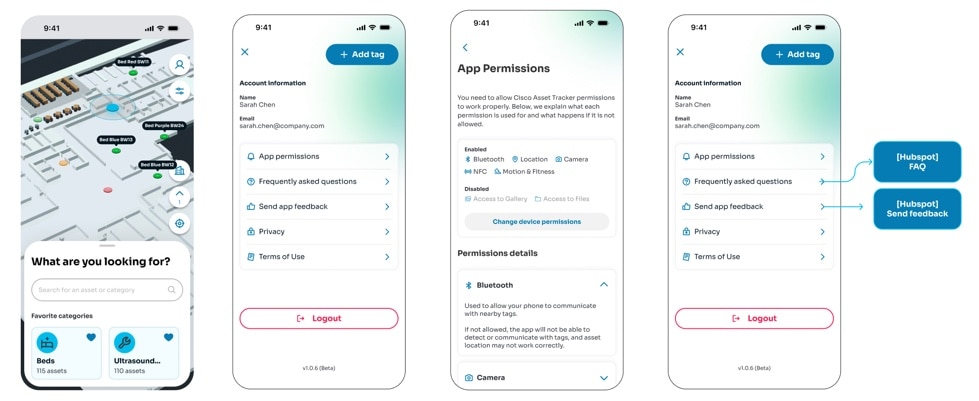
The User icon is located in the top-right corner of the map. The profile shows your name and email address and provides access to the available profile actions.

Figure 10. Profile

Before you begin

You must be logged in to the Cisco Asset Tracker mobile app.

Procedure


Step 1

On the map, tap the User icon.

Step 2

Review your account information.

Step 3

Select the required profile option.

  • Select Add tag to start onboarding a Cisco Asset Tag.

  • Select App permissions to review Bluetooth, Location, Camera, NFC, Motion & Fitness, Gallery, and Files permissions.

  • Select Frequently asked questions to access the app FAQ.

  • Select Send app feedback to send feedback to the Cisco Team.

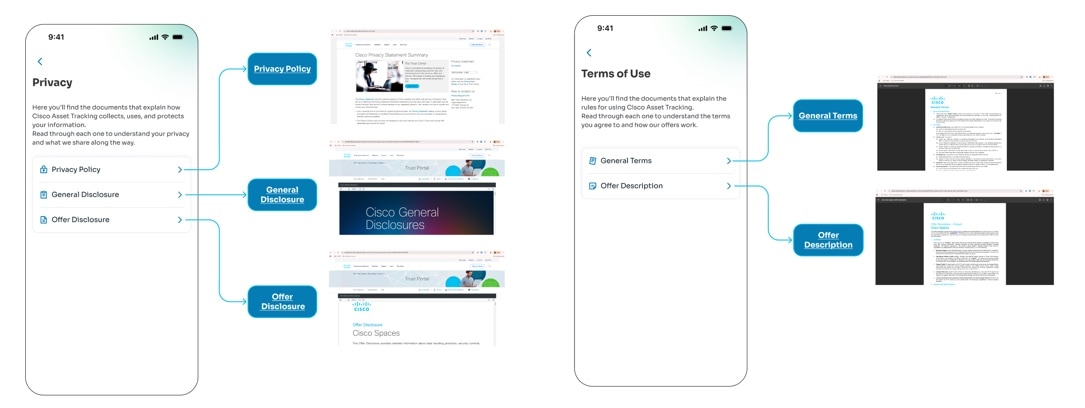
  • Select Privacy to access privacy documents.

  • Select Terms of Use to access terms and offer documents.

  • Select Logout to sign out of the app.

Step 4

If you selected App permissions, select Change device permissions to open the native permission settings, if necessary.


You reviewed or updated the selected profile information or option.

What to do next

Return to the map to continue searching for and locating assets.