- Preface
-
- Overview
- Adding and Deleting Mobility Services Engines and Licenses
- Synchronizing Mobility Services Engines
- Configuring High Availability
- MSE Delivery Modes
- Configuring and Viewing System Properties
- Mobile Concierge Services
- Managing Users and Groups
- Configuring Event Notifications
- Context-Aware Service Planning and Verification
- Working with Maps
- Monitoring the System and Services
- Index
MSE Delivery Modes
The Cisco MSE comes preinstalled on a physical appliance with various performance characters. The MSE is delivered in two modes, the physical appliance and the virtual appliance.
- Physical Appliance
- Virtual Appliance
- Deploying the MSE Virtual Appliance
- Adding Virtual Appliance License to the Prime Infrastructure
- Viewing the MSE License Information Using the License Center
- Removing a License File Using the License Center
Physical Appliance
When the MSE is located on the physical appliance, you can use the standard license center UI to add new licenses. When the MSE is located on the physical appliance, the license installation process is based on Cisco Unique Device Identifier (UDI). Choose Administration > License Center on the Cisco Prime Infrastructure UI to add the license.
 Note | Virtual appliance licenses are not allowed on physical appliances. |
Virtual Appliance
The MSE is also offered as a virtual appliance, to support lower-level, high, and very high deployments. When the MSE is located on the virtual appliance, the license is validated against Virtual Unique Device Identifier (VUDI) instead of UDI.
Note | MSE is available as a virtual appliance for Release 7.2 and later. The virtual appliance must be activated first before installing any other service licenses. |
The MSE virtual appliance software is distributed as an Open Virtualization Archive (OVA) file. You can install the MSE virtual appliance using any of the methods for deploying an OVF supported by the VMware environment. Before starting, make sure that the MSE virtual appliance distribution archive is in a location that is accessible to the computer on which you are running vSphere Client.
For a virtual appliance, you must have an activation license. Without an activation license, the MSE starts in evaluation mode. Even if service licenses are present on the host, it rejects them if the activation license is not installed.
Note | See the VMware vSphere 4.0 documentation for more information about setting up your VMware environment. |
You can add and delete a virtual appliance license either using the Services > Mobility Services Engine > Add Mobility Services Engine page when you are installing MSE for the first time, or you can use the Administration > License Center page to add or delete a license.
See the Adding and Deleting Mobility Services Engines and Licenses and the Deleting an MSE License File for more information on adding a license and deleting a license using the mobility services engine wizard.
For more details on deploying MSE virtual appliance, see the Cisco MSE Virtual Appliance Configuration Guide.
- Operating Systems Requirements
- Client Requirements
- Virtual Appliance Sizing
- Reinstalling MSE on a Physical Appliance
Operating Systems Requirements
The following operating systems are supported:
Red Hat Linux Enterprise server 5.4 64-bit operating system installations are supported.
Red Hat Linux version support on VMware ESX/ESXi Version 4.1 and later with either local storage or SAN over fiber channel.
Note | We recommend UCA and ESX/ESXi deployments for a virtual appliance. |
Client Requirements
The MSE user interface requires Microsoft Internet Explorer 7.0 or later with the Google Chrome plugin or Mozilla Firefox 3.6 or later releases.
The client running the browser must have a minimum of 1 GB of RAM and a 2-GHz processor. The client device should not be running any CPU or memory-intensive applications.
Virtual Appliance Sizing
The following table lists the information on virtual appliance sizing.
|
CMX License (APs) |
|||||
|
Not Supported |
|||||
|
2500 |
|||||
|
5000 |
|||||
|
3355 |
16G |
8 |
2500 |
2500 |
6000 |
Reinstalling MSE on a Physical Appliance
You must have root privileges to install the MSE on a physical appliance. To reinstall the MSE on a physical appliance, follow these steps:
Deploying the MSE Virtual Appliance
This section describes how to deploy the MSE virtual appliance on an ESXi host using the vSphere Client using the Deploy OVF wizard or from the command line.
- Deploying the MSE Virtual Appliance from the VMware vSphere Client
- Configuring the Basic Settings to Start the MSE Virtual Appliance VM
- Deploying the MSE Virtual Appliance Using the Command-Line Client
Deploying the MSE Virtual Appliance from the VMware vSphere Client
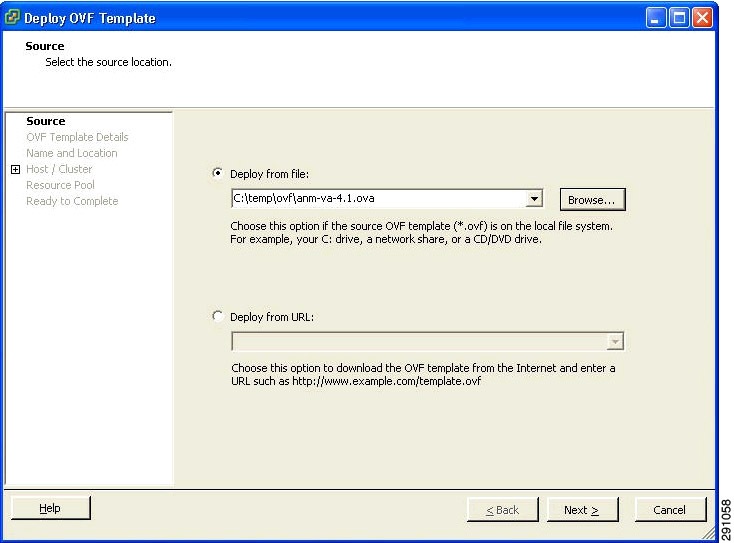
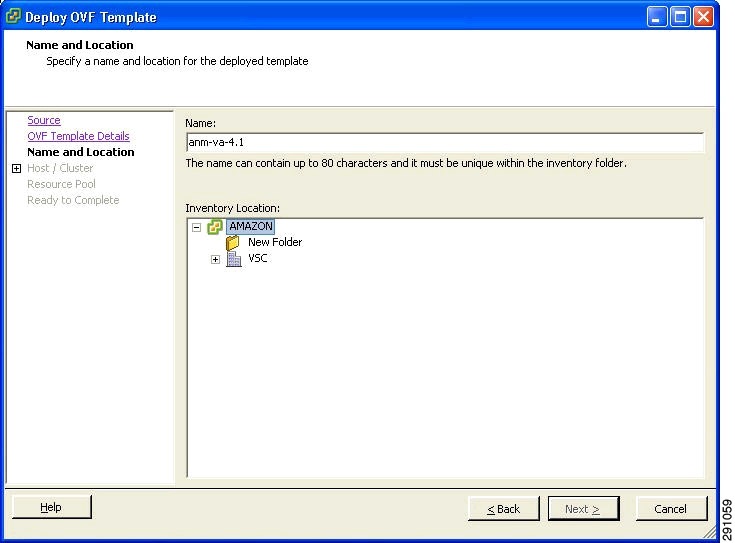
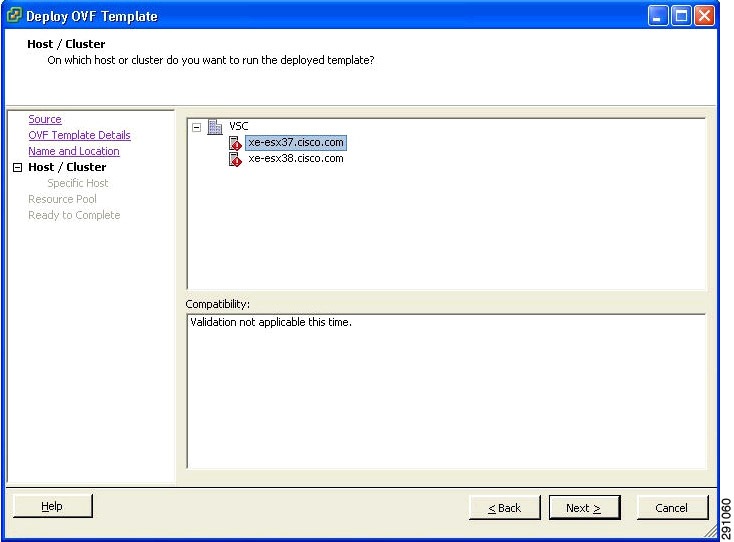
The MSE virtual appliance is distributed as an OVA file that can be deployed on an ESXi using the vSphere Client. An OVA is a collection of items in a single archive. In the vSphere Client, you can deploy the OVA wizard to create a virtual machine running the MSE virtual appliance application as described in this section.
Configuring the Basic Settings to Start the MSE Virtual Appliance VM
You have completed deploying (installing) the MSE virtual appliance on a new virtual machine. A node for the virtual machine now appears in the resource tree in the VMware vSphere Client window. Deploying the OVF template creates a new virtual machine in vCenter with the MSE virtual appliance application and related resources already installed on it. After deployment, you need to configure basic settings for the MSE virtual appliance.
Deploying the MSE Virtual Appliance Using the Command-Line Client
This section describes how to deploy the MSE virtual appliance from the command line. As an alternative to using the vSphere Client to deploy the MSE OVA distribution, you can use the VMware OVF tool, which is a command-line client.
To deploy an OVA with the VMware OVF tool, use the ovftool command, which uses the name of the OVA file to be deployed and the target location as arguments, as in the following example:
ovftool MSE-VA-X.X.X-large.ova vi://my.vmware-host.example.com
In this case, the OVA file to be deployed is MSE-VA-X.X.X-large.ova and the target ESX host is my.vmware-host.example.com. For complete documentation on the VMware OVF Tool, see the VMware vSphere 4.0 documentation.
Adding Virtual Appliance License to the Prime Infrastructure
You can add virtual appliance license to the Prime Infrastructure using the following two options:
-
Using the Add Mobility Service Engine page when you are installing MSE for the first time. See the Adding a Mobility Services Engine to the Prime Infrastructure for more information.
Adding a License File to the MSE Using the License Center
To add a license, follow these steps:
Viewing the MSE License Information Using the License Center
The license center allows you to manage the Prime Infrastructure, Cisco WLCs, and MSE licenses. To view the license information, follow these steps:
Removing a License File Using the License Center
| Step 1 | Install the MSE virtual appliance. |
| Step 2 | Add the MSE to Prime Infrastructure using the wizard. |
| Step 3 | Choose Administration > License Center to access the License Center page. |
| Step 4 | Choose Files > MSE Files from the left sidebar menu. |
| Step 5 | Choose an MSE license file that you want to remove by selecting the MSE License File radio button, and click Remove. |
| Step 6 | Click OK to confirm the deletion. |
 Feedback