Cisco Wireless EST On-Prem Deployment Guide
Available Languages
Bias-Free Language
The documentation set for this product strives to use bias-free language. For the purposes of this documentation set, bias-free is defined as language that does not imply discrimination based on age, disability, gender, racial identity, ethnic identity, sexual orientation, socioeconomic status, and intersectionality. Exceptions may be present in the documentation due to language that is hardcoded in the user interfaces of the product software, language used based on RFP documentation, or language that is used by a referenced third-party product. Learn more about how Cisco is using Inclusive Language.
- US/Canada 800-553-2447
- Worldwide Support Phone Numbers
- All Tools
 Feedback
 Feedback
Contents
Introduction to Enrollment over Secure Transport
Certificate-based Generic Scenario
Certificate-based Common Root CA scenario
Certificate-based SUDI Scenario
Username and Password Only Scenario
Certificate Lifecyle Management
Supported Cryptographic Algorithms in Locally Significant Certificates (LSC)
CA Hierarchy Used in the Configuration
Configuration Using Manual Import
Configuration Using SUDI Certificate
Configuration Using Username and Password
July 16, 2026
● New sections
◦ Added section Configuration Using Username and Password
● Updated sections
◦ Updated section Authentication in EST to include username/password option
May 18, 2026
● Document first published
Introduction to Enrollment over Secure Transport
Enrollment over Secure Transport (hereafter referred as EST) was introduced as the secure replacement of Simple Certificate Enrollment Protocol (SCEP) fixing its main security gaps.
Like SCEP, EST is placed between clients and the Certificate Authority (CA) so clients can securely obtain certificates. EST leverages HTTP over TLS over TCP. You can find more information in the RFC 7030.
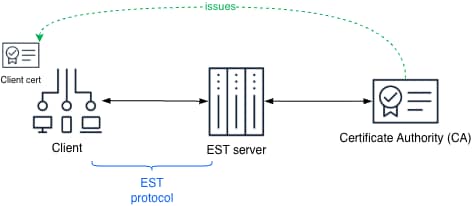
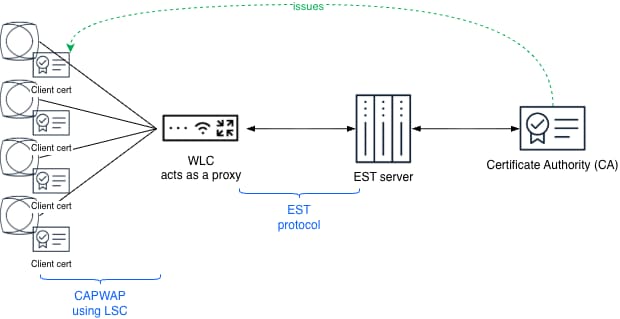
From now on, in this document the Client is a Cisco Catalyst 9800 Series Controller, also known as Wireless LAN Controller (WLC). In the context of a WLC, EST is mainly used to obtain certificates for the Access Points (APs). Provisioning certificates in Access Points is known as Locally Significant Certificates (LSC). The Access Points can use these certificates for wired 802.1X against the switch and/or for secure communication with the Wireless LAN Controller (WLC).
EST is only used between the WLC and the EST server, between the AP and the WLC, the protocol named Control and Provisioning of Wireless Access Points (CAPWAP) is used. The WLC therefore acts as a proxy to request certificates for APs.
EST can use several methods to authenticate the client and perform enrollment. This guide covers the following methods:
● Using a certificate as authentication method, once successfully enrolled, one can reuse the issued certificate to continue operations. This method of EST uses certificates on both sides so they can authenticate each other, this is also known as mutual TLS (mTLS). Each side must trust the Root CA of the other side, so the certificates can be validated and secure communications can happen.
● Using a certificate and additionally username and password: this method combines certificate authentication adding on top the username and password.
● Using just username and password (HTTP-based client authentication over TLS transport)
In the following sections some scenarios are explained for the described methods. The first three scenarios cover certificate-based approaches, it is optional to add on top of those username and password. The last scenario covers the username and password only scenario which might be simpler to deploy.
Certificate-based Generic Scenario
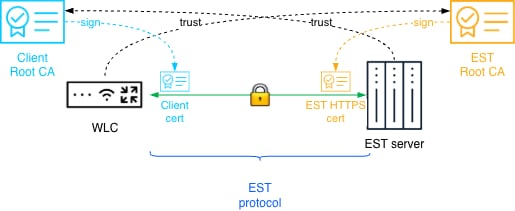
There are several possible certificate-based scenarios, first we will start with the generic scenario. In this scenario, there are 2 separate Root CAs that issue certificates, one for the WLC and one for the EST server.
Certificate-based Common Root CA scenario
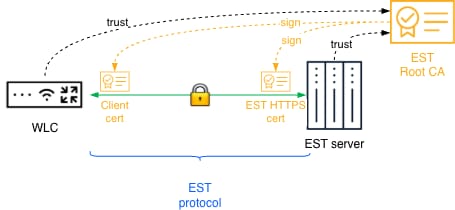
In this scenario there is a single Root CA that issues certificates for both the WLC and the EST server.
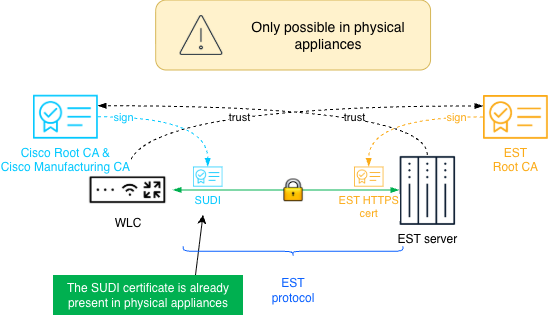
Certificate-based SUDI Scenario
There is another certificate-based scenario, which uses the Secure Unique Device Identifier (SUDI) certificates that were installed during WLC manufacturing and are signed by Cisco. This might simplify operations since no WLC certificate installation is required, only the EST Root CA must be trusted in the WLC.
This is only applicable for physical appliances since those contain SUDI certificates. Virtual appliances do not have SUDI certificate and cannot leverage this method.
Username and Password Only Scenario
This method allows for authentication using username/password using the HTTP Basic or Digest authentication. HTTP-based client authentication is always performed over a TLS-protected transport only. This might be leveraged to simplify deployments by giving up the mTLS higher security standard. The deployment is simplified because it is easier to configure.
Certificate Lifecyle Management
As stated above, the end goal of EST is to provide certificates to both the APs and WLC. Certificates have a certain lifetime determined by organizational policies. Before certificates expire, they must be renewed.
For APs, the certificate lifecycle is managed using the functionality named “AP certificate renewal (LSC)” which was introduced in IOS-XE 17.17. This feature allows requesting new certificates for APs in a staggered fashion before they expire. This document will not cover this in detail.
For WLCs, there are 2 possible paths:
● Manual certificate lifecycle management: One must install a new certificate before the old one has expired and then remove the old one or let it expire. In this document only the initial install is covered. When the certificate is about to expire, a new one should be installed using the same method as the first time.
● Automated certificate renewal: This is the recommended method. The WLC can be configured to automatically get a new certificate before the old one is expired using EST. This is the process that described in this document.
Supported Cryptographic Algorithms in Locally Significant Certificates (LSC)
The functionality Locally Significant Certificates (LSC) has some limitations regarding which cryptographic keys are supported, in other words the APs only support the following algorithms. The WLC itself doesn’t present this limitation.
Table 1. Supported Cryptographic Algorithms
| Cryptographic algorithm |
“Normal” mode |
FIPS mode |
FIPS + Common Criteria mode |
| RSA with SHA-256/384/512 (using RSA-2048+ keys) |
✓ |
✓ |
✕ |
| ECDSA (256-bit or 384-bit or 521-bit curves) |
✕ |
✕ |
✓ |
Depending on the scenario chosen and the type of appliance, there are a few alternatives for the first-time configuration. For certificate-based deployments the first-time configuration is important as using EST with mTLS requires a certificate in the WLC. Since EST is not yet operational, the first certificate must be manually provisioned without leveraging EST. For username and password deployments the first configuration is simple.
The three possible approaches are:
1. Manual import of the certificate
2. Leverage the SUDI certificate that comes in physical appliances. Instead of manually importing you can leverage the already existing SUDI certificate
3. Using username and password to authenticate
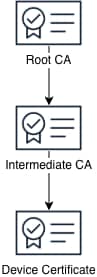
Table 2. Support of first configuration approaches
| Method name |
Supported in physical appliance |
Supported in virtual appliance |
| Manual import |
✓ |
✓ |
| SUDI certificate |
✓ |
✕ |
| Username and password |
✓ |
✓ |
There are 2 main configuration elements used in the EST configuration:
● Trustpoint: This is an abstract container that holds certificates. It can store two active certificates simultaneously: a Certificate Authority (CA) certificate and a client certificate issued by that CA. The trustpoint configuration, defines which CA certificate is loaded, which CA the trustpoint enrolls to, how the client enrolls the trustpoint, and how certificates issued by the CA are validated. Essentially, a trustpoint represents the relationship and configuration details between the device and a CA for certificate management and validation.
● Enrollment Profile: This is used to specify parameters for certificate authentication, enrollment, and reenrollment when communicating with a CA.
CA Hierarchy Used in the Configuration
Depending on the organization there are different certificate hierarchies used, some organizations just have a Root CA, some others have one or more Intermediate CA. In the following examples the following hierarchy is used with 1 single Intermediate CA and a Root CA.
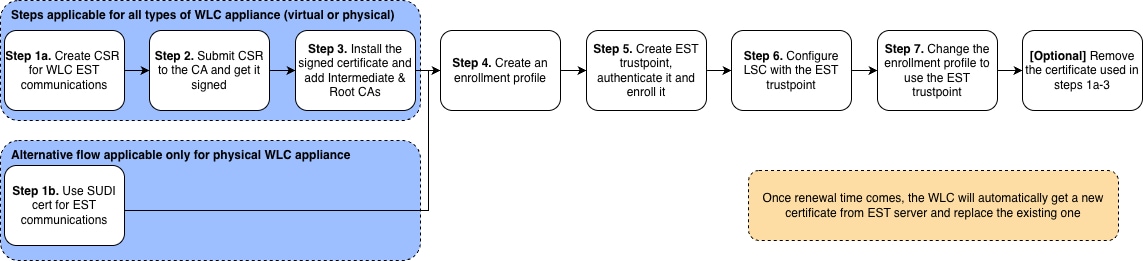
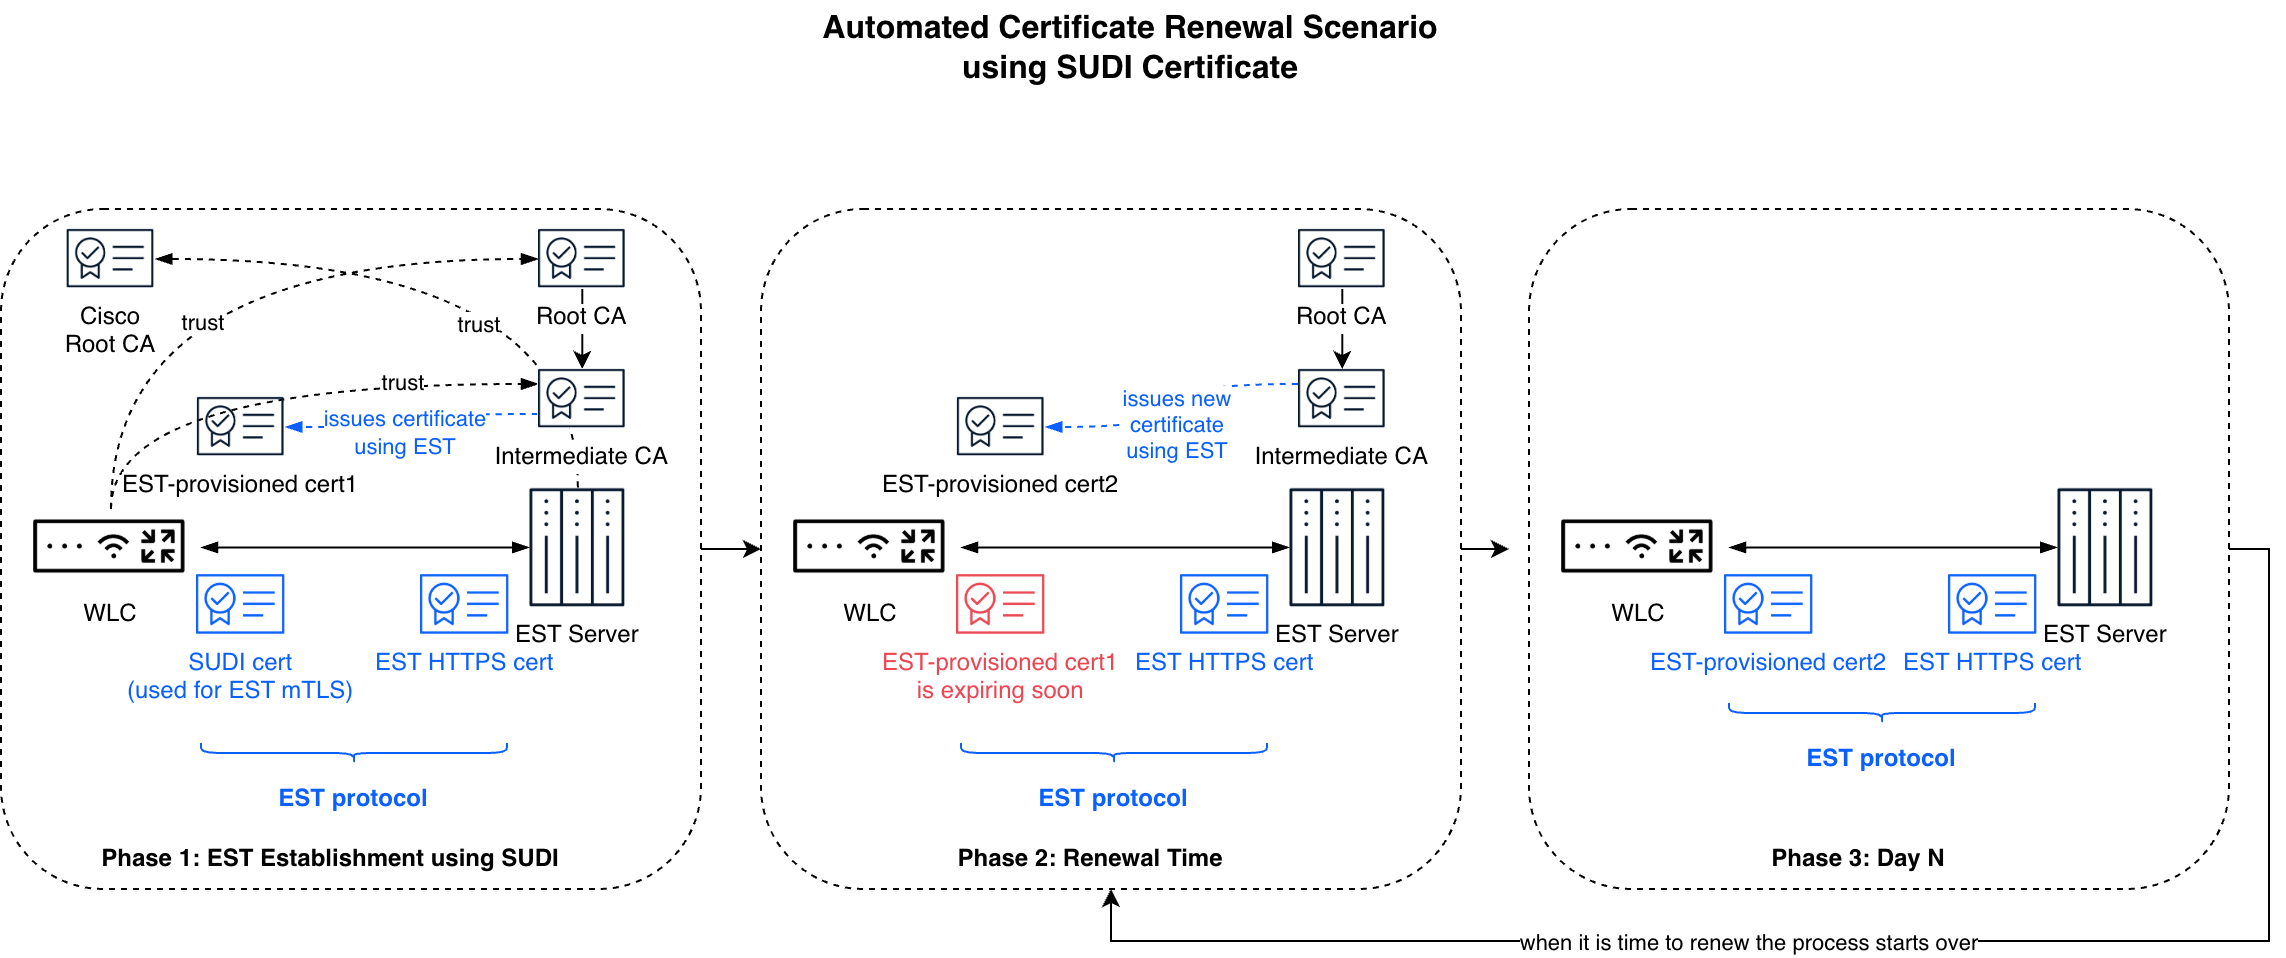
Configuration Using Manual Import
There are a few ways to get a signed certificate for the WLC, you can generate a CSR outside of the WLC and just install the signed certificate. Alternatively, you can create the CSR directly in the WLC and then get it signed by the CA. The two approaches are described in detail here, for simplicity only one will be covered here.
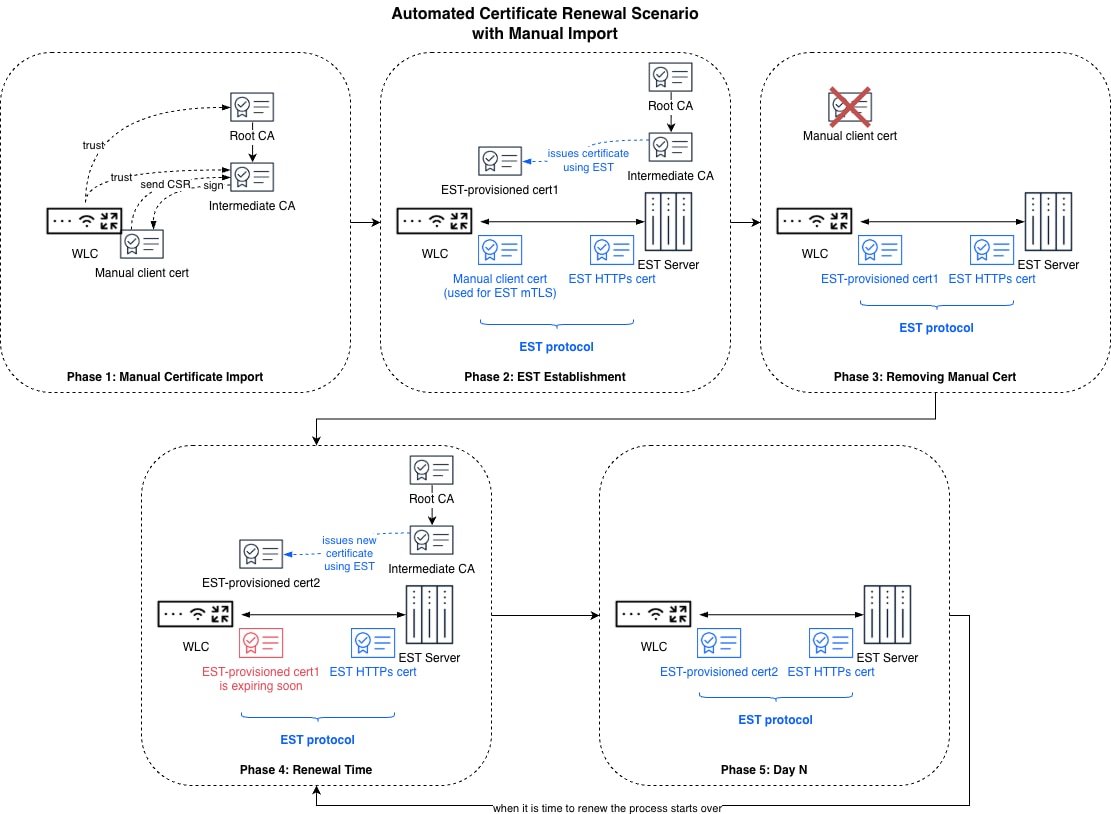
After the first-time certificate import, when the trustpoint is enrolled a certificate will be issued to the WLC. Then we will re-configure EST in the WLC to use this certificate, and we can remove the first-time certificate. After that all the posterior renewals will happen automatically. The following diagram depicts at a high level all the different steps.
Phase 1: to establish for the first time an EST mTLS connection between the WLC and the EST server a trusted certificate is needed for the WLC. For the WLC to have a trusted certificate by the EST server, the certificate must be issued by a Root CA which is trusted by the EST server. The manual certificate import method is a way to achieve this. This so-called “manual certificate” is a temporary certificate that will be used just one time.
Phase 2: once EST is established using the manual certificate from the previous step a certificate will be issued for the WLC using EST itself.
Phase 3: the manual certificate is no longer needed, now the enrollment profile configuration must be updated to use the recently issued certificate for the WLC. After this step LSC can leverage this trustpoint to request certificates for APs.
Phase 4: the issued certificate for the WLC is going to expire soon, the WLC will automatically request a new one and replace the old one.
Phase 5: the lifecycle starts again; APs can continue requesting certificates and whenever the WLC certificate expires it will be renewed again.
Step 1. To create the CSR in the WLC we first need the private keys.
9800#crypto key generate rsa modulus 4096 label my-4096rsa-key
Now the CSR can be created, here is a sample.
9800(config)#crypto pki trustpoint est_rsa_mTLS
9800(ca-trustpoint)#enrollment terminal pem
9800(ca-trustpoint)#serial-number none
9800(ca-trustpoint)#ip-address none
9800(ca-trustpoint)#subject-name C=ES, ST=Madrid, L=Madrid, O=Cisco, OU=Cisco Wireless TME, CN=LabW-9800CL5.cisco.com, E=madlab@cisco.com
9800(ca-trustpoint)#revocation-check none
9800(ca-trustpoint)#rsakeypair my-4096rsa-key
9800(ca-trustpoint)#hash sha512
Now the CA that will be signing this certificate needs to be trusted, for that we need to authenticate the trustpoint we just created.
9800(config)#crypto pki authenticate est_rsa_mTLS
Paste the Base64-encoded certificate for the CA that signed the certificate. Depending on the hierarchy used here you would use the Intermediate CA or the Root CA.
Now, display the CSR in the terminal using the enroll command.
9800(config)#crypto pki enroll est_rsa_mTLS
Step 2. Using the CSR from the previous step submit it to your Intermediate CA for signing.
Step 3. Now let’s import the signed certificate, paste the Base64-encoded certificate.
9800(config)#crypto pki import est_rsa_mTLS certificate
You can verify that the certificate has been imported correctly with:
9800#show crypto pki certificate verbose est_rsa_mTLS
Now to finish this step, we need to also create a trustpoint for the Root CA. This trustpoint provides the Root CA for validation of the EST server certificate chain.
9800(config)#crypto pki trustpoint est_RootCA
9800(ca-trustpoint)#enrollment terminal pem
9800(ca-trustpoint)#revocation-check none
9800(config)#crypto pki authenticate est_RootCA
Paste the Base64-encoded certificate for the Root CA. You can check that it was imported successfully running:
9800#show crypto pki certificate verbose est_RootCA
Step 4. Create an enrollment profile for EST using the manual certificate we just created, this is done by indicating the enrollment credential. In the enrollment urls, you need to specify the enrollment url/alias provided by your PKI software. The following (“/.well-known/est/cisco-wireless”) is just an example.
9800(config)#crypto pki profile enrollment est-profile-cert
9800(ca-profile-enroll)#method-est
9800(ca-profile-enroll)#enrollment credential est_rsa_mTLS
9800(ca-profile-enroll)#enrollment url https://10.50.0.149:443/.well-known/est/cisco-wireless
9800(ca-profile-enroll)#reenrollment url https://10.50.0.149:443/.well-known/est/cisco-wireless
Note: The reenrollment url is used for the WLC to go back to the EST server and ask for a new certificate when it is time to reenroll.
Step 5. Now, create a new trustpoint, this is the EST trustpoint that will leverage the previously created enrollment profile. The enrollment profile will use the certificate we just manually imported. This trustpoint will enroll with the EST server and get a certificate for the WLC. First a new key is needed for the CSR that will be sent under the hood.
9800#crypto key generate rsa modulus 4096 label autorenewal-key
Now the trustpoint can be created.
9800(config)#crypto pki trustpoint est-cert-autorenewal
9800(ca-trustpoint)#enrollment profile est-profile-cert
9800(ca-trustpoint)#serial-number none
9800(ca-trustpoint)#ip-address none
9800(ca-trustpoint)#fqdn none
9800(ca-trustpoint)#subject-name CN=LabW-9800CL5.cisco.com, C=ES, ST=Madrid, L=Madrid, O=Cisco, OU=Cisco Wireless TME, E=madlab@cisco.com
9800(ca-trustpoint)#revocation-check none
9800(ca-trustpoint)#rsakeypair autorenewal-key
9800(ca-trustpoint)#hash sha512
9800(ca-trustpoint)#eku request client-auth
9800(ca-trustpoint)#auto-enroll 80 regenerate
The auto-enroll is what tells the trustpoint that at 80% of the certificate lifetime it should auto-enroll and then generate new keys. Now, authenticate the trustpoint.
9800(config)#crypto pki authenticate est-cert-autorenewal
Since auto enroll is configured, there is no need to manually trigger enrollment as it will happen automatically. To check the result you may run the following command.
9800#show crypto pki certificate verbose est-cert-autorenewal
Step 6. Configure LSC to use the newly created EST trustpoint. LSC configuration is not covered in detail in this guide, this is one of the commands required, please check the Additional Resources section for instructions and examples for LSC configuration.
9800(config)#ap lsc-provision trustpoint est-cert-autorenewal
Step 7. Now, we can change the enrollment profile to use the recently EST-issued WLC certificate instead of the manual certificate. This means that we will be authenticating against the EST server using the certificate that was just issued to the WLC.
9800(config)#crypto pki profile enrollment est-profile-cert
9800(ca-profile-enroll)#enrollment credential est-cert-autorenewal
Step 8. You might optionally delete the manual certificate and its keys since they are not needed anymore.
9800(config)#no crypto pki trustpoint est_rsa_mTLS
9800(config)# crypto key zeroize rsa my-4096rsa-key
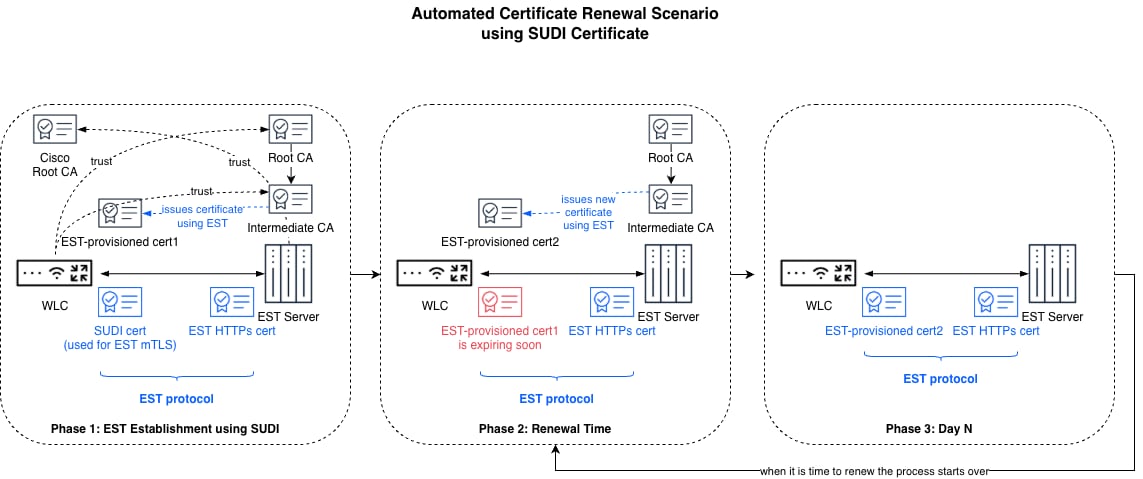
Configuration Using SUDI Certificate
As explained already, physical appliances come with a SUDI certificate installed. You might use this certificate to authenticate against the EST server, this will simplify things since no signing is required. Of course, for this to work your EST server needs to trust the Cisco CA at least temporarily during enrollment. Once enrolled, you might remove the trust since you will already have a certificate signed by your organization CA.
In this example we are using the SUDI certificate named CISCO_IDEVID_CMCA3_SUDI, which is signed by the Intermediate CA Cisco Manufacturing CA III (cmca3) which is signed by Cisco Basic Assurance Root CA 2099 (cbarc2099). The certificates for those can be downloaded from https://www.cisco.com/security/pki/.
The following diagram depicts at a high level all the different steps.
Phase 1: EST is established using the WLC SUDI certificate, then a certificate will be issued for the WLC using EST. The SUDI certificate is no longer needed, now the enrollment profile configuration must be updated to use the recently issued certificate for the WLC. After this step LSC can leverage this trustpoint to request certificates for APs.
Phase 2: the issued certificate for the WLC is going to expire soon, the WLC will automatically request a new one and replace the old one.
Phase 3: the lifecycle starts again; APs can continue requesting certificates and whenever the WLC certificate expires it will be renewed again.
The configuration steps are very similar to the previous scenario but a bit more simple.
Step 1. First we need to trust the Root CA of the EST server. This trustpoint provides the Root CA for validation of the EST server certificate chain.
9800(config)#crypto pki trustpoint est_RootCA
9800(ca-trustpoint)#enrollment terminal pem
9800(ca-trustpoint)#revocation-check none
9800(config)#crypto pki authenticate est_RootCA
Paste the Base64-encoded certificate for the Root CA. You can check it running:
9800#show crypto pki certificate verbose est_RootCA
Step 2. Now let’s create the enrollment profile using the SUDI certificate. In the enrollment urls, you need to specify the enrollment url/alias provided by your PKI software. The following (“/.well-known/est/cisco-wireless”) is just an example.
9800(config)#crypto pki profile enrollment est-profile-cert
9800(ca-profile-enroll)#method-est
9800(ca-profile-enroll)#enrollment credential CISCO_IDEVID_CMCA3_SUDI
9800(ca-profile-enroll)#enrollment url https://10.50.0.149:443/.well-known/est/cisco-wireless
9800(ca-profile-enroll)#reenrollment url https://10.50.0.149:443/.well-known/est/cisco-wireless
Note: The reenrollment url is used for the WLC to go back to the EST server and ask for a new certificate when it is time to reenroll.
Step 3. Now, create a new trustpoint, this is the EST trustpoint that will leverage the previously created enrollment profile. This trustpoint will enroll with the EST server and get a certificate for the WLC. First a new key is needed for the CSR that will be sent under the hood.
9800#crypto key generate rsa modulus 4096 label autorenewal-key
Now the trustpoint can be created.
9800(config)#crypto pki trustpoint est-cert-autorenewal
9800(ca-trustpoint)#enrollment profile est-profile-cert
9800(ca-trustpoint)#serial-number none
9800(ca-trustpoint)#ip-address none
9800(ca-trustpoint)#fqdn none
9800(ca-trustpoint)#subject-name CN=LabW-9800L3.cisco.com, C=ES, ST=Madrid, L=Madrid, O=Cisco, OU=Cisco Wireless TME, E=madlab@cisco.com
9800(ca-trustpoint)#revocation-check none
9800(ca-trustpoint)#rsakeypair autorenewal-key
9800(ca-trustpoint)#hash sha512
9800(ca-trustpoint)#eku request client-auth
9800(ca-trustpoint)#auto-enroll 80 regenerate
The auto-enroll is what tells the trustpoint that at 80% of the certificate lifetime it should auto-enroll and then generate new keys. Now, authenticate the trustpoint.
9800(config)#crypto pki authenticate est-cert-autorenewal
Since auto enroll is configured, there is no need to manually trigger enrollment as it will happen automatically. To check the result you may run the following command.
9800#show crypto pki certificate verbose est-cert-autorenewal
Step 4. Configure LSC to use the newly created EST trustpoint. LSC configuration is not covered in detail in this guide, this is one of the commands required, please check the Additional Resources section for instructions and examples for LSC configuration.
9800(config)#ap lsc-provision trustpoint est-cert-autorenewal
Step 5. Now, we can remove the SUDI certificate we used for the first-time enrollment and use the new trustpoint to authenticate against the EST server.
9800(config)#crypto pki profile enrollment est-profile-cert
9800(ca-profile-enroll)#enrollment credential est-cert-autorenewal
Configuration Using Username and Password
As explained already, it is also possible to authenticate using a username and password. This method uses HTTP Basic or Digest authentication. HTTP-based client authentication is always performed over a TLS-protected transport.
The following diagram depicts at a high level all the different steps.
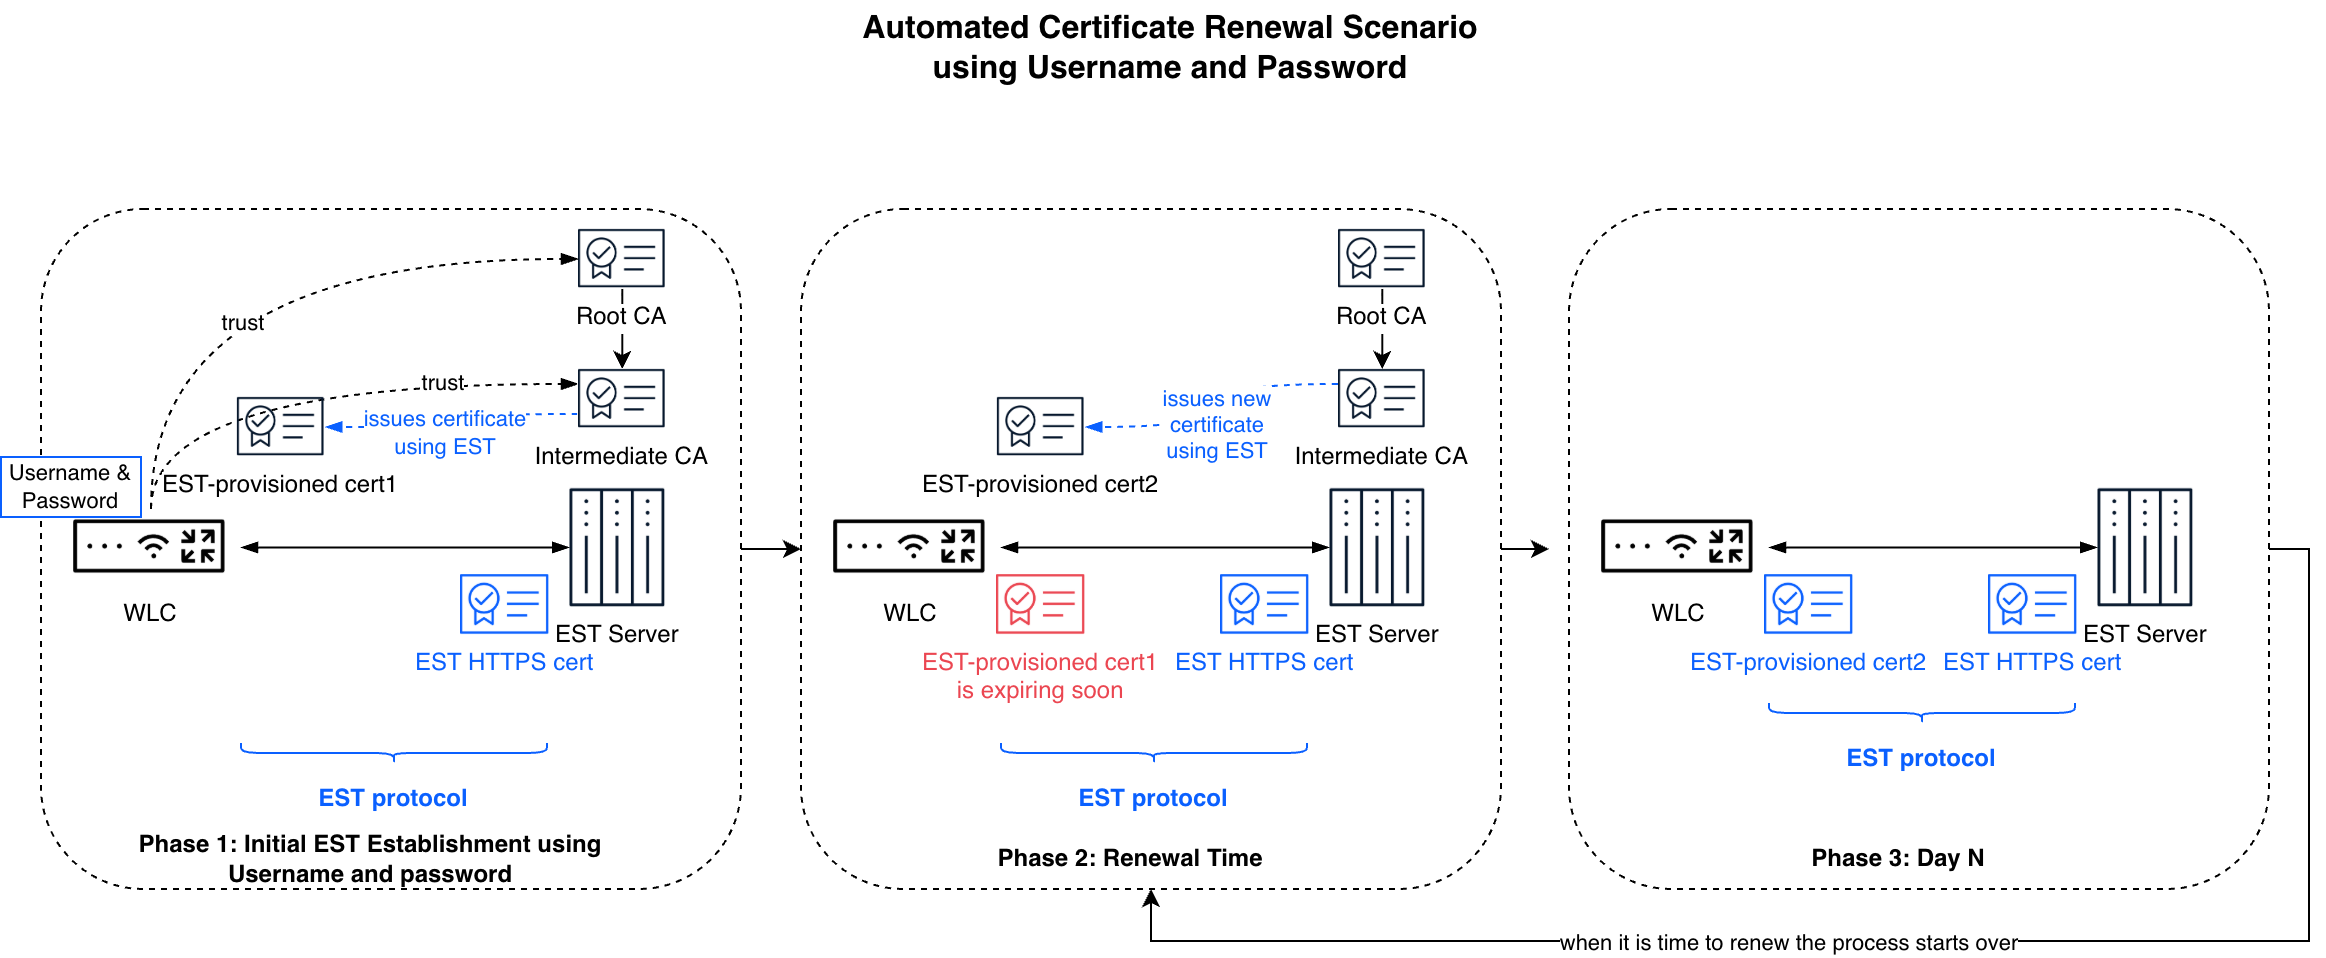
Phase 1: EST is established using a username and password, then a certificate will be issued for the WLC using EST. Username and Password are no longer needed, so optionally the enrollment profile configuration might be updated to use the recently issued certificate for the WLC. After this step, LSC can leverage this trustpoint to request certificates for APs.
Phase 2: The issued certificate for the WLC is going to expire soon, the WLC will automatically request a new one and replace the old one.
Phase 3: The lifecycle starts again; APs can continue requesting certificates and whenever the WLC certificate expires it will be renewed again.
The configuration steps are:
Step 1. First, we need to trust the Root CA of the EST server. This trustpoint provides the Root CA for validation of the EST server certificate chain. Even if using a username and password this step is required.
9800(config)#crypto pki trustpoint est_RootCA
9800(ca-trustpoint)#enrollment terminal pem
9800(ca-trustpoint)#revocation-check none
9800(config)#crypto pki authenticate est_RootCA
Paste the Base64-encoded certificate for the Root CA. You can check it running:
9800#show crypto pki certificate verbose est_RootCA
Step 2. Now, we need to create a dummy trustpoint with no certificate within it, so empty. This is an important step, if it is omitted the WLC will pick a certificate and use it for the EST which might create issues with the EST server. By using an empty certificate, the WLC tries to authenticate without presenting a certificate which is required by some EST servers.
9800(config)#crypto pki trustpoint dummy-empty
Step 3. Now, let’s create the enrollment profile using the username and password. In the enrollment urls, you need to specify the enrollment url/alias provided by your PKI software. The following (“/.well-known/est/cisco-wireless”) is just an example.
9800(config)#crypto pki profile enrollment est-profile-username
9800(ca-profile-enroll)#method-est
9800(ca-profile-enroll)#enrollment http username <username> password 0 <password>
9800(ca-profile-enroll)#enrollment credential dummy-empty
9800(ca-profile-enroll)#enrollment url https://10.50.0.149:443/.well-known/est/cisco-wireless
9800(ca-profile-enroll)#reenrollment url https://10.50.0.149:443/.well-known/est/cisco-wireless
Note: The reenrollment url is used for the WLC to go back to the EST server and ask for a new certificate when it is time to reenroll.
Step 4. Now, create a new trustpoint, this is the EST trustpoint that will leverage the previously created enrollment profile. This trustpoint will enroll with the EST server and get a certificate for the WLC. First, a new key is needed for the CSR that will be sent under the hood.
9800#crypto key generate rsa modulus 4096 label autorenewal-key
Now the trustpoint can be created.
9800(config)#crypto pki trustpoint est-username-autorenewal
9800(ca-trustpoint)#enrollment profile est-profile-username
9800(ca-trustpoint)#serial-number none
9800(ca-trustpoint)#ip-address none
9800(ca-trustpoint)#fqdn none
9800(ca-trustpoint)#subject-name CN=LabW-9800L3.cisco.com, C=ES, ST=Madrid, L=Madrid, O=Cisco, OU=Cisco Wireless TME, E=madlab@cisco.com
9800(ca-trustpoint)#revocation-check none
9800(ca-trustpoint)#rsakeypair autorenewal-key
9800(ca-trustpoint)#hash sha512
9800(ca-trustpoint)#eku request client-auth
9800(ca-trustpoint)#auto-enroll 80 regenerate
The auto-enroll is what tells the trustpoint that at 80% of the certificate lifetime it should auto-enroll and then generate new keys. Now, authenticate the trustpoint.
9800(config)#crypto pki authenticate est-username-autorenewal
Since auto enroll is configured, there is no need to manually trigger enrollment as it will happen automatically. To check the result you may run the following command.
9800#show crypto pki certificate verbose est-username-autorenewal
Step 5. Configure LSC to use the newly created EST trustpoint. LSC configuration is not covered in detail in this guide, this is one of the commands required, please check the Additional Resources section for instructions and examples for LSC configuration.
9800(config)#ap lsc-provision trustpoint est-username-autorenewal
Step 6. Now, we can replace the dummy certificate we used for the first-time enrollment and use the new trustpoint to authenticate against the EST server.
9800(config)#crypto pki profile enrollment est-profile-username
9800(ca-profile-enroll)#enrollment credential est-username-autorenewal
Optionally, you might remove the username and password. But make sure that your EST server is configured accordingly and allows that in the same EST alias. This is unlikely unless you manually change the EST alias configuration to not require username and password.
9800(ca-profile-enroll)#no enrollment http username <username> password 0 <password>
9800(config)#ap lsc-provision trustpoint est-cert-autorenewal
To provision all APs at once
9800(config)#ap lsc-provision
To provision some APs
9800(config)#ap lsc-provision mac-address aa11.bb22.cc33
9800(config)#ap lsc-provision provision-list
To force an AP to renew its certificate
9800#ap name <AP-Name> lsc renew
9800#show crypto pki certificate verbose est-cert-autorenewal
9800#debug crypto pki messages
9800#debug crypto est-client
9800#debug crypto pki transactions
9800#debug crypto pki validation
Useful links:
● Cisco Catalyst 9800 Series Wireless Controller Software Configuration Guide, Chapter Locally significant certificates: https://www.cisco.com/c/en/us/td/docs/wireless/controller/9800/17-18/config-guide/b_wl_17_18_cg/m_locally_significant_certificates.html
● Understand Certificate and Trustpoint Types on the 9800 WLC: https://www.cisco.com/c/en/us/support/docs/wireless/catalyst-9800-series-wireless-controllers/221047-understand-certificate-and-trustpoint-ty.html
● Generate and Download CSR Certificates on Catalyst 9800 WLCs: https://www.cisco.com/c/en/us/support/docs/wireless/catalyst-9800-series-wireless-controllers/213917-generate-csr-for-third-party-certificate.html
● Configure 802.1X on APs for PEAP or EAP-TLS with LSC: https://www.cisco.com/c/en/us/support/docs/wireless/catalyst-9100-access-points/221127-configure-locally-significant-certificat.html
● Security and VPN Configuration Guide, Cisco IOS XE 17.x: https://www.cisco.com/c/en/us/td/docs/routers/ios/config/17-x/sec-vpn/b-security-vpn/m_sec-est-client-supp-pki.html