Hotspot 2.0
Hotspot 2.0 is a network interworking feature that
-
enables IEEE 802.11 devices to interwork with external networks
-
provides network discovery and selection services, and
-
allows mobile devices to join Wi-Fi networks automatically, including during roaming.
Hotspot 2.0 components
The Hotspot 2.0 feature has four distinct parts:
-
Hotspot 2.0 Beacon Advertisement: Allows a mobile device to discover Hotspot 2.0-compatible and 802.11u-compatible WLANs.
-
Access Network Query Protocol (ANQP) Queries: Sends queries about the networks from IEEE 802.11 devices, such as network type (private or public); connectivity type (local network, internet connection, and so on), or the network providers supported by a given network.
-
Online Sign-up: Allows a mobile device to obtain credentials to authenticate itself with the Hotspot 2.0 or WLAN.
-
Authentication and Session Management: Provides authentication (802.1x) and management of the STA session (session expiration, extension, and so on).
Hotspot 2.0, also known as HS2 and Wi-Fi Certified Passpoint, is based on the IEEE 802.11u and Wi-Fi Alliance Hotspot 2.0 standards. It seeks to provide better bandwidth and services-on-demand to end users.
The interworking service aids network discovery and selection, enabling information transfer from external networks. It provides information to the stations about the networks before association.
Interworking not only helps users within the home, enterprise, and public access domains, but also assists manufacturers and operators to provide common components and services for IEEE 802.11 customers. These services are configured on a per-WLAN basis on the Cisco Wireless Controller (controller).
In order to mark a WLAN as Hotspot 2.0-compatible, the 802.11u-mandated information element and the Hotspot 2.0 information element is added to the basic service set (BSS) beacon advertised by the corresponding AP, and in WLAN probe responses.
 Note |
The Hotspot 2.0 feature supports only local mode or FlexConnect mode (central switching and central authentication). FlexConnect local switching is only supported when the Open Roaming configuration template is set up using the wireless hotspot ANQP-server server-name type open-roaming command. If the configuration diverges from this template, FlexConnect local switching will not be supported. |
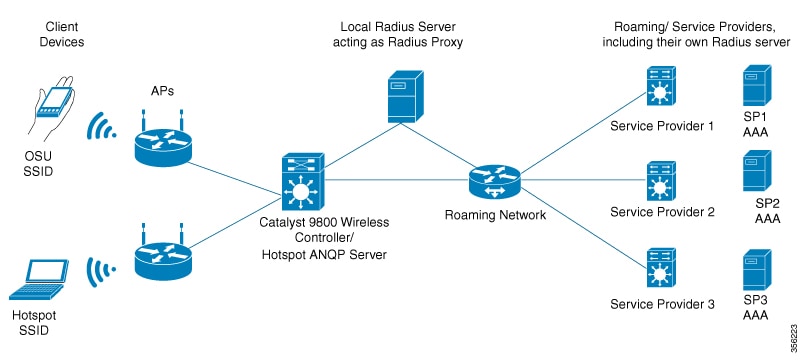
This figure shows a standard deployment of the Hotspot 2.0 network architecture:
Configure Hotspot 2.0
Configure an access network query protocol server (CLI)
The Access Network Query Protocol Server (ANQP) is a query and response protocol that defines the services offered by an AP, usually at a Wi-Fi Hotspot 2.0.
Note |
When configuring roaming-OI in the ANQP server, ensure that you set the beacon keyword for at least one roaming-OI, as mandated by the 802.11u standard. |
Procedure
|
Step 1 |
Enter global configuration mode. Example: |
||
|
Step 2 |
Configure a Hotspot 2.0 ANQP server. Example:Example: |
||
|
Step 3 |
Add a description for the ANQP server. Example:Example: |
||
|
Step 4 |
Configure a 802.11u Third Generation Partnership Project (3GPP) cellular network. Example:Example:The mobile-country-code should be a 3-digit decimal number. The mobile-network-code should be a 2-digit or 3-digit decimal number. |
||
|
Step 5 |
Configure the ANQP reply fragmentation threshold, in bytes. Example:Example:The ANQP protocol can be customized by setting the fragmentation threshold, after which the ANQP reply is split into multiple messages.
|
||
|
Step 6 |
Configure the Hotspot 2.0 ANQP domain identifier. Example:Example: |
||
|
Step 7 |
Configure the 802.11u network authentication type. Example:Example:Depending on the authentication type, a URL is needed for HTTP and HTTPS. |
||
|
Step 8 |
Configure the Hotspot 2.0 protocol and port capabilities. Example:Example:
|
||
|
Step 9 |
Configure an 802.11u domain name. Example:Example:You can configure up to 32 domain names. The domain-name should not exceed 220 characters. |
||
|
Step 10 |
Configure an 802.11u IPv4 address type in the Hotspot 2.0 network. Example:Example: |
||
|
Step 11 |
Configure an 802.11u IPv6 address type in the Hotspot 2.0 network. Example:Example: |
||
|
Step 12 |
Configure an 802.11u NAI realm profile that identifies the realm that is accessible using the AP. Example:Example: |
||
|
Step 13 |
Configure a Hotspot 2.0-operating class identifier. Example:Example: |
||
|
Step 14 |
Configure a Hotspot 2.0 operator-friendly name in a given language. Example:Example:Use only the first three letters of the language, in lower case, for the language code. For example, use eng for English. To see the full list of language codes, go to: http://www.loc.gov/standards/iso639-2/php/code_list.php.
|
||
|
Step 15 |
Configure the SSID that wireless clients will use for OSU. Example:Example:The SSID length can be up to 32 characters. |
||
|
Step 16 |
Configure the 802.11u roaming organization identifier. Example:Example:If the beacon keyword is specified, the roaming OUI is advertised in the AP WLAN beacon or probe response. Otherwise, it will only be returned while performing the roaming OUI ANQP query.
|
||
|
Step 17 |
Configure the 802.11u venue information. Example:Example:The venue-name should not exceed 220 characters and the language-code should only be 2 or 3 lowercase letters (a-z) in length. |
Configure WAN metrics
Procedure
|
Step 1 |
Enter global configuration mode. Example: |
|
Step 2 |
Configure a Hotspot 2.0 ANQP server. Example:Example: |
|
Step 3 |
Configure the WAN downlink load. Example:Example: |
|
Step 4 |
Configure the WAN downlink speed, in kbps. Example:Example: |
|
Step 5 |
Configure the WAN link to operate at its maximum capacity. Example: |
|
Step 6 |
Set the WAN link status. Example:Example: |
|
Step 7 |
Configure the uplink or downlink load measurement duration. Example:Example: |
|
Step 8 |
Configure the WAN uplink load. Example:Example: |
|
Step 9 |
Configure the WAN uplink speed, in kbps. Example:Example: |
Configure OSU provider (CLI)
Configure an OSU (Online Sign-Up) provider to enable wireless clients to connect and provision network access through the Hotspot/OpenRoaming service.
Use this procedure to set up an OSU provider with the necessary configuration parameters including provider name, NAI realm, authentication methods, server URI, icon configuration, and friendly names for different languages.
Before you begin
Follow these steps to configure OSU provider using CLI:
Procedure
|
Step 1 |
Enter global configuration mode. Example: |
|
Step 2 |
Configure an icon for Hotspot 2.0 and its parameters, such as media type, language code, icon width, and icon height. Example: |
|
Step 3 |
Configure a Hotspot 2.0 ANQP server. Example: |
|
Step 4 |
Configure a Hotspot 2.0 OSU provider name. Example: |
|
Step 5 |
Configure the name of the OSU operator in a given language. Example:The OSU operator name and description should not exceed 220 characters. The language code should be 2 or 3 lower-case letters (a-z). |
|
Step 6 |
Configure the server Uniform Resource Identifier (URI) of the OSU operator. Example: |
|
Step 7 |
Configure the primary supported OSU method of the OSU operator. Example: |
|
Step 8 |
Configures the Network Access Identifier (NAI) realm of the OSU operator. Example:The nai-realm should not exceed 220 characters. |
|
Step 9 |
Configure the icon for the OSU provider. Example:The file-name should not exceed 100 characters. |
The OSU provider is configured and applied to the device, enabling wireless clients to use the Online Sign-Up service for network provisioning.
Configure Hotspot 2.0 WLAN
Procedure
|
Step 1 |
Enter global configuration mode. Example: |
|
Step 2 |
Configure a WLAN and enter WLAN configuration mode. Example:Example: |
|
Step 3 |
Configure random GTK for hole 196 mitigation. Example:Hole 196 is the name of WPA2 vulnerability. |
|
Step 4 |
Enable the WLAN. Example: |
Configure an online subscription with encryption WLAN (CLI)
Procedure
|
Step 1 |
Enter global configuration mode. Example: |
||
|
Step 2 |
Configure a WLAN and enter WLAN configuration mode. Example:Example: |
||
|
Step 3 |
Enable WPA OSEN security support. Example:
|
||
|
Step 4 |
Enable the WLAN. Example: |
Attach an ANQP server to a policy profile (CLI)
Procedure
|
Step 1 |
Enter global configuration mode. Example: |
|
Step 2 |
Configure a policy profile. Example:Example: |
|
Step 3 |
Disable the policy profile. Example: |
|
Step 4 |
Attach the Hotspot 2.0 ANQP server to the policy profile. Example:Example: |
|
Step 5 |
Enable the policy profile. Example: |
What to do next
Attach the policy profile to the WLAN to make the WLAN Hotspot 2.0 enabled.Configure interworking for Hotspot 2.0
Procedure
|
Step 1 |
Enter global configuration mode. Example: |
|
Step 2 |
Configure a Hotspot 2.0 ANQP server. Example:Example: |
|
Step 3 |
Configure a 802.11u network type. Example:Example:The access-level can be allowed or forbidden. |
|
Step 4 |
(Optional) Configure a homogenous extended service set. Example:Example: |
|
Step 5 |
Select a group type and venue type from the list of available options. Example:Example: |
Configure the Generic Advertisement Service rate limit (CLI)
Procedure
|
Step 1 |
Enter global configuration mode. Example: |
|
Step 2 |
Configure an AP profile and enter AP profile configuration mode. Example:Example: |
|
Step 3 |
Configure the number of Generic Advertisement Services (GAS) request action frames sent to the controller by an AP in a given interval. Example:Example: |
|
Step 4 |
Return to global configuration mode. Example: |
|
Step 5 |
Configure the number of GAS request action frames to be processed by the controller. Example:Example: |
Verify Hotspot 2.0 configuration
Use these show commands to verify the quality of service (QoS) and AP GAS rate limit.
To view whether a QoS map ID is user configured or the default one, use this command:
Device# show ap profile <profile name> detailed

QoS Map                       : user-configured
To view the QoS map values used and their source, use this command:
Device# show ap profile <profile name> qos-map

QoS Map                       : default
DSCP ranges to User Priorities
 User Priority   DSCP low   DSCP high   Upstream UP to DSCP
-----------------------------------------------------------
             0          0           7                     0
             2         16          23                    10
             3         24          31                    18
             4         32          39                    26
             5         40          47                    34
             6         48          55                    46
             7         56          63                    48

DSCP to UP mapping exceptions
 DSCP   User Priority
---------------------
    0               0
    2               1
    4               1
    6               1
   10               2
   12               2
   14               2
   18               3
   20               3
   22               3
To view the AP rate limiter configuration, use this command:
Device# show ap name AP0462.73e8.f2c0 config general | i GAS

GAS rate limit Admin status                     : Enabled
Number of GAS request per interval              : 30
GAS rate limit interval (msec)                  : 100
 Feedback