Installing the Access Point

Installing an AP involves the following high-level tasks.

Package contents

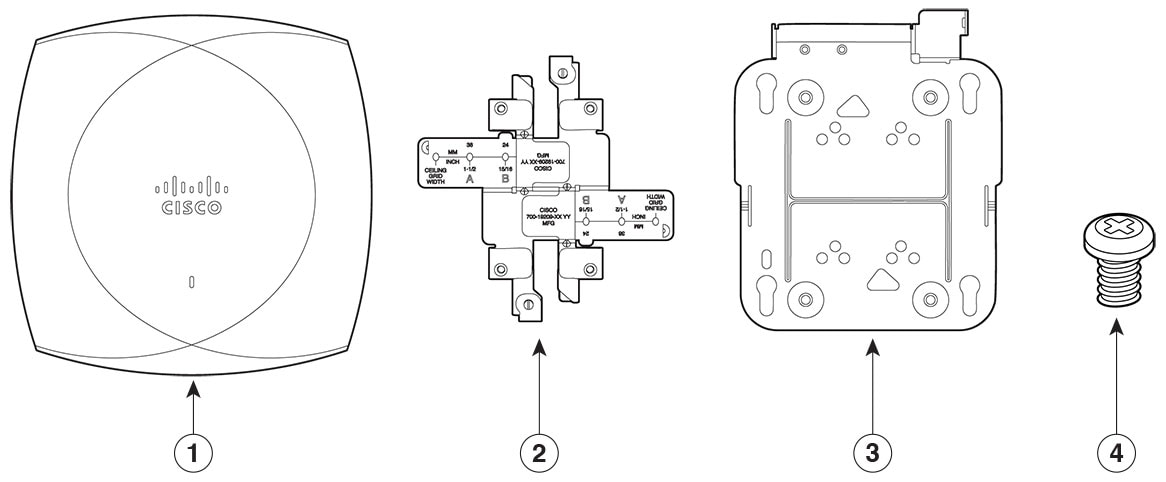
Each AP package contains the following items:

1

CW9174I access point

2

AIR-AP-T-RAIL-R

3

AIR-AP-BRACKET-1

4

Screws

  • One CW9174I AP

  • Default mounting brackets: Adjustable ceiling-rail clips AIR-AP-T-RAIL-R= and AIR-AP-BRACKET-1=

  • Orderable optional mounting brackets: AIR-AP-T-RAIL-F=, and AIR-AP-BRACKET-2=

  • Cisco product documentation and pointer card

Unpack the access point

Procedure


Step 1

Unpack and remove the access point and the selected mounting accessory kit from the shipping box.

Step 2

Return the packing material to the shipping container and save it for future use.

Step 3

Verify that you have received all the items you ordered. If any item is missing or is damaged, contact your Cisco representative or reseller for instructions.


Cisco orderable accessories

You can order the following accessories separately, from Cisco:

  • MA-PWR-50WAC

    • Description: Cisco 50W AC Power Supply

    • Power Specifications: 50W, 54VDC

  • AP-mounting brackets to mount the AP

    Mounting brackets

    Description

    AIR-AP-BRACKET-2=

    For electrical or network boxes above ceiling mounts

    AIR-AP-T-RAIL-F=

    Flush ceiling grid clip

    AIR-CHNL-ADAPTER=

    T-RAIL channel adapter

  • Power injectors when Power over Ethernet (PoE) is not available

    Power supply

    Description

    CW-INJ-8

    Meraki 802.3bt PoE injector

    Power Specifications: 60W, 10 Gbps Ethernet

    For more information, see Cisco Power Injector CW-INJ-8 Quick Start Guide.

    AIR-PWRINJ7=

    Mid-span power injector AIR-PWRINJ7= when (PoE) is not available

    Power specifications: 50W, 56VDC

    For more information, see the Cisco Multigigabit 802.3bt Power Injector.

    AIR-PWRINJ6=

    1

    Power Specifications: 30W, 55VDC

    For more information, see the Cisco Aironet Power Injector AIR-PWRINJ6= Installation Guide.

    MA-INJ-6-x

    Meraki 802.3bt PoE injector

    Power Specifications: 60W, 55VDC

    For more information, see the MA-INJ-6 Meraki Multigigabit 802.3bt Power over Ethernet Injector.

    1

    If 802.3af is used, the system function will be disabled.

    A 802.3at power injector when PoE is not available

Preinstallation configuration - Cisco Catalyst mode

Controller discovery process

To support the CW9174I AP, the controller must be running Cisco IOS XE 17.18.2 or a later release. For more information, see the Cisco Catalyst 9174I Series Access Points Data Sheet.

Guidelines and limitations

  • It is not possible to edit or query an access point using the controller CLI if the name of the access point contains a space.

  • Make sure that the controller is set to the current time. If the controller is set to a time that has already occurred, the access point might not join the controller because its certificate may not be valid for that time.

The AP must discover the controller before it can become an active part of the network. The AP supports the following controller discovery processes:

  • Locally stored controller IP address discovery: If the access point was previously joined to a controller, the IP addresses of the primary, secondary, and tertiary controllers are stored in the access point's nonvolatile memory. This process of storing controller IP addresses on an access point for later deployment is called priming the access point. For more information about priming, see Performing a preinstallation configuration.

  • DHCP server discovery: This feature uses DHCP Option 43 to provide controller IP addresses to the access points. Cisco switches support a DHCP server option that is typically used for this capability. For more information about DHCP Option 43, see Configuring DHCP option 43.

  • DNS discovery: The access point can discover controllers through your domain name server (DNS). For the access point to do so, you must configure your DNS to return controller IP addresses in response to CISCO-CAPWAP-CONTROLLER.localdomain, where localdomain is the access point domain name. Configuring the CISCO-CAPWAP-CONTROLLER provides backwards compatibility in an existing customer deployment. When an access point receives an IP address and DNS information from a DHCP server, it contacts the DNS to resolve CISCO-CAPWAP-CONTROLLER.localdomain. When the DNS sends a list of controller IP addresses, the access point sends discovery requests to these controllers.

Performing a preinstallation configuration

The following procedures describe the processes to ensure that your AP installation and initial operation go as expected.


Note


Performing a preinstallation configuration is an optional procedure. If your network controller is properly configured, you can install your AP in its final location and connect it to the network from there. For more information, see Deploy the access point on a wireless network.
The following illustration shows the preinstallation configuration setup:

Perform the following steps:

Before you begin

Ensure that the Cisco Controller Distribution System (DS) port is connected to the network. Use the procedure for CLI or GUI, as described in the release-appropriate Cisco Catalyst 9800 Series Wireless Controller Software Configuration Guide.
  • Enable Layer 3 connectivity between APs and wireless controller's wireless management interface.

  • Configure the switch to which your AP has to attach. See the Cisco Wireless Controller Configuration Guide for the release you are using, for additional information.

  • Ensure that the DHCP is enabled on the network. The AP must receive its IP address through DHCP.


    Note


    An AP is assigned an IP address from the DHCP server only if a default router (gateway) is configured on the DHCP server (enabling the AP to receive its gateway IP address) and the gateway ARP is resolved.
  • CAPWAP UDP ports must not be blocked in the network.

  • The AP must be able to find the IP address of the controller. This can be accomplished using DHCP, DNS, or IP subnet broadcast. This guide describes the DHCP method to convey the controller IP address. For other methods, see the product documentation. See also Configuring DHCP option 43 for more information.


    Note


    The AP requires an 5G Ethernet link to prevent the Ethernet port from becoming a bottleneck for traffic.


Procedure


Step 1

Power the AP using a supported power source.

See Power the access point.

  • The AP checks for cloud connectivity and attempts to connect to the Meraki dashboard.

  • If the AP is unable to find cloud connectivity, it uses fast offline migration to look for a Cisco Catalyst 9800 Controller. The AP uses DHCP, DNS, and L2 discovery mechanisms for the migration. For more information, see Global Use Access Points.

    Note


    The AP should not have cloud connectivity from its subnet if it intends to connect to a controller. If the AP joins a Meraki Dashboard, it can be later migrated to a controller.

Once the AP discovers the controller, it performs a firmware image download and reboots.

Step 2

If the preinstallation configuration is successful, the Status LED is green, indicating normal operation. Disconnect the AP and mount it on the location at which you intend to deploy it on the wireless network.

Step 3

If your AP does not indicate normal operation, turn it off and repeat the preinstallation configuration.

Note

 
When you are installing a Layer 3 access point on a subnet that is different from the Catalyst 9800 controller, ensure that the following setup is configured:
  • A DHCP server is reachable from the subnet on which you plan to install the AP.

  • The subnet has a route back to the controller.

  • This route has destination UDP ports 5246 and 5247 open for CAPWAP communications.

  • The route back to the primary, secondary, and tertiary controller allows IP packet fragments.

  • If address translation is used, the access point and the controller have a static 1-to-1 NAT to an outside address. Port Address Translation is not supported.


Preinstallation checks and installation guidelines

Before you mount and deploy your access point, we recommend that you perform a site survey (or use the Site Planning tool) to determine the best location to install your access point.

You should have the following information about your wireless network available:

  • Access point locations

  • Access point mounting options:

    • Below a suspended ceiling

    • on a flat horizontal surface

    • on top of a desk


Note


You can mount the access point above a suspended ceiling, but you must purchase additional mounting hardware. For more information, see Mount the access point.
  • Access point power options: Use either of the following options to power the AP:

    • Cisco-approved power injector

    • PoE with a supporting switch

    • DC power jack


    Note


    • The power adapter must be certified to IEC/EN 62368-1 (or equivalent IT/telecom safety standard) by a Nationally Recognized Testing Laboratory (NRTL) or other authority accepted in the country of use (UL, CSA, ETL, TUV, CE,CCC, PSE, BIS, INMETRO). The adapter must meet the following minimum specifications: Rated output of 42.5 to 57VDC, min 0.701A-0.941A, Tmax of 50C minimum, altitude of 3048m minimum.

    • If 802.3af is used, all the radios get switched off. Ethernet gets downgraded to 1 GbE. The Wi-Fi client serving radios and IoT radio are switched off.


  • Operating temperature:

    • CW9174I: 32°F to 122°F (0°C to 50°C)


    Note


    When installing the AP in an environment where the ambient temperature is in the range of 104°and 122°F (>40° and 50°C), the access point configuration changes.
    • 10SS mode: 5G and 6G radios scale to 2x2, Ethernet remains at 5G, and the USB remains enabled.

    • 8SS mode: 2G and 5G radios scale to 2x2, Ethernet remains at 5G, and the USB remains enabled.


  • Console access using the console port

    We recommend that you use a console cable that is one meter or less in length.


    Note


    The AP may face issues while booting if you use an unterminated console cable (not plugged into any device or terminal) or a console cable that is more than one meter in length.

We recommend that you make a site map showing access point locations so that you can record the device MAC addresses from each location and return them to the person who is planning or managing your wireless network.

Preinstallation configuration - Cisco Meraki mode

Perform a preinstallation configuration - Cisco Meraki mode

This is a brief overview of the steps required to add the access point to your network. For more information about creating, configuring and managing Meraki wireless networks, see the Cisco Meraki documentation.

Before you begin

You should complete these steps before going on-site to perform an installation.

Follow these steps to configure dashboard network.

Procedure


Step 1

Log in to Cisco Meraki dashboard. If this is your first time, create a new account.

Step 2

Find the network to which you plan to add your APs or create a new network.

Step 3

Add your APs to your network. You will need your Meraki order number (found on your invoice) or the Cloud ID of each AP, which looks like Qxxx-xxxx-xxxx, and is found on the bottom of the unit. You will also need your license key, which you should have received via email.

Step 4

Go to the map or floor plan view and place each AP on the map by clicking and dragging it to the location where you plan to mount it.


What to do next

For more information about onboarding access points, see Wireless Access Points Quick Start Guide.

Mount the access point

Cisco Wireless 9174I Wi-Fi Access Point can be mounted in the following places:

  • Suspended ceiling

  • Hard ceiling

  • Wall

  • Electrical or network box

  • Above a suspended ceiling

For detailed instructions on mounting the AP, see the Access Point Mounting Instructions document at:

http://www.cisco.com/c/en/us/td/docs/wireless/access_point/mounting/guide/apmount.html.

The standard mounting hardware supported by the AP are listed in the following table.

Table 1. Brackets and clips to mount the AP
Mounting type Part number Description

Brackets234

AIR-AP-BRACKET-1

Low-profile bracket: Used for ceiling-mount installations. (This is the default option.)

AIR-AP-BRACKET-2

Universal bracket: Used for wall or electrical box installations.

Clips

AIR-AP-T-RAIL-R

Ceiling grid clip (recessed mounting). (This is the default option.)

AIR-AP-T-RAIL-F

Ceiling grid clip (flush mounting).

AIR-CHNL-ADAPTER

Optional adapter for channel-rail ceiling grid profile.

2 Mount the AP using no less than four screw holes on a bracket.
3 AIR-AP-BRACKET-3 is not compatible for use with Cisco CW9174I access points.
4 You can also use the in-tile mounting options available from third parties. For more information, see the access point data sheet.

When mounting the AP in areas where there is a possibility of the AP being knocked off the mounting bracket, use the lock hasp at the back of the AP to lock it to the bracket.

Power the access point


Caution


Ensure that the AP is powered using a Underwriters' Laboratories-compliant (UL-compliant) PoE power source. You must connect the unit only to the PoE network, without routing to the outside plant.

Note


Actual power consumption may vary depending on access point usage. It is recommended that you ensure that Link Layer Discovery Protocol (LLDP)/Cisco Discovery Protocol is enabled to allow proper power negotiation.


Power source

2GHz Radio

5GHz Radio

6G Radio

Link Speed

USB

Max power consumption

Configuration

802.3bt/Class 5/UPOE, DC Jack

2x2

4x4

4x4

5G

Y (9W)

37.3W

10SS, Tri-band

802.3bt/Class 5/UPOE, DC Jack

4x4

4x4

-

5G

Y (9W)

32.1W

8SS, Dual-band

802.3at/POE+

2x2

4x4

4x4

2.5G

Y (2.5W)

25.5W

10SS, Tri-band

802.3at/POE+

4x4

4x4

-

2.5G

Y (2.5W)

25.5W

8SS, Dual-band

802.3af/POE

-

-

-

1G

N

13.9W

All radios off

Deploy the access point on a wireless network

After you mount the access point, follow these steps to deploy it on a wireless network:

Procedure


Step 1

Connect and power up the access point.

Step 2

Observe the access point LED.

For LED status descriptions, see Checking the access point LEDs.

  • When you power up the access point, it begins a power-up sequence that you can verify by observing the access point LED. If the power-up sequence is successful, the discovery and join process begins. During this process, the LED blinks green, red, and off sequentially. When the access point joins a controller, the LED is green if no clients are associated, or blue if one or more clients are associated.

  • If the LED is not on, it is most likely that the access point is not receiving power.

  • If the LED blinks sequentially for more than five minutes, the access point is unable to find its primary, secondary, and tertiary controller. Check the connection between the access point and the Cisco Wireless Controller, and be sure that the access point and the Cisco Wireless Controller are either on the same subnet or that the access point has a route back to its primary, secondary, and tertiary Cisco Wireless Controller. Also, if the access point is not on the same subnet as the Cisco Wireless Controller, ensure that there is a properly configured DHCP server on the same subnet as the access point.