Configuring Custom SQL Server Port
Pre-requisites:
-
Install the following ES or later cummulative ES releases:
-
For Rogger/Logger, install ICM 12.6.2_ES98.
-
For Administration & Data Servers and Administration Client, install ICM 12.6.2_ES100.
-
For CUIC, install CUIC.1262.ES04 COP.
-
-
Download the 'SQL Port Update' utility from CCO at https://software.cisco.com/download/home/268439622/type/284420243/release/12.6(2)_ES. Extract the package on the ICM nodes (for example C:\SQLPortUpdate); it contains the 'SQLPortUpdate.exe' and 'Config.psd1' files.
Right click the 'Config.psd1' file and click Edit.
Update the 'Config.psd1' file with the following information:
-
FQDN of the Logger/Rogger Side A and Side B
-
FQDN of Primary and Secondary Administration & Data Servers
-
FQDN of Administration Client

Note
You must have the Administrator user privilege to run this 'SQLPortUpdate.exe' file.
If Administration Client is installed on a Windows Client OS (e.g. Windows 11), you must enable remote registry service manually on that machine. If this is not possible for any reason, you must run the 'SQLPortUpdate.exe' file manually on those machine(s).
-
-
Run the 'SQLPortUpdate.exe' file on Windows PowerShell with the '-setup' parameter on Logger/Rogger Side A to create required registries with the default port 1433 for all components specified in 'Config.psd1'.
For example:
PS C:\SQLPortUpdate>.\SQLPortUpdate.exe -setup
To configure and manage custom SQL Server port for Logger/Rogger, Administration & Data Servers, do the following:
Step 1. Configure Custom SQL Port for Logger/Rogger Side A
-
Initiate maintenance mode on Logger/Rogger Side A.
For more information about bringing the Packaged CCE components to maintenance mode, see the Invoking Maintenance Mode topic in the Cisco Packaged Contact Center Enterprise Administration and Configuration Guide at https://www.cisco.com/c/en/us/support/customer-collaboration/packaged-contact-center-enterprise/products-maintenance-guides-list.html.
Once the Logger/Rogger Side A services are stopped, now stop the SQL Server, SQL Server Agent, and Tomcat services.
-
Change the service start up type from Automatic to Manual if it is not set to Manual for all the above services.
-
Open the SQL Server Configuration Manager, navigate to SQL Server Network Configuration > Protocols for MSSQLSERVER > TCP/IP. The TCP/IP Properties dialog box appears.
Figure 1. SQL Server Configuration Manager 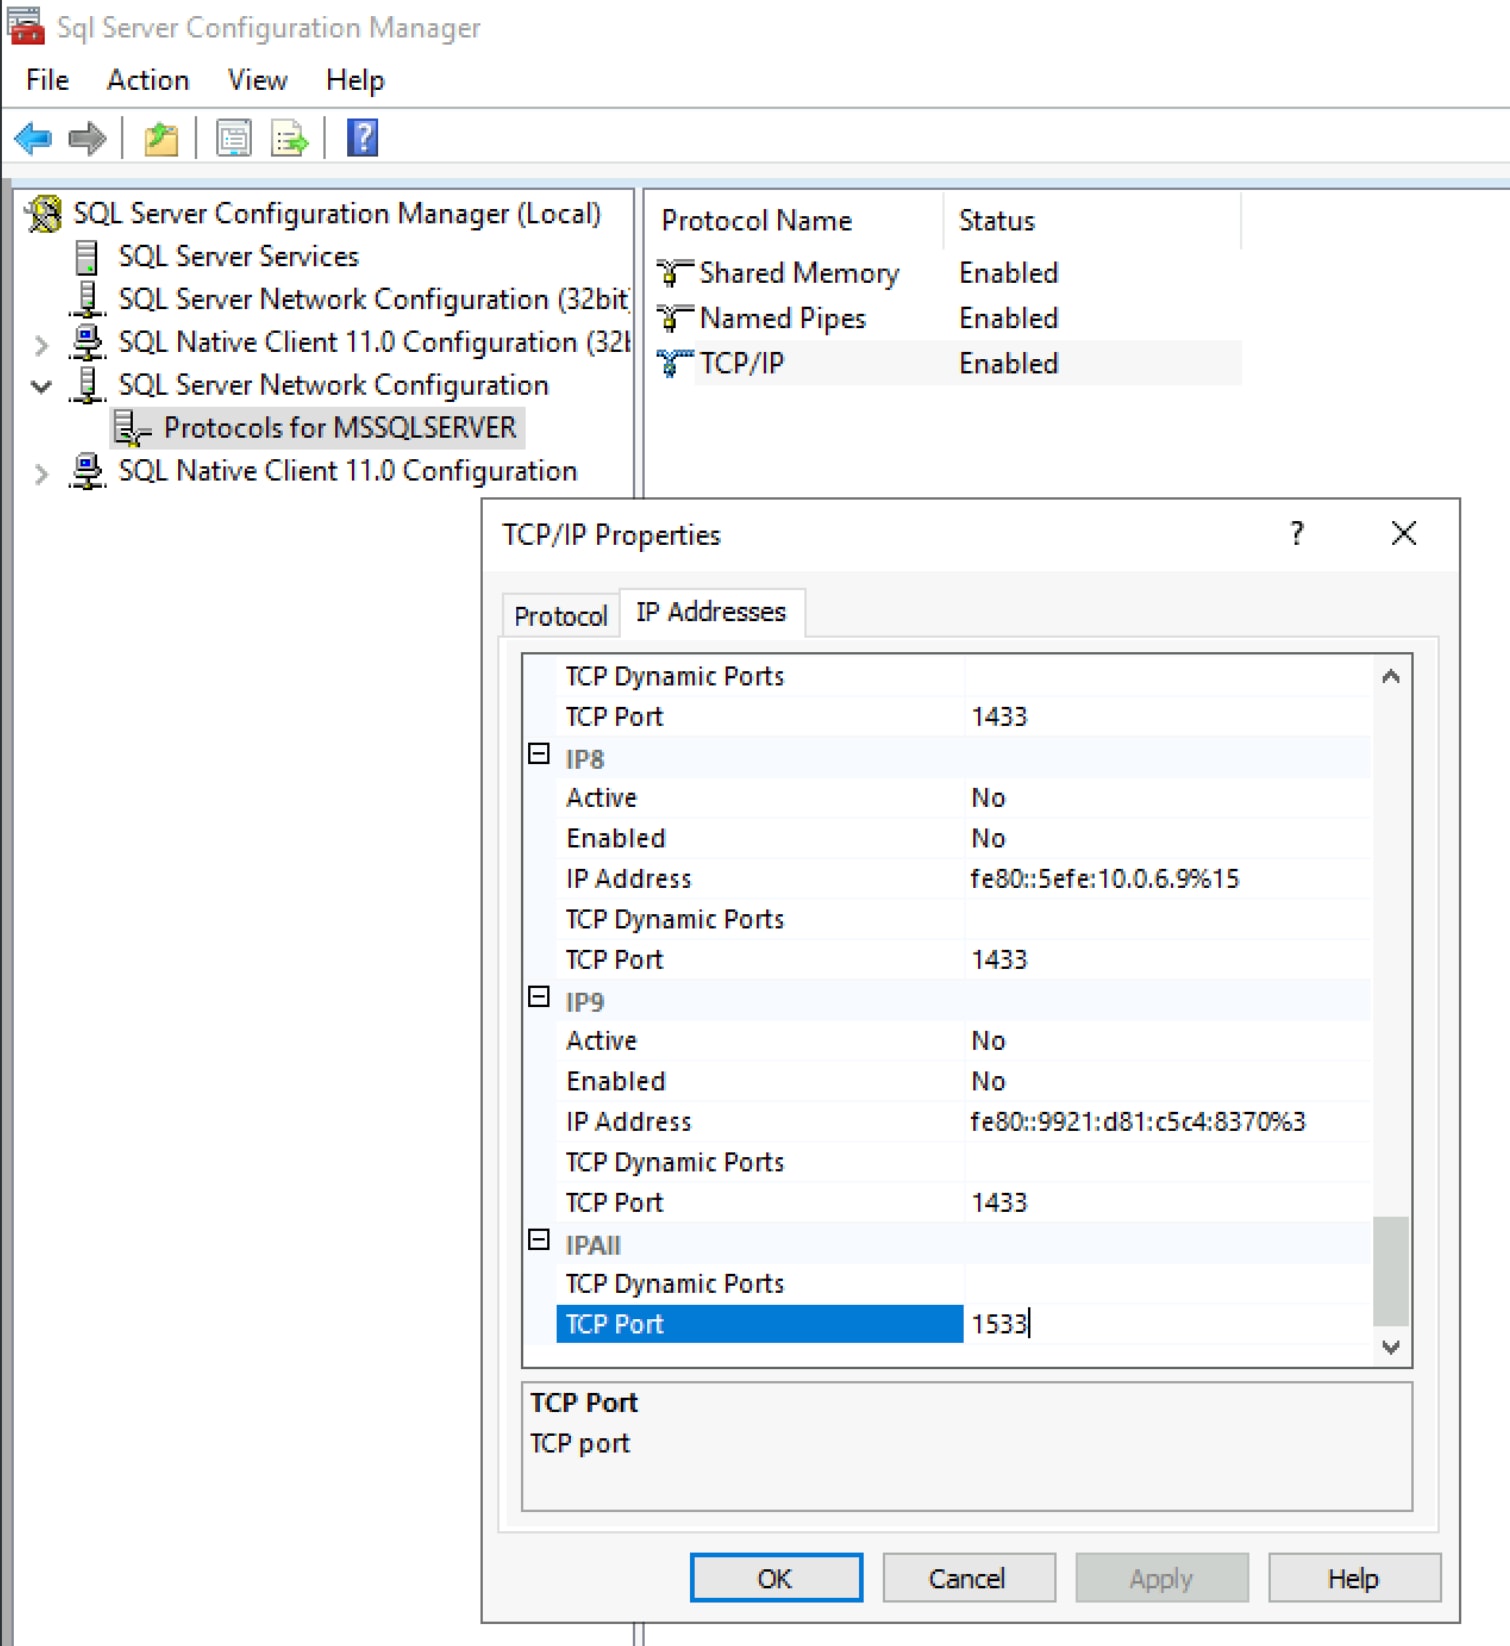
-
Click the IP Addresses tab and go to IPAll section, specify the custom SQL server port.
-
Click Ok.
-
Run the 'SQLPortUpdate.exe' file on Windows PowerShell with the '-configure' parameter and follow the instructions to update custom port.
-
Revert the service type to Automatic only if it was changed to manual in Step 2 of this topic.
-
Reboot and start the Logger/Rogger Side A.
Step 2. Configure Custom SQL Server Port for Primary Administration & Data Servers (Side A for Packaged CCE 2000 Agent Deployment)
The custom SQL server port change made to the Primary Administration & Data Servers impacts the Cisco Finesse, CUIC, Live Data, and Administration Client.
Note |
Only for Packaged CCE 2000 agent deployment, consider Primary as Side A and Secondary as Side B. |
-
Initiate maintenance mode on Primary Administration & Data Servers.
Now the Secondary Administration & Data Servers will handle the traffic of Cisco Finesse, CUIC, Live Data, and Administration Client.
Once the Distributor service is stopped, now stop the SQL Server, SQL Server Agent, and Tomcat services.
-
Change the service start up type from Automatic to Manual if it is not set to Manual for all the above services.
-
Open the SQL Server Configuration Manager, navigate to SQL Server Network Configuration > Protocols for MSSQLSERVER > TCP/IP.
The TCP/IP Properties dialog box appears.
-
Click the IP Addresses tab and go to IPAll section, specify the custom SQL server port.
-
Click Ok
-
Run the 'SQLPortUpdate.exe' file on Windows PowerShell with the '-configure' parameter and follow the instructions to update required custom SQL port registries.
-
Revert the service type to Automatic only if it is changed to manual in Step 2 of this topic.
-
Reboot and start the Primary Administration & Data Servers.
-
Update Primary Administration & Data Servers custom SQL port details to all the dependent Packaged CCE components.
-
Cisco Finesse Publisher
-
Open the Cisco Finesse Administrator Console.
-
In the Contact Center Enterprise Administration & Data Server Settings section, specify the custom SQL server port to the Database Port field.
-
Perform Cisco Finesse maintenance mode.
For more information, see the Perform Routine Maintenance chapter in Cisco Finesse Administration Guide at https://www.cisco.com/c/en/us/support/customer-collaboration/finesse/products-maintenance-guides-list.html.
This will move all agents to subscriber.
-
Restart Finesse Tomcat.
Figure 2. Cisco Finesse Administrator Console 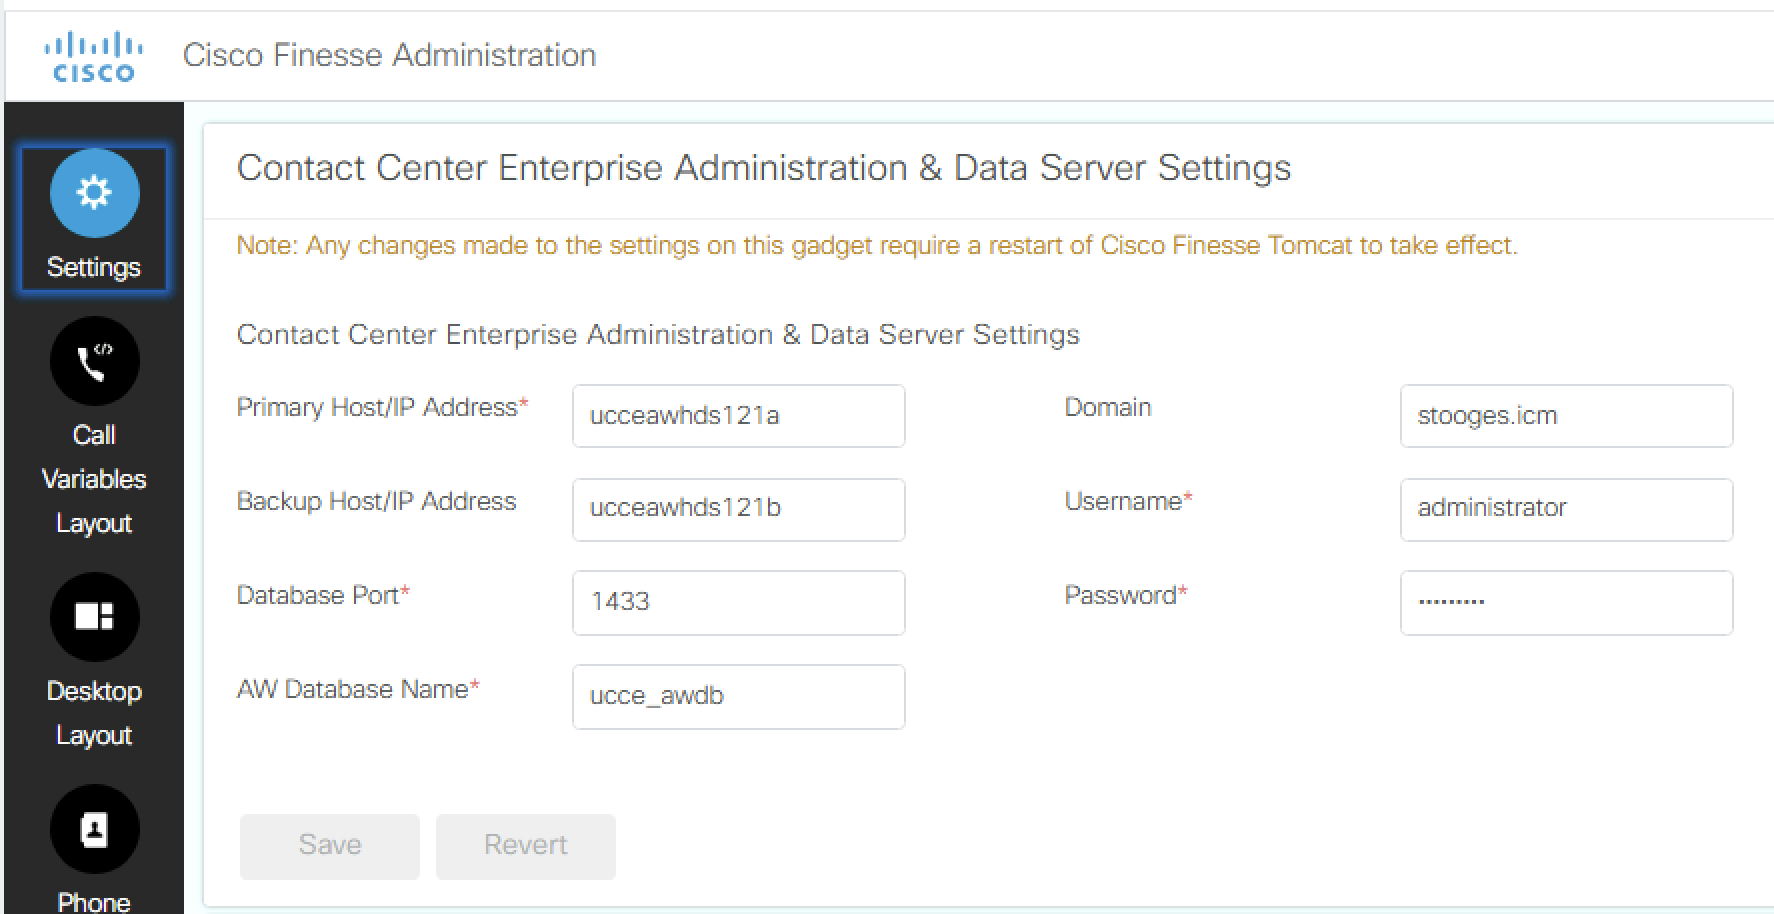
-
-
Cisco Finesse Subscriber:
-
Initiate Cisco Finesse maintenance mode.
For more information about maintenance mode, see the Perform Routine Maintenance chapter in Cisco Finesse Administration Guide at https://www.cisco.com/c/en/us/support/customer-collaboration/finesse/products-maintenance-guides-list.html.
This will move all agents to Publisher.
-
Restart Finesse Tomcat.
-
-
Live Data (LD) Publisher
-
For non-Packaged CCE 2000 agent deployment, on the Publisher LD, update the Primary AW access information section with the custom SQL server port.
Note
Changes made to Publisher LD, automatically gets synchronized to Subscriber LD.
-
-
CUIC Publisher
-
For non-Packaged CCE 2000 agent deployment, navigate to the Unified Intelligence Center Administration Console and click Configure.
-
Select Data Sources.
-
For all the data source configured with CCE database, update only the Primary Administration & Data Servers port in CUIC data source configuration.
Note
Changes made to Publisher CUIC, automatically gets synchronized to Subscriber CUIC.
Figure 3. Cisco Unified Intelligence Center Administrator Console 
-
-
Administration Client
If you are unable to start the remote registry service on Administration Client for any reason, run the 'SQLPortUpdate.exe' file on Windows PowerShell with the '-configure' parameter and follow the instructions to update required Primary Administration & Data Server custom SQL port registries.
-
Step 3. Configure Custom SQL Server Port for Logger/Rogger Side B
To configure custom SQL server port for Logger/Rogger Side B, do the following:
-
Initiate maintenance mode on Logger/Rogger Side B.
For more information about bringing the Packaged CCE components to maintenance mode, see the Invoking Maintenance Mode topic in the Cisco Packaged Contact Center Enterprise Administration and Configuration Guide at https://www.cisco.com/c/en/us/support/customer-collaboration/packaged-contact-center-enterprise/products-maintenance-guides-list.html.
Once the Logger/Rogger Side B services are stopped, now stop the SQL Server, SQL Server Agent, and Tomcat services.
-
Change the service start up type from Automatic to Manual if it is not set to Manual for all the above services.
-
Open the SQL Server Configuration Manager, navigate to SQL Server Network Configuration > Protocols for MSSQLSERVER > TCP/IP. The TCP/IP Properties dialog box appears.
-
Click the IP Addresses tab and go to IPAll section, specify the custom SQL server port.
-
Click Ok
-
Run the 'SQLPortUpdate.exe' file on Windows PowerShell with the '-configure' parameter and follow the instructions to update custom port.
-
Revert the service type to Automatic only if it was changed to manual in Step 2 of this topic.
-
Reboot and start the Logger/Rogger Side B.
Step 4. Configure Custom SQL Server Port for Primary Administration & Data Servers (Side B for Packaged CCE 2000 Agent Deployment)
The custom SQL server port change made to the Secondary Administration & Data Servers impacts the Cisco Finesse, CUIC, Live Data, and Administration Client.
Note |
Only for Packaged CCE 2000 agent deployment, consider Primary as Side A and Secondary as Side B. |
-
Initiate maintenance mode on Secondary Administration & Data Servers.
Now the Primary Administration & Data Servers will handle the traffic of Cisco Finesse, CUIC, Live Data, and Administration Client.
Once the Distributor service is stopped, now stop the SQL Server, SQL Server Agent, and Tomcat services.
-
Change the service start up type from Automatic to Manual if it is not set to Manual for all the above services.
-
Open the SQL Server Configuration Manager, navigate to SQL Server Network Configuration > Protocols for MSSQLSERVER > TCP/IP.
The TCP/IP Properties dialog box appears.
-
Click the IP Addresses tab and go to IPAll section, specify the custom SQL server port.
-
Click Ok
-
Run the 'SQLPortUpdate.exe' file on Windows PowerShell with the '-configure' parameter and follow the instructions to update required custom SQL port registries.
-
Revert the service type to Automatic only if it is changed to manual in Step 2 of this topic.
-
Reboot and start the Secondary Administration & Data Servers.
-
Update Secondary Administration & Data Servers custom SQL port details to all the dependent Packaged CCE components.
-
Live Data (LD) Publisher
-
For non-Packaged CCE 2000 agent deployment, on the Publisher LD, update the Secondary AW access information section with the custom SQL server port.
Note
Changes made to Publisher LD, automatically gets synchronized to Subscriber LD.
-
-
CUIC Publisher
-
For non-Packaged CCE 2000 agent deployment, navigate to the Unified Intelligence Center Administration Console and click Configure.
-
Select Data Sources.
-
For all the data source configured with CCE database, update only the Secondary Administration & Data Servers port in CUIC data source configuration.
Note
Changes made to Publisher CUIC, automatically gets synchronized to Subscriber CUIC.
-
-
Administration Client
If you are unable to start the remote registry service on Administration Client for any reason, run the 'SQLPortUpdate.exe' file on Windows PowerShell with the '-configure' parameter and follow the instructions to update required Secondary Administration & Data Server custom SQL port registries.
-
 Feedback