Cisco Packaged Contact Center Enterprise Administration and Configuration Guide, Release 12.6(2)
Bias-Free Language
The documentation set for this product strives to use bias-free language. For the purposes of this documentation set, bias-free is defined as language that does not imply discrimination based on age, disability, gender, racial identity, ethnic identity, sexual orientation, socioeconomic status, and intersectionality. Exceptions may be present in the documentation due to language that is hardcoded in the user interfaces of the product software, language used based on RFP documentation, or language that is used by a referenced third-party product. Learn more about how Cisco is using Inclusive Language.
When you create a routing script, you typically use the nodes available in
Script Editor to define how the script is to categorize contacts. By
categorizing contacts, a script can provide unique solution for different
customer needs.
Categorization and Call Type
Categorization is the process of classifying a contact based on certain
data associated with the contact. Through categorization, a script can
determine the best way to process a contact.
When you create a routing script, you typically use the nodes available in
Script Editor to define how the script is to categorize contacts. By
categorizing contacts, a script can provide unique solutions for different
customer's needs.
Categorization Through Scheduling Scripts by Call Type
Call types provide the first level of categorization for routing scripts. You schedule scripts by call type; therefore, the call type
of a contact determines which script is run, enabling you to create different scripts for different types of contacts.
Change Call Type to Static
You can change the call type of a contact to static by using the Call Type node in a script. The Call Type node is in the
Routing tab of the Palette.
Figure 1. The Call Type Icon
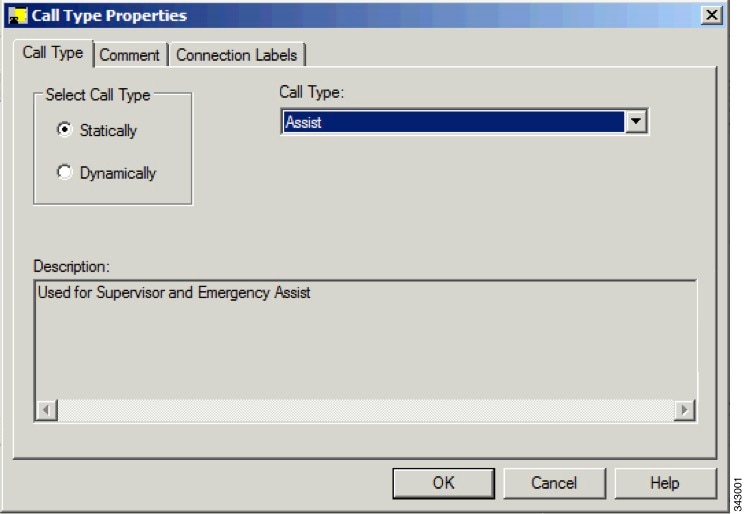
The following figure is the Call Type Properties dialog box of the Static Call Type node:
Figure 2. Call Type Properties Dialog Box - Static Call Type
To define a static call type node, complete the following steps.
Procedure
Step 1
In the Call Type tab, click the Statically radio button.
Step 2
From the Call Type list, click the call type to assign to the contact.
What to do next
Warning
The Call Type node changes the call type and continues running the current script. The Requalify Call node stops running the
current script and runs a new script associated with that call type.
Change Call Type to
Dynamic
You can change the
call type of a contact to dynamic by using the Call Type node in a script. The Call Type is on the
Routing tab of the Palette.
Figure 3. Call Type
Icon
Note
The dynamic call type option is enabled only for System
Administrators. For other users, this option is disabled.
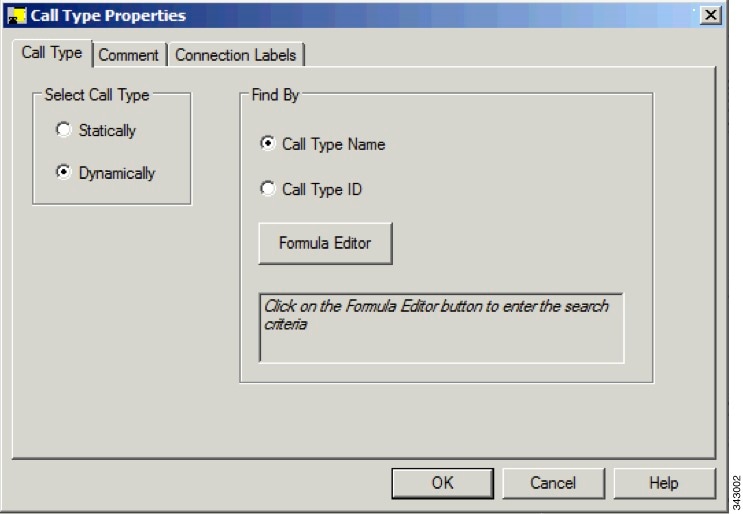
The following figure
is the Call Type Properties dialog box of a dynamic call type node:
Figure 4. Call Type
Properties Dialog Box - Dynamic Call Type
To define a dynamic
call type node, complete the following steps.
Procedure
Step 1
On the call type
tab, select the
Dynamically radio button.
Step 2
To dynamically
change the call type of a contact by call type name, In the Find By section,
select the
Call
Type Name radio button.
Step 3
To dynamically
change the call type of a contact by call type ID, In the Find By section,
select the
Call
Type ID radio button.
Step 4
To determine
which call type name or ID to use to change the call type of a contact, click
the Formula Editor button to create a formula.
Change Call Type and Run a New Script
You can change the call type of a contact from within a script and run a new script associated with the call type by using
the Requalify Call node ( in the Routing tab of the Palette).
Figure 5. The Requalify Call Icon
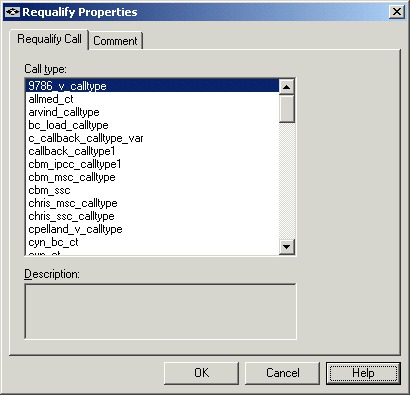
Following is the Requalify Properties dialog box of the Requalify Call node:
Figure 6. The Requalify Properties - Requalify Call Tab
Define Requalify node properties as follows:
Procedure
Step 1
In the Requalify Call Tab, select the Call type to assign to
the contact.
Step 2
Optionally, add comments.
What to do next
Warning
The Call Type node changes the call type and continues running the current script. The Requalify Call node stops running the
current script and runs a new script associated with that call type.
Categorization by
Call Type Qualifiers
A contact's call type is determined by the dialed number
qualifier.
When the system determines a contact's call type based on these qualifiers, it runs the associated script.
However, after the script is run, you can further categorize the contact based on the values of the call type qualifiers.
Categorize Contact by Dialed Number
You can categorize a contact based on its dialed number by using the
Dialed Number (DN) node ( in the Routing tab of the Palette).
Figure 7. The Dialed Number Icon
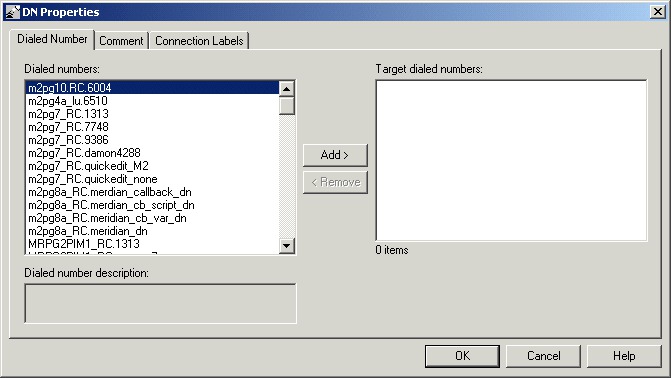
Following is the DN Properties dialog box of the Dialed Number
node:
Figure 8. DN Properties - Dialed numbers Tab
You can define the Dialed Number node properties as
follows:
Procedure
Step 1
Select one or more dialed numbers or Script Selectors from the
Dialed numbers list and click Add> to move
them to the Target dialed numbers list. If the current contact
matches one of the selections in the Target dialed numbers list,
processing continues on the node's success branch; otherwise,
processing continues on the failure branch.
Step 2
Optionally, add comments and connection labels.
Categorization by Time and Date
You schedule a script by associating it with a call type. When a contact
of a certain call type is received, the associated script runs for that
contact.
However, after the script is run, you can further categorize the contact based on the time and day of week. This categorization
refines the schedule.
Note
The time and day of the week are determined by the settings on the CallServer virtual machine.
For example, a call type named "CHAT_CT" may be defined to include all chat web requests. A script named "CHAT_SCRIPT" runs
every time a contact with the call type "CHAT_CT" is received. Typically, this script instructs Enterprise Chat and
Email to assign the request to the longest available agent in the "Chat" skill group. However, the contact center is staffed differently
over the weekend and the supervisor wants to report to improved weekend activity. Therefore, for chat web requests received
on Saturday or Sunday, the script branches differently and instructs Enterprise Chat and
Email to assign the request to the longest available agent in the "WKEND_SUPPORT" skill group.
As another example, for a contact center where no phone support is available during night hours or weekends, you may choose
to design a script that routes a phone call to an announcement instead to an agent, during the off hours.
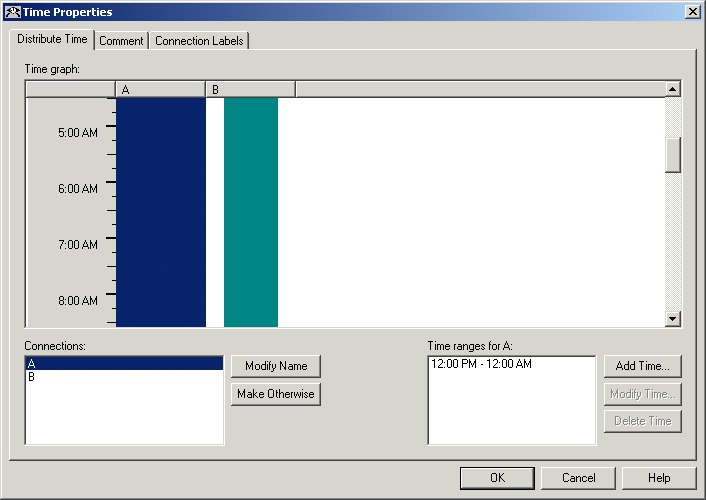
Categorize Contact by Date and Time
You use the Time node (in the General tab of the Palette) to choose from among several paths within the script based on the
current time at
Packaged CCE Central Controller. Following is the Time Properties dialog box of the Time node.
Figure 9. Time Icon
Following is the Properties dialog box of the Time node:
Figure 10. Time Properties
You must insert targets and connections from the Time node before you can define the node's properties.
Then define Time node properties as follows:
Procedure
Step 1
For each branch listed in the Connections list, define a Time
Range. You can define multiple time ranges for a single branch.
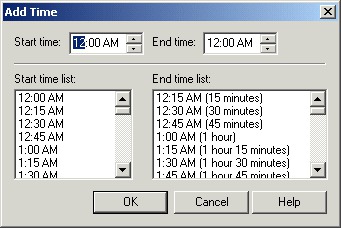
Click Add Time to add a new time range to the
branch, or select a time range listed and click Modify
Time to modify it. A dialog box opens in which you
can define the time range (the Add Time dialog box is shown
below; the Modify Time dialog box looks and functions
similarly):
Figure 11. Add Time Dialog
Step 2
To delete a time associated with the branch, select the time
and click Delete Time.
Step 3
You can define a branch as Otherwise by selecting the branch
and clicking Make Otherwise. Execution follows
this branch if none of the specified time ranges apply. You can
specify only one Otherwise branch for the node. If you do not
want to define the branch as Otherwise, select
the branch and click Delete Otherwise.
Step 4
Optionally, add comments and connection labels.
What to do next
Note
If you delete a connection, the time-range information you specified in the Properties dialog box is also deleted.
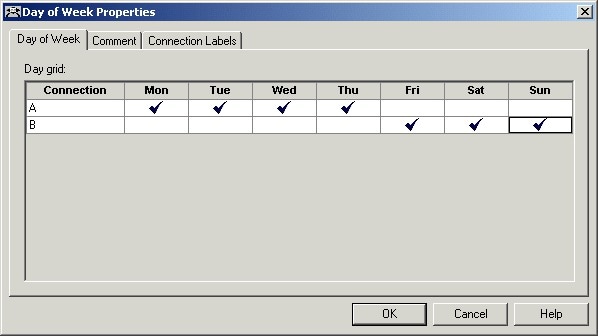
Categorize Contact by the Day of Week
You use the Day of Week node (in the General tab of the Palette) to
transfer control to one of several branches depending on the current day
of week (Sunday, Monday, etc.).
Figure 12. Day of Week Icon
Following is the Properties dialog box of the Day of Week node:
Figure 13. Day of Week Properties
You can define multiple output connections from the Day of Week node
and associate each with one or more days of the week.
You must insert targets and connections from the Day of Week node
before you can define the node's properties.
Define Day of Week node properties as follows:
Procedure
Step 1
For each branch listed in the Connection list, check the days
of the week in which processing should continue on that branch.
To check the day for that connection, left-click in a spot in
the grid corresponding to that connection and day. A check mark
appears in the grid. You can associate each day of week with one connection.
However, you can associate each connection with one or more days
of the week.
Step 2
Optionally, add comments and connection labels.
Categorization by Branching
Within a script, you can create multiple branches to direct script
processing based on certain conditions. Branching allows you to use a single
script that processes contacts differently, depending on data associated
with the contact, or on conditions at the contact center.
Run a Different Script
You use the Go To Script node (in the General tab of the Palette) to direct contact processing to another script without changing the call type. When
Packaged CCE encounters a Go To Script node, it stops running the current script and starts the script indicated in the node.
Figure 14. Go To Script Icon
For example, you might have several scripts that check for exception conditions and, if none are found, run a standard subroutine.
Instead of including that subroutine as a branch from the failure output terminal of each of the exception conditions, you
could use a Go To Script node pointing to a separate script containing the subroutine.
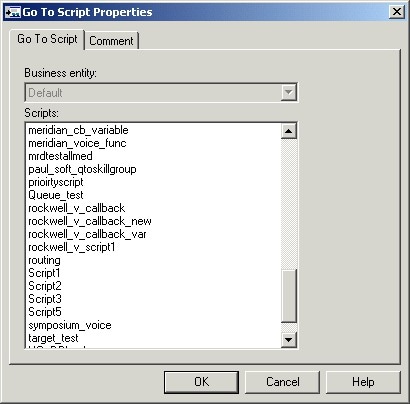
Following is the Properties dialog box of the Go To Script node:
Figure 15. Go To Script Properties
Define "Go to Script" node properties as follows:
Procedure
Step 1
Select the Business entity that owns the script that the node should run. By default, Packaged CCE consists of one business
entity.
Step 2
Select a script from the Scripts list. From within an administrative script, you can only go to another administrative script.
Within a routing script, you can
only go to another routing script.
Step 3
Optionally, add comments and connection labels.
Direct Script Execution to Different Branches by Percentage
You can direct specific percentages of contacts to different branches in a script by using the Percent Allocation node (in
the General tab of the Palette).
Figure 16. Percent Allocation Icon
Each branch may lead directly to a target, or may include additional processing. Because contacts are distributed by percentage
and without tests of the targets' data, distributing by percentage never fails.
For example, in a geographically diverse environment, you can create a script that sends 10% of contacts to Boston, 5% to
Chicago, and distributes the remaining 85% to another set of targets.
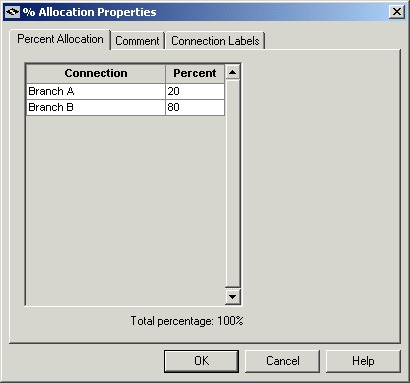
Following is the Properties dialog box of the Percent Allocation node:
Figure 17. % Allocation Properties
Define Percent Allocation node properties as follows:
Procedure
Step 1
In the Percent column for each connection, enter a percent
number for the percentage of contacts to process on that branch.
Note
The percent total for all rows must equal 100.
Step 2
Optionally, modify the Connection name. Changes appear in the
connector labels when you save the properties and view the
script.
Step 3
Optionally, add comments and connection labels.
Categorize Contact Based on a Condition
You use the If node (in the General tab in the Palette) to direct script execution to one of two branches based on the result of an evaluation.
You can use formulas to define the If node.
Figure 18. If Icon
When the system runs an If node, it first evaluates the condition specified in the node Properties dialog box Define condition
field. If the system determines that the condition is true, control flows through the success output terminal; if it determines
the condition is false, control flows through the failure output terminal.
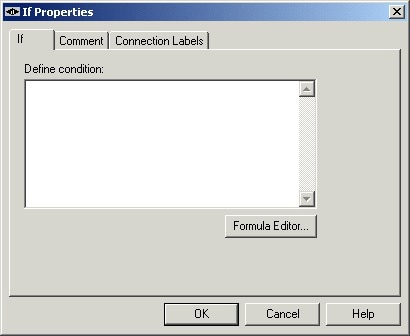
Following is the Properties dialog box of the If node:
Figure 19. If Properties
Define If node properties as follows:
Procedure
Step 1
In the Define condition field, enter a condition or use the
Formula Editor to create a formula.
Step 2
Optionally, add comments and connection labels.
Categorize a Contact Based on Its Media Routing Domain
You use the Media Routing Domain node to categorize contacts based on
their media routing domains. This node is described in the Universal
Queue section of this document.
Categorize by External Applications
You can categorize a contact based on data returned from an application
external to Unified ICM by using the Application Gateway node (in the
General tab of the Palette).
Figure 20. Gateway Icon
For example, a script that processes incoming phone calls can send the
caller's account number to an external application, which returns to the
script the caller's account balance. The script can then branch on the value
of the account balance, providing premium service to callers with higher
account balances.
Note
You must use Unified ICM Configuration Manager to define the external
application. For more information, see the Configuration Guide for Cisco Unified ICM/Contact Center Enterprise.
Define the Application Gateway properties as
follows:
Procedure
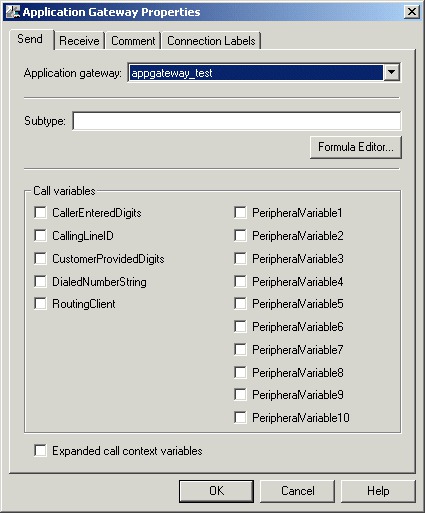
Step 1
In the Send tab:
Figure 21. App Gateway Properties - Send
Choose the gateway from the Application Gateway drop-down
list.
In the Subtype field, enter the string that is to be sent
to the external application, or use the Formula Editor to
write an expression that evaluates to a string.
In the Call variables list, check the call variables to
send to the external application.
To send expanded call variables to the external
application, check Expanded call context
variables.
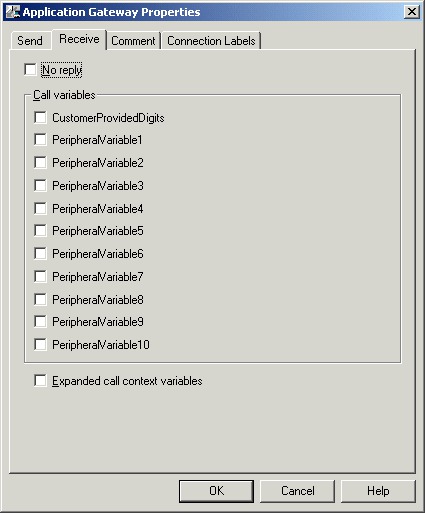
Step 2
In the Receive tab:
Figure 22. App Gateway Properties - Receive
Select No Reply if the external
application is not to return data to the script.
Note
If you select this option, Unified ICM cannot retrieve any data from the external application.
In the Call variables list, check variables that the
external application may modify.
Select Expanded call context variables if the external
application modifies and returns values for the expanded
call variables.


 Feedback