
Table Of Contents
Cisco Unified Reporting Administration Guide for Cisco Unified CallManager, Release 5.1(3)
What is Cisco Unified Reporting?
Understanding the User Interface
Status Messages and Status Icons
Accessing Cisco Unified Reporting
Accessing On-Line and Report Help
Viewing and Generating Reports
Downloading and Archiving Reports
Where to Find More Information
Obtaining Documentation, Obtaining Support, and Security Guidelines
Cisco Product Security Overview
Cisco Unified Reporting Administration Guide for Cisco Unified CallManager, Release 5.1(3)
This guide provides an overview of the Cisco Unified Reporting web application, describes how to use the application, and provides procedures for completing various reporting tasks.
The guide serves as a reference and procedural guide for users of Cisco Unified CallManager and other Cisco IP telephony applications.
This guide includes the following topics:
•
What is Cisco Unified Reporting?
•
•
•
•
•
•
What is Cisco Unified Reporting?
Cisco Unified Reporting web application, which is accessed at the Cisco Unified CallManager console, generates reports for troubleshooting or inspecting cluster data.
This convenient tool provides a snapshot of cluster data without requiring multiple steps to get the data. The tool design facilitates gathering data from existing sources, comparing the data, and reporting irregularities.
A report combines data from one or more sources on one or more servers into one output view. For example, you can view a report that shows the hosts file for all servers in the cluster.
The application gathers information from the publisher server and each subscriber server. A report provides data for all active cluster nodes that are accessible at the time that the report is generated.
Some reports run checks to identify conditions that could impact cluster operations. Status messages indicate the outcome of every data check that is run.
Only authorized users can access the Cisco Unified Reporting application. By default, this includes administrator users in the Standard Unified CM Super Users group. As an authorized user, you can view reports, generate new reports, or download reports at the graphical user interface (GUI).

Note
Cisco Unified Reporting includes the following capabilities:
•
•
Data Sources
Reports that Cisco Unified Reporting generates may use any of the following sources:
•
•
•
•
•
•
•
•
•
The Report Descriptions link in the System Reports list provides the information sources that are used in a report, as described in Accessing On-Line and Report Help.
Output Format
This release supports HTML output for reports.
System Requirements
Cisco Unified Reporting runs as an application on the Cisco Tomcat service. The Cisco Tomcat service gets activated at Cisco Unified CallManager installation. Make sure that Cisco Unified CallManager 5.1(3) is running on all servers in the cluster.
The report subsystem gathers information from other servers by using an RPC mechanism via HTTPS. The HTTPS port must be open and the Cisco Tomcat service must be running on the server to successfully generate a report.
To access the application, you access Cisco Unified CallManager Administration in a browser window. Cisco Unified Reporting uses HTTPS to establish a secure connection to the browser.
Supported Browsers
The Cisco Unified Reporting application supports the same Microsoft Windows operating system browsers that Cisco Unified CallManager Administration uses to connect to the Cisco Unified CallManager server:
•
•
•
Note
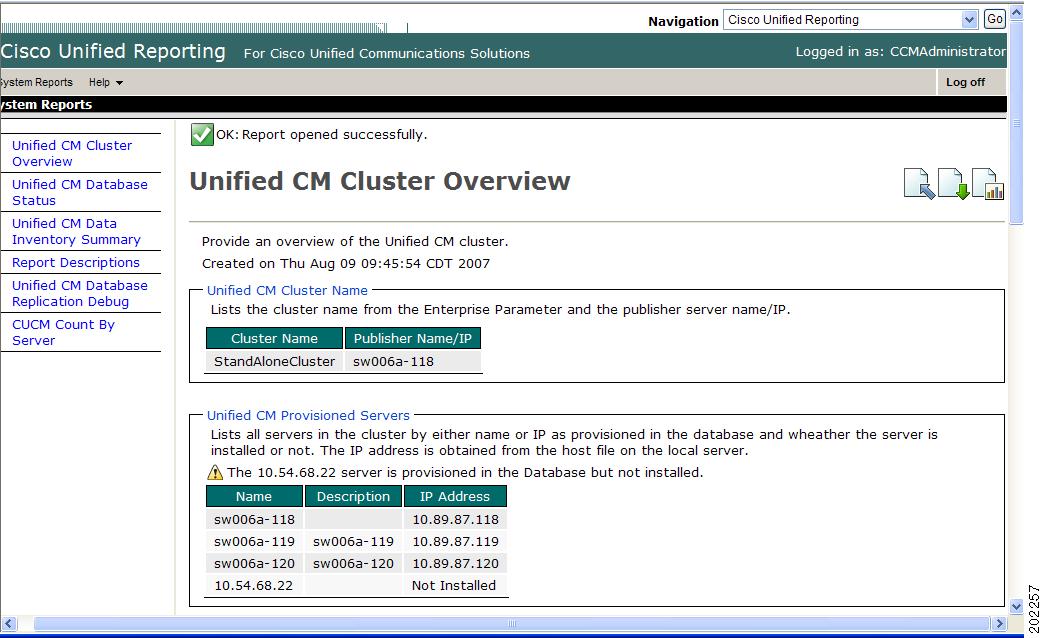
Understanding the User Interface
Figure 1 shows the GUI elements for Cisco Unified Reporting:
•
•
•
•
•
•
•
•
Note
Figure 1 User Interface
Status Messages and Status Icons
Status messages display for an operation or data check. Status icons identify the message type for quick scanning of a report.
Operation Icons
The interface displays these icons for report operations. You can view the icon caption when you move the mouse over the icon. If an operation is not available for a window, the icon does not display.

Upload Report icon. See Uploading Reports for this procedure.

Download Report icon. See Downloading and Archiving Reports for this procedure.

Generate Report icon. See Viewing and Generating Reports for this procedure.
Accessing Cisco Unified Reporting
The system uses the Cisco Tomcat service to authenticate users before allowing access to the web application. You can access the application
•
•
•
If you get a security alert, the server certificate has not yet downloaded. Refer to the Cisco Unified CallManager Security Guide for certificate download procedures for IE 6 and Netscape 7.1; refer to the Cisco Unified CallManager 5.1.3 Release Notes for the certificate download procedure for IE 7.
The web application deploys to all servers in a cluster at installation. Reports get generated from database records. If the database on the publisher server is down, you can generate a report for the active nodes.
Note
Additional Information
See Related Topics for related information and procedures.
Accessing On-Line and Report Help
The GUI provides two types of on-line help: administrative help and report help.
•
•
Note
Additional Information
See Related Topics for related information and procedures.
Identifying a Report
You can identify a report by the report name and the date-and-time stamp. The application stores a local copy of the most recent report for you to view.
You can archive the local copy of the most recent report or a new report to your hard disk. When you archive a report, you can rename archived files or store them in different folders for identification purposes.
Additional Information
See Related Topics for related information and procedures.
Viewing and Generating Reports
The following procedure describes how to view a local copy of a report or how to generate and view a new report.
When you choose a report type, if a local copy of a previously generated report exists, the info message "A local copy of report with name <filename> already exists." displays with a link to the local copy. If no local copy exists, the application prompts you to generate a new report.
Note
Note

Tip
Before You Begin
The application requires you to use a web browser to view a report (see Supported Browsers). Before you can view or generate a report, the Cisco Tomcat service must be running on at least one server (see System Requirements).
Procedure
Step 1
The list of reports displays.
Step 2
If a previous version of this report exists, the message "A local copy of report with name <filename> already exists." displays.
If a previous version of the report does not exist, the message "A report by name <filename> does not exist. Generate a new report." displays.
Step 3
•
•
The application notifies you if a report will take excessive time to generate or consume excessive CPU time. A progress bar displays while the report generates. The new report displays, and the date and time updates.
Step 4
If the green checkmark icon displays for an information group, you can choose not to view the details for that group. This icon indicates that the data check for that information group was successful.
Next Steps
If the report shows an unsuccessful data check for an item, access the Report Descriptions report for possible remedies, as described in Accessing On-Line and Report Help.
Additional Information
See Related Topics for related information and procedures.
Printing a Report
To print a report, open the report in the browser and use the browser print function. Be sure to click the View Details link to expose all the data that you want to print.
Additional Information
See the Related Topics for related information and procedures.
Downloading and Archiving Reports
Downloading a report downloads the raw XML data file to your hard disk. You archive reports by downloading them and storing them on your hard drive.
Procedure
Step 1
If a previous version of this report exists, an info message "A local copy of report with name <filename> already exists." displays.
If a previous version of the report does not exist, the message "A report by name <filename> does not exist. Generate a new report." displays.
Step 2
•
•
Note
Step 3
If you clicked Open, the XML file for the report displays. If you clicked Save, go to Step 4.
Step 4
When the download completes, click Close in the Download Complete window or click Open to open the folder that contains the file and view the XML report. You can navigate to the file location and click the filename link to view the XML report file at any time.
Note
Next Steps
For technical assistance, you can attach the downloaded file in an e-mail or upload the file to another server.
To view a downloaded or archived file in your browser, upload the file to your server as described in Uploading Reports.
Additional Information
See the Related Topics for related information and procedures.
Uploading Reports
You upload an XML report file that is stored on your hard drive to view the file in your browser.
Procedure
Step 1
Step 2
Step 3
Step 4
When the upload to the server completes, the Upload Results window displays the uploaded filename.
Step 5
Next Steps
You can compare an uploaded report and a newly generated report side-by-side during an upgrade, for example.
Additional Information
See the Related Topics for related information and procedures.
Logging Out
To log out of Cisco Unified Reporting, click Log off on the menu bar.
Additional Information
See the Related Topics for related information and procedures.
Where to Find More Information
Related Topics
•
•
•
•
•
•
•
•
•
•
•
Additional Cisco Documentation
Refer to the following documentation about related Cisco IP Telephony applications and products:
•
•
•
•
•
•
•
•
Obtaining Documentation, Obtaining Support, and Security Guidelines
For information on obtaining documentation, obtaining support, providing documentation feedback, security guidelines, and also recommended aliases and general Cisco documents, see the monthly What's New in Cisco Product Documentation, which also lists all new and revised Cisco technical documentation, at:
http://www.cisco.com/en/US/docs/general/whatsnew/whatsnew.html
Cisco Product Security Overview
This product contains cryptographic features and is subject to United States and local country laws governing import, export, transfer and use. Delivery of Cisco cryptographic products does not imply third-party authority to import, export, distribute or use encryption. Importers, exporters, distributors and users are responsible for compliance with U.S. and local country laws. By using this product you agree to comply with applicable laws and regulations. If you are unable to comply with U.S. and local laws, return this product immediately.
A summary of U.S. laws governing Cisco cryptographic products may be found at: http://www.cisco.com/wwl/export/crypto/tool/stqrg.html
If you require further assistance, please contact us by sending email to export@cisco.com.

CCVP, the Cisco logo, and the Cisco Square Bridge logo are trademarks of Cisco Systems, Inc.; Changing the Way We Work, Live, Play, and Learn is a service mark of Cisco Systems, Inc.; and Access Registrar, Aironet, BPX, Catalyst, CCDA, CCDP, CCIE, CCIP, CCNA, CCNP, CCSP, Cisco, the Cisco Certified Internetwork Expert logo, Cisco IOS, Cisco Press, Cisco Systems, Cisco Systems Capital, the Cisco Systems logo, Cisco Unity, Enterprise/Solver, EtherChannel, EtherFast, EtherSwitch, Fast Step, Follow Me Browsing, FormShare, GigaDrive, HomeLink, Internet Quotient, IOS, iPhone, IP/TV, iQ Expertise, the iQ logo, iQ Net Readiness Scorecard, iQuick Study, LightStream, Linksys, MeetingPlace, MGX, Networking Academy, Network Registrar, Packet, PIX, ProConnect, ScriptShare, SMARTnet, StackWise, The Fastest Way to Increase Your Internet Quotient, and TransPath are registered trademarks of Cisco Systems, Inc. and/or its affiliates in the United States and certain other countries.
All other trademarks mentioned in this document or Website are the property of their respective owners. The use of the word partner does not imply a partnership relationship between Cisco and any other company. (0705R)
Cisco Unified Reporting Administration Guide
Copyright © 2007 Cisco Systems, Inc. All rights reserved.


