Configuring VLANs
- Finding Feature Information
- Prerequisites for VLANs
- Restrictions for VLANs
- Information About VLANs
- How to Configure VLANs
- Monitoring VLANs
- Configuration Examples
- Where to Go Next
- Additional References
- Feature History and Information for VLAN
Finding Feature Information
Your software release may not support all the features documented in this module. For the latest caveats and feature information, see Bug Search Tool and the release notes for your platform and software release. To find information about the features documented in this module, and to see a list of the releases in which each feature is supported, see the feature information table at the end of this module.
Use Cisco Feature Navigator to find information about platform support and Cisco software image support. To access Cisco Feature Navigator, go to http://www.cisco.com/go/cfn. An account on Cisco.com is not required.
Prerequisites for VLANs
The following are prerequisites and considerations for configuring VLANs:
- Before you create VLANs, you must decide whether to use VLAN Trunking Protocol (VTP) to maintain global VLAN configuration for your network.
- The switch supports 1000 VLANs in VTP client, server, and transparent modes.

NoteOn using the LAN Base image, only the lanbase-default template supports 1000 VLANs. The remaining templates (default and lanbase-routing) only supports 255 VLANs. Up to 64 VLANs are supported when the switch is running the LAN Lite image.
- The switch supports homogeneous stacking and mixed stacking. Mixed stacking is supported only with the Catalyst 2960-S switches. A homogenous stack can have up to eight stack members, while a mixed stack can have up to four stack members. All switches in a switch stack must be running the LAN Base image.
Restrictions for VLANs
The following are restrictions for configuring VLANs:
- 1K VLAN is supported only on switches running the LAN Base image with the lanbase-default template set.
- To avoid warning messages of high CPU utilization with a normal-range VLAN configuration, we recommend that you have no more than 256 VLANs. In such cases, approximately 10 access interfaces or 5 trunk interfaces can flap simultaneously with negligible impact to CPU utilization (if there are more interfaces that flap simultaneously, then CPU usage may be excessively high.)
- Private VLANs are not supported on the switch.
Information About VLANs
Logical Networks
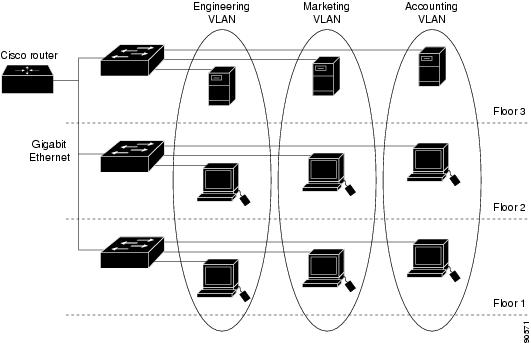
A VLAN is a switched network that is logically segmented by function, project team, or application, without regard to the physical locations of the users. VLANs have the same attributes as physical LANs, but you can group end stations even if they are not physically located on the same LAN segment. Any switch port can belong to a VLAN, and unicast, broadcast, and multicast packets are forwarded and flooded only to end stations in the VLAN. Each VLAN is considered a logical network, and packets destined for stations that do not belong to the VLAN must be forwarded through a router or a switch supporting fallback bridging. In a switch stack, VLANs can be formed with ports across the stack. Because a VLAN is considered a separate logical network, it contains its own bridge Management Information Base (MIB) information and can support its own implementation of spanning tree.
VLANs are often associated with IP subnetworks. For example, all the end stations in a particular IP subnet belong to the same VLAN. Interface VLAN membership on the switch is assigned manually on an interface-by-interface basis. When you assign switch interfaces to VLANs by using this method, it is known as interface-based, or static, VLAN membership.
Traffic between VLANs must be routed.
The switch can route traffic between VLANs by using switch virtual interfaces (SVIs). An SVI must be explicitly configured and assigned an IP address to route traffic between VLANs.
Supported VLANs
The switch supports VLANs in VTP client, server, and transparent modes. VLANs are identified by a number from 1 to 4094. VLAN IDs 1002 through 1005 are reserved for Token Ring and FDDI VLANs.
VTP version 1 and version 2 support only normal-range VLANs (VLAN IDs 1 to 1005). In these versions, the switch must be in VTP transparent mode when you create VLAN IDs from 1006 to 4094. Cisco IOS Release 12.2(52)SE and later support VTP version 3. VTP version 3 supports the entire VLAN range (VLANs 1 to 4094). Extended range VLANs (VLANs 1006 to 4094) are supported only in VTP version 3. You cannot convert from VTP version 3 to VTP version 2 if extended VLANs are configured in the domain.
Although the switch stack supports a total of 1,000 (normal range and extended range) VLANs, the number of configured features affects the use of the switch hardware.
Note | On using the LAN Base image, only the lanbase-default template supports 1000 VLANs. The remaining templates (default and lanbase-routing) only supports 255 VLANs. Up to 64 VLANs are supported when the switch is running the LAN Lite image. |
The switch supports per-VLAN spanning-tree plus (PVST+) or rapid PVST+ with a maximum of 128 spanning-tree instances. One spanning-tree instance is allowed per VLAN. The switch supports only IEEE 802.1Q trunking methods for sending VLAN traffic over Ethernet ports.
Note | Up to 64 spanning-tree instances are supported when the switch is running the LAN Lite image. |
VLAN Port Membership Modes
You configure a port to belong to a VLAN by assigning a membership mode that specifies the kind of traffic the port carries and the number of VLANs to which it can belong.
When a port belongs to a VLAN, the switch learns and manages the addresses associated with the port on a per-VLAN basis.
|
Membership Mode |
VLAN Membership Characteristics |
VTP Characteristics |
|---|---|---|
|
Static-access |
A static-access port can belong to one VLAN and is manually assigned to that VLAN. |
VTP is not required. If you do not want VTP to globally propagate information, set the VTP mode to transparent. To participate in VTP, there must be at least one trunk port on the switch or the switch stack connected to a trunk port of a second switch or switch stack. |
|
Trunk (IEEE 802.1Q) : |
A trunk port is a member of all VLANs by default, including extended-range VLANs, but membership can be limited by configuring the allowed-VLAN list. You can also modify the pruning-eligible list to block flooded traffic to VLANs on trunk ports that are included in the list. |
VTP is recommended but not required. VTP maintains VLAN configuration consistency by managing the addition, deletion, and renaming of VLANs on a network-wide basis. VTP exchanges VLAN configuration messages with other switches over trunk links. |
|
Dynamic access |
A dynamic-access port can belong to one VLAN (VLAN ID 1 to 4094) and is dynamically assigned by a VLAN Member Policy Server (VMPS). The VMPS can be a Catalyst 6500 series switch, for example, but never a Catalyst switch. The Catalyst switch is a VMPS client. You can have dynamic-access ports and trunk ports on the same switch, but you must connect the dynamic-access port to an end station or hub and not to another switch. |
VTP is required. Configure the VMPS and the client with the same VTP domain name. To participate in VTP, at least one trunk port on the switch or a switch stack must be connected to a trunk port of a second switch or switch stack. |
|
Voice VLAN |
A voice VLAN port is an access port attached to a Cisco IP Phone, configured to use one VLAN for voice traffic and another VLAN for data traffic from a device attached to the phone. |
VTP is not required; it has no effect on a voice VLAN. |
VLAN Configuration Files
Configurations for VLAN IDs 1 to 1005 are written to the vlan.dat file (VLAN database), and you can display them by entering the show vlan privileged EXEC command. The vlan.dat file is stored in flash memory. If the VTP mode is transparent, they are also saved in the switch running configuration file.
In a switch stack, the whole stack uses the same vlan.dat file and running configuration. On some switches, the vlan.dat file is stored in flash memory on the active switch.
You use the interface configuration mode to define the port membership mode and to add and remove ports from VLANs. The results of these commands are written to the running-configuration file, and you can display the file by entering the show running-config privileged EXEC command.
When you save VLAN and VTP information (including extended-range VLAN configuration information) in the startup configuration file and reboot the switch, the switch configuration is selected as follows:
- If the VTP mode is transparent in the startup configuration, and the VLAN database and the VTP domain name from the VLAN database matches that in the startup configuration file, the VLAN database is ignored (cleared), and the VTP and VLAN configurations in the startup configuration file are used. The VLAN database revision number remains unchanged in the VLAN database.
- If the VTP mode or domain name in the startup configuration does not match the VLAN database, the domain name and VTP mode and configuration for the VLAN IDs 1 to 1005 use the VLAN database information.
- In VTP versions 1 and 2, if VTP mode is server, the domain name and VLAN configuration for VLAN IDs 1 to 1005 use the VLAN database information. VTP version 3 also supports VLANs 1006 to 4094.
Normal-Range VLAN Configuration Guidelines
Normal-range VLANs are VLANs with IDs from 1 to 1005.
VTP 1 and 2 only support normal-range VLANs.
Follow these guidelines when creating and modifying normal-range VLANs in your network:
- Normal-range VLANs are identified with a number between 1 and 1001. VLAN numbers 1002 through 1005 are reserved for Token Ring and FDDI VLANs.
- VLAN configurations for VLANs 1 to 1005 are always saved in the VLAN database. If the VTP mode is transparent, VTP and VLAN configurations are also saved in the switch running configuration file.
- If the switch is in VTP server or VTP transparent mode, you can add, modify or remove configurations for VLANs 2 to 1001 in the VLAN database. (VLAN IDs 1 and 1002 to 1005 are automatically created and cannot be removed.)
- With VTP versions 1 and 2, the switch supports VLAN IDs 1006 through 4094 only in VTP transparent mode (VTP disabled). These are extended-range VLANs and configuration options are limited. Extended-range VLANs created in VTP transparent mode are not saved in the VLAN database and are not propagated. VTP version 3 supports extended range VLAN (VLANs 1006 to 4094) database propagation in VTP server mode. If extended VLANs are configured, you cannot convert from VTP version 3 to version 1 or 2.
- Before you can create a VLAN, the switch must be in VTP server mode or VTP transparent mode. If the switch is a VTP server, you must define a VTP domain or VTP will not function.
- The switch does not support Token Ring or FDDI media. The switch does not forward FDDI, FDDI-Net, TrCRF, or TrBRF traffic, but it does propagate the VLAN configuration through VTP.
- The switch supports 128 spanning tree instances. If a switch has more active VLANs than supported spanning-tree instances, spanning tree can be enabled on 128 VLANs and is disabled on the remaining VLANs. If you have already used all available spanning-tree instances on a switch, adding another VLAN anywhere in the VTP domain creates a VLAN on that switch that is not running spanning-tree. If you have the default allowed list on the trunk ports of that switch (which is to allow all VLANs), the new VLAN is carried on all trunk ports. Depending on the topology of the network, this could create a loop in the new VLAN that would not be broken, particularly if there are several adjacent switches that all have run out of spanning-tree instances. You can prevent this possibility by setting allowed lists on the trunk ports of switches that have used up their allocation of spanning-tree instances. If the number of VLANs on the switch exceeds the number of supported spanning-tree instances, we recommend that you configure the IEEE 802.1s Multiple STP (MSTP) on your switch to map multiple VLANs to a single spanning-tree instance.
- When a switch in a stack learns a new VLAN or deletes or modifies an existing VLAN (either through VTP over network ports or through the CLI), the VLAN information is communicated to all stack members.
- When a switch joins a stack or when stacks merge, VTP information (the vlan.dat file) on the new switches will be consistent with the active switch.
Extended-Range VLAN Configuration Guidelines
Extended-range VLANs are VLANs with IDs from 1006 to 4094.
VTP 3 only supports extended-range VLANs.
Follow these guidelines when creating extended-range VLANs:
- VLAN IDs in the extended range are not saved in the VLAN database and are not recognized by VTP unless the switch is running VTP version 3.
- You cannot include extended-range VLANs in the pruning eligible range.
- In VTP version 1 and 2, a switch must be in VTP transparent mode when you create extended-range VLANs. If VTP mode is server or client, an error message is generated, and the extended-range VLAN is rejected. VTP version 3 supports extended VLANs in server and transparent modes.
- For VTP version 1 or 2, you can set the VTP mode to transparent in global configuration mode. You should save this configuration to the startup configuration so that the switch boots up in VTP transparent mode. Otherwise, you lose the extended-range VLAN configuration if the switch resets. If you create extended-range VLANs in VTP version 3, you cannot convert to VTP version 1 or 2.
- Although the switch stack supports a total of 1000 (normal-range and extended-range) VLANs, the number of configured features affects the use of the switch hardware. If you try to create an extended-range VLAN and there are not enough hardware resources available, an error message is generated, and the extended-range VLAN is rejected.
- In a switch stack, the whole stack uses the same running configuration and saved configuration, and extended-range VLAN information is shared across the stack.
Default VLAN Configurations
Default Ethernet VLAN Configuration
The following table displays the default configuration for Ethernet VLANs.
Note | The switch supports Ethernet interfaces exclusively. Because FDDI and Token Ring VLANs are not locally supported, you only configure FDDI and Token Ring media-specific characteristics for VTP global advertisements to other switches. |
|
Parameter |
Default |
Range |
||
|---|---|---|---|---|
|
VLAN ID |
1 |
1 to 4094.
|
||
|
VLAN name |
VLANxxxx, where xxxx represents four numeric digits (including leading zeros) equal to the VLAN ID number |
No range |
||
|
IEEE 802.10 SAID |
100001 (100000 plus the VLAN ID) |
1 to 4294967294 |
||
|
IEEE 802.10 SAID |
1500 |
576-18190 |
Default VLAN Configuration
You can change only the MTU size and the remote SPAN configuration state on extended-range VLANs; all other characteristics must remain at the default state.
Note | The switch must be running the LAN Base image to support remote SPAN. |
How to Configure VLANs
How to Configure Normal-Range VLANs
You can set these parameters when you create a new normal-range VLAN or modify an existing VLAN in the VLAN database:
- VLAN ID
- VLAN name
- VLAN type
- VLAN state (active or suspended)
- Maximum transmission unit (MTU) for the VLAN
- Security Association Identifier (SAID)
- Bridge identification number for TrBRF VLANs
- Ring number for FDDI and TrCRF VLANs
- Parent VLAN number for TrCRF VLANs
- Spanning Tree Protocol (STP) type for TrCRF VLANs
- VLAN number to use when translating from one VLAN type to another
You can cause inconsistency in the VLAN database if you attempt to manually delete the vlan.dat file. If you want to modify the VLAN configuration, follow the procedures in this section.
Creating or Modifying an Ethernet VLAN
Each Ethernet VLAN in the VLAN database has a unique, 4-digit ID that can be a number from 1 to 1001. VLAN IDs 1002 to 1005 are reserved for Token Ring and FDDI VLANs. To create a normal-range VLAN to be added to the VLAN database, assign a number and name to the VLAN.
Note | With VTP version 1 and 2, if the switch is in VTP transparent mode, you can assign VLAN IDs greater than 1006, but they are not added to the VLAN database. |
1.
enable
3.
vlan
vlan-id
4.
name
vlan-name
5.
mtu
mtu-size
6.
remote-span
8.
show vlan {name
vlan-name |
id
vlan-id}
9.
copy running-config
startup-config
DETAILED STEPS
Deleting a VLAN
When you delete a VLAN from a switch that is in VTP server mode, the VLAN is removed from the VLAN database for all switches in the VTP domain. When you delete a VLAN from a switch that is in VTP transparent mode, the VLAN is deleted only on that specific switch or a switch stack.
You cannot delete the default VLANs for the different media types: Ethernet VLAN 1 and FDDI or Token Ring VLANs 1002 to 1005.
 Caution | When you delete a VLAN, any ports assigned to that VLAN become inactive. They remain associated with the VLAN (and thus inactive) until you assign them to a new VLAN. |
1.
enable
3.
no vlan
vlan-id
5.
show vlan brief
6.
copy running-config
startup-config
DETAILED STEPS
| Command or Action | Purpose | |
|---|---|---|
| Step 1 |
enable
Example:
Switch> enable
|
Enables privileged EXEC mode. Enter your password if prompted. |
| Step 2 | configure
terminal
Example: Switch# configure terminal | |
| Step 3 | no vlan
vlan-id
Example:
Switch(config)# no vlan 4
|
Removes the VLAN by entering the VLAN ID. |
| Step 4 | end
Example: Switch(config)# end | |
| Step 5 | show vlan brief
Example:
Switch# show vlan brief
|
Verifies the VLAN removal. |
| Step 6 | copy running-config
startup-config
Example:
Switch# copy running-config startup-config
|
(Optional) Saves your entries in the configuration file. |
Assigning Static-Access Ports to a VLAN
You can assign a static-access port to a VLAN without having VTP globally propagate VLAN configuration information by disabling VTP (VTP transparent mode).
If you assign an interface to a VLAN that does not exist, the new VLAN is created.
2.
interface
interface-id
3.
switchport mode access
4.
switchport access vlan
vlan-id
6.
show running-config interface
interface-id
7.
show interfaces
interface-id
switchport
DETAILED STEPS
| Command or Action | Purpose | |
|---|---|---|
| Step 1 | configure
terminal
Example: Switch# configure terminal | |
| Step 2 | interface
interface-id
Example:
Switch(config)# interface gigabitethernet2/0/1
|
Enters the interface to be added to the VLAN. |
| Step 3 | switchport mode access
Example:
Switch(config-if)# switchport mode access
|
Defines the VLAN membership mode for the port (Layer 2 access port). |
| Step 4 | switchport access vlan
vlan-id
Example:
Switch(config-if)# switchport access vlan 2
|
Assigns the port to a VLAN. Valid VLAN IDs are 1 to 4094. |
| Step 5 | end
Example: Switch(config)# end | |
| Step 6 | show running-config interface
interface-id
Example:
Switch# show running-config interface gigabitethernet2/0/1
|
Verifies the VLAN membership mode of the interface. |
| Step 7 | show interfaces
interface-id
switchport
Example:
Switch# show interfaces gigabitethernet2/0/1 switchport
|
Verifies your entries in the Administrative Mode and the Access Mode VLAN fields of the display. |
How to Configure Extended-Range VLANs
With VTP version 1 and version 2, when the switch is in VTP transparent mode (VTP disabled), you can create extended-range VLANs (in the range 1006 to 4094). VTP version supports extended-range VLANs in server or transparent move. Extended-range VLANs enable service providers to extend their infrastructure to a greater number of customers. The extended-range VLAN IDs are allowed for any switchport commands that allow VLAN IDs.
With VTP version 1 or 2, extended-range VLAN configurations are not stored in the VLAN database, but because VTP mode is transparent, they are stored in the switch running configuration file, and you can save the configuration in the startup configuration file by using the copy running-config startup-config privileged EXEC command. Extended-range VLANs created in VTP version 3 are stored in the VLAN database.
Creating an Extended-Range VLAN
You create an extended-range VLAN in global configuration mode by entering the vlan global configuration command with a VLAN ID from 1006 to 4094. The extended-range VLAN has the default Ethernet VLAN characteristics and the MTU size, and RSPAN configuration are the only parameters you can change. See the description of the vlan global configuration command in the command reference for the default settings of all parameters. In VTP version 1 or 2, if you enter an extended-range VLAN ID when the switch is not in VTP transparent mode, an error message is generated when you exit VLAN configuration mode, and the extended-range VLAN is not created.
In VTP version 1 and 2, extended-range VLANs are not saved in the VLAN database; they are saved in the switch running configuration file. You can save the extended-range VLAN configuration in the switch startup configuration file by using the copy running-config startup-config privileged EXEC command. VTP version 3 saves extended-range VLANs in the VLAN database.
2.
vtp mode transparent
3.
vlan
vlan-id
4.
mtu mtu size
5.
remote-span
7.
show vlan id
vlan-id
8.
copy running-config startup config
DETAILED STEPS
| Command or Action | Purpose | |||
|---|---|---|---|---|
| Step 1 | configure
terminal
Example: Switch# configure terminal | |||
| Step 2 | vtp mode transparent Example:
Switch(config)# vtp mode transparent
|
Configures the switch for VTP transparent mode, disabling VTP.
| ||
| Step 3 | vlan
vlan-id Example: Switch(config)# vlan 2000 Switch(config-vlan)# |
Enters an extended-range VLAN ID and enters VLAN configuration mode. The range is 1006 to 4094. | ||
| Step 4 | mtu mtu size Example: Switch(config-vlan)# mtu 1024
| Modifies the VLAN by changing the MTU size. | ||
| Step 5 | remote-span Example:
Switch(config-vlan)# remote-span
|
(Optional) Configures the VLAN as the RSPAN VLAN. | ||
| Step 6 | end
Example: Switch(config)# end | |||
| Step 7 | show vlan id
vlan-id Example:
Switch# show vlan id 2000
|
Verifies that the VLAN has been created. | ||
| Step 8 | copy running-config startup config Example:
Switch# copy running-config startup-config
|
Saves your entries in the switch startup configuration file. To save an extended-range VLAN configuration, you need to save the VTP transparent mode configuration and the extended-range VLAN configuration in the switch startup configuration file. Otherwise, if the switch resets, it will default to VTP server mode, and the extended-range VLAN IDs will not be saved.
|
Monitoring VLANs
Command |
Purpose |
|---|---|
|
show interfaces [vlan vlan-id] |
Displays characteristics for all interfaces or for the specified VLAN configured on the switch. |
|
show vlan [brief | group [group-name name] |id vlan-id | ifindex | internal | mtu | name name |remote-span | summary]] |
Displays parameters for all VLANs or the specified VLAN on the switch. The following command options are available:
|
show vlan [ access-log {config | flow | statistics} | access-map name | brief | dot1q { tag native } | filter [ access-map | vlan ] | group [ group-name name ] | id vlan-id | ifindex | internal usage | mtu | name name | private-vlan type | remote-span | summary ] |
Displays parameters for all VLANs or the specified VLAN on the switch . The following command options are available:
|
Configuration Examples
Example: Creating a VLAN Name
This example shows how to create Ethernet VLAN 20, name it test20, and add it to the VLAN database:
Switch# configure terminal
Switch(config)# vlan 20
Switch(config-vlan)# name test20
Switch(config-vlan)# end
Example: Configuring a Port as Access Port
This example shows how to configure a port as an access port in VLAN 2:
Switch# configure terminal
Enter configuration commands, one per line. End with CNTL/Z.
Switch(config)# interface gigabitethernet2/0/1
Switch(config-if)# switchport mode access
Switch(config-if)# switchport access vlan 2
Switch(config-if)# end
Example: Creating an Extended-Range VLAN
This example shows how to create a new extended-range VLAN with all default characteristics, enter VLAN configuration mode, and save the new VLAN in the switch startup configuration file:
Switch(config)# vtp mode transparent
Switch(config)# vlan 2000
Switch(config-vlan)# end
Switch# copy running-config startup config
Where to Go Next
After configuring VLANs, you can configure the following:
Additional References
Related Documents
| Related Topic | Document Title |
|---|---|
For complete syntax and usage information for the commands used in this chapter. |
Catalyst 2960-X Switch VLAN Management Command Reference |
Standards and RFCs
| Standard/RFC | Title |
|---|---|
— |
— |
MIBs
| MIB | MIBs Link |
|---|---|
All supported MIBs for this release. |
To locate and download MIBs for selected platforms, Cisco IOS releases, and feature sets, use Cisco MIB Locator found at the following URL: |
Technical Assistance
| Description | Link |
|---|---|
|
The Cisco Support website provides extensive online resources, including documentation and tools for troubleshooting and resolving technical issues with Cisco products and technologies. To receive security and technical information about your products, you can subscribe to various services, such as the Product Alert Tool (accessed from Field Notices), the Cisco Technical Services Newsletter, and Really Simple Syndication (RSS) Feeds. Access to most tools on the Cisco Support website requires a Cisco.com user ID and password. |
Feature History and Information for VLAN
| Release | Modification |
|---|---|
| Cisco IOS 15.0(2)EX |
This feature was introduced. |
 Feedback