
Contents
- Configuring Private VLANs Using NX-OS
- Information About Private VLANs
- Private VLAN Overview
- Primary and Secondary VLANs in Private VLANs
- Private VLAN Ports
- Primary, Isolated, and Community Private VLANs
- Associating Primary and Secondary VLANs
- Broadcast Traffic in Private VLANs
- Private VLAN Port Isolation
- Private VLANs and VLAN Interfaces
- Private VLANs Across Multiple Devices
- High Availability for Private VLANs
- Virtualization Support for Private VLANs
- Licensing Requirements for Private VLANs
- Prerequisites for Private VLANs
- Guidelines and Limitations for Configuring Private VLANs
- Secondary and Primary VLAN Configuration
- Private VLAN Port Configuration
- Limitations with Other Features
- Default Settings for Private VLANs
- Configuring a Private VLAN
- Enabling Private VLANs - CLI Version
- Configuring a VLAN as a Private VLAN - CLI Version
- Associating Secondary VLANs with a Primary Private VLAN - CLI Version
- Mapping Secondary VLANs to the VLAN Interface of a Primary VLAN - CLI Version
- Configuring a Layer 2 Interface as a Private VLAN Host Port
- Configuring a Layer 2 Interface as a Private VLAN Isolated Trunk Port
- Configuring a Layer 2 Interface as a Private VLAN Promiscuous Port
- Configuring a Layer 2 Interface as a Private VLAN Promiscuous Trunk Port
- Verifying the Private VLAN Configuration
- Displaying and Clearing Private VLAN Statistics
- Configuration Examples for Private VLANs
- Additional References for Private VLANs -- CLI Version
- Feature History for Configuring Private VLANs -- CLI Version
Configuring Private VLANs Using NX-OS
This chapter describes how to configure private VLANs on Cisco NX-OS devices. Private VLANs provide additional protection at the Layer 2 level.
This chapter includes the following sections:
- Information About Private VLANs
- Licensing Requirements for Private VLANs
- Prerequisites for Private VLANs
- Guidelines and Limitations for Configuring Private VLANs
- Default Settings for Private VLANs
- Configuring a Private VLAN
- Verifying the Private VLAN Configuration
- Displaying and Clearing Private VLAN Statistics
- Configuration Examples for Private VLANs
- Additional References for Private VLANs -- CLI Version
- Feature History for Configuring Private VLANs -- CLI Version
Information About Private VLANs
Note
A Layer 2 port can function as either a trunk port, an access port, or a private VLAN port.
Note
Beginning with Cisco NX-OS Release 5.0(2), the system supports private VLAN promiscuous trunk ports and isolated trunk ports. Private VLAN community ports cannot be trunk ports.
Note
You must enable the private VLAN feature before you can configure this feature.
In certain instances where similar systems do not need to interact directly, private VLANs provide additional protection at the Layer 2 level. Private VLANs are an association of primary and secondary VLANs.
A primary VLAN defines the broadcast domain with which the secondary VLANs are associated. The secondary VLANs may either be isolated VLANs or community VLANs. Hosts on isolated VLANs communicate only with associated promiscuous ports in primary VLANs, and hosts on community VLANs communicate only among themselves and with associated promiscuous ports but not with isolated ports or ports in other community VLANs.
In configurations that use integrated switching and routing functions, you can assign a single Layer 3 VLAN network interface to each private VLAN to provide routing. The VLAN network interface is created for the primary VLAN. In such configurations, all secondary VLANs communicate at Layer 3 only through a mapping with the VLAN network interface on the primary VLAN. Any VLAN network interfaces previously created on the secondary VLANs are put out-of-service.
Private VLAN Overview
You must enable private VLANs before the device can apply the private VLAN functionality.
You cannot disable private VLANs if the device has any operational ports in a private VLAN mode.
Note
You must have already created the VLAN before you can convert the specified VLAN to a private VLAN, either primary or secondary.
- Primary and Secondary VLANs in Private VLANs
- Private VLAN Ports
- Primary, Isolated, and Community Private VLANs
- Associating Primary and Secondary VLANs
- Broadcast Traffic in Private VLANs
- Private VLAN Port Isolation
- Private VLANs and VLAN Interfaces
- Private VLANs Across Multiple Devices
Primary and Secondary VLANs in Private VLANs
The private VLAN feature addresses two problems that users encounter when using VLANs:
Each VDC supports up to 4096 VLANs. If a user assigns one VLAN per customer, the number of customers that the service provider can support is limited.
To enable IP routing, each VLAN is assigned with a subnet address space or a block of addresses, which can result in wasting the unused IP addresses and creating IP address management problems.
Using private VLANs solves the scalability problem and provides IP address management benefits and Layer 2 security for customers.
The private VLAN feature allows you to partition the Layer 2 broadcast domain of a VLAN into subdomains. A subdomain is represented by a pair of private VLANs: a primary VLAN and a secondary VLAN. A private VLAN domain can have multiple private VLAN pairs, one pair for each subdomain. All VLAN pairs in a private VLAN domain share the same primary VLAN. The secondary VLAN ID differentiates one subdomain from another.
Note
A private VLAN domain has only one primary VLAN.
Secondary VLANs provide Layer 2 isolation between ports within the same private VLAN. The following two types are secondary VLANs within a primary VLAN:
Private VLAN Ports
Note
Both community and isolated private VLAN ports are labeled as PVLAN host ports. A PVLAN host port is either a community PVLAN port or an isolated PVLAN port depending on the type of secondary VLAN with which it is associated.
The types of private VLAN ports are as follows:
Promiscuous port—A promiscuous port belongs to the primary VLAN. The promiscuous port can communicate with all interfaces, including the community and isolated host ports, that belong to those secondary VLANs associated to the promiscuous port and associated with the primary VLAN. You can have several promiscuous ports in a primary VLAN. Each promiscuous port can have several secondary VLANs, or no secondary VLANs, associated to that port. You can associate a secondary VLAN to more than one promiscuous port, as long as the promiscuous port and secondary VLANs are within the same primary VLAN. You may want to do this association for load balancing or redundancy purposes. You can also have secondary VLANs that are not associated to any promiscuous port, but these secondary VLANs cannot communicate to the Layer 3 interface.
Beginning with Cisco NX-OS Release 5.0(2), the primary VLAN becomes inactive after you remove all the mapped secondary VLANs to that primary VLAN.
Promiscuous trunk—Beginning with Cisco NX-OS Release 5.0(2) and Cisco DCNM Release 5.1(1), on the Cisco Nexus 7000 Series devices, you can configure a promiscuous trunk port to carry traffic for multiple primary VLANs. You map the private VLAN primary VLAN and either all or selected associated VLANs to the promiscuous trunk port. Each primary VLAN and one associated and secondary VLAN is a private VLAN pair, and you can configure a maximum of 16 private VLAN pairs on each promiscuous trunk port.
Note
Private VLAN promiscuous trunk ports carry traffic for normal VLANs as well as for primary private VLANs.
Isolated port—An isolated port is a host port that belongs to an isolated secondary VLAN. This port has complete Layer 2 isolation from other ports within the same private VLAN domain, except that it can communicate with associated promiscuous ports. Private VLANs block all traffic to isolated ports except traffic from promiscuous ports. Traffic received from an isolated port is forwarded only to promiscuous ports. You can have more than one isolated port in a specified isolated VLAN, and each port is completely isolated from all other ports in the isolated VLAN.
Isolated or secondary trunk—Beginning with Cisco NX-OS Release 5.0(2) and Cisco DCNM Release 5.1(1) on the Cisco Nexus 7000 Series devices, you can configure an isolated trunk port to carry traffic for multiple isolated VLANs. Each secondary VLAN on an isolated trunk port must be associated with a different primary VLAN. You cannot put two secondary VLANs that are associated with the same primary VLAN on an isolated trunk port. Each primary VLAN and one associated secondary VLAN is a private VLAN pair, and you can configure a maximum of 16 private VLAN pairs on each isolated trunk port.
Note
Private VLAN isolated trunk ports carry traffic for normal VLANs as well as for secondary private VLANs.
Community port—A community port is a host port that belongs to a community secondary VLAN. Community ports communicate with other ports in the same community VLAN and with associated promiscuous ports. These interfaces are isolated at Layer 2 from all other interfaces in other communities and from all isolated ports within the private VLAN domain.
Note
Because trunks can support the VLANs that carry traffic between promiscuous, isolated, and community ports, the isolated and community port traffic might enter or leave the device through a trunk interface.
Primary, Isolated, and Community Private VLANs
Because the primary VLAN has the Layer 3 gateway, you associate secondary VLANs with the primary VLAN in order to communicate outside the private VLAN. Primary VLANs and the two types of secondary VLANs, isolated VLANs and community VLANs, have these characteristics:
Primary VLAN— The primary VLAN carries traffic from the promiscuous ports to the (isolated and community) host ports and to other promiscuous ports.
Isolated VLAN —An isolated VLAN is a secondary VLAN that carries unidirectional traffic upstream from the hosts toward the promiscuous ports and the Layer 3 gateway. You can configure multiple isolated VLANs in a private VLAN domain, and all the traffic remains isolated within each one. In addition, each isolated VLAN can have several isolated ports, and the traffic from each isolated port also remains completely separate.
Community VLAN—A community VLAN is a secondary VLAN that carries upstream traffic from the community ports to the promiscuous port gateways and to other host ports in the same community. You can configure multiple community VLANs in a private VLAN domain. The ports within one community can communicate, but these ports cannot communicate with ports in any other community or isolated VLAN in the private VLAN.
This figure shows the Layer 2 traffic flows within a primary, or private VLAN, along with the types of VLANs and types of ports.
Figure 1. Private VLAN Layer 2 Traffic Flows
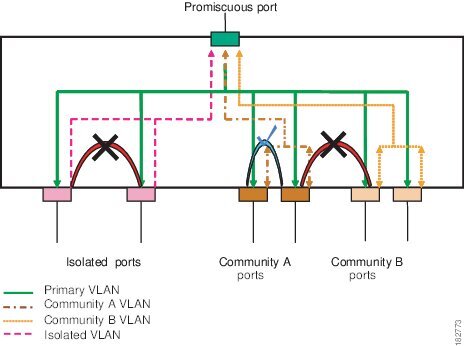
Note
The private VLAN traffic flows are unidirectional from the host ports to the promiscuous ports. Traffic that egresses the promiscuous port acts like the traffic in a normal VLAN, and there is no traffic separation among the associated secondary VLAN.
A promiscuous port can serve only one primary VLAN, but it can serve multiple isolated VLANs and multiple community VLANs. (Layer 3 gateways are connected to the device through a promiscuous port.) With a promiscuous port, you can connect a wide range of devices as access points to a private VLAN. For example, you can use a promiscuous port to monitor or back up all the private VLAN servers from an administration workstation.
Note
Beginning with Cisco NX-OS Release 5.0(2) for the Nexus 7000 Series devices, you can configure private VLAN promiscuous and isolated trunk ports. These promiscuous and isolated trunk ports carry traffic for multiple primary and secondary VLANs as well as normal VLAN.
Although you can have several promiscuous ports in a primary VLAN, you can have only one Layer 3 gateway per primary VLAN.
In a switched environment, you can assign an individual private VLAN and associated IP subnet to each individual or common group of end stations. The end stations need to communicate only with a default gateway to communicate outside the private VLAN.
Note
You must enable the VLAN interface feature before you can configure the Layer 3 gateway. See the Cisco Nexus 7000 Series NX-OS Interfaces Configuration Guide, Release 5.x for complete information on VLAN network interfaces and IP addressing.
Associating Primary and Secondary VLANs
To allow the host ports in secondary VLANs to communicate outside the private VLAN, you associate secondary VLANs to the primary VLAN. If the association is not operational, the host ports (isolated and community ports) in the secondary VLAN are brought down.
Note
You can associate a secondary VLAN with only one primary VLAN.
For an association to be operational, the following conditions must be met:
The primary VLAN must exist.
The secondary VLAN must exist.
The primary VLAN must be configured as a primary VLAN.
The secondary VLAN must be configured as either an isolated or community VLAN.
Note
See the show command display to verify that the association is operational. The device does not issue an error message when the association is nonoperational.
If the association is not operational on private VLAN trunk ports, only that VLAN goes down, not the entire port.
When you enter the no private-vlan command, the VLAN returns to the normal VLAN mode. All associations on that VLAN are suspended, but the interfaces remain in private VLAN mode.
If you enter the no vlan command for the primary VLAN, all private VLAN associations with that VLAN are lost. However, if you enter the no vlan command for a secondary VLAN, the private VLAN associations with that VLAN are suspended and return when you recreate the specified VLAN and configure it as the secondary VLAN.
Note
This behavior is different from how Catalyst devices work.In order to change the association between a secondary and primary VLAN, you must first remove the current association and then add the desired association.
Broadcast Traffic in Private VLANs
Broadcast traffic from ports in a private VLAN flows in the following ways:
The broadcast traffic flows from all promiscuous ports to all ports in the primary VLAN. This broadcast traffic is distributed to all ports within the primary VLAN, including those ports that are not configured with private VLAN parameters.
The broadcast traffic from all isolated ports is distributed only to those promiscuous ports in the primary VLAN that are associated to that isolated port.
The broadcast traffic from community ports is distributed to all ports within the port’s community and to all promiscuous ports that are associated to the community port. The broadcast packets are not distributed to any other communities within the primary VLAN or to any isolated ports.
Private VLAN Port Isolation
You can use private VLANs to control access to end stations as follows:
Configure selected interfaces connected to end stations as isolated ports to prevent any communication at Layer 2. For example, if the end stations are servers, this configuration prevents Layer 2 communication between the servers.
Configure interfaces connected to default gateways and selected end stations (for example, backup servers) as promiscuous ports to allow all end stations access to a default gateway.
Private VLANs and VLAN Interfaces
A VLAN interface to a Layer 2 VLAN is also called a switched virtual interface (SVI). Layer 3 devices communicate with a private VLAN only through the primary VLAN and not through secondary VLANs.
Configure VLAN network interfaces only for primary VLANs. Do not configure VLAN interfaces for secondary VLANs. VLAN network interfaces for secondary VLANs are inactive while the VLAN is configured as a secondary VLAN. You will see the following actions if you misconfigure the VLAN interfaces:
If you try to configure a VLAN with an active VLAN network interface as a secondary VLAN, the configuration is not allowed until you disable the VLAN interface.
If you try to create and enable a VLAN network interface on a VLAN that is configured as a secondary VLAN, that VLAN interface remains disabled and the system returns an error.
When the primary VLAN is associated with and mapped to the secondary VLAN, any configuration on the primary VLAN is propagated to the secondary VLANs. For example, if you assign an IP subnet to the VLAN network interface on the primary VLAN, this subnet is the IP subnet address of the entire private VLAN.
Note
You must enable the VLAN interface feature before you configure VLAN interfaces. See the Cisco Nexus 7000 Series NX-OS Interfaces Configuration Guide, Release 5.x , for information on VLAN interfaces and IP addressing.
Private VLANs Across Multiple Devices
You can extend private VLANs across multiple devices by trunking the primary, isolated, and community VLANs to other devices that support private VLANs. To maintain the security of your private VLAN configuration and to avoid other uses of the VLANs configured to be private VLANs, configure private VLANs on all intermediate devices, including devices that have no private VLAN ports.
High Availability for Private VLANs
The software supports high availability for both stateful and stateless restarts, as during a cold reboot, for private VLANs. For the stateful restarts, the software supports a maximum of three retries. If you try more than 3 times within 10 seconds of a restart, the software reloads the supervisor module.
You can upgrade or downgrade the software seamlessly, with respect to private VLANs.
Beginning with Cisco NX-OS Release 5.0(2), if you configure private VLAN promiscuous or isolated trunk ports, you must unconfigure those ports in order to downgrade the software.
Note
See the Cisco Nexus 7000 Series NX-OS High Availability and Redundancy Guide, Release 5.x , for complete information on high-availability features.
Virtualization Support for Private VLANs
The software supports virtual device contexts (VDCs).
Note
See the Cisco Nexus 7000 Series NX-OS Virtual Device Context Configuration Guide, Release 5.x , for complete information on VDCs and assigning resources.
Each VLAN must have all of its private VLAN ports for both the primary VLAN and all secondary VLANs in the same VDC. Private VLANs cannot cross VDCs.
Licensing Requirements for Private VLANs
The following table shows the licensing requirements for this feature:
Product
License Requirement
Cisco NX-OS
Private VLANs require no license. Any feature not included in a license package is bundled with the Cisco NX-OS system images and is provided at no extra charge to you. For a complete explanation of the Cisco NX-OS licensing scheme, see the Cisco NX-OS Licensing Guide.
However, using VDCs requires an Advanced Services license.
Guidelines and Limitations for Configuring Private VLANs
Private VLANs have the following configuration guidelines and limitations:
You must enable private VLANs before the device can apply the private VLAN functionality.
You must enable the VLAN interface feature before the device can apply this functionality.
Shut down the VLAN network interface for all VLANs that you plan to configure as secondary VLANs before you configure these VLANs.
You cannot configure a shared interface to be part of a private VLAN. For more details, see the Cisco Nexus 7000 Series NX-OS Interfaces Configuration Guide, Release 5.x.
- Secondary and Primary VLAN Configuration
- Private VLAN Port Configuration
- Limitations with Other Features
Secondary and Primary VLAN Configuration
Follow these guidelines when configuring secondary or primary VLANs in private VLANs:
You cannot configure the default VLAN (VLAN1) or any of the internally allocated VLANs as primary or secondary VLANs.
You must use VLAN configuration (config-vlan) mode to configure private VLANs.
A primary VLAN can have multiple isolated and community VLANs associated with it. An isolated or community VLAN can be associated with only one primary VLAN.
Although private VLANs provide host isolation at Layer 2, hosts can communicate with each other at Layer 3.
When a secondary VLAN is associated with the primary VLAN, the STP parameters of the primary VLAN, such as bridge priorities, are propagated to the secondary VLAN. However, STP parameters do not necessarily propagate to other devices. You should manually check the STP configuration to ensure that the spanning tree topologies for the primary, isolated, and community VLANs match exactly so that the VLANs can properly share the same forwarding database.
For normal trunk ports, note the following:
For nontrunking ports, note the following:
Note
We recommend that you enable BPDU Guard on all ports that you configure as a host port; do not enable this feature on promiscuous ports.
You can configure a maximum of 16 private VLAN primary and secondary VLAN pairs on each promiscuous trunk port.
The native VLAN must be either a normal VLAN or a private VLAN primary VLAN. You cannot configure a private VLAN secondary VLAN as the native VLAN for a private VLAN promiscuous trunk port.
To downgrade a system that has private VLAN promiscuous trunk ports configured, you must unconfigure these ports.
For private VLAN isolated trunk ports, note the following:
You can configure a maximum of 16 private VLAN primary and secondary VLAN pairs on each isolated trunk port.
The native VLAN must be either a normal VLAN or a private VLAN secondary VLAN. You cannot configure a private VLAN primary port as the native VLAN for a private VLAN isolated trunk port.
To downgrade a system that has private VLAN isolated trunk ports configured, you must unconfigure these ports.
You can apply different Quality of Service (QoS) configurations to primary, isolated, and community VLANs.
To apply a VACL to all private VLAN traffic, map the secondary VLANs on the VLAN network interface of the primary VLAN, and then configure the VACLs on the VLAN network interface of the primary VLAN.
The VACLs that you apply to the VLAN network interface of a primary VLAN automatically apply to the associated isolated and community VLANs only after you have configured the mapping.
If you do not map the secondary VLAN to the VLAN network interface of the primary VLAN, you can have different VACLs for primary and secondary VLANs, which can cause problems.
Because traffic in a private VLAN flows in different directions in different VLANs, you can have different VACLs for ingressing traffic and different VACLs for egressing traffic prior to configuring the mapping.
Note
You must keep the same VACLs for the primary VLAN and all secondary VLANs in the private VLAN.
You can enable DHCP snooping on private VLANs. When you enable DHCP snooping on the primary VLAN, the DHCP configuration is propagated to the secondary VLANs. If you configure DHCP on a secondary VLAN, the configuration does not take effect if the primary VLAN is already configured.
Before you configure a VLAN as a secondary VLAN, you must shut down the VLAN network interface for the secondary VLAN.
To prevent interhost communication in isolated private VLANs with a promiscuous port, configure a role-based ACL (RBACL) that disallows hosts in that subnet from communicating with each other.
Private VLAN Port Configuration
Follow these guidelines when configuring private VLAN ports:
Use only the private VLAN configuration commands to assign ports to primary, isolated, or community VLANs.
The Layer 2 access ports that are assigned to the VLANs that you configure as primary, isolated, or community VLANs are inactive while the VLAN is part of the private VLAN configuration. Layer 2 trunk interfaces, which may carry private VLANs, are active and remain part of the STP database.
Do not configure ports that belong to a port-channel group as private VLAN ports. While a port is part of the private VLAN configuration, any port-channel configuration for it is inactive.
If you delete a VLAN used in the private VLAN configuration, the private VLAN ports that are associated with the VLAN become inactive.
Limitations with Other Features
Consider these configuration limitations with other features when configuring private VLANs:
Note
In some cases, the configuration is accepted with no error messages, but the commands have no effect.
IGMP runs only on the primary VLAN and uses the configuration of the primary VLAN for all secondary VLANs.
Any IGMP join request in the secondary VLAN is treated as if it is received in the primary VLAN.
Private VLANs support these Switched Port Analyzer (SPAN) features:
Private VLAN host or promiscuous ports cannot be a SPAN destination port.
A destination SPAN port cannot be an isolated port. (However, a source SPAN port can be an isolated port.)
You can configure SPAN to span both primary and secondary VLANs or to span either one if the user is interested only in ingress or egress traffic.
After you configure the association between the primary and secondary VLANs, the dynamic MAC addresses learned the secondary VLANs are flushed.
After you configure the association between the primary and secondary VLANs, all static MAC addresses that were created on the secondary VLANs are inserted into the primary VLAN. If you delete the association, the static MAC addresses revert to the secondary VLANs only.
After you configure the association between the primary and secondary VLANs, you cannot create static MAC addresses for the secondary VLANs.
After you configure the association between the primary and secondary VLANs, if you delete the association, all static MAC addresses that were created on the primary VLANs remain on primary VLAN only.
Port security features are not supported with private VLANs.
In private VLANs, STP controls only the primary VLAN.
Note
See the Cisco Nexus 7000 Series NX-OS Security Configuration Guide, Release 5.x for information on configuring static MAC addresses.
Configuring a Private VLAN
You must have already created the VLAN before you can assign the specified VLAN as a private VLAN.
See the Cisco Nexus 7000 Series NX-OS Interfaces Configuration Guide, Release 5.x, for information on assigning IP addresses to VLAN interfaces.
Note
If you are familiar with the Cisco IOS CLI, be aware that the Cisco NX-OS commands for this feature might differ from the Cisco IOS commands that you would use.
- Enabling Private VLANs - CLI Version
- Configuring a VLAN as a Private VLAN - CLI Version
- Associating Secondary VLANs with a Primary Private VLAN - CLI Version
- Mapping Secondary VLANs to the VLAN Interface of a Primary VLAN - CLI Version
- Configuring a Layer 2 Interface as a Private VLAN Host Port
- Configuring a Layer 2 Interface as a Private VLAN Isolated Trunk Port
- Configuring a Layer 2 Interface as a Private VLAN Promiscuous Port
- Configuring a Layer 2 Interface as a Private VLAN Promiscuous Trunk Port
Enabling Private VLANs - CLI Version
SUMMARY STEPSYou must enable private VLANs on the device to have the private VLAN functionality.
Note
The private VLAN commands do not appear until you enable the private VLAN feature.
4. (Optional) copy running-config startup-config
DETAILED STEPS
Command or Action Purpose Step 1 config t
Example:switch# config t switch(config)#Enters configuration mode.
Step 2 feature private-vlan
Example:switch(config)# feature private-vlan switch(config)#Enables private VLAN functionality on the device.
Note You cannot apply the no feature private-vlan command if there are operational ports on the device that are in private VLAN mode.
Step 3 exit
Example:switch(config)# exit switch#Exits the configuration mode.
Step 4 copy running-config startup-config
Example:switch(config)# copy running-config startup-config(Optional) Copies the running configuration to the startup configuration.
Configuring a VLAN as a Private VLAN - CLI Version
Note
Before you configure a VLAN as a secondary VLAN—that is, either a community or isolated VLAN—you must first shut down the VLAN network interface.You can configure a VLAN as a private VLAN.
To create a private VLAN, you first create a VLAN and then configure that VLAN to be a private VLAN.
You create all VLANs that you want to use in the private VLAN as a primary VLAN, a community VLAN, or an isolated VLAN. You will later associate multiple isolated and multiple community VLANs to one primary VLAN. You can have many primary VLANs and associations, which means that you could have many private VLANs.
If you delete either the primary or secondary VLAN, the ports that are associated with the VLAN become inactive.
On private VLAN trunk ports, if you delete either the secondary or primary VLAN, only that specific VLAN becomes inactive; the trunk ports stay up.
Before You BeginSUMMARY STEPSEnsure that the private VLAN feature is enabled.
Ensure that you are in the correct VDC (or enter the switchto vdc command). You can repeat VLAN names and IDs in different VDCs, so you must confirm that you are working in the correct VDC
2. vlan {vlan-id | vlan-range}
3. Enter one of the following commands:
5. (Optional) show vlan private-vlan [type]
6. (Optional) copy running-config startup-config
DETAILED STEPSAssociating Secondary VLANs with a Primary Private VLAN - CLI Version
Follow these guidelines when you associate secondary VLANs with a primary VLAN:
The secondary-vlan-list parameter cannot contain spaces. It can contain multiple comma-separated items. Each item can be a single secondary VLAN ID or a hyphenated range of secondary VLAN IDs.
The secondary-vlan-list parameter can contain multiple community and isolated VLAN IDs.
Enter a secondary-vlan-list or enter the add keyword with a secondary-vlan-list to associate secondary VLANs with a primary VLAN.
Enter the remove keyword with a secondary-vlan-list to clear the association between secondary VLANs and a primary VLAN.
You change the association between a secondary and primary VLAN by removing the existing association and then adding the desired association.
If you delete either the primary or secondary VLAN, the ports that are associated with the VLAN become inactive.
When you enter the no private-vlan command, the VLAN returns to the normal VLAN mode. All associations on that VLAN are suspended, but the interfaces remain in private VLAN mode.
When you reconvert the specified VLAN to private VLAN mode, the original associations are reinstated.
If you enter the no vlan command for the primary VLAN, all private VLAN associations with that VLAN are lost. However, if you enter the no vlan command for a secondary VLAN, the private VLAN associations with that VLAN are suspended and return when you recreate the specified VLAN and configure it as the previous secondary VLAN.
Before You BeginSUMMARY STEPSEnsure that the private VLAN feature is enabled.
Ensure that you are in the correct VDC (or enter the switchto vdc command). You can repeat VLAN names and IDs in different VDCs, so you must confirm that you are working in the correct VDC.
3. Enter one of the following commands:
5. (Optional) show vlan private-vlan [type]
6. (Optional) copy running-config startup-config
DETAILED STEPS
Command or Action Purpose Step 1 config t
Example:switch# config t switch(config)#Enters configuration mode.
Step 2 vlan primary-vlan-id
Example:switch(config)# vlan 5 switch(config-vlan)#Enters the number of the primary VLAN that you are working in for the private VLAN configuration.
Step 3 Enter one of the following commands:
Option Description private-vlan association {[add] secondary-vlan-list | remove secondary-vlan-list} Associates the secondary VLANs with the primary VLAN.
no private-vlan association Removes all associations from the primary VLAN and returns it to normal VLAN mode.
Example:switch(config-vlan)# private-vlan association 100-105,109Step 4 exit
Example:switch(config-vlan)# exit switch(config)#Exits the VLAN configuration submode.
Step 5 show vlan private-vlan [type]
Example:switch# show vlan private-vlan(Optional) Displays the private VLAN configuration.
Step 6 copy running-config startup-config
Example:switch(config)# copy running-config startup-config(Optional) Copies the running configuration to the startup configuration.
Mapping Secondary VLANs to the VLAN Interface of a Primary VLAN - CLI Version
Note
See the Cisco Nexus 7000 Series NX-OS Interfaces Configuration Guide, Release 5.x, for information on assigning IP addresses to VLAN interfaces on primary VLANs of private VLANs.You map secondary VLANs to the VLAN interface of a primary VLAN. Isolated and community VLANs are both called secondary VLANs. To allow Layer 3 processing of private VLAN ingress traffic, you map secondary VLANs to the VLAN network interface of a primary VLAN.
Note
You must enable VLAN network interfaces before you configure the VLAN network interface. VLAN network interfaces on community or isolated VLANs that are associated with a primary VLAN will be out of service. Only the VLAN network interface on the primary VLAN is in service.
Before You BeginSUMMARY STEPS
Enable the private VLAN feature.
Enable the VLAN interface feature.
Ensure that you are in the correct VDC (or enter the switchto vdc command). You can repeat VLAN names and IDs in different VDCs, so you must confirm that you are working in the correct VDC.
Ensure that you are working on the correct primary VLAN Layer 3 interface to map the secondary VLANs.
2. interface vlan primary-vlan-ID
3. Enter one of the following commands:
5. (Optional) show interface vlan primary-vlan-id private-vlan mapping
6. (Optional) copy running-config startup-config
DETAILED STEPS
Command or Action Purpose Step 1 config t
Example:switch# config t switch(config)#Enters configuration mode.
Step 2 interface vlan primary-vlan-ID
Example:switch(config)# interface vlan 5 switch(config-if)#Enters the number of the primary VLAN that you are working in for the private VLAN configuration. Places you into the interface configuration mode for the primary VLAN.
Step 3 Enter one of the following commands:
Option Description private-vlan mapping {[add] secondary-vlan-list | remove secondary-vlan-list} Maps the secondary VLANs to the SVI or Layer 3 interface of the primary VLAN. This action allows the Layer 3 switching of private VLAN ingress traffic.
no private-vlan mapping Clears the mapping to the Layer 3 interface between the secondary VLANs and the primary VLANs.
Example:switch(config-if)# private-vlan mapping 100-105, 109Step 4 exit
Example:switch(config-if)# exit switch(config)#Exits the interface configuration mode.
Step 5 show interface vlan primary-vlan-id private-vlan mapping
Example:switch(config)# show interface vlan 101 private-vlan mapping(Optional) Displays the interface private VLAN information.
Step 6 copy running-config startup-config
Example:switch(config)# copy running-config startup-config(Optional) Copies the running configuration to the startup configuration.
Configuring a Layer 2 Interface as a Private VLAN Host Port
You can configure a Layer 2 interface as a private VLAN host port. In private VLANs, host ports are part of the secondary VLANs, which are either community VLANs or isolated VLANs.
Note
We recommend that you enable BPDU Guard on all interfaces configured as a host port.
You then associate the host port with both the primary and secondary VLANs.
Before You BeginSUMMARY STEPSEnsure that the private VLAN feature is enabled.
Ensure that you are in the correct VDC (or enter the switchto vdc command). You can repeat VLAN names and IDs in different VDCs, so you must confirm that you are working in the correct VDC.
3. switchport mode private-vlan host
4. Enter one of the following commands:
6. (Optional) show interface switchport
7. (Optional) copy running-config startup-config
DETAILED STEPS
Command or Action Purpose Step 1 config t
Example:switch# config t switch(config)#Enters configuration mode.
Step 2 interface type slot/port
Example:switch(config)# interface ethernet 2/1 switch(config-if)#Selects the Layer 2 port to configure as a private VLAN host port.
Step 3 switchport mode private-vlan host
Example:switch(config-if)# switchport mode private-vlan host switch(config-if)#Configures the Layer 2 port as a host port for a private VLAN.
Step 4 Enter one of the following commands:
Option Description switchport private-vlan host-association {primary-vlan-id} {secondary-vlan-id} Associates the Layer 2 host port with the primary and secondary VLANs of a private VLAN. The secondary VLAN can be either an isolated or community VLAN.
no switchport private-vlan host-association Removes the private VLAN association from the port.
Example:switch(config-if)# switchport private-vlan host-association 10 50Step 5 exit
Example:switch(config-if)# exit switch(config)#Exits the interface configuration mode.
Step 6 show interface switchport
Example:switch# show interface switchport(Optional) Displays information on all interfaces configured as switch ports.
Step 7 copy running-config startup-config
Example:switch(config)# copy running-config startup-config(Optional) Copies the running configuration to the startup configuration.
This example shows how to configure the Layer 2 port 2/1 as a host port for a private VLAN and associate it to primary VLAN 10 and secondary VLAN 50:
switch# config t switch(config)# interface ethernet 2/1 switch(config-if)# switchport mode private-vlan host switch(config-if)# switchport private-vlan host-association 10 50 switch(config-if)# exit switch(config)#Configuring a Layer 2 Interface as a Private VLAN Isolated Trunk Port
Beginning with Cisco NX-OS Release 5.0(2), you can configure a Layer 2 interface as a private VLAN isolated trunk port. These isolated trunk ports carry traffic for multiple secondary VLANs as well as normal VLANs.
Note
You must associate the primary and secondary VLANs before they become operational on the private VLAN isolated trunk port.
Before You BeginSUMMARY STEPSEnsure that the private VLAN feature is enabled.
Ensure that you are in the correct VDC (or enter the switchto vdc command). You can repeat VLAN names and IDs in different VDCs, so you must confirm that you are working in the correct VDC.
4. switchport mode private-vlan trunk secondary
5. (Optional) switchport private-vlan trunk native vlan vlan-id
6. switchport private-vlan trunk allowed vlan {add vlan-list | all | except vlan-list | none | remove vlan-list}
7. Enter one of the following commands
9. (Optional) show interface switchport
10. (Optional) copy running-config startup-config
DETAILED STEPS
Command or Action Purpose Step 1 config t
Example:switch# config t switch(config)#Enters configuration mode.
Step 2 interface {type slot/port}
Example:switch(config)# interface ethernet 2/11 switch(config-if)#Selects the Layer 2 port to configure as a private VLAN isolated trunk port.
Step 3 switchport
Example:switch(config-if)# switchport switch(config-if)#Configures the Layer 2 port as a switch port.
Step 4 switchport mode private-vlan trunk secondary
Example:switch(config-if)# switchport mode private-vlan trunk secondary switch(config-if)#Configures the Layer 2 port as an isolated trunk port to carry traffic for multiple isolated VLANs.
Note You cannot put community VLANs into the isolated trunk port.
Step 5 switchport private-vlan trunk native vlan vlan-id
Example:switch(config-if)# switchport private-vlan trunk native vlan 5(Optional) Sets the native VLAN for the 802.1Q trunk. Valid values are from 1 to 3968 and 4048 to 4093. The default value is 1.
Note If you are using a private VLAN as the native VLAN for the isolated trunk port, you must enter a value for a secondary VLAN or a normal VLAN; you cannot configure a primary VLAN as the native VLAN.
Step 6 switchport private-vlan trunk allowed vlan {add vlan-list | all | except vlan-list | none | remove vlan-list}
Example:switch(config-if)# switchport private-vlan trunk allowed vlan add 1 switch(config-if)#Sets the allowed VLANs for the private VLAN isolated trunk interface. Valid values are from 1 to 3968 and 4048 to 4093.
When you map the private primary and secondary VLANs to the isolated trunk port, the system automatically puts all the primary VLANs into the allowed VLAN list for this port.
Note Ensure that the native VLAN is part of the allowed VLAN list. The default for this command is to allow no VLANs on this interface, so you must configure the native VLAN as an allowed VLAN, unless it is already added as an associated VLAN, to pass native VLAN traffic.
Step 7 Enter one of the following commands
Option Description switchport private-vlan association trunk {primary-vlan-id} {secondary-vlan-id} Associates the Layer 2 isolated trunk port with the primary and secondary VLANs of private VLANs. The secondary VLAN must be an isolated VLAN. You can associate a maximum of 16 private VLAN primary and secondary pairs on each isolated trunk port. You must reenter the command for each pair of primary and secondary VLANs that you are working with.
Note Each secondary VLAN on an isolated trunk port must be associated with a different primary VLAN. You cannot put two isolated VLANs that are associated with the same primary VLAN into a private VLAN isolated trunk port. If you do, the last entry overwrites the previous entry.
no switchport private-vlan association trunk [primary-vlan-id [secondary-vlan-id]] Removes the private VLAN association from the private VLAN isolated trunk port.
Example:switch(config-if)# switchport private-vlan association trunk 10 101 switch(config-if)#Step 8 exit
Example:switch(config-if)# exit switch(config)#Exits the interface configuration mode.
Step 9 show interface switchport
Example:switch# show interface switchport(Optional) Displays information on all interfaces configured as switch ports.
Step 10 copy running-config startup-config
Example:switch(config)# copy running-config startup-config(Optional) Copies the running configuration to the startup configuration.
This example shows how to configure the Layer 2 port 2/1 as a private VLAN isolated trunk port associated with three different primary VLANs and an associated secondary VLAN:
switch# config t switch(config)# interface ethernet 2/1 switch(config-if)# switchport mode private-vlan trunk switch(config-if)# switchport private-vlan trunk allowed vlan add 1 switch(config-if)# switchport private-vlan association trunk 10 101 switch(config-if)# switchport private-vlan association trunk 20 201 switch(config-if)# switchport private-vlan association trunk 30 102 switch(config-if)# exit switch(config)#Configuring a Layer 2 Interface as a Private VLAN Promiscuous Port
You can configure a Layer 2 interface as a private VLAN promiscuous port and then associate that promiscuous port with the primary and secondary VLANs.
Before You BeginSUMMARY STEPSEnsure that the private VLAN feature is enabled.
Ensure that you are in the correct VDC (or enter the switchto vdc command). You can repeat VLAN names and IDs in different VDCs, so you must confirm that you are working in the correct VDC.
3. switchport mode private-vlan promiscuous
4. Enter one of the following commands:
6. (Optional) show interface switchport
7. (Optional) copy running-config startup-config
DETAILED STEPS
Command or Action Purpose Step 1 config t
Example:switch# config t switch(config)#Enters configuration mode.
Step 2 interface {type slot/port}
Example:switch(config)# interface ethernet 2/1 switch(config-if)#Selects the Layer 2 port to configure as a private VLAN promiscuous port.
Step 3 switchport mode private-vlan promiscuous
Example:switch(config-if)# switchport mode private-vlan promiscuousConfigures the Layer 2 port as a promiscuous port for a private VLAN.
Step 4 Enter one of the following commands:
Option Description switchport private-vlan mapping {primary-vlan-id} {secondary-vlan-list | add secondary-vlan-list | remove secondary-vlan-list} Configures the Layer 2 port as a promiscuous port and associates the specified port with a primary VLAN and a selected list of secondary VLANs. The secondary VLAN can be either an isolated or community VLAN.
no switchport private-vlan mapping Clears the mapping from the private VLAN.
Example:switch(config-if)# switchport private-vlan mapping 10 50Step 5 exit
Example:switch(config-if)# exit switch(config)#Exits the interface configuration mode.
Step 6 show interface switchport
Example:switch# show interface switchport(Optional) Displays information on all interfaces configured as switch ports.
Step 7 copy running-config startup-config
Example:switch(config)# copy running-config startup-config(Optional) Copies the running configuration to the startup configuration.
This example shows how to configure the Layer 2 port 2/1 as a promiscuous port associated with the primary VLAN 10 and the secondary isolated VLAN 50:
switch# config t switch(config)# interface ethernet 2/1 switch(config-if)# switchport mode private-vlan promiscuous switch(config-if)# switchport private-vlan mapping 10 50 switch(config-if)# exit switch(config)#Configuring a Layer 2 Interface as a Private VLAN Promiscuous Trunk Port
Beginning with Cisco NX-OS Release 5.0(2), you can configure a Layer 2 interface as a private VLAN promiscuous trunk port and then associate that promiscuous trunk port with multiple primary VLANs. These promiscuous trunk ports carry traffic for multiple primary VLANs as well as normal VLANs.
Note
You must associate the primary and secondary VLANs before they become operational on the private VLAN promiscuous trunk port.
Before You BeginSUMMARY STEPSEnsure that the private VLAN feature is enabled.
Ensure that you are in the correct VDC (or enter the switchto vdc command). You can repeat VLAN names and IDs in different VDCs, so you must confirm that you are working in the correct VDC.
4. switchport mode private-vlan trunk promiscuous
5. (Optional) switchport private-vlan trunk native vlan vlan-id
6. switchport mode private-vlan trunk allowed vlan {add vlan-list | all | except vlan-list | none | remove vlan-list}
7. Enter one of the following commands
9. (Optional) show interface switchport
10. (Optional) copy running-config startup-config
DETAILED STEPS
Command or Action Purpose Step 1 config t
Example:switch# config t switch(config)#Enters configuration mode.
Step 2 interface {type slot/port}
Example:switch(config)# interface ethernet 2/1 switch(config-if)#Selects the Layer 2 port to configure as a private VLAN promiscuous trunk port.
Step 3 switchport
Example:switch(config-if)# switchport switch(config-if)#Configures the Layer 2 port as a switch port.
Step 4 switchport mode private-vlan trunk promiscuous
Example:switch(config-if)# switchport mode private-vlan trunk promiscuous switch(config-if)#Configures the Layer 2 port as a promiscuous trunk port to carry traffic for multiple private VLANs as well as normal VLANs.
Step 5 switchport private-vlan trunk native vlan vlan-id
Example:switch(config-if)# switchport private-vlan trunk native vlan 5(Optional) Sets the native VLAN for the 802.1Q trunk. Valid values are from 1 to 3968 and 4048 to 4093. The default value is 1.
Note If you are using a private VLAN as the native VLAN for the promiscuous trunk port, you must enter a value for a primary VLAN or a normal VLAN; you cannot configure a secondary VLAN as the native VLAN.
Step 6 switchport mode private-vlan trunk allowed vlan {add vlan-list | all | except vlan-list | none | remove vlan-list}
Example:switch(config-if)# switchport private-vlan trunk allowed vlan add 1 switch(config-if)#Sets the allowed VLANs for the private VLAN promiscuous trunk interface. Valid values are from 1 to 3968 and 4048 to 4093.
When you map the private primary and secondary VLANs to the promiscuous trunk port, the system automatically puts all the primary VLANs into the allowed VLAN list for this port.
Note Ensure that the native VLAN is part of the allowed VLAN list. The default for this command is to allow no VLANs on this interface, so you must configure the native VLAN as an allowed VLAN, unless it is already added as an associated VLAN, to pass native VLAN traffic.
Step 7 Enter one of the following commands
Option Description switchport private-vlan mapping trunk primary-vlan-id {add secondary-vlan-list | remove secondary-vlan-id} Maps or removes the mapping for the promiscuous trunk port with the primary VLAN and a selected list of associated secondary VLANs. The secondary VLAN can be either an isolated or community VLAN. The private VLAN association between primary and secondary VLANs must be operational to pass traffic. You can map a maximum of 16 private VLAN primary and secondary pairs on each promiscuous trunk port. You must reenter the command for each primary VLAN that you are working with.
no switchport private-vlan mapping trunk [primary-vlan-id [secondary-vlan-id]] Removes the private VLAN promiscuous trunk mappings from the interface.
Example:switch(config-if)# switchport private-vlan mapping trunk 4 add 5 switch(config-if)#Step 8 exit
Example:switch(config-if)# exit switch(config)#Exits the interface configuration mode.
Step 9 show interface switchport
Example:switch# show interface switchport(Optional) Displays information on all interfaces configured as switch ports.
Step 10 copy running-config startup-config
Example:switch(config)# copy running-config startup-config(Optional) Copies the running configuration to the startup configuration.
This example shows how to configure the Layer 2 port 2/1 as a promiscuous trunk port associated with two primary VLANs and their associated secondary VLANs:
switch# config t switch(config)# interface ethernet 2/1 switch(config-if)# switchport switch(config-if)# switchport mode private-vlan trunk promiscuous switch(config-if)# switchport private-vlan trunk allowed vlan add 1 switch(config-if)# switchport private-vlan mapping trunk 2 add 3 switch(config-if)# switchport private-vlan mapping trunk 4 add 5 switch(config-if)# switchport private-vlan mapping trunk 1 add 20 switch(config-if)# exit switch(config)#Verifying the Private VLAN Configuration
To display private VLAN configuration information, perform one of the following tasks:
Command
Purpose
show running-config vlan vlan-id
Displays VLAN information.
show vlan private-vlan [type]
Displays information on private VLANs
show interface private-vlan mapping
Displays information on interfaces for private VLAN mapping.
show interface vlan primary-vlan-id private-vlan mapping
Displays information on interfaces for private VLAN mapping.
show interface switchport
Displays information on all interfaces configured as switch ports.
For detailed information about the fields in the output from these commands, see the Cisco Nexus 7000 Series NX-OS Layer 2 Switching Command Reference.
Configuration Examples for Private VLANs
The following example shows how to create the three types of private VLANs, how to associate the secondary VLANs to the primary VLAN, how to create a private VLAN host and promiscuous port and assign them to the correct VLAN, and how to create a VLAN interface, or SVI, to allow the primary VLAN to communicate with the rest of the network:
switch# configure terminal
switch(config)# vlan 2
switch(config-vlan)# private-vlan primary
switch(config-vlan)# exit
switch(config)# vlan 3
switch(config-vlan)# private-vlan community
switch(config-vlan)# exit
switch(config)# vlan 4
switch(config-vlan)# private-vlan isolated
switch(config-vlan)# exit

switch(config)# vlan 2
switch(config-vlan)# private-vlan association 3,4
switch(config-vlan)# exit

switch(config)# interface ethernet 1/11
switch(config-if)# switchport
switch(config-if)# switchport mode private-vlan host
switch(config-if)# exit
switch(config)# interface ethernet 1/12
switch(config-if)# switchport
switch(config-if)# switchport mode private-vlan promiscuous
switch(config-if)# exit

switch(config)# interface ethernet 1/11
switch(config-if)# switchport private-vlan host-association 2 3
switch(config-if)# exit
switch(config)# interface ethernet 1/12
switch(config-if)# switchport private-vlan mapping 2 3,4
switch(config-if)# exit

switch(config)# interface vlan 2
switch(config-vlan)# private-vlan mapping 3,4
switch(config-vlan)# exit
switch(config)#
Additional References for Private VLANs -- CLI Version
Related Documents
Related Topic
Document Title
Command reference
Cisco Nexus 7000 Series NX-OS Layer 2 Switching Command Reference
NX-OS Layer 2 switching configuration
VLAN interfaces, IP addressing
Cisco Nexus 7000 Series NX-OS Interfaces Configuration Guide, Release 5.x
Static MAC addresses, security
Cisco Nexus 7000 Series NX-OS Security Configuration Guide, Release 5.x
NX-OS fundamentals
Cisco Nexus 7000 Series NX-OS Fundamentals Configuration Guide, Release 5.x
High availability
Cisco Nexus 7000 Series NX-OS High Availability and Redundancy Guide, Release 5.x
System management
Cisco Nexus 7000 Series NX-OS System Management Configuration Guide, Release 5.x
VDCs
Cisco Nexus 7000 Series NX-OS Virtual Device Context Configuration Guide, Release 5.x
VDCs
Licensing
Cisco NX-OS Licensing Guide
Release notes
Cisco Nexus 7000 Series NX-OS Release Notes, Release 5.x
MIBs
MIBs
MIBs Link
To locate and download MIBs, go to the following URL: http://www.cisco.com/public/sw-center/netmgmt/cmtk/mibs.shtml
Feature History for Configuring Private VLANs -- CLI Version
This table lists the release history for this feature.
Table 2 Feature History for Configuring Private VLANsFeature Name
Releases
Feature Information
Private VLAN promiscuous trunk ports and isolated trunk ports
5.0(2)
This feature allows promiscuous ports to carry traffic for multiple private VLANs and normal VLANs and allows isolated ports to carry traffic for multiple isolated VLANs and normal VLANs.
No change
4.2(1)
–
Display features enabled on the device
4.1(2)
You can display which features are enabled on the device by entering the following command:
