Configuring Bidirectional Forwarding Detection

About BFD

BFD is a detection protocol designed to provide fast forwarding-path failure detection times for media types, encapsulations, topologies, and routing protocols. You can use BFD to detect forwarding path failures at a uniform rate, rather than the variable rates for different protocol hello mechanisms. BFD makes network profiling and planning easier and reconvergence time consistent and predictable.

BFD provides subsecond failure detection between two adjacent devices and can be less CPU-intensive than protocol hello messages because some of the BFD load can be distributed onto the data plane on supported modules.

Asynchronous Mode

Cisco NX-OS supports the BFD asynchronous mode, which sends BFD control packets between two adjacent devices to activate and maintain BFD neighbor sessions between the devices. You configure BFD on both devices (or BFD neighbors). Once BFD has been enabled on the interfaces and on the appropriate protocols, Cisco NX-OS creates a BFD session, negotiates BFD session parameters, and begins to send BFD control packets to each BFD neighbor at the negotiated interval. The BFD session parameters include the following:

  • Desired minimum transmit interval—The interval at which this device wants to send BFD hello messages.

  • Required minimum receive interval—The minimum interval at which this device can accept BFD hello messages from another BFD device.

  • Detect multiplier—The number of missing BFD hello messages from another BFD device before this local device detects a fault in the forwarding path.

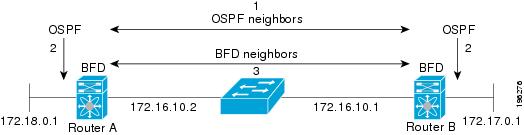
The following figure shows how a BFD session is established. The figure shows a simple network with two routers running Open Shortest Path First (OSPF) and BFD. When OSPF discovers a neighbor (1), it sends a request to the local BFD process to initiate a BFD neighbor session with the OSPF neighbor router (2). The BFD neighbor session with the OSPF neighbor router is now established (3).

Figure 1. Establishing a BFD Neighbor Relationship


BFD Detection of Failures

Once a BFD session has been established and timer negotiations are complete, BFD neighbors send BFD control packets that act in the same manner as an IGP hello protocol to detect liveliness, except at a more accelerated rate. BFD detects a failure, but the protocol must take action to bypass a failed peer.

BFD sends a failure detection notice to the BFD-enabled protocols when it detects a failure in the forwarding path. The local device can then initiate the protocol recalculation process and reduce the overall network convergence time.

The following figure shows what happens when a failure occurs in the network (1). The BFD neighbor session with the OSPF neighbor router is torn down (2). BFD notifies the local OSPF process that the BFD neighbor is no longer reachable (3). The local OSPF process tears down the OSPF neighbor relationship (4). If an alternative path is available, the routers immediately start converging on it.


Note


Note The BFD failure detection occurs in less than a second, which is much faster than OSPF Hello messages could detect the same failure.


Figure 2. Tearing Down an OSPF Neighbor Relationship


Distributed Operation

Cisco NX-OS can distribute the BFD operation to compatible modules that support BFD. This process offloads the CPU load for BFD packet processing to the individual modules that connect to the BFD neighbors. All BFD session traffic occurs on the module CPU. The module informs the supervisor when a BFD failure is detected.

BFD Echo Function

The BFD echo function sends echo packets from the forwarding engine to the remote BFD neighbor. The BFD neighbor forwards the echo packet back along the same path in order to perform detection; the BFD neighbor does not participate in the actual forwarding of the echo packets. The echo function and the forwarding engine are responsible for the detection process. BFD can use the slow timer to slow down the asynchronous session when the echo function is enabled and reduce the number of BFD control packets that are sent between two BFD neighbors. Also, the forwarding engine tests the forwarding path on the remote (neighbor) system without involving the remote system, so there is less interpacket delay variability and faster failure detection times.

The echo function is without asymmetry when both BFD neighbors are running echo function.

Security

Cisco NX-OS uses the packet Time to Live (TTL) value to verify that the BFD packets came from an adjacent BFD peer. For all asynchronous and echo request packets, the BFD neighbor sets the TTL value to 255 and the local BFD process verifies the TTL value as 255 before processing the incoming packet. For the echo response packet, BFD sets the TTL value to 254.

You can configure SHA-1 authentication of BFD packets.

High Availability

BFD supports stateless restarts. After a reboot or supervisor switchover, Cisco NX-OS applies the running configuration and BFD immediately sends control packets to the BFD peers.

Virtualization Support

BFD supports virtual routing and forwarding instances (VRFs). VRFs exist within virtual device contexts (VDCs). By default, Cisco NX-OS places you in the default VDC and default VRF.

Prerequisites for BFD

BFD has the following prerequisites:

  • You must enable the BFD feature.

  • Disable Internet Control Message Protocol (ICMP) redirect messages on BFD-enabled interfaces.

  • Disable the IP packet verification check for identical IP source and destination addresses.

  • See other detailed prerequisites that are listed with the configuration tasks.

Guidelines and Limitations

BFD has the following configuration guidelines and limitations:

  • show commands with the internal keyword are not supported.

  • Starting with Release 7.0(3)I5(1), BFD per-member link support is added on Cisco Nexus 9000 Series switches.

  • BFD supports BFD version 1.

  • BFD supports IPv4 and IPv6.

  • BFD supports OSPFv3.

  • BFD supports IS-ISv6.

  • BFD supports BGPv6.

  • BFD supports EIGRPv6.

  • BFD supports only one session per address family, per Layer 3 interface.

  • BFD supports only sessions which have unique (src_ip, dst_ip, interface/vrf) combination.

  • BFD supports single-hop BFD.

  • BFD for BGP supports single-hop EBGP and iBGP peers.

  • BFD supports keyed SHA-1 authentication.

  • BFD supports the following Layer 3 interfaces—physical interfaces, port channels, subinterfaces, and VLAN interfaces.

  • BFD depends on a Layer 3 adjacency information to discover topology changes, including Layer 2 topology changes. A BFD session on a VLAN interface (SVI) may not be up after the convergence of the Layer 2 topology if there is no Layer 3 adjacency information available.

  • For BFD on a static route between two devices, both devices must support BFD. If one or both of the devices do not support BFD, the static routes are not programmed in the Routing Information Base (RIB).

  • Port channel configuration limitations:

    • For Layer 3 port channels used by BFD, you must enable LACP on the port channel.

    • For Layer 2 port channels used by SVI sessions, you must enable LACP on the port channel.

  • SVI limitations:

    • An ASIC reset causes traffic disruption for other ports and it can cause the SVI sessions on the other ports to flap. For example, if the carrier interface is a virtual port channel (vPC), BFD is not supported over the SVI interface and it could cause a trigger for an ASIC reset. When a BFD session is over SVI using virtual port channel (vPC) Peer-Link, the BFD echo function is not supported. You must disable the BFD echo function for all sessions over SVI between vPC peer nodes.

      An SVI on the Cisco Nexus series switches should not be configured to establish a BFD neighbor adjacency with a device connected to it via a vPC. This is because the BFD keepalives from the neighbour, if sent over the vPC member link connected to the vPC peer-switch, do not reach this SVI causing the BFD adjacency to fail.

    • When you change the topology (for example, add or delete a link into a VLAN, delete a member from a Layer 2 port channel, and so on), the SVI session could be affected. It may go down first and then come up after the topology discovery is finished.

    • BFD over FEX HIF interfaces is not supported.

    • When a BFD session is over SVI using virtual port-channel (vPC) Peer-Link (either BCM or GEM based ports), the BFD echo function is not supported. You must disable the BFD echo function for all sessions over SVI between vPC peer nodes using the no bfd echo command at the SVI configuration level.


      Tip


      If you do not want the SVI sessions to flap and you need to change the topology, you can disable the BFD feature before making the changes and reenable BFD after the changes have been made. You can also configure the BFD timer to be a large value (for example, 5 seconds), and change it back to a fast timer after the above events complete.


  • When you configure the BFD Echo function on the distributed Layer 3 port channels, reloading a member module flaps the BFD session hosted on that module, which results in a packet loss.

    If you connect the BFD peers directly without a Layer 2 switch in between, you can use the BFD per-link mode as an alternative solution.


    Note


    Using BFD per-link mode and subinterface optimization simultaneously on a Layer 3 port channel is not supported.


  • When you specify a BFD neighbor prefix in the clear {ip | ipv6} route prefix command, the BFD echo session will flap.

  • The clear {ip | ipv6} route * command causes BFD echo sessions to flap.

  • HSRP for IPv4 is supported with BFD.

  • BFD packets generated by the Cisco NX-OS device linecards are sent with COS 6/DSCP CS6. The DSCP/COS values for BFD packets are not user configurable.

  • When configuring BFDv6 in no-bfd-echo mode, it is recommended to run with timers of 150 ms with a multiplier of 3.

  • BFDv6 is not supported for VRRPv3 and HSRP for v6.

  • IPv6 eigrp bfd cannot be disabled on an interface.

  • Port channel configuration notes:

    • When the BFD per-link mode is configured, the BFD echo function is not supported. You must disable the BFD echo function using the no bfd echo command before configuring the bfd per-link command.

    • Configuring BFD per-link with link-local is not supported.

Default Settings

The following table lists the default settings for BFD parameters.

Table 1. Default BFD Parameters

Parameters

Default

BFD feature

Disabled

Required minimum receive interval

50 milliseconds

Desired minimum transmit interval

50 milliseconds

Detect multiplier

3

Echo function

Enabled

Mode

Asynchronous

Port-channel

Logical mode (one session per source-destination pair address)

Slow timer

2000 milliseconds

Configuring BFD

Configuration Hierarchy

You can configure BFD at the global level and at the interface level. The interface configuration overrides the global configuration.

For physical ports that are members of a port channel, the member port inherits the primary port channel BFD configuration.

Task Flow for Configuring BFD

Follow these steps in the following sections to configure BFD:

  • Enabling the BFD Feature.

  • Configuring Global BFD Parameters or Configuring BFD on an Interface.

Enabling the BFD Feature

You must enable the BFD feature before you can configure BFD on an interface and protocol.


Note


Use the no feature bfd command to disable the BFD feature and remove all associated configuration.

Command

Purpose

no feature bfd

Example:
switch(config)# no feature bfd  

Disables the BFD feature and removes all associated configuration.


SUMMARY STEPS

  1. configure terminal
  2. feature bfd
  3. show feature | include bfd
  4. copy running-config startup-config

DETAILED STEPS

  Command or Action Purpose

Step 1

configure terminal

Example:

switch# configure terminal
switch(config)#

Enters configuration mode.

Step 2

feature bfd

Example:

switch(config)# feature bfd

Enables the BFD feature.

Step 3

show feature | include bfd

Example:

switch(config)# show feature | include
bfd

(Optional) Displays enabled and disabled features.

Step 4

copy running-config startup-config

Example:

switch(config)# copy running-config startup-config  

(Optional) Saves the configuration change.

Configuring Global BFD Parameters

You can configure the BFD session parameters for all BFD sessions on the device. The BFD session parameters are negotiated between the BFD peers in a three-way handshake.

See the Configuring BFD on an Interface section to override these global session parameters on an interface.

Before you begin

Enable the BFD feature.

SUMMARY STEPS

  1. configure terminal
  2. bfd interval mintx min_rx msec multiplier value
  3. bfd slow-timer [interval]
  4. bfd echo-interface loopback interface number
  5. show running-config bfd
  6. copy running-config startup-config

DETAILED STEPS

  Command or Action Purpose

Step 1

configure terminal

Example:

switch# configure terminal
switch(config)#

Enters configuration mode.

Step 2

bfd interval mintx min_rx msec multiplier value

Example:

switch(config)# bfd interval 50 min_rx
50 multiplier 3

Configures the BFD session parameters for all BFD sessions on the device. This command overrides these values by configuring the BFD session parameters on an interface. The mintx and msec range is from 50 to 999 milliseconds and the default is 50. The multiplier range is from 1 to 50. The multiplier default is 3.

Step 3

bfd slow-timer [interval]

Example:

switch(config)# bfd slow-timer 2000

Configures the slow timer used in the echo function. This value determines how fast BFD starts up a new session and at what speed the asynchronous sessions use for BFD control packets when the echo function is enabled. The slow-timer value is used as the new control packet interval, while the echo packets use the configured BFD intervals. The echo packets are used for link failure detection, while the control packets at the slower rate maintain the BFD session. The range is from 1000 to 30000 milliseconds. The default is 2000.

Step 4

bfd echo-interface loopback interface number

Example:

switch(config)# bfd echo-interface loopback 1 3

Configures the interface used for Bidirectional Forwarding Detection (BFD) echo frames. This command changes the source address for the echo packets to the one configured on the specified loopback interface. The interface number range is from 0 to 1023.

Step 5

show running-config bfd

Example:

switch(config)# show running-config bfd  

(Optional) Displays the BFD running configuration.

Step 6

copy running-config startup-config

Example:

switch(config)# copy running-config startup-config  

(Optional) Saves the configuration change.

Configuring BFD on an Interface

You can configure the BFD session parameters for all BFD sessions on an interface. The BFD session parameters are negotiated between the BFD peers in a three-way handshake.

This configuration overrides the global session parameters for the configured interface.

Before you begin

Ensure that Internet Control Message Protocol (ICMP) redirect messages are disabled on BFD-enabled interfaces. Use the no ip redirects command or the no ipv6 redirects command on the interface.

Enable the BFD feature. See the Enabling the BFD Feature section.

SUMMARY STEPS

  1. configure terminal
  2. interface int-if
  3. bfd interval mintx min_rx msec multiplier value
  4. bfd authentication keyed-sha1 keyid id key ascii_key
  5. show running-config bfd
  6. copy running-config startup-config

DETAILED STEPS

  Command or Action Purpose

Step 1

configure terminal

Example:

switch# configure terminal
switch(config)#

Enters configuration mode.

Step 2

interface int-if

Example:

switch(config)# interface ethernet 2/1
switch(config-if)#

Enters interface configuration mode. Use the ? keyword to display the supported interfaces.

Step 3

bfd interval mintx min_rx msec multiplier value

Example:

switch(config-if)# bfd interval 50
min_rx 50 multiplier 3

Configures the BFD session parameters for all BFD sessions on the device. This command overrides these values by configuring the BFD session parameters on an interface. The mintx and msec range is from 50 to 999 milliseconds and the default is 50. The multiplier range is from 1 to 50. The multiplier default is 3.

Beginning with Cisco NX-OS Release 9.3(5), configuring BFD session parameters under interface with default timer values using the bfd interval 50 min_rx 50 multiplier 3 command is functionally equivalent to no bfd interval command.

Once BFD session parameters under interface are set to default values, those BFD sessions running on that interface will inherit global session parameters, if present.

Step 4

bfd authentication keyed-sha1 keyid id key ascii_key

Example:

switch(config-if)# bfd authentication
keyed-sha1 keyid 1 ascii_key cisco123

(Optional) Configures SHA-1 authentication for all BFD sessions on the interface. The ascii_key string is a secret key shared among BFD peers. The id value, a number between 0 and 255, is assigned to this particular ascii_key . BFD packets specify the key by id , allowing the use of multiple active keys.

To disable SHA-1 authentication on the interface, use the no form of the command.

Step 5

show running-config bfd

Example:

switch(config-if)# show running-config bfd  

(Optional) Displays the BFD running configuration.

Step 6

copy running-config startup-config

Example:

switch(config-if)# copy running-config startup-config  

(Optional) Saves the configuration change.

Configuring BFD on a Port Channel

You can configure the BFD session parameters for all BFD sessions on a port channel. If per-link mode is used for Layer 3 port channels, BFD creates a session for each link in the port channel and provides an aggregate result to client protocols. For example, if the BFD session for one link on a port channel is up, BFD informs client protocols, such as OSPF, that the port channel is up. The BFD session parameters are negotiated between the BFD peers in a three-way handshake.

This configuration overrides the global session parameters for the configured port channel. The member ports of the port channel inherit the port channel BFD session parameters.

Before you begin

Ensure that you enable LACP on the port channel before you enable BFD.

Ensure that Internet Control Message Protocol (ICMP) redirect messages are disabled on BFD-enabled interfaces. Use the no ip redirects command on the interface.

Enable the BFD feature. See the Enabling the BFD Feature section.

SUMMARY STEPS

  1. configure terminal
  2. interface port-channel number
  3. bfd per-link
  4. bfd interval mintx min_rx msec multiplier value
  5. bfd authentication keyed-sha1 keyid id key ascii_key
  6. show running-config bfd
  7. copy running-config startup-config

DETAILED STEPS

  Command or Action Purpose

Step 1

configure terminal

Example:

switch# configure terminal
switch(config)#

Enters global configuration mode.

Step 2

interface port-channel number

Example:

switch(config)# interface port-channel 2
switch(config-if)#

Enters port-channel configuration mode. Use the ? keyword to display the supported number range.

Step 3

bfd per-link

Example:

switch(config-if)# bfd per-link

Configures the BFD sessions for each link in the port channel.

Step 4

bfd interval mintx min_rx msec multiplier value

Example:

switch(config-if)# bfd interval 50
min_rx 50 multiplier 3

(Optional) Configures the BFD session parameters for all BFD sessions on the port channel. This command overrides these values by configuring the BFD session parameters. The mintx and msec range is from 50 to 999 milliseconds and the default is 50. The multiplier range is from 1 to 50. The multiplier default is 3.

Step 5

bfd authentication keyed-sha1 keyid id key ascii_key

Example:

switch(config-if)# bfd authentication
keyed-sha1 keyid 1 ascii_key cisco123

(Optional) Configures SHA-1 authentication for all BFD sessions on the interface. The ascii_key string is a secret key shared among BFD peers. The id value, a number between 0 and 255, is assigned to this particular ascii_key . BFD packets specify the key by id , allowing the use of multiple active keys.

To disable SHA-1 authentication on the interface, use the no form of the command.

Step 6

show running-config bfd

Example:

switch(config-if)# show running-config bfd  

(Optional) Displays the BFD running configuration.

Step 7

copy running-config startup-config

Example:

switch(config-if)# copy running-config startup-config  

(Optional) Saves the configuration change.

Configuring the BFD Echo Function

You can configure the BFD echo function on one or both ends of a BFD-monitored link. The echo function slows down the required minimum receive interval, based on the configured slow timer. The RequiredMinEchoRx BFD session parameter is not set to zero if the echo function is disabled in compliance with RFC 5880. The slow timer becomes the required minimum receive interval if the echo function is enabled.

Before you begin

Enable the BFD feature. See the Enabling the BFD Feature section.

Configure the BFD session parameters. See the Configuring Global BFD Parameters section on or the Configuring BFD on an Interface section.

Ensure that Internet Control Message Protocol (ICMP) redirect messages are disabled on BFD-enabled interfaces. Use the no ip redirects command on the interface.

Ensure that the IP packet verification check for identical IP source and destination addresses is disabled. Use the no hardware ip verify address identical command. See the Cisco Nexus 9000 Series NX-OS Unicast Routing Configuration Guide for more information about this command.

SUMMARY STEPS

  1. configure terminal
  2. bfd slow-timer echo-interval
  3. interface int-if
  4. bfd echo
  5. show running-config bfd
  6. copy running-config startup-config

DETAILED STEPS

  Command or Action Purpose

Step 1

configure terminal

Example:

switch# configure terminal
switch(config)#

Enters configuration mode.

Step 2

bfd slow-timer echo-interval

Example:

switch(config)# bfd slow-timer 2000

Configures the slow timer used in the echo function. This value determines how fast BFD starts up a new session and is used to slow down the asynchronous sessions when the BFD echo function is enabled. This value overwrites the required minimum receive interval when the echo function is enabled. The range is from 1000 to 30000 milliseconds. The default is 2000.

Step 3

interface int-if

Example:

switch(config)# interface ethernet 2/1
switch(config-if)#

Enters interface configuration mode. Use the ? keyword to display the supported interfaces.

Step 4

bfd echo

Example:

switch(config-if)# bfd echo

Enables the echo function. The default is enabled.

Step 5

show running-config bfd

Example:

switch(config-if)# show running-config bfd  

(Optional) Displays the BFD running configuration.

Step 6

copy running-config startup-config

Example:

switch(config-if)# copy running-config startup-config  

(Optional) Saves the configuration change.

Configuring BFD Support for Routing Protocols

Configuring BFD on BGP

You can configure BFD for the Border Gateway Protocol (BGP).

Before you begin

Enable the BFD feature. See the Enabling the BFD Feature section.

Configure the BFD session parameters. See the Configuring Global BFD Parameters section or the Configuring BFD on an Interface section.

Enable the BGP feature. See the Cisco Nexus 9000 Series NX-OS Unicast Routing Configuration Guide for more information.

SUMMARY STEPS

  1. configure terminal
  2. router bgp as-number
  3. neighbor (ip-address | ipv6-address) remote-as as-number
  4. bfd
  5. update-source interface
  6. show running-config bgp
  7. copy running-config startup-config

DETAILED STEPS

  Command or Action Purpose

Step 1

configure terminal

Example:

switch# configure terminal
switch(config)#

Enters configuration mode.

Step 2

router bgp as-number

Example:

switch(config)# router bgp 64496
switch(config-router)#

Enables BGP and assigns the AS number to the local BGP speaker. The AS number can be a 16-bit integer or a 32-bit integer in the form of a higher 16-bit decimal number and a lower 16-bit decimal number in xx.xx format.

Step 3

neighbor (ip-address | ipv6-address) remote-as as-number

Example:

switch(config-router)# neighbor
209.165.201.1 remote-as 64497
switch(config-router-neighbor)#

Configures the IPv4 or IPv6 address and AS number for a remote BGP peer. The ip-address format is x.x.x.x. The ipv6-address format is A:B::C:D.

Step 4

bfd

Example:

switch(config-router-neighbor)# bfd

Configures BFD on the neighbor.

Step 5

update-source interface

Example:

switch(config-router-neighbor)# update-source ethernet 2/1

Allows BGP sessions to use the primary IP address from a particular interface as the local address when forming a BGP session with a neighbor and enables BGP to register as a client with BFD.

Step 6

show running-config bgp

Example:

switch(config-router-neighbor)# show
running-config bgp  

(Optional) Displays the BGP running configuration.

Step 7

copy running-config startup-config

Example:

switch(config-router-neighbor)# copy
running-config startup-config  

(Optional) Saves the configuration change.

Configuring BFD on EIGRP

You can configure BFD for the Enhanced Interior Gateway Routing Protocol (EIGRP).

Before you begin

Enable the BFD feature. See the Enabling the BFD Feature section.

Configure the BFD session parameters. See the Configuring Global BFD Parameters section or the Configuring BFD on an Interface section.

Enable the EIGRP feature. See the Cisco Nexus 9000 Series NX-OS Unicast Routing Configuration Guide for more information.

SUMMARY STEPS

  1. configure terminal
  2. router eigrp instance-tag
  3. bfd [ipv4 | ipv6]
  4. interface int-if
  5. ip eigrp instance-tag bfd
  6. show ip eigrp [vrf vrf-name] [ interfaces if]
  7. copy running-config startup-config

DETAILED STEPS

  Command or Action Purpose

Step 1

configure terminal

Example:

switch# configure terminal
switch(config)#

Enters configuration mode.

Step 2

router eigrp instance-tag

Example:

switch(config)# router eigrp Test1
switch(config-router)#

Creates a new EIGRP process with the configured instance tag. The instance tag can be any case-sensitive, alphanumeric string up to 20 characters.

If you configure an instance-tag that does not qualify as an AS number, you must use the autonomous-system to configure the AS number explicitly or this EIGRP instance will remain in the shutdown state.

Step 3

bfd [ipv4 | ipv6]

Example:

switch(config-router-neighbor)# bfd ipv4

(Optional) Enables BFD for all EIGRP interfaces.

Step 4

interface int-if

Example:

switch(config-router-neighbor)# interface
ethernet 2/1
switch(config-if)#

Enters interface configuration mode. Use the ? keyword to display the supported interfaces.

Step 5

ip eigrp instance-tag bfd

Example:

switch(config-if)# ip eigrp Test1 bfd  

(Optional) Enables or disables BFD on an EIGRP interface. The instance tag can be any case-sensitive, alphanumeric string up to 20 characters.

The default is disabled.

Step 6

show ip eigrp [vrf vrf-name] [ interfaces if]

Example:

switch(config-if)# show ip eigrp  

(Optional) Displays information about EIGRP. The vrf-name can be any case-sensitive, alphanumeric string up to 32 characters.

Step 7

copy running-config startup-config

Example:

switch(config-if)# copy
running-config startup-config  

(Optional) Saves the configuration change.

Configuring BFD on OSPF

You can configure BFD for the Open Shortest Path First.

Before you begin

Enable the BFD feature. See the Enabling the BFD Feature section.

Configure the BFD session parameters. See the Configuring Global BFD Parameters section or the Configuring BFD on an Interface section.

Enable the OSPF feature. See the Cisco Nexus 9000 Series NX-OS Unicast Routing Configuration Guide for more information.

SUMMARY STEPS

  1. configure terminal
  2. router ospf instance-tag
  3. bfd [ipv4 | ipv6]
  4. interface int-if
  5. ip ospf bfd
  6. show ip ospf [vrf vrf-name] [ interfaces if]
  7. copy running-config startup-config

DETAILED STEPS

  Command or Action Purpose

Step 1

configure terminal

Example:

switch# configure terminal
switch(config)#

Enters global configuration mode.

Step 2

router ospf instance-tag

Example:

switch(config)# router ospf 200
switch(config-router)#

Creates a new OSPF instance with the configured instance tag. The instance tag can be any case-sensitive, alphanumeric string up to 20 characters.

Step 3

bfd [ipv4 | ipv6]

Example:

switch(config-router)# bfd

(Optional) Enables BFD for all OSPF interfaces.

Step 4

interface int-if

Example:

switch(config-router)# interface
ethernet 2/1
switch(config-if)#

Enters interface configuration mode. Use the ? keyword to display the supported interfaces.

Step 5

ip ospf bfd

Example:

switch(config-if)# ip ospf bfd  

(Optional) Enables or disables BFD on an OSPF interface. The default is disabled.

Step 6

show ip ospf [vrf vrf-name] [ interfaces if]

Example:

switch(config-if)# show ip ospf  

(Optional) Displays information about OSPF. The vrf-name can be any case-sensitive, alphanumeric string up to 32 characters.

Step 7

copy running-config startup-config

Example:

switch(config-if)# copy
running-config startup-config  

(Optional) Saves the configuration change.

Example Configurations for BFD on OSPF

Example configuration where BFD is enabled under a non-default VRF (OSPFv3 neighbors in vrf3).

configure terminal
  router ospfv3 10
    vrf vrf3 
    bfd    

Configuring BFD on IS-IS

You can configure BFD for the Intermediate System-to-Intermediate System (IS-IS) protocol.

Before you begin

Enable the BFD feature. See the Enabling the BFD Feature section.

Configure the BFD session parameters. See the Configuring Global BFD Parameters section or the Configuring BFD on an Interface section.

Enable the IS-IS feature. See the Cisco Nexus 9000 Series NX-OS Unicast Routing Configuration Guide for more information.

SUMMARY STEPS

  1. configure terminal
  2. router isis instance-tag
  3. bfd [ipv4 | ipv6]
  4. interface int-if
  5. isis bfd
  6. show isis [vrf vrf-name] [ interface if]
  7. copy running-config startup-config

DETAILED STEPS

  Command or Action Purpose

Step 1

configure terminal

Example:

switch# configure terminal
switch(config)#

Enters global configuration mode.

Step 2

router isis instance-tag

Example:


switch(config)# router isis 100
  switch(config-router)# net 49.0001.1720.1600.1001.00
  switch(config-router)# address-family ipv6 unicast

Creates a new IS-IS instance with the configured instance tag .

Step 3

bfd [ipv4 | ipv6]

Example:

switch(config-router)# bfd

(Optional) Enables BFD for all OSPF interfaces.

Step 4

interface int-if

Example:

switch(config-router)# interface
ethernet 2/1
switch(config-if)#

Enters interface configuration mode. Use the ? keyword to display the supported interfaces.

Step 5

isis bfd

Example:

switch(config-if)# isis bfd  

(Optional) Enables or disables BFD on an IS-IS interface. The default is disabled.

Step 6

show isis [vrf vrf-name] [ interface if]

Example:

switch(config-if)# show isis  

(Optional) Displays information about IS-IS. The vrf-name can be any case-sensitive, alphanumeric string up to 32 characters.

Step 7

copy running-config startup-config

Example:

switch(config-if)# copy
running-config startup-config  

(Optional) Saves the configuration change.

Example Configurations for BFD on IS-IS

Example configuration for IS-IS where BFD is enabled under IPv4 and an IPv6 address family.

configure terminal
  router isis isis-1 
    bfd      
    address-family ipv6 unicast 
    bfd      

Configuring BFD on HSRP

You can configure BFD for the Hot Standby Router Protocol (HSRP). The active and standby HSRP routers track each other through BFD. If BFD on the standby HSRP router detects that the active HSRP router is down, the standby HSRP router treats this event as an active time rexpiry and takes over as the active HSRP router.

The show hsrp detail command shows this event as BFD@Act-down or BFD@Sby-down.

Before you begin

Enable the BFD feature. See the Enabling the BFD Feature section.

Configure the BFD session parameters. See the Configuring Global BFD Parameters section or the Configuring BFD on an Interface section.

Enable the HSRP feature. See the Cisco Nexus 9000 Series NX-OS Unicast Routing Configuration Guide for more information.

SUMMARY STEPS

  1. configure terminal
  2. hsrp bfd all-interfaces
  3. interface int-if
  4. hsrp bfd
  5. show running-config hsrp
  6. copy running-config startup-config

DETAILED STEPS

  Command or Action Purpose

Step 1

configure terminal

Example:

switch# configure terminal
switch(config)#

Enters global configuration mode.

Step 2

hsrp bfd all-interfaces

Example:

switch# hsrp bfd all-interfaces

(Optional) Enables or disables BFD on all HSRP interfaces. The default is disabled.

Step 3

interface int-if

Example:

switch(config-router)# interface
ethernet 2/1
switch(config-if)#

Enters interface configuration mode. Use the ? keyword to display the supported interfaces.

Step 4

hsrp bfd

Example:

switch(config-if)# hsrp bfd  

(Optional) Enables or disables BFD on an HSRP interface. The default is disabled.

Step 5

show running-config hsrp

Example:

switch(config-if)# show running-config hsrp  

(Optional) Displays the HSRP running configuration.

Step 6

copy running-config startup-config

Example:

switch(config-if)# copy
running-config startup-config  

(Optional) Saves the configuration change.

Configuring BFD on VRRP

You can configure BFD for the Virtual Router Redundancy Protocol (VRRP). The active and standby VRRP routers track each other through BFD. If BFD on the standby VRRP router detects that the active VRRP router is down, the standby VRRP router treats this event as an active time rexpiry and takes over as the active VRRP router.

The show vrrp detail command shows this event as BFD@Act-down or BFD@Sby-down.

Before you begin

Enable the BFD feature. See the Enabling the BFD Feature section.

Configure the BFD session parameters. See the Configuring Global BFD Parameters section or the Configuring BFD on an Interface section.

Enable the VRRP feature. See the Cisco Nexus 9000 Series NX-OS Unicast Routing Configuration Guide for more information.

SUMMARY STEPS

  1. configure terminal
  2. interface int-if
  3. vrrp group-no
  4. vrrp bfd address
  5. show running-config vrrp
  6. copy running-config startup-config

DETAILED STEPS

  Command or Action Purpose

Step 1

configure terminal

Example:

switch# configure terminal
switch(config)#

Enters global configuration mode.

Step 2

interface int-if

Example:

switch(config)# interface
ethernet 2/1
switch(config-if)#

Enters interface configuration mode. Use the ? keyword to display the supported interfaces.

Step 3

vrrp group-no

Example:

switch(config-if)# vrrp 2

Specifies the VRRP group number.

Step 4

vrrp bfd address

Example:

switch(config-if)# vrrp bfd  

Enables or disables BFD on a VRRP interface. The default is disabled.

Step 5

show running-config vrrp

Example:

switch(config-if)# show running-config vrrp  

(Optional) Displays the VRRP running configuration.

Step 6

copy running-config startup-config

Example:

switch(config-if)# copy
running-config startup-config  

(Optional) Saves the configuration change.

Configuring BFD on PIM

You can configure BFD for the Protocol Independent Multicast (PIM) protocol.

Before you begin

Enable the BFD feature. See the Enabling the BFD Feature section.

Enable the PIM feature. See the Cisco Nexus 9000 Series NX-OS Unicast Routing Configuration Guide for more information.

SUMMARY STEPS

  1. configure terminal
  2. ip pim bfd
  3. interface int-if
  4. ip pim bfd-instance [disable]
  5. show running-config pim
  6. copy running-config startup-config

DETAILED STEPS

  Command or Action Purpose

Step 1

configure terminal

Example:

switch# configure terminal
switch(config)#

Enters global configuration mode.

Step 2

ip pim bfd

Example:

switch(config)# ip pim bfd  

Enables BFD for PIM.

Step 3

interface int-if

Example:

switch(config)# interface
ethernet 2/1
switch(config-if)#

Enters interface configuration mode. Use the ? keyword to display the supported interfaces.

Step 4

ip pim bfd-instance [disable]

Example:

switch(config-if)# ip pim bfd-instance

(Optional) Enables or disables BFD on a PIM interface. The default is disabled.

Step 5

show running-config pim

Example:

switch(config)# show running-config pim  

(Optional) Displays the PIM running configuration.

Step 6

copy running-config startup-config

Example:

switch(config)# copy
running-config startup-config  

(Optional) Saves the configuration change.

Configuring BFD on Static Routes

You can configure BFD for static routes on an interface. You can optionally configure BFD on a static route within a virtual routing and forwarding (VRF) instance.

Before you begin

Enable the BFD feature. See the Enabling the BFD Feature section.

SUMMARY STEPS

  1. configure terminal
  2. vrf context vrf-name
  3. ip route route interface {nh-address | nh-prefix}
  4. ip route static bfd interface {nh-address | nh-prefix}
  5. show ip route static [vrf vrf-name]
  6. copy running-config startup-config

DETAILED STEPS

  Command or Action Purpose

Step 1

configure terminal

Example:

switch# configure terminal
switch(config)#

Enters global configuration mode.

Step 2

vrf context vrf-name

Example:

switch(config)# vrf context Red
switch(config-vrf)#

(Optional) Enters VRF configuration mode.

Step 3

ip route route interface {nh-address | nh-prefix}

Example:

switch(config-vrf)# ip route 192.0.2.1 ethernet 2/1 192.0.2.4  

Creates a static route Use the ? keyword to display the supported interfaces.

Step 4

ip route static bfd interface {nh-address | nh-prefix}

Example:

switch(config-vrf)# ip route static bfd ethernet 2/1 192.0.2.4  

Enables BFD for all static routes on an interface. Use the? keyword to display the supported interfaces.

Step 5

show ip route static [vrf vrf-name]

Example:

switch(config-vrf)# show ip route static vrf Red  

(Optional) Displays the static routes.

Step 6

copy running-config startup-config

Example:

switch(config-vrf)# copy
running-config startup-config  

(Optional) Saves the configuration change.

Disabling BFD on an Interface

You can selectively disable BFD on an interface for a routing protocol that has BFD enabled at the global or VRF level.

To disable BFD on an interface, use one of the following commands in interface configuration mode:

Command

Purpose

ip eigrp instance-tag bfd disable

Example:
switch(config-if)# ip eigrp Test1 bfd
disable

Disables BFD on an EIGRP interface. The instance tag can be any case-sensitive, alphanumeric string up to 20 characters.

ip ospf bfd disable

Example:
switch(config-if)# ip ospf bfd disable

Disables BFD on an OSPFv2 interface.

isis bfd disable

Example:
switch(config-if)# isis bfd disable

Disables BFD on an IS-IS interface.

Disabling BFD on an Interface

Example configuration where BFD is disabled per interface.

configure terminal
  interface port-channel 10
    no ip redirects
    ip address 22.1.10.1/30
    ipv6 address 22:1:10::1/120
    no ipv6 redirects
    ip router ospf 10 area 0.0.0.0
    ip ospf bfd disable        /*** disables IPv4 BFD session for OSPF
    ospfv3 bfd disable 		      /*** disables IPv6 BFD session for OSPFv3

Configuring BFD Interoperability

Configuring BFD Interoperability in Cisco NX-OS Devices in a Point-to-Point Link

SUMMARY STEPS

  1. configure terminal
  2. interface port-channel int-if
  3. ip ospf bfd
  4. no ip redirects
  5. bfd interval mintx min_rx msec multiplier value
  6. exit

DETAILED STEPS

  Command or Action Purpose

Step 1

configure terminal

Example:

switch# configure terminal
switch(config)#

Enters global configuration mode.

Step 2

interface port-channel int-if

Example:

switch(config-if)# interface ethernet 2/1

Enters interface configuration mode. Use the ? keyword to display the supported interfaces.

Step 3

ip ospf bfd

Example:

switch(config-if)# ip ospf bfd

Enables BFD on an OSPFv2 interface. The default is disabled.

OSPF is used as an example. You can enable BFD of any of the supported protocols.

Step 4

no ip redirects

Example:

switch(config-if)# no ip redirects

Prevents the device from sending redirects.

Step 5

bfd interval mintx min_rx msec multiplier value

Example:

switch(config-if)# bfd interval 50
min_rx 50 multiplier 3

Configures the BFD session parameters for all BFD sessions on the port channel. This command overrides these values by configuring the BFD session parameters. The mintx and msec range is from 50 to 999 milliseconds and the default is 50. The multiplier range is from 1 to 50. The multiplier default is 3.

Step 6

exit

Example:

switch(config-if)# exit

Exits interface configuration mode and returns to EXEC mode.

Configuring BFD Interoperability in Cisco NX-OS Devices in a Switch Virtual Interface

SUMMARY STEPS

  1. configure terminal
  2. interface port-channel vlan vlan-id
  3. bfd interval mintx min_rx msec multiplier value
  4. no ip redirects
  5. ip address ip-address/length
  6. ip ospf bfd
  7. exit

DETAILED STEPS

  Command or Action Purpose

Step 1

configure terminal

Example:

switch# configure terminal
switch(config)#

Enters global configuration mode.

Step 2

interface port-channel vlan vlan-id

Example:

switch(config)# interface vlan 998
switch(config-if)# 

Creates a dynamic Switch Virtual Interface (SVI).

Step 3

bfd interval mintx min_rx msec multiplier value

Example:

switch(config-if)# bfd interval 50
min_rx 50 multiplier 3

Configures the BFD session parameters for all BFD sessions on the device. The mintx and msec range is from 50 to 999 milliseconds and the default is 50. The multiplier range is from 1 to 50. The multiplier default is 3.

Step 4

no ip redirects

Example:

switch(config-if)# no ip redirects

Prevents the device from sending redirects.

Step 5

ip address ip-address/length

Example:

switch(config-if)# ip address 10.1.0.253/24

Configures an IP address for this interface.

Step 6

ip ospf bfd

Example:

switch(config-if)# ip ospf bfd

Enables BFD on an OSPFv2 interface. The default is disabled.

Step 7

exit

Example:

switch(config-if)# exit

Exits interface configuration mode and returns to EXEC mode.

Configuring BFD Interoperability in Cisco NX-OS Devices in Logical Mode

SUMMARY STEPS

  1. configure terminal
  2. interface port-channel type number.subinterface-id
  3. bfd interval mintx min_rx msec multiplier value
  4. no ip redirects
  5. ip ospf bfd
  6. exit

DETAILED STEPS

  Command or Action Purpose

Step 1

configure terminal

Example:

switch# configure terminal
switch(config)#

Enters global configuration mode.

Step 2

interface port-channel type number.subinterface-id

Example:

switch(config-if)# interface port-channel 50.2

Enters port channel configuration mode. Use the ? keyword to display the supported number range.

Step 3

bfd interval mintx min_rx msec multiplier value

Example:

switch(config-if)# bfd interval 50
min_rx 50 multiplier 3

Configures the BFD session parameters for all BFD sessions on the port channel. The mintx and msec range is from 50 to 999 milliseconds and the default is 50. The multiplier range is from 1 to 50. The multiplier default is 3.

Step 4

no ip redirects

Example:

switch(config-if)# no ip redirects

Prevents the device from sending redirects.

Step 5

ip ospf bfd

Example:

switch(config-if)# ip ospf bfd

Enables BFD on an OSPFv2 interface. The default is disabled.

OSPF is used as an example. You can enable BFD of any of the supported protocols.

Step 6

exit

Example:

switch(config-if)# exit

Exits interface configuration mode and returns to EXEC mode.

Verifying BFD Interoperability in a Cisco Nexus 9000 Series Device

The following example shows how to verify BFD interoperability in a Cisco Nexus 9000 Series device.


switch# show bfd neighbors details
OurAddr NeighAddr LD/RD RH/RS Holdown(mult) State Int
Vrf
10.1.1.1 10.1.1.2 1140850707/2147418093 Up 6393(4) Up Vlan2121
default
Session state is Up and using echo function with 50 ms interval
Local Diag: 0, Demand mode: 0, Poll bit: 0, Authentication: None
MinTxInt: 50000 us, MinRxInt: 2000000 us, Multiplier: 3
Received MinRxInt: 2000000 us, Received Multiplier: 4
Holdown (hits): 8000 ms (0), Hello (hits): 2000 ms (108)
Rx Count: 92, Rx Interval (ms) min/max/avg: 347/1996/1776 last: 1606 ms ago
Tx Count: 108, Tx Interval (ms) min/max/avg: 1515/1515/1515 last: 1233 ms ago
Registered protocols: ospf
Uptime: 0 days 0 hrs 2 mins 44 secs
Last packet: Version: 1 - Diagnostic: 0
State bit: Up - Demand bit: 0
Poll bit: 0 - Final bit: 0
Multiplier: 4 - Length: 24
My Discr.: 2147418093 - Your Discr.: 1140850707
Min tx interval: 2000000 - Min rx interval: 2000000
Min Echo interval: 1000 - Authentication bit: 0
Hosting LC: 10, Down reason: None, Reason not-hosted: None


switch# show bfd neighbors details
OurAddr NeighAddr LD/RD RH/RS Holdown(mult) State Int
Vrf
10.0.2.1 10.0.2.2 1140850695/131083 Up 270(3) Up Po14.121
default
Session state is Up and not using echo function
Local Diag: 0, Demand mode: 0, Poll bit: 0, Authentication: None
MinTxInt: 50000 us, MinRxInt: 50000 us, Multiplier: 3
Received MinRxInt: 100000 us, Received Multiplier: 3
Holdown (hits): 300 ms (0), Hello (hits): 100 ms (3136283)
Rx Count: 2669290, Rx Interval (ms) min/max/avg: 12/1999/93 last: 29 ms ago
Tx Count: 3136283, Tx Interval (ms) min/max/avg: 77/77/77 last: 76 ms ago
Registered protocols: ospf
Uptime: 2 days 21 hrs 41 mins 45 secs
Last packet: Version: 1 - Diagnostic: 0
State bit: Up - Demand bit: 0
Poll bit: 0 - Final bit: 0
Multiplier: 3 - Length: 24
My Discr.: 131083 - Your Discr.: 1140850695
Min tx interval: 100000 - Min rx interval: 100000
Min Echo interval: 0 - Authentication bit: 0
Hosting LC: 8, Down reason: None, Reason not-hosted: None

Verifying the BFD Configuration

To display BFD configuration information, perform one of the following:

Command

Purpose

show running-config bfd

Displays the running BFD configuration.

show startup-config bfd

Displays the BFD configuration that will be applied on the next system startup.

Monitoring BFD

Use the following commands to display BFD:

Command

Purpose

show bfd neighbors [application name] [details]

Displays information about BFD for a supported application, such as BGP or OSPFv2.

show bfd neighbors [interface int-if] [details]

Displays information about BGP sessions on an interface.

show bfd neighbors [dest-ip ip-address] [src-ip ip-address][details]

Displays information about the specified BGP session on an interface.

show bfd neighbors [vrf vrf-name] [details]

Displays information about BFD for a VRF.

show bfd [ipv4 | ipv6] [neighbors]

Displays information about IPv4 neighbors or IPv6 neighbors.

Configuration Examples for BFD

This example shows how to configure BFD for OSPFv2 on Ethernet 2/1, using the default BFD session parameters:


feature bfd
feature ospf
router ospf Test1
interface ethernet 2/1
ip ospf bfd
no shutdown

This example shows how to configure BFD for all EIGRP interfaces, using the default BFD session parameters:


feature bfd
feature eigrp
bfd interval 100 min_rx 100 multiplier 4
router eigrp Test2
bfd

This example shows how to configure BFDv6:


feature bfd
feature ospfv3
router ospfv3 Test1
interface Ethernet2/7
  ipv6 router ospfv3 Test1 area 0.0.0.0
  ospfv3 bfd
  no shutdown

Show Example for BFD

This example shows results of the show bfd ipv6 neighbors details command.


#show bfd ipv6 neighbors details

OurAddr                          NeighAddr                        
 LD/RD                 RH/RS           Holdown(mult)     State       Int                   Vrf                             
cc:10::2                         cc:10::1                         
 1090519335/1090519260 Up              5692(3)           Up          Po1                   default                         


Session state is Up and using echo function with 250 ms interval
Local Diag: 0, Demand mode: 0, Poll bit: 0, Authentication: None
MinTxInt: 250000 us, MinRxInt: 2000000 us, Multiplier: 3
Received MinRxInt: 2000000 us, Received Multiplier: 3
Holdown (hits): 6000 ms (4), Hello (hits): 2000 ms (205229)
Rx Count: 227965, Rx Interval (ms) min/max/avg: 124/1520/1510 last: 307 ms ago
Tx Count: 205229, Tx Interval (ms) min/max/avg: 1677/1677/1677 last: 587 ms ago
Registered protocols:  bgp
Uptime: 3 days 23 hrs 31 mins 13 secs
Last packet: Version: 1                - Diagnostic: 0  
             State bit: Up             - Demand bit: 0  
             Poll bit: 0               - Final bit: 0  
             Multiplier: 3             - Length: 24  
             My Discr.: 1090519260     - Your Discr.: 1090519335  
             Min tx interval: 250000   - Min rx interval: 2000000  
             Min Echo interval: 250000 - Authentication bit: 0  
Hosting LC: 1, Down reason: None, Reason not-hosted: None

Related Documents

Related Topic

Document Title

BFD commands

Cisco Nexus 9000 Series NX-OS Unicast Routing Configuration Guide

RFCs

RFC

Title

RFC 5880

Bidirectional Forwarding Detection (BFD)

RFC 5881

BFD for IPv4 and IPv6 (Single Hop)

RFC 7130

Bidirectional Forwarding Detection (BFD) on Link Aggregation Group (LAG) Interfaces