Deploy Software Agents
Secure Workload software agent is a lightweight piece of software that you install on your workloads. The purpose of the agent is to:
-
Collect host information such as network interfaces and active processes running in the system.
-
Monitor and collect network flow information.
-
Enforce security policies by setting firewall rules for hosts on which the software agent is installed and enabled.
Agents automatically update the Secure Workload inventory when interface addresses change. You do not need to install agents on end-user (employee) computers.
After the software agent is deployed, the agent is assigned a unique identity by the Secure Workload cluster. The unique identity is based on a set of parameters specific to the host where the agent is running. If the host name and the BIOS UUID are a part of the set of parameters, you may encounter the following issues:
 Note |
Installer scripts downloaded from LDAP or AD accounts with automatic role mapping fail once you are logged out. To give the installer scripts uninterrupted access to the cluster, enable Use Local Authentication. |
-
Registration failure when cloning a virtual machine and retaining the BIOS UUID and host name, and when instant cloning a VDI. The registration failure happens because Secure Workload already has a registered software agent using the same parameters set. You can delete the registered agent using OpenAPI. In some cases, a duplicate BIOS UUID configured during startup is changed by VMware after a certain period of time. Agent registration recovers once the Cisco Secure Workload services are restarted.
-
A new identity is generated for the agent if the host name is changed and the host rebooted. The redundant or the old agent is marked as inactive after a certain period of time. For more information, see Frequently Asked Questions section.
Supported Platforms and Prerequisites
For information on supported platforms and requirements for software agents, refer to the following:
-
Release Notes; Check the release notes for your specific version. See Release Notes.
-
Agent Install Wizard: Acces the Secure Workload web portal. Navigate to , then select the Installer tab. Choose an installation method, platform, and if applicable, an agent type to view supported platform versions.
-
Support Matrix: Refer to the Support Matrix for additional dependencies.
-
A software agent installed on a workload establishes multiple connections to the cluster through various channels, including WSS, Check in, Flow export, and Enforcement.
-
The number of connections depends on the agent type such as Visibility, Enforcement, or Kubernetes/OpenShift agents.
-
To prevent connectivity issues between an agent and a cluster, ensure the following:
-
Firewall policies: If the workload is behind a firewall, or if the host firewall service is enabled, administrators must configure appropriate firewall policies.
-
TLS Security: Secure Workload agents use TLS to secure the TCP connections to the Secure Workload Cloud SaaS servers. The sensor validates the TLS certificate from the Secure Workload Cloud control, data, and enforcement servers against a local CA installed with the agent. Any other certificate sent to the agent will result in connection failure.
-
Proxy Configuration: Configure explicit or transparent web proxies to bypass SSL/TLS decryption for agent communications. If bypass rules are not configured, proxies may attempt to decrypt SSL/TLS traffic by sending their own certificate to the agent. Since the agent only uses its local CA to validate certificates, proxy certificates will cause connection failures.
-
-
The following sections for details on additional requirements for each platform and agent type.
Install Linux Agents for Deep Visibility and Enforcement
Prerequisites to Install Linux Agents
-
For platform requirements, see Supported Platforms and Requirements.
-
To install and execute the agent services, you require root or administrator privileges.
-
The agent and log file require 1 GB of storage space.
-
Configure security exclusions on the security applications that are monitoring the host. This action prevents these applications from blocking agent installation or agent activity. For more information, see Security Exclusions.
-
The system creates a special user, tet-sensor, in the host where the agent is installed. If Pluggable Authentication Modules (PAM) or Security-Enhanced Linux (SELinux) is configured on the host, then grant the tet-sensor user with appropriate privileges. These privileges are necessary to execute the tet-sensor process and make connections to collectors. If you provide an alternative install directory and Security-Enhanced Linux (SELinux) is configured, ensure that you allow execution for that location.
-
If you install the agent using the AutoInstall (installer script) method, you must be able to use the unzip command.
Supported Methods to Install Linux Agents
Methods to install a Linux agent for deep visibility and enforcement:
Install Linux Agent using the Agent Image Installer Method
We recommend the automated installer script method for installing Linux agents. Use the image installer method if you have a specific reason for using this manual method..
Prerequisite:
Configure the ACTIVATION_KEY and HTTPS_PROXY in the user.cfg file for SaaS clusters and when you are installing the agent on a non-default tenant of on-premises clusters with multiple tenants. For more information, see (Manual Installations Only) Update the User Configuration File.
To install a Linux agent using the agent image method:
Procedure
|
Step 1 |
Navigate to Agent Installation Methods:
|
||
|
Step 2 |
Click Agent Image Installer. |
||
|
Step 3 |
In the Platform field, enter Linux. |
||
|
Step 4 |
Enter the required agent type and the version of the agent, and then from the results, download the required version of the agent. |
||
|
Step 5 |
Copy the RPM package to all the Linux hosts for deployment.
|
||
|
Step 6 |
Based on your platform, run the RPM commands with root privileges.
|
Install Linux Agent Using the Agent Script Installer Method
We recommend the installer script method to deploy Linux agents for deep visibility and enforcement.
Note |
|
To install a Linux agent using the script installer method:
Procedure
|
Step 1 |
Navigate to Agent Installation methods:
|
||
|
Step 2 |
Click Agent Script Installer. |
||
|
Step 3 |
From the Select Platform drop-down list, choose Linux. To view the supported Linux platforms, click Show Supported Platforms. |
||
|
Step 4 |
Choose the tenant to install the agents.
|
||
|
Step 5 |
If you want to assign labels to the workload, choose the label keys and enter label values. When the installed agent reports IP addresses on the host, the installer CMDB labels selected here, along with other uploaded CMDB labels that have been assigned to IPs reported by this host, would be automatically assigned to the new IP address. If there are conflicts between uploaded CMDB labels and installer CMDB labels:
|
||
|
Step 6 |
If an HTTP proxy is required to communicate with Secure Workload, choose Yes, and then enter a valid proxy URL. |
||
|
Step 7 |
In the Installer expiration section, select an option:
|
||
|
Step 8 |
Click Download and save the file to the local disk. |
||
|
Step 9 |
Copy the installer shell script on Linux hosts and run the following command to grant execute permission to the script:
|
||
|
Step 10 |
To install the agent, run the following command with root privileges:
|
We recommend running the precheck, as specified in the script usage details.
bash tetration_linux_installer.sh [--pre-check] [--skip-pre-check=<option>] [--no-install] [--logfile=<filename>] [--proxy=<proxy_string>] [--no-proxy] [--help] [--version] [--sensor-version=<version_info>] [--ls] [--file=<filename>] [--save=<filename>] [--new] [--reinstall] [--unpriv-user] [--force-upgrade] [--upgrade-local] [--upgrade-by-uuid=<filename>] [--basedir=<basedir>] [--logbasedir=<logbdir>] [--tmpdir=<tmp_dir>] [--visibility] [--golden-image]
  --pre-check: run pre-check only
  --skip-pre-check=<option>: skip pre-installation check by given option; Valid options include 'all', 'ipv6' and 'enforcement'; e.g.: '--skip-pre-check=all' will skip all pre-installation checks; All pre-checks will be performed by default
  --no-install: will not download and install sensor package onto the system
  --logfile=<filename>: write the log to the file specified by <filename>
  --proxy=<proxy_string>: set the value of CL_HTTPS_PROXY, the string should be formatted as http://<proxy>:<port>
  --no-proxy: bypass system wide proxy; this flag will be ignored if --proxy flag was provided
  --help: print this usage
  --version: print current script's version
  --sensor-version=<version_info>: select sensor's version; e.g.: '--sensor-version=3.4.1.0'; will download the latest version by default if this flag was not provided
  --ls: list all available sensor versions for your system (will not list pre-3.1 packages); will not download any package
  --file=<filename>: provide local zip file to install sensor instead of downloading it from cluster
  --save=<filename>: download and save zip file as <filename>
  --new: remove any previous installed sensor
  --reinstall: reinstall sensor and retain the same identity with cluster; this flag has higher priority than --new
  --unpriv-user=<username>: use <username> for unpriv processes instead of tet-sensor
  --force-upgrade: force sensor upgrade to version given by --sensor-version flag; e.g.: '--sensor-version=3.4.1.0 --force-upgrade'; apply the latest version by default if --sensor-version flag was not provided
  --upgrade-local: trigger local sensor upgrade to version given by --sensor-version flag: e.g.: '--sensor-version=3.4.1.0 --upgrade-local'; apply the latest version by default if --sensor-version flag was not provided
  --upgrade-by-uuid=<filename>: trigger sensor whose uuid is listed in <filename> upgrade to version given by --sensor-version flag; e.g.: '--sensor-version=3.4.1.0 --upgrade-by-uuid=/usr/local/tet/sensor_id'; apply the latest version by default if --sensor-version flag was not provided
  --basedir=<base_dir>: instead of using /usr/local use <base_dir> to install agent. The full path will be <base_dir>/tetration
  --logbasedir=<log_base_dir>: instead of logging to /usr/local/tet/log use <log_base_dir>. The full path will be <log_base_dir>/tetration
  --tmpdir=<tmp_dir>: instead of using /tmp use <tmp_dir> as temp directory
  --visibility: install deep visibility agent only; --reinstall would overwrite this flag if previous installed agent type was enforcer
  --golden-image: install Cisco Secure Workload Agent but do not start the Cisco Secure Workload Services; use to install Cisco Secure Workload Agent on Golden Images in VDI environment or Template VM. On VDI/VM instance created from golden image with different host name, Cisco Secure Workload Services will work normally
Note |
|
Agent Support for NVIDIA Bluefield Networking Platform
A data processing unit (DPU) is a programmable processor that is designed to manage data-centric tasks, including but not limited to data transfer, power optimization, security, compression, analytics, and encryption.
The NVIDIA DPU is a smart network interface card (SmartNic) with excellent network performance. It delivers a high-speed Ethernet NIC capability and it enables the execution of software directly on the NIC itself, allowing for interception, monitoring, and manipulation of network traffic passing through the NIC.
NVIDIA facilitates the functionality through the provision of the DOCA SDK. Leveraging virtualization technology based on PCIe Single Root I/O Virtualization (SR-IOV), the DPU establishes a mechanism for virtual machines (VMs) to communicate directly without hypervisor involvement. The DPU incorporates an OpenVSwitch-based hardware-accelerated eSwitch for network control, enhancing overall efficiency.
Requirements and Prerequisites
-
Ensure that Ubuntu 22.04-based DOCA is installed on the BlueField networking platform.
-
Set up the DPU card network to enable an agent's connection to the cluster through one of the out-of-band interfaces. Options include oob_net0, tmfifo_net0, or the in-band connection through enp3s0f0s0.
Agent Installation
The installation follows a Linux-like process.
-
Navigate to Agent Installation Methods:
-
If you are a first-time user, launch the Quick Start wizard and click Install Agents.
-
From the navigation pane, choose Manage > Workloads > Agents.
-
-
Under the Installer tab, click Agent Script Installer.
-
From the Select Platform drop-down list, choose Linux.
To view the supported Linux platforms, click Show Supported Platforms.
Note
Secure Workload Agent is only supported on the Ubuntu 22-based DOCA SDK.
-
Choose the tenant to install the agents.
Note
Selecting a tenant is not required for Secure Workload SaaS clusters.
-
(Optional) If you want to assign labels to the workload, choose the label keys and enter label values.
-
If an HTTP proxy is required to communicate with Secure Workload, click Yes, and then enter a valid proxy.
-
In the Installer expiration section, select one of the available options:
-
No expiration: The installer script can be used multiple times.
-
One time: The installer script can be used only once.
-
Time-bound: You can set the number of days for which the installer script can be used.
-
Number of deployments: You can set the number of times the installer script can be used.
-
-
Click Download to download the Linux installer script on to DPU using one of the network devices.
-
Run the installer script. For more information, see Install Linux Agent using the Agent Script Installer Method.
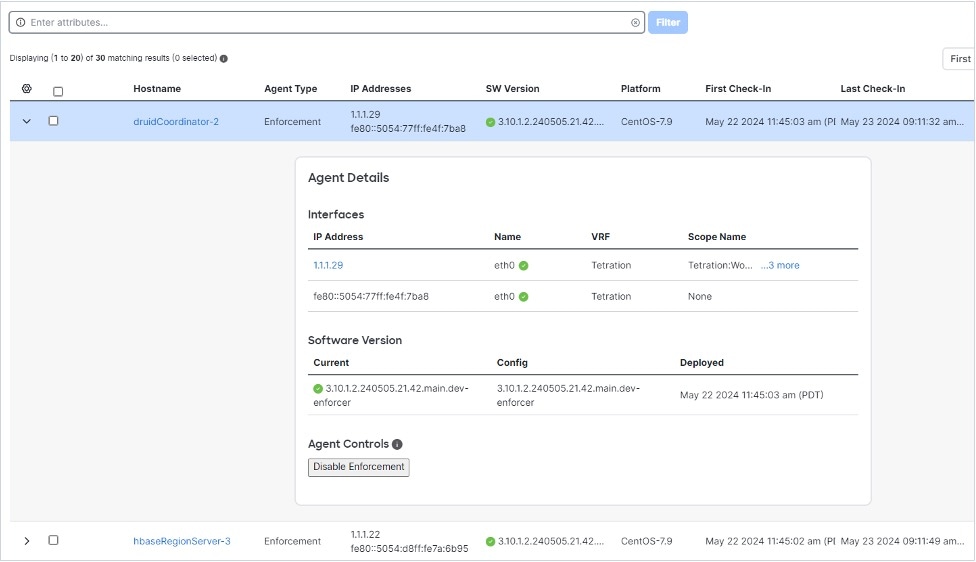
Figure 1. Install Script 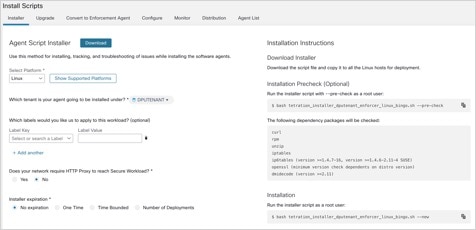
Choose and click a Hostname. Under Interfaces, you can view the current mapping of interfaces with the associated IP addresses.
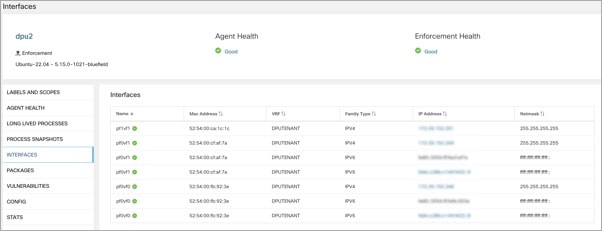
Choose to monitor the network traffic between virtual machines (VMs) when those are utilizing the SR_IOV virtual network interfaces provided by the DPU. The agent on the DPU enables the segmentation of network traffic between these virtual network interfaces.
Verify Linux Agent Installation
Procedure
|
Run the command sudo rpm -q tet-sensor Sample output: The specific output may differ depending on the platform and architecture. |
Install Windows Agents for Deep Visibility and Enforcement
Prerequisites for Installing Windows Agent
-
For platform requirements, see the Supported Platforms and Prerequisites section.
-
To install and execute the agent services, you require root or administrator privileges.
-
Install Npcap on workloads running Windows 2008 R2 or when the installed agent version is earlier than version 3.8. If the Npcap driver is not already installed, the agent installs the recommended Npcap version in the background after the service starts. For more information, see the Npcap version information.
-
The agent and log files require 1 GB of storage space.
-
Enable the Windows services required for agent installation. Some Windows services could have been disabled if your Windows hosts have been security hardened, or have deviated from the default configurations. For more information, see the Required Windows Services section.
-
Configure security exclusions on security applications that are monitoring the host and that could block agent installation or agent activity. For more information, see Security Exclusions.
Supported Methods to Install Windows Agents
There are two methods to install Windows agents for deep visibility and enforcement.
-
Install Windows Agent using the Agent Script Installer Method
-
Install Windows Agent using the Agent Image Installer Method
You can also install using a golden image. For more information, see Deploying Agents on a VDI Instance or VM Template (Windows).
Install Windows Agent using the Agent Script Installer Method
We recommend the script installer method to deploy Windows agents for deep visibility and enforcement.
Note |
|
To install a Windows agent using the script installer method:
Procedure
|
Step 1 |
Navigate to Agent Installation Methods:
|
||
|
Step 2 |
Click Agent Script Installer. |
||
|
Step 3 |
From the Select Platform drop-down menu, choose Windows. To view the supported Windows platforms, click Show Supported Platforms. |
||
|
Step 4 |
Choose the tenant to install the agents.
|
||
|
Step 5 |
If you want to assign labels to the workload, choose the label keys and enter label values. When the installed agent reports IP addresses on the host, the installer CMDB labels selected here, along with other uploaded CMDB labels that have been assigned to IPs reported by this host, would be assigned to the new IP address. If there are conflicts between uploaded CMDB labels and installer CMDB labels:
|
||
|
Step 6 |
If HTTP proxy is required to communicate with Secure Workload, choose Yes, and then enter a valid proxy URL. |
||
|
Step 7 |
Under the Installer expiration section, select one from the available options:
|
||
|
Step 8 |
Click Download and save the file to the local disk. |
||
|
Step 9 |
Copy the installer PowerShell script to all the Windows hosts for deployment and run the script with administrative privileges.
|
# powershell -ExecutionPolicy Bypass -File tetration_windows_installer.ps1 [-preCheck] [-skipPreCheck <Option>] [-noInstall] [-logFile <FileName>] [-proxy <ProxyString>] [-noProxy] [-help] [-version] [-sensorVersion <VersionInfo>] [-ls] [-file <FileName>] [-save <FileName>] [-new] [-reinstall] [
-npcap] [-forceUpgrade] [-upgradeLocal] [-upgradeByUUID <FileName>] [-visibility] [-goldenImage] [-installFolder <Installation Path>]
  -preCheck: run pre-check only
  -skipPreCheck <Option>: skip pre-installation check by given option; Valid options include 'all', 'ipv6' and 'enforcement'; e.g.: '-skipPreCheck all' will skip all pre-installation checks; All pre-checks will be performed by default
  -noInstall: will not download and install sensor package onto the system
  -logFile <FileName>: write the log to the file specified by <FileName>
  -proxy <ProxyString>: set the value of HTTPS_PROXY, the string should be formatted as http://<proxy>:<port>
  -noProxy: bypass system wide proxy; this flag will be ignored if -proxy flag was provided
  -help: print this usage
  -version: print current script's version
  -sensorVersion <VersionInfo>: select sensor's version; e.g.: '-sensorVersion 3.4.1.0.win64'; will download the latest version by default if this flag was not provided
  -ls: list all available sensor versions for your system (will not list pre-3.1 packages); will not download any package
  -file <FileName>: provide local zip file to install sensor instead of downloading it from cluster
  -save <FileName>: downloaded and save zip file as <FileName>
  -new: remove any previous installed sensor;
  -reinstall: reinstall sensor and retain the same identity with cluster; this flag has higher priority than -new
  -npcap: overwrite existing npcap
  -forceUpgrade: force sensor upgrade to version given by -sensorVersion flag; e.g.: '-sensorVersion 3.4.1.0.win64 -forceUpgrade'; apply the latest version by default if -sensorVersion flag was not provided
  -upgradeLocal: trigger local sensor upgrade to version given by -sensorVersion flag; e.g.: '-sensorVersion 3.4.1.0.win64 -upgradeLocal'; apply the latest version by default if -sensorVersion flag was not provided
  -upgradeByUUID <FileName>: trigger sensor whose uuid is listed in <FileName> upgrade to version given by -sensorVersion flag; e.g.: '-sensorVersion 3.4.1.0.win64 -upgradeByUUID "C:\\Program Files\\Cisco Tetration\\sensor_id"'; apply the latest version by default if -sensorVersion flag was not provided
  -visibility: install deep visibility agent only; -reinstall would overwrite this flag if previous installed agent type was enforcer
  -goldenImage: install Cisco Secure Workload Agent but do not start the Cisco Secure Workload Services; use to install Cisco Secure Workload Agent on Golden Images in VDI environment or Template VM. On VDI/VM instance created from golden image with different host name, Cisco Secure Workload Services will work normally
  -installFolder: install Cisco Secure Workload Agent in a custom folder specified by -installFolder e.g.: '-installFolder "c:\\custom sensor path"'; default path is "C:\Program Files\Cisco Tetration"
Install Windows Agent using the Agent Image Installer Method
We recommend the automated installer script method for installing Windows agents. Use the image installer method if you have a specific reason for using this manual method.
Note |
Do not manually deploy an older MSI agent version when an existing agent is already running on the host. |
Site-related files that are in the package:
-
ca.cert—Mandatory—CA certificate for sensor communications.
-
enforcer.cfg—Mandatory only when installing enforcement sensor—Contains configuration of enforcement endpoints.
-
sensor_config—Mandatory—Configuration for deep visibility sensor.
-
sensor_type—Type of the sensor (enforcement or deep visibility).
-
site.cfg—Mandatory—Global site endpoint configuration.
-
user.cfg—Mandatory for SaaS—Sensor activation key and proxy configuration.
Prerequisite:
Configure the ACTIVATION_KEY and HTTPS_PROXY in the user.cfg file for SaaS clusters and when you are installing the agent on a non-default tenant of on-premises clusters with multiple tenants. For more information, see (Manual Installations Only) Update the User Configuration File.
To install a Windows agent using the agent image method:
Procedure
|
Step 1 |
Navigate to Agent Installation Methods:
|
||||||||||||||||||
|
Step 2 |
Click Agent Image Installer. |
||||||||||||||||||
|
Step 3 |
In the Platform field, enter Windows. |
||||||||||||||||||
|
Step 4 |
Enter the required agent type and the version of the agent, and then from the results, download the required version of the agent. |
||||||||||||||||||
|
Step 5 |
Copy the tet-win-sensor<version>.win64-<clustername>.zip file to all the Windows hosts for deployment. |
||||||||||||||||||
|
Step 6 |
Ensure that you have administrative privileges and extract the ZIP file. |
||||||||||||||||||
|
Step 7 |
In the extracted folder, run the following command to install the agent: Additionally, the following options are available for MSI installer.
|
Note |
|
Verify Windows Agent Installation
Procedure
|
Step 1 |
Ensure that the folder |
|
Step 2 |
Ensure that the service—
CswAgent, for deep visibility and enforcement, exists and is in the running state. Run command Run the command Check if the status is Running Run the command Check if the DISPLAY-NAME is Cisco Secure Workload Deep Visibility OR Run the command services.msc Find the name Cisco Secure Workload Deep Visibility Check if the status is Running |
Verify Windows Agent in the Configured Service User Context
-
Ensure that the service CswAgent running in the configured service user context. CswAgent runs in the same service user context.
Run the command
cmd.exewith Admin privilegesRun the command
sc qc cswagentCheck SERVICE_START_NAME <configured service user>
OR
Run the command
services.mscFind the name Cisco Secure Workload Deep Visibility
Check Log On As for the <configured service user>
Find the name Cisco Secure Workload Enforcement
Check Log On As for the <configured service user>
OR
Run the command
tasklist /v | find /i “cswengine”Check the user context for the running processes (5th column)
Modify Service Account
After installing Windows Agents, use one of the following methods to modify the existing CswAgent service.
-
Use services.msc.
Figure 3. Modify Service Account based on services.msc Account 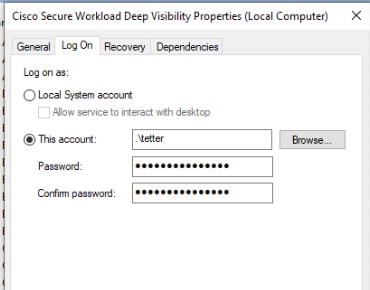
-
Use any third party application to configure the services.
-
Use the following commands:
-
Run cmd as an administrator.
-
Modify the services using the service account name by running the following commands:
-
sc config cswagent obj= <service user name> password= <password>
-
-
Verify service configurations by running the following commands:
-
sc qc cswagent
-
-
Restart the CswAgent service by running the following commands:
-
sc.exe cswagent -
sc.exe cswagent
-
-
Deploying Agents on a VDI Instance or VM Template (Windows)
By default, agent services start automatically after agents are installed. When installing on a golden image, you must use installer flags to prevent these services from starting. When instances are cloned from the golden image, agent services, as expected, start automatically.
Agent will not install Npcap on golden VMs, but will be automatically installed if needed on VM instances cloned from a golden image. For more information, see Windows Agent Installer and Npcap.
Install the agent on a golden image in a VDI environment or VM template
Procedure
|
Step 1 |
Install the agent on a golden image in a VDI environment or VM template using an MSI installer or PowerShell installer script: Use MSI installer with nostart=yes
OR Use PowerShell installer with the -goldenImage flag.
|
|
Step 2 |
Ensure that the folder |
|
Step 3 |
Ensure that the service CswAgent exists and is stopped: Run the command Run the command Check if the STATE is Stopped. |
|
Step 4 |
The VM template is now configured. |
|
Step 5 |
Shut down the VM template. |
Create a new VDI instance VM
Procedure
|
Step 1 |
Create a new VDI instance VM by cloning the VM template. |
||
|
Step 2 |
Reboot the VDI instance VM. |
||
|
Step 3 |
After rebooting the VDI instance VM, ensure that the service CswAgent is running in the configured service context. See Verify the Agent is Installed. |
||
|
Step 4 |
On the VDI instance VM, ensure that the NPCAP driver is installed and running: Run the command Run the command Check if STATE is Running |
||
|
Step 5 |
On the VDI instance VM, ensure that the agent is registered using a valid sensor_id:
|
Windows Agent Installer and Npcap—For Windows 2008 R2
-
For supported Npcap versions, see the Support Matrix at https://www.cisco.com/go/secure-workload/requirements/agents.
-
Installation:
If Npcap is not installed, the agent installs the supported version ten seconds after the service starts. If User has Npcap installed but the version is older than the supported version, Npcap is not be upgraded. Manually upgrade or uninstall Npcap, run the agent installer with the option overwritenpcap=yes, or run installer script with -npcap to get the supported Npcap version. If Npcap driver is in use by any application, the agent upgrades Npcap at a later time.
-
Upgrade:
If Npcap is installed by Windows Agent and the version is older than the supported version, Npcap is upgraded to the supported version ten seconds after the service starts. If Npcap driver is in use by any application, the agent upgrades Npcap at a later time. If Npcap is not installed by Windows Agent, Npcap is not upgraded.
-
Uninstall:
If Npcap is installed by the Windows Agent, the agent uninstalls Npcap. If Npcap is installed by the user, but upgraded by the agent installer with overwritenpcap=yes, Npcap is not uninstalled. If Npcap driver is in use by any application, the agent does not uninstall Npcap.
Windows Agent Flow Captures: For All Windows OS Excluding Windows Server 2008 R2
From the latest version of Windows, the agent uses ndiscap.sys (Microsoft in-built) driver and Events Tracing using Windows (ETW) framework to capture the network flows.
During the upgrade to the latest version:
-
The agent switches to ndiscap.sys from npcap.sys.
-
The agent installer uninstalls Npcap if:
-
Npcap is installed by the agent.
-
Npcap is not in use.
-
OS version is not Windows Server 2008 R2.
-
After the agent services are started, the agent creates ETW sessions, CSW_MonNet, and CSW_MonDns (for DNS data), and initiates the capture of network flows.
Note |
|
Install AIX Agents for Deep Visibility and Enforcement
Note |
Process tree, Package (CVE), and Forensic Event reporting features are not available on AIX. Additionally, some aspects of those features may not be available on specific minor releases of otherwise supported platforms due to OS limitations. |
Requirements and Prerequisites for Installing AIX Agents
-
Additional requirements for deep visibility:
-
Root privileges to install and execute the agent services.
-
Storage requirement for agent and log files: 500 MB.
-
Security exclusions configured on any security applications that are monitoring the host. These exclusions are to prevent other security applications from blocking agent installation or agent activity. For more information, see Security Exclusions.
-
AIX supports flow capture of only 20 network devices (6 network devices if version is AIX 7.1 TL3 SP4 or earlier). The deep visibility agent captures from a maximum of 16 network devices, leaving the other 4 capture sessions available for exclusive generic system usage (For example, tcpdump).
-
The deep visibilty agent does the following to ensure flow capture of 20 network devices:
-
The agent creates 16 bpf device nodes under the agents directory (/opt/cisco/tetration/chroot/dev/bpf0 - /opt/cisco/tetration/chroot/dev/bpf15)
-
tcpdump and other system tools using bpf will scan through the system device nodes (/dev/bpf0-/dev/bpf19) until they find an unused node (!EBUSY)
-
The bpf nodes created by the agent and the system bpf nodes share the same major/minor, with each major or minor being opened only by one instance (either tcpdump or agent).
-
The agent does not access the system device nodes nor does it create them as the tcpdump does (tcpdump-D creates /dev/bpf0. . . /dev/bpf19 if they do not exist).
-
-
Running iptrace on the system prevents, in certain scenarios, flow capture from tcpdump and the deep visibilty agent. This is a known design issue and needs to be checked with IBM.
-
To check if this scenario exists, before installing the agent, run tcpdump. If error message is tcpdump: BIOCSETIF: en0: File exists the iptrace is blocking flow capture. Stop iptrace to resolve the issue.
-
-
-
Process Visibility and Forensics are supported on AIX 7 and POWER8 or later.
-
Additional requirements for policy enforcement:
-
If IP Security Filter is enabled (that is, smitty IPsec4), agent installation fails in pre-check. We recommend you to disable IP Security Filter before installing the agent.
-
If IP Security is enabled when the Secure Workload enforcer agent is running, an error is reported and the enforcer agent stops enforcing. Contact support to safely disable the IP Security filter when the enforcer agent is running.
-
Install AIX Agent using the Agent Script Installer Method
Deep visibility and enforcement AIX agents can only be installed using the Agent Script Installation method.
Note |
|
To install an AIX agent:
Procedure
|
Step 1 |
Navigate to Agent Installation Methods:
|
||
|
Step 2 |
Click Agent Script Installer. |
||
|
Step 3 |
From the Select Platform drop-down menu, choose AIX. To view the supported AIX platforms, click Show Supported Platforms. |
||
|
Step 4 |
Choose the tenant to install the agents.
|
||
|
Step 5 |
If you want to assign labels to the workload, choose the label keys and enter label values. When the installed agent reports IP addresses on the host, the installer CMDB labels selected here, along with other uploaded CMDB labels that have been assigned to IPs reported by this host, would be automatically assigned to the new IP address. If there are conflicts between uploaded CMDB labels and installer CMDB labels:
|
||
|
Step 6 |
If HTTP proxy is required to communicate with Secure Workload, choose Yes, and then enter a valid proxy URL. |
||
|
Step 7 |
Under the Installer expiration section, select one from the available options:
|
||
|
Step 8 |
Click Download and save the file to the local disk. |
||
|
Step 9 |
Copy the installer shell script to all the AIX hosts for deployment. |
||
|
Step 10 |
To grant execute permission to the script, run the command:
|
||
|
Step 11 |
To install the agent, run the following command with root privileges:
|
We recommend running the pre-check, as specified in the script usage details.
AIX installer script usage details:
ksh tetration_installer_default_enforcer_aix.sh [--pre-check] [--pre-check-user] [--skip-pre-check=<option>] [--no-install] [--logfile=<filename>] [--proxy=<proxy_string>] [--no-proxy] [--help] [--version] [--sensor-version=<version_info>] [--ls] [--file=<filename>] [--osversion=<osversion>] [--save=<filename>] [--new] [--reinstall] [--unpriv-user] [--libs=<libs.zip|tar.Z>] [--force-upgrade] [--upgrade-local] [--upgrade-by-uuid=<filename>] [--logbasedir=<logbdir>] [--tmpdir=<tmp_dir>] [--visibility] [--golden-image]
  --pre-check: run pre-check only
  --pre-check-user: provide alternative to nobody user for pre-check su support
  --skip-pre-check=<option>: skip pre-installation check by given option; Valid options include 'all', 'ipv6' and 'enforcement'; e.g.: '--skip-pre-check=all' will skip all pre-installation checks; All pre-checks will be performed by default
  --no-install: will not download and install sensor package onto the system
  --logfile=<filename>: write the log to the file specified by <filename>
  --proxy=<proxy_string>: set the value of HTTPS_PROXY, the string should be formatted as http://<proxy>:<port>
  --no-proxy: bypass system wide proxy; this flag will be ignored if --proxy flag was provided
  --help: print this usage
  --version: print current script's version
  --sensor-version=<version_info>: select sensor's version; e.g.: '--sensor-version=3.4.1.0'; will download the latest version by default if this flag was not provided
  --ls: list all available sensor versions for your system (will not list pre-3.3 packages); will not download any package
  --file=<filename>: provide local zip file to install sensor instead of downloading it from cluster
  --osversion=<osversion>: specify osversion for --save flag;
  --save=<filename>: download and save zip file as <filename>; will download package for osversion given by --osversion flag; e.g.: '--save=myimage.aix72.tar.Z --osversion=7.2'
  --new: remove any previous installed sensor;
  --reinstall: reinstall sensor and retain the same identity with cluster; this flag has higher priority than --new
  --unpriv-user=<username>: use <username> for unpriv processes instead of tet-snsr
  --libs=<libs.zip|tar.Z>: install provided libs to be used by agents
  --force-upgrade: force sensor upgrade to version given by --sensor-version flag; e.g.: '--sensor-version=3.4.1.0 --force-upgrade'; apply the latest version by default if --sensor-version flag was not provided
  --upgrade-local: trigger local sensor upgrade to version given by --sensor-version flag: e.g.: '--sensor-version=3.4.1.0 --upgrade-local'; apply the latest version by default if --sensor-version flag was not provided
  --upgrade-by-uuid=<filename>: trigger sensor whose uuid is listed in <filename> upgrade to version given by --sensor-version flag; e.g.: '--sensor-version=3.4.1.0 --upgrade-by-uuid=/usr/local/tet/sensor_id'; apply the latest version by default if --sensor-version flag was not provided
  --logbasedir=<log_base_dir>: instead of logging to /opt/cisco/tetration/log use <log_base_dir>. The full path will be <log_base_dir>/tetration
  --tmpdir=<tmp_dir>: instead of using /tmp use <tmp_dir> as temp directory
  --visibility: install deep visibility agent only; --reinstall would overwrite this flag if previous installed agent type was enforcer
  --golden-image: install Cisco Secure Workload Agent but do not start the Cisco Secure Workload Services; use to install Cisco Secure Workload Agent on Golden Images in VDI environment or Template VM. On VDI/VM instance created from golden image with different host name, Cisco Secure Workload Services will work normally
Verify AIX Agent Installation
Procedure
|
Run command
# |
Install Kubernetes or OpenShift Agents for Deep Visibility and Enforcement
Kubernetes or OpenShift Overview
Container orchestration platforms allow to define and enforce security policies, such as network policies, pod security policies, and role-based access control (RBAC), to further enhance the security of containerized applications. Cisco Secure Workload uses Kubernetes to automate the deployment, scaling, and management of containerized applications. It provides detailed visibility into the state and performance of containerized workloads. On the other hand, OpenShift builds on Kubernetes, adding enterprise-grade features such as enhanced security, developer tools, and management capabilities.
Key Concepts
-
Namespaces : A namespace is a logical way to divide a cluster into multiple virtual subclusters.
-
Pods: A pod is the smallest unit in the Kubernetes object model that you can create or deploy. A pod represents a single instance of a running process in your cluster and can contain one or more containers.
-
Node: A node is a machine in the cluster, either physical or virtual, that runs applications in containers. Each node is managed by the Kubernetes control plane.
-
Services: Services define a logical set of pods and policies for accessing them. Services enable loose coupling between dependent Pods, making it easier to manage microservices architectures.
-
Sidecar Container: A sidecar container in Kubernetes is an extra container that runs alongside the main application container in the same Pod. This setup allows the sidecar container to share the network, storage, and lifecycle with the main container, enabling them to work closely together.
-
Service Mesh: A Service Mesh in Kubernetes manages microservice communication, enhancing security, reliability, and observability with advanced traffic management and monitoring capabilities.
Control Pane Components
You can access the Kubernetes control panel through the UI or use the command Kubectl to access from CLI.
-
API Server: The API server is the central management entity that exposes the Kubernetes API, handling all internal and external requests and serving as the front end of the control plane.
-
Scheduler: The scheduler is responsible for assigning pods to nodes based on resource requirements, constraints, and availability.
-
Controller-Manager: Runs various controllers that regulate the state of the cluster which ensure that the desired state of the cluster matches the actual state.
-
etcd: etcd is a distributed key-value store that Kubernetes uses for all its cluster data storage needs
Node Components
-
kubelet: The kubelet is an agent on each node that ensures containers in pods are running and reports their status to the control plane.
-
kube-proxy: The kube-proxy is a network proxy on each node that manages network rules and balances traffic, ensuring services are accessible and connections reach the right pods.
-
Container Runtime: The container runtime is the software responsible for running containers.
Kubernetes/OpenShift deployment in Cisco Secure Workload
The deployment comprises four major components:
-
The Control or Management Pane that reside on either an on-premises Secure Workload cluster or a Secure Workload tenant hosted on SaaS
-
The Secure Workload Orchestrator or Connector, established within the management plane, engages with Kubernetes cluster APIs for EKS, AKS, GKE, OpenShift or Unmanaged Kubernetes. This interaction allows enhanced visibility into pod and service metadata, providing details such as pod IDs, annotations, or labels. For more information, see Kubernetes/OpenShift.
-
The Kubernetes Daemonset is deployed to the Kubernetes or OpenShift cluster intended for security measures. The Daemonset ensures the continuous operation of the Secure Workload agent or pod on each Kubernetes or OpenShift node. For more information, see Install Kubernetes or OpenShift Agents for Deep Visibility and Enforcement.
-
Activating the Vulnerability Scanner initiates a scan on one of the pods within the Kubernetes nodes. This scanner oversees every container image in the Kubernetes or OpenShift cluster, reporting the identified CVEs to the Control or Management plane.
Requirements and Prerequisites
Operating system support information is available at Agent OS support matrix.
Requirements
-
The install script requires Kubernetes or OpenShift administrator credentials to start privileged agent pods on the cluster nodes.
-
Secure Workload entities are created in the tetration namespace.
-
The node or pod security policies must permit privileged mode pods.
-
busybox:1.33 images must either be preinstalled or be downloadable from Docker Hub.
-
For containerd run time, if the config_path is not set, modify your config.toml (default location: /etc/containerd/config.toml) as follows: ``` [plugins."io.containerd.grpc.v1.cri".registry] config_path = "/etc/containerd/certs.d" ```Restart the containerd daemon.
-
To run on Kubernetes or OpenShift control plane nodes, the –toleration flag can be used to pass in a toleration for the Secure Workload pods. The toleration that is usually passed is the NoSchedule toleration that normally prevents pods from running on control plane nodes.
-
For Windows worker nodes:
-
Supported Windows worker node container runtime: ContainerD.
-
ContainerD config: Configure the following containerd change. ``` [plugins."io.containerd.grpc.v1.cri".registry] config_path = "/etc/containerd/certs.d" ```Remove configurations under registry.mirrors. The default configuration file location is C:\Program Files\containerd\config.toml.
Restart the containerd daemon after the configuration changes.
-
The image mcr.microsoft.com/oss/kubernetes/windows-host-process-containers-base-image:v1.0.0 must either be preinstallated or downloadable on the Windows worker node.
-
The existing Kubernetes agent which is upgrading to the newer version includes the Windows DaemonSet agent automatically. However, the previous script does not uninstall the Windows DaemonSet agent. Download the latest installer script to uninstall the Windows DaemonSet agent.
-
Supported on:
-
Microsoft Windows Server 2022
-
Windows Server 2019
-
Kubernetes 1.27 and later
-
-
Requirements for Policy Enforcement
IPVS-based kube-proxy mode is not supported for OpenShift.
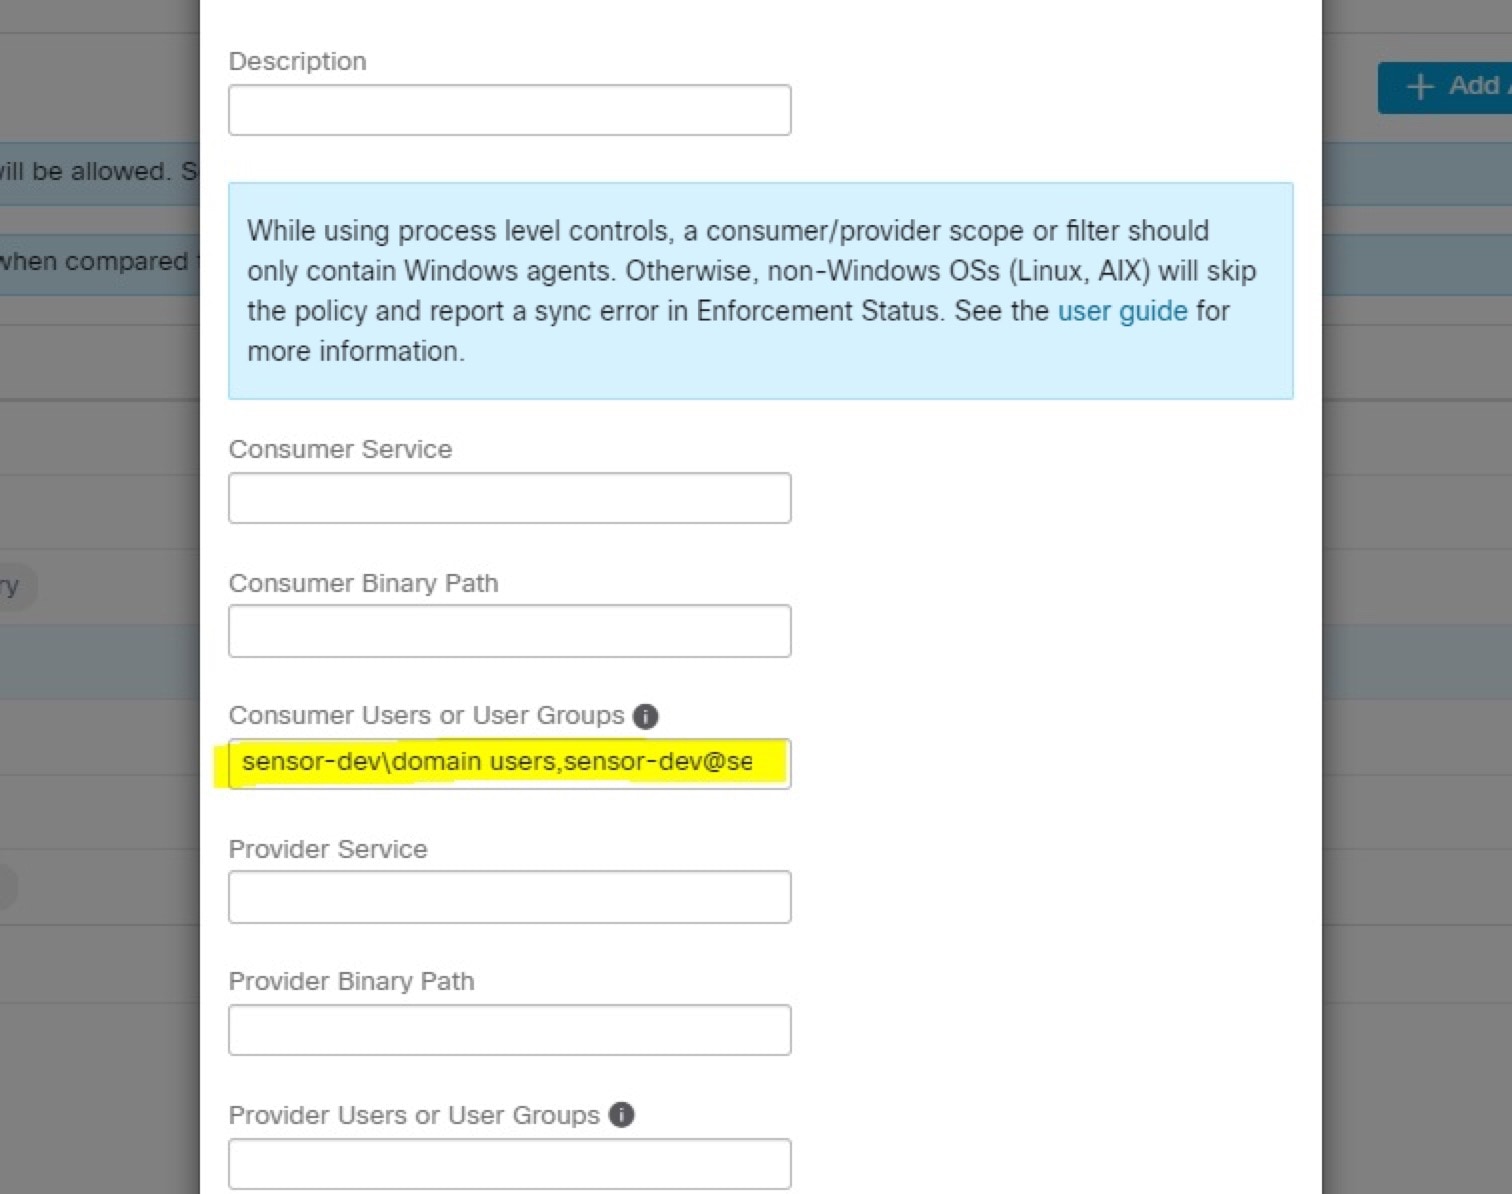
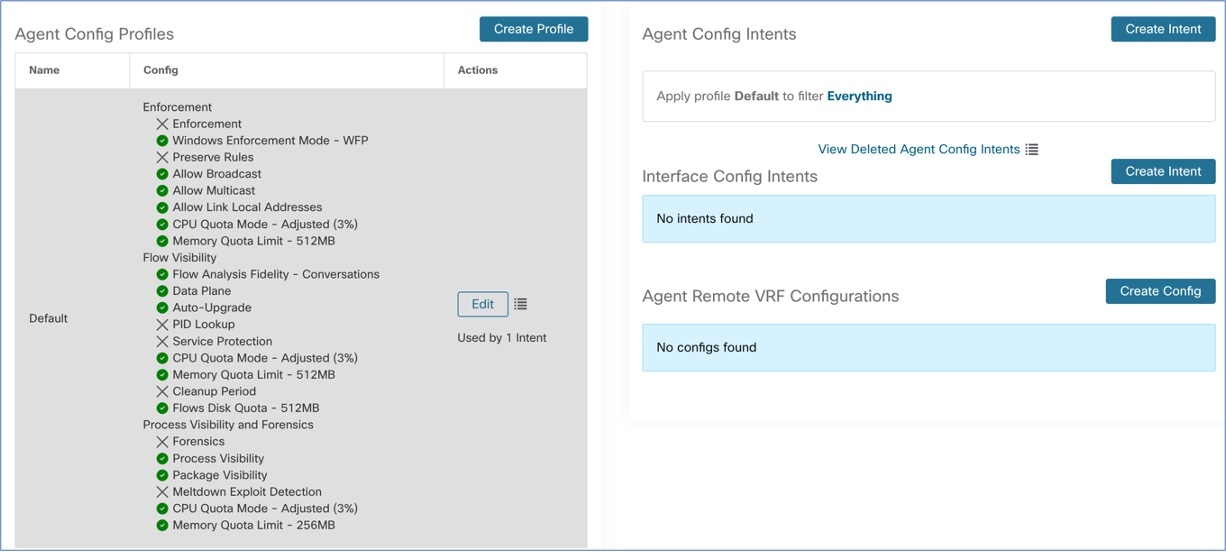
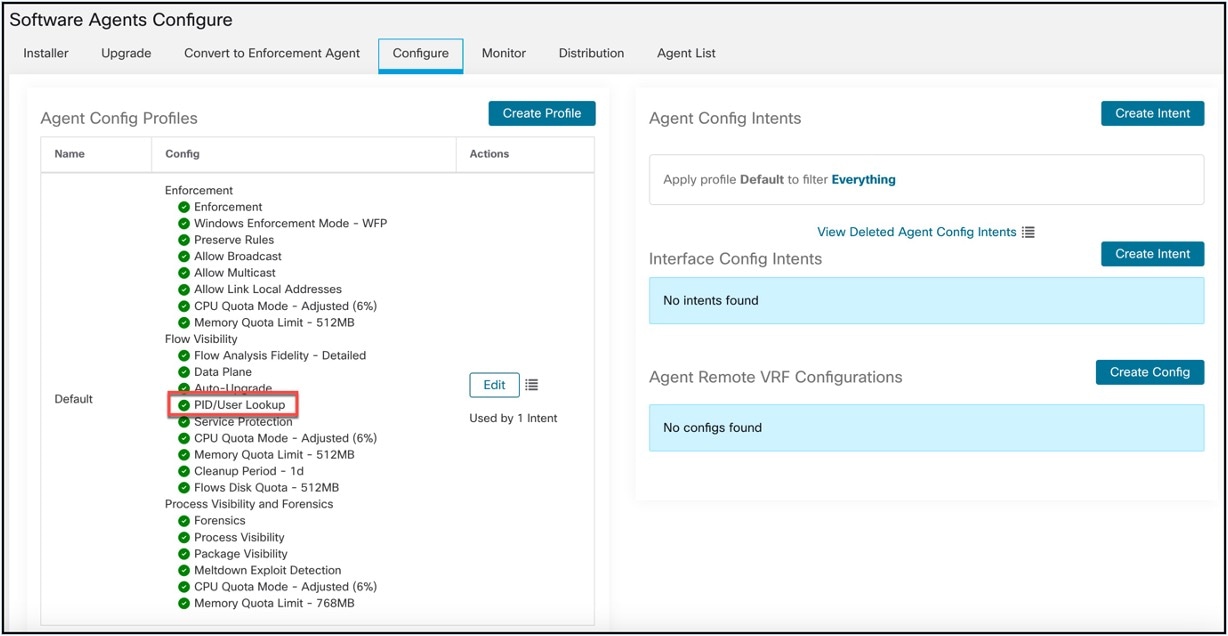
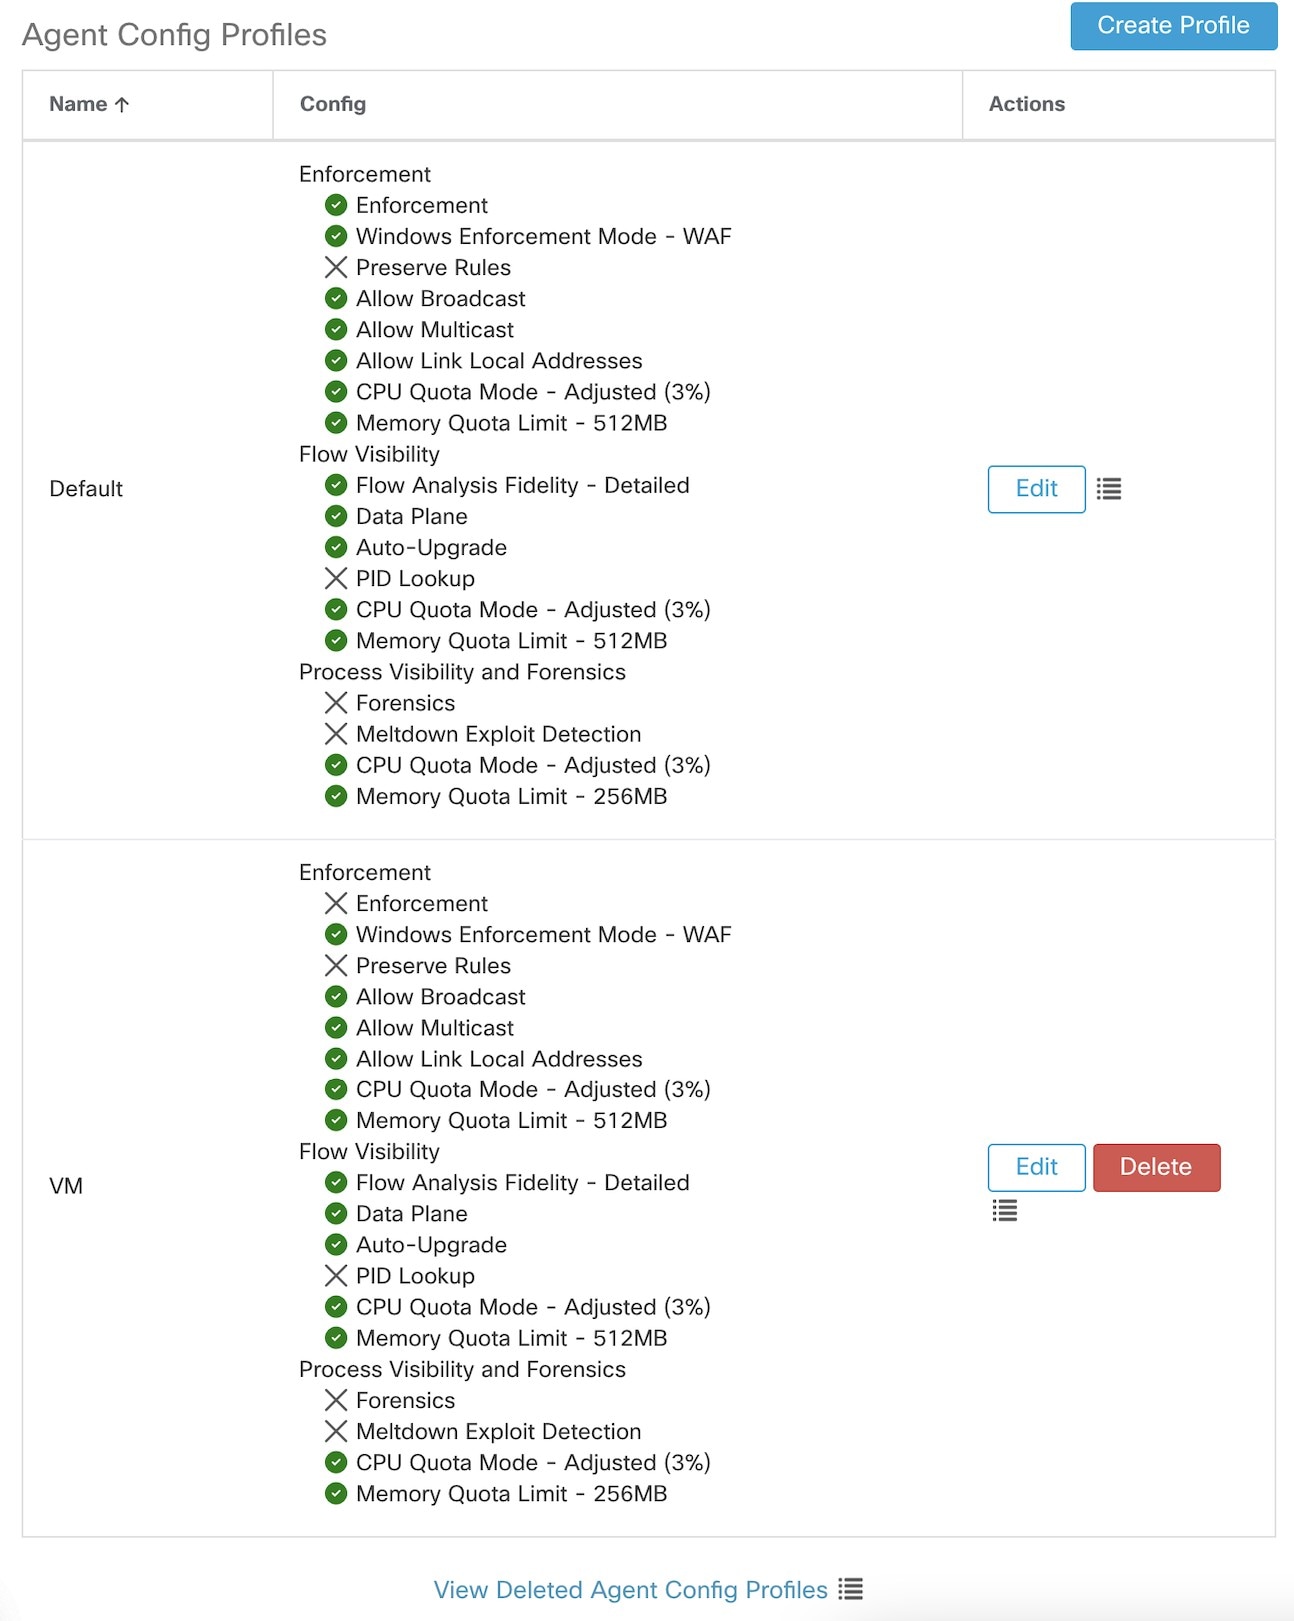
These agents should be configured with the Preserve Rules option that is enabled. For more information, see Creating an Agent Config Profile.
For enforcement to function properly, any installed CNI plug-in must:
-
Provide flat address space (IP network) between all nodes and pods. Network plug-ins that masquerade the source pod IP for intracluster communication are not supported.
-
Not interfere with Linux iptables rules or marks that are used by the Secure Workload Enforcement Agent (mark bits 21 and 20 are used to allow and deny traffic for NodePort services)
The following CNI plug-ins are tested for the above requirements:
-
Calico (3.13) with the following Felix configurations: (ChainInsertMode: Append, Ipta- blesRefreshInterval: 0) or (ChainInsertMode: Insert, IptablesFilterAllowAction: Return, IptablesMangleAllowAction: Return, IptablesRefreshInterval: 0). All other options use their default values.
For more information on setting these options, see the Felix configuration reference.
Install Kubernetes or OpenShift Agent using the Agent Script Installer Method
Note |
The agent script installer method automatically installs agents on nodes included later. |
Procedure
|
Step 1 |
Navigate to the Agent Installation Methods:
|
||
|
Step 2 |
Click Agent Script Installer. |
||
|
Step 3 |
From the Select Platform drop-down menu, choose Kubernetes. To view the supported Kubernetes or OpenShift platforms, click Show Supported Platforms. |
||
|
Step 4 |
Choose the tenant to install the agents.
|
||
|
Step 5 |
If HTTP proxy is required to communicate with Secure Workload, choose Yes, and then enter a valid proxy URL. |
||
|
Step 6 |
Click Download and save the file to the local disk. |
||
|
Step 7 |
Run the installer script on a Linux machine which has access to the Kubernetes API server and a kubectl configuration file with administrative privileges as the default context/cluster/user. The installer attempts to read the file from its default location (~/.kube/config). However, you can explicitly specify the location of the config file using the --kubeconfig command. |
The installation script provides instructions for verifying the Secure Workload Agent Daemonset and the Pods that were installed.
Note |
The HTTP Proxy configured on the agent installer page prior to download only controls how Secure Workload agents connect to the Secure Workload cluster. This setting does not affect how Docker images are fetched by Kubernetes or OpenShift nodes, because the container runtime on those nodes uses its own proxy configuration. If the Docker images are not fetched from the Secure Workload cluster, debug the image pulling process of the container and add a suitable HTTP proxy. |
Deep Visibility and Enforcement with Istio Service Mesh
Secure workload provides comprehensive visibility and enforcement for all applications running within Kubernetes or OpenShift clusters that are enabled with Istio Service Mesh.
Following are key components and guidelines for effective segmentation of these applications:
Service Mesh Sidecars
Service Mesh uses sidecar proxies deployed with application containers to intercept and manage network traffic. Sharing the same network namespace as the application, these sidecars mediate all inbound and outbound network communication.
Traffic Enforcement
-
When implementing segmentation policies for Service Mesh enabled applications, it's essential to consider the additional ports used by sidecar proxies. These ports play a vital role in managing and securing the application's network traffic.
-
For the Service Mesh to remain intact and available, ensure your segmentation policies explicitly include rules for the ports used by sidecar proxies.
Supported Port and Protocol for Sidecar Proxy
Include the following ports while enforcing segmentation policies on Service Mesh enabled applications.
|
Port |
Protocol |
Description |
|---|---|---|
|
15000 |
TCP |
Envoy admin port (commands/diagnostics) |
|
15001 |
TCP |
Envoy outbound |
|
15004 |
HTTP |
Debug port |
|
15006 |
TCP |
Envoy inbound |
|
15008 |
HTTP2 |
HBONE mTLS tunnel port |
|
15020 |
HTTP |
Mereged Prometheus telemetry from Istio agent, Envoy, and application |
|
15021 |
HTTP |
Health Checks |
|
15053 |
DNS |
DNS port, if capture is enabled |
|
15090 |
HTTP |
Envoy Prometheus telemetry |
Note |
The above ports are the default ports used by Istio for Envoy sidecar proxy communication.If these ports have been updated in the Istio global Service Mesh configuration settings, use the updated ports in the applications. |
Supported Port and Protocol for Service Mesh Control Plane
Use the following port and protocol when segmenting the control plane.
|
Port |
Protocol |
Description |
|---|---|---|
|
443 |
HTTPS |
Webhook servie port |
|
8080 |
HTTP |
Debug Interface (deprecated, container port only) |
|
15010 |
GRPC |
XDS and CA services (Plaintext, only for secure networks) |
|
15012 |
GRPC |
XDS and CA services (TLS and mTLS, recommended for production use) |
|
15014 |
HTTP |
Control plane monitoring |
|
15017 |
HTTPS |
Webhook container port, forwarded from 443 |
Install Solaris Agents for Deep Visibility and Enforcement
Prerequisites for Installing Solaris Agents
-
Root privileges to install and execute the agent services.
-
One GB storage space for agent and log files.
-
Configuration of security exclusions on security applications that are monitoring the host, to prevent other security applications from blocking of agent installation or agent activity. For more information, see Security Exclusions.
Install Solaris Agent using the Agent Script Installer Method
Procedure
|
Step 1 |
Navigate to Agent Installation Methods:
|
||
|
Step 2 |
Click Agent Script Installer. |
||
|
Step 3 |
From the Select Platform drop-down menu, choose Solaris. To view the supported Solaris platforms, click Show Supported Platforms. |
||
|
Step 4 |
Choose the tenant to install the agents.
|
||
|
Step 5 |
If you want to assign labels to the workload, choose the label keys and enter label values. When the installed agent reports IP addresses on the host, the installer CMDB labels selected here, along with other uploaded CMDB labels that have been assigned to IPs reported by this host, would be assigned automatically to the new IP address. If there are conflicts between uploaded CMDB labels and installer CMDB labels:
|
||
|
Step 6 |
If HTTP proxy is required to communicate with Secure Workload, choose Yes, and then enter a valid proxy URL. |
||
|
Step 7 |
Under the Installer expiration section, select one from the available options:
|
||
|
Step 8 |
Click Download and save the file to the local disk. |
||
|
Step 9 |
Copy the installer shell script on Solaris hosts and run the following command to grant execute permission to the script:
|
||
|
Step 10 |
To install the agent, run the following command with root privileges:
|
We recommend running the precheck, as specified in the script usage details.
Solaris installer script usage details:
tetration_installer_default_sensor_solaris.sh [--pre-check] [--skip-pre-check=<option>] [--no-install] [--logfile=<filename>] [--proxy=<proxy_string>] [--no-proxy] [--help] [--version] [--sensor-version=<version_info>] [--ls] [--file=<filename>] [--save=<filename>] [--new] [--reinstall] [--unpriv-user] [--force-upgrade] [--upgrade-local] [--upgrade-by-uuid=<filename>] [--basedir=<basedir>] [--logbasedir=<logbdir>] [--tmpdir=<tmp_dir>] [--visibility] [--golden-image]
  --pre-check: run pre-check only
  --skip-pre-check=<option>: skip pre-installation check by given option; Valid options include 'all', 'ipv6' and 'enforcement'; e.g.: '--skip-pre-check=all' will skip all pre-installation checks; All pre-checks will be performed by default
  --no-install: will not download and install sensor package onto the system
  --logfile=<filename>: write the log to the file specified by <filename>
  --proxy=<proxy_string>: set the value of CL_HTTPS_PROXY, the string should be formatted as http://<proxy>:<port>
  --no-proxy: bypass system wide proxy; this flag will be ignored if --proxy flag was provided
  --help: print this usage
  --version: print current script's version
  --sensor-version=<version_info>: select sensor's version; e.g.: '--sensor-version=3.4.1.0'; will download the latest version by default if this flag was not provided
  --ls: list all available sensor versions for your system (will not list pre-3.1 packages); will not download any package
  --file=<filename>: provide local zip file to install sensor instead of downloading it from cluster
  --save=<filename>: download and save zip file as <filename>
  --new: remove any previous installed sensor;
  --reinstall: reinstall sensor and retain the same identity with cluster; this flag has higher priority than --new
  --unpriv-user=<username>: use <username> for unpriv processes instead of nobody
  --force-upgrade: force sensor upgrade to version given by --sensor-version flag; e.g.: '--sensor-version=3.4.1.0 --force-upgrade'; apply the latest version by default if --sensor-version flag was not provided
  --upgrade-local: trigger local sensor upgrade to version given by --sensor-version flag: e.g.: '--sensor-version=3.4.1.0 --upgrade-local'; apply the latest version by default if --sensor-version flag was not provided
  --upgrade-by-uuid=<filename>: trigger sensor whose uuid is listed in <filename> upgrade to version given by --sensor-version flag; e.g.: '--sensor-version=3.4.1.0 --upgrade-by-uuid=/usr/local/tet/sensor_id'; apply the latest version by default if --sensor-version flag was not provided
  --logbasedir=<log_base_dir>: instead of logging to /opt/cisco/secure-workload/log use <log_base_dir>. The full path will be <log_base_dir>/secure-workload
  --tmpdir=<tmp_dir>: instead of using /tmp use <tmp_dir> as temp directory
  --visibility: install deep visibility agent only; --reinstall would overwrite this flag if previous installed agent type was enforcer
  --golden-image: install Cisco Secure Workload Agent but do not start the Cisco Secure Workload Services; use to install Cisco Secure Workload Agent on Golden Images in VDI environment or Template VM. On VDI/VM instance created from golden image with different host name, Cisco Secure Workload Services will work normally
Verify Solaris Agent Installation
-
For Solaris 11.4, run the command
sudo pkg list tet-sensor.A single entry as output confirms that a Solaris agent is installed on the host. Below is the sample output:
Name (Publisher)
Version
Info
tet-sensor (cisco)
3.8.1.1
i--
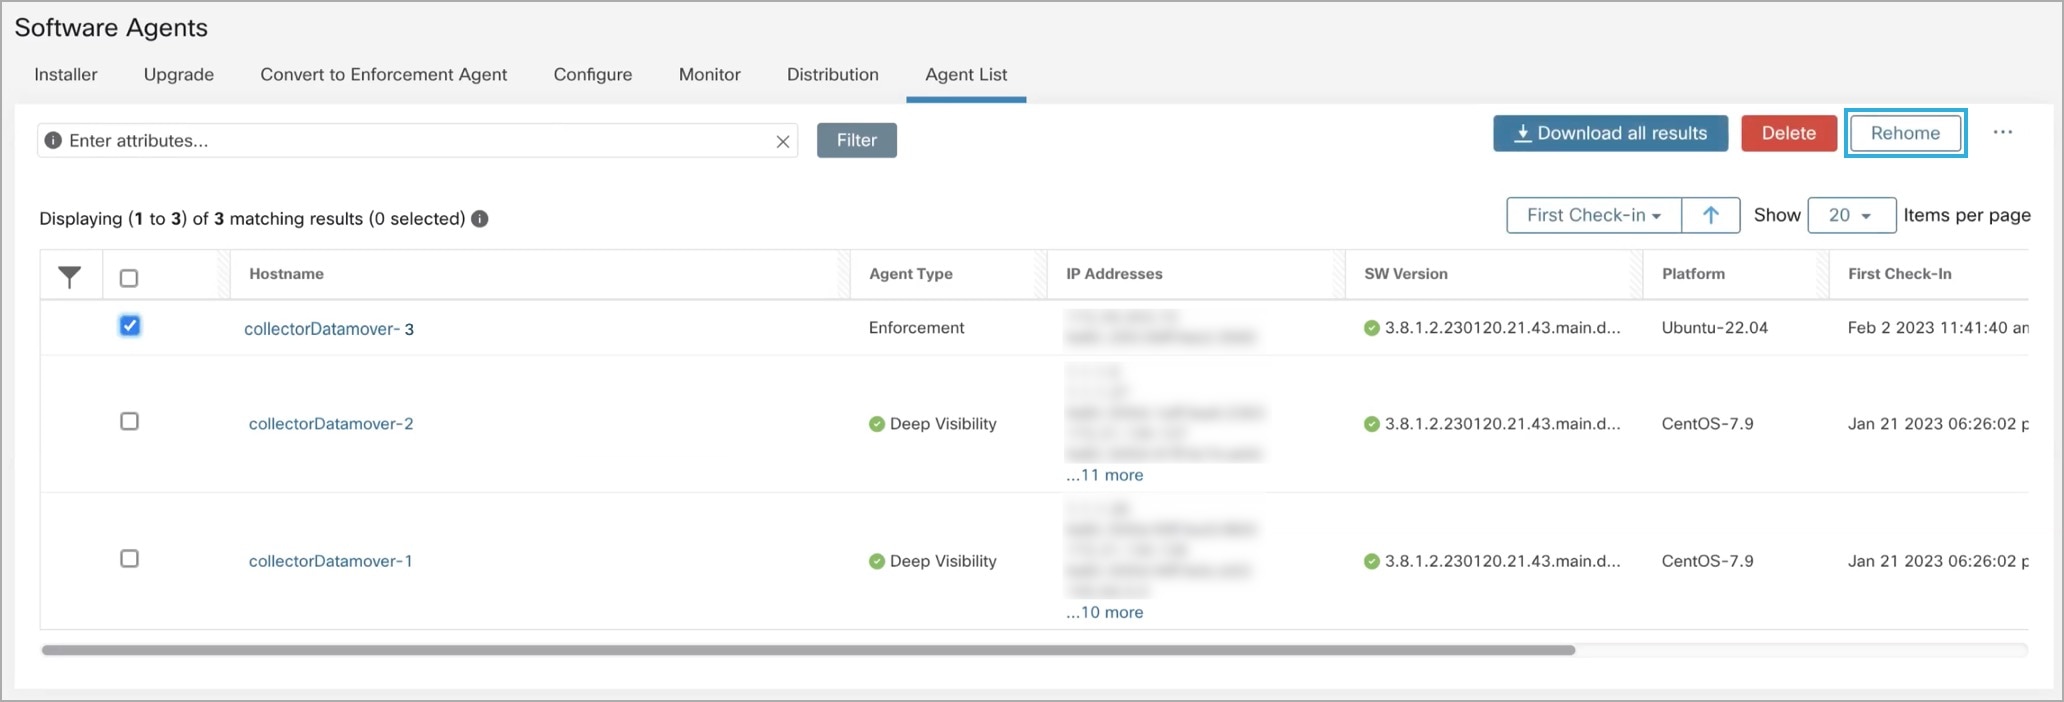
Revoke Software Agent Package
The Revoke Software Agents allows site administrators and customer support to block users from downloading, installing, or upgrading to certain versions of agent packages. By revoking an agent package, they can use filters to target specific operating systems or groups, and selectively revoke both sensor and enforcement package types. This ensures that only approved agent versions are available, thereby enhancing control and security across deployments.
Procedure
|
Step 1 |
Navigate to Agent Installation Methods:
|
|
Step 2 |
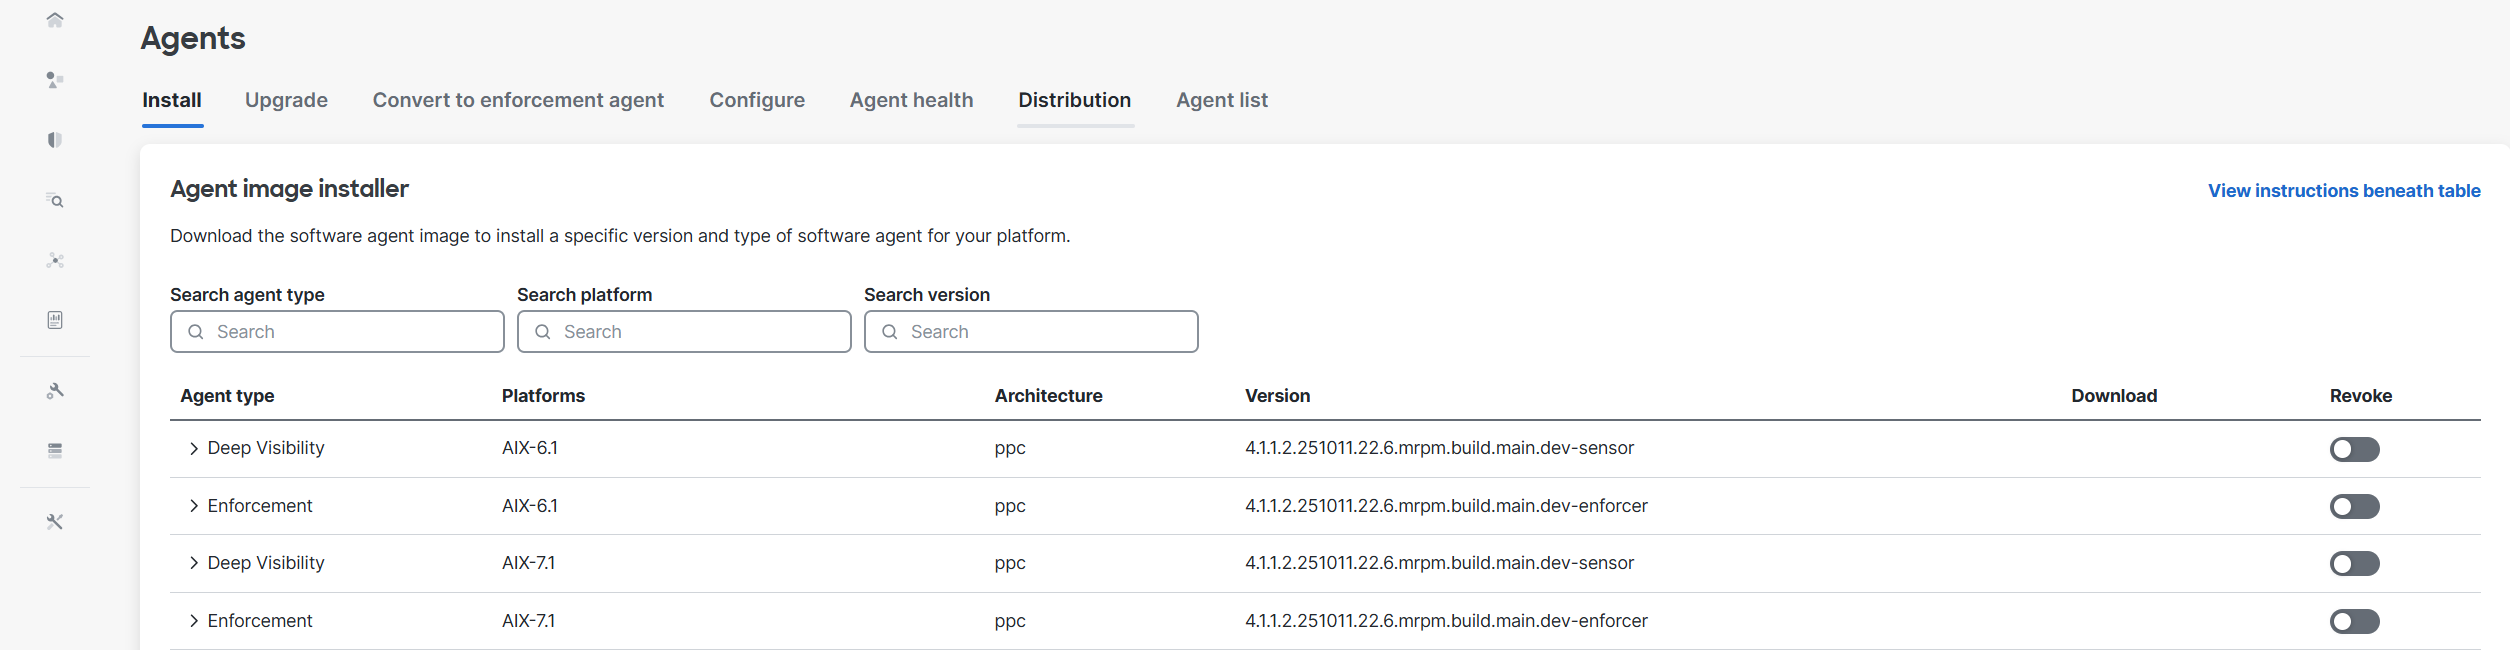
Select Agent Image Installer. |
|
Step 3 |
Select the required agent package, and toggle the Revoke button. |
(Manual Installations Only) Update the User Configuration File
The following procedure is required only for installations involving all of the following:
-
Secure Workload SaaS, or on-premises clusters with multiple tenants (on-premises clusters that use only the default tenant do NOT need this procedure)
-
Manual installation
-
Linux or Windows platform
Agents require an activation key to register to the Secure Workload cluster. they require a cluster activation key. Additionally, they might need an HTTPS proxy to reach the cluster.
Note |
In Windows Environment, you do not need to manually configure user.cfg, if activationkey and proxy options are used during manual installation. |
Before installation, configure the required variables in the user configuration file:
Procedure
|
Step 1 |
To retrieve your activation key, navigate to , click the Installer tab, click Manual Install using classic packaged installers, then click Agent Activation Key. |
|
Step 2 |
Open the |
|
Step 3 |
Add the activation key to the ACTIVATION_KEY variable. Example: |
|
Step 4 |
If the agent requires an HTTPS proxy, add the http protocol proxy server and port using the HTTPS_PROXY variable. Example: |
Other Agent-Like Tools
AnyConnect Agents
No Secure Wrokload agent is required for platforms supported by Cisco AnyConnect Secure Mobility agent with Network Visibility Module (NVM). AnyConnect connector registers these agents and exports flow observations, inventories, and labels to Secure Workload. For more information, see AnyConnect Connector.
For Windows, Mac, or Linux platforms, see Cisco AnyConnect Secure Mobility Client Data Sheet.
ISE Agents
A Secure Workload agent on the endpoint is not required for endpoints registered with Cisco Identity Service Engine (ISE). ISE connector collects metadata about endpoints from ISE through pxGrid service on ISE appliance. It registers the endpoints as ISE agents on Secure Workload and pushes labels for the inventories on these endpoints. For more information, see ISE Connector.
SPAN Agents
SPAN agents work with the ERSPAN connector. For more information, see ERSPAN Connector.
Third-Party and Additional Cisco Products
-
For integrations using external orchestrators configured in Secure Workload,
see External Orchestrators in Secure Workload.
-
For integrations using connectors configured in Secure Workload.
see What are Connectors.
Connectivity Information
In general, when the agent is installed on the workload, it makes several network connections to the back-end services hosted on the Secure Workload cluster. The number of connections will vary depending on the agent type and its functions.
The following table captures various permanent connections that are made by various agent types.
|
Agent type |
Config server |
Collectors |
Enforcement backend |
|---|---|---|---|
|
visibility (on-premises) |
CFG-SERVER-IP:443 |
COLLECTOR-IP:5640 |
N/A |
|
visibility (SaaS) |
CFG-SERVER-IP:443 |
COLLECTOR-IP:443 |
N/A |
|
enforcement (on-premises) |
CFG-SERVER-IP:443 |
COLLECTOR-IP:5640 |
ENFORCER-IP:5660 |
|
enforcement (SaaS) |
CFG-SERVER-IP:443 |
COLLECTOR-IP:443 |
ENFORCER-IP:443 |
|
docker images |
CFG-SERVER-IP:443 |
N/A |
N/A |
Legends:
-
CFG-SERVER-IP is the IP address of the config server.
-
COLLECTOR-IP is the IP address of the collector. Deep visibility and enforcement agents connect to all available collectors.
-
ENFORCER-IP is the IP address of the enforcement endpoint. The enforcement agent connects to only one of the available endpoints.
-
For Kubernetes/Openshift agent deployments, the installation script does not contain the agent software - Docker images containing the agent software are pulled from the Secure Workload cluster by every Kubernetes/Openshift node. These connections are established by the container run time image fetch component and directed at CFG-SERVER-IP:443.
Navigate to Platform > Cluster Configuration to know the config server IP and collector IP.
-
Sensor VIP is for the config server IP: The IP address that has been set up for the config server in this cluster.
-
External IPs are for collectors IPs and enforcer: If this is populated, when assigning external cluster IP addresses, the selection process is restricted to only IP addresses defined in this list, that are part of the external network.
Note |
|
Connections to the cluster might be denied if the workload is behind a firewall, or if the host firewall service is enabled. In such cases, administrators must create appropriate firewall policies to allow the connections.


 Feedback