High Availability

The following topics describe how to configure Active/Standby high availability of Cisco s:

About High Availability

To ensure the continuity of operations, the high availability feature allows you to designate redundant s to manage devices. The s support Active/Standby high availability where one appliance is the active unit and manages devices. The standby unit does not actively manage devices. The active unit writes configuration data into a data store and replicates data for both units, using synchronization where necessary to share some information with the standby unit.

Active/Standby high availability lets you configure a secondary to take over the functionality of a primary if the primary fails. When the primary fails, you must promote the secondary to become the active unit.

Event data streams from managed devices to both s in the high availability pair. If one fails, you can monitor your network without interruption using the other .

Note that s configured as a high availability pair do not need to be on the same trusted management network, nor do they have to be in the same geographic location.


Caution


Because the system restricts some functionality to the active , if that appliance fails, you must promote the standby to active.


Note


Triggering a switchover on immediately after a successful change deployment can lead to preview configuration not working on the new active . This does not impact policy deploy functionality. It is recommended to trigger a switchover on the after the necessary sync is completed.

Similarly, when HA synchronization is in degraded state, triggering a switchover or changing roles could make HA to damage the database and it can become catastrophic. We recommend that you immediately contact Cisco Technical Assistance Center (TAC) for further assistance to resolve this issue.

This HA synchronization can end up in degraded state due to various reasons. The Replacing s in a High Availability Pair section in this chapter covers some of the failure scenarios and the subsequent procedure to fix the issue. If the reason or scenario of degraded state matches to the scenarios explained, follow the steps to fix the issue. For other reasons, we recommend that you contact TAC.


About Remote Access VPN High Availability

If the primary device has Remote Access VPN configuration with an identity certificate enrolled using a CertEnrollment object, the secondary device must have an identity certificate enrolled using the same CertEnrollment object. The CertEnrollment object can have different values for the primary and secondary devices due to device-specific overrides. The limitation is only to have the same CertEnrollment object enrolled on the two devices before the high availability formation.

SNMP Behavior in High Availability

In an SNMP-configured HA pair, when you deploy an alert policy, the active sends the SNMP traps. When the primary fails, the secondary which becomes the active unit starts sending the SNMP traps without the need for any additional configuration.

Roles v. Status in High Availability

Primary/Secondary Roles

When setting up s in a high availability pair, you configure one to be primary and the other as secondary. During configuration, the primary unit's policies are synchronized to the secondary unit. After this synchronization, the primary becomes the active peer, while the secondary becomes the standby peer, and the two units act as a single appliance for managed device and policy configuration.

Active/Standby Status

The main differences between the two s in a high availability pair are related to which peer is active and which peer is standby. The active remains fully functional, where you can manage devices and policies. On the standby , functionality is hidden; you cannot make any configuration changes.

Event Processing on High Availability Pairs

Since both s in a high availability pair receive events from managed devices, the management IP addresses for the appliances are not shared. This means that you do not need to intervene to ensure continuous processing of events if one of the fails.

AMP Cloud Connections and Malware Information

Although they share file policies and related configurations, s in a high availability pair share neither Cisco AMP cloud connections nor malware dispositions. To ensure continuity of operations, and to ensure that detected files’ malware dispositions are the same on both s, both primary and secondary s must have access to the AMP cloud.

URL Filtering and Security Intelligence

URL filtering and Security Intelligence configurations and information are synchronized between s in a high availability deployment. However, only the primary downloads URL category and reputation data for updates to Security Intelligence feeds.

If the primary fails, not only must you make sure that the secondary can access the internet to update threat intelligence data, but you must also use the web interface on the secondary to promote it to active.

User Data Processing During Failover

If the primary fails, the Secondary propagates to managed devices user-to-IP mappings from the TS Agent identity source; and propagates SGT mappings from the ISE/ISE-PIC identity source. Users not yet seen by identity sources are identified as Unknown.

After the downtime, the Unknown users are re identified and processed according to the rules in your identity policy.

Configuration Management on High Availability Pairs

In a high availability deployment, only the active can manage devices and apply policies. Both s remain in a state of continuous synchronization.

If the active fails, the high availability pair enters a degraded state until you manually promote the standby appliance to the active state. Once the promotion is complete, the appliances leave maintenance mode.

High Availability Disaster Recovery

In case of a disaster recovery situation, a manual switchover must be performed. When the primary - FMC1 fails, access the web interface of the secondary - FMC2 and switch peers. This is applicable conversely also in case the secondary (FMC2) fails. For more information, see Switching Peers in the High Availability Pair.

For restoring a failed , refer to Replacing s in a High Availability Pair.

Single Sign-On and High Availability Pairs

s in a high availability configuration can support Single Sign-On, but you must keep the following considerations in mind:

  • SSO configuration is not synchronized between the members of the high availability pair; you must configure SSO separately on each member of the pair.

  • Both s in a high availability pair must use the same identity provider (IdP) for SSO. You must configure a service provider application at the IdP for each configured for SSO.

  • In a high availability pair of s where both are configured to support SSO, before a user can use SSO to access the secondary for the first time, that user must first use SSO to log into the primary at least once.

  • When configuring SSO for s in a high availability pair:

    • If you configure SSO on the primary , you are not required to configure SSO on the secondary .

    • If you configure SSO on the secondary , you are required to configure SSO on the primary as well. (This is because SSO users must log in to the primary at least once before logging into the secondary .)

High Availability Behavior During a Backup

When you perform a Backup on a high availability pair, the Backup operation pauses synchronization between the peers. During this operation, you may continue using the active , but not the standby peer.

After Backup is completed, synchronization resumes, which briefly disables processes on the active peer. During this pause, the High Availability page briefly displays a holding page until all processes resume.

High Availability Split-Brain

If the active in a high-availability pair goes down (due to power issues, network/connectivity issues), you can promote the standby to an active state. The HA attains 'split-brain' state. When the original active peer comes up, both peers can assume they are active. When this situation occurs, the system prompts you to choose an active appliance, which demotes the other appliance to standby.

If the active goes down (or disconnects due to a network failure), you may either break high availability or switch roles. The standby enters a degraded state.


Note


Whichever appliance you use as the intended standby loses all of its device registrations and policy configurations when you resolve split-brain. For example, you would lose modifications to any policies that existed on the intended standby but not on the intended active. If the is in a high availability split-brain scenario where both appliances are active, and you register managed devices and deploy policies before you resolve split-brain, you must export any policies and unregister any managed devices from the intended standby before re-establishing high availability. You may then register the managed devices and import the policies to the intended active .


Troubleshooting High Availability

This section lists troubleshooting information for some common high availability operation errors.

Error

Description

Solution

You must reset your password on the active before you can log in to the standby.

You attempted to log into the standby when a force password reset is enabled for your account.

As the database is read-only for a standby , reset the password on the login page of the active .

500 Internal

May appear when attempting to access the web interface while performing critical high availability operations, including switching peer roles or pausing and resuming synchronization.

Wait until the operation completes before using the web interface.

System processes are starting, please wait

Also, the web interface does not respond.

May appear when the reboots (manually or while recovering from a power down) during a high availability or data synchronization operation.

  1. Access the shell and use the manage_hadc.pl command to access the high availability configuration utility.

    Note


    Run the utility as a root user, using sudo.

  2. Pause mirroring operations by using option 5.

    Reload the web interface.

  3. Use the web interface to resume synchronization. Choose Integration > Other Integrations, then click the High Availability tab and choose Resume Synchronization.

Device Registration Status:Host <string> is not reachable

During the initial configuration of a Firewall Threat Defense, if the IP address and NAT ID are specified, the Host field can be left blank. However, in an HA environment with both the s behind a NAT, this error occurs when you add the Firewall Threat Defense on the secondary .

  1. Delete the Firewall Threat Defense from primary . See Delete a Device from the in Cisco Device Configuration Guide.

  2. Remove managers from Firewall Threat Defense using the configure manager delete command. See Cisco Secure Firewall Threat Defense Command Reference.

  3. Add Firewall Threat Defense to the with the IP address or name of the Firewall Threat Defense device in the Host field. See Add a Device to the in Cisco Device Configuration Guide.

Device Registration Status:Host <string> is not reachable

The error occurs when adding Firewall Threat Defense device to the secondary center in a high-availability deployment where both the secondary and the Firewall Threat Defense device are behind NAT.

On the standby web interface, click Integration > Other Integrations > High Availability. Under the pending device registration table, click the IP address of the pending device, and then change the IP address to the public IP address of the Firewall Threat Defense.

OR

  1. Access the Firewall Threat Defense shell and use the show managers command to get the standby entry identifier value.

  2. In the Firewall Threat Defense shell, edit the standby hostname to the public IP address. Execute the configure manager edit <standby_uuid> hostname <standby_ip> command using the entry identifier value and the host IP address.

    For more information, see Using CLI to Resolve Device Registration in High Availability.

Device configuration synchronization has been stopped between high availability s.

The device configuration history files are now synced in parallel with other configuration data during a HA synchronization. The monitors the configuration history file sync task and notifies you if the sync has not happened for the last 6 hours. This health alert appears in both active and standby s.

Both the active and standby s move to the degraded state. Contact Cisco TAC to troubleshoot the issue.

Requirements for High Availability

Model support

See Hardware Requirements.

Virtual Model Support

See Virtual Platform Requirements.

Supported domains

Global

User roles

Admin

Hardware Requirements

  • All hardware supports high availability. The peers must be the same model.

  • The peers may be physically and geographically separated from each other in different data centers.

  • Bandwidth requirement for high availability configuration depends on various factors such as the size of the network, the number of managed devices, the volume of events and logs, and the size and frequency of configuration updates.

    For a typical high availability deployment, in case of high latency networks of close to 100 ms, a minimum of 5 Mbps network bandwidth between the peers is recommended.

    You can enhance the high availability synchronization speed by reducing the number of configuration versions saved on your . For more information, see Set the Number of Configuration Versions in Cisco Secure Firewall Management Center Device Configuration Guide. Note that this option is not supported on versions 7.3.0 and 7.4.0.

  • Ensure that both s have unique UUIDs. To check the UUID, review this file:/etc/sf/ims.conf.

  • Do not restore a backup of the primary peer to the secondary.

  • See also License Requirements for High Availability Configurations.

Virtual Platform Requirements

High availability is supported for the following public cloud platforms:

  • Amazon Web Services (AWS)

  • Oracle Cloud Infrastructure (OCI)

  • Microsoft Azure

And these on-prem/private cloud platforms:

  • Cisco HyperFlex

  • Kernel-based virtual machine (KVM)

  • Microsoft Hyper-V

  • VMware vSphere/VMware ESXi

The s must have the same device management capacity (not supported on FMCv2) and be identically licensed. You also need one Firewall Threat Defense entitlement for each managed device. For more information, see License Requirements for High Availability Configurations.

Software Requirements

Access the Appliance Information widget to verify the software version, the intrusion rule update version and the vulnerability database update. By default, the widget appears on the Status tab of the Detailed Dashboard and the Summary Dashboard. For more information, see The Appliance Information Widget

  • The two s in a high availability configuration must have the same major (first number), minor (second number), and maintenance (third number) software version.

  • The two s in a high availability configuration must have the same version of the intrusion rule update installed.

  • The two s in a high availability configuration must have the same version of the vulnerability database update installed.

  • The two s in a high availability configuration must have the same version of the LSP (Lightweight Security Package) installed.

  • The two management centers in a high availability configuration must have port 8305 accessible between them for communication.


Warning


If the software versions, intrusion rule update versions and vulnerability database update versions are not identical on both s, you cannot establish high availability.

License Requirements for High Availability Configurations

Each device requires the same licenses whether managed by a single or by s in a high availability pair (hardware or virtual).

Example: If you want to enable advanced malware protection for two devices managed by a pair, buy two Malware Defense licenses and two TM subscriptions, register the active with the Smart Software Manager, then assign the licenses to the two devices on the active .

Only the active is registered with the Smart Software Manager. When failover occurs, the system communicates with Smart Software Manager to release the license entitlements from the originally-active and assign them to the newly-active .

In Specific License Reservation deployments, only the primary requires a Specific License Reservation.

Hardware

No special license is required for hardware s in a high availability pair.

Firewall Management Center Virtual

You will need two identically licensed Firewall Management Center Virtuals. Firewall Management Center Virtual needs an individual license for each device it manages.

Each registered device in a Firewall Management Center Virtual high-availability pair must have its own license. Although only the active FMC registers with Smart Software Manager at any time, entitlement usage accounts for both Firewall Management Center Virtuals in the high availability pair.

Entitlement calculation for Firewall Management Center Virtual high availability pairs:

Firewall Management Center Virtual entitlement = Number of Firewall Management Center Virtual peers in the high availability pair x Number of managed devices

Example:

For the Firewall Management Center Virtual high availability pair managing 2 devices, you can use:

  • Two (2) Firewall Management Center Virtual entitlements

  • 2 device licenses

  • Firepower MCv Device Licenses seen on Smart Software Manager is 4

For two Firewall Management Center Virtual high availability pair managing 2 devices each, you can use:

  • Four (4) Firewall Management Center Virtual entitlements

  • 4 device licenses

  • Firepower MCv Device Licenses seen on Smart Software Manager is 8

If you break the high availability pair, the Firewall Management Center Virtual entitlements associated with the secondary Firewall Management Center Virtual are released. (In the example, you would then have two standalone Firewall Management Center Virtual devices.)

Prerequisites for High Availability

Before establishing the high availability pair:

You can now proceed to establish high availability. For more information, see Establishing High Availability.

Establishing High Availability

Establishing high availability can take a significant amount of time, even several hours, depending on the bandwidth between the peers and the number of policies. It also depends on the number of devices registered to the active , which need to be synced to the standby . You can view the High Availability page to check the status of the high availability peers.

Before you begin

  • Confirm that both the s adhere to the high availability system requirements. For more information , see Requirements for High Availability.

  • Confirm that you completed the prerequisites for establishing high availability. For more information, see Prerequisites for High Availability.

  • In a multidomain deployment, you must be in the Global domain to perform this task.

Procedure


Step 1

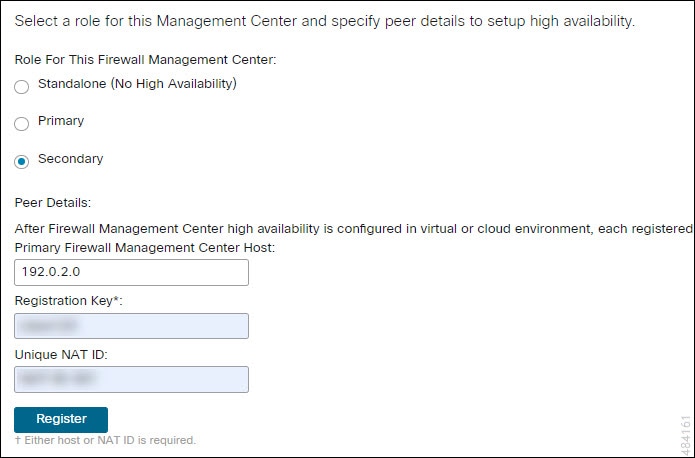
Log into the that you want to designate as the secondary.

Step 2

Choose Integration > Other Integrations, and then choose High Availability.

Step 3

Under Role for this , choose Secondary.

Step 4

Enter the hostname or IP address of the primary in the Primary Firewall Management Center Host text box.

You can leave this empty if the primary does not have an IP address reachable from the peer (which can be public or private IP address). In this case, use both the Registration Key and the Unique NAT ID fields. You need to specify the IP address of at least one to enable HA connection.

Step 5

Enter a one-time-use registration key in the Registration Key text box.

The registration key is any user-defined alphanumeric value up to 37 characters in length. This registration key will be used to register both -the secondary and the primary s.

Step 6

If you did not specify the primary IP address, or if you do not plan to specify the secondary IP address on the primary , then in the Unique NAT ID field, enter a unique alphanumeric ID. See NAT Environments for more information.

Step 7

Click Register.

Step 8

Using an account with Admin access, log into the that you want to designate as the primary.

Step 9

Choose Integration > Other Integrations, and then choose High Availability.

Step 10

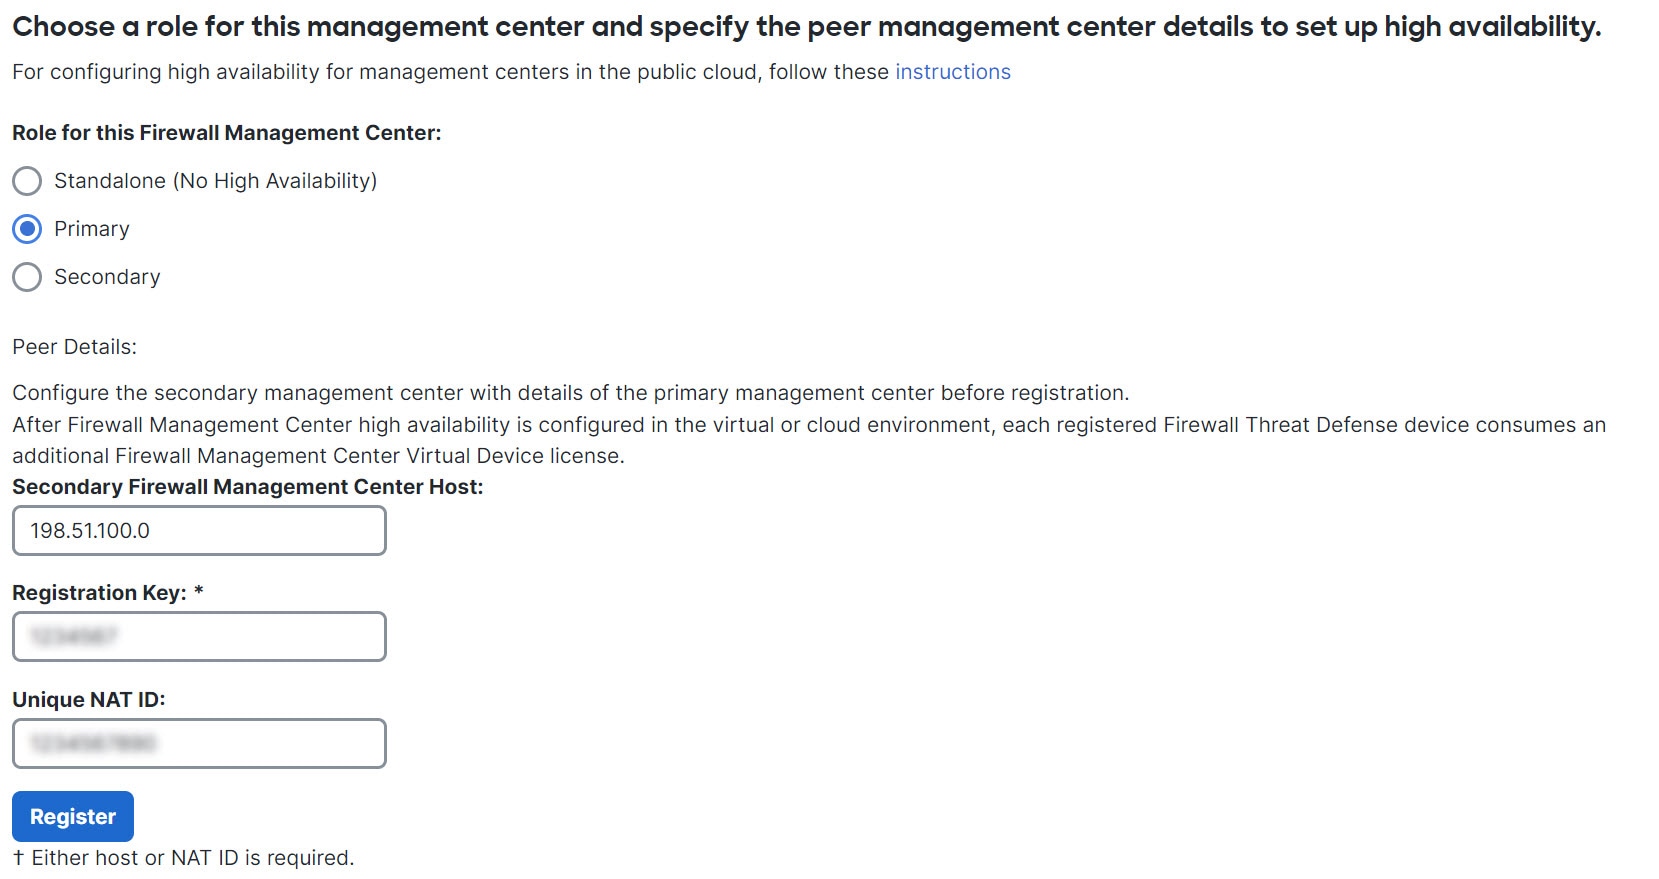
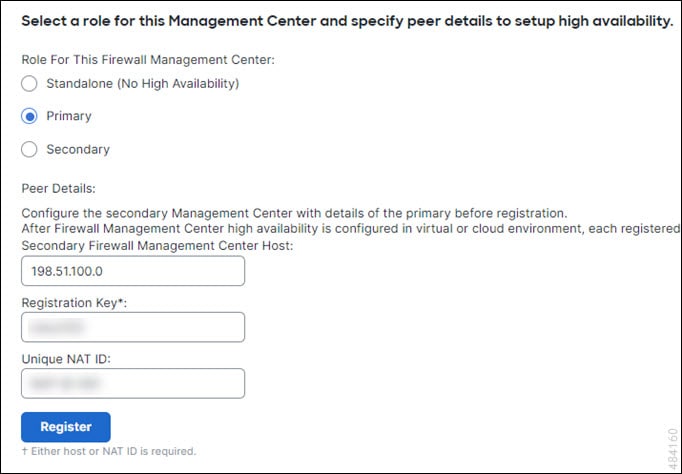
Under Role for this , choose Primary.

Step 11

Enter the hostname or IP address of the secondary in the Secondary Firewall Management Center Host text box.

You can leave this empty if the secondary does not have an IP address reachable from the peer (which can be public or private IP address). In this case, use both the Registration Key and the Unique NAT ID fields. You need to specify the IP address of at least one to enable HA connection.

Step 12

Enter the same one-time-use registration key in the Registration Key text box you used in step 6.

Step 13

If required, enter the same NAT ID that you used in step 7 in the Unique NAT ID text box.

Step 14

Click Register.


What to do next

After establishing the high availability pair, devices registered to the active are automatically registered to the standby .


Note


When a registered device has a NAT IP address, automatic device registration fails and the secondary High Availability page lists the device as local, pending. You can then assign a different NAT IP address to the device on the standby High Availability page. If automatic registration otherwise fails on the standby , but the device appears to be registered to the active Secure Firewall Management Center, see Using CLI to Resolve Device Registration in High Availability.


High Availability for s Hosted on Public Cloud

While establishing high availability between s hosted on public clouds, the combinations of IP addresses or hostnames for the primary and secondary s described below can successfully form high availability and get the devices registered on both the peers. In the High Availability page (Integration > Other Integrations > High Availability), perform one of the following configurations to successfully form high availability between s hosted in public cloud.

Using the Public IP Addresses or Hostnames for Both the Primary and Secondary s

  1. On the secondary , do the following:

    1. Choose Secondary as the Role for this Firewall Management Center.

    2. Enter the public IP address or hostname for the secondary in the Primary Firewall Management Center Host field.

    3. Enter the registration key.

    4. Enter the same NAT ID that you used in the primary .

  2. On the primary , do the following:

    1. Choose Primary as the Role for this Firewall Management Center.

    2. Enter the public IP address or hostname for the secondary in the Secondary Firewall Management Center Host field.

    3. Enter the registration key.

    4. Enter the unique NAT ID.

Using the Public IP Address or Hostname for the Secondary

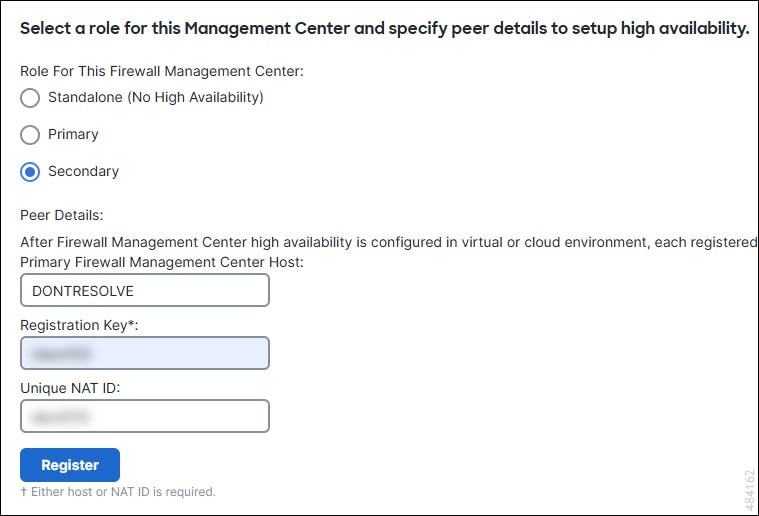
  1. On the secondary , do the following:

    1. Choose Secondary as the Role for this Firewall Management Center.

    2. Enter DONTRESOLVE in the Primary Firewall Management Center Host field.

    3. Enter the registration key.

    4. Enter the same NAT ID that you used in the primary .

  2. On the primary , do the following:

    1. Choose Primary as the Role for this Firewall Management Center.

    2. Enter the public IP address or hostname for the secondary in the Secondary Firewall Management Center Host field.

    3. Enter the registration key.

    4. Enter the unique NAT ID.

Viewing High Availability Status

After you identify your active and standby s, you can view information about the local and its peer.


Note


In this context, Local Peer refers to the appliance where you are viewing the system status. Remote Peer refers to the other appliance, regardless of active or standby status.


Procedure


Step 1

Log into one of the s that you paired using high availability.

Step 2

Choose Integration > Other Integrations, and then choose High Availability .


Configurations Synced on High Availability Pairs

When you establish high availability between two s, the following configuration data is synced between them:

  • License entitlements

  • Access control policies

  • Intrusion rules

  • Malware and file policies

  • DNS policies

  • Identity policies

  • SSL policies

  • Prefilter policies

  • Network discovery rules

  • Application detectors

  • Correlation policy rules

  • Alerts

  • Scanners

  • Response groups

  • Contextual cross-launch of external resources for investigating events

  • Remediation settings, although you must install custom modules on both s. For more information on remediation settings, see Managing Remediation Modules.

Configuring External Access to the Database in a High Availability Pair

In a high availability setup, we recommend you to use only the active peer to configure the external access to the database. When you configure the standby peer for external database access, it leads to frequent disconnections. To restore the connectivity, you must pause and resume the synchronization of the standby peer. For information on how to enable external database access to s, see Enabling External Access to the Database .

Using CLI to Resolve Device Registration in High Availability

If automatic device registration fails on the standby , but appears to be registered to the active , complete the following steps:


Warning


If you do an RMA of secondary or add a secondary , the managed devices are unregistered, and their configuration can get deleted as a result.


Procedure


Step 1

Delete the device from the active . See Delete (Unregister) a Device from the in Cisco Secure Firewall Management Center Device Configuration Guide.

Step 2

Complete the following steps to trigger automatic registration of the device on the standby :

  1. Log in to the CLI for the affected device.

  2. Run the CLI command: configure manager delete .

    This command disables and removes the current .

  3. Run the CLI command: configure manager add .

    This command configures the device to initiate a connection to a .

    Tip


    Configure remote management on the device, only for the active . When you establish high availability, the devices are automatically registered to the standby .

  4. Log in to the active and register the device.

Step 3

If the standby is behind NAT, complete the following steps to edit the hostname of the standby :

  1. Access the Firewall Threat Defense shell and use the show managers command to get the standby entry identifier value.

  2. In the Firewall Threat Defense shell, edit the standby hostname to the public IP address. Execute the configure manager edit <standby_uuid> hostname <standby_ip> command using the entry identifier value and the host IP address.


Switching Peers in the High Availability Pair

Because the system restricts some functionality to the active , if that appliance fails, you must promote the standby to active:

Procedure


Step 1

Log into one of the s that you paired using high availability.

Step 2

Choose Integration > Other Integrations, and then choose High Availability.

Step 3

Choose Switch Peer Roles to change the local role from Active to Standby, or Standby to Active. This switches the active and standby roles between the two peers, while the Primary and Secondary designations remain unchanged. Note that role here refers to the active or standby status of the management center in the HA deployment, not the primary or secondary designation assigned during HA setup.


Pausing Communication Between Paired s

If you want to temporarily disable high availability, you can disable the communications channel between the s. You can pause synchronization from an active or standby peer.

Procedure


Step 1

Log into one of the s that you paired using high availability.

Step 2

Choose Integration > Other Integrations, and then choose High Availability.

Step 3

Choose Pause Synchronization.


Restarting Communication Between Paired s

If you temporarily disable high availability, you can restart high availability by enabling the communications channel between the s. You can resume synchronization from an active or standby peer.

Procedure


Step 1

Log into one of the s that you paired using high availability.

Step 2

Choose Integration > Other Integrations, and then choose High Availability.

Step 3

Choose Resume Synchronization.


Change the IP Address of the in a High Availability Pair

If the IP address for one of the high availability peers is changed, this change will not be automatically updated on the other peer, even after performing a high availability synchronization. To ensure that the remote peer is also updated, you must manually change the IP address.

Procedure


Step 1

Log in to the peer where you want to manually modify the IP address of the other peer manager.

Step 2

Choose Integration > Other Integrations.

Step 3

Choose High Availability.

Step 4

Choose Peer Manager.

Step 5

Choose Edit (edit icon).

Step 6

Enter the display name of the appliance, which is used only within the context of the system.

Entering a different display name does not change the host name for the appliance.

Step 7

Enter the fully qualified domain name or the name that resolves through the local DNS to a valid IP address (that is, the host name), or the host IP address.

Step 8

Click Save.


Disabling High Availability

Procedure


Step 1

Log into one of the s in the high availability pair.

Step 2

Choose Integration > Other Integrations, and then choose High Availability.

Step 3

Choose Break High Availability.

Step 4

Choose one of the following options for handling managed devices:

  • To control all managed devices with this , choose Manage registered devices from this console. All devices will be unregistered from the peer.

  • To control all managed devices with the other , choose Manage registered devices from peer console. All devices will be unregistered from this .

  • To stop managing devices altogether, choose Stop managing registered devices from both consoles. All devices will be unregistered from both s.

Note

 
  • If you choose to manage the registered devices from the secondary , the devices will be unregistered from the primary . The devices are now registered to be managed by the secondary . However the licenses that were applied to these devices are deregistered on account of the high availability break operation. You must now proceed to re-register (enable) the licenses on the devices from the secondary . For more information see Assign Licenses to Devices.

  • The standby management center retains the access control policies after the HA break is complete.

Step 5

Click OK.


Replacing s in a High Availability Pair

If you need to replace a failed unit in the high availability pair, you must follow one of the procedures listed below. The table lists four possible failure scenarios and their corresponding replacement procedures.

Failure Status

Data Backup Status

Replacement Procedure

Primary failed

Data backup successful

Replace a Failed Primary (Successful Backup)

Data backup not successful

Replace a Failed Primary (Unsuccessful Backup)

Secondary failed

Data backup successful

Replace a Failed Secondary (Successful Backup)

Data backup not successful

Replace a Failed Secondary (Unsuccessful Backup)

Replace a Failed Primary (Successful Backup)

Two s, FMC1 and FMC2, are part of a high availability pair. FMC1 is the primary and FMC2 is the secondary. This task describes the steps to replace a failed primary , FMC1, when data backup from the primary is successful.

Before you begin

Verify that the data backup from the failed primary is successful.

Procedure


Step 1

Contact Support to request a replacement for a failed - FMC1.

Step 2

When the primary - FMC1 fails, access the web interface of the secondary - FMC2 and switch peers. For more information, see Switching Peers in the High Availability Pair.

This promotes the secondary - FMC2 to active.

You can use FMC2 as the active until the primary - FMC1 is replaced.

Caution


Do not break high availability from FMC2, since licenses that were synced to FMC2 from FMC1 (before failure ), will be removed from FMC2 and you will be unable to perform any deploy actions from FMC2.

Step 3

Reimage the replacement with the same software version as FMC1.

Step 4

Restore the data backup retrieved from FMC1 to the new .

Step 5

Install required patches, geolocation database (GeoDB) updates, vulnerability database (VDB) updates and system software updates to match FMC2.

The new and FMC2 will now both be active peers, resulting in a high availability split-brain.

Step 6

When the web interface prompts you to choose an active appliance, select FMC2 as active.

This syncs the latest configuration from FMC2 to the new - FMC1.

Step 7

When the configuration syncs successfully, access the web interface of the secondary - FMC2 and switch roles to make the primary - FMC1 active. For more information, see Switching Peers in the High Availability Pair.


What to do next

High availability has now been re-established and the primary and the secondary s will now work as expected.

Replace a Failed Primary (Unsuccessful Backup)

Two s - FMC1 and FMC2 are part of a high availability pair. FMC1 is the primary and FMC2 is the secondary. This task describes the steps to replace a failed primary -FMC1 when data backup from the primary is unsuccessful.

Procedure


Step 1

Contact Support to request a replacement for a failed - FMC1.

Step 2

When the primary - FMC1 fails, access the web interface of the secondary - FMC2 and switch peers. For more information, see Switching Peers in the High Availability Pair.

This promotes the secondary - FMC2 to active.

You can use FMC2 as the active until the primary - FMC1 is replaced.

Caution


Do not break High Availability from FMC2, since licenses that were synced to FMC2 from FMC1 (before failure ), will be removed from FMC2 and you will be unable to perform any deploy actions from FMC2.

Step 3

Reimage the replacement with the same software version as FMC1.

Step 4

Install required patches, geolocation database (GeoDB) updates, vulnerability database (VDB) updates and system software updates to match FMC2.

Step 5

Deregister one of the s - FMC2 from the Cisco Smart Software Manager. For more information, see Deregister the.

Deregistering from the Cisco Smart Software Manager removes the Management Center from your virtual account. All license entitlements associated with the release back to your virtual account. After deregistration, the enters Enforcement mode where no update or changes on licensed features are allowed.

Step 6

Access the web interface of the secondary - FMC2 and break high availability. For more information, see Disabling High Availability. When prompted to select an option for handling managed devices, choose Manage registered devices from this console.

As a result, licenses that were synced to the secondary - FMC2, will be removed and you cannot perform deployment activities from FMC2.

Step 7

Re-establish high availability, by setting up the - FMC2 as the primary and - FMC1 as the secondary. For more information , see Establishing High Availability.

Step 8

Register a Smart License to the primary - FMC2. For more information see Register the with the Smart Software Manager.


What to do next

High availability has now been re-established and the primary and the secondary s will now work as expected.

Replace a Failed Secondary (Successful Backup)

Two s - FMC1 and FMC2 are part of a high availability pair. FMC1 is the primary and FMC2 is the secondary. This task describes the steps to replace a failed secondary -FMC2 when data backup from the secondary is successful.

Before you begin

Verify that the data backup from the failed secondary is successful.

Procedure


Step 1

Contact Support to request a replacement for a failed - FMC2.

Step 2

Continue to use the primary - FMC1 as the active .

Step 3

Reimage the replacement with the same software version as FMC2.

Step 4

Restore the data backup from FMC2 to the new .

Step 5

Install required patches, geolocation database (GeoDB) updates, vulnerability database (VDB) updates and system software updates to match FMC1.

Step 6

Resume data synchronization (if paused) from the web interface of the new - FMC2, to synchronize the latest configuration from the primary - FMC1. For more information, see Restarting Communication Between Paired s.

Classic and Smart Licenses work seamlessly.

What to do next

High availability has now been re-established and the primary and the secondary s will now work as expected.

Replace a Failed Secondary (Unsuccessful Backup)

Two s - FMC1 and FMC2 are part of a high availability pair. FMC1 is the primary and FMC2 is the secondary. This task describes the steps to replace a failed secondary -FMC2 when data backup from the secondary is unsuccessful.

Procedure


Step 1

Contact Support to request a replacement for a failed - FMC2.

Step 2

Continue to use the primary - FMC1 as the active .

Step 3

Reimage the replacement with the same software version as FMC2.

Step 4

Install required patches, geolocation database (GeoDB) updates, vulnerability database (VDB) updates and system software updates to match FMC1.

Step 5

Access the web interface of the primary - FMC1 and break high availability. For more information, see Disabling High Availability. When prompted to select an option for handling managed devices, choose Manage registered devices from this console.

Step 6

Re-establish high availability, by setting up the - FMC1 as the primary and - FMC2 as the secondary. For more information , see Establishing High Availability.

  • When high availability is successfully established, the latest configuration from the primary - FMC1 is synchronized to the secondary - FMC2.

  • Classic and Smart Licenses work seamlessly.


What to do next

High availability has now been re-established and the primary and the secondary s will now work as expected.

High Availability Disaster Recovery

In case of a disaster recovery situation, a manual switchover must be performed. When the primary - FMC1 fails, access the web interface of the secondary - FMC2 and switch peers. This is applicable conversely also in case the secondary (FMC2) fails. For more information, see Switching Peers in the High Availability Pair.

For restoring a failed , refer to Replacing s in a High Availability Pair.

Restoring Management Center in a High Availability Pair (No Hardware Failure)

To restore a high availability pair when there is no hardware failure, follow these procedures:

Restore Backup on the Primary Management Center

Before you begin

  • There is no hardware failure and replacement of the management center.

  • You are familiar with the backup and restore process. See Backup/Restore.

Procedure


Step 1

Verify if backup of the primary is available—either a local storage in /var/sf/backup/, or a remote network volume.

Step 2

Pause synchronization on the primary . Choose Integration > Other Integrations, and then choose High Availability tab to pause synchronization.

Step 3

Restore the backup on the primary . The reboots when the restoration is complete.

Step 4

Once the primary is active and its user interface is reachable, resume synchronization on the secondary . Choose Integration > Other Integrations, and then choose High Availability tab to resume synchronization.


Restore Backup on the Secondary Management Center

Before you begin

  • There is no hardware failure and replacement of the management center.

  • You are familiar with the backup and restore process. See Backup/Restore.

Procedure


Step 1

Verify if backup of the secondary is available—either a local storage in /var/sf/backup/, or a remote network volume.

Step 2

Pause synchronization on the primary . Choose Integration > Other Integrations, and then chooseHigh Availability tab to pause synchronization.

Step 3

Restore the backup on the secondary . The reboots when the restoration is complete.

Step 4

Once the secondary is active and its user interface is reachable, resume synchronization on the primary . Choose Integration > Other Integrations, and then choose High Availability tab to resume synchronization.


Unified Backup of Management Centers in High Availability

You can perform a unified backup on an active , where a single backup file is created for both the active and standby s. The unified backup is applicable only for configuration-only backup. If eventing or TID backup is required, you must take separate backup for active and standby s. When you select configuration-only backup, by default, unified backup is applied. In a unified backup, if the active is unable to get a backup tar file from the standby , the normal backup file is generated for the active unit that can be used for restoration. There are several benefits of unified backup over the normal backup:

  • Unified backup does not require you to take separate backups on active and standby s.

  • Redundant data in backups and storage constraints are removed in a unified backup.

  • In a normal backup, when the primary unit fails, and if a secondary unit backup is not available, you had to break the high availability pairing for the secondary RMA. This situation is eradicated in a unified backup.

  • Typically, the backup of a standby unit cannot be scheduled. In an unified backup that is scheduled, both active and standby units' backup are taken.

  • While executing unified backup, you do not have to pause the HA synchronization to perform backup on the standby unit.

You can use the unified backup to recover a new RMA device if an unanticipated incident occurs. You can identify the unified backup file by its name. A prefix "Unified" is added to the unified backup file name. You can select the to restore and also select its State (Active/Standby).

Ensure that you select the appropriate state of the restored to prevent Split-Brain conflict.

Restore Management Center from Unified Backup

Use this procedure to restore from the unified backup(configuration-only).

Procedure

Step 1

Log into the you want to restore.

Step 2

Select System (system gear icon) > Tools > Backup/Restore.

The Backup Management page lists all locally and remotely stored backup files including the unified backup file (configuration-only).

If the unified backup file is not in the list and you have it saved on your local computer, click Upload Backup; see Manage Backups and Remote Storage.

Step 3

Select the unified backup file that you want to restore and click Restore.

Step 4

In the Restore Backup page, select which unit you want to restore. Because the unified backup stores the backup configuration of both primary and secondary s, you need to choose which unit you want to restore.

Step 5

To select the state of the restored , click the Active or Standby radio button. You must verify the role and state of your working management center to avoid having both peers with same role and state configuration. Choosing the incorrect role and state for your management center when restoring can cause HA failure.

Step 6

Click Restore, and then Confirm Restore to begin the restoration.


History for High Availability

Feature

Minimum

Minimum Firewall Threat Defense

Details

Support for high availability on Azure.

7.4.2

Any

We now support high availability on Firewall Management Center Virtual for Azure.

Single backup file for high availability s.

7.4.1

7.2.6

Any

When performing a configuration-only backup of the active in a high availability pair, the system now creates a single backup file which you can use to restore either unit.

high availability synchronization enhancements.

7.4.1

Any

high availability (HA) includes the following synchronization enhancements:

  • Large configuration history files can cause synchronization to fail in high-latency networks. To prevent this from happening, the device configuration history files are now synchronized in parallel with other configuration data. This enhancement also reduces the synchronization time.

  • The now monitors the configuration history file synchronization process and displays a health alert if the synchronization times out.

New/modified screens: You can view these alerts on the following screens:

  • Notifications > Message Center > Health

  • Integration > Other Integrations > High Availability > Status (under Summary)

Support for high availability on Hyper-V.

7.4.0

Any

We now support high availability on Firewall Management Center Virtual for Hyper-V.

Support for high availability on KVM.

7.3.0

Any

We now support high availability on Firewall Management Center Virtual for KVM.

Support for high availability on AWS and OCI.

7.1.0

Any

We now support high availability on Firewall Management Center Virtual for AWS and OCI.

Support for high availability on HyperFlex.

7.0.0

Any

We now support high availability on Firewall Management Center Virtual for HyperFlex.

Support for high availability on VMware.

6.7.0

Any

We now support high availability on Firewall Management Center Virtual for VMware.

Single sign-on.

6.7.0

Any

When configuring one or both members of a high availability pair for single sign-on, you must take into account special considerations.