Secure Firewall 3100 Threat Defense Getting Started: Cloud-Delivered Firewall Management Center

PDF

Onboard the firewall to Security Cloud Control

Want to summarize with AI?

Log in

Overview

How to onboard a Secure Firewall 3100 to Security Cloud Control so you can manage it using Cloud-Delivered Firewall Management Center.

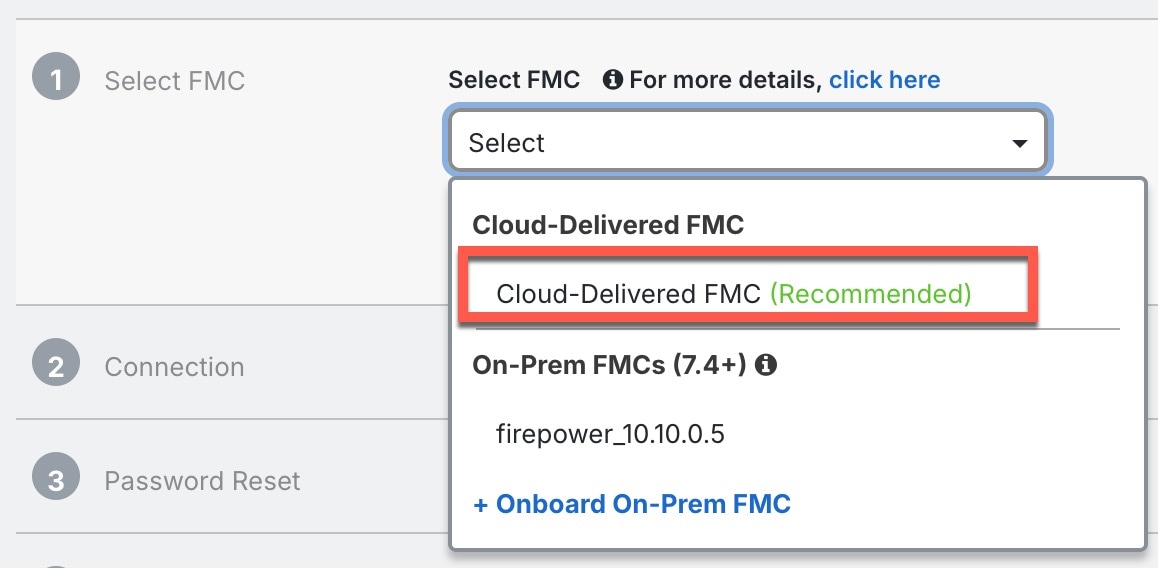
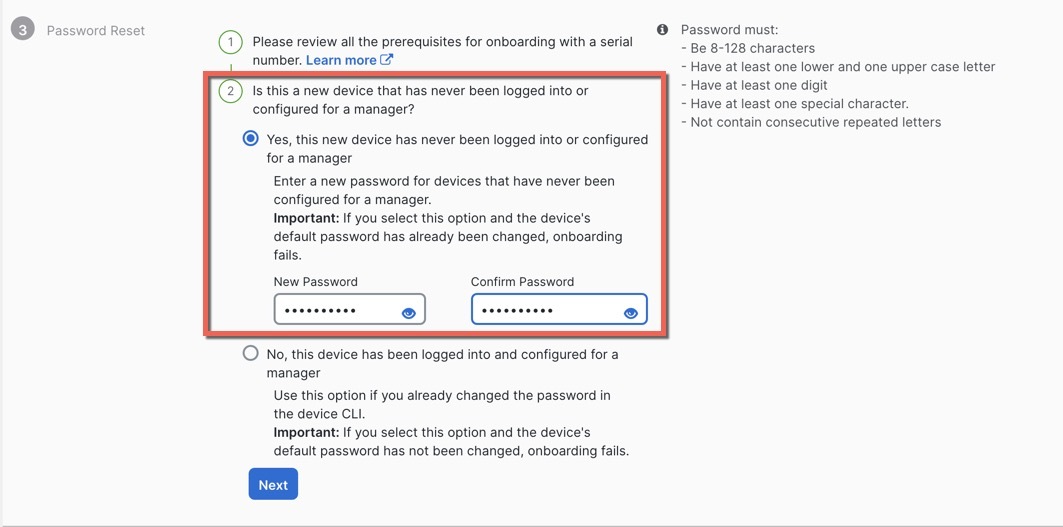
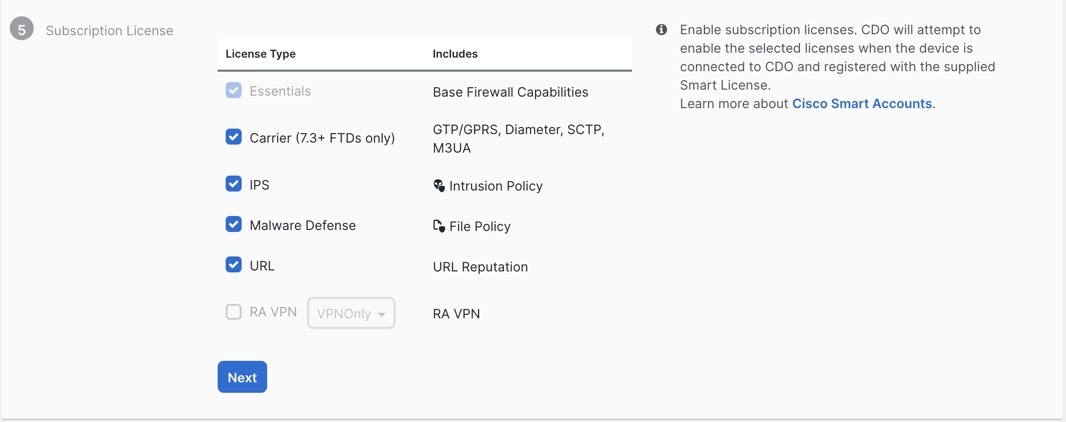
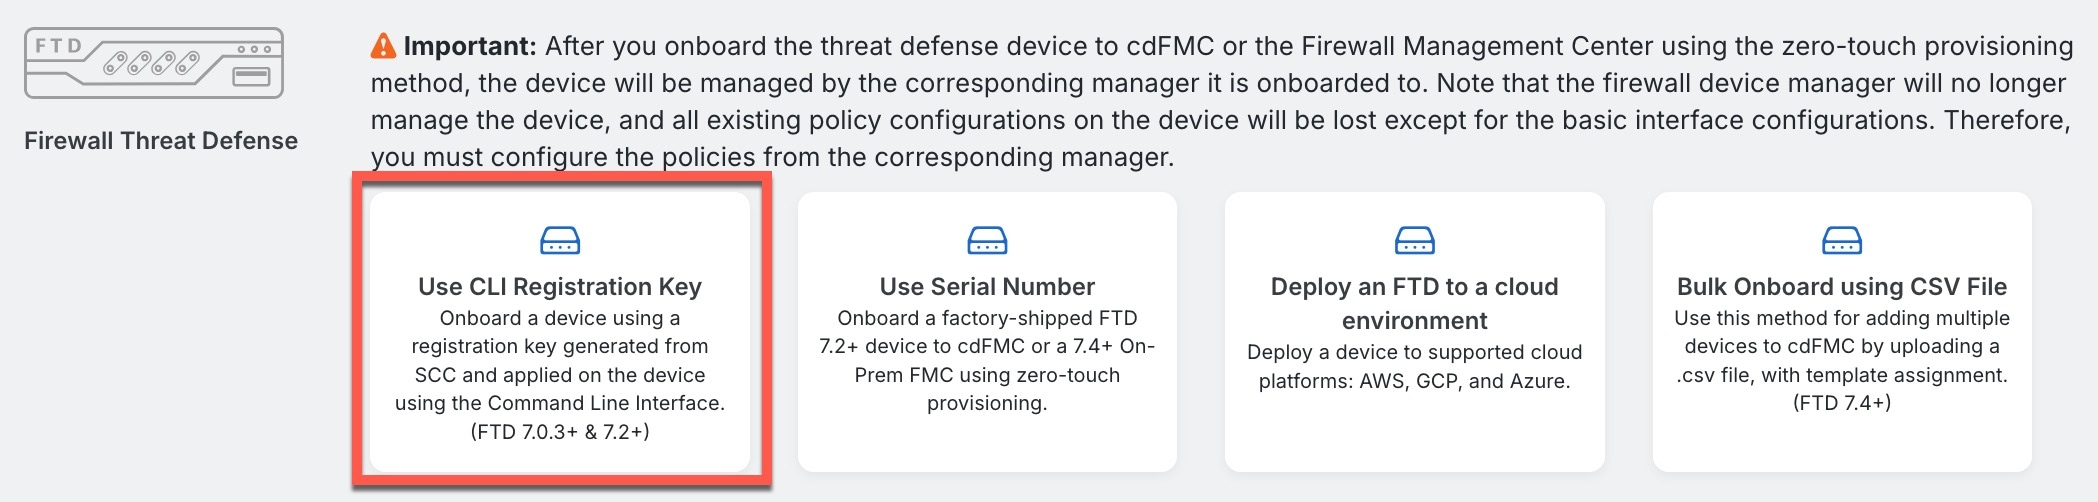
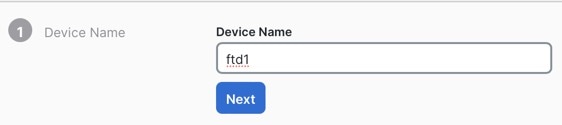
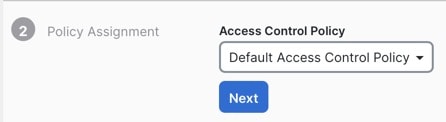
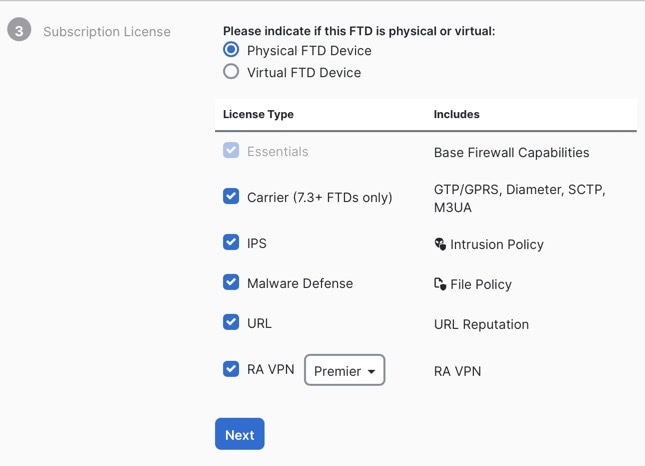
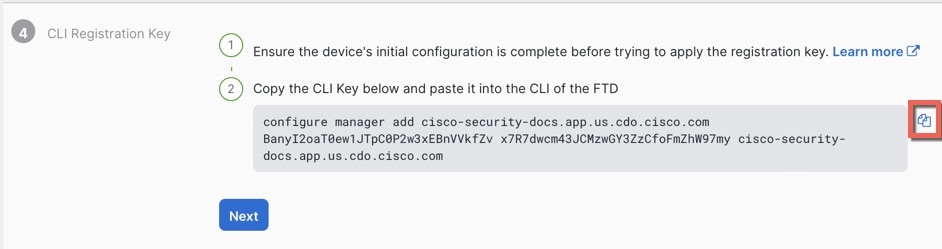
Onboard the firewall using zero-touch provisioning or manual provisioning. Log into Security Cloud Control at https://security.cisco.com.


Onboard the firewall with zero-touch provisioning

Onboard the Firewall Threat Defense using zero-touch provisioning and the device serial number.

Before you begin

  • Obtain your device's serial number.

    • If you have the shipping box, you can see the chassis serial number on the label.

    • The chassis serial number is on the compliance label on a pull-out tab at the front of the device.

    • The PCB serial number is on a label on the chassis called "S/N."

    • You can view the serial numbers using the following CLI commands:

      • FXOS—show chassis detail shows both serial numbers.

      • Firewall Threat Defenseshow inventory shows the chassis serial number. show serial-number shows the PCB serial number.

  • Check your LEDs to make sure the firewall is ready for registration.

    Table 1. Zero-Touch Provisioning: Managed (M) LED behavior

    M LED

    Description

    Time after firewall powered on (minutes:seconds)

    Slow flashing green

    Connected to the Cisco cloud and ready for onboarding

    15:00 - 30:00

    Alternating green and amber

    (error condition)

    Failed to connect to the Cisco cloud

    15:00 - 30:00

    Solid green

    Onboarded

    20:00 - 45:00

Procedure

1.

In the Security Cloud Control navigation menu, click Security Devices, then click the blue plus button (plus sign) to Onboard a device.

2.

Select the FTD tile.

3.

Under Management Mode, be sure FTD is selected.

At any point after selecting FTD as the management mode, you can click Manage Smart License to enroll in or modify the existing smart licenses available for your device. See Obtain licenses to see which licenses are available.

4.

Select Use Serial Number as the onboarding method.

Figure 1. Use Serial Number
Use Serial Number
5.

In Select FMC, choose the Cloud-Delivered FMC > Cloud-Delivered FMC from the list, and click Next.

Figure 2. Select FMC
Select FMC
6.

In the Connection area, enter the Device Serial Number and the Device Name and then click Next.

Figure 3. Connection
Connection
7.

In Password Reset, click Yes.... Enter a new password and confirm the new password for the device, then click Next.

For zero-touch provisioning, the device must be brand new or has been reimaged.

Note

If you logged into the device and reset the password, and you did not change the configuration in a way that would disable zero-touch provisioning, then you should choose the No... option. There are a number of configurations that disable zero-touch provisioning provisioning, so we don't recommend logging into the device unless you need to, for example, to perform a reimage.

Figure 4. Password Reset
Password Reset
8.

For the Policy Assignment, use the drop-down menu to choose an access control policy for the device. If you have no policies configured, choose the Default Access Control Policy.

Figure 5. Policy Assignment
Policy Assignment
9.

For the Subscription License, check each of the feature licenses you want to enable. Click Next.

Figure 6. Subscription License
Subscription License
10.

(Optional) Add labels to your device to help sort and filter the Security Devices page. Enter a label and select the blue plus button (plus sign). Labels are applied to the device after it's onboarded to Security Cloud Control.

Figure 7. Done
Done

What to do next

From the Security Devices page, select the device you just onboarded and select any of the option listed under the Management pane located to the right.

Onboard the firewall with manual provisioning

Onboard the firewall using a CLI registration key.

Procedure

1.

In the Security Cloud Control navigation menu, click Security Devices, then click the blue plus button (plus sign) to Onboard a device.

2.

Click the FTD tile.

3.

Under Management Mode, be sure FTD is selected.

4.

Select Use CLI Registration Key as the onboarding method.

Figure 8. Use CLI Registration Key
Use CLI Registration Key
5.

Enter the Device Name and click Next.

Figure 9. Device Name
Device Name
6.

For the Policy Assignment, use the drop-down menu to choose an access control policy for the device. If you have no policies configured, choose the Default Access Control Policy.

Figure 10. Access Control Policy
Access Control Policy
7.

For the Subscription License, click the Physical FTD Device radio button, and then check each of the feature licenses you want to enable. Click Next.

Figure 11. Subscription License
Subscription License
8.

For the CLI Registration Key, Security Cloud Control generates a command with the registration key and other parameters. You must copy this command and use it in the intial configuration of the Firewall Threat Defense.

Figure 12. CLI Registration Key
CLI Registration Key

configure manager add Security Cloud Control_hostname registration_key nat_id display_name

Complete initial configuration at the CLI or using the Firewall Device Manager:

  • Initial configuration: CLI—Copy this command at the Firewall Threat Defense CLI after you complete the startup script.

  • Initial configuration: Firewall Device Manager—Copy the scc_hostname , registration_key , and nat_id parts of the command into the Management Center/Security Cloud Control Hostname/IP Address, Management Center/Security Cloud Control Registration Key, and NAT ID fields.

Example:

Sample command for CLI setup:


configure manager add account1.app.us.scc.cisco.com KPOOP0rgWzaHrnj1V5ha2q5Rf8pKFX9E
Lzm1HOynhVUWhXYWz2swmkj2ZWsN3Lb account1.app.us.scc.cisco.com

Sample command components for GUI setup:

Figure 13. configure manager add command components
configure manager add command components
9.

Click Next in the onboarding wizard to start registering the device.

10.

(Optional) Add labels to your device to help sort and filter the Security Devices page. Enter a label and select the blue plus button (plus sign). Labels are applied to the device after it's onboarded to Security Cloud Control.

Figure 14. Done
Done