Overview of Cisco ISE on Amazon Web Services
Methods to launch Cisco ISE on AWS
You can configure and launch Cisco ISE in AWS through AWS CloudFormation Templates (CFTs) or Amazon Machine Images (AMIs). We recommend that you use CFTs through one of the ways in the following list. To launch Cisco ISE on AWS, perform one of the following procedures:
Overview of CFTs
CFTs are AWS solutions that allow you to easily create and manage cloud deployments. Extend your network into the cloud by creating a virtual private cloud in AWS and configure a virtual private gateway to enable communication with your organization's network over an IPsec tunnel.
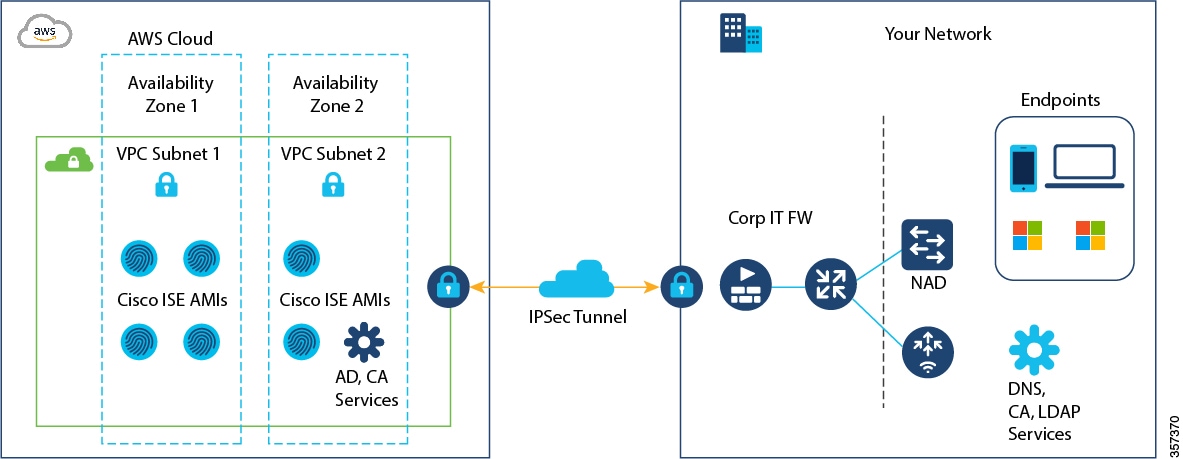
Example of a deployment connected to AWS cloud
This illustration is only an example. You can place common services such as Certificate Authority (CA), Active Directory (AD), Domain Name System (DNS) servers, and Lightweight Directory Access Protocol (LDAP) on premises or in AWS, based on the requirements of your organization.
References
For more information on using CFTs in AWS, refer to AWS CloudFormation User Guide.
Cisco ISE instances and intended usage
This table contains details of the Cisco ISE instances that are currently available. You must purchase a Cisco ISE VM license to use any of these instances. For information on EC2 instance pricing for your specific requirements, refer to Amazon EC2 On-Demand Pricing.
|
Cisco ISE instance type |
CPU cores |
RAM (in GB) |
|---|---|---|
|
t3.xlarge This instance supports the Cisco ISE evaluation use case. 100 concurrent active endpoints are supported. From Cisco ISE release 3.5, t3.xlarge instance type is not supported. |
4 |
16 |
|
m5.2xlarge |
8 |
32 |
|
c5.4xlarge |
16 |
32 |
|
m5.4xlarge From Cisco ISE release 3.3, m5.4xlarge instance type is not supported. |
16 |
64 |
|
c5.9xlarge |
36 |
72 |
|
m5.8xlarge |
32 |
128 |
|
m5.16xlarge |
64 |
256 |
|
c7i.4xlarge* |
16 |
32 |
|
m7i.2xlarge* |
8 |
32 |
|
m7i.8xlarge* |
32 |
128 |
|
m7i.16xlarge* |
64 |
256 |
*Cisco ISE releases 3.4 patch 4, 3.5, and later support M7i and C7i instance types on AWS.
You can leverage the AWS S3 storage service to easily store backup and restore files, monitoring and troubleshooting reports, and more.
 Attention |
|
Intended use of specific instance types
This table categorizes some of the instance types and their intended usage.
|
Instance category |
Instance type example |
Intended use |
|---|---|---|
|
Compute-optimized instances |
c5.4xlarge c5.9xlarge c7i.4xlarge |
|
|
General purpose instances |
m5.4xlarge (This instance is available only in Cisco ISE release 3.2 and earlier releases.) m5.8xlarge m5.16xlarge m7i.8xlarge m7i.16xlarge |
|
References
For information on the scale and performance data for AWS instances, refer to Cisco ISE Performance and Scale guide.
Multi-node Cisco ISE deployments on AWS
In addition to the procedures explained earlier, you can also use these Cisco-developed solutions to install and automatically create multi-node Cisco ISE deployments on AWS.
-
Cisco ISE AWS Partner Solution for small deployments.
-
Cisco Developed Terraform Script for deployments of any size.
 Feedback